BWT 3 x 3 User manual

1/48
2019/01 - Indice de révision : A - Code : 97160421
WOODEN POOLS BWT myPOOL HOTLINE
INSTALLATION AND
OPERATING INTRUCTIONS
to be read carefully and kept for future reference
EN | PAGE 1
Rectangular
wooden pools
Double pine coping
Composite coping

2/48 2019/01 - Indice de révision : A - Code : 97160421 WOODEN POOLS BWT myPOOL
HOTLINE
1. WOOD, A NATURAL MATERIAL .................................................................... 4
1.1 Colour variations ....................................................................................................................4
1.2 Resin beads.............................................................................................................................4
1.3 Salt stains................................................................................................................................4
1.4 Greying ....................................................................................................................................4
1.5 Splitting and cracking ............................................................................................................4
1.6 Knots........................................................................................................................................5
1.7 Surface mould.........................................................................................................................5
1.8 Joined wood............................................................................................................................5
1.9 Curved wood ...........................................................................................................................5
2. FOREWORD................................................................................................... 6
3. STORAGE & ASSEMBLY TIMES.................................................................... 6
3.1 Storage.....................................................................................................................................6
3.2 Above-ground kit ....................................................................................................................6
3.3 Safety .......................................................................................................................................7
4. QUICK OVERVIEW ..........................................................................................................7
4.1 Tools.........................................................................................................................................7
4.2 Time required ..........................................................................................................................7
5. EXCAVATION ................................................................................................ 8
5.1 Dimensions of the excavation and concrete slab................................................................9
6. ASSEMBLY OF THE METALLIC STRUCTURE ............................................. 10
6.1 The metallic structure...........................................................................................................12
7. POURING THE CONCRETE SLAB ............................................................... 13
8. ASSEMBLING THE WALLS ......................................................................... 14
9. THE WALLS (CONTD) & DRESSING THE POSTS ....................................... 16
10. MOUNTING THE COPING SUPPORT BRACKETS....................................... 18
11. INSTALLING THE METAL FITTINGS........................................................... 20
12. MOUNTING THE LINER LOCKING TRACK ................................................. 21
13. WALL FINISHINGS...................................................................................... 22
14. INSTALLATION OF THE POOL FITTINGS................................................... 22
14.1 Simmers ........................................................................................................ 23
14.2 Throughwallanges.............................................................................................................24
15. FITTING THE UNDERLAY, LINER & FILLING THE POOL ........................... 24
15.1 The underlay..........................................................................................................................24
15.2 The liner.................................................................................................................................24

3/48
2019/01 - Indice de révision : A - Code : 97160421
WOODEN POOLS BWT myPOOL HOTLINE
16. THE FILTRATION GROUP ........................................................................... 25
16.1 Installation.............................................................................................................................25
16.1.1 Precautions and advice..............................................................................................26
16.2 Mounting the rigid descending pipes .................................................................................27
16.3 Assemblyofthelter ...........................................................................................................29
16.4 Collectorandpump/ltermodule.......................................................................................31
16.5 Pipe connections ..................................................................................................................31
16.6 FIlling the water circuit.........................................................................................................33
16.7 Filling the pool and cutting the liner...................................................................................33
16.8 The underwater light (Odyssea model)...............................................................................34
17. COPING....................................................................................................... 34
17.1 Installation of the double pine coping - Weva....................................................................34
17.2 Installation of the composite coping - Odyssea ................................................................35
18. LADDERS .................................................................................................... 37
19. COMMISSIONING AND OPERATING RECOMMENDATIONS ....................... 38
19.1 Filter and valve operation ....................................................................................................38
19.2 Lengthoftheltrationcyclen.............................................................................................38
19.3 Cleaningthepre-lter<erbackwash ............................................................................39
19.3.1 Pre-lter .....................................................................................................................39
19.3.2 Filter...........................................................................................................................39
19.3.3 Dechlorinator (Odyssea model) .................................................................................40
20. OPERATION AND MAINTENANCE .............................................................. 40
20.1 Winterizing the pool..............................................................................................................41
20.1.1 Winterizing the hydraulic installation..........................................................................41
20.2 Water treatment.....................................................................................................................41
20.3 Hygiene..................................................................................................................................42
21. GUARANTEES............................................................................................. 42
21.1 Wooden components: .........................................................................................................42
21.2 Accessories...........................................................................................................................42
22. DO NOT PLAY WITH SAFETY ! ! ! ............................................................... 45
23. APPENDICES - EXPLODED VIEWS.............................................................. 46

4/48 2019/01 - Indice de révision : A - Code : 97160421 WOODEN POOLS BWT myPOOL
HOTLINE
1. WOOD, A NATURAL MATERIAL
Being a natural material, wood will have some imperfections. These are normal and have no impact on the
service life of the product.
Acertainnumberaresupercialanddonotfallwithinthescopeoftheguarantees.
1.1 Colour variations
Colour variations are common to every species of wood.
Treatment brings them out because the depth of penetration of
the product depends on the wood density and grain. Weathering
of wood outdoors will signicantly attenuate these colour
variations.
1.2 Resin beads
When resinous wood species are autoclaved, the alternating
pressure and vacuum can cause sticky residue to rise to the
surface. To remove it, scrape it carefully with an appropriate
tool, being careful not to touch the wood. Turpentine spirits
could also be effective, but could stain the wood if too much is
applied.
1.3 Salt stains
Small green stains are frequently found on the surface of
autoclaved wood. These can be removed with light sanding. If
left untreated, this colour will disappear over time.
1.4 Greying
Wood exposed to the sun and the moon is susceptible to
greying. Some of the wood could already be greyed due to the
storage conditions of the various elements of the structure.
This is a natural phenomenon that has no impact on the structural
integrity of the product. The colour of the whole structure will
even out after a few months of exposure..
1.5 Splitting and cracking

5/48
2019/01 - Indice de révision : A - Code : 97160421
WOODEN POOLS BWT myPOOL HOTLINE
Wood expands and contracts when exposed to variations in
humidity and temperature. As it dries, wood contracts unevenly
resulting in the appearance of cracks. While these can seem to
be cause for concern, they have no impact on the mechanical
properties of the product and therefore do not fall within the
scope of the guarantee.
1.6 Knots
Knots mark the places where branches were attached. The
quantity and size depends on the species of wood and the
sorting process. For outdoor installations, small adherent knots
are acceptable.
1.7 Surface mould
.
Mould, caused by microscopic fungi, can grow on wood,
particularly on resinous species, on which the growth can
appear as “blueing”. It is a surface phenomenon, exacerbated
by heat, humidity and inadequate aeration and is characterised
by stains ranging from light to dark blue. They can be removed
by wiping the surface.
Remember that class IV treated wood is protected against
attack by fungi that could destroy the physical and mechanical
properties of the wood
1.8 Joined wood
To ensure the highest quality in the selection of our wood, it
is sorted meticulously before planing. Sections that features
defects on both sides are removed and the wood is then joined
together (see image).
This is no way penalises the mechanical properties of the wood.
1.9 Curved wood
Due to the constant pressure exerted by the water, the walls of the pool may curve slightly over time.
This phenomenon, attributable to the natural elasticity of wood, will stabilise of its own accord and in no
way would lead to failure of the wooden slats.
It is not a defect, and would not constitute grounds for a guarantee claim..

6/48 2019/01 - Indice de révision : A - Code : 97160421 WOODEN POOLS BWT myPOOL
HOTLINE
2. FOREWORD
Congratulations on acquiring your pool. We have taken great care with the design and manufacture of your
pool to provide you with a top quality product.
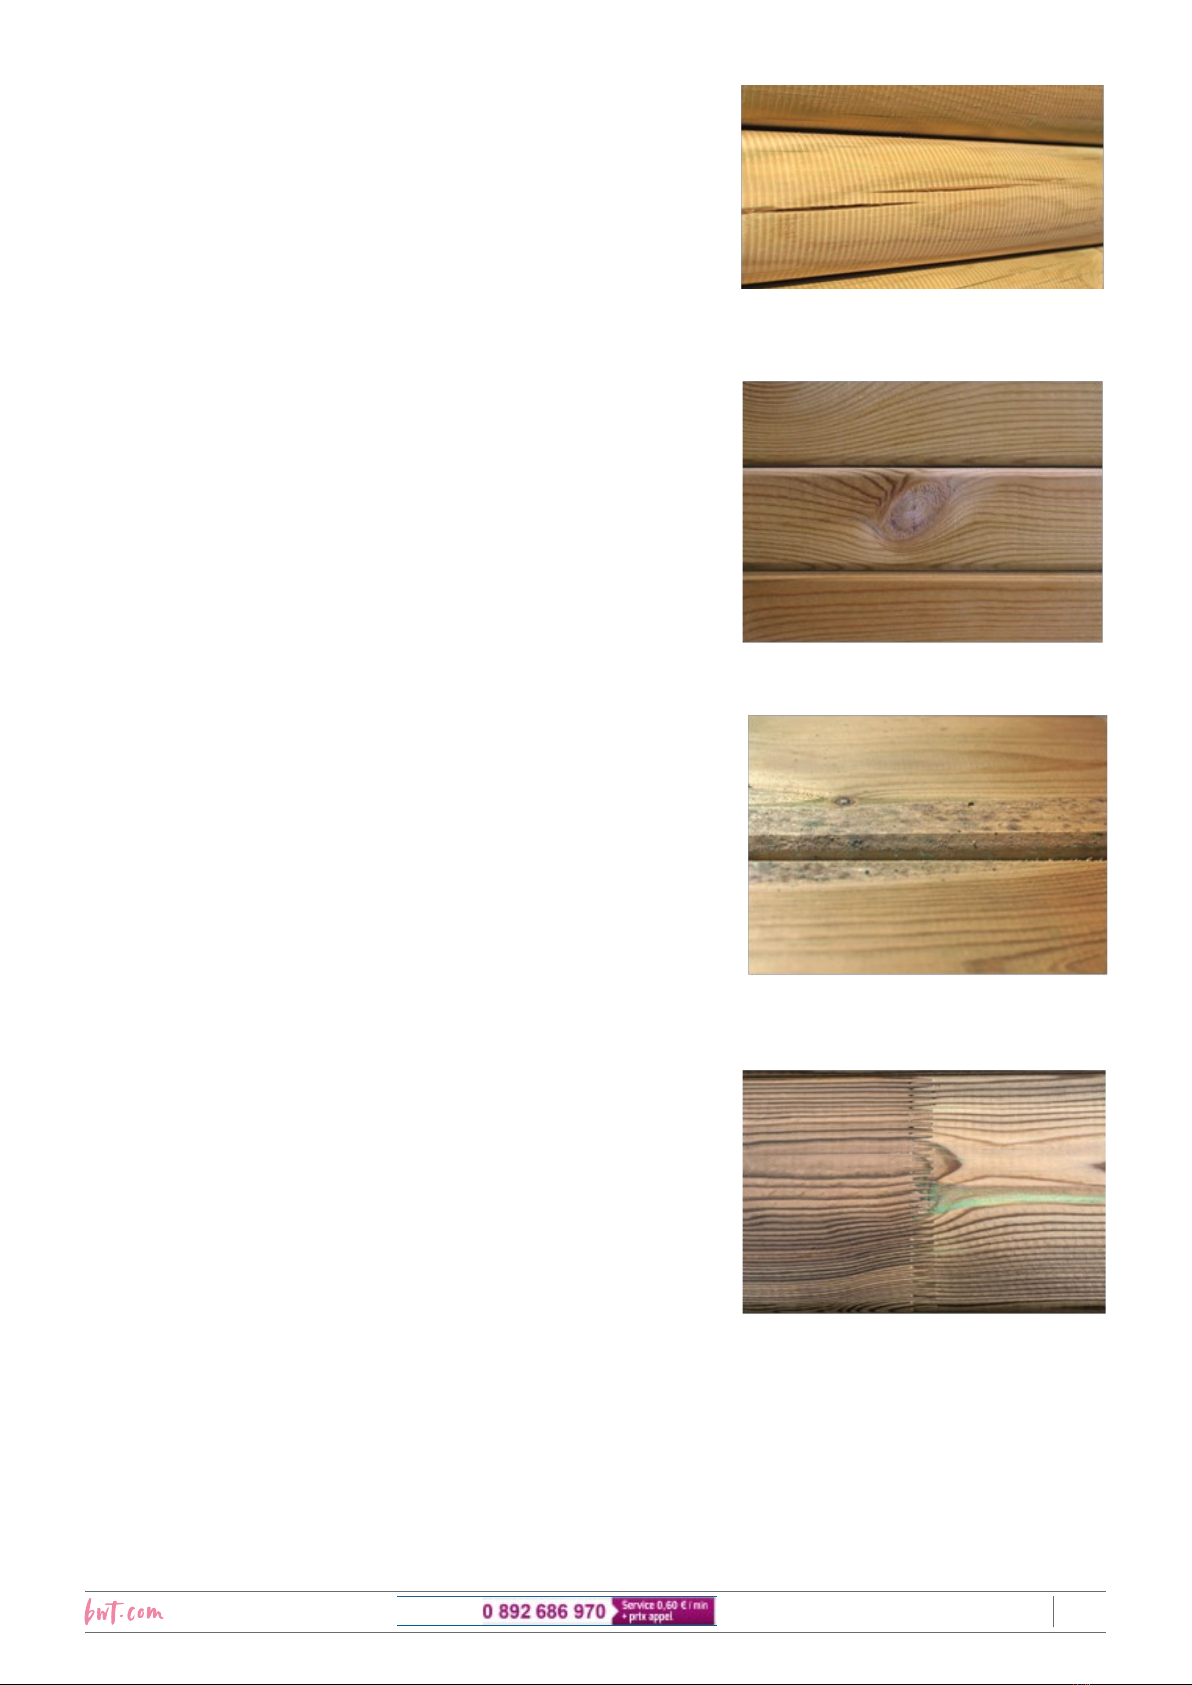
The wood used to make the various elements (interlocking walls, coping, ladder, etc.) was carefully
selected. Outdoors, these wooden elements are subject to constant weathering: contact with the ground,
temperature variations, exposure to sunlight, rain and frost, insect attack, etc. The wood’s ability to
withstand this aggression depends on the origin of the wood and the method used to treat it.
For this reason, we choose pine from extensive, sustainably managed forests in northern Europe. Why do
we insist on this? Because the more rigorous climates above the 57th parallel favour very slow tree growth,
making the wood stronger and more resilient.
The wood is autoclaved, this involves subjecting the wood alternately to pressure and vacuum in order to
drivethetreatmentchemicalsintotheheartofthewoodasopposedtoothermoresupercialtreatment
techniques such as soaking.
Class IV treated wood in contact with the ground is immune to insect attack and rotting caused by humidity.
Autoclave treatment is guaranteed 10 years, in accordance with standards currently in effect.
The pool coping is made of either composite slats or grooved pine planks, depending on the model selected.
Wood is a living material, variations in temperature and humidity can cause it to expand or contract so take
care to follow the storage and assembly instructions concerning the wooden structure. Similarly, prolonged
exposure to UV light can cause wood to grey. These are natural phenomena that in no way effect the
service life of the products.
Do not apply any product to the wood (for example: lazure, micro-porous products, etc.).
3. STORAGE & ASSEMBLY TIMES
Weshallnowexplainhowtoassembleyourpool,butrstsomeinstructionsbeforeyoubegin.
Please read these instructions carefully, this will allow you to prepare each stage to achieve optimum
efciency.Pleasekeeptheseinstructionsforfuturereference.
You should take the time to go through the components using the nomenclature page enclosed with the
accessories kit and make sure that no items are missing.
Please retain the following documents;
• the production sheets for the various kits
• proofs of purchase
3.1 Storage
If you do not intend to assemble your pool immediately, you should store it without opening it, in a well
ventilated room, or failing this, in an area protected from humidity and sunlight. Once the pallets are
undone, the kit must be assembled within 24 hours. Once work has begun, try to avoid leaving the structure
exposedtosignicantclimaticvariationsthatcouldcausethewoodto“work”tooquickly.Thiscouldlead
to deformations that could render the item unusable. By preference, the wooden structure should be
assembledinonegoonadaythatisnottoohot.ThelinerorPVCwaterproongmembraneshouldbe
storedataminimumof20°Cforatleast24hoursbeforeitistted.Thisistorenderthelinermoresupple
andthusfacilitatetting.Thelinershouldonlybettediftheambienttemperatureishigherthan20°C.
3.2 Above-ground kit
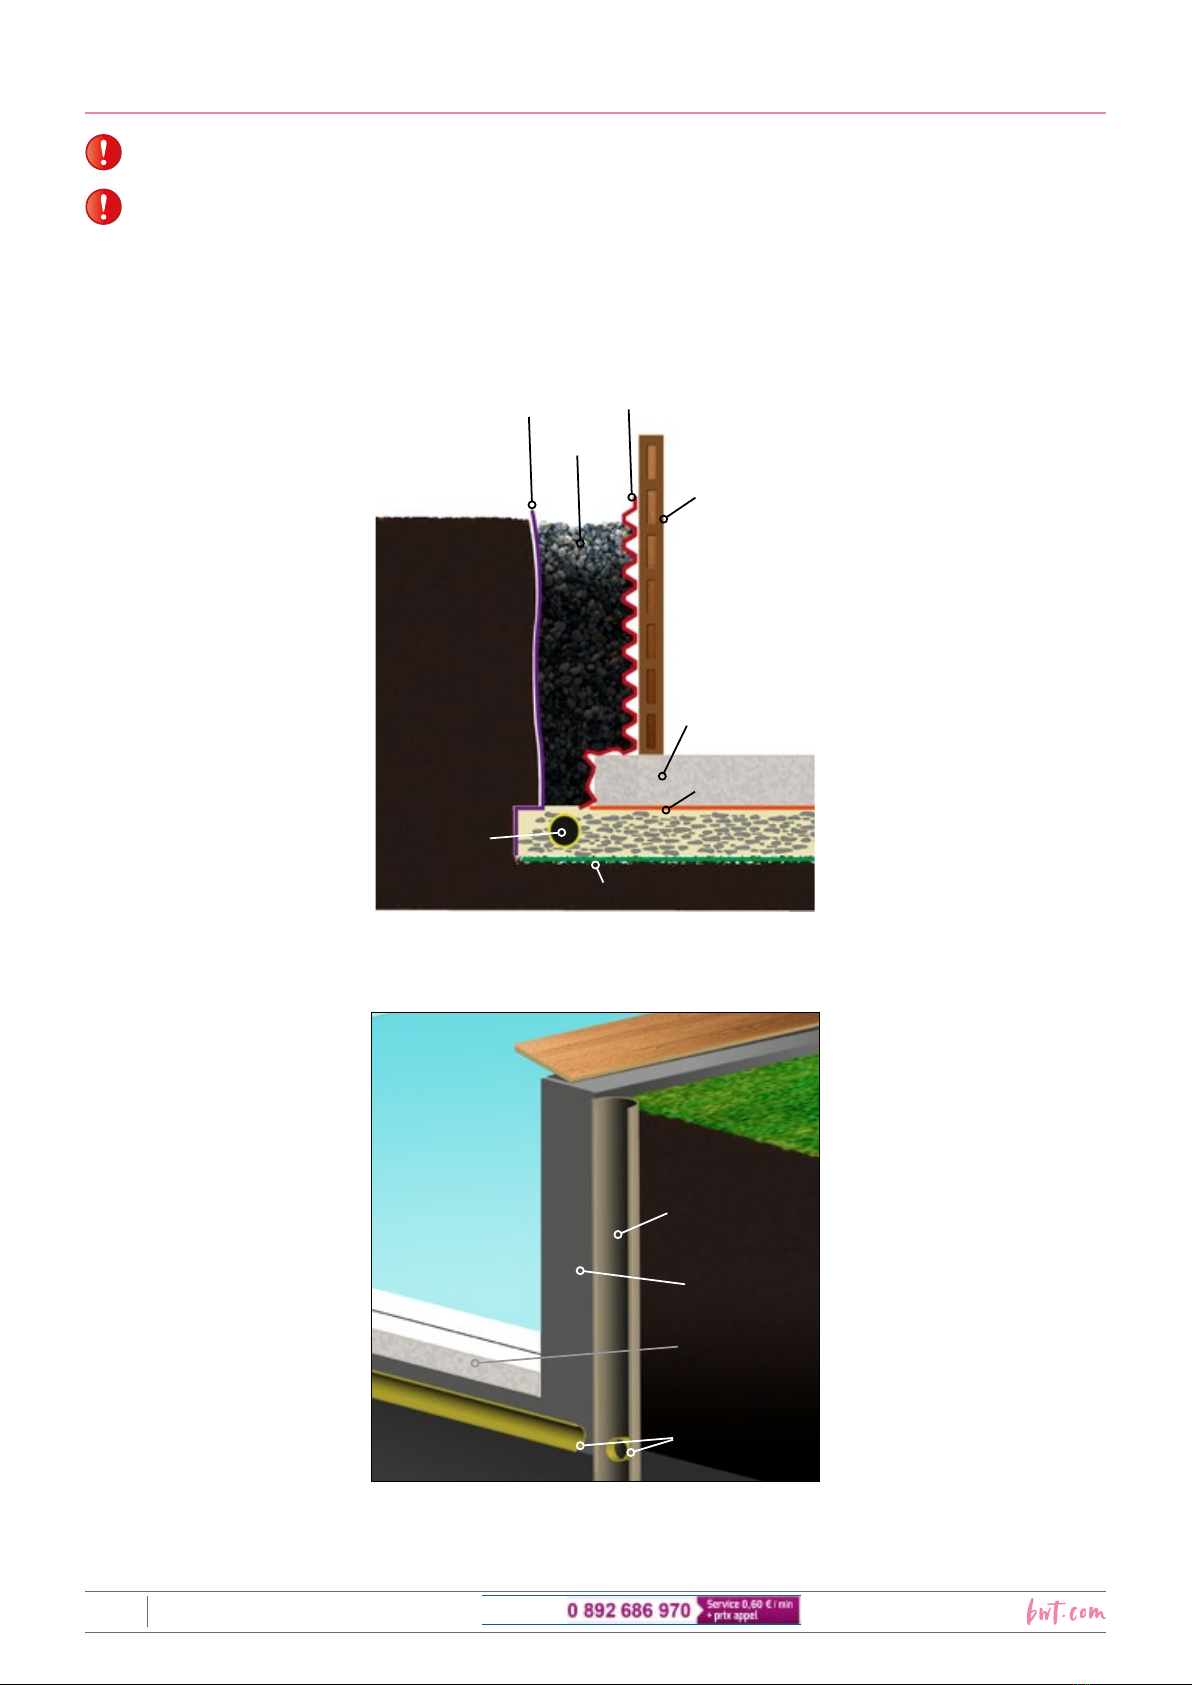
The kit delivered is intended for installation above-ground. If the pool is to be installed partially or entirely
in-ground, additional measures will need to be taken :
• Ifthegroundisnotlevel,digintotheslope,neverbackllunderthepool.
• Takecaretoensuresufcientdrainageadaptedtotheterrainaroundtheperipheryoftheconcrete

7/48
2019/01 - Indice de révision : A - Code : 97160421
WOODEN POOLS BWT myPOOL HOTLINE
slab.
• Cover the portion of the wall that is underground with a protective layer of foundation grade plastic
lm.
• Forbackllingaroundthepoolusestabilisedsand(mortar150kg/m3).(Thematerialsnecessaryto
implement these measures are not included in the kit.
3.3 Safety
• Your installation should comply with the standard C15-100. Notably, the electrical supply of the pump
shouldbeprotectedbya30mAdifferentialcircuitbreaker.(Wiringshouldbecarriedoutbyaqualied
professional).
• Thekitprovidedwillallowinstallationoftheltrationsystem3.5mfromthepool,thisisinlinewith
pool safety standards.
We recommend that you secure access to the pool using one of the protective measures set out
inthepoolsafetystandardsNFP90-306,307,308&309thatis:Barriers-Alarms-Safetycovers
- Shelters.
• Children should only use the pool under the supervision of an adult.
• Remember to remove the exterior wooden ladder while the pool is not in use to prevent unsupervised
access to the pool.
• This pool is intended for private use only.
• Do not install the pool beneath electrical wires.
4. QUICK OVERVIEW
• Excavation
• Assembly of the metal structure
• Pouring the concrete slab
• The wooden structure
• Theltrationgroup
4.1 Tools
• decameter
• rope,
• tube wrench (13 and 17),
• mallet,
• screw gun (with a torx, pozi bit),
• Stanley knife,
• metal saw,
• big spirit level,
• atheadscrewdriver,
• cross head screw driver,
• bolt cutters,
• sand paper,
• le,
• excavation equipment
4.2 Time required
Excavation : 1 TO 2 DAYS (DEPENDING ON THE MATERIALS USED)
Metallic structure: 1 DAY (WITH 2 PEOPLE)
Pouring the slab: 1 TO 2 DAYS (WITH 2 PEOPLE DEPENDING ON THE MATERIALS USED)
Woodenstructureandltration:2 TO 3 DAYS (WITH 2 PEOPLE - THE TIME INDICATED DOES
NOT INCLUDE THE CONCRETE CURING TIME)
Curingoftheconcreteslabbeforellingthepoolwithwater:21 DAYS (3 WEEKS)

8/48 2019/01 - Indice de révision : A - Code : 97160421 WOODEN POOLS BWT myPOOL
HOTLINE
5. EXCAVATION
Avoid siting your pool beneath trees or electrical lines.
Orient the pool such that the skimmers face into prevailing winds.
After determining the ideal position for your pool, start with the excavation required to accommodate the
concrete slab that will form the base of your pool. In Figure 1, identify those dimensions that correspond
to your pool.
Neverbackllunderthe pooltoachievealevelsurface,alwaysdig down sothatyourpoolrestsona
stable, level surface.
Anti-racinaire
ou feutrine
Terrain naturel
Drainage
périphérique
Graviers
drainants
Hérisson de pierres stabilisées
Film d’étanchéité
Dalle béton épaisseur
minimale : 150 mn
Ossature bois
Feutres géotextile
Delta MS
Excavation
The Delta MS membrane allows ventilation of the pool’s wooden structure. Ventilation is necessary to
prevent rotting of the wood.
Terrain
Puits de
décompression
Graviers
concassés
Drain
périphérique
Dalle béton
Drainage
Ensure that there is adequate peripheral drainage, especially if the pool is to be installed in-ground.

9/48
2019/01 - Indice de révision : A - Code : 97160421
WOODEN POOLS BWT myPOOL HOTLINE
5.1 Dimensions of the excavation and concrete slab
Type de ferraillage : ST minimum
Type de béton : C25/30 minimum
Longueur de la dalle à couler
Largeur de la dalle à couler
Modèle de bassin Longueur dalle béton en mm Largeur Dalle béton en mm
3 x 3 4100 4100
3 x 6 7100 4100
4 x 8 9100 5100
Figure 1 – dimensions of the excavation and concrete slab
Note that the excavation is deeper around the periphery in order to accommodate the reinforcing metallic
structure. (Figure 2)
By deepening the excavation around the edges only, you minimise the total volume of concrete required
to pour the slab.
Figure 2 – Excavation around the periphery Figure 3 – Rebar
The bottom of the excavation should be perfectly level to facilitate installation of the metallic structure.
(Figure 3) (either add a layer of compacted gravel or pour a rough layer of concrete). Lay rebar mesh over
this section (Figure 3).

10/48 2019/01 - Indice de révision : A - Code : 97160421 WOODEN POOLS BWT myPOOL
HOTLINE
6. ASSEMBLY OF THE METALLIC STRUCTURE
Themetallicstructurecomprisespostsjoinedtogetheratthetopandthebottomwithatbars(Figure 4)
Observe how these parts overlap to ensure correct positioning of the structure. The top links should be
dismantled once the slab has been poured.
Figure 4 – Metallic structure
Figure 5 – Jacks
Aftercorrectlypositioningtherstlayerofrebar(Figure 3) set out the metallic posts required to assemble
your pool (Figure 8).Makesurethatyoutthemwithjacksrst(Figure 4). These posts are joined together
atthebottomwithatbarsfastenedbytwoscrews(bagA).
Thedistancebetweentheeachpostisdeterminedbythelengthoftheatbars.
Theatbarsfeatures4holesateachend.
The upper and lower connection bars are identical.
Around the base, the outer holes are used (Figure 4) while the inner holes are used on bars around the
top of the structure (Figure 6).

11/48
2019/01 - Indice de révision : A - Code : 97160421
WOODEN POOLS BWT myPOOL HOTLINE
Figure 6 – Top and bottom bars
Dependingontheversion,theatmetallicbardsaredeliveredastwoseparatesections
to be bolted together.
Once the metallic structure has been assembled, adjust the position of the posts carefully and check :
• that the posts are level, straight and perfectly aligned.
• that the pool diagonals measured at the axis of the corner jacks are equal (Figure 8).
For pools1.20 m deep, the slab thickness should be approx 350 mm, disregard the +/- 40 mm
measurement. The measurement before adjustment, 90 mm, is unchanged
.
Figure 7 – Detail of the jack
Take particular care during this stage of the assembly, it will impact subsequent phases and determine
thequalityofthepoolnish.

12/48 2019/01 - Indice de révision : A - Code : 97160421 WOODEN POOLS BWT myPOOL
HOTLINE
6.1 The metallic structure
Once the structure has been assembled, make sure that the diagonals are equal in length. Check that
the posts are level and straight. Check that the height is correct.
Figure 8 – Metallic structure - pool 3 x 6
Acorrespondstoaatbarwithaninteraxialdistanceof1m.
Bcorrespondstoaatbarwithaninteraxialdistanceof1.5m
Ccorrespondstoaatbarfortopcorners
Atthebottomcorners,theseatbarsarejoinedtogetherbyanARtypejack(DetailFigure 6)
Tabledetailingthelayoutoftheatbarsalongthepoollengthandwidthforthevariouspoolmodels.
Pool model Diagonal in mm Layoutoftheatbars
along each length
Layoutoftheatbars
along each width
3 x 3 4282 B / B B / B
3 x 6 6748 B / B / B / B B / B
4 x 8 8984 B / B / A / A / B / B B / A / B

13/48
2019/01 - Indice de révision : A - Code : 97160421
WOODEN POOLS BWT myPOOL HOTLINE
7. POURING THE CONCRETE SLAB
Encase the base of the metal posts with a small amount of concrete before pouring the rest of the slab,
this will help prevent deformation of the metallic structure (Figure 10).
See Figure 7 and Figure 11 to determine the correct height of the concrete slab with respect to the
posts.
Thenishoftheconcreteslabwilldeterminethecorrectseatingofthewallsaswellasthequalityof
thepooloor.
Position the top layer of rebar (second layer) over the entire surface of the excavation before pouring the
concrete.
Once laid, the metal trellis should cover the whole surface (lay the trellis such that it is set 3 to 5 cm back
from the edge around the entire periphery). Some cutting around the posts will be necessary (Figure 10).
Bars should be allowed to overlap and should be connected together.
While pouring the slab, make sure that the upper rebar mesh is encased to the correct depth in the
concrete.(minimum 3 cm)
Level the surface and smooth it as carefully as possible in order to minimise protrusions and asperities that
will have to be corrected later.
Figure 9 – Position of the metallic posts
Figure 10 – Trimming around the posts
Figure 11 – Detail of the metallic posts

14/48 2019/01 - Indice de révision : A - Code : 97160421 WOODEN POOLS BWT myPOOL
HOTLINE
8. ASSEMBLING THE WALLS
Before starting to assemble the wooden walls, make sure that the nish of the concrete slab is
perfectly smooth and level. Any unevenness will be accentuated and more noticeable once the pool
hasbeenlledwithwater.Ifnecessary,correctdefectsbysandingorresurfacing.
Assembly of the wooden structure may begin 2 to 3 days after the slab is poured, it is not
necessary to wait for the concrete to cure completely.
However,youmustwait2to3weeksbeforellingthepoolwithwater.
Your pool comprises several types of wooden slat, the position of the various types of slat are indicated in
the exploded views.
Pleasenotethatthe3x3modelisttedwithoneskimmerandonereturntting
Pool model Layoutoftheatbarsalongeach
length
Layoutoftheatbarsalongeachwidth
3 x 3 1700 + 1700 1700 + 1700
3 x 6 1700 + 1570 + 1570 + 1700 1700 + 1700
4 x 8 1700 + 1570 + 1070 + 1070 + 1570 + 1700 1700 + 1070 + 1700
PAROI
FEMELLE
1/2 PAROI
FEMELLE
PAROI
MALE-FEMELLE
1/2 PAROI
MALE
Figure 12 – Assembling the walls
The slats comprising your pool are common to several pool models. For information concerning the lengths
of the slats constituting the walls of each pool model, please refer to the table above:
Paint the ends of the slats in the corners with a wood stabiliser to limit deformation over time. This product
is white on application, but becomes colourless when dry. Drying time is 2 to 3 hours. Apply a second layer
if the temperature is high or if the product dries too quickly. Follow the safety instructions printed on the
container. Rinse the brush after use.

15/48
2019/01 - Indice de révision : A - Code : 97160421
WOODEN POOLS BWT myPOOL HOTLINE
Lame mâle/femelle hauteur 145
Lame femelle hauteur 78
Lame mâle hauteur 78
Lame femelle hauteur 137
Lame mâle/femelle refoulement
Figure 13 – Layout of the slats by type - WEVA model - 6 x 3
Lame de refoulement
Prise balai
6
4
11
10
4
4 Male/ female slats
6 Female slats
10 Female half slat
11 Male half slat
Figure 14 – Layout of the slats by type - ODYSSEA model - 8 x 4

16/48 2019/01 - Indice de révision : A - Code : 97160421 WOODEN POOLS BWT myPOOL
HOTLINE
9. THE WALLS (CONTD) & DRESSING THE POSTS
While assembling the slats, make sure as of the beginning that the tongues are fully engaged in the
grooves.
Start by unrolling the strips of asphalt (Figure 15) that will insulate the wooden structure from the concrete slab.
Figure 15 – unrolling the asphalt strips
Layoutthe½slats‘ref.8’thatmakeupthepoolwidths,thenatthecornerstthemintotheslatsmarked‘1’
that make up the pool lengths (Figure 16). After positioning the 1st layer of slats, check that the diagonals
are equal. Screw the slats together using screws from bag C as shown in (Figure 16). Be careful to remove
any splinters as you go.
81
5x40
sachet C
Figure 16 – 1st row of slats
Theslatsshouldbexedtothemetallicpostsastheyareslottedintoposition(thesearepre-drilled)with
screws 6x30 from bag D.
Use a hammer and a clamp to gently tap the slats into position if necessary. Do not strike the wooden
slats directly, use the protective martyr blocks (supplied). Be careful to ensure that each row of slats is fully
engaged before starting with the next.

17/48
2019/01 - Indice de révision : A - Code : 97160421
WOODEN POOLS BWT myPOOL HOTLINE
Figure 17 – Detail
Figure 18 – Assembly of the slat walls
Fittogethertheremainingslatstakingcarethattheslatsmachinedtoreceivethepoolttingsareintheir
correct positions.
Theslatswiththeopeningsforthereturnttingsshouldbeinthe6throw
The slats machined to take the skimmers should be placed in rows 8 and 9 of 1.20m high pools, rows 9
and 10 of 1.33 m high pools and rows 11 and 12 of 1.46 m high pools.
Cover the metallic posts with the decorative proles. The proles should be ush with the top of the
wooden wall.
Screw them in place from the inside of the pool as shown opposite. (SS screw 5x80 bag O). The top of
theproleswillbescrewedtogetherwhenthecopingsupportttingsare mounted on top of the posts
(Figure 21).
Eliminateanysplintersraisedbyscrewing.Shoulditbenecessarytotrimtheprolestosize(forexample,
ifthepool ispartiallyin-ground)orientthecut surfacefacingupwards.The2prolesdonotmeet,the
metallic post remains visible.
5x100
Figure 19 – Fastening the slat to the posts

18/48 2019/01 - Indice de révision : A - Code : 97160421 WOODEN POOLS BWT myPOOL
HOTLINE
10. MOUNTING THE COPING SUPPORT BRACKETS
Chamfer the edge of the central holes in the support bracket plates so that they can be correctly screwed
into position.
Make sure that the plates are level to facilitate subsequent laying of the coping.
Mount the coping support brackets, on every side, except from the side housing the skimmers(s), position
a bracket midway between each two posts as shown in the following illustrations (Figure 22). For the
position of the brackets across the width housing the skimmer(s), refer to the diagrams (Figure 22).
Usethe5x100SSscrewsfrombagLtoxtheminposition.Thebracketsshouldbepositioned3mm
belowthetopofthewall(g19)sothatthesupportbracketplateswillbeushwiththetopofthewallwhen
installed. PBefore screwing the plates into position, lightly mill the central holes through which the screws
(5x40) will be inserted.
475385450450 590
bassin 5x10
475 590 385 450450
Figure 20 – pool 5 x 10
5x100
4x40
Figure 21 – Coping support brackets

19/48
2019/01 - Indice de révision : A - Code : 97160421
WOODEN POOLS BWT myPOOL HOTLINE
385 590 475
bassin 3x6
590 385475
475590385
450
bassin 4x8
450
385590
475
Bassin largeur 3m Bassin largeur 4m
Skimmer
Skimmer
Skimmer
Skimmer
385 590 475
bassin 3x6
Bassin largeur 3m 1 skimmer
Skimmer
Figure 22 – skimmer positions

20/48 2019/01 - Indice de révision : A - Code : 97160421 WOODEN POOLS BWT myPOOL
HOTLINE
11. INSTALLING THE METAL FITTINGS
Thecopingsupportttingsaredesignedtohold
thecopingmodulesandxtheminposition.
Fastenthemetalttingsthatwillholdthecopingto
thetopoftheposts.Makesurethattheyareush
with the top slat and that they are aligned with each
other and with the support bracket plates along the
lengths of the wall. Use the 6x30 Torx screws from
bag D.
Figure 23 – Metal ttingss
Figure 24 – Corner brackets
In the corners, use the remaining left and right
ttingsand4cornerbrackets.
Fixdecorativeprolestotheendsofeachwallusing
3 evenly spaced nails from bag I. The decorative
prolesshouldbepre-drilledalongtheiraxis.
Ifyouneedtotrimtheproles,orientthecutsideso
that it is facing upwards.
Figure 25 – Finishing trim
In each corner, mount a wooden triangle to support
the liner locking track corner elements. (stainless
steel screw 5x40 bag C).
Figure 26 – Wooden triangle
This manual suits for next models
2
Table of contents
Other BWT Swimming Pool manuals
Popular Swimming Pool manuals by other brands

Bestway
Bestway Splash and Play Interactive 3D Adventure owner's manual

Hans Grohe
Hans Grohe Pharo 300 Series installation instructions

Certikin
Certikin Dolphin Sport manual

Endless Pools
Endless Pools Streamline Installation, Operations and User's manual

Steinbach
Steinbach v1910 Series instruction manual

Bestway
Bestway 53302 owner's manual