BYGMA 3,0HK OLIEFRI User manual

UK
Safety and operation instructions.
Maintenance and trouble shooting.
Tool specification, application
and declaration of conformity.
Explode drawing and spare part list.
DA
Sikkerheds- og driftsvejledning.
Vedligeholdelse og fejlfinding.
og overensstemmelseserklæring.
Tegning og reservedelsliste.
BYGMA KOMPRESSOR
3,0HK OLIEFRI

.....................................................................................3
UK English............................................................................................................4
Explode drawing and spare parts..................................................................6
DA Dansk ...........................................................................................................16
Tegning og stykliste .....................................................................................18
2

3
Figures
Fig. A
2
3
1
31 cm
Fig. B
2
1
Fig. C
1
ON/OFF
Fig. D
1
OFF
ON
Fig. E
1
Fig. F
1
Fig. G Fig. H
2
1
OFF
ON
Fig. I
Key parts
J
I
K
C
A
B
F
E
G
H
D

4
IMPROPER AND UNSAFE USE OF THE COMPRESSOR CAN RESULT IN DEATH OR SERI-
OUS INJURY. IT IS VERY IMPORTANT THAT THE INTENDED OPERATOR OF THE COM-
PRESSOR READS AND UNDERSTANDS THIS MANUAL BEFORE OPERATING THE
COMPRESSOR. KEEP THIS MANUAL AVAILABLE FOR OTHERS BEFORE THEY USE THE
COMPRESSOR.
Please keep this manual in safe place for future reference.
Important safety information
The manufacturer cannot possibly anticipate every possible circumstance that might involve a hazard. The warn-
must make sure that it is safe for you and others. You must also make sure that the procedure, work method, or
operating technique that you choose does not render the compressor unsafe.
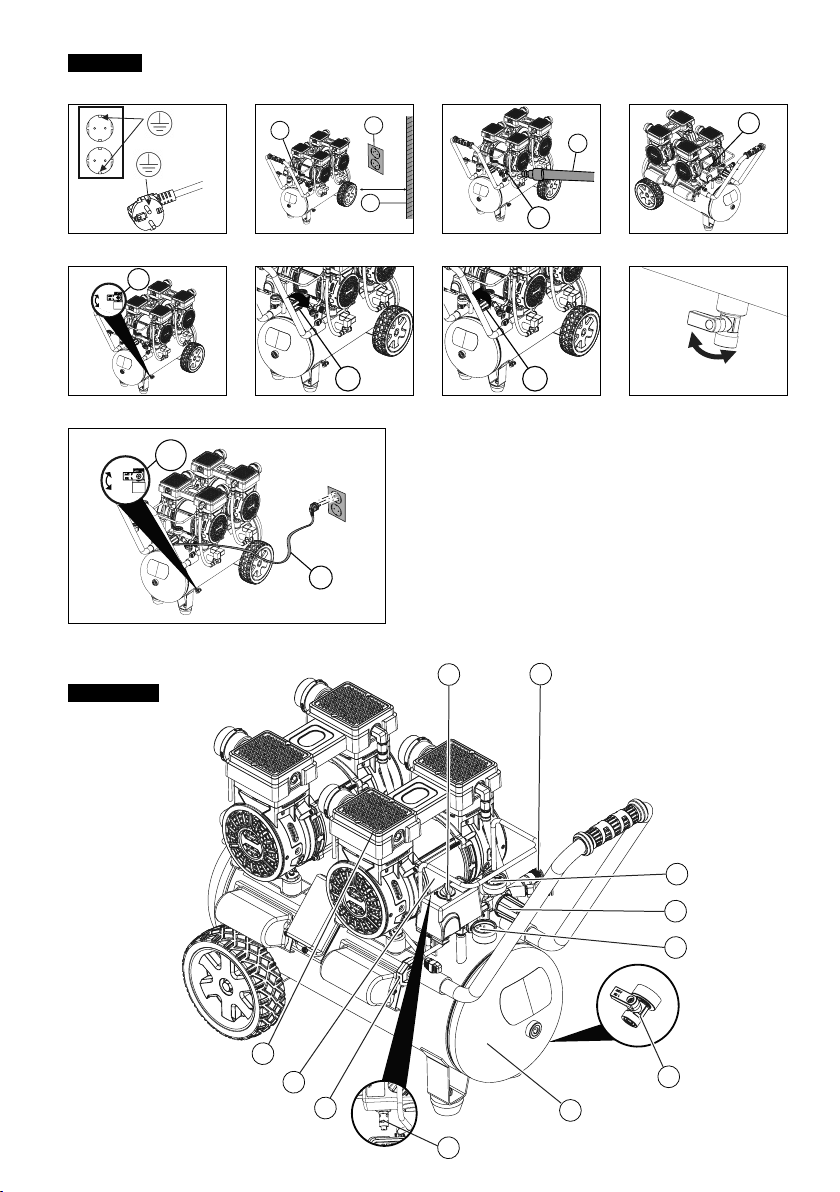
Figures
Table of content
............................................................................................................................. 4
Figures ............................................................................................................................................................... 4
.................................................................................................................................... 5
Tool application.................................................................................................................................................. 5
Declaration of conformity .................................................................................................................................. 5
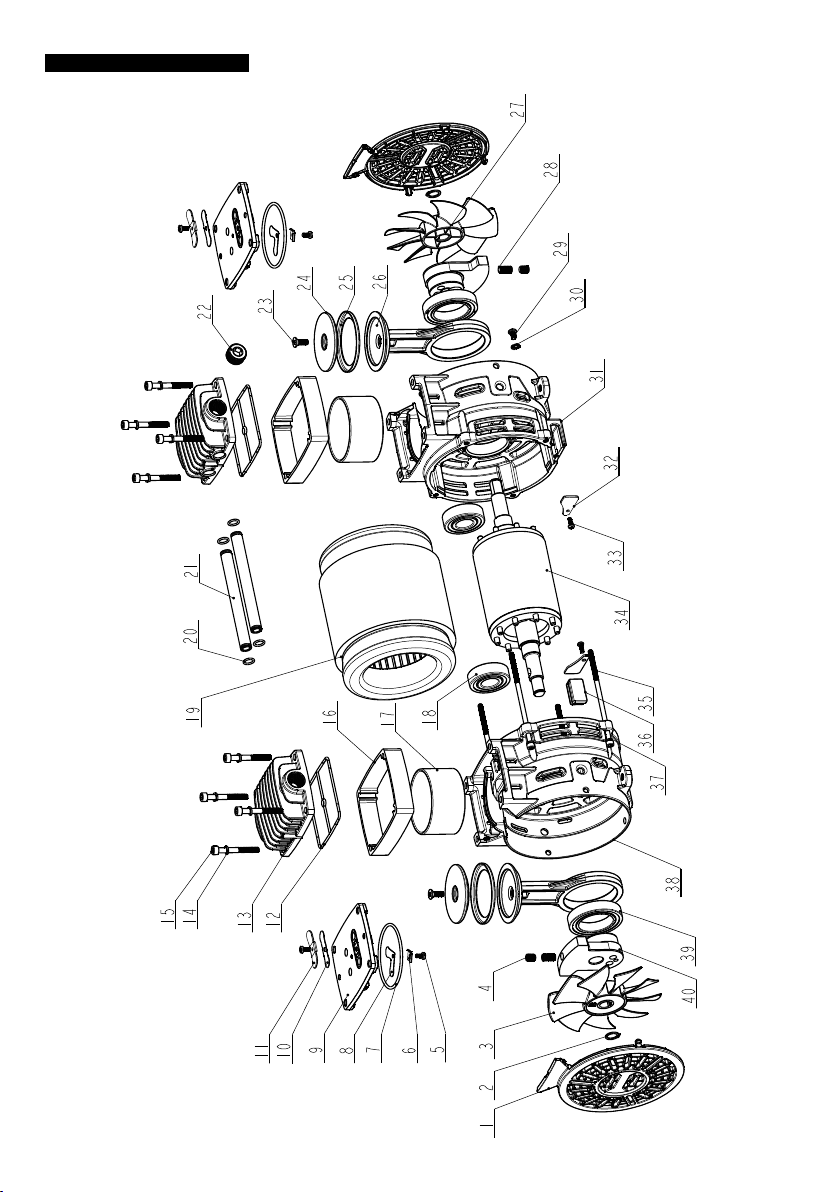
Explode drawing ................................................................................................................................................ 6
Spare parts ........................................................................................................................................................ 7
Explode drawing - motor.................................................................................................................................... 8
Spare parts - motor............................................................................................................................................ 9
Explanation of symbols.................................................................................................................................... 10
Key parts ...........................................................................................................................................................11
General safety warnings...................................................................................................................................11
Assembly instructions.......................................................................................................................................12
Positioning of the air compressor ................................................................................................................12
Connect air hose to compressor..................................................................................................................12
Operating instructions ......................................................................................................................................12
Break in the pump ........................................................................................................................................12
Before each start-up.....................................................................................................................................12
How to start ..................................................................................................................................................12
How to shut down .........................................................................................................................................12
Maintenance .....................................................................................................................................................13
How to drain tank..........................................................................................................................................13
Storage .........................................................................................................................................................13
Trouble shooting ...............................................................................................................................................14
ORIGINAL INSTRUCTIONS
BYGMA COMPRESSOR 3.0HP OIL-FREE

English
5
Technical specications
Technical info. BYGMA COMPRESSOR 3.0HP OIL-FREE
Tank size
Power 220-240V / 50Hz / 3.0 HP
RPM 1400
Rating Amps 11A
Working pressure 8.0 - 10.0 bar
Motor type
Oil free/Oil lube Oil-free
Quick coupler 2
Drain valve Ball valve
Duty cycle 50%
PA 69 dBA
WA 83 dBA
As we are constantly developing and improving our products, the information in this overview is subject to change without notice.
Tool application
• Pneumatic nailers and staplers
Declaration of conformity
We;
Jiangsu, China
declare under our sole responsibility that the;
conforms with the directive(s), its amedment(s) and standard(s);
EN 1012-1:2010, EN 60204-1:2018, EN 55014-1:2017, EN 55014-2:2015, EN 61000-3-2:2014, EN 61000-3-3:2013/A1:2019.
Serial number can be found on the front page.

6
Explode drawing

English
7
Spare parts
ITEM
NO. PART NO. DESCRIPTION
1 AT2515.00.00.01 Tank
2 J8335250201 Metal tube
3 J0907040313 Drain valve
4 X3110590032 Rubber foot
5 D9000084139 Crimping cap
6 D9079865177 Connecting line
7 JAE46710733 Protect the frame
8 Q4726521001
9 J3266600414 Handle
10 X3111020031 Handgrip
11 J2993490675 Quick coupler
12 J7104880061 Manifold
13 J0304870463 Pressure regulator
14 J2469930042 Check valve
15 F5013701079 Pressure gauge
16 D1011073274 Power cord
17 D3005000147 Pressure switch
18 J0023160647 Safety valve
19 F5013701083 Pressure gauge
20 Q5911245001 Crimping board CC1103W
21 D5010003001 Crimping cap
22 J7383090034 Capacitor shroud
23 F0000901043 Heat shroud
24 J3095040201
25 Q411A263001
26 J3161200423
27 2556C273 Motor pump assembly
28 X0004360212 Cushion pad
29 X4207350167
30 D6015006026 Capacitor
31
32 J5638170344 End cap
33 D9079865178 Connecting line
34 J7432360249 Solenoid valve
ITEM
NO. PART NO. DESCRIPTION
35 J0189940407 Check valve
36 F4813700569 Roller components
101 J2981850040 Washer Ø10
102 J0191860022 Spring washer Ø10
103 J2984440032 Washer
104 J0802430032 Screw M10X20
105 J2021830040 Nut M10
106 J0782410032 Screw M5X10
107 J0782380299 Screw ST4.8×14F
108 J0783470485 Screw ST3.9×14F
109 J0783480674 Screw M4X17
110 J2020810033 Nut M8
111 J2851380428 Shaft

8
Explode drawing - motor

English
9
Spare parts - motor
ITEM
NO. PART NO. DESCRIPTION
1 Q5531996001 End cover
2 J3642450022
3 Q5537046001 Motor fan B
4 J0782360022 Screw M8x10
5 J0781650464 Screw M4x8
6 J0656000170 Press plate
7 X5530820229 Gasket O-ring
8 J0645990198
9 P5713072014 Valve plate
10 J7663900198
11 J3566010170
12 X5530820231 Gasket seal ring
13 P5710412014 Head
14 J0195790040
15 J0786040157 Screw M6x50
16 J6993210289 Bushing
17 J0945970152 Cylinder
18 J1763720216 Bearing
19 A5562071116 Stator
20 X5530820250 Pipe O-ring
21 J7026070152 Pipe
22 J7426030157 Cap
23 J0784910040 Screw M6x16
24 J6535950070 Rod cover
25 X5532600228 Piston ring
26 J0725940070 Rod
27 Q5537036001 Motor fan A
28 J0784830022 Screw M8x15
29 J0780560032 Screw M5x8
30 J2981200040
31 P5716962014 Crankcase A
32 J1226050170 Plate
33 J0786210032 Screw M4x8
34 A5532060635 Rotor
ITEM
NO. PART NO. DESCRIPTION
35 J0805930157 Screw M5x120
36 X5535630230 Crankcase plug
37 J0190730040
38 P5716972014 Crankcase B
39 J1762350197 Bearing
40 J3535960065 Crank

10
Explanation of symbols
Symbols in manual
!
The safety alert symbol indicates a potential hazard to personal injury. A signal word (DANGER,
seriousness. A safety symbol may be used to represent the type of hazard.
The signal word NOTICE is used to address practices not related to personal injury.
DANGER
WARNING
CAUTION
Read and understand compressor labels and manual. Failure to follow warnings could result in
serious injury.
Operators and others in work area shall wear impact-resistant eye protection with side shields.
Operators and others in work area shall wear hearing protection.
Symbols on compressor
Read and understand compressor
labels and manual. Failure to follow
warnings could result in serious injury.
This compressor is CE-approved
according to applicable standards.
Dispose product according to the
WEEE directive.
Risk of bursting tank if operating above
maximum operating pressure.
-
mable gasses or vapor.
Risk of accidental start-up in case of a
black-out and subsequent reset. Keep
clear of rotating parts.
Risk of eye injury. Always wear CE-ap-
proved safety glasses when operating
the compressor.
Risk of electrical shock could result in
death or serious injury. Only connect
the compressor to a properly grounded
receptacle.
Risk of high temperatures
Pressure discharge. Keep body parts
and bystanders away
2× 2424 Drain tank min 2 times a day.

English
11
Key parts
Parts description - see drawing on page 3
A
ELECTRIC MOTOR:
to prevent the motor from being damaged.
BAIR COMPRESSOR PUMP: The pump compresses the air and discharges it into the tank via the piston
that moves up and down in the cylinder.
CSAFETY VALVE:
pressure reaches the preset level of the safety valve, it will automatically pop open.
D
PRESSURE SWITCH: This switch turns on the compressor and is operated manually.When in the
ON position, it allows the compressor to start up or shut down automatically, without warning, upon air
the compressor.
E
PRESSURE REGULATOR KNOB: The regulator is used to adjust the pressure inside the line to the
tool that is being used. Turn the knob clockwise to increase the pressure and counter-clockwise to
decrease the pressure.
FTANK PRESSURE GAUGE: The gauge measures the pressure level of the air that is stored in the tank.
GOUTLET PRESSURE GAUGE: The gauge measures the regulated outlet pressure.
HQUICK COUPLER: The quick coupler is connected to a quick connector which is connecting to air hose.
DRAIN VALVE: The drain valve is used to remove moisture from the air tank after the compressor is
JAIR TANK: The tank is where the compressed air is stored.
K
POWER CORD: This product is for use on a nominal 230-volt circuit and should be grounded. A cord
with a grounding plug must be used. Make sure that the product is connected to an grounded outlet that
with a licensed electrician if the grounding instructions are not understood or there is doubt as to whether
by a licensed electrician.
!DANGER:
cord or plug is necessary, do not connect the ground-
of grounding wire is mixed with yellow and green.
General safety warnings
• Do not operate the compressor until you have
read and understand this instruction manual for
safety, operation and maintenance instructions.
WARNING:
• -
sure switch could result in death or serious injury.
•
vicinity of compressor.
• High pressure air could result in death or serious
prior to servicing.
• Never operate above maximum operating pressure
of the nailer/stapler.
• Drain water from tank after each use.
• Do not weld or repair tank.
• Do not operate with pressure switch or safety valve
set above maximum allowable working pressure.
• Hot compressors surfaces could result in serious
injury. Allow compressor to cool before touching.
•
result in death or serious injury.
•
• Do not restrict compressor ventilation openings or
place objects against or on top of the compressor
• Operate compressor only in a clean, dry, well
ventilated area.
•
unplug the compressor when not in use.
!

12
• Risk of serious eye injury from moisture
and debris. Operators and others in work area
shall wear CE approved and impact-resistant eye
protection with side shields when working with the
compressor and/or opening the drain valve.
• Do not spray any part of the body.
• Shock risk could result in death or serious injury.
Only connect the compressor to a properly ground-
ed receptacle.
• Dust can be created when cutting, sanding,
drilling or grinding materials such as wood, paint,
metal, concrete, cement, or other masonry. To
reduce your exposure to these chemicals, work in
safety equipment.
• -
CAUTION:
• High pressure air containing water condensation
could result in minor or moderate injury. Do not
spray at any person.
NOTICE:
•
down (even partially), allow the pump to sit in a nor-
mal, upright position for approximately 10 minutes
before starting.
Assembly instructions
•
contact your dealer immediately.
•
that you have purchased the intended model and that it
has the required pressure rating for its intended use.
• The carton should contain the compressor and
these safety and operation instructions.
Positioning of the air compressor
1. Position the air compressor (1) near an electrical
outlet (2) (Fig. B).
2. The compressor must be at least 31 cm from any
wall (3) or obstruction, in a clean, well-ventilated area
3.
surface.The compressor must be level to ensure prop-
er drainage of the moisture in the tank.
Connect air hose to compressor
1. Connect the air hose (1) to the compressor’s quick
coupler (2) (Fig. C).
Operating instructions
Break in the pump
1. Set the pressure switch (1) to the OFF position (Fig. D).
2. Open tank drain valve (1) by turning it counter-clock-
wise to permit the air to escape and prevent air
pressure build-up in the air tank during the break-in
period (Fig. E).
3. Turn the pressure knob (1) clockwise until it stops
(Fig. F).
4. Plug in the power cord
-
vices are drawing from the compressor’s circuit,
the compressor may fail to start or an overload
circuit can result in sluggish starting that causes
the motor overload protection system or circuit
breaker to trip, especially in cold conditions.
Disconnect the power cord only after break-in
process has been completed, otherwise the
motor might get damaged.
5. Set the pressure switch (1) to the ON position (Fig.
D). The compressor will start. Run the compressor for
Please note that breaking-in the unit is only required
prior to rst use.
6.
7. Close the tank drain valve (1) by turning it clockwise
(Fig. E).
8. Set the pressure switch to the ON position. (Fig. D)
the compressor’s motor will stop. The compressor is
now ready for use.
Before each start-up
1. Set the pressure switch (1) to the OFF position (Fig.
D).
2. Turn the pressure regulator knob (1) counterclock-
wise until it stops (Fig. G).
3. Attach hose and accessories (Fig. C)
When using an extension cord or extension cord
.
2.
How to start
1.
2
3. Set the pressure switch to the ON position and allow
the tank pressure to build (Fig. D). Motor will stop
when tank pressure reaches cut-out pressure.
4. Turn the air pressure regulator knob clockwise until
desired pressure is reached (Fig. F).
5. The compressor is ready for use.
How to shut down
1. Set the pressure switch (1) to the OFF position
(Fig. D).
2.
3. Set the tank drain valve (1) to ON to ensure the tank
WARNING:
Do not unplug the compressor while it is running, as
it will cause malfunction when plugging in again, and
pose great risk of burning the compressor unit.
!
!

English
13
Maintenance
Item Description / reason Service
interval
Drain the
tank
Through normal operation of your
compressor, condensation of water
will accumulate in the tank. To prevent
corrosion of the tank from the inside,
condensation must be drained twice a
day. Be sure to wear safety glasses.
Relieve the air pressure in the system
then open the drain valve on the bottom
-
tions it is especially important to drain
the tank after each use to reduce the
chance of problems resulting from the
freezing of condensation water.
NOTE: Refer to instructions on how to
drain tank.
Twice a
day
Test for
leaks
Check that all connections are tight.
Small leaks in the tank, hoses, connec-
tions or transfer tubes will substantially
reduce the compressor and tool perfor-
mance. Spray a small amount of soapy
water around the area of suspected
appear, repair, replace or reseal the
faulty component. Do not over-tighten
any connections.
Monthly
How to drain tank
1. Set the pressure switch (1) to the OFF position (Fig. D).
2.
3. Turn air pressure regulator knob counter-clockwise
to set the outlet pressure to zero (Fig. G)
4. Place suitable container under unit to catch water.
5. Slightly tilt unit and gently turn drain valve coun-
ter-clockwise to open. (Fig. H)
6. After the water has been drained,close the drain
valve (clockwise) (Fig. E). The air compressor can now
be stored.
Storage
Before storing the air compressor:
1. Drain tank
2.
the compressor.
3. Disconnect and wind up the power cord.
4. Clean the ventilation openings on the motor enclo-
sure with a damp cloth.
5. Drain all moisture from the tank.
WARNING:
•
or serious injury.
• Do not place a storage cover over a hot air com-
pressor.
• -
ing the cover on the equipment.
• Store the air compressor in a clean and dry loca-
tion.
•
building when it is not in use. This will reduce prob-
lems related to starting the motor and the freezing
of water condensation.
!

14
Trouble shooting
Problem Possible cause Solutions
The motor will not run or start
The power cord is not
plugged in. Plug the power cord into a grounded outlet.
The pressure switch is in the
O (OFF) position. Set the pressure switch to the ON position.
The extension cord is the
wrong wire gauge or is too
long.
Check extension cord information for the proper wire gauge and
cord length.
The motor’s thermal overload
protection has tripped.
down. Wait at least 15 minutes to make sure the thermal overload
protector has recovered before turning on the compressor again.
A fuse has blown or a circuit
breaker has been tripped.
Replace the fuse or reset the circuit breaker.
Verify that the fuse has the proper amperage.
Check for low voltage conditions.
Disconnect any other electrical appliances from the circuit or oper-
ate the compressor on a dedicated circuit.
The air tank pressure
exceeds the preset pressure
switch limit.
The motor will start automatically when the tank pressure drops
below the cut-in pressure.
The safety valve is stuck
open. Clean or replace the safety valve.
Electrical connections are
lose. Contact an authorized service center.
The motor, capacitor or safety
valve is defective. Contact an authorized service center.
The motor runs continuously
when the pressure switch is in
the ON position.
The pressure switch does
the air compressor reaches
the cut-out pressure and the
safety valve activates.
defective, replace it.
The compressor’s capacity is
not enough.
the compressor, a larger capacity compressor is needed.
The check valve is open Make sure that no granule or rust from the tank has got stuck in the
check valve.
The regulator does not
regulate the pressure.
The regulator or its internal
parts are dirty or damaged. Replace the regulator.

English
15
Problem Possible cause Solutions
The pressure is low or there is
not enough air.
There is a leak at one of the
(apply plumber s tape on threads). Do not over tighten.
The tank drain valve is open. Close the drain valve.
The air intake is restricted.
Prolonged excessive use
of air. Decrease the amount of air used.
There is a hole in the air
hose. Check the air hose and replace it if necessary.
The tank leaks. Replace the tank immediately. Do not attempt to repair it.
The valve is leaking. Check for worn parts and replace them if necessary.
There is moisture in the
discharge air.
There is condensation in the
air tank caused by a high
level of atmospheric humidity
or because the compressor
has not been running long
enough.
Drain the air tank. Drain the air tank more often in humid weather
The compressor overheats.
The ventilation is inadequate. Relocate the compressor to an area with cool, dry and well-circu-
lated air.
Cooling surfaces are dirty. Clean all cooling surfaces on the pump and the motor thoroughly.
The valve is leaking. Replace worn parts and reassemble using new plumber’s tape.
For failure other than above situations, please stop using the compressor and contact an authorized service center.

16
FEJLAGTIG OG USIKKER BRUG AF KOMPRESSOREN KAN MEDFØRE DØDEN ELLER AL-
VORLIG PERSONSKADE. DET ER MEGET VIGTIGT, AT BRUGEREN AF KOMPRESSOREN
LÆSER OG FORSTÅR DENNE MANUAL, INDEN KOMPRESSOREN ANVENDES. OPBEVAR
DENNE MANUAL TILGÆNGELIG FOR ANDRE, FØR DE ANVENDER KOMPRESSOREN.
Opbevar denne manual et sikkert sted til fremtidig brug.
Vigtig sikkerhedsinformation
Producenten kan ikke forudsige alle potentielle forhold, der kunne indebære en fare. Advarslerne i denne manual,
og de etiketter og mærkater, der er sat på kompressoren, er derfor ikke udtømmende. Hvis du anvender en pro-
er sikker for dig og andre. Du skal også sikre, at proceduren, arbejdsmetoden eller betjeningsteknikken, som du
vælger, ikke gør kompressoren usikker.
Figurer
Indhold
Vigtig sikkerhedsinformation........................................................................................................................... 16
Figurer.............................................................................................................................................................. 16
...................................................................................................................................17
Anvendelsesområde for værktøj ......................................................................................................................17
Overensstemmelseserklæring .........................................................................................................................17
Tegning .............................................................................................................................................................18
Reservedele......................................................................................................................................................19
Tegning - motor................................................................................................................................................ 20
Reservedele - motor ........................................................................................................................................ 21
Forklaring af symboler..................................................................................................................................... 22
Vigtige dele ...................................................................................................................................................... 23
Generelle sikkerhedsadvarsler ....................................................................................................................... 23
Monteringsvejledning....................................................................................................................................... 24
Placering af luftkompressoren .................................................................................................................... 24
Tilslut luftslangen til kompressoren ............................................................................................................ 24
Brugsanvisninger............................................................................................................................................. 24
Den første opstart........................................................................................................................................ 24
....................................................................................................................................... 24
Sådan starter du.......................................................................................................................................... 24
Sådan lukker du ned.................................................................................................................................... 24
Vedligeholdelse ............................................................................................................................................... 25
Sådan aftappes tanken ............................................................................................................................... 25
Opbevaring .................................................................................................................................................. 25
......................................................................................................................................................... 26
OVERSÆTTELSE AF DEN ORIGINALE VEJLEDNING
BYGMA KOMPRESSOR 3,0HK OLIEFRI

Dansk
17
Tekniske specikationer
Teknisk info. BYGMA KOMPRESSOR 3,0HK OLIEFRI
Tankstørrelse
Strøm 220-240V / 50Hz / 3,0 HP
O/min. 1400
Ampere nominelt 11A
Driftstryk 8,0 - 10,0 bar
Motortype
Oliefri/oliesmøring Oliefri
2
Kugleventil
Arbejdscyklus 50%
PA 69 dBA
WA 83 dBA
Da vi konstant udvikler og forbedrer vores produkter, er informationen i denne oversigt med forbehold for ændringer uden varsel.
Anvendelsesområde for værktøj
• Pneumatiske sømpistoler og klammepistoler
Overensstemmelseserklæring
Vi;
Jiangsu, Kina
erklærer som eneansvarlige, at;
er i overensstemmelse med direktivet/direktiverne, dets tilføjelse(r) og standarden/standarderne;
EN 1012-1:2010, EN 60204-1:2018, EN 55014-1:2017, EN 55014-2:2015, EN 61000-3-2:2014, EN 61000-3-3:2013/A1:2019.

18
Tegning

Dansk
19
Reservedele
ITEM
NO. PART NO. DESCRIPTION
1 AT2515.00.00.01 Tank
2 J8335250201 Metalrør
3 J0907040313
4 X3110590032 Gummifod
5 D9000084139 Klemmedæksel
6 D9079865177 Forbindelsesled
7 JAE46710733 Beskyttelsesbøjle
8 Q4726521001
9 J3266600414 Håndtag
10 X3111020031 Håndgreb
11 J2993490675 Hurtigkobling
12 J7104880061 Manifold
13 J0304870463 Trykregulator
14 J2469930042 Kontraventil
15 F5013701079 Trykmåler
16 D1011073274 Strømledning
17 D3005000147 Trykafbryder
18 J0023160647 Sikkerhedsventil
19 F5013701083 Trykmåler
20 Q5911245001 Klemmebræt CC1103W
21 D5010003001 Klemmedæksel
22 J7383090034 Kondensatorskærm
23 F0000901043 Beskyttelse f/cylindertop
24 J3095040201
25 Q411A263001
26 J3161200423 Knærør
27 2556C273 Motor/pumpe-enhed
28 X0004360212 Polstringspude
29 X4207350167 Kondensatorfastgørelsesring
30 D6015006026 Kondensator
31
32 J5638170344 Endedæksel
33 D9079865178 Slange for kontraventil
34 J7432360249 Elektronisk kontraventil
ITEM
NO. PART NO. DESCRIPTION
35 J0189940407 Kontraventil
36 F4813700569 Hjul
101 J2981850040 Skiver Ø10
102 J0191860022 Fjerskive Ø10
103 J2984440032 Skiver
104 J0802430032 Skrue M10X20
105 J2021830040 Møtrik M10
106 J0782410032 Skrue M5X10
107 J0782380299 Skrue ST4.8×14F
108 J0783470485 Skrue ST3.9×14F
109 J0783480674 Skrue M4X17
110 J2020810033 Møtrik M8
111 J2851380428 Navaksel

20
Tegning - motor
Table of contents
Languages:
Popular Air Compressor manuals by other brands

Danfoss
Danfoss Turbocor Twin-Turbine TTS Series Applications and Installation Manual

CVS
CVS RPO 200 operating instructions

Meec tools
Meec tools 004055 operating instructions

Swann
Swann DRS SERIES Operation manual

Scheppach
Scheppach HC85V Translation of original instruction manual

Husky
Husky Oilless, Single Stage, Direct Drive, Electric Air... Operator's manual