CAB FM1 User manual

S
K
Y
L
I
N
E
Instructions Manual
for Flavor Machine
Models
FM1, FM2, FM3

INSTRUCTION MANUAL
Before operating the machine, read this manual carefully and scrupulously.
Failure to follow the directions contained therein, exempt the manufacturer from any
liability.
The machine has been designed and manufactured to be used in the preparation of
slushes/sorbets and for the refrigeration of drinks.
The machine must be used exclusively within environments that do not present danger of
explosions, and fire-fighting measures must be adhered to.
It is prohibited to use the machine for purposes other than those listed in this
manual.
The appliance is of the type requiring supervision and must be installed in places
where it is possible to be observed by trained personnel.
In the event of improper use, all warranty rights will be forfeited and the
manufacturer will accept no liability for injury or damage to persons and/or property.
Information about the Manufacturer is provided on the first and/or last page of the manual.
Before carrying out any operation on the machine, the operators and specialised
technicians shall carefully read the instructions contained in this manual. In case of doubts
regarding the correct interpretation of the instructions, contact the Manufacturer to obtain
the necessary clarifications.
The Manufacturer is not liable for any damages arising from non-compliance with this
manual.
The instruction manual is an integral part of the product and it must always accompany it,
even in the event of transfer to subsequent owners of the product
The machine must be installed in rooms with suitable fire extinguishers.
The instruction manual must be kept in the immediate vicinity of the Machine.
In case this manual is damaged or lost, it is necessary to immediately request another copy
from the Manufacturer or the authorised distributor of the country where the machine is
used.
This appliance is not intended for use by persons (including children) with reduced physical,
sensory or mental capabilities, or lack of experience and knowledge, unless they have had
supervision or instructions for use of the appliance by a person responsible for their safety.
Never let children play with the appliance.
Cleaning and maintenance to be carried out by the user shall not be carried out by children.
The appliance can only be used by a person with adequate technical training for
using the products and adequate knowledge of the health and safety regulations in
force.
1

Carefully read the instruction manual.
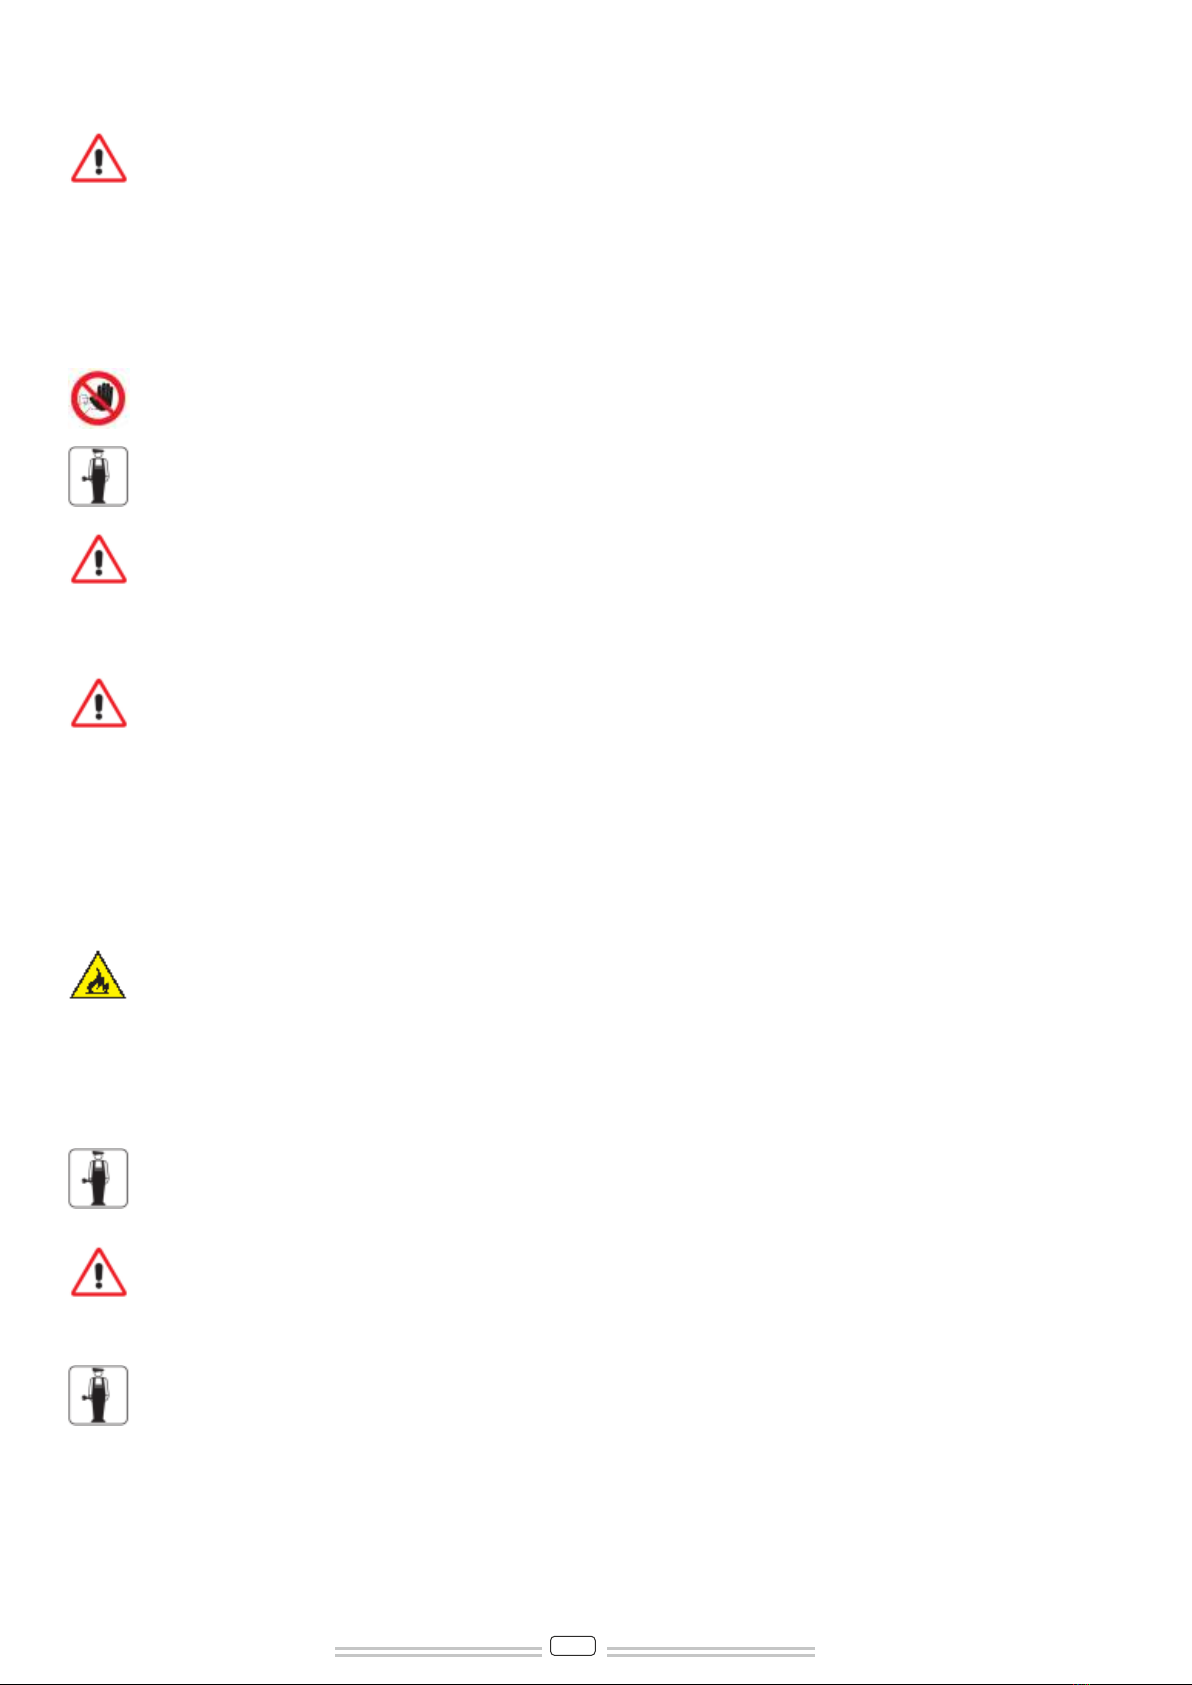
The mains connection must comply with the safety regulations in force in the country of use.
The socket must be in conformity with the type of plug installed on the same and its size shall comply with the
data of the serial number plate.
The machine must be connected to a grounding system in accordance norms in force and connected to a
system with differential magnetothermal switch.
The power cord must be protected from contact with liquids, should not be crushed, it must not be wound in a
coil when the machine is in operation, must not be tampered with.
If the power cord is damaged, it must be replaced by the Manufacturer or by the technical assistance
service or in any case a person with similar qualification, so as to prevent any risk.
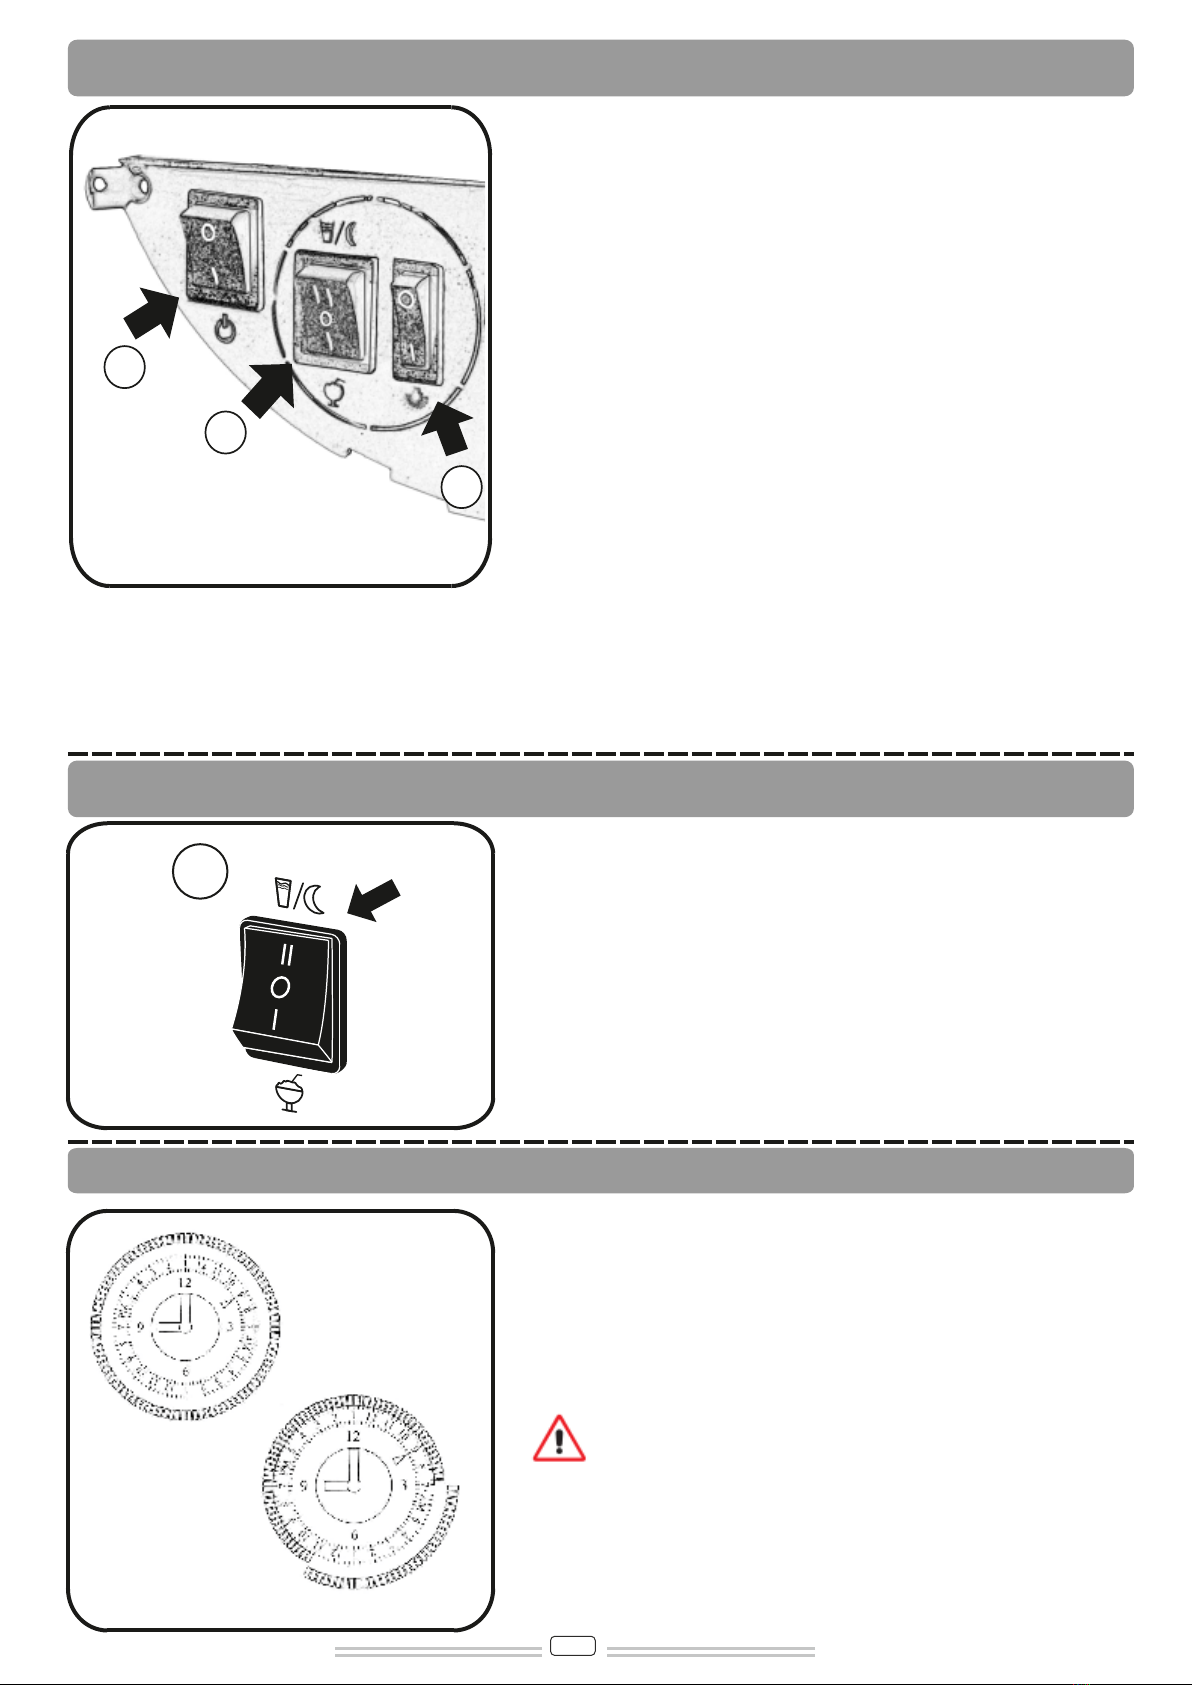
Do not leave the lights on when the device cannot be supervised.
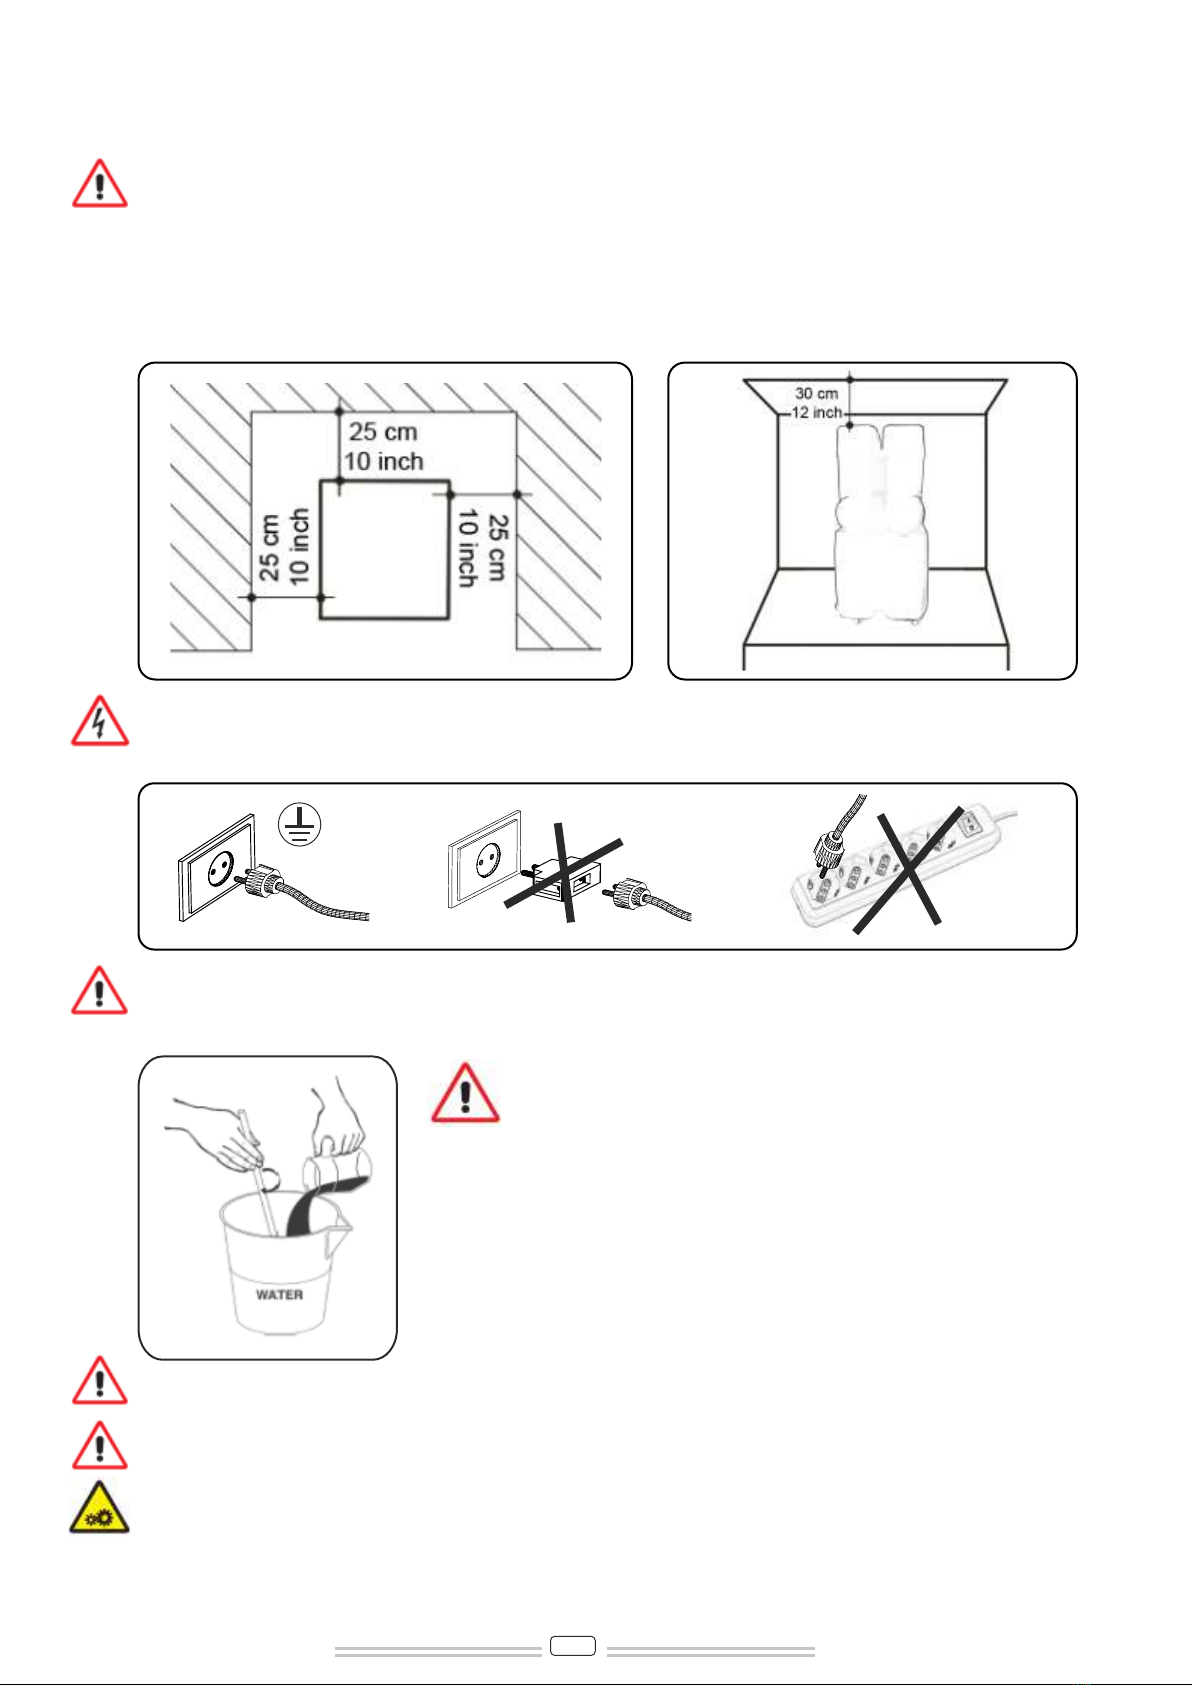
In any emergency situation, to stop the machine, firmly press the main switch to -0 -.
In case of freezing shut down the machine and contact the service centre or a qualified technician.
In case of fire, immediately clear the area to allow trained personnel equipped with suitable protective
equipment to intervene. Always use approved fire extinguishers, never use water or unknown substances
It is prohibited to:
install the machine in different ways than those described in this manual.
install the machine in areas where a jet of water can be used.
use the machine in the vicinity of inflammable and/or explosive substances.
use spare parts which are not recommended by the manufacturer. All repairs can be performed only by a
specialist and trained personnel.
make any technical changes to the machine.
wash the machine with a water jet.
utilise the machine in different ways than those described in this manual.
use the machine in altered psychophysical conditions.
Install the machine in the vicinity of machines that can be a source of heat to other appliances.
use of the machine in an environment of fire risk;
use of the machine for dispensing substances not suited to the characteristics of the same.
use of the machine in an environment with a low or insufficient volume of air ventilation.
obstruct the grilles positioned to the side of the machine, either with fixed elements or with mobile elements
(such as glasses and other accessories).
installation of the machinery in external environments or outdoors.
The machine must be periodically checked by a qualified technician, at least once a year.
This periodic inspection is necessary to maintain a high level of safety of all the installed components and of
the machine itself.
In case of a worn component, this must be replaced with a new original part. Do not use the machine if even a
single component is worn or defective.
INSTALLATION
2

Place the machine on a level surface, sufficient to bear its weight. Leave a minimum space
of 25 cm (10 inches) around the perimeter of the machine, to prevent overheating.
The optimal environmental temperature for the operation of the machine varies from 20° to
32°C (N climatic class).
In the upper part of the machine, a space of 30 cm (12 inches) must be allowed.
Before putting the machine into operation for the first time, is absolutely necessary to carry out a thorough
cleaning of the components that make up the same as well as a sanitisation of the parts in contact with the
crushed ice.
Dilute and mix the concentrate with water in a suitable
container. There must be at least 18% sugar.
A lower concentration may damage the augers and/or gear
motors.
After pouring the product into the bowl, close the lid on top of the bowl.
Never switch on the machine if the lid is missing. Before removing the lid, switch off the machine and
unplug it.
There are some moving parts inside the bowl, which may cause injuries; turn off and unplug the machine
before carrying out any operation inside the bowl.
Pay attention to the voltage. Make sure that is the machine is grounded.
Do not use multiple sockets.
Do not use extension cords.
INSTALLATION
3
Never use the machine with water only
inside the bowl.

HANDLING AND STORAGE
All the operations described in chapter may be carried out exclusively by technicians who
are also specialized in the lifting and handling of packed or unpacked machines.
They must organize all the operational sequences and use suitable equipment, according
to the characteristics and weight of the object to be handled and in strict compliance with the
applicable regulations currently in force.
STORAGE
CONVEYANCE AND HANDLING
Make sure that no one is stationed within range of lifting and handling operations.
In difficult conditions, specialized personnel should be appointed to oversee the
movements of the machine.
Manual handling of the machine requires at least two people.
The machine must be moved into an upright position, only after every
bowl has been emptied of product.
Lift the box and carefully convey it, avoiding routes with obstacles. Pay attention
to the overall dimensions and any parts sticking out.
Warning: do not make any additional cuts on the packing container.
The WARRANTY does not cover damage caused to the machine during its
conveyance and handling.
The Purchaser will bear the cost of repairing or replacing damaged parts
Before the machine is placed in storage and whenever the machine is started up
again after a period of storage, it must be thoroughly cleaned and sanitized.
Warning: do not store more than two machines stacked on top of one
another.
If the machine is to remain unused for a long period of time, due precautions
must be taken with respect to the place and duration of storage:
• store the machine in a closed place;
• protect the machine from shocks and stresses;
• protect the machine from humidity and large temperature fl uctuations;
• prevent the machine from coming into contact with corrosive substances.
4

GENERAL USE OF THE MACHINE
Never turn machine on without product in bowl or
with only water in bowl. Pour product into bowl to
“max” line (never add a hot product).
Do not let product go below “min” line (keep at
least 1" above cylinder at all times).
Refill with refrigerated product when level is
halfway bet ween min and max levels. This way
there will always be frozen product available for
customers).
Adjustment for slush consistency.
The machine has been adjusted for fruit
granitas (normal).
Products containing milk, or other products which
may take longer to freeze, adjust “+” as shown in
picture.
5

CONTROL PANEL
A) Main power switch
B) Main freeze/refrigeration switch
C) Light switch
D) Individual bowl freezerefrigeration
switch (Mod./2 and Mod./3)
E) Freeze/refrigeration switch (Mod./2
and Mod./3)
F) Gear motor switch.
MODEL 1
MODEL 2
MODEL 3
A
B
B
B
C
C
C
F
F
F
F
F
E
D
D
EE
A
A
BOWL 1
BOWL 1
6

INSTRUCTIONS FOR TIMER SWITCH - ( REFRIGERATION POSITION )
TO OBTAIN SLUSH
PICTURE 2
PICTURE 1
B
C
B
A
MODEL 1
REFRIGERATION POSITION
Besure t he bowl closer switches i s at “ max” level.
If leaving product in machine overnight, turn
main freeze switch (B) to refrigeration position,
as in picture. This keeps product refrigerated in a
liquid state and extends llife of t he compressor.
FUNCTION OF TIMER
The TIMER switch assembled on the control panel starts the
refrigeration function (cold drink dispenser).
HOW TO USE TIMER
To use the timer switch follow these instructions:
1. Switch on the machine;
2. See picture 1 for time reference;
3. Set the triangle of the timer on the right local time.
Please note AM - PM signs.
N.B. Without the correct time setting, the timer will not work properly.
TIMER PROGRAMMING (Day & Refrigeration Function)
See picture n. 2
For example, to have the machine work for slush (Day function) from
7:00 AM to 11:00 PM, push inwards all segments included in those
hours, as shown in Picture 2.
During the remaining hours the machine will work as a cold drink
dispenser (Refrigeration function).
7
Plug in machine and turn on main power s witch
( A), as i n picture.
Turn on main freeze/refrigeration switch (B), as in
picture.
To light up the lid, turn on light switch (C), as in
picture.
To t urn t he machine o ff, perform steps in reverse
o rder.

TO OBTAIN SLUSH
Plug in machine and turn on main power switch
(A). Turn auger switches on for each bowl (F).
Turn lower switches (B), (D) and (E) to
freeze position.
To light up the lid, turn on light switch (C).
To turn the machine off, perform steps in
reverse order.
If you want to work with only one or two tanks,
please turn off the bowl 2 or 3, keeping always
the tank 1 turned on. Please turn off both
switches (F2-E2 or F3-E3) if you want to turn off
the tank 2 or 3.
MODEL 2
MODEL 3
BC
D
E
F
F
A
BCD
F
F
F
F
F
E
E
E
E
E
F
A
2
3
11
3
2
Attention
VASCA 1
BOWL 1
8

SLUSH AND COLD DRINK FUNCTION
Attention! This machine is designed to make
liquid cold drink and granita simultaneously in
one or all bowls. However, the bowl closer to
switches is the one capable of making the cold
drink. In order to achieve this, turn lower
freeze switch (D) to refrigeration position.
DAILY CLEANING OPERATION
To empty bowl:turn power off.
Drain product. Fill bowl with tepid water. Let
stand 15 minutes.
D
MODEL 2
MODEL 3
D
9

DAILY CLEANING OPERATION
To remove bowl for thoroughly cleaning:
Attention! Before raising bowl make sure
that it is completely empty. Drain product.
Turn power off. Raise bowl at front until legs
“pop” out, as shown in picture.
Slowly remove bowl, as shown in picture.
Wash parts with tepid water. Never use
detergent.
Do not use abrasive cleaners.
Remove spiral blade, as shown in picture.
Remove large gasket at back of machine, as
shown in picture.
10

DAILY CLEANING OPERATION
Replacing parts:
1) Replace gasket. Be sure seal is tight with no
gaps against back of machine. Seal is best
when starting at bottom + pressing with thumbs
on each side towards the top;
2) Replace auger.
3) Replace bowl. Slide on and press against
gasket.
Remove spout and separate parts in following order:
1) Pin
2) Handle
3) Tap pin
4) Tap spring
Wash spout parts in warm water and disinfectant.
Then lubricate Tap.
Using thumbs, press on both legs until they
snap in place. Replace lid.
ATTENTION: WHEN USING A MILK BASED
PRODUCT, THOROUGHLY CLEAN EVERY
DAY. PERIODICALLY CLEAN UNDER O-
RING ON TAP.
3
41
2
11

Daily, or after each thorough cleaning lubricate
where indicated
Push suction cap gasket into spiral head
deeply. Be sure that cap gasket is properly
positioned, as shown in picture.
Every month check following parts:
5.08 Tap o-ring
5.09 Lower gasket for tap
2.05 Suction cap gasket.
DAILY CLEANING OPERATION
MONTLY GENERAL MAINTENANCE
Incorrect Correct
2.05
5.08
5.09
12

Pic. 24
Pic. 26 Pic. 27
Pic. 25
1
T u r n power off.
Fill the tank with tepid water and
empty it just using the tap.
See picture 24 & 25.
For an easy removal of the bowl follow instructions shown in Pictures 26 & 27.
Place fingers under
the front lower part
of the bowl, near the
tap, and push
upwards until legs
pop out.
Place fingers behind
the bowl legs and
pull the bowl onwards
slowly until it has
been completely
ATTENTION: Place all the components in a safe place in order to be sure
they are not lost.
Clean the components with dish-washing soap and tepid water. Never use
abrasive cleaners.
NOTE: Do not use too hot water to clean the plastic components .
To remove spiral blade put fingers on
the plate part of the spiral and pull it
onwards gently as shown in Pict. 28
& 29.
Pic. 28 Pic. 29
Pic. 30 Pic. 31
Once the spiral blade
is removed complete-
ly remove the suction
cap gasket from the
front spiral as shown
in Pict. 30
Remove bowl gasket
from the back part of
the evaporator tube
(see Pict. 31).
CLEANING OPERATION
BASIC SANITIZING OPERATIONS
13
removed.

1
1
Clean the gaskets carefully.
Do not use aggressives detergents or abrhasive products.
Softly wet the surfaces by the use of a brush. It is recommended to proceed
with the cleaning of all gaskets with abundant water.
NOTE: Do not use too hot water to clean the plastic components .
CLEANING OPERATION
Pic. 33
Pic. 32
Pic. 34 Pic. 35
1 - Pull out the pin
for handle fixing
(see Pict. 32).
3 - Unthread the
main tap pin by
pulling it downwards
(see Pict.34)
2 - Pull the handle
from its place
(see Pict. 33).
4 - Repeat the
same operation for
the tap spring
(see Pict. 35)
How to clean each part
How to remove and clean the tap components
Clean the suction
cap gasket as
shown
in Picture 36.
clean the lower
gasket for tap as
shown
in Picture 38
Clean the tap o-ring
on both sides as
shown in Picture
37.
clean the bowl
gasket along all the
edges as shown in
Picture 39
Pic. 36 Pic. 37
Pic. 38 Pic. 39
14

REASSEMBLY OF THE COMPONENTS
Pic. 43
Pic. 42
CORRECT INCORRECT
Reassembly of the parts removed during the cleaning.
Before reassebling of parts, clean the evaporapor tube and drip trays & grids without using abrasive
cleaners. Before reassemblyng the bowl gasket rinse it with water in order to facilitate the assembly of
the bowl.
Insert the spiral blade by pushing it gently and deeply as indicated in Pict. 44a & 44b. After this it is
important to lubricate the head of the spiral (see Pict. 43).
Put the bowl gasket in its position on the back part of the evaporator tube.
Once the bowl gasket is in its right position press it with your thumbs first in the lower part and then
progressively towards its upper part (marking a circle with your fingers); until it is correctly fixed in its site
(see Pict. 40 & 41).
Insert the suction cap gasket into the spiral
blade by pushing it deeply (see Pict. 42).
Lubricate with water.
Pic. 40 Pic. 41
Pic. 44a
Pic. 44b
15

REASSEMBLY OF THE TAP
Pic. 49
Pic. 47
Pic. 46
When inserting the main tap pin please be
careful that the little square hole (see Pic.
47) is placed right in front of you. Before
inserting the tap pin lubricate with
abundant water.
Keep the tap pin pressed upwards until
you are able to see the square hole where
you will insert the handle (see Pict. 48).
Insert the pin for handle fixing as indicated
in Pict. 49.
Before reassembling of the tap components lubricate by water the tap siege as indicated
in Pict. 45 and lubricate with abundant water the seals as indicated in Pict.47.
Pic. 45
HOLE
Insert the tap spring and tap pin as indicated in Pic. 45 and 46.
Pic. 48
LUBRICATE
I N S I D E
16

CONDENSER CLEANING
Remove side panels. Clean condenser with
a brush every week. Attention! A dirty
condenser can cause compressor damage.
Maintenance of the LED lamp cover may only be performed by a specialized technician, who
must organize all the operating sequences and the use of appropriate means for operating in
strict compliance with current regulations. The operator must not disassemble any part of the
cover. Only lamps provided by the Manufacturer may be used, in order to avoid any possible
damage to the equipment.
WEEKLY GENERAL MAINTENANCE
REPLACEMENT OF A LED LAMP
17

MOD. 1
18

MOD. 2
19
This manual suits for next models
2
Table of contents
Popular Commercial Food Equipment manuals by other brands

Hatco
Hatco GRBW Series Installation and operating manual

Bake Max
Bake Max BMHBD01 Operation manual

Heiniger
Heiniger XplorerPro Translation of the original instructions

Showmaster
Showmaster Top-Cut Instructions for use

Lotus
Lotus LIBR.ISTR.CW110G Installation and operating instructions

Gastro-Cool
Gastro-Cool GCKW50 Instructions for use