Cable Electronics MP800BL User manual

MP800 UHD Media Player Manual Page 2of 45 Rev. 100- 10/17/16
Table of Contents
IMPORTANT SAFETY INSTRUCTIONS ......................................................................... 3
Chapter 1 –INTRODUCTION ............................................................................................. 4
Introduction to the MP800 HD Media Player.........................................................................4
Package Contents....................................................................................................................4
Chapter 2 –INSTALLATION............................................................................................... 5
MP800 Detailed Player View .................................................................................................5
Remote Control.......................................................................................................................6
MP800 Connections................................................................................................................7
Mounting.................................................................................................................................8
Chapter 3 –CONTROL SOFTWARE................................................................................. 9
Hardware and Software Requirements ...................................................................................9
Hardware........................................................................................................................... 9
Software............................................................................................................................ 9
CE Labs QS Pro Designer 7X.................................................................................................9
QS Pro Designer 7X Workflow...................................................................................... 11
GPIO Interface Programming......................................................................................... 13
Layouts and Templates ................................................................................................... 14
Firewall Issues..............................................................................................................16
Disabling Checksum Offloading...................................................................................17
CE labs CCM2 Content Manager for Windows®................................................................18
CCM2 for Windows......................................................................................................20
Chapter 4 –MP800 OPERATION...................................................................................... 22
Initial Startup Procedure.......................................................................................................22
Theory of Operation..............................................................................................................22
OSD / On Screen Display menu ...........................................................................................23
Remote Control.....................................................................................................................25
Using the Tuner Input on the MP800T.................................................................................26
Chapter 5 –Using Extended Applications (XApp)............................................................ 27
X-App Manager Technical Specification ....................................................................... 27
CCM2 Enterprise software and Using the MP800 X-App:..................................................31
Chapter 6 –MP800 SPECIFICATIONS............................................................................ 32
Troubleshooting Tips:...........................................................................................................35
WARRANTY .......................................................................................................................36
APPENDIX............................................................................................................................ 38
Software Installation.............................................................................................................38
Software Installation for QS Pro 7X............................................................................... 38
QS Pro 7X Installation Procedure.................................................................................38
CCM2 for Windows......................................................................................................40
General Purpose Input/Output (GPIO) Options............................................................41
MP800 4K Media Player Media Encoding Preferences ..................................42
Firmware Update via SD Card........................................................................................ 43
Browser Layer Design Guidelines.................................................................................. 44
Manual SD Card Formatting........................................................................................... 45

MP800 UHD Media Player Manual Page 3of 45 Rev. 100- 10/17/16
IMPORTANT SAFETY INSTRUCTIONS
1. Read these instructions.
2. Keep these instructions.
3. Heed all warnings.
4. Follow all instructions.
5. Do not use this apparatus near water.
6. Clean only with dry cloth.
7. Do not block any ventilation openings. Install in accordance with the manufacturer’s instructions.
8. Do not install near any heat sources such as radiators, heat registers, stoves, or other apparatus (including
amplifiers) that product heat.
9. Do not defeat the purpose of the polarized or grounding-type plug. A polarized plug has two blades with
one wider that the other. A grounding type plug has two blades and a third grounding prong. The wide
blade or the third prong is provided for your safety. If the provided plug does not fit into your outlet, consult
an electrician for replacement of the obsolete outlet.
10. Protect the power cord from being walked on or pinched particularly at plugs, convenience receptacles, and
the point where the exit from the apparatus.
11. Only use the attachments/accessories specified by the manufacturer.
12. Use only with the cart, stand, tripod, bracket, or table specified by the
manufacturer, or sold with the apparatus. When a cart is used, use caution
when moving the cart/apparatus combination to avoid injury from tip-over.
13. Unplug this apparatus during lightning storms or when unused for long periods
of time.
14. Refer all servicing to qualified service personnel. Servicing is required when
the apparatus has been damaged in any way such as power supply cord or plug
is damaged, liquid has been spilled or objects have fallen into the apparatus,
the apparatus has been exposed to rain or moisture, does not operate normally,
or has been dropped.
WARNING: To Reduce the Risk of Fire or Electric Shock, Do Not Expose This
Apparatus to Rain or Moisture
CAUTION: To reduce the risk of electric shock, do not remove cover or back. No
user serviceable parts inside. Refer servicing to qualified personnel.

MP800 UHD Media Player Manual Page 4of 45 Rev. 100- 10/17/16
NOTICE:
We try to include the latest up to date information, but this document will require periodic updates. We
recommend you check at our web site, www.celabs.net, for the latest information available.
Getting Started
Chapter 1 –INTRODUCTION
Introduction to the MP800 HD Media Player
The MP800 is a high quality advertising solution that allows users to play content from
multiple sources such as a solid state memory device, hard drive, or IP streams from
Ethernet or ATSC/QAM tuner (MP800T model). It has an extremely effective
performance versus cost ratio and provides a great return on investment.
The MP800 is a commercial grade, application specific graphics processor, specifically
designed for driving digital signage. Do not let the small size fool you; the powerful
internal video processor rivals the performance of a PC costing many times more. The
graphics capability is on par with a UHD-BluRay player but with much greater reliability
because there are no moving parts.
Package Contents
The packing box should contain the following items:
MP800 Media Player
12 Volt DC Universal Input Power Supply
Remote Control
Two AAA batteries
HDMI cable
(optional) L/R Stereo Audio / Composite Video Cable
Quick Start Guide

MP800 UHD Media Player Manual Page 5of 45 Rev. 100- 10/17/16
Chapter 2 –INSTALLATION
MP800 Detailed Player View
The MP800 may be ordered with or without the GPIO push button board. See the GPIO section in this document
for a description of the connector pin out.
HDMI VIDEO OUPUT
POWER LED
IR IN
IR Out
IR
Receiver
2 USB
ETHERNET
10/100/1000
VGA /
COMPONENT
VIDEO OUPUT
COMPOSITE VIDEO
R/L AUDIO OUT
DIGITAL AUDIO OUT
RS-232
CONTROL
12V DC INPUT
850mA
HDMI INPUT
720/1080/4K
8 Port
Push Button
Interface
RF INPUT
(MP800T only)
SD Memory
Socket with
Security Door
LCD Status
Panel
IR Remote
Input
Reset switch
(Recessed)
SD Socket

MP800 UHD Media Player Manual Page 6of 45 Rev. 100- 10/17/16
Remote Control
The unit includes a remote control for accessing the On Screen Display. Press the
MENU button to bring up the OSD menu. Use the Arrow keys to navigate and press
ENTER to select an item. If you wish to exit the On Screen Display, press MENU
repeatedly until the OSD is removed.
If you require a different Video output resolution, the TV MODE button when
pressed will toggle through several options (720p 60, 720p 50, 1080i 59.94, 1080i 60,
1080p 59.94, 1080p 60, 4Kp 25, 4Kp 30, 4Kp 50, and 4Kp 60).
In the blue button section you may use: PLAY, STOP, FWD, REV, PREV, and
NEXT. Pressing PLAY will alternate between PLAY and PAUSE.
The numerical buttons may be used to enter a RF channel on the MP800T (tuner) unit.
The format is: “041”to tune in channel 4-1. To tune upper channels, use “331”to
select channel 33-1. These channel selections are temporary and will not be kept on a
power cycle. In order to keep a RF channel, it must be programmed into a playlist.
Note: Before the tuner may be used, it may be necessary to perform a RF channel
scan to populate the local channel table. An alternative is to use the fixed channel
table. This can be set on the unit OSD under Menu, Player Setup, Configuration,
Tuner Settings, and then Tuner Channel Mode.

MP800 UHD Media Player Manual Page 7of 45 Rev. 100- 10/17/16
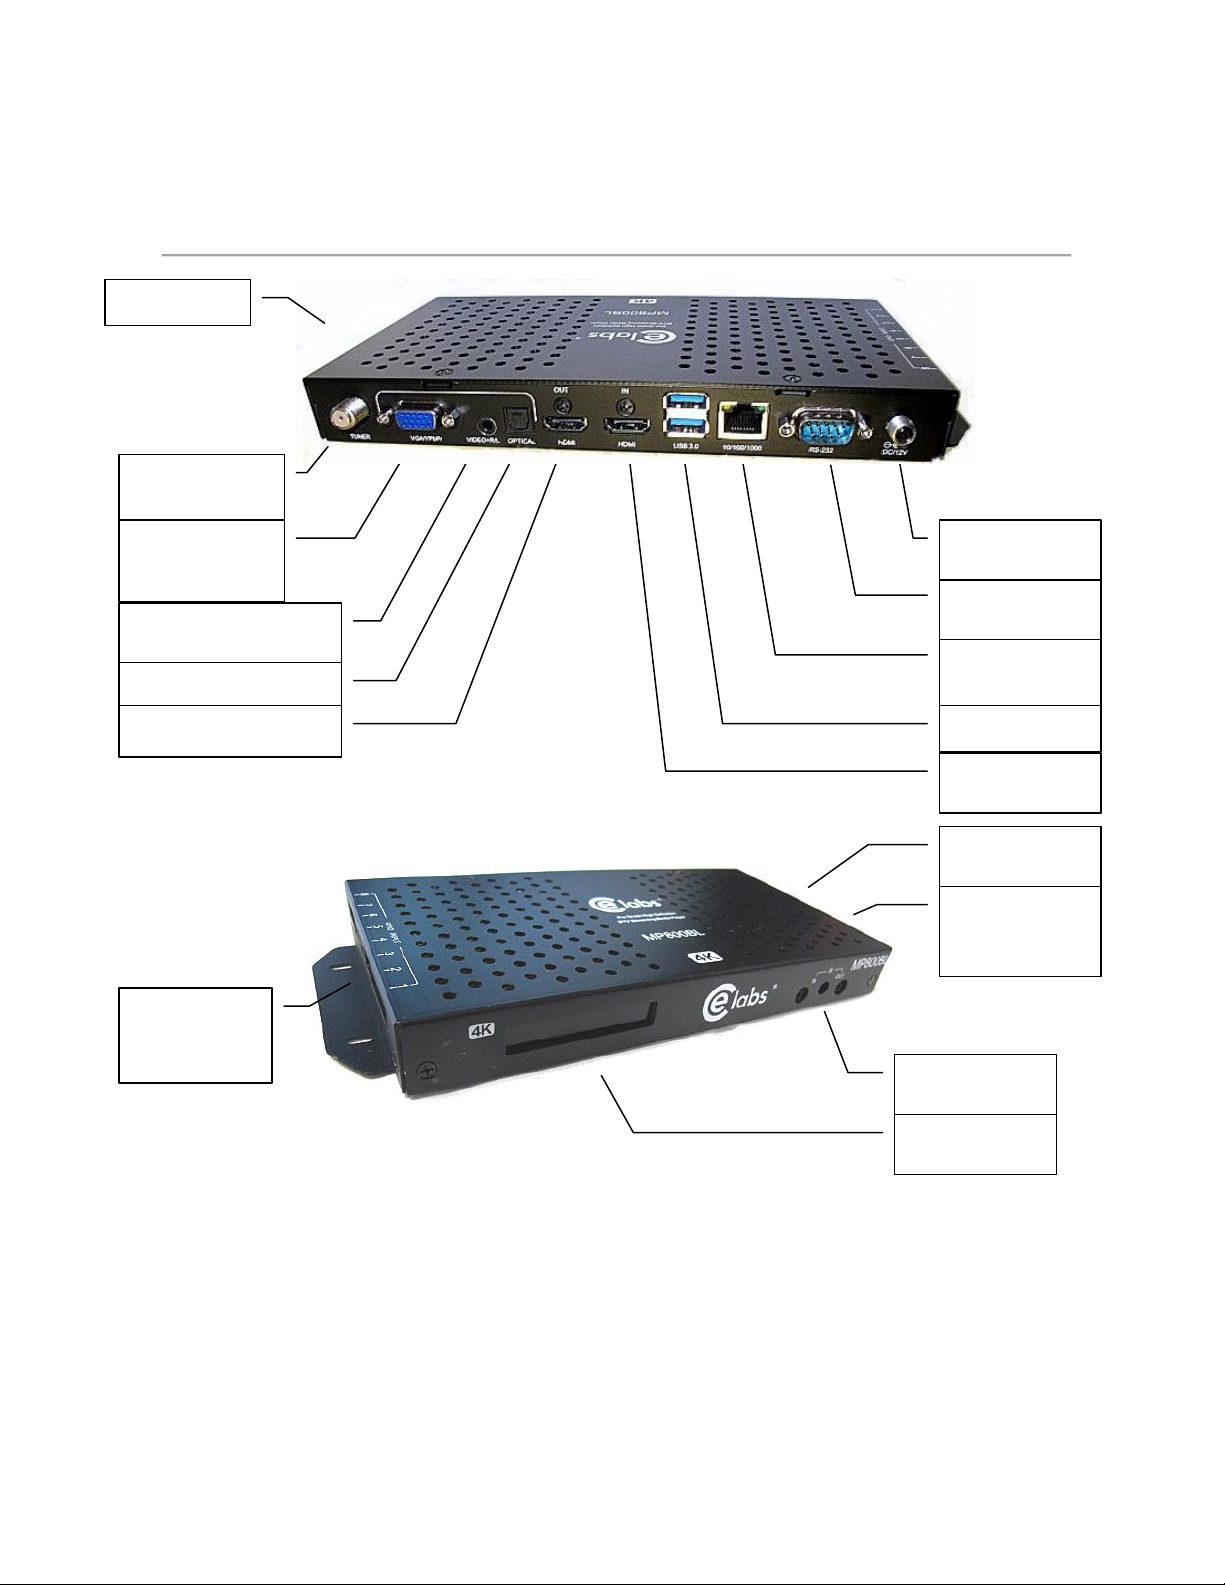
MP800 Connections
The MP800 is capable of driving a wide variety of displays at up to 3840 x 2160P 60Hz resolution at bit rates up to 80 Mbps
(HEVC file type). Depending upon your application, connect the following cables to operate the unit.
Display cable –Depending on the application, plug in the cable from the media player to the display, switch, or
first distribution amplifier. The HDMI and Component outputs are both active simultaneously if the resolution is set
to one that is compatible with both interfaces.
oThe component video output (for connection to CElabs AV901HD distribution amplifier) uses a DB-15 to
RCA cable to break out the video signal. The L/R audio ports can be used in conjunction with the
component or the composite video ports.
oIF the TV wall uses CElabs HDMI distribution amplifiers, connect the HDMI cable.
oIf your application uses an older monitor or if you need to drive a modulator, the composite video port is
always on regardless of the output resolution.
oThe DB-15 VGA/YPrPb port supports the output of component and VGA video. Only one or the other is
available at one time. In order to set the output resolution to a VGA mode, use QS Pro Designer 7X and
select TOOLS, Set Video Output, and Custom.
Note: Video output resolution has been pre-set at the factory for 1080p (in most applications) on the HDMI and Component
Video Outputs (unless another resolution is requested). Standard 480i video is available on the composite video port at all times.
The output and resolution can be specified at time of order and pre-set to your requirements.
Audio cable –The analog audio output is via two RCA jacks on the rear panel. Connect a patch cable from the rear
jacks to the display or audio system as desired.
Note: If HDMI cables being used, separate audio cables are not required as long as the monitor has internal
speakers.
Toslink –Digital Multi-channel audio is available on the optical connector. You may select between PCM or AC3
compressed on the OSD by selecting Menu, Player Setup, and Audio Settings. Save your selection before exiting.
Tuner Input (ATSC/QAM Tuner Option on the MP800T) - Connect the F-connector cable from the off-air
antenna or High Definition modulator to the Tuner Input. Tighten the F-connector securely. The optimum RF level
will be between 0 and +20dBmV. Ensure the RF level at the input is greater than -20dBmV (unit mutes @ -
23dBmV). The RF channel may be changed by remote PC application or by IR remote control. You may also type
in the channel number directly on the remote. Typing a 0 first is necessary on single digit channels. Example: To
tune to channel 4-1, type 0 then 4 then 1.
Power –The MP800 uses a 12VDC, 2A power supply. Total power consumption is approximately 8 Watts which
leaves a large reserve in the power supply. Insert the power supply 12 VDC plug into the MP800 power jack. Turn
the knurled ring clockwise to tighten the security ring if this option is purchased. Insert the AC Plug of the power
supply into an electrical outlet. After a few seconds, the front panel green LCD will light up (The panel will display
the unit’s IP address for a brief period during boot up).
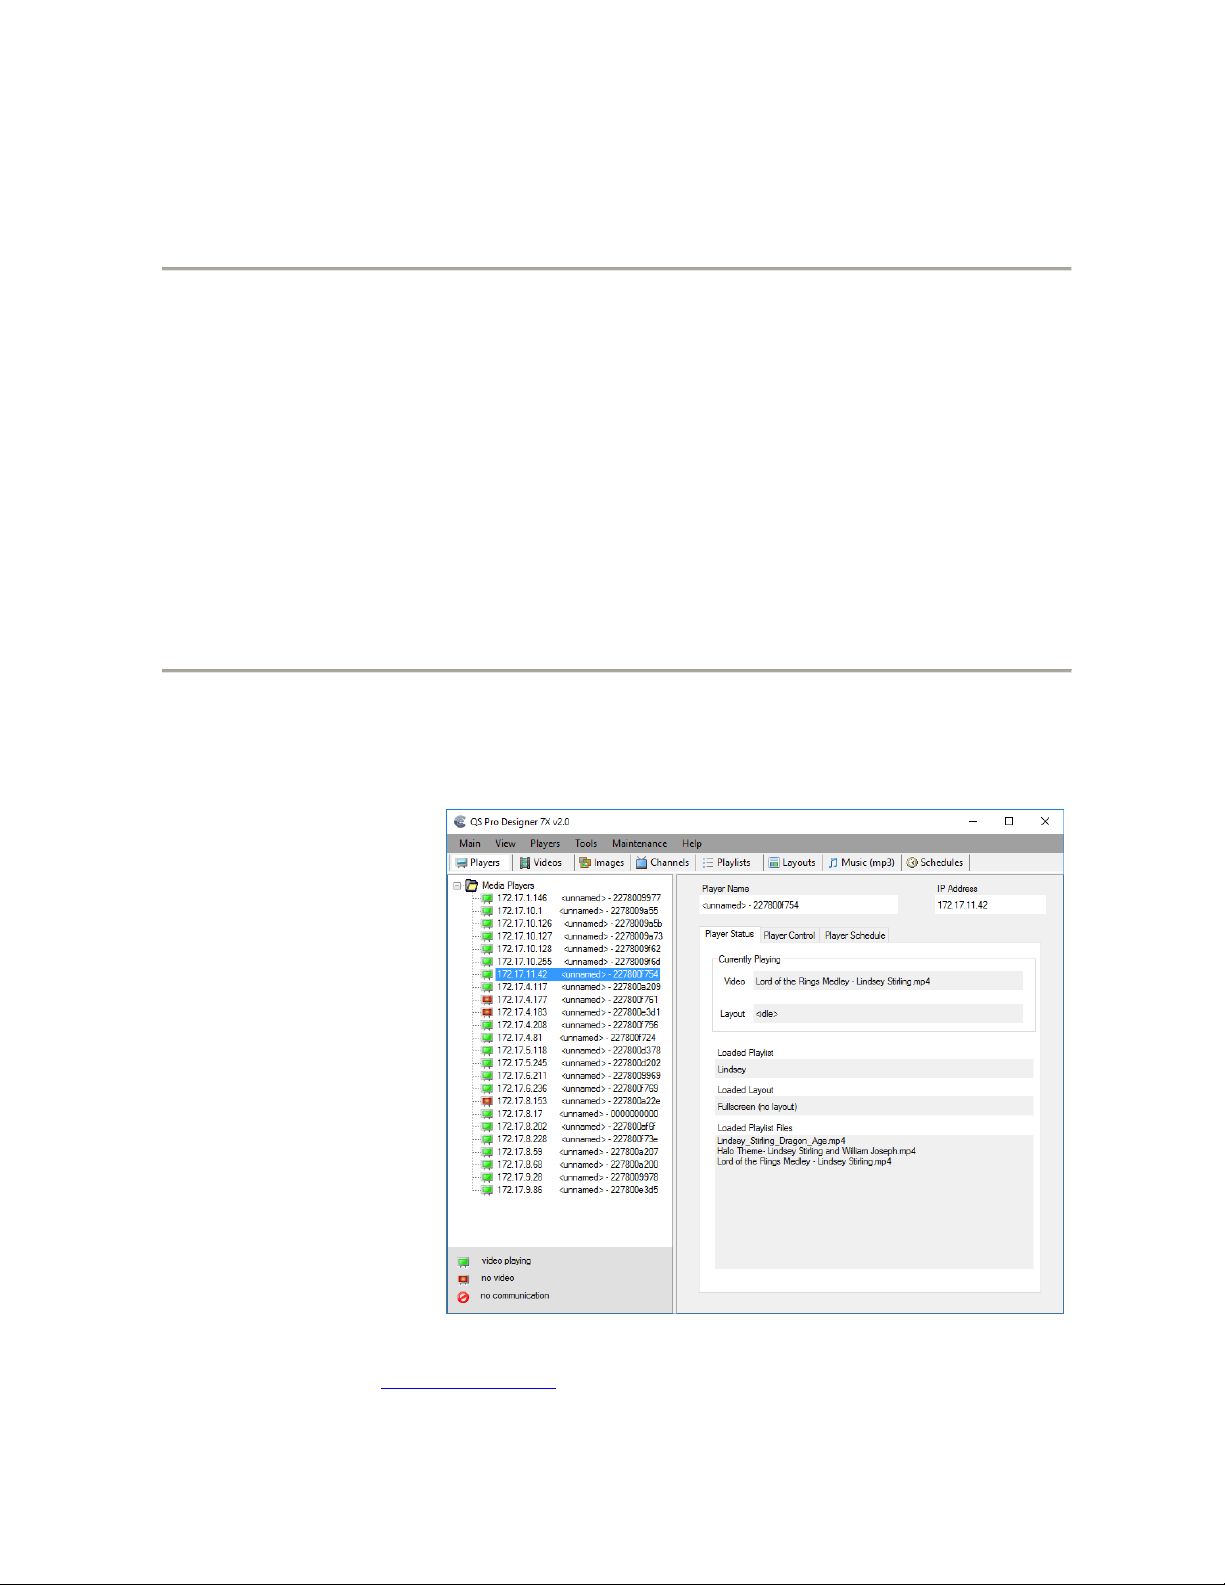
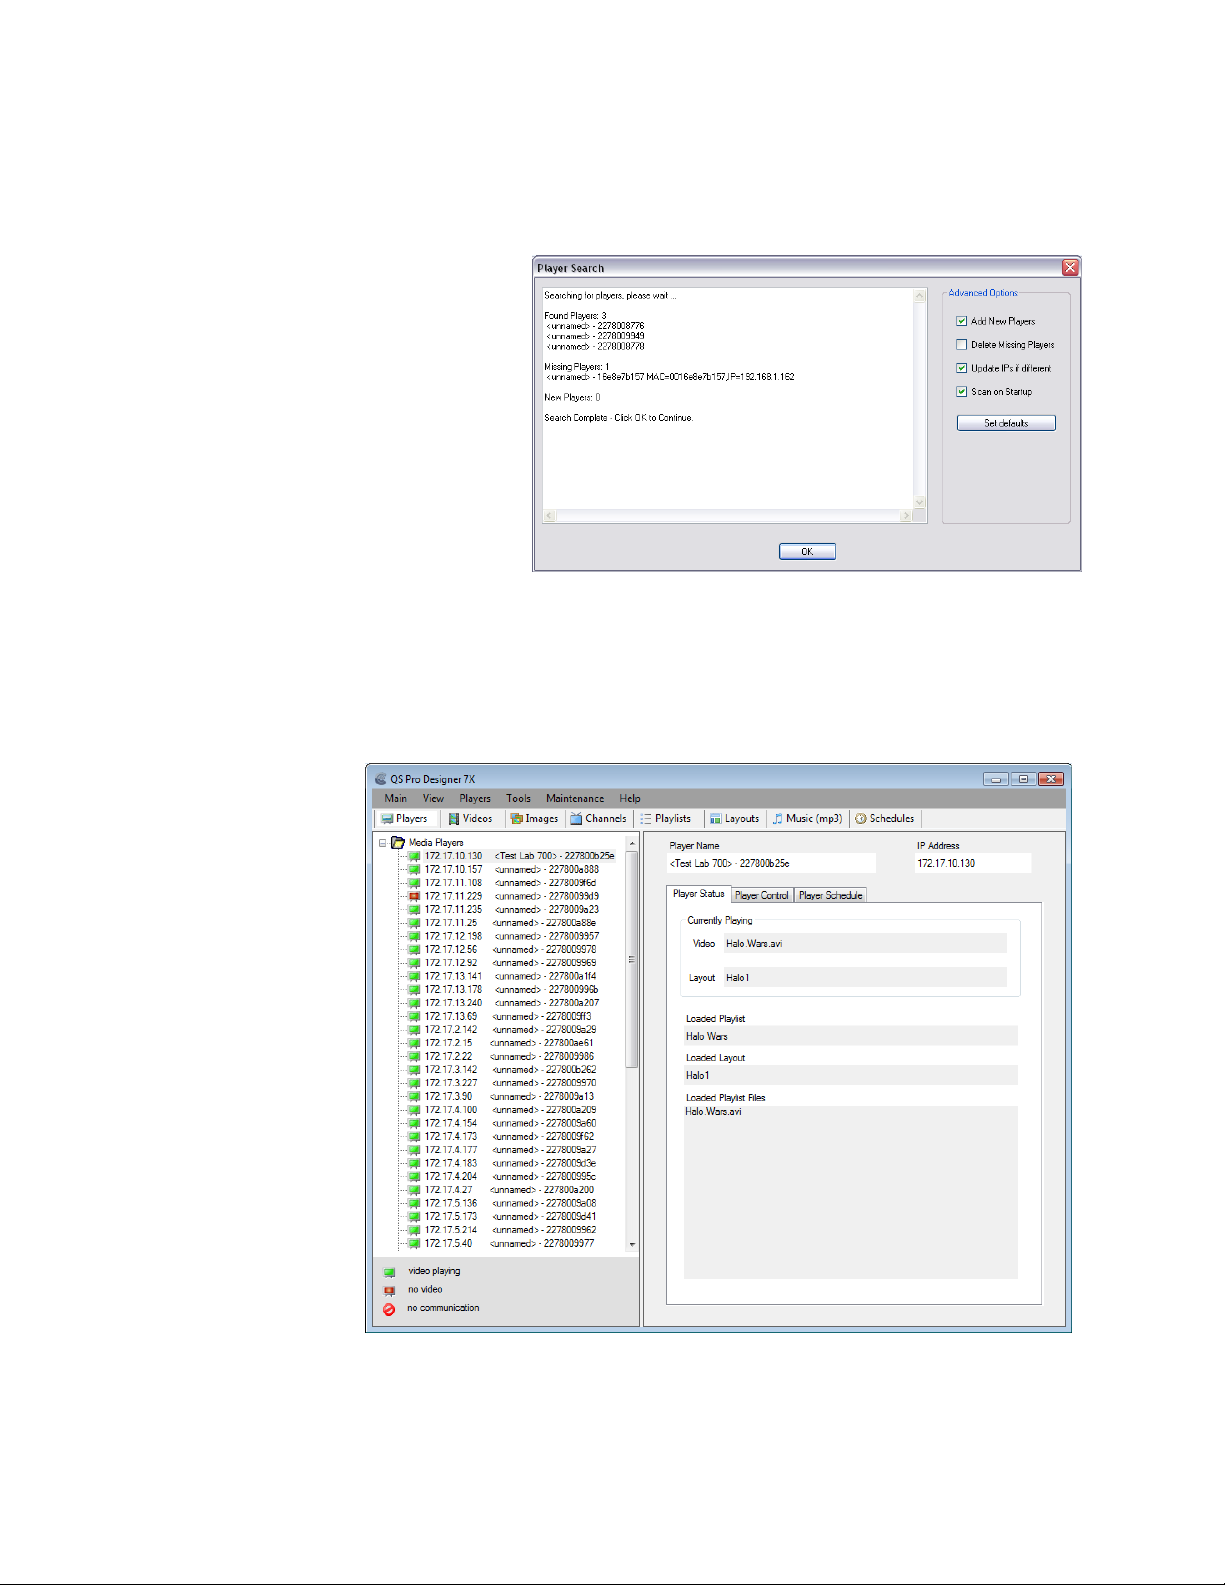
Ethernet –If this is a networked installation, connect the Ethernet Port to a Switch or Router via an Ethernet cable.
The unit will automatically obtain an IP address as long as unit’s DHCP is selected as ON and there is a DHCP
server somewhere on the local subnet.
oPlease wait for approximately 1 1/2 minutes until the unit completes the boot-up process. The media
player can be configured to have a default start-up item such as a video file or ATSC RF channel (ATSC
option). If the default startup item has been configured, Video should start playing automatically when
the unit has completed its boot-up process.
IR Remote - The IR remote is used to access the unit’s On Screen Display menu for configuring the unit and
perform basic unit controls such as setting volume and selecting RF channels. If you need to determine the IP
address for the unit, go to the network settings window. In certain applications, with channel setting pre-set at the
factory, the infrared remote is not needed. There are applications for the MP800 that use of the remote could be
helpful. Please store the remote in a safe location for possible later use.
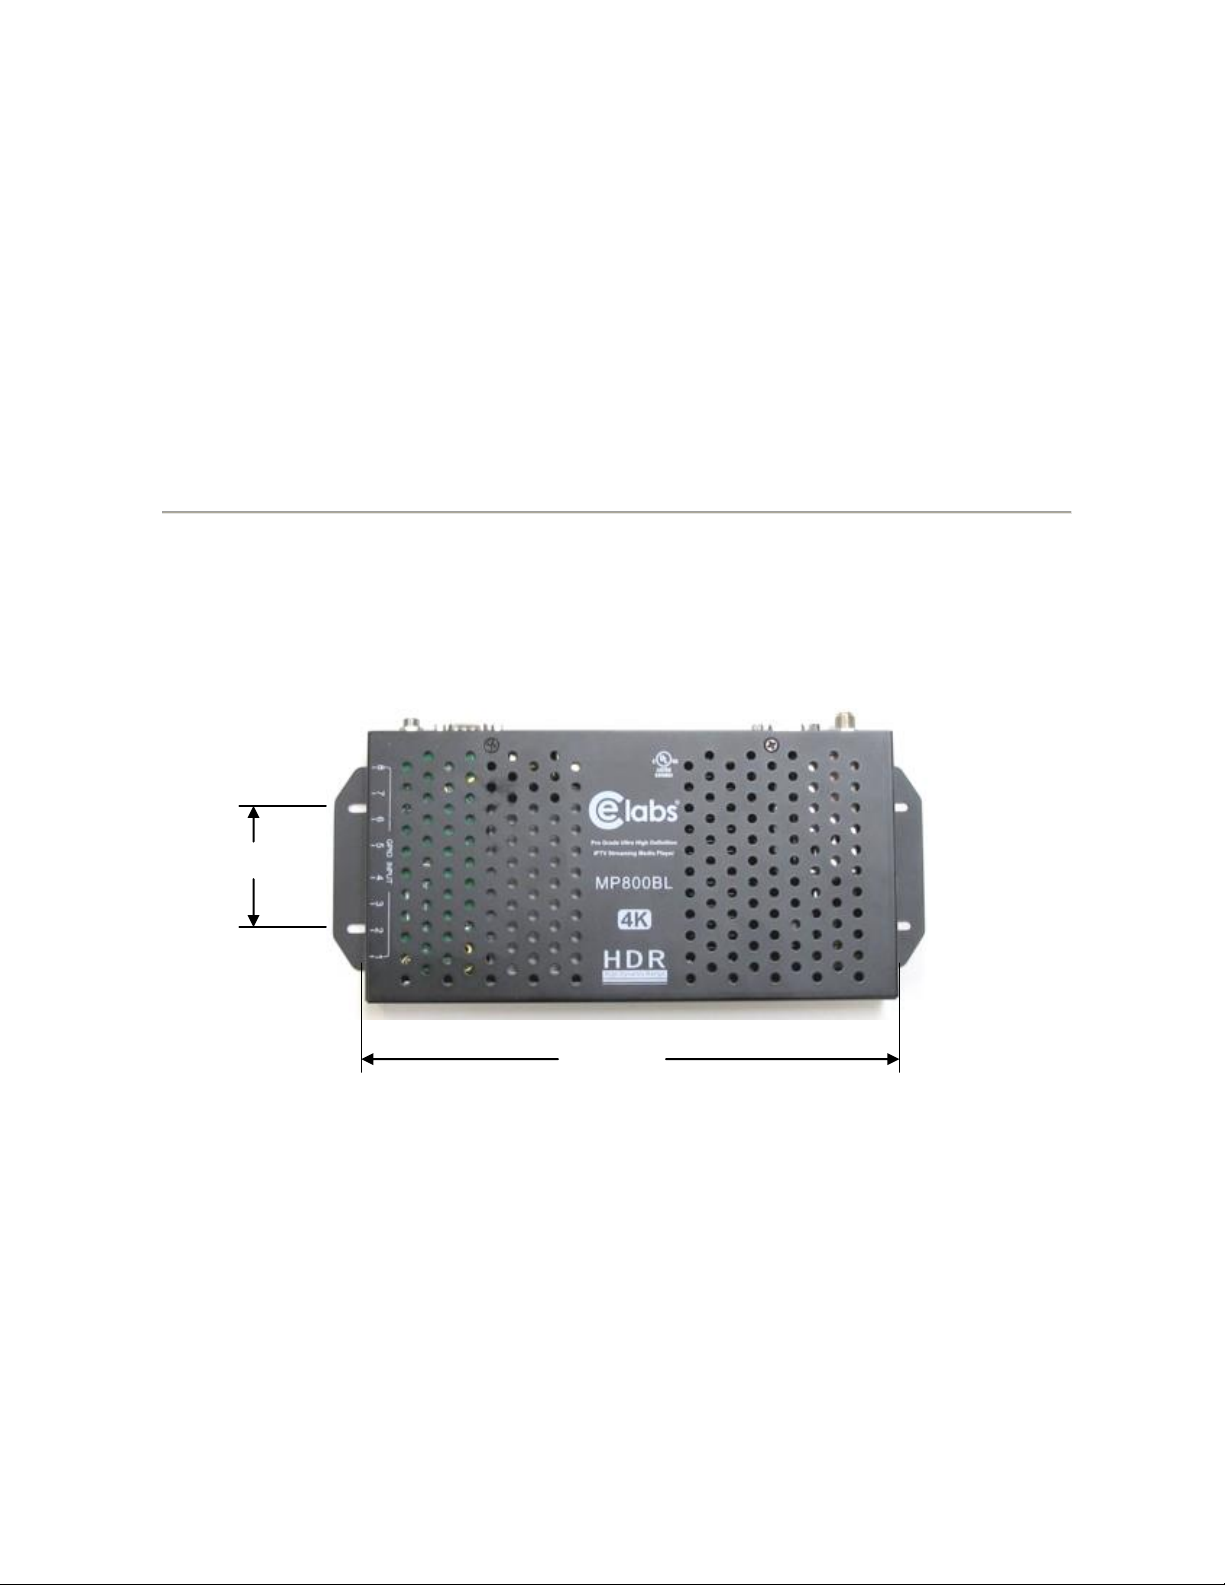
GPIO - These ports are generally used to interface with pushbuttons that can be used to trigger certain videos.
Refer to the GPIO section later in this manual for a full description of the eight GPIO ports.
RS-232 –The media player may be controlled via the serial port. Call Customer Support for the RS-232 control X-
app and the proper command protocol.

MP800 UHD Media Player Manual Page 8of 45 Rev. 100- 10/17/16
IR IN Jack –A remote IR receiver may be plugged into the front panel IR jack. This allows use of the Remote
Control even when the unit may be installed in an enclosure or behind a TV where IR access is difficult. The
connections are: Tip=Signal, Ring=GND, and Sleeve=+5V. Inserting a plug into this jack will defeat the onboard
IR receiver.
IR Receiver –There is an internal IR receiver just to the right of the IR input jack. Point the IR remote at this target
when accessing the OSD menu.
IR OUT Jack –This is an IR Blaster that can be used by a custom Xapp to control external IR devices. The IR
frequency is fixed at 38kHz and most protocols can be accommodated. The connections are Tip=+5V, Ring=Signal,
Sleeve=Signal. Contact one of our sales professionals if you are interested in utilizing the IR OUT.
Mounting
The media player should be located in a well ventilated air conditioned space for best operation. The overall
dimensions of the units are 4.3” x 9.6” x 1.1”. The mounting dimensions given below are measured from center
to center of the mounting holes. The mounting holes will accommodate a #6 screw.
2.1”
9.5”
The unit has ventilation holes all along the top. Theses should remain uncovered during operation. There are no
ventilation openings on the bottom of the chassis, so it may be bolted directly to a shelf or monitor.
Note: The MP800 contains a high power processor that generates quite a bit of heat. Do not stack the MP800 on top of
other electronics or place inside of an enclosure with no air flow.

MP800 UHD Media Player Manual Page 9of 45 Rev. 100- 10/17/16
Chapter 3 –CONTROL SOFTWARE
Hardware and Software Requirements
Hardware
Platform Pentium4 2.0GHz Class Processor or better
Operating System Windows XP Pro, Windows 7, 8, or 10
RAM 1 Gbyte or more
Ports Ethernet 10/100
Communications Players use ports 80 and 161 for HTTP and SNMP, 7798 for com.
Software
CE Labs QS Pro Designer 7X
The MP800 can be remotely controlled from within a LAN (restricted to local sub-net) via the CE labs QS Pro
Designer 7X software. This application allows you to scan your network to discover installed players or you can
manually add them. Once the player is input, the software may be used to check status, set video resolution, add
or delete content, create playlists, etc.
Please refer to the Help tab in
QS Pro Designer for a complete
reference of available command
options.
The QS Pro Designer 7X software is available at no cost with the media player. It may be downloaded from our
website Support Section at http://www.celabs.net. Click on the Digital Signage Solutions site, then
RESOURCES and then DOWNLOAD. The help tab in QS Pro Designer will show you how to use the software
and get started controlling your players. Please see Appendix for Installation details.

MP800 UHD Media Player Manual Page 10 of 45 Rev. 100- 10/17/16
Software (continued)
The first screen you see on QS Pro Designer 7X is Player Search. Click OK to add the discovered players to the
Media Player database.
The main screen with Player Status selected will show you what is loaded and playing on the selected media
player.

MP800 UHD Media Player Manual Page 11 of 45 Rev. 100- 10/17/16
QS Pro Designer 7X Workflow
1. Click on the Videos Tab and add your video
content to the Video database.
2. If you have pictures, add them under the Images
Tab.
3. You may also create a “Channel” for setting up
web sites or RTP/UDP streaming sources under
the Channels Tab. Or add audio files under the
Music Tab. These media elements make up the
content that can play in the media player playlist.
4. Select the Playlist Tab and create a playlist by
adding some of the content added to the Video,
Images, Channels, or Music Tabs. You may
select “New Playlist” to create an all new content
package or select “Edit” or “Copy” on one of the
existing Playlists.
5. Creating or editing a playlist will open the
window shown at the right. Highlight content in
the left window and use the arrow to send to the
right Playlist box. Note the Image / Channel
Duration box at the top right. This allows you to
set the duration of pictures, UDP Streams, or
Web Sites in the playlist before moving on to the
next element. Click on Save when finished.

MP800 UHD Media Player Manual Page 12 of 45 Rev. 100- 10/17/16
6. Back at the main window, select the Players tab and highlight the media player in the left column that
you wish to update with new content.
7. Select Player Control Tab on the right side. Click on the Playlist to load and select the playlist you just
created. You may also select a Layout to load if there is one available. If you do not select a Layout, the
videos or other elements in the playlist will play full screen.
8. Click on Load/Play button and the content will be sent over the network to the media player. The
software will let you know when the process is complete.
9. The new content should now be playing on your media player.

MP800 UHD Media Player Manual Page 13 of 45 Rev. 100- 10/17/16
GPIO Interface Programming
The MP800G can be ordered with a GPIO interface to allow customer interaction with the player using push
buttons or sensors. This allows the player to play a video, playlist or ATSC tuner channel upon receiving a
button press from the GPIO inputs of a MP800 media player. Up to eight button inputs are supported. One can
easily configure a wide variety of media to play for each button. An ‘idle loop’ video is played when the video
triggered by the button is not playing.
The actions associated with each GPIO port may be assigned by using the Tools, Button Setup menu in QSP700.
Creating the Push Button configuration files with QS Pro Designer 7X:
Start QS Pro Designer 7X on a PC that resides on the same network as the target media player, select the correct
player, click on TOOLS and then click BUTTON SETUP. Assign content via the drop down windows and then
click Load Button Setup to send the media and configuration files over the network to the player. This may take
quite some time depending upon the size of the assigned media.
If you do not have network visibility to the player, the complete configuration and media can be sent to a SD
card plugged into your PC by pressing the Publish button. This copies all necessary configuration files, videos,
pictures, layouts, etc. and places them in the proper folders on the SD card. Simply take the newly loaded SD
card and plug it into the player and the unit will begin to play the files.

MP800 UHD Media Player Manual Page 14 of 45 Rev. 100- 10/17/16
Layouts and Templates
QS Pro Designer 7X has the ability to create and manage multilayer screens via Layouts that you create.
Select Layouts from the
toolbar. You may create a
very media rich layout
using the included tools.
The image to the right is
showing the Layout
creation screen. The
Zones in the left column
are dragged into the
Layout area.
Important: Set the desired
Layout resolution before
you begin placing zones.
This can be set under
“View” and “Resolution”.
NOTE:
This Layout Size must match the Browser Resolution setting on the MP800 (Set on the main page under “Tools”, “Set
Video Output”).

MP800 UHD Media Player Manual Page 15 of 45 Rev. 100- 10/17/16
Position and size the zones in
the Layout area where you
need them.
Drag the pictures you want
into the image zones.
If you placed a SlideShow
zone, right click on it and
add the desired images to the
box that opens.
If there is a RSS feed in the
layout, right click and setup
the needed parameters.
A Weather zone will need
the City, State, and Zip Code
in order to find the correct
information.
NOTE: The Video Zone will always be black at this level. It is a placeholder for when we merge the
Layout with a Video Playlist later.
Once the layout is created and saved, click on the X to exit back to QS Pro Designer main page. Click on Players Tab to see
the available players and select the one you wish to load in the left window. Select “Player Control in the right box and select
the desired Playlist to load (this will fill in the video zone in your layout) and Layout to Load (the layout you just created).
Click on the Load/Play button to send the complete content package to the MP800.
Please see the help files in QS Pro Designer 7X for additional information on the program operation.

MP800 UHD Media Player Manual Page 16 of 45 Rev. 100- 10/17/16
Software (continued)
Firewall Issues
QS Pro Designer uses HTTP protocol when downloading files to the media players. If QS Pro Designer fails to
download files to the players, a PC firewall or a firewall in the router may be blocking this operation.
Virus protection programs may block this operation also.
Unblocking the Computer Firewall
When QS Pro Designer is first installed, you will be prompted to unblock the firewall for QS Pro. Please accept
to unblock. This does not pose much of security issue due to the fact that you are only unblocking the QS Pro
application as opposed to the whole computer and it will only download video files that you have specified.
Usually no further action will be needed and QS Pro will function properly.
Manually Unblocking the Computer Firewall
If video files fail to download, you may need to verify that the firewall is indeed off for QS Pro.
You can temporarily turn the firewall completely off to test if this resolves the file transfer issue.
Windows7 / VISTA Operating System
To turn firewall completely off (not recommended):
1. Control Panel->Security->Windows Firewall-> Turn Windows Firewall on or Off
2. Select Off
3. Click OK
To allow just Quick Sign through the Firewall:
1. Control Panel->Security-Windows Firewall-> All a program through Windows Firewall
2. Click Add Program
3. Browse to C:\Program Files\CE labs\QS Pro Designer 7X\QuickSignPro.exe for QS Pro Designer 7X
(Typical, may be different location on some PCs)
QS300 and QS400 typical locations:
Quick Sign 300: C:\Program Files\CE labs\CCM Quick Sign 300\CCM Quick Sign for HD300ZX.exe
Quick Sign 400: C:\Program Files\CE labs\CCM Quick Sign 400\CCMQuickSign.exe
4. Click OK
Now add port 7898 TCP
1. Click Add Port
2. Set Name: http port:7898 TCP.
3. Click OK
XP Operating System
To turn firewall completely off (not recommended):
1. Control Panel-> Security Center->Windows Firewall-> Turn Windows Firewall on or Off
2. Select Off
3. Click OK

MP800 UHD Media Player Manual Page 17 of 45 Rev. 100- 10/17/16
Software (continued)
To allow just QS Pro Designer through the Firewall:
1. Control Panel-> Security Center->Windows Firewall
2. Click Exceptions Tab
3. Click Add Program
4. Browse to C:\Program Files\CE labs\QS Pro Designer 7X\QuickSignPro.exe for QS Pro Designer 7X
(Typical, may be different location on some PCs)
QS300 and QS400 typical locations:
Quick Sign 300: C:\Program Files\CE labs\CCM Quick Sign 300\CCM Quick Sign for HD300ZX.exe
Quick Sign 400: C:\Program Files\CE labs\CCM Quick Sign 400\CCMQuickSign.exe
5. Click OK
Now add port 7898 TCP
1. Click Add Port
2. Set Name: http port:7898 TCP.
3. Click OK
Virus Protection Programs
If you are running a virus protection program, the settings may need to be altered to allow Quick Sign to use the
HTTP protocol (TCP/IP). Virus protection programs vary widely so no details are provided here.
Disabling Checksum Offloading
If you have a large number of download failures with QS Pro Designer during Load/Play, the procedure below
may help. Note that if the downloads are always failing, you likely have firewall issue. Please refer to Quick Sign
help on disabling the firewall in that case.
Rarely with some newer network cards, QS Pro Desinger will have an usually high number of download errors.
We have found that by disabling “Checksum Offloading” on the network card often corrects these errors.
VISTA/Windows 7
1. Go to Control Panel → Hardware and Sound
2. Click on Device Manager. (For Windows 7, Device Manager is located under Device and Printers)
3. Select the network device under Network adapters and right click and select properties.
4. Find the “Checksum Offloading” or maybe “IP4 Checksum Offloading” and select disable.
5. Click OK
XP
1. Go to Control Panel → System
2. Click on Hardware Tab.
3. Click Device Manager.
4. Select the network device and right click and select properties.
5. Find the “Checksum Offloading” or maybe “IP4 Checksum Offloading” and select disable.
6. Click OK.

MP800 UHD Media Player Manual Page 18 of 45 Rev. 100- 10/17/16
CE labs CCM2 Content Manager for Windows®
The MP800 can be remotely controlled over the internet via the CE labs CCM2 player application. The CE Labs
Content Manager (CCM2) is a paid subscription service hosted in the Cloud and allows users to upload media
files, create content playlists, control player parameters and download media/playlist information to the MP800
media player over the internet. CCM2 can also be used on private and local networks. The CCM2 web
application is accessed using any standard web browser such as Internet Explorer, Firefox, Chrome, or Safari.
NOTE: Players that are to be used with CCM2 must be loaded with the CCM2 CE labs Player X-App. The
CCM2 X-app is an application that runs on the player and enables it to be directed to the CCM2 enterprise
control software. The MP800 can be ordered with this application pre-loaded or it can be loaded using QS Pro
Designer 7X software. Please contact our sales department if you are interested in CCM2.
Key Features:
Manage 1 to several hundred or more media players
Add, edit, and remove players
Assign names and locations
View player status
Organize into player groups
Assign descriptive information to each player
Create video content packages
Create content packages that group playlists and
schedules together
Easily add, edit, or remove playlists and schedules
Assign content packages to players
Assign descriptive information to the content package
Upload video files to be distributed to players
Organize and manage uploaded videos
Preview images of videos
Layout support
Layouts provide a way to show text, images, and RSS
feed info around a predefined video area.
Upload layouts created with Quick Sign Pro.
Schedule layouts to appear on media players.
Quickly create video playlists
User-friendly play list editor
Create any number of playlists
Easily schedule video content
Schedule play lists by start dates and times
Schedule by day of week
Easily set schedules by selecting playlist and
clicking on calendar dates
Schedule playlists with layouts
Automatic Operation
Periodic status check
Download video files as needed per user selectable
download times
Playlists run as scheduled
Monitor Player Status
Updated about every 10 minutes
View playing content and playlist names
View downloading status
View online/offline status
Reporting
Play count logging
File downloads times and total bandwidth usage
Specify report for individual players or player group
Specify start and stop dates
Export reports to Microsoft Excel

MP800 UHD Media Player Manual Page 19 of 45 Rev. 100- 10/17/16
MP800 with
CCM2 XApp
Internet
MP800 with
CCM2 XApp
MP800 with
CCM2 XApp
TV 1
TV 2
TV 3
Server
Running CCM2
Content Manager
Sys Admin or User
PC with Standard
Web Browser
Typical CCM2 System Setup
In the CCM2 system, the players are preconfigured with the CCM2 server address. Players can then be operated in
any location that has internet access. This arrangement does not require port forwarding on the local router and
eliminates many of the hassles with firewalls.
This environment allows System administrators or users to access the secured server over local or internet
connections to update content and schedules for all the media players in the system.

MP800 UHD Media Player Manual Page 20 of 45 Rev. 100- 10/17/16
CCM2 for Windows
CCM2 is enterprise level software used to control hundreds of media players that can be spread over a diverse
geographical or network landscape. This type of software is generally very expensive to purchase and maintain, but
our software breaks barriers in price point per unit. Contact our CE labs Sales department for more information and to
schedule a demonstration.
In order to use the CCM2 system, an application is loaded on the MP800 that will link to the control software using the
configured server HTTP address. This method allows for communications to be established without the need for
forwarding ports through corporate routers.
When communication is established, the player is added to the system, assigned content packages, and scheduling
information. Data logs can be reported from the player to include proof of playback information.
Table of contents
Other Cable Electronics Media Player manuals