Zinwell ZP-320 User manual

ZP-320
HD Multimedia Player
User’s Manual

2
Index
Introduction ............................................................................................................................................................ 3
Package Contents.................................................................................................................................................... 3
Product Overview................................................................................................................................................... 4
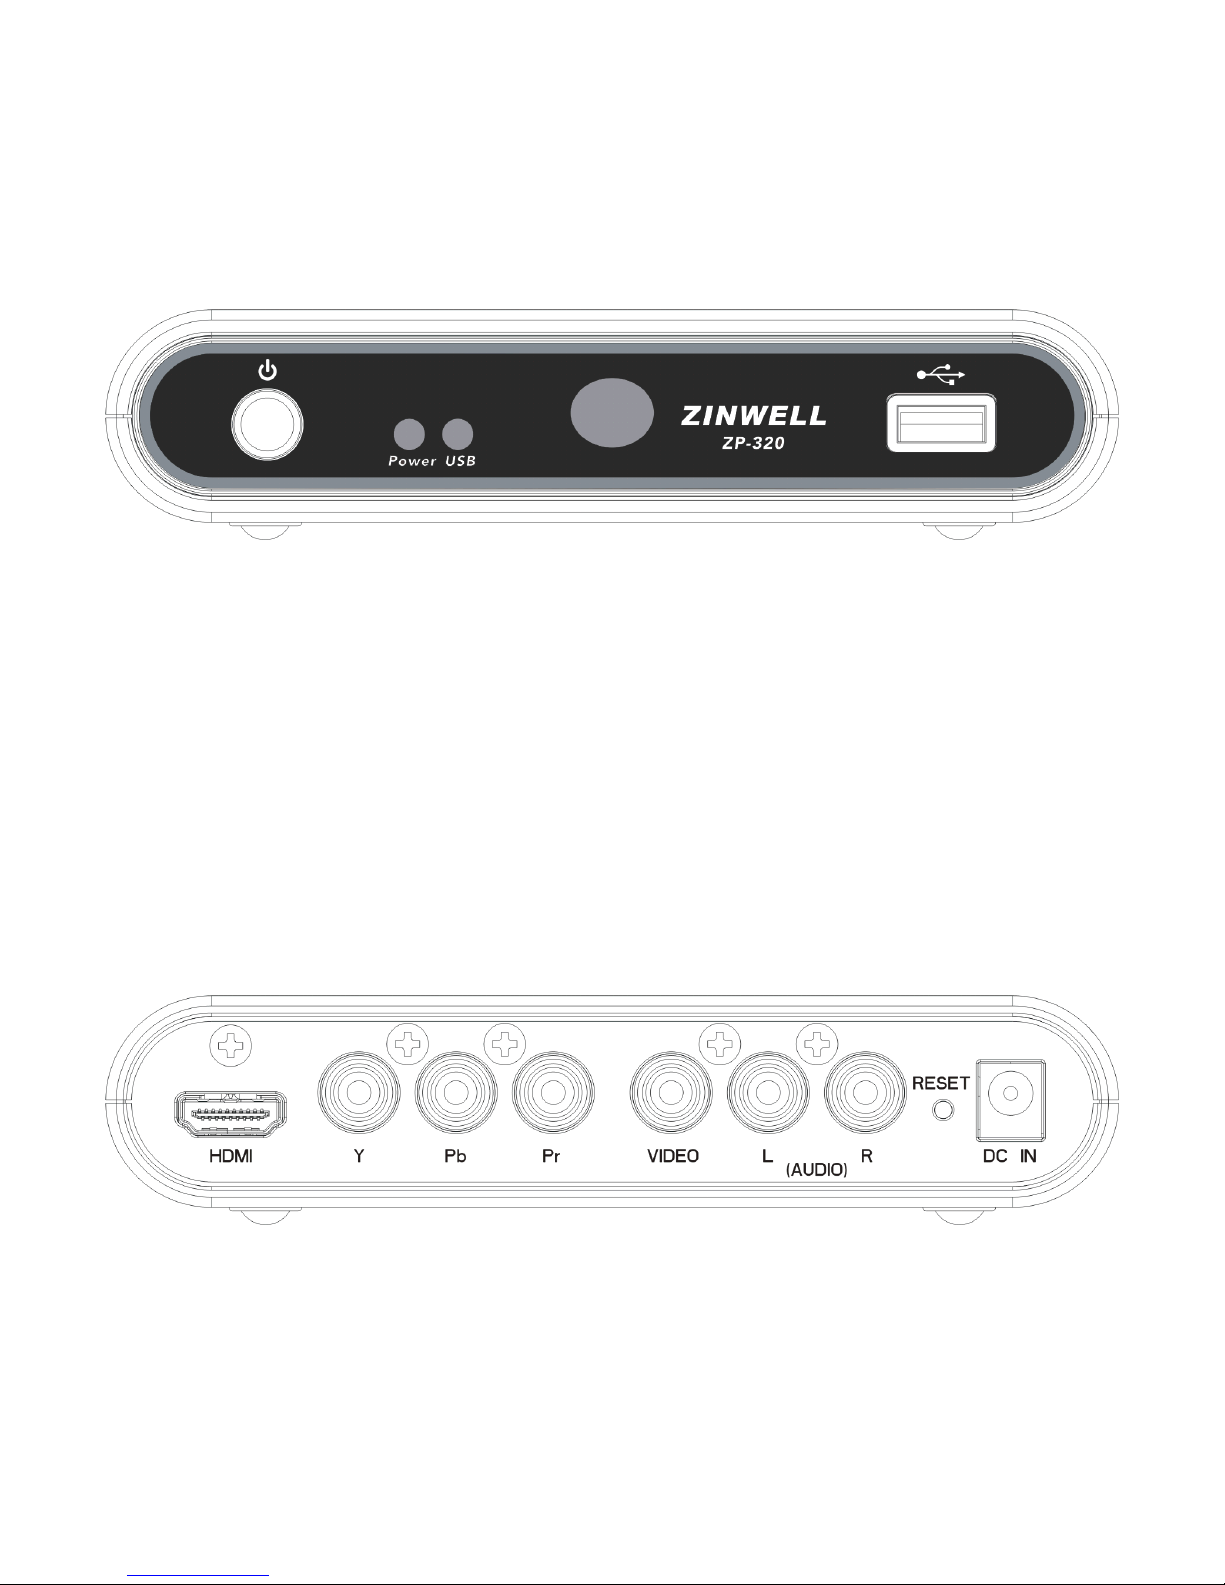
Panel Front side .............................................................................................................................................. 4
Panel Back side............................................................................................................................................... 4
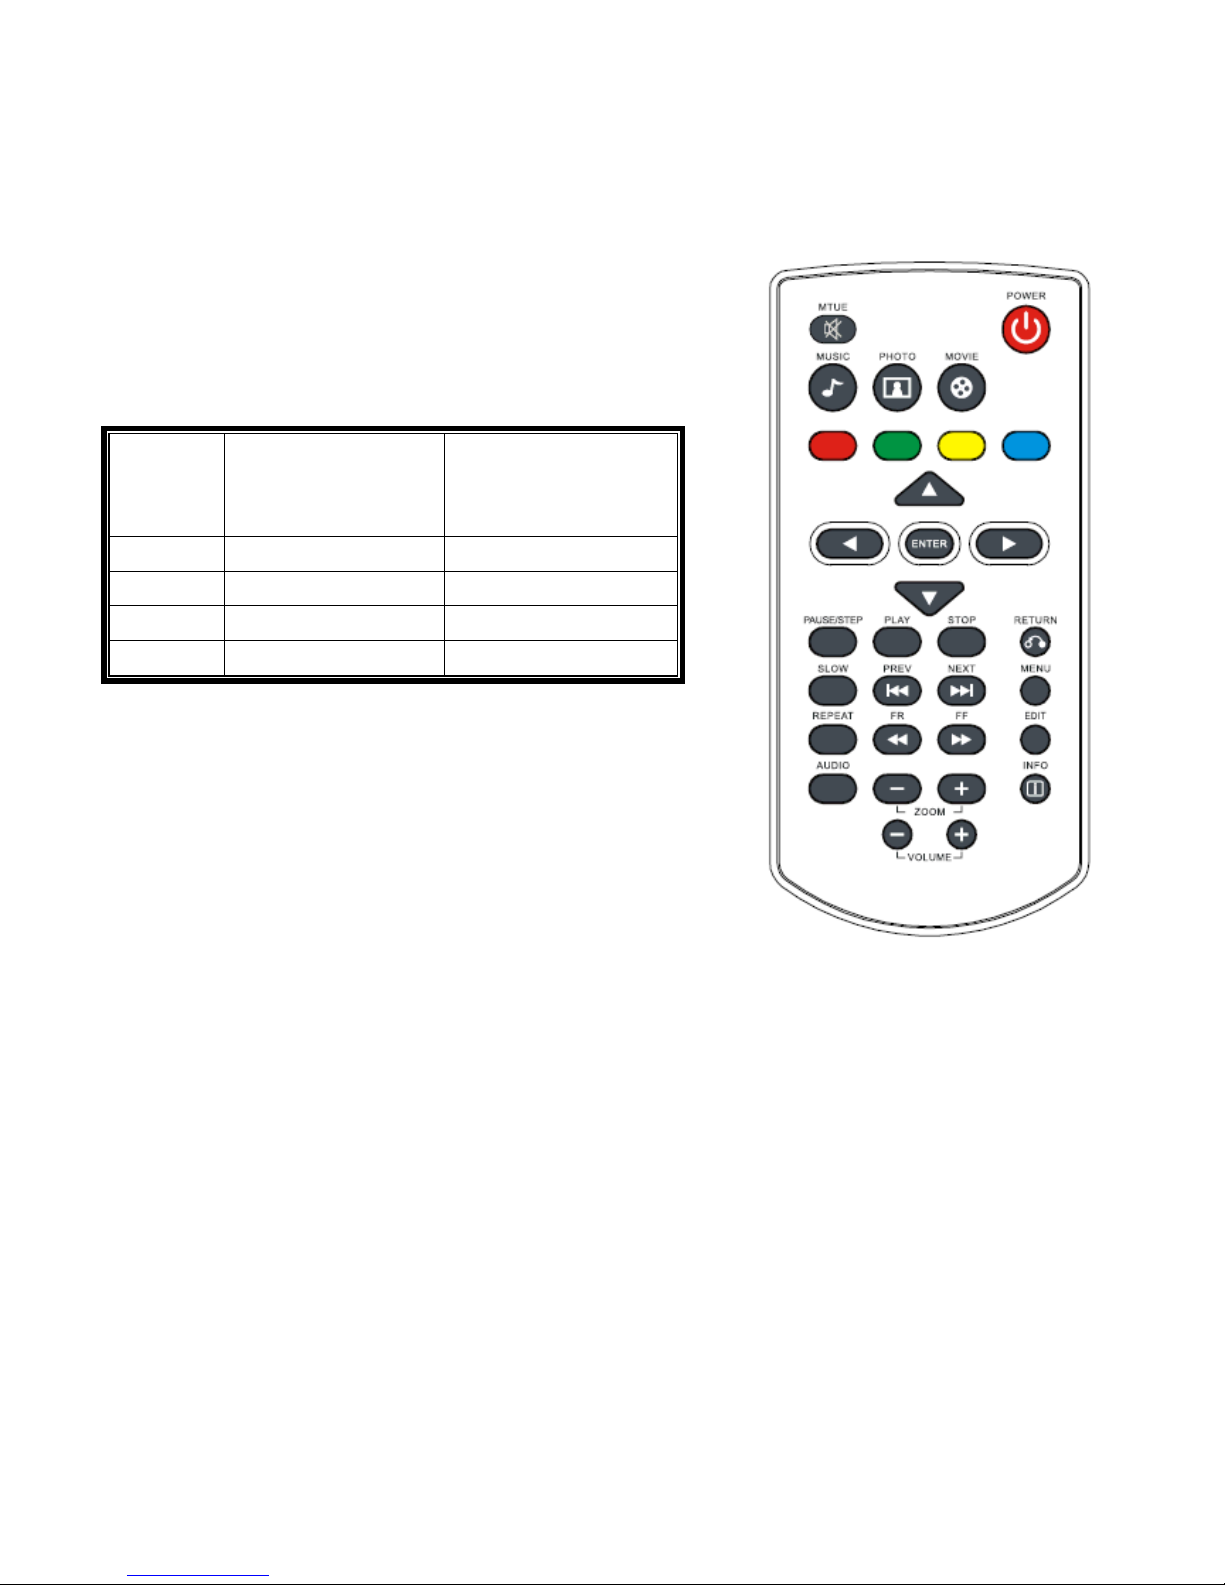
Remote Control .............................................................................................................................................. 5
Connect................................................................................................................................................................... 6
Setup....................................................................................................................................................................... 6
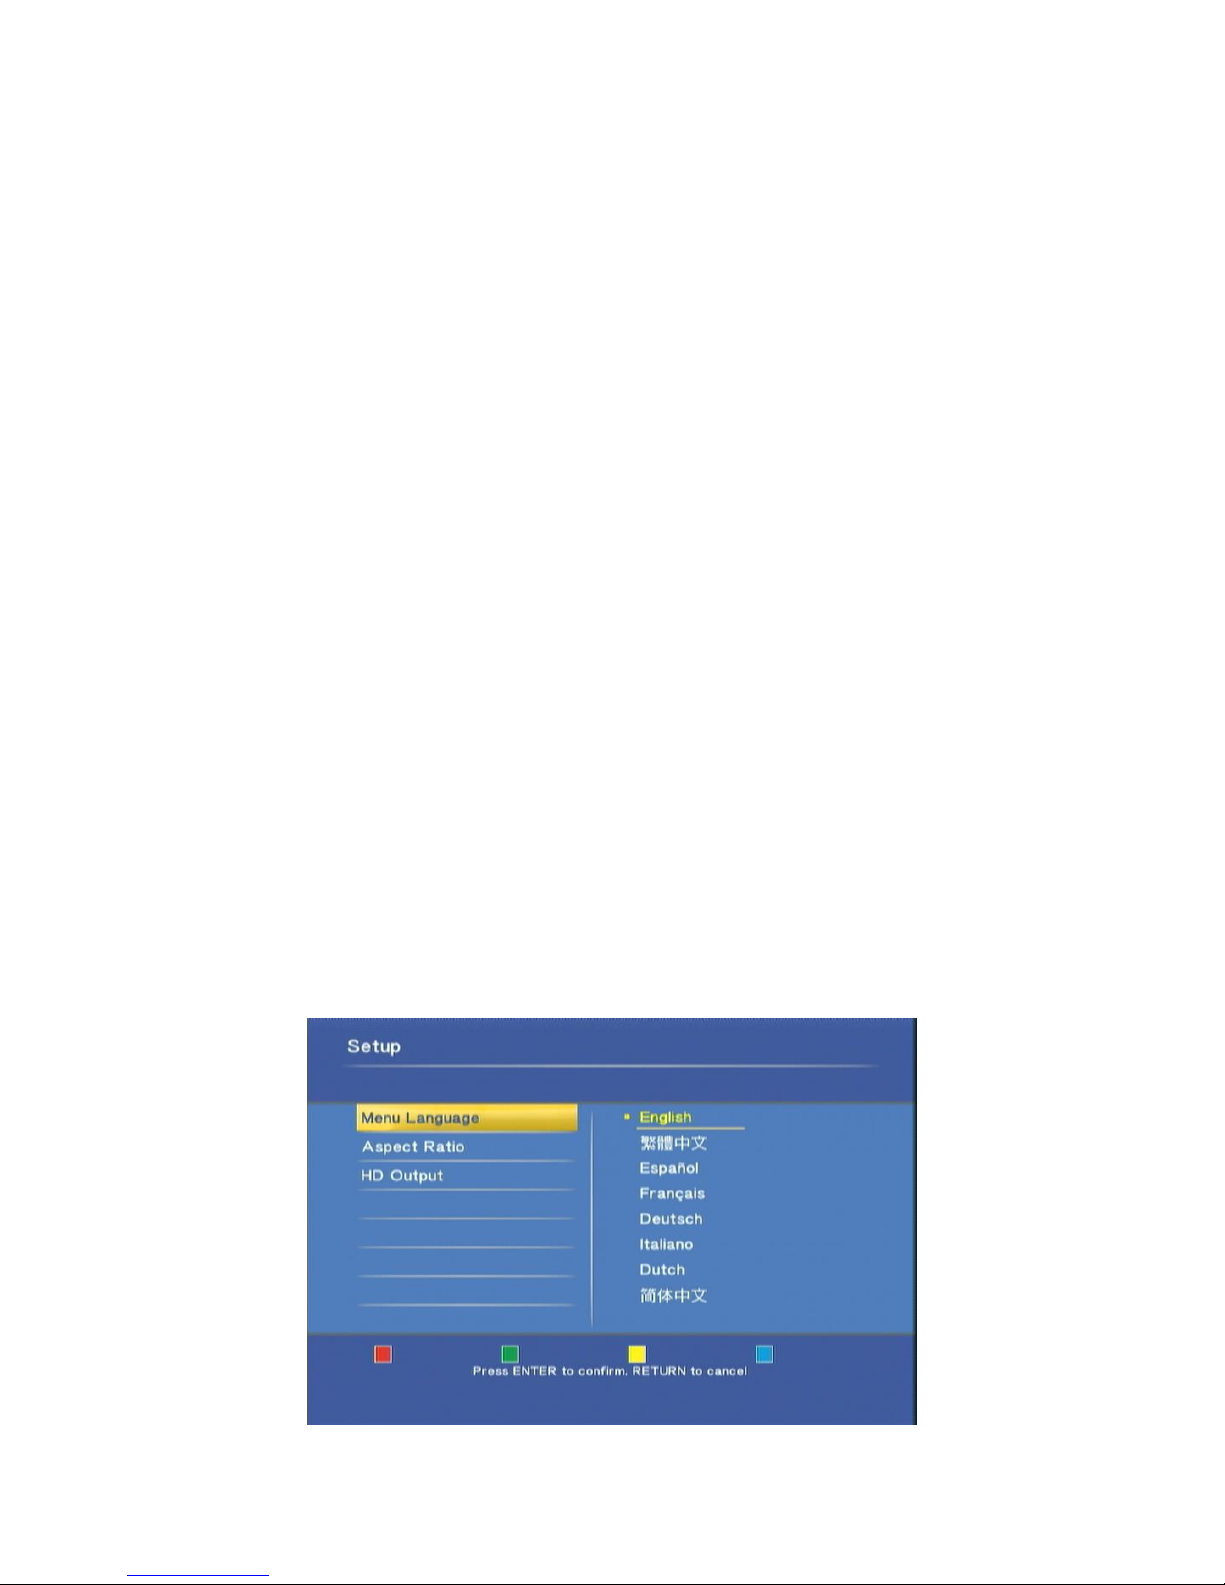
Initial setup ..................................................................................................................................................... 6
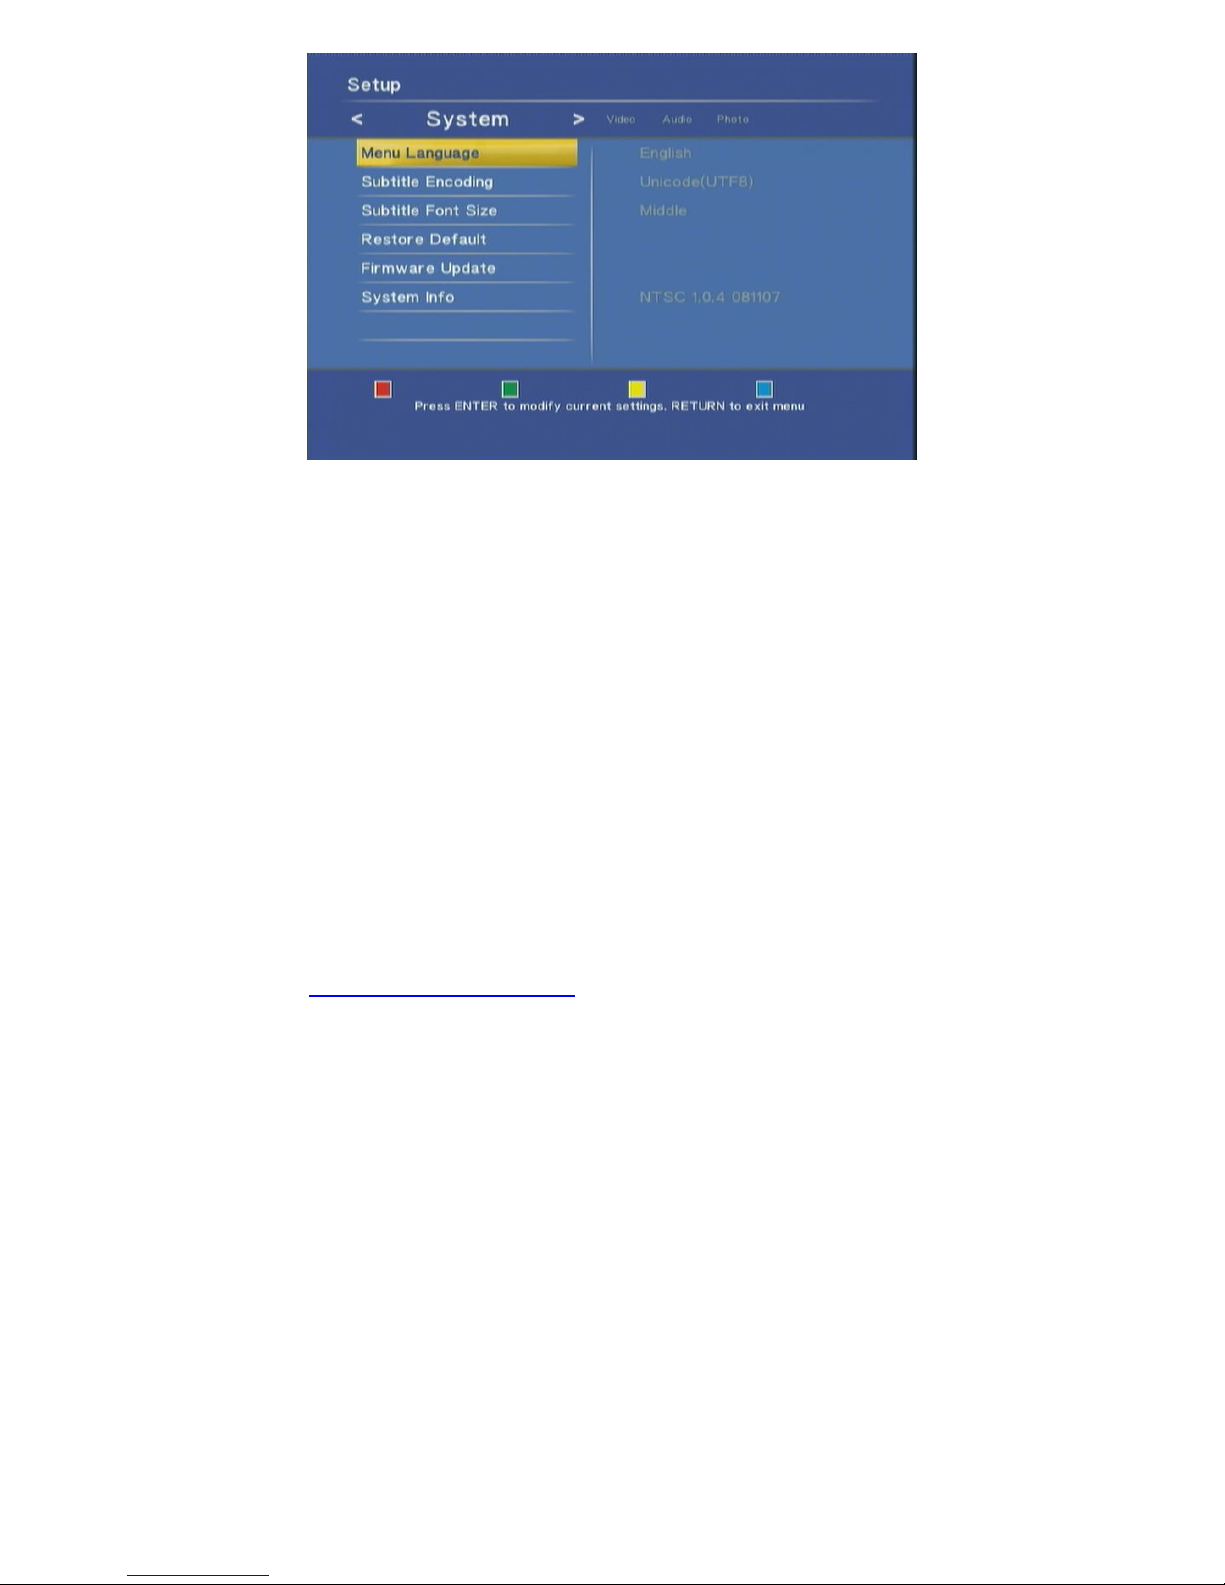
Setup Menu..................................................................................................................................................... 7
Multimedia Jukebox ............................................................................................................................................. 10
Playback the media files............................................................................................................................... 10
Movie.................................................................................................................................................... 10
Music .................................................................................................................................................... 13
Photo..................................................................................................................................................... 14
Slide show with Music ......................................................................................................................... 14
Zoom in and pan the focus ................................................................................................................... 15
Rotating the photo ................................................................................................................................ 15
All................................................................................................................................................................. 15
Edit the media files....................................................................................................................................... 16
Rename ................................................................................................................................................. 16
Delete.................................................................................................................................................... 17
Maintenance ......................................................................................................................................................... 18
Reset the device............................................................................................................................................ 18
Power on/Standby time................................................................................................................................. 18
Battery .......................................................................................................................................................... 18
Black screen.................................................................................................................................................. 18
Connect DVI to HDMI converter................................................................................................................. 18
Video/Audio codec support .......................................................................................................................... 19
Specification ................................................................................................................................................. 20

3
Introduction
ZP-320 is the first media player which truly decodes, playback and outputs High Definition 1080i in
the market. Through the USB 2.0 port and the HDMI interface, ZP-320 playbacks the HD
MPEG2/MPEG4-ASP Xvid / DivX movie or transport stream from the USB flash drive or hard disk
drive to HDTV screen. Not only plays HD movie smoothly, but also be capable to Zoom in, pan the
picture, fast forward, fast reverse and slow-motion. The playback of photo and music is also great for
enjoy the fun of high definition world.
Feature Highlight:
::
:
Decode and output High Definition 1080i video and Photo.
Various formats of HD video are supported.
Within the next generation interface—HDMI output.
High performance video playback. Experience fluent playback control like Zoom-in, Pan the
picture, Fast Forward, Fast Reverse, Slow-motion.
Fully supports the subtitle format. Dynamically change the subtitle display by remote control.
Photo playback via HD. Supports Up to 4 mega-pixel photo files, 16X Zoom in, 3-direction
rotation.
Slide show mode with 8 kinds of transition effect. Background music playback is supported.
Rich types of music file. The playback function includes Fast Forward, Fast Reverse, Repeat,
Shuffle and Shuffle Repeat.
Within USB 2.0 port, plug-and-play the USB Flash Drive, USB Mobile Hard Disk Drive and USB
Card Reader.
Supports all most all formats of HDD and has the most interchangeability.
Easy to use and intuitive control. Change to setup menu at any time even in media playing to
provide the fluent control.
Package Contents
Please check the parts in the package. Contact the distributor if something is missing.
1. One ZP-320 HD Media Player 9. One user’s manual
2. One power adapter 10. One warranty
3. One remote control unit
4. Two AAA batteries

4
5. One stand
6. One YPbPr cable
7. One RCA cable
8. One quick installation guide
Product Overview
Panel Front side
LED/button/connector:
(1) POWER STANDBY: Press it to power on the device or put it into standby mode.
(2) POWER indicator: It lights on when the power is plugged in.
(3) USB indicator: It lights when the USB Storage is plugged in and ready. It may take 5 seconds to
get ready when the USB storage is plugged in.
(4) IR sensor: It receives the command from remote control unit. Do not block the port.
(5)USB: It is the USB 2.0 port. Connect the external USB Flash disk or USB Mass Storage into it.
Panel Back side
Video connection: Please select one below to connect the TV set.
HDMI output: Please connect the HDMI cable to the HDMI input of TV set.
YPbPr: They connect the component YPbPr to the input of TV set.
VIDEO (CVBS): It connects the CVBS input of TV set.
AUDIO L/R: They connect the audio L/R to the input of TV set. If the HDMI is connected, then you
don’t need to connect AUDIO L/R.
Reset: Press the button to power off and on the device.
2. 3.
1. 4.
5.

5
DC IN: It connects the DC input of the Power Adapter. The power requirement is 12Vdc, 1.5 A.
Remote Control
MUTE: Mute
POWER: Power on/Suspend
MUSIC: Hotkey to view the music file
PHOTO: Hotkey to view the photo file
MOVIE: Hotkey to view the movie file
RED / GREEN / YELLOW / BLUE: Special function
Function
key
Video
playback/DVD
Menu
File browser
Red Open DVD Menu None
Green Toggle audio track None
Yellow Switch the subtitle None
Blue Change the Angle Go to root directory
: UP
: LEFT
: RIGHT
: DOWN
ENTER: ENTER
PAUSE/STEP: Pause and step in frame by frame
PLAY: Playback
STOP: Stop
RETURN: go up one folder/Exit the current menu
SLOW: Slow motion
PREV: Previous file / section
NEXT: Next file / section
MENU: open System Setup page
REPEAT: 1/ALL repeat
FR: Fast Reverse
FF: Fast Forward
EDIT: Delete, Rename the folders and the files.
AUDIO: Change the audio track for VOB/ISO/IFO playback.
ZOOM +/-: Zoon In/Out
INFO: Display the information during playback
VOLUME +/-: increase/decrease volume

6
Connect
There are three ways shown below to connect this player to your TV set. Please choose one to apply.
Basic connection:
Power Cord: Connect the DC input in the device.
Audio cable output: Connect the cables to TV set.
CVBS video output (480i or 576i): Connect to TV set
Advanced connection:
Power Cord: Connect the DC input in the device.
Audio cable output: connect the cables to TV set.
Component video cable for HD video output (720p, 1080i): connect to TV set.
HDMI connection:
Power Cord: Connect the DC input in the device.
HDMI output (720p, 1080i): connect to HDMI input of TV set. The HDMI port sends digital video and
audio signal through the cable.
Setup
Please check the battery of Remote Control first, and then start the initial setup.
Initial setup
When plugged in the power at the first time, after the booting logo, the setup page should pop up to
start the initial setting. The first item is the menu language. Please setup the menu language for OSD.
Use ▲▼ button to select the language and press “ENTER” to confirm.

7
The second item is to setup the aspect ratio for your TV set. If your TV set is 4:3 then you can choose
Pan Scan 4:3 or Letter Box 4:3. If you have wide-screen TV then you can choose 16:9. Use ▲▼
button to select one and press “ENTER” to confirm.
The final item is to choose whether using HDTV or not. If you want HD output, please make sure that
you connect the component video from TV set to the device, and then choose 720p or 1080i according
to the specification of your TV set.
The initial setting can be configured anytime in the setup menu. Please refer to the setup menu.
Setup Menu
You can press “MENU” to open the setup menu. Use ◄► key to select different pages among
“System”, “Video”, “Audio” and “Photo”. Use ▲▼ key to select different item to setup. Press “ENTER”
to open detail setting for configuration.

8
The menu structure and options are listed below.
1. System
Select this option to open the detail setting for the system.
Menu Language: Select the OSD language among English, Chinese Traditional, Español, Franҫais,
Deutsch, Italiano, Dutch and Chinese Simplified.
Subtitle Encoding: Select the encoding for subtitle file, file name and folder name display from
Unicode (UTF8), Chinese Simplified (GBK), and Chinese Traditional (BIG5).
Please select the right code to display or the garbage characters may appear on
OSD.
Subtitle Font Size: Select the Font size for the subtitle. The available options are “Big, Middle, and
Small”. The default setting is “Middle”. If the format of font is “idx + sub”, the font
size option here won’t be applied.
Restore Default: Select this option to reset the setting to factory default.
Firmware Update: Select this option to apply the new firmware. Please visit the web site
http://www.zintech.com.tw/ to check the latest firmware. When you find the new
firmware, please check the “System Info” for current firmware vision to see if the
device needs to upgrade. If so, please download the firmware file for upgrade.
The upgrade procedure is below.
1. Prepare an empty flash disk. Plug it into PC and copy all firmware files to its root directory.
2. Plug it into this device.
3. Open the “Firmware Update” option in the configure menu. Press it and select “OK” to
continue.
4. Wait for 5 minutes. Do not unplug the power during the upgrade procedure. When the
upgrade is completed, it will reboot and return to the main screen.

9
System Info: It displays the firmware version.
2. Video
Select this option to open the detail setting for video display.
Aspect Ratio: Select one among these options “Pan Scan 4:3, Letter Box 4:3, 16:9”.
Pan Scan 4:3: Select for a full-height picture with both sides cut.
Letter Box 4:3: Select for the “wide screen” display with black bands on the upper and lower parts
of the TV screen.
16:9: Select this for a wide screen 16:9 TV.
*: When the video is in wider wide-screen-ratio such as 2.40:1, the both sides are still cut in
16:9.
HD Output: Use ▲▼ key to adjust the relative lightness or darkness for the TV picture.
Off: This is the default value. If your TV set doesn’t support HD, please select this option.
720P: If your TV set is HDTV 720p, and you connect to the box via component video, you can
choose this option to get the 720p output.
1080i: If your TV set is HD-ready / Full-HD 1080i, and you connect to the box via component video,
you can choose this option to get the 1080i output.
*: When connecting LCD monitor via DVI to HDMI converter, the player will detect if the LCD
monitor can receive HD video; if not, the option of HD output will be locked and use SD
output only.
3. Photo
Select this option to open the detail setting for the photo display.
Slide Show Timing: Choose from these options “Off, 2 Seconds, 5 Seconds, 10 Seconds, 30
Seconds, 1 Minutes and 2 Minutes”. It decides the waiting time before changing
to the next photo while viewing photos.
Transition Effect: Choose from these options “Off, Cross Fade, Left to Right, Top to Bottom,
Waterfall, Snake, Dissolve, Strip Left Down and All Effect Shuffle”. It decides the
transition effect for changing photos.
4. Audio
Select this option to open the detail setting for the audio playback.
Digital Output: Choose one between these options: “HDMI LPCM, HDMI RAW”. Select the correct
format according to your decoding device. If your decoder doesn’t detect the digital

10
automatically, you have to select “HDMI RAW” format for 5.1 channel audio playback
and “HDMI LPCM” for the stereo audio playback.
Multimedia Jukebox
Playback the media files
You can playback the movies, music and photos in the connected USB storage via this device. Plug in
the USB storage, and then press the three buttons “MUSIC, PHOTO, MOVIE” to enter the interface
and playback the media files. In the interface, select “USB” and then press “ENTER” to browse the
media files.
When plugging in the USB Mass Storage device, USB card reader or USB flash disk into this device,
wait for 5 seconds, and you can see the message on screen “USB detected You can browse this
device now.” Then you can continue to browse the USB device.
If the USB storage device is unplugged, the USB LED on the player will be off, and the following
message will show on screen: “USB Removed: The USB device has been removed. You cannot
browse it anymore.”
When selecting “USB”, the following message may pop up. Please follow the instructions to continue.
“USB Storage is not detected. Please plug in the USB Storage and try again. Please wait about 5
seconds till the USB indicator lights if you already plug in the USB Storage.”
Movie
Press “MOVIE” button to enter the interface. In the interface, you can use ▲▼ arrow keys
to move and highlight the file titles. Press “ENTER” to open the folder or file title, or press
“RETURN” key to return to the previous folder. After entering this page, you can select the
USB icon, folder, or files to browse. The right panel will show preview of the highlighted title.

11
Press the file title and it starts to playback the video. When the movie begins to play, the four
key “Red, Green, Yellow, Blue” will be showed in the top of the TV screen.
Red, Green, Yellow, Blue: When playing the video files supporting DVD menu such as
ISO/IFO file, you can press red key for “Menu”, green key for “Audio”, yellow key for
“Subtitle” and blue key for “Angle”.
►, ▐▐►: Press Play key to play file. Press Pause key to hold the playing. Press Play key
again to continue playing.
REPEAT: When playing the media, press to switch the repeat modes among the following
modes, “Repeat Title” to repeat the current file, “Repeat ALL” to repeat all files in
the directory, “Repeat Chapter” to repeat current chapter in VOB/IFO/ISO file, or
“Repeat Off” to turn off the repeat mode.
│◄◄, ►►│: Jump to the previous or next file. While playing VOB/ISO/IFO video files,
press it to jump to the previous/next chapter. If there is no chapter in this file,
the “Ban” sign will show on screen. Press it again
: Ban sign. When pressing the irrelevant button, it will be blocked and shows this sign
on screen.
◄◄, ►►: Press to play fast forward or fast reverse. Press it again to switch the rate among
“1.5X, 2X, 4X, 8X, 16X, and 32X”.
SLOW: While playing the video, press the button to play slow motion. Press again to toggle
among the speeds 3/4X, 1/2X, 1/4X, 1/8X, 1/16X and 1X (normal speed)。
ZOOM +, -: Press “+” to enlarge the video to 2X, 3X, 4X, 8X. Press “-” to recover the video
to 8X, 4X, 3X, 2X and 1X. When zoom the video, you can use the direction key
to change the visible picture of the whole video.
VOLUME +, -: Press volume keys to control the volume.
RETURN: Press it to go up one folder in the browse window.
Blue key: In the browser, press it to go to the root directory.
Yellow key: While playing ISO/IFO file which supports DVD menu, you can press it to switch

12
the language of the subtitle. When playing the other formats of video file, you
can press it to change the subtitle code among “OFF” for turning off the subtitle,
“BIG5” for the traditional Chinese, and “GBK” for the simplified Chinese.
When finishing the current video file, it will continue to play the next file in the directory to the
last file. You can also use REPEAT key (All, Chapter, Title) to repeat the current file or all
files in the directory during the playback. You can also use the playback control while
playing the video. If you press “INFO” key, the video information will show on screen.
Subtitle:This device supports the subtitle file including the formats of srt,
sub, smi, idx+sub and ssa. Please change the file name of
subtitle file as the same as the video file and put them in the
same folder. This device detects and applies the subtitle file
automatically. If you have multiple formats of subtitle file with
the same file name in the same folder, this device will show the
menu for you to select one to play. Use the direction key to
select one and press “ENTER” to apply.

13
Music
Press the “MUSIC” button to enter the interface. Navigate to highlight the file and press
enter to playback the file. When the file is highlighted, the right panel shows the detail
information about the file including artist, title, album, genre and track. It will continue to play
next file till the last file. You can also use the playback control while playing the video.
►, ▐▐►: Press Play key to playback. Press Pause key to hold the playback. Press Play
key again to continue playing.
REPEAT: When playing the media, press to switch the repeat modes among the following
modes:
Repeat Off: turn off the repeat mode.
Repeat Track: repeat the highlighted music file.
Repeat All: repeat to play all music files in the folder.
Shuffle Repeat: repeat the randomly select music file in the folder to playback.
Shuffle Only: randomly select music file in the folder to playback.
│◄◄, ►►│: Press to leap forward or backward 6 files.
◄◄, ►►: Press to play fast forward or fast reverse. Press it again to switch the rate among
“2X, 4X, 8X, 16X, and 32X”. When switching to FF 2X, the playback still comes
with audio.
VOLUME +, -: Press volume keys to control the volume.
RETURN: Press it to go up one folder in the browse window.
Blue key: In the browser, press it to go to the root directory.
: Ban sign. When pressing the irrelevant button, it will be blocked and shows this sign
on screen.

14
Photo
Press the “PHOTO” button to enter the interface. Navigate to highlight the file and press
“ENTER” to playback the file. When the file is highlighted, the right panel shows the detail
information about the file. It will continue to play next file till the last file. You can also use the
playback control while viewing photo.
►, ▐▐►: Press Play key to playback. Press Pause key to hold the playback. Press Play
key again to continue playing.
REPEAT: When playing the media, press to switch the repeat modes among the following
modes, “Repeat All” to repeat all files in the directory or “Repeat Off” to turn off the
repeat mode.
VOLUME +, -: Press volume keys to control the volume.
RETURN: Press it to go up one folder in the browse window.
Blue key: In the browser, press it to go to the root directory.
: Ban sign. When pressing the irrelevant button, it will be blocked and shows this sign
on screen.
Slide show with Music
Before viewing the photo, you can enter the Music interface to playback Music files first. Don’t press
“Stop” key but press “Photo” key to enter Photo interface and start viewing photo files. The photo will
show and change with music playing in the background.
The second way is to put music files in the same folder with photo files. When playing photo files,
the device will also play music files to start as slide show.

15
Zoom in and pan the focus
When viewing the photos, press “+” to zoom in and then “-” to change back. You can switch the rate
between 2X, 4X, 8X and 16X. When zoom-in to the photo, press ▲▼◄► arrow keys to move the
focus on the photo. You can see the overview window in the bottom right corner to indicate the
current focus.
Rotating the photo
When viewing the photos, press ◄► arrow keys to rotate from 90 to 180 or 270 degree. However, if
you zoom in the photo then you cannot rotate the photo.
All
If the browse interface is already opened, press ◄► keys to navigate to “All” category to
browse all files including Movies, Music and Photo. Navigate to highlight the file and press
“ENTER” to playback the file. When the file is highlighted, the right panel shows the detail

16
information about the file. It will continue to play next file which is in the same kind of media
till the last file. You can also use the playback control while playing the media files. Please
refer to the section of video, music and photo playback.
Edit the media files
In the browser window, press the “EDIT” key to open the edit window. You can rename or delete the
files in the browser. If you don’t want to continue, select “Return” or press “Return” key on the remote
control.
Note: The edit function of the disk format “NTFS” is not supported by this device. If the connected
USB storage is in NTFS format, press the “EDIT” key and the warning message shows up “NTFS not
supported.”
Rename
Choose “Rename” and the keyboard will be pop-up for entering new name. Use the arrow key to
highlight the key and press “ENTER” to input the character. When the input is complete, navigate to
highlight the “OK” button and then press “ENTER”.

17
Delete
Choose the “Delete” and the confirm window will pop up. Select “OK” to delete the file or “Return” to
cancel.

18
Maintenance
Reset the device
You can press “MENU” to open the setup menu. To Reset the device, navigate to Setup menu and
select “Restore Default” and press “ENTER”. Please refer to setup section for the details.
Power on/Standby time
The device needs sometime to power on. The time costs are listed below.
Plug in the power -> power on and ready to use: it takes about 15 seconds.
Power on status -> Standby mode by pressing the power button: it takes about 15 seconds.
Standby mode -> power on mode by pressing the power button: it takes about 8 seconds.
In this short time, the remote control unit and the power button are not functional.
Battery
When the distance of remote control is dropped dramatically, please replace the new battery for the
remote control.
Black screen
If you get black screen while starting to play Movie or Photo files, please check the connection from
TV to the device. If the HD output is enabled, the video connection should be component YPbPr. In
case of not connecting YPbPr but CVBS, you can press “MENU” button to open the menu. It should
show menu picture via CVBS, so you should be able to see the setup menu. Then select Video, HD
output to turn off the HD output.
Connect DVI to HDMI converter
When using the DVI to HDMI converter to
connect the player, some LCD monitors could
only accept the SD video. This player detects
the support format of the LCD player and locks
the HD option if the monitor doesn’t support it.
In this case, the player output SD video to the
monitor.

19
Video/Audio codec support
Codec Feature Others File container
MPEG-1 MPEG-1
DAT
MPG
MPEG
MPEG-2 MP@HL / MP@ML 480i/480p/576i/576p/720p/1080i
ISO
IFO
VOB
MPG
MPEG
TS
TP
Divx 3/4/5/6
Xvid
DivX 3.11
DivX 4.12
DivX 5
DivX 6
DivX HD
Xvid
480i/480p/576i/576p/720p/1080i
Xvid: GMC not supported
AVI
MKV
Real Video Real Video 9
Real Video 10
640x480, 30fps, Average
450Kbps, Maximum 900Kbps,
2-pass video encoding*, No RPR**
RM/RMVB
Video
MPEG4
MJPEG
MJPEG unsupport AAC,
MPEG-Audio, u-law
MP4
AVI
MPEG-1 Layer 3 2 channels
8~320kbps, VBR M3U (MP3 list) supported mp3
WMA
WMA ver. 9.1
CBR up to 320kbps, VBR
up to 256kbps
ASF
wma
WAV Microsoft PCM only wav
AAC
MPEG-2/4 LC/HE profile
AAC+ ver 1/2
UP to 288 kbps
aac
mp4
m4a
OGG Vorbis ogg
Dolby Digital AC3 AC3 5.1 Included in the video only
Audio
DTS DTS 5.1 Included in the video only
*: The Real Video 9 &10 compressed with 2-pass Video encoding option are supported。
**: The RPR (Reference Picture Resampling) option isn’t supported. When playing the Real video

20
compressing with RPR option, the alert message will pop for notify the unsupported format.
Specification
Model name ZP-320
Disc format FAT16/FAT32/NTFS (Read only)/UDF/EXT3
Subtitle Chinese Traditional/Chinese Simplified/UTF8
Specification
Aspect ratio Pan Scan 4:3 / Letterbox 4:3 /16:9
Video 1x CVBS composite RCA Video 480i
1x Y/Pb/Pr Up to HD 720P/1080i
1x HDMI Up to HD 720P/1080i
Audio 1x AUDIO L/R RCA
Interface
USB 1x USB 2.0, 5V~1000mA
Video format MPEG1 (DAT / MPG / MPEG)
MPEG2 (MPG / MPEG / VOB / ISO / IFO / TS / TP)
MPEG4, MJPEG (MP4 / AVI)
DivX 3/4/5/6/HD, Xvid (AVI / MKV)
Real Video 9/10 (RM / RMVB)
Audio format MP3, WMA, WAV,ASF, AAC, OGG Vorbis, MP4, M4A(AAC),
M3U(Playlist), Dolby Digital AC3/DTS, Real Audio(RM)
Photo format jpg(JPEG), bmp(BMP), jpg(40-mega pixel)
Playback
Subtitle format
srt, sub, smi, *idx+sub, ssa, DVD subtitle, DivX subtitle
Power rating 12V 1.5A
Power
consumption
Operation: 4.8W (USB device consumption not included)
Standby: 1W
Size 101x146x30.6 mm (L x W x H)
Housing
Operation
temperature
40 Celsius
*: When playing the HD video, the display position of the subtitle could be in the higher part of the TV
picture. Only the subtitle format “idx + sub” can maintain the same position as playing in the SD video.
We recommend using this kind of subtitle format.
Table of contents
Other Zinwell Media Player manuals