Caldura ICM300 User manual

www.caldura.co.uk ICM300/14042016
Home Ice Cream Maker
Operating Instructions

www.caldura.co.uk ICM300/14042016
Introduction
The Caldura Home Ice Cream Maker is designed to give great
results for small batches of Ice Cream.
By making your own Ice Cream, you can keep control of the
ingredients used, and be certain of the quality of the end product.
This manual explains how to install and use the Ice Cream Maker,
and also contains some important safety advice. Please read it
carefully before using the product.
Installation
Before use, please carry out the following installation procedure:
Clean the unit in accordance with the Cleaning Instructions later in
this manual.
Place the unit on a level surface which is capable of supporting the
unit when fully loaded.
The unit should be located in a cool, dry place at least 5cm from any
walls and away from direct sunlight.
The unit should be installed in a place where the ambient
temperature is within the range 10ºC to 25ºC. If the ambient
temperature is outside of this range, the performance of the unit will
be affected.
Connect the unit to a standard 13 amp earthed electrical power
outlet using the power cord provided.

www.caldura.co.uk ICM300/14042016
Safety Instructions
In order to avoid electric shock, do not open the casing of the Ice
Cream Maker. There are no user serviceable parts inside and any
problems should be reported to your supplier.
Never obstruct the air vents.
Never allow children to operate or play with the Ice Cream Maker.
Never clean the unit with flammable liquids, the fumes can create a
fire hazard or explosion.
Do not store or use gasoline or any other flammable vapours and
liquids in the vicinity of this unit or any other electrical appliance.
The fumes can create a fire hazard or explosion.
The unit is supplied with a mains lead fitted with a standard UK 13
amp plug; if the lead becomes damaged, have it replaced
immediately by a qualified electrician. Any excess cord should be
secured behind the unit and not left exposed or dangling to prevent
accidental injury.
Parts Identification
1. Upper Lid
2. Lower Lid
3. Paddle Motor
4. Push Button to Release
5. Ice Cream Paddle
6. Main Unit
7. Aluminium Bowl
8. Ventilation Grill
9. Power Supply
10. Mode Selection

www.caldura.co.uk ICM300/14042016
Cleaning
Before cleaning, you MUST unplug the mains power supply from the
wall, AND remove the plug from the main unit.
Twist the lid anti-clockwise to release it from the main unit.
Remove the paddle from the motor mechanism by pulling.
Release the paddle motor from the lid by pressing the push button.
The upper and lower lid parts can now be separated by pinching the
two fixing lugs together.
A damp soapy sponge should be used, if required, to clean the
paddle drive shaft on the paddle motor. DO NOT immerse the
paddle motor in water.
The paddle, upper and lower lid can be cleaned using warm soapy
water. The parts are NOT dishwasher safe, but are easily cleaned
by hand immediately after use.
The aluminium bowl can be cleaned by holding the main unit under
warm running water whilst cleaning with a soapy sponge. DO NOT
immerse the main unit in water, and be very careful not to allow
water into the main unit through the ventilation grills.
Important: If any amount of water accidentally enters the main unit
during cleaning, remove as much as possible, and then leave in a
warm place to thoroughly dry out for at least 48 hours. The main unit
runs at a low voltage, so water ingress would not cause a safety
issue, but the electronics within the unit would most certainly be
damaged if it is operated when wet.

www.caldura.co.uk ICM300/14042016
Operation
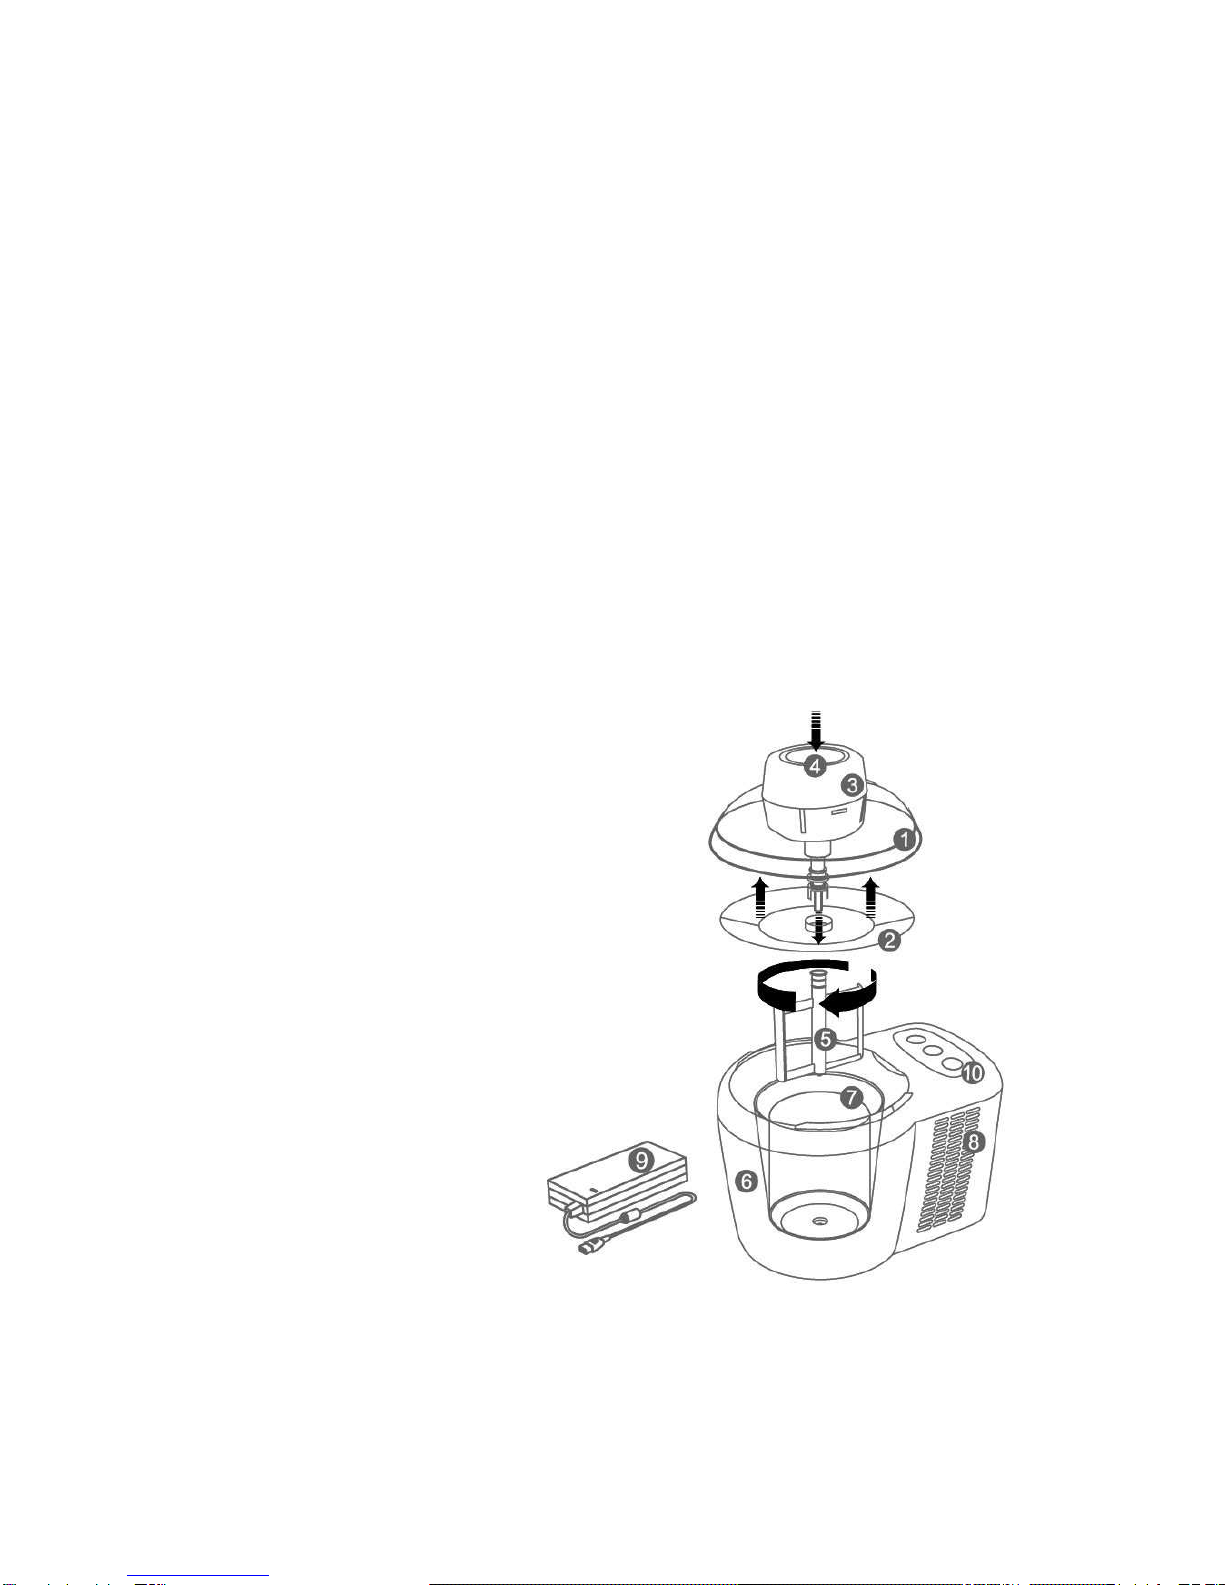
Plug the power supply into the main unit and plug the 3 pin mains
plug into a wall socket.
Pour your ice cream mixture into the aluminium bowl up to the MAX
line. It is very important that you do not fill the bowl higher than the
MAX line.
Assemble the lid of the machine as shown in the diagram at the start
of this booklet, and push the mixing paddle on to the motor shaft.
The lid assembly is fixed to the main unit by lining up the electrical
contact pins with the two small silver pads on the main unit, twisting
anticlockwise a little, and then clockwise to secure.
Start the Ice Cream Maker by selecting either “Hard” or “Soft” mode.
Once the correct consistency has been attained, the Ice Cream
Maker will automatically stop the paddle, and beep to indicate that
the cycle has finished.
Remove the lid assembly by twisting anticlockwise and lifting off.
Scoop out the Ice Cream using a small silicone spatula; to prevent
scratching, it is recommended not to use any other implements
inside the aluminium bowl.
If the Ice Cream is not being consumed immediately, and/or you
would prefer a firmer texture, place it in the freezer.
If you have more Ice Cream mixture, you can top up the machine
and restart it.
Depending upon the consistency of the mixture, the hardness mode
selected, and the ambient temperature, the Ice Cream Maker will
take from 40 to 90 minutes to complete the cycle.
One batch of Ice Cream (filled to the MAX line) makes 3 to 4
servings.

www.caldura.co.uk ICM300/14042016
Recipes
There are many recipes for Ice Cream available online, and several
dedicated recipe books. Here are a couple of easy recipes just to
get you started, once you make one of these, you’ll be hooked!
Really Good Vanilla Ice Cream (makes 2 batches)
1 Large Egg
250ml Double Cream
100ml Milk
1 Vanilla Pod
100g Caster Sugar
Warm the milk just a little in a saucepan and remove from the heat.
Split the vanilla pod lengthways and scrape out the seeds from
inside. Place the seeds and the pod into the warm milk, and leave to
infuse.
Meanwhile, crack the egg into a mixing bowl.
Whisk the egg (an electric whisk is preferable) for a few minutes until
light and fluffy.
Gradually add the sugar while still whisking to blend.
Remove the vanilla pod from the milk and cool it down as much as
possible (you can run the bottom of the saucepan under the cold tap
to speed up the process).
Mix the milk with the cream and pour into the egg/sugar mixture
while stirring gently.
Pour the mixture into the Ice Cream Maker up to the MAX line. Keep
the remaining mixture to one side for the second batch.
Put the lid on, and set the machine to “Soft” mode.
The first batch should be ready in about 50 minutes to an hour.
Remove it to a bowl and place in the freezer while you continue with
the second batch.

www.caldura.co.uk ICM300/14042016
Easy Banana/Banoffee Ice Cream the Kids will Love (makes 1
batch)
2 Bananas
100ml Milk
20g Caster Sugar
Toffee Sauce (optional)
Peel and mash the bananas to a smooth pulp.
Add the sugar to the milk and stir well to dissolve.
Mix all the ingredients together and pour into the machine (do not go
beyond the MAX line).
Put the lid on, and set the machine to “Soft” mode.
This mixture takes a little longer to freeze (a little over an hour), and
due to the fibrous nature of the bananas, it can stick to the paddle
when it gets hard, so keep an eye on it. Once it looks ready, it’s
done!
Add a good squeeze of toffee sauce whilst you’re unloading it from
the machine, and the kids will love you forever!

www.caldura.co.uk ICM300/14042016
Warranty
The Ice Cream Maker carries a full 12 month warranty which covers
faults due to workmanship or materials but not accidental damage.
In the event of any warranty query, please contact the retailer you
bought the unit from. You will require proof of purchase in order to
claim against the 12 month warranty.
Technical Data
Voltage: 100-240V AC.
Maximum input power: 90W.
Capacity: 350ml.
Net weight: 2.55Kg.
Dimensions: 185 x 238 x 265mm (w x h x d).
Table of contents
Popular Ice Cream Maker manuals by other brands

Cuisinart
Cuisinart Ice Cream Duo ICE40BCE instructions

Wolfgang Puck
Wolfgang Puck BCICM020 Use and care guide

Silvercrest
Silvercrest SEM 90 C3 Short manual

Silvercrest
Silvercrest 111458 operating instructions

Silvercrest
Silvercrest SECM 12 A1 operating instructions

Clatronic
Clatronic ICM 3764 instruction manual