CallToU VP02 User manual
Caregiver Pager System
User Manual
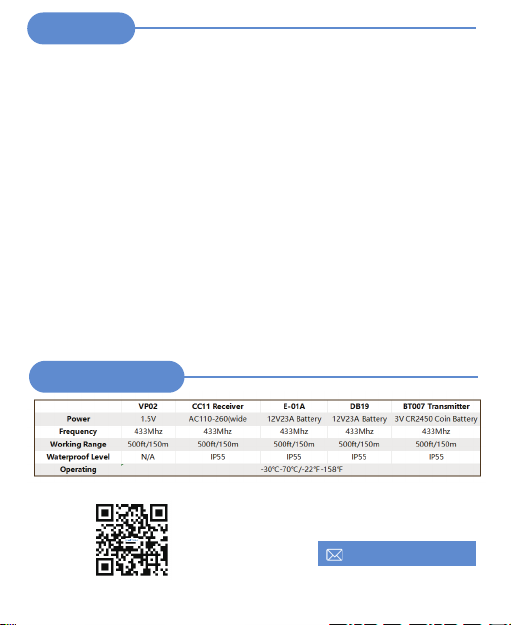
RECEIVER MODEL
Portable Battery Receiver
VP02
Plug-in Receiver
CC11WH
TRANSMITTER MODEL
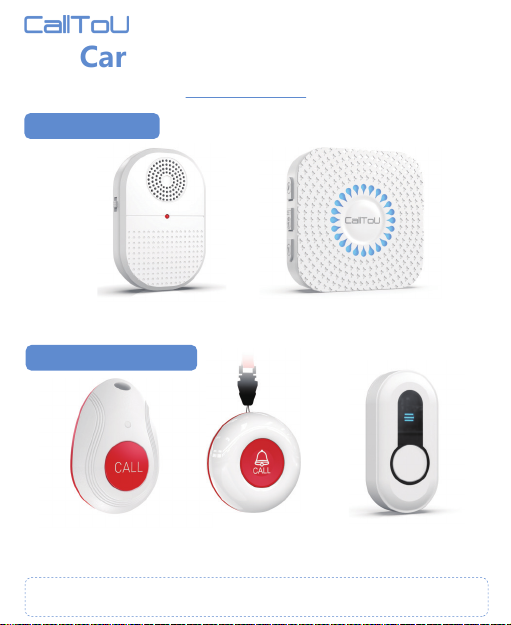
Wearable Button
BT007WH
Wearable Button
E-01A
Stickable Button
DB19WH
NOTE: In the CCVP Series, there are different types of receivers and buttons, please
refer to the corresponding instructions according to the system you purchased.

A Good Life in Old Age
Monitoring and Improving Quality in Long-term Care
As a growing number of frail old people in need of home care,
delivering quality long-term care services, which are effective and
responsive in time, has become a priority for every family.
"Call to You" is determined to provide perfect solutions that enable
your loved ones to retain their independence and dignity in daily
life, so they can live on their own and release your burden with
peace of mind.
We "CallToU" fucus on professional home caregiver pagers for
more than a decade, and have helped and cared for millions of
ELDERLY and those in need to help timely.
"Call to you" gives more care for the elderly
You Need, We Here!
For FAQs and more information, please visit:
CallToU Brand Product Introduce
www.calltou.com

ANYWHERE IN THE HOME
Deliver users' help signal to their family or caregivers

Product Diagram
Plug-in Receiver Model :CC11WH
55 ringtones 5 volume levels(0-110db)

Product Diagram
Portable Battery Receiver Model :VP02
Battery receiver with vibration reminder
15 tones 5 volume control from 0 dB to 110 dB
Product Diagram
E-01A
● Low Battery Reminder
● IP55 Water Repellent
● Double Sided Adhesive Tape
DB19WH
● IP55 Water Repellent
● Double Sided Adhesive Tape
BT007WH
● Low Battery Reminder
● IP55 Water Repellent
Detachable Lanyard
Silicone Cover
Detachable Bracket
(wall-mounted)
Light Indicator after
Pressing
Silicone Cover
With stickers to stick on
the wall
Red Light Indicator after
Pressing
Detachable Lanyard
Red Light Indicator
afterPressing
Silicone Cover
Features
Portable Battery Receiver - VP02
- Portable and Back Clip
- 15 Ringtones for Choose
- 500Feet Coverage Range
- Alert mode: Vibration, Ringtone
- Driven by 2 AAA batteries (included)
- Low Battery Reminder(Audio reminder)
- 5-level Adjustable Volumes(0dB - 110dB)
- STOP Button: Switch it to stop the receiver's calling.
- Extendable with more receivers and call buttons(CallToU)
- Memory function, set ringtone will not change(even after power off)
Plug-in Receiver - CC11WH
- LED Flashing Receiver
- 55 Ringtones for Choose
- 500Feet Coverage Range
- 5-level Adjustable Volumes(0dB - 110dB)
- Extendable with more receivers and call buttons(CallToU)
- Memory function, set ringtone will not change(even after power off)
Specifications
For FAQs and more information, please visit:
Address:
room 605 , building 2, hengdali factory, chidian
J injiang, fujian, CN
www.calltou.com
Receiver Operating Instructions
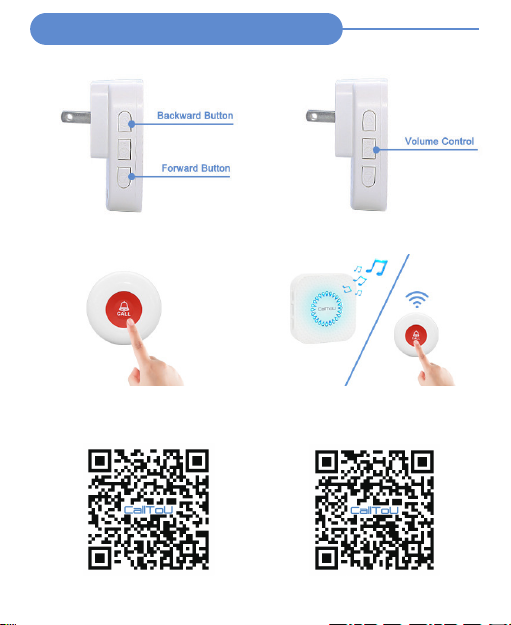
Pair Method of Plug-In Receiver --- CC11WH
Select your wanted ringtone
Press "Backward" and "Forward"
button to choose your wanted chimes
Press Volume Button
Press "Volume" Button until hear a "Ding"
Pairing
Short press call button, will hear a
"Ding-ding"
Paired
Press call button again to confirm the
setting is successful
CC11WH Pairing Method VP02 Pairing Method

Receiver Operating Instructions
Pairing Method of Portable Receiver --- VP02
Turn on the portable receiver
Put 2 AAA batteries (included in the package)
into the receiver, then the receiver turns ON.
Select your wanted setting
Setting your wanted chimes, volume, and
vibration before pairing
Pairing
Long press [Setting &Volume] until you hear
“DI” to into the pairing mode
Short press call button, will hear a"Di Di"
Paired
Press call button again to confirm the
setting is successful
NOTE:
1) The device has been paired before leaving the factory, please test the working range
before use.
2) Press [SOS Button], and the receiver will be alerted and flashing.
3) After testing, you can use the device as needed.
4) The pairing process of E-01A,DB19 and BT007 transmitters is the same. Follow the steps
shown in the figure above.
5) If your first pairing fails, please try to re-pair once time, pairing may be disturbed by
other signals.
6) If an abnormal sound occurs during use, please clear the setting and re-pair.
7) If you buy more extra receivers and transmitters, you need to pair the new units with
your original units, then they can work together.
8) The default ringtone is "Ding-Dong".If you want to change the ringtone, you need to
reset the receiver, then select the ringtone you want, and then re-pair it.
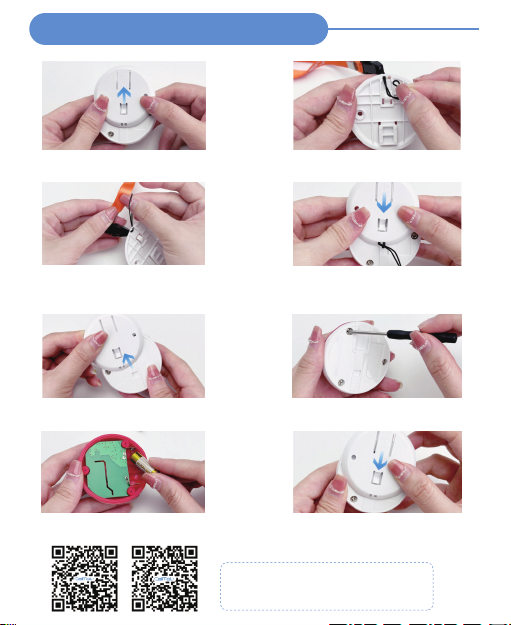
Button Operating Instructions
Attach Lanyard - E-01A
STEP 1
Slide the back cover according to the
direction of the arrow
STEP 2
Pin the lanyard
STEP 3
Slip the tip of the rope over the entire
lanyard
STEP 4
Slide the back cover back (to where it
was)
Replacing Battery - E-01A
STEP 1
Slide the back cover according to the
direction of the arrow
STEP 2
Open the button base by turning the
screw with a screwdriver
STEP 3
Replace the 23A 12V AIkaline battery
STEP 4
Close the button base, retighten the
screws, and close the back cover
Video Guide
Button -Operating Instructions (E-01A)
Low battery alert - red light flashes
This manual suits for next models
4
Table of contents


