CamFi Pro User manual

Contents
Chapter 1: CamFi Pro at Glance .................................................................................................... 1
Packaging List .................................................................................................................................. 1
CamFi Overview ................................................................................................................................ 1
Chapter 2: Getting started ..............................................................................................................3
Charging Battery ..............................................................................................................................3
Quick Installation ..............................................................................................................................3
How to replace the battery? ...........................................................................................................5
Firmware Upgrade ............................................................................................................................5
Chapter 3: Using the iOS App ........................................................................................................6
Remote capture ................................................................................................................................7
Browse photo .................................................................................................................................. 13
Settings ............................................................................................................................................ 15
Chapter 4: Working with Sony Cameras .................................................................................... 16
Connection ...................................................................................................................................... 16
PC Remote mode ........................................................................................................................... 17
MTP mode ....................................................................................................................................... 18
Chapter 5: Precautions and FAQ ................................................................................................. 19
PRECAUTIONS ............................................................................................................................... 19
FAQ ................................................................................................................................................. 20

Chapter 1: CamFi Pro at Glance
Packaging List
CamFi Overview
1. CamFi Pro
2. 3200 mAH battery
3. Mini USB cable for connecting to the camera
4. Micro USB cable for charging the battery
5. Quick start guide
USB port
ON/OFF
Charging port
Reset
5G Wi-Fi
USB
Power
Battery
Hot shoe screw
Battery compartment
1

Power Light
Battery Light
5G Wi-Fi Light
USB Light
Turned on when the system is starting up
The light is red when the battery is low.
The light is orange when the battery is charging.
The light is green when the battery is fully charged.
The WiFi starts up normally, when the light is on.
Turned on when the USB is connecting.
2

Charging Battery
Use the micro USB cable to connect to a mobile phone
charger or the USB port of a computer to charge the
battery of the CamFi device.
Micro USB
Connect to CamFi Pro
USB
Chapter 2: Getting started
Quick Installation
1. Connect CamFi Pro to your camera
Connect the CamFi Pro device to your camera using the mini USB
cable, then turn on the CamFi Pro and your camera.
3

Get the CamFi app
You will need to install the CamFi app on your
smartphone or your PC. The CamFi app is available for
iPhone®, Android ™ , Mac and Windows®. For a full list
of supported devices, visit:
http://www.cam-.com/download.html
1. On your smartphone or your computer browser, visit:
http://www.cam-.com/download.html
2. Follow the instructions to install the CamFi app on
your smartphone or your computer.
Connect to the Wi-Fi hotspot of the CamFi Pro
After you turn on CamFi Pro and the system status indicator light turns a constant
green, you can nd and connect to the Wi-Fi hotspot of the CamFi Pro with the name
prexed with “CamFi-Pro”on your smart phone or your computer.
Start CamFi App
Launch the CamFi app on your smart phone or your computer.
CamFi-Pro-xxxxxx
4

How to replace the battery?
Step 1:
Detach the battery cover from A, B, C.
A
D
B
C
Step 2:
Release the buckle from D.
D
Watch the video
Step 3:
Completely separate the battery cover from A.
Firmware Upgrade
5
How to upgrade the firmware?
Please connecting the WiFi signal of CamFi
Pro, open the app, tap the Settings-> Upgrade
Firmware.
DoneSettings
About
3.216.329Firmware Update
Network Settings
Access Password
AP modeConnection Mode
Print Settings
Camera Information
Transfer Settings
Auto download (Sony only)
Confirm Photo
Auto download (Sony only): Download the photos automatically
when shooting
100%9:41 AM
CamFi
Upgrade
Cancel
New firmware is available
Current version: 3.1.16.323
New version: 3.2.16.329
Please disconnect the camera
before upgrading.
Firware upgrade

Chapter 3: Using the iOS App
The CamFi app supports iPad, iPhone, Android, Windows and Mac. We’ll only introduce
the iOS app to illustrate the use of CamFi. The apps on the other platforms are similar,
and any parts where signicant dierences exist will be called out.
The user can slide the toolbar to show more buttons.
Camera status bar
Exposure mode,
shutter speed,
aperture,ISO,EV
Open live view
Toolbar
Browse photo mode Auto view mode
Capture
Settings
6

Live view
Change the capture settings
Tap the “Live view” at the center of
the screen or the “View On” button at
the bottom to start the live view.
Tap the shutter button at the bottom to remote control the camera to capture.
To change the capture settings, please tap the top area of the screen where shows the
exposure mode, shutter, aperture and ISO.
It will pop up a setting window. User can drag the sliders to change the settings.
Note: the exposure mode for Canon camera cannot be set.
Open live view
Live view switch
Tap to set the exposure mode,
shutter, aperture and ISO
Remote capture
7
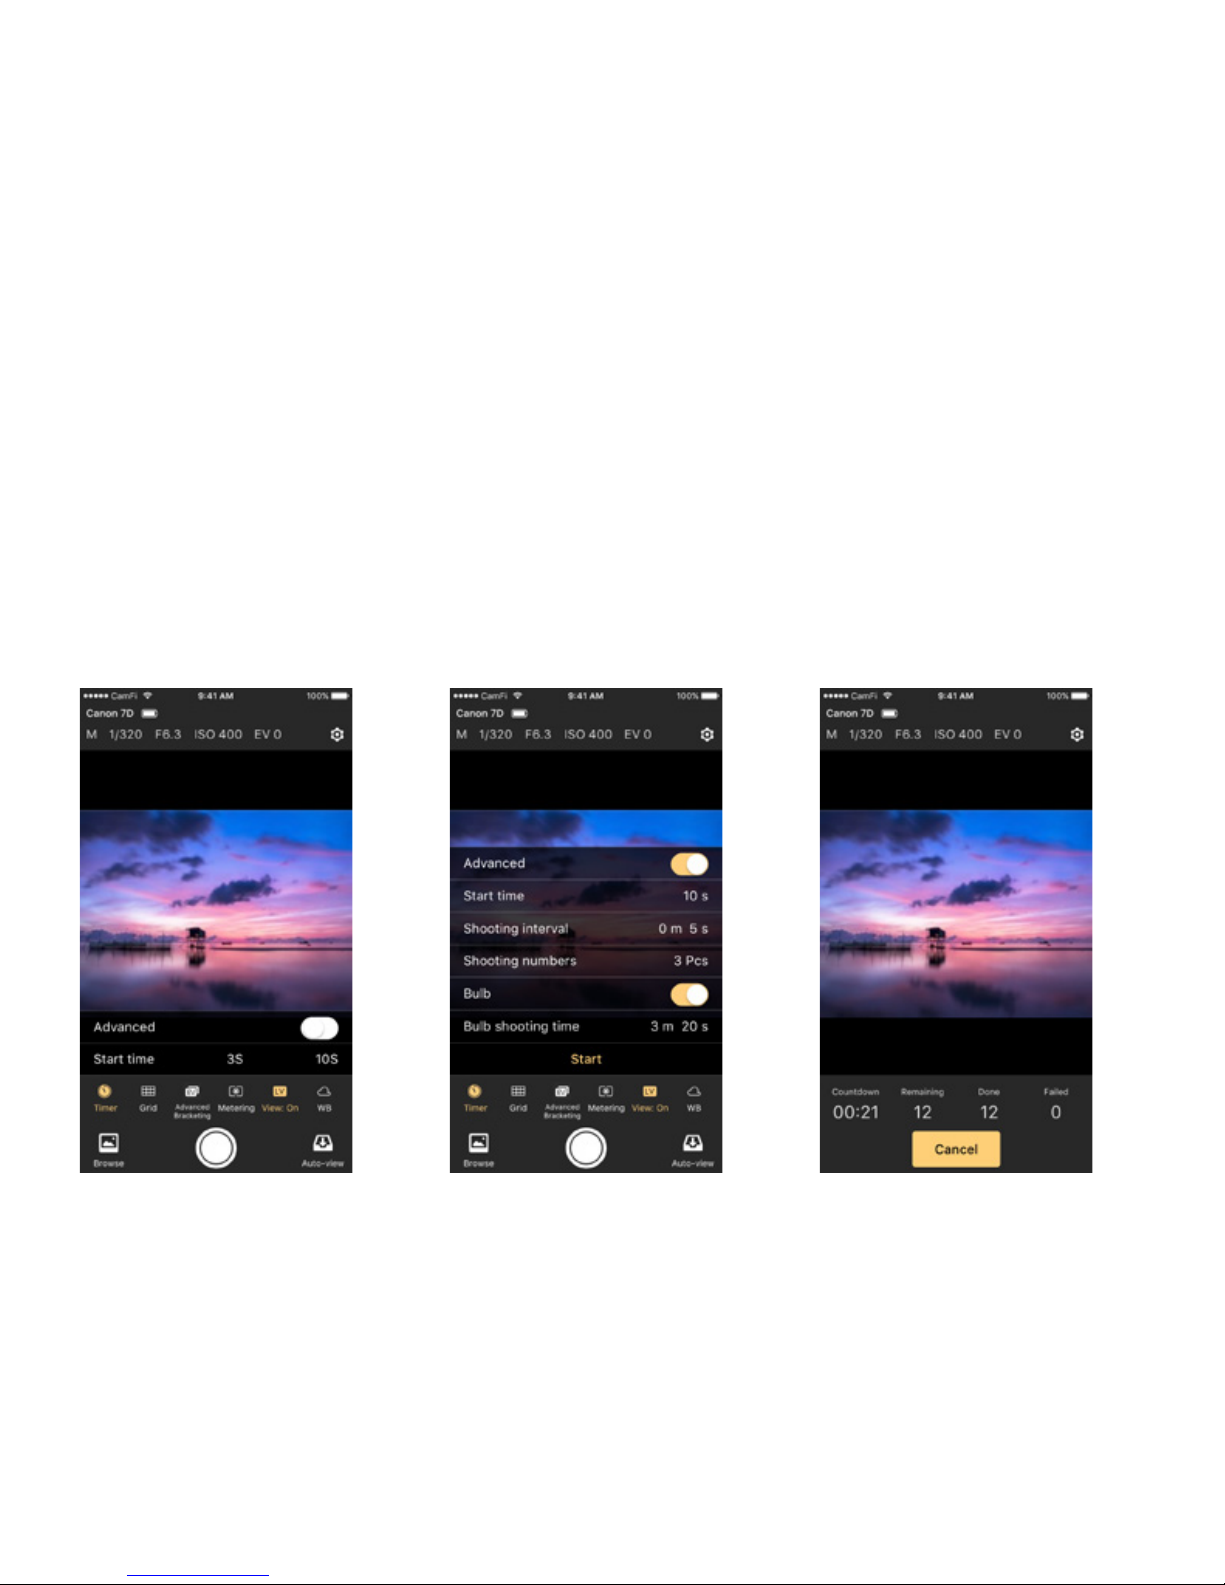
Time-lapse
Quick mode
Advanced Mode
There are two modes for time-lapse: the quick mode and the advanced mode.
It has two options, 3s and 10s. You can use it for quick self-portrait.
After switching to the advanced mode, you may change the following properties:
• Start-up time
• Shooting interval
• Shooting numbers
• Bulb mode
• Bulb time
After setting, tap the Start button to begin capture.
8

Grid
Manual Focus
Show and hide the grid.
Please tap the Manual Focus button to change the focus manually. Manual Focus can
only be used when the lens is set to AF mode and the live view is on.
Manual focus
9
Other manuals for Pro
1
Table of contents
Other CamFi Camera Accessories manuals


Popular Camera Accessories manuals by other brands

Viltrox
Viltrox EF-NEX Mount instructions

Calumet
Calumet 7100 Series CK7114 operating instructions

Ropox
Ropox 4Single Series User manual and installation instructions

Cambo
Cambo Wide DS Digital Series Main operating instructions

Samsung
Samsung SHG-120 Specification sheet

Ryobi
Ryobi BPL-1820 Owner's operating manual


