Campbell AM25T User manual

INSTRUCTION MANUAL
AM25T Solid-State
Thermocouple Multiplexer
Revision: 4/17
Copyright © 1995-2017
Campbell Scientific, Inc.


Limited Warranty
“Products manufactured by CSI are warranted by CSI to be free from defects in
materials and workmanship under normal use and service for twelve months
from the date of shipment unless otherwise specified in the corresponding
product manual. (Product manuals are available for review online at
www.campbellsci.com.) Products not manufactured by CSI, but that are resold
by CSI, are warranted only to the limits extended by the original manufacturer.
Batteries, fine-wire thermocouples, desiccant, and other consumables have no
warranty. CSI’s obligation under this warranty is limited to repairing or
replacing (at CSI’s option) defective Products, which shall be the sole and
exclusive remedy under this warranty. The Customer assumes all costs of
removing, reinstalling, and shipping defective Products to CSI. CSI will return
such Products by surface carrier prepaid within the continental United States of
America. To all other locations, CSI will return such Products best way CIP
(port of entry) per Incoterms ® 2010. This warranty shall not apply to any
Products which have been subjected to modification, misuse, neglect, improper
service, accidents of nature, or shipping damage. This warranty is in lieu of all
other warranties, expressed or implied. The warranty for installation services
performed by CSI such as programming to customer specifications, electrical
connections to Products manufactured by CSI, and Product specific training, is
part of CSI's product warranty. CSI EXPRESSLY DISCLAIMS AND
EXCLUDES ANY IMPLIED WARRANTIES OF MERCHANTABILITY
OR FITNESS FOR A PARTICULAR PURPOSE. CSI hereby disclaims,
to the fullest extent allowed by applicable law, any and all warranties and
conditions with respect to the Products, whether express, implied or
statutory, other than those expressly provided herein.”

Assistance
Products may not be returned without prior authorization. The following
contact information is for US and international customers residing in countries
served by Campbell Scientific, Inc. directly. Affiliate companies handle repairs
for customers within their territories. Please visit www.campbellsci.com to
determine which Campbell Scientific company serves your country.
To obtain a Returned Materials Authorization (RMA), contact CAMPBELL
SCIENTIFIC, INC., phone (435) 227-9000. Please write the issued RMA
number clearly on the outside of the shipping container. Campbell Scientific’s
shipping address is:
CAMPBELL SCIENTIFIC, INC.
RMA#_____
815 West 1800 North
Logan, Utah 84321-1784
For all returns, the customer must fill out a “Statement of Product Cleanliness
and Decontamination” form and comply with the requirements specified in it.
The form is available from our website at www.campbellsci.com/repair. A
completed form must be either emailed to repair@campbellsci.com or faxed to
(435) 227-9106. Campbell Scientific is unable to process any returns until we
receive this form. If the form is not received within three days of product
receipt or is incomplete, the product will be returned to the customer at the
customer’s expense. Campbell Scientific reserves the right to refuse service on
products that were exposed to contaminants that may cause health or safety
concerns for our employees.

Safety
DANGER — MANY HAZARDS ARE ASSOCIATED WITH INSTALLING, USING, MAINTAINING, AND WORKING ON OR AROUND
TRIPODS, TOWERS, AND ANY ATTACHMENTS TO TRIPODS AND TOWERS SUCH AS SENSORS, CROSSARMS, ENCLOSURES,
ANTENNAS, ETC. FAILURE TO PROPERLY AND COMPLETELY ASSEMBLE, INSTALL, OPERATE, USE, AND MAINTAIN TRIPODS,
TOWERS, AND ATTACHMENTS, AND FAILURE TO HEED WARNINGS, INCREASES THE RISK OF DEATH, ACCIDENT, SERIOUS
INJURY, PROPERTY DAMAGE, AND PRODUCT FAILURE. TAKE ALL REASONABLE PRECAUTIONS TO AVOID THESE HAZARDS.
CHECK WITH YOUR ORGANIZATION'S SAFETY COORDINATOR (OR POLICY) FOR PROCEDURES AND REQUIRED PROTECTIVE
EQUIPMENT PRIOR TO PERFORMING ANY WORK.
Use tripods, towers, and attachments to tripods and towers only for purposes for which they are designed. Do not exceed design limits.
Be familiar and comply with all instructions provided in product manuals. Manuals are available at www.campbellsci.com or by
telephoning (435) 227-9000 (USA). You are responsible for conformance with governing codes and regulations, including safety
regulations, and the integrity and location of structures or land to which towers, tripods, and any attachments are attached. Installation
sites should be evaluated and approved by a qualified engineer. If questions or concerns arise regarding installation, use, or
maintenance of tripods, towers, attachments, or electrical connections, consult with a licensed and qualified engineer or electrician.
General
•Prior to performing site or installation work, obtain required approvals and permits. Comply
with all governing structure-height regulations, such as those of the FAA in the USA.
•Use only qualified personnel for installation, use, and maintenance of tripods and towers, and
any attachments to tripods and towers. The use of licensed and qualified contractors is highly
recommended.
•Read all applicable instructions carefully and understand procedures thoroughly before
beginning work.
•Wear a hardhat and eye protection, and take other appropriate safety precautions while
working on or around tripods and towers.
•Do not climb tripods or towers at any time, and prohibit climbing by other persons. Take
reasonable precautions to secure tripod and tower sites from trespassers.
•Use only manufacturer recommended parts, materials, and tools.
Utility and Electrical
•You can be killed or sustain serious bodily injury if the tripod, tower, or attachments you are
installing, constructing, using, or maintaining, or a tool, stake, or anchor, come in contact with
overhead or underground utility lines.
•Maintain a distance of at least one-and-one-half times structure height, 20 feet, or the distance
required by applicable law, whichever is greater, between overhead utility lines and the
structure (tripod, tower, attachments, or tools).
•Prior to performing site or installation work, inform all utility companies and have all
underground utilities marked.
•Comply with all electrical codes. Electrical equipment and related grounding devices should be
installed by a licensed and qualified electrician.
Elevated Work and Weather
•Exercise extreme caution when performing elevated work.
•Use appropriate equipment and safety practices.
•During installation and maintenance, keep tower and tripod sites clear of un-trained or non-
essential personnel. Take precautions to prevent elevated tools and objects from dropping.
•Do not perform any work in inclement weather, including wind, rain, snow, lightning, etc.
Maintenance
•Periodically (at least yearly) check for wear and damage, including corrosion, stress cracks,
frayed cables, loose cable clamps, cable tightness, etc. and take necessary corrective actions.
•Periodically (at least yearly) check electrical ground connections.
WHILE EVERY ATTEMPT IS MADE TO EMBODY THE HIGHEST DEGREE OF SAFETY IN ALL CAMPBELL SCIENTIFIC PRODUCTS,
THE CUSTOMER ASSUMES ALL RISK FROM ANY INJURY RESULTING FROM IMPROPER INSTALLATION, USE, OR
MAINTENANCE OF TRIPODS, TOWERS, OR ATTACHMENTS TO TRIPODS AND TOWERS SUCH AS SENSORS, CROSSARMS,
ENCLOSURES, ANTENNAS, ETC.


i
Table of Contents
PDF viewers: These page numbers refer to the printed version of this document. Use the
PDF reader bookmarks tab for links to specific sections.
1. Introduction ................................................................1
2. Precautions ................................................................2
3. Initial Inspection.........................................................2
4. Overview .....................................................................2
4.1 Measurement Terminals.......................................................................2
4.2 Excitation Terminal (VX) ....................................................................2
4.3 Power (12V).........................................................................................3
4.4 Power Ground (G), Ground Terminals (⏚) ..........................................3
4.5 Analog Ground (⏚) ..............................................................................3
4.6 Reset (RES)..........................................................................................3
4.7 Clock (CLK) ........................................................................................3
5. Overview .....................................................................4
6. Specifications.............................................................4
7. Installation ..................................................................5
7.1 Installing the AM25T...........................................................................5
7.2 Datalogger to AM25T Wiring..............................................................6
7.3 Sensor to AM25T Wiring ....................................................................7
7.3.1 Thermocouple Measurement.........................................................7
7.3.2 Differential Analog Measurements...............................................8
7.3.3 Mixed Sensor Types .....................................................................8
8. Operation....................................................................8
8.1 General Measurement Considerations .................................................8
8.2 Datalogger Programming .....................................................................9
8.2.1 CRBasic Programming ...............................................................10
9. Maintenance .............................................................10
Appendices
A. Importing Short Cut Code Into CRBasic Editor ... A-1

Table of Contents
ii
B. Example Program...................................................B-1
Figures
1-1. AM25T Solid-State Thermocouple Multiplexer ................................. 1
5-1. AM25T Solid-State Thermocouple Multiplexer with cover................ 4
7-1. External Battery Connections.............................................................. 6
7-2. Differential Measurement of Type T Thermocouple........................... 8
7-3. Differential Voltage Measurement ...................................................... 8
8-1. Short Cut ............................................................................................. 9
Tables
7-1. AM25T to Datalogger Wiring ............................................................. 7
CRBasic Example
B-1. CR6 Program Using One Instruction to Measure Both the
Reference Temperature and Thermocouples................................ B-1

1
AM25T Solid-State Thermocouple
Multiplexer
1. Introduction
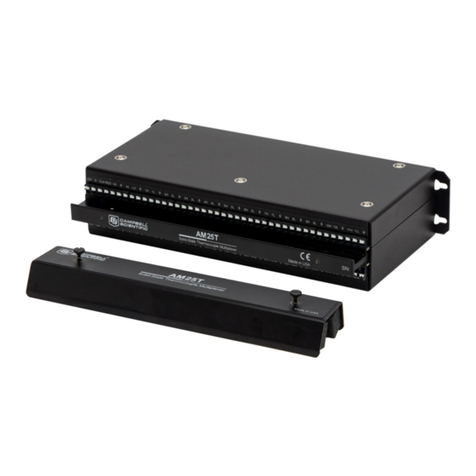
The AM25T (FIGURE 1-1) multiplexer increases the number of channels for
measuring thermocouples or voltage sensors with Campbell Scientific
dataloggers. The AM25T is positioned between the sensors and the datalogger.
The datalogger controls the AM25T’s solid-state relays, sequentially
connecting each sensor to the datalogger.
The AM25T is not suitable for resistive bridge measurements (high impedance
of the solid-state relays) or multiplexing power (25 mA maximum switching
current).
A maximum of 25 thermocouples (differential voltage measurement) can be
multiplexed by an AM25T. Single-ended voltage measurements are not
recommended.
The AM25T must be used in a noncondensing environment. An enclosure is
required for field use. In applications where one or two multiplexers are
deployed in the field, the ENC12/14 can be used. The ENC16/18 can be used
to house several multiplexers at the same site.
FIGURE 1-1. AM25T Solid-State Thermocouple Multiplexer

AM25T Solid-State Thermocouple Multiplexer
2
2. Precautions
•The AM25T is not designed to multiplex power. Its intended function is to
switch low-level analog signals. Switched currents in excess of 30 mA will
degrade the relay contacts involved, rendering that channel unsuitable for
further low-level analog measurement. Customers who need to switch
power are directed to Campbell Scientific’s SDM-CD16AC, A6REL-12,
or A21REL-12 relays.
•After wiring an AM25T, exercise due care to avoid inadvertently putting
excess voltage on a line or short circuiting a power supply which might
damage connected devices such as datalogger, wiring panel, sensor, or
multiplexer (not covered under warranty).
3. Initial Inspection
•The AM25T ships with:
oAM25T Cover
o4 each pn 6044, Grommet
o4 each pn 505, Screw
•Upon receipt of the AM25T, inspect the packaging and contents for
damage. File damage claims with the shipping company.
•Immediately check package contents. Thoroughly check all packaging
material for product that may be concealed. Check model number, part
numbers, and product descriptions against the shipping documents. Model
or part numbers are found on each product. On cables, the number is often
found at the end of the cable that connects to the measurement device.
Ensure that the expected lengths of cables were received. Contact
Campbell Scientific immediately if there are any discrepancies.
4. Overview
The AM25T is connected to the datalogger with eight insulated wires and a
large ground wire. These wires are used to power and control the multiplexer,
and connect the common analog inputs to the datalogger.
4.1 Measurement Terminals
There are 25 differential channels on the AM25T. These channels are labeled 1H
and 1L through 25H and 25L. The channels are sequentially connected and
reversed to the common channels HI and LO.
4.2 Excitation Terminal (VX)
This terminal is used to excite the reference temperature (PRT) on the AM25T.
The excitation line is protected from transients with a transorb. (Earlier
versions of the AM25T, prior to serial number 1839, used a Zener diode for
protection. The diode limited the negative excitation voltage to –400 mV.)

AM25T Solid-State Thermocouple Multiplexer
3
4.3 Power (12V)
The AM25T requires a 9.6 to 16 Vdc (12 Vdc nominal) power supply.
In low current drain applications, it is convenient to power the AM25T from
the datalogger’s battery. For power intensive operations, use a high amp hour
12 Vdc battery.
See Campbell Scientific’s application note on power supplies
(https://s.campbellsci.com/documents/us/technical-papers/pow-sup.pdf) for
information on calculating the power requirements for a system.
4.4 Power Ground (G), Ground Terminals (⏚)
Each differential input channel has a ground terminal located next to it. The
ground terminals (⏚) are common with the power ground (G) and the ground
lug on the base. Connect the sensor shields to the ground terminals (⏚). Always
tie the datalogger and multiplexer to a common earth ground via the ground
lug.
4.5 Analog Ground (⏚)
The analog ground terminal is the ground reference for the AM25T reference
temperature measurement It is the ⏚terminal located between the VX and HI
terminals. Analog ground is not common with the other ground terminals
labeled ⏚. The analog ground terminal must be connected to the
datalogger ground as shown in TABLE 7-1.
4.6 Reset (RES)
A control port is used to operate the RES channel. The AM25T is reset and
activated by applying and holding 5 Vdc to the RES channel. Once the AM25T
is activated, the AM25T reference temperature can be immediately measured.
The AM25T enters its quiescent state when the RES channel is set to 0Vdc.
4.7 Clock (CLK)
Pulsing the CLK channel sequentially advances the relays. A control port is
used to operate the CLK channel.
The first CLK pulse advances the relays to the reference temperature excitation
channel. The second CLK pulse advances the relays and connects HI and LO to
1H and 1L on the multiplexer.
Two clock pulses are required to advance to the next adjacent
sensor input channel on the AM25T.
The fourth CLK pulse advances the relays and connects HI and LO to 2H and
2L. The sixth CLK pulse advance the relays and connects HI and LO to 3H
and 3L. This sequence is continued for the remaining input channels.
NOTE

AM25T Solid-State Thermocouple Multiplexer
4
5. Overview
The AM25T is housed in an anodized aluminum case with a cover that will
help reduce temperature gradients across the AM25T’s terminal strips
(FIGURE 5-1).
The terminal strips that run the length of the AM25T are for sensor
connections. All inputs are protected by spark gaps. All terminals accept
stripped and tinned lead wires up to 1.5 mm (0.059 inches) in diameter. A
strain-relief flange is located between the input terminals.
FIGURE 5-1. AM25T Solid-State Thermocouple Multiplexer with cover
6. Specifications
Power: Unregulated 9.6 to 16 Vdc; 12 Vdc nominal
Current Drain
Quiescent: 0.5 mA
Active: 1.0 mA (typical)
Enable
Inactive: < 0.9 V
Active: 3.5 to 5.0 V (7 V max.)
Clock
The relays are advanced on the falling edge of the clock pulse (transition
from >3.5 V to <1.5 V; 7 V max.). The minimum clock pulse width is
limited by the datalogger.
Minimum ON Time:50 microseconds
Minimum OFF Time:60 microseconds

AM25T Solid-State Thermocouple Multiplexer
5
Operating Temperature
Standard: –40 to 85 °C
PRT accuracy ±0.4 °C
Operating Humidity
Noncondensing: 0 to 95%
Dimensions
Length: 23.6 cm (9.3 in)
Width: 5.10 cm (2.0 in)
Depth: 13.2 cm (5.2 in)
Weight: 0.91 kg (2.0 lb)
3.6 kg (8.0 lb); shipping
Expandability (Nominal)*:2 AM25Ts per CR800 or CR850
3 AM25Ts per CR6
4 AM25Ts per CR1000, CR3000
7 AM25Ts per CR5000
CR9000X variable, depending on how many
CR9051E modules are installed
Maximum Cable Length: Multiplexers can be located up to 305 m
(1000 ft) from the datalogger. When
lightning protection is required, do not
exceed 152 m (500 ft) in cable length. The
spark gaps will not fire if the heavy ground
wire is longer than 152 m (500 ft).
Typical relay Resistance: 500 Ω
Maximum Switching Current: 25 mA; switching currents greater than
25 mA will damage the relays and render
them unusable.
Compliance: View the EU Declaration of Conformity at
www.campbellsci.com/am25t
*Assumes sequential activation of multiplexers and that each datalogger channel is
uniquely dedicated. If your application requires additional multiplexing capability,
please consult Campbell Scientific for application assistance.
7. Installation
7.1 Installing the AM25T
The AM25T may be operated in a non-condensing environment, such as a
laboratory, without being housed in an enclosure. For field use, the AM25T
must be protected against dust and liquid. Campbell Scientific offers weather-
resistant enclosures for this purpose.
Fasten the AM25T to the enclosure backplate. Securely fasten the leads to the
strain relief flange running between the AM25T terminal strips and install the
cover to reduce temperature gradients during thermocouple measurements.

AM25T Solid-State Thermocouple Multiplexer
6
7.2 Datalogger to AM25T Wiring
When powering the AM25T from the same battery as the datalogger, connect
the datalogger to the AM25T as shown in TABLE 7-1. Two CABLE4CBL-L
cables typically carry control, power, and measurement signals between the
AM25T and the datalogger.
Do not reverse the polarity of the +12 volt and ground
wires. Damage to the multiplexer, sensors, and
datalogger will occur.
A separate battery can be used to power the AM25T. A separate battery might
be used when the AM25T is installed some distance from the datalogger.
Ground must be connected between the datalogger and the AM25T (FIGURE
7-1).
FIGURE 7-1. External Battery Connections
When leads in excess of 152 m (500 feet) are used to connect the datalogger to
the AM25T, it may be necessary to compensate for the drop in PRT excitation
voltage.
All AM25T inputs are spark gap protected. To ensure that
the spark gaps fire, the large ground wire between the
AM25T and the datalogger must not be greater than 152 m
(500 ft). In applications where lightning protection is not
required, limit the cable length between the AM25T and the
datalogger to 305 m (1000 ft).
WARNING
CAUTION

AM25T Solid-State Thermocouple Multiplexer
7
TABLE 7-1. AM25T to Datalogger Wiring
Function AM25T Datalogger
12 Vdc Power 12V 12V
Power Ground G G
Analog Ground1
⏚
⏚
Clock CLK Uor Control Port
Reset RES Uor Control Port
PRT Excitation VX VX, U, or Control Port
Common High HI Diff H, U, or Control Port
Common Low LO Diff L, U, or Control Port
1Analog Ground is the
⏚
terminal located between the VX and HI terminals on the
AM25T.
7.3 Sensor to AM25T Wiring
This section and the examples describe differential voltage measurements of
thermocouples. It is possible to make single-ended measurements with the
AM25T; however, they are more likely to have problems.
Shield wires are connected to the ground terminal next to the measurement
channel and left unattached at the sensor.
7.3.1 Thermocouple Measurement
An internal reference PRT is located in the AM25T. This reference temperature
does not require an additional datalogger input to measure the reference.
Thermal gradients between the AM25T sensor input terminals and the PRT
cause errors in thermocouple readings. For example, a one-degree gradient
between input terminals and the PRT will result in a one-degree measurement
error. The thermal bar in the AM25T, which includes the strain relief, and the
AM25T cover are designed to reduce gradients. The PRT is attached to the
thermal bar.
Heat conduction along the thermocouple wire, into the terminal strips, can be
reduced by coiling some excess lead wire inside the enclosure.
The datalogger manual contains a thorough discussion on thermocouple
measurements and error analysis. Consult the datalogger manual for more
details.
For a differential voltage measurement of a thermocouple, wire the high side of
the thermocouple to the high side of a differential input channel on the AM25T
and the low side of the thermocouple to the low side of the channel.
Thermocouples that follow the U.S. industry standards use red insulation on
the low side of the thermocouple. Wire one thermocouple per differential input
channel (FIGURE 7-2).

AM25T Solid-State Thermocouple Multiplexer
8
FIGURE 7-2. Differential Measurement of Type T Thermocouple
7.3.2 Differential Analog Measurements
Connect one differential sensor to a differential AM25T input channel.
Connect the sensor shields to the ground terminals next to the input channel.
Up to 25 differential sensors may be measured by one differential channel on
the datalogger (FIGURE 7-3).
FIGURE 7-3. Differential Voltage Measurement
7.3.3 Mixed Sensor Types
Different sensors may be mixed on the AM25T. Additional loops and
measurement instructions will be required.
8. Operation
8.1 General Measurement Considerations
Cables have additional capacitance that increases the time required for a signal
to settle its true value. To reduce settling time, Campbell Scientific
C
ontrol/ Power
Datalogger
Copper
Copper
GND
1H
1L
VX
AM25T
H
L
VX
Analog
Ground1
1H
1L
2H
2L
CU
CO
Shield
CU
CO
Shield
T1
T2
1Analog Ground isthe terminal between VXand Hi on the AM25T
Control/ Power
Datalogger
Copper
Copper
GND
1H
1L
G
AM25T
H
L
1H
1L
2H
2L
S
S
Shield
Shield
G
1Analog Ground is the ⏚terminal between VX and HI on the AM25T.

AM25T Solid-State Thermocouple Multiplexer
9
recommends use of Teflon®, polyethylene, or polypropylene insulation around
individual conductors. Do not use PVC as conductor insulation. PVC may be
used as a cable jacket.
With long lead lengths, a delay within the measurement instruction will allow
the capacitance of the lead wires to discharge before the measurement is made.
Consult the measurement section of the datalogger manual for more
information.
8.2 Datalogger Programming
Short Cut can build many program configurations for various supported
sensors providing a quick way to generate a program and wiring diagram
(FIGURE 8-1). Short Cut can be downloaded free of charge
(www.campbellsci.com).
FIGURE 8-1. Short Cut
Short Cut is the best source for up-to-date datalogger programming code.
Programming code is needed when:
•Creating a program for a new datalogger installation
•Adding sensors to an existing datalogger program
If the data acquisition requirements are simple, a datalogger program can be
created and maintained exclusively with Short Cut. If the data acquisition
needs are more complex, the files that Short Cut creates are a great source for
programming code to start a new program or add to an existing custom
program.

AM25T Solid-State Thermocouple Multiplexer
10
Short Cut cannot edit programs after they are imported and edited
in CRBasic Editor.
If there is a need to import Short Cut code into the CRBasic Editor to create or
add to a custom program, follow the procedure in Appendix A, Importing Short
Cut Code Into CRBasic Editor (p. A-1). Programming basics for CRBasic
dataloggers are provided in the following section. A complete program
example for a select datalogger can be found in Appendix B, Example Program
(p. B-1).
8.2.1 CRBasic Programming
In CRBasic, the AM25T() instruction is used to control the AM25T
multiplexer with the datalogger. The instruction measures the PRT
incorporated in the AM25T and uses it as a reference temperature for
thermocouple measurements. The AM25T() instruction and parameters are as
follows:
AM25T (Dest, Reps, Range, AM25TChan, DiffChan, TCType, TRef,
ClkPort, ResPort, ExChan, RevDiff, SettlingTime, Integ/fN1, Mult,
Offset)
For information on this instruction, refer to the CRBasic Help.
9. Maintenance
Maintain a level of calibration appropriate to the application. Campbell
Scientific recommends factory recalibration of the AM25T every five years.
Consider the following factors when setting a calibration schedule:
•the importance of the measurements
•how long the multiplexer will be used
•the operating environment
•how the multiplexer will be handled
U6
U5
Datalogger AM25T
Power
Supply
12V
G
U1
U2
U3
Control
P
orts
E
xcitation
Analog
Input
12V
G
CLK
RES
VX
HI
LO
12V OUT
1Analog Ground isthe terminal between VXand Hion the AM25T
1
NOTE
1
Analog Ground is the
⏚
terminal between
VX
and
HI
on the AM25T.

A-1
Appendix A. Importing Short Cut Code
Into CRBasic Editor
This tutorial shows:
•How to import a Short Cut program into a program editor for
additional refinement
•How to import a wiring diagram from Short Cut into the comments of
a custom program
Short Cut creates files, which can be imported into CRBasic Editor. Assuming
defaults were used when Short Cut was installed, these files reside in the
C:\campbellsci\SCWin folder:
•.DEF (wiring and memory usage information)
•.CR6 (CR6-series datalogger code)
•.CR8 (CR800-series datalogger code)
•.CR1 (CR1000 datalogger code)
•.CR3 (CR3000 datalogger code)
•.CR5 (CR5000 datalogger code)
•.CR9 (CR9000(X) datalogger code)
Use the following procedure to import Short Cut code and wiring diagram into
CRBasic Editor.
1. Open CRBasic Editor.
2. Click File | Open. Assuming the default paths were used when Short Cut
was installed, navigate to C:\CampbellSci\SCWin folder. The file of
interest has the .CR6, .CR8, .CR1, .CR3, .CR5., or .CR9 extension. Select
the file and click Open.
3. Immediately save the file in a folder different from
C:\Campbellsci\SCWin, or save the file with a different file name.
Once the file is edited with CRBasic Editor, Short Cut can no
longer be used to edit the datalogger program. Change the name
of the program file or move it, or Short Cut may overwrite it next
time it is used.
4. The program can now be edited, saved, and sent to the datalogger.
5. Import wiring information to the program by opening the associated .DEF
file. Copy and paste the section beginning with heading “-Wiring for
CRXXX–” into the CRBasic program, usually at the head of the file. After
pasting, edit the information such that an apostrophe (') begins each line.
This character instructs the datalogger compiler to ignore the line when
compiling.
NOTE

Other manuals for AM25T
2
Table of contents
Other Campbell Multiplexer manuals

Campbell
Campbell AM16/32B User manual

Campbell
Campbell AM16 User manual

Campbell
Campbell AM32 User manual

Campbell
Campbell AM416 User manual

Campbell
Campbell AM16B User manual

Campbell
Campbell AM16/32 User manual

Campbell
Campbell AM25T User manual

Campbell
Campbell AM16/32B User manual

Campbell
Campbell AM16/32B Owner's manual

Campbell
Campbell AM25T User manual
Popular Multiplexer manuals by other brands

Quark-Elec
Quark-Elec QK-A035 Setup guide

Telecast
Telecast DiamondBack 2 instruction manual

Televes
Televes T.0X Series quick guide

Lightscape Networks
Lightscape Networks mSDM-1RD Installation, operation and maintenance manual

Fisher
Fisher HART 2530H1 instruction manual

Technica
Technica BR SPY mini user manual