France :
L'appareil doit
destiné à être emmanché sur des abouts
annelés coté appareil et coté détendeur,
immobilisé par des colliers
110).
Appareil
Vérifier que le tuyau se développe
normalement, sans torsion ou traction, ni
contact avec les parois chaudes de l'appareil. Il
devra être changé lorsque la date de
péremption inscrite sur le tuyau sera atteinte ou
dans tous les cas s'il est endommagé ou s'il
présente des craquelures.
Ne pas tirer sur le tuyau ou le vriller. Le tenir
éloigné des pièces pouvant devenir chaudes.
Utilisation de l'appareil avec tuyau
à e ancher et colliers (Nor e XP
110)
de montage fournies avec le tuyau souple et
les colliers.
L'étanchéité sera vérifiée en suivant les
indications du paragraphe
Royau e Uni, Irlande, Pologne, Portugal,
Espagne, Italie, République Tchèque,
Norvège, Suède, Dane ark, Finlande,
Hongrie
, Rou anie, Pologne, Slovaquie,
Slovénie, Turquie, Croatie, Grèce
L'appareil est équipé d'un about annelé. Il doit
être ut
ilisé avec un tuyau souple de qualité
adaptée à l'utilisation du butane et du
propane.
Sa longueur ne devra pas excéder 1,20 m. Il
devra être changé s'il est endommagé, s
présente des craquelures,
conditions nationales l’exigent
validité
. Ne pas tirer sur le tuyau ou le vriller.
Le tenir éloigné des pièces pouvant devenir
chaudes. Vérifier que le tube souple se
un
destiné à être emmanché sur des abouts
annelés coté appareil et coté détendeur,
immobilisé par des colliers
Vérifier que le tuyau se développe
normalement, sans torsion ou traction, ni
contact avec les parois chaudes de l'appareil. Il
devra être changé lorsque la date de
péremption inscrite sur le tuyau sera atteinte ou
dans tous les cas s'il est endommagé ou s'il
présente des craquelures.
Ne pas tirer sur le tuyau ou le vriller. Le tenir
éloigné des pièces pouvant devenir chaudes.
Utilisation de l'appareil avec tuyau
à e ancher et colliers (Nor e XP
:
de montage fournies avec le tuyau souple et
L'étanchéité sera vérifiée en suivant les
indications du paragraphe
D).
Royau e Uni, Irlande, Pologne, Portugal,
Espagne, Italie, République Tchèque,
Norvège, Suède, Dane ark, Finlande,
, Rou anie, Pologne, Slovaquie,
Slovénie, Turquie, Croatie, Grèce
L'appareil est équipé d'un about annelé. Il doit
ilisé avec un tuyau souple de qualité
adaptée à l'utilisation du butane et du
Sa longueur ne devra pas excéder 1,20 m. Il
devra être changé s'il est endommagé, s
présente des craquelures,
conditions nationales l’exigent
. Ne pas tirer sur le tuyau ou le vriller.
Le tenir éloigné des pièces pouvant devenir
chaudes. Vérifier que le tube souple se
-5-
destiné à être emmanché sur des abouts
annelés coté appareil et coté détendeur,
-
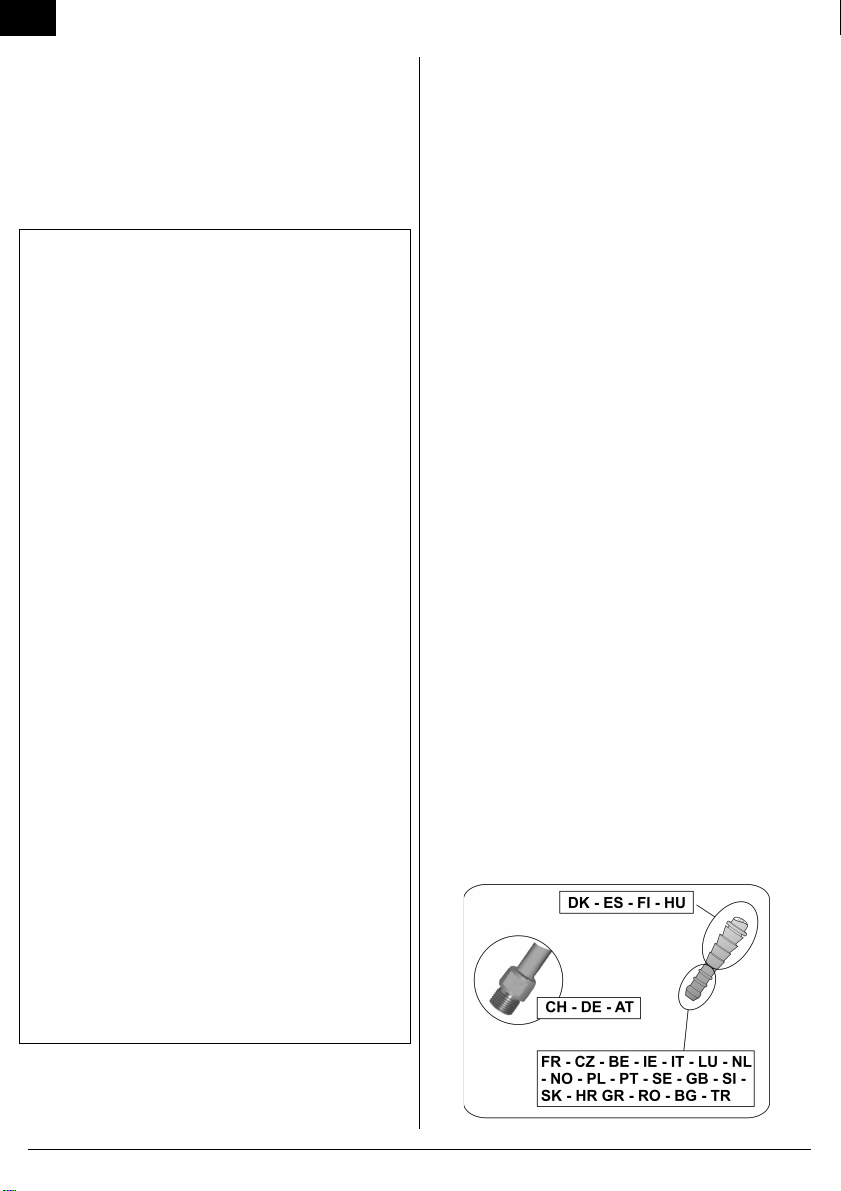
M 20x1,5
Détendeur
Vérifier que le tuyau se développe
normalement, sans torsion ou traction, ni
contact avec les parois chaudes de l'appareil. Il
devra être changé lorsque la date de
péremption inscrite sur le tuyau sera atteinte ou
dans tous les cas s'il est endommagé ou s'il
Ne pas tirer sur le tuyau ou le vriller. Le tenir
éloigné des pièces pouvant devenir chaudes.
Utilisation de l'appareil avec tuyau
souple
à e ancher et colliers (Nor e XP
D 36-
de montage fournies avec le tuyau souple et
L'étanchéité sera vérifiée en suivant les
Pays-Bas,
Royau e Uni, Irlande, Pologne, Portugal,
Espagne, Italie, République Tchèque,
Norvège, Suède, Dane ark, Finlande,
, Rou anie, Pologne, Slovaquie,
Slovénie, Turquie, Croatie, Grèce
:
L'appareil est équipé d'un about annelé. Il doit
ilisé avec un tuyau souple de qualité
adaptée à l'utilisation du butane et du
Sa longueur ne devra pas excéder 1,20 m. Il
devra être changé s'il est endommagé, s
'il
selon sa
. Ne pas tirer sur le tuyau ou le vriller.
Le tenir éloigné des pièces pouvant devenir
chaudes. Vérifier que le tube souple se
développe normalement, sans torsion ou
L'étanchéité sera vérifiée en suivant les
indications du paragraphe
Suisse, Alle agne, Autriche :
Cet appareil doit être utilisé avec un tuyau
souple de qualité adaptée à l'utilisation du
butane et du propane. Sa longueur ne devra
est endommagé, s'il présente des
craquelures, lorsque les conditions nationales
l’exigent ou selon sa validité. Ne pas tirer sur
le tuyau ou le vriller. Le tenir éloigné des
pièces pouvant devenir chaudes. Vérifier que
sans torsion ou traction.
tuyau sur le raccord d’entrée de l'appareil,
serrer l'écrou du tuyau fermement mais sans
excès avec 2 clés appropriées :
•
•
Raccorder l’autre extrémité sur le raccord de
indications du paragraphe
D
Si un réservoir vide est en place, lire le
changement du réservoir de gaz".
réservoir de gaz, opérer toujours dans un
endroit aéré, à l’extérieur et jamais en
présence d'une flamme, source de chaleur
ou étincelle (cigarette, appareil électrique,
etc.), loin d'autres personnes et de
développe normalement, sans torsion ou
L'étanchéité sera vérifiée en suivant les
indications du paragraphe
Suisse, Alle agne, Autriche :
Cet appareil doit être utilisé avec un tuyau
souple de qualité adaptée à l'utilisation du
butane et du propane. Sa longueur ne devra
Il devra être changé s'il
est endommagé, s'il présente des
craquelures, lorsque les conditions nationales
l’exigent ou selon sa validité. Ne pas tirer sur
le tuyau ou le vriller. Le tenir éloigné des
pièces pouvant devenir chaudes. Vérifier que
ouple se développe normalement,
sans torsion ou traction.
tuyau sur le raccord d’entrée de l'appareil,
serrer l'écrou du tuyau fermement mais sans
excès avec 2 clés appropriées :
clé de 10
pour bloquer le raccord d’entrée
de l’appareil.
clé de 17 pour visser l'écrou du tuyau.
Raccorder l’autre extrémité sur le raccord de
indications du paragraphe
Si un réservoir vide est en place, lire le
changement du réservoir de gaz".
la
mise en place ou le démontage d'un
réservoir de gaz, opérer toujours dans un
endroit aéré, à l’extérieur et jamais en
présence d'une flamme, source de chaleur
ou étincelle (cigarette, appareil électrique,
etc.), loin d'autres personnes et de
développe normalement, sans torsion ou
L'étanchéité sera vérifiée en suivant les
indications du paragraphe
D).
Suisse, Alle agne, Autriche :
Cet appareil doit être utilisé avec un tuyau
souple de qualité adaptée à l'utilisation du
butane et du propane. Sa longueur ne devra
Il devra être changé s'il
est endommagé, s'il présente des
craquelures, lorsque les conditions nationales
l’exigent ou selon sa validité. Ne pas tirer sur
le tuyau ou le vriller. Le tenir éloigné des
pièces pouvant devenir chaudes. Vérifier que
ouple se développe normalement,
sans torsion ou traction.
tuyau sur le raccord d’entrée de l'appareil,
serrer l'écrou du tuyau fermement mais sans
excès avec 2 clés appropriées :
pour bloquer le raccord d’entrée
clé de 17 pour visser l'écrou du tuyau.
Raccorder l’autre extrémité sur le raccord de
indications du paragraphe
D).
Si un réservoir vide est en place, lire le
changement du réservoir de gaz".
mise en place ou le démontage d'un
réservoir de gaz, opérer toujours dans un
endroit aéré, à l’extérieur et jamais en
présence d'une flamme, source de chaleur
ou étincelle (cigarette, appareil électrique,
etc.), loin d'autres personnes et de
développe normalement, sans torsion ou
L'étanchéité sera vérifiée en suivant les
Cet appareil doit être utilisé avec un tuyau
souple de qualité adaptée à l'utilisation du
butane et du propane. Sa longueur ne devra
Il devra être changé s'il
est endommagé, s'il présente des
craquelures, lorsque les conditions nationales
l’exigent ou selon sa validité. Ne pas tirer sur
le tuyau ou le vriller. Le tenir éloigné des
pièces pouvant devenir chaudes. Vérifier que
ouple se développe normalement,
tuyau sur le raccord d’entrée de l'appareil,
serrer l'écrou du tuyau fermement mais sans
pour bloquer le raccord d’entrée
Raccorder l’autre extrémité sur le raccord de
DU
Si un réservoir vide est en place, lire le
mise en place ou le démontage d'un
réservoir de gaz, opérer toujours dans un
endroit aéré, à l’extérieur et jamais en
présence d'une flamme, source de chaleur
ou étincelle (cigarette, appareil électrique,
etc.), loin d'autres personnes et de