manuals.online logo
Brands
  1. Home
  2. •
  3. Brands
  4. •
  5. camry
  6. •
  7. Computer Accessories
  8. •
  9. camry eQCM 10m User manual

camry eQCM 10m User manual

Electrochemical Quartz Crystal Microbalance
INSTALLATION GUIDE
Quick-Start
TM
The ‘Gamry Software Installation’ program will run.
NOTE - If you have Gamry Software PREVIOUSLY INSTALLED:
You will be asked to remove previous versions of the software
and the Gamry device drivers. Click ‘Yes’ - All previous data will be saved.
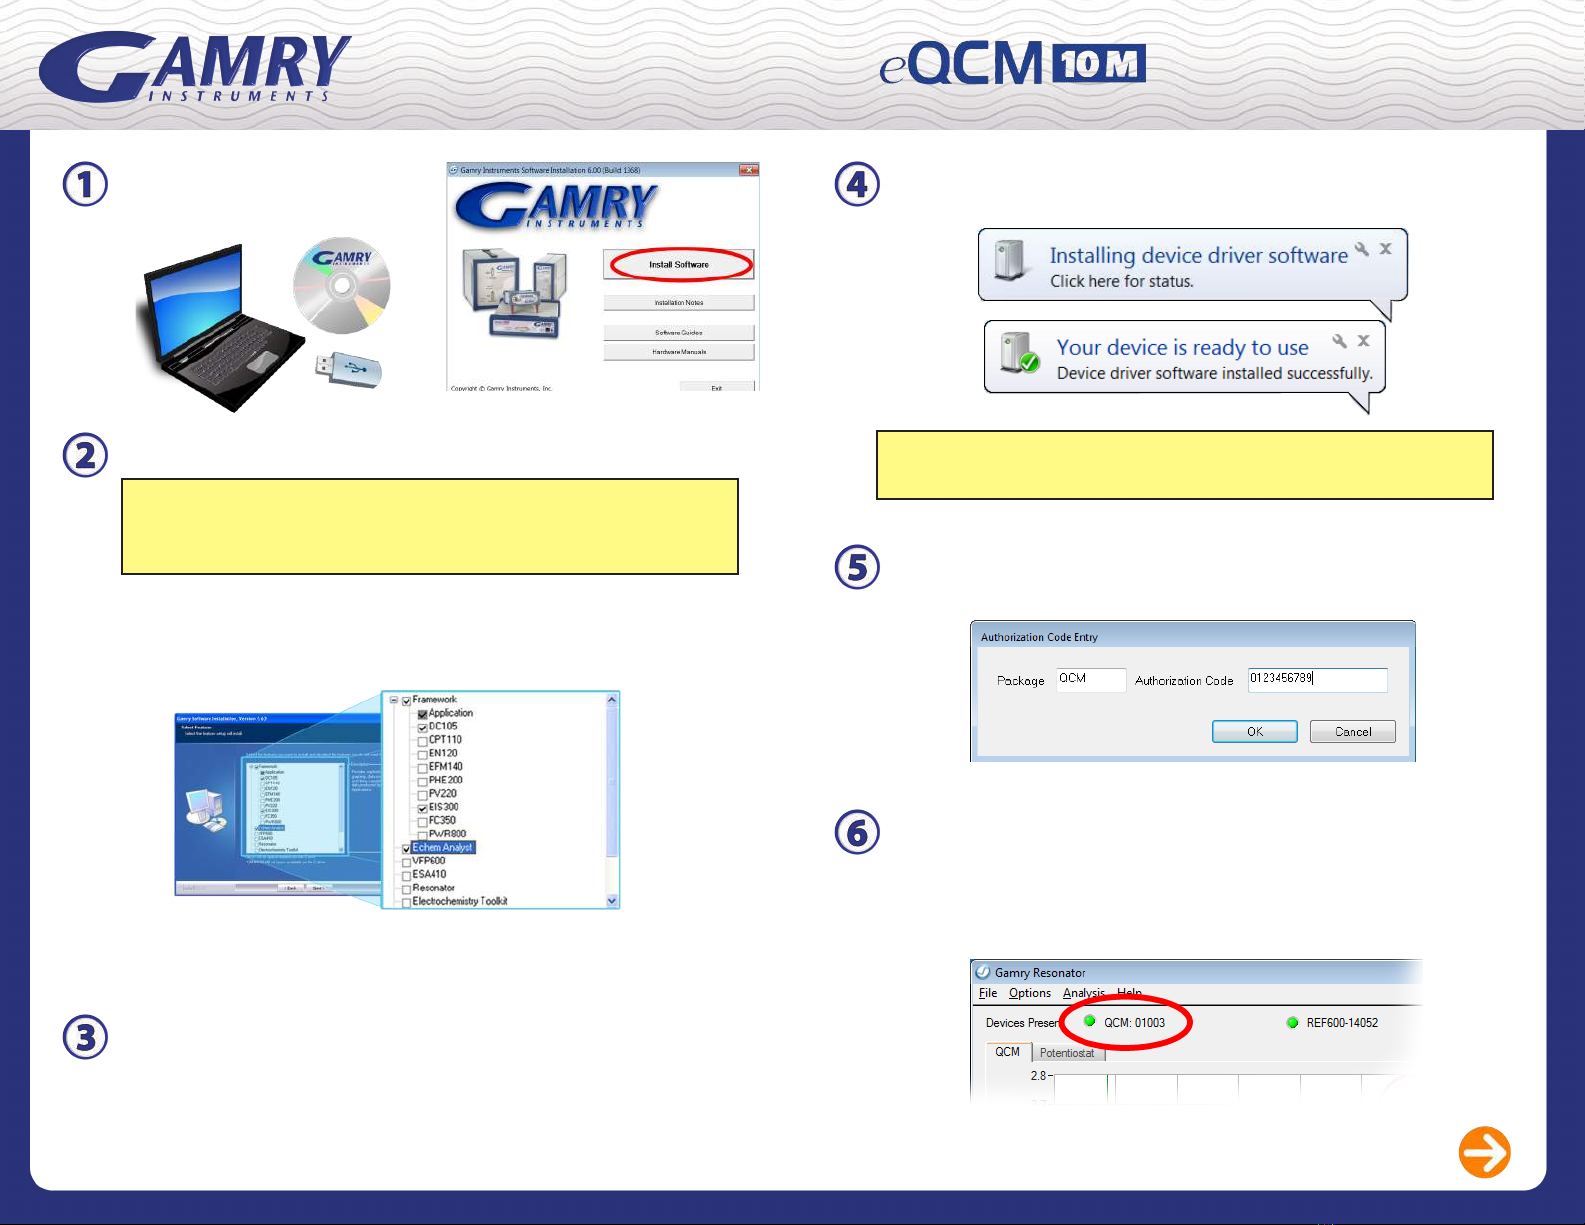
• When asked to select folder location, click ‘Next’.
• Select ‘Framework’, ‘Echem Analyst’, and ‘Resonator’
from the list of available packages.
• Follow prompts through the rest of the installation process.
• Restart your computer after installation is complete.
INSTALLING YOUR
www.gamry.com
1-215-682-9330
techsupport@gamry.com
Insert installation media
and click ‘Install Software’.
Plug in the eQCM 10M power cord.
Connect the USB cable between the eQCM and the computer.
Switch on the power switch.
* The blue power LED on the front of the eQCM
should turn on and stay lit.
Microsoft Windows will detect your instrument, and a
‘Found New Hardware’ prompt will appear.
Conrm that your eQCM is recognized properly in the
Resonator software.
• Double-click the Gamry Resonator icon.
• A green virtual LED will appear in the devices list of
Resonator to indicate that your instrument is ready to use.
Be sure to add your QCM authorization code to the Gamry
Potentiostat if you will be performing eQCM experiments.
Gamry Resonator Software Overview
Windows XP Users - When prompted, select ‘Install Software
Automatically’ and continue through the remaining steps.
Installation QSG: eQCM 10M - 988-00025 - Rev 1.0 - Gamry Instruments © 2012
RESONATOR OVERVIEW
Find the resonant frequencies.
• Enter the center (nominal) frequency of your crystal and
press ‘Single Scan’.
• If you do not see a nice S-shaped spectrum such as the
one shown here, increase your frequency window and
press ‘Single Scan’ again.
Once you nd the appropriate window, drag the two green
cursors closer to fsand fp.
You can now begin continuous acquisition by pressing
‘Start’.
Set up your potentiostat on the‘Potentiostat’ tab if you are
performing EQCM work.
QCM data acquired during an EQCM experiment will be
saved automatically in the data le.
QCM data acquired for a stand-alone QCM experiment
needs to be saved using the disc icon or by clicking ‘Save’
under the le menu.

Popular Computer Accessories manuals by other brands

Enable-IT 350 user manual

Enable-IT

Enable-IT 350 user manual

PerfecTron MT321 Quick installation guide

PerfecTron

PerfecTron MT321 Quick installation guide

ZALMAN ZM-SHE350 user manual

ZALMAN

ZALMAN ZM-SHE350 user manual

Logitech MK875 PERFORMANCE Setup guide

Logitech

Logitech MK875 PERFORMANCE Setup guide

Kinesis Advantage 360 KB360-PRO-GBR user manual

Kinesis

Kinesis Advantage 360 KB360-PRO-GBR user manual

Amada AMBMS05 instruction manual

Amada

Amada AMBMS05 instruction manual

Gardigo 62343 instruction manual

Gardigo

Gardigo 62343 instruction manual

AZZA ECLIPSE 440 user manual

AZZA

AZZA ECLIPSE 440 user manual

Intergraph StudioZ GT RAX System reference

Intergraph

Intergraph StudioZ GT RAX System reference

GameFactor CSG502 manual

GameFactor

GameFactor CSG502 manual

Cooler Master Elite 241 installation guide

Cooler Master

Cooler Master Elite 241 installation guide

Livescribe PULSE Getting started guide

Livescribe

Livescribe PULSE Getting started guide

Renesas HS0005KCU04HE user manual

Renesas

Renesas HS0005KCU04HE user manual

Riotoro CR480 MID installation guide

Riotoro

Riotoro CR480 MID installation guide

IOGear Quietus RF Desktop GKM553R quick start guide

IOGear

IOGear Quietus RF Desktop GKM553R quick start guide

HP GM322AA datasheet

HP

HP GM322AA datasheet

Konix Drakkar Raider user manual

Konix

Konix Drakkar Raider user manual

Logitech Bluetooth wireless hub installation guide

Logitech

Logitech Bluetooth wireless hub installation guide

manuals.online logo
manuals.online logoBrands
  • About & Mission
  • Contact us
  • Privacy Policy
  • Terms and Conditions

Copyright 2025 Manuals.Online. All Rights Reserved.