CAMSO X4S 2021 User manual

CAMSO X4S
FOR ALL-TERRAIN VEHICLES
AND SIDE-BY-SIDE VEHICLES
USER MANUAL 202
;6

CAUTION: The X4S Track System by Camso is first and foremost designed to provide the
best performance in terms of traction and floatation in conditions of extreme terrain such
as deep snow and mud. The Track System is also designed for All-terrain and Side–by-
Side type vehicles that can ride at a maximum speed of 40 km/h (about 70 km/h on the
speedometer). Exceeding this speed when the terrain conditions are dry can cause
premature wear and or major breakdowns on the Track System. If breakage occurs due to
excessive speed, damage will not be covered under normal warranty. It is the user's
responsibility to abide by these terms of use.
CAUTION: Longevity of the Camso X4S Track System components is directly linked to the
way the System is used. Sportive driving, rapid direction changes and repeated fast turns
(especially on power steering vehicles) are not advised. These driving styles increase the
risk of derailing and can cause premature wear and or major breakdowns on the Track
System which will not be covered under normal warranty.
CAUTION: The Camso X4S Track System is designed for installation and use on a
specific range of All-Terrain and light Side-by-Side vehicles. Any installation and use on
a vehicle that is not on Camso’s application list, will not be covered under warranty.
Camso inc.
4162, rue Burrill - Local A
Shawinigan, QC G9N 0C3
CANADA
TECHNICAL SUPPORT
If your dealer or distributor is unable to solve a problem related to the System, you may contact
the Camso support team from Monday to Friday.
E-Mail: enduser.atv@camso.co
Internet: www.camso.co
System Serial Number: 7522NIH_______________
Original notice
Translations in other languages available at www.camso.co
WARNING
Please read carefully each part of this document as well as the model specific
Installation Guidelines prior to assembling, installing and using the Track System.
® and MC are trademarks of Camso inc.
All rights reserved. ©202 Camso inc.
Printed in Canada.

TABLE OF CONTENTS
INTRODUCTION . . . . . . . . . . . . . . . . . . . . . . . . . . . . . . . . . . . . . . . . . . . . . . . . . . . . . . . . . . . . . . . . . . . . . . . . . . . . . . . 1
SYMBOLS AND SIGNAL WORDS . . . . . . . . . . . . . . . . . . . . . . . . . . . . . . . . . . . . . . . . . . . . . . . . . . . . 1
GENERAL INFORMATION . . . . . . . . . . . . . . . . . . . . . . . . . . . . . . . . . . . . . . . . . . . . . . . . . . . . . . . . . . 1
SERIAL NUMBER LOCATION . . . . . . . . . . . . . . . . . . . . . . . . . . . . . . . . . . . . . . . . . . . . . . . . . . . . . . . 1
SAFETY . . . . . . . . . . . . . . . . . . . . . . . . . . . . . . . . . . . . . . . . . . . . . . . . . . . . . . . . . . . . . . . . . . . . . . . . . . . . . . . . . . . . . 2
OPERATING INSTRUCTIONS . . . . . . . . . . . . . . . . . . . . . . . . . . . . . . . . . . . . . . . . . . . . . . . . . . . . . . . . . . . . . . . . . . . . 4
SPECIFICATIONS . . . . . . . . . . . . . . . . . . . . . . . . . . . . . . . . . . . . . . . . . . . . . . . . . . . . . . . . . . . . . . . . . . . . . . . . . . . . . 9
ADJUSTMENTS . . . . . . . . . . . . . . . . . . . . . . . . . . . . . . . . . . . . . . . . . . . . . . . . . . . . . . . . . . . . . . . . . . . . . . . . . . . . . . 10
ANGLE OF ATTACK - FRONT SYSTEMS . . . . . . . . . . . . . . . . . . . . . . . . . . . . . . . . . . . . . . . . . . . . . 10
ANGLE OF ATTACK - REAR SYSTEMS . . . . . . . . . . . . . . . . . . . . . . . . . . . . . . . . . . . . . . . . . . . . . . 11
ALIGNMENT . . . . . . . . . . . . . . . . . . . . . . . . . . . . . . . . . . . . . . . . . . . . . . . . . . . . . . . . . . . . . . . . . . . . 13
TRACK TENSION . . . . . . . . . . . . . . . . . . . . . . . . . . . . . . . . . . . . . . . . . . . . . . . . . . . . . . . . . . . . . . . . 16
MAINTENANCE . . . . . . . . . . . . . . . . . . . . . . . . . . . . . . . . . . . . . . . . . . . . . . . . . . . . . . . . . . . . . . . . . . . . . . . . . . . . . . 17
LUBRICATION . . . . . . . . . . . . . . . . . . . . . . . . . . . . . . . . . . . . . . . . . . . . . . . . . . . . . . . . . . . . . . . . . . 20
WEAR . . . . . . . . . . . . . . . . . . . . . . . . . . . . . . . . . . . . . . . . . . . . . . . . . . . . . . . . . . . . . . . . . . . . . . . . . 24
TROUBLESHOOTING . . . . . . . . . . . . . . . . . . . . . . . . . . . . . . . . . . . . . . . . . . . . . . . . . . . . . . . . . . . . . . . . . . . . . . . . . 27
2-YEAR LIMITED WARRANTY . . . . . . . . . . . . . . . . . . . . . . . . . . . . . . . . . . . . . . . . . . . . . . . . . . . . . . . . . . . . . . . . . . 29
’’CE’’ DECLARATION OF CONFORMITY . . . . . . . . . . . . . . . . . . . . . . . . . . . . . . . . . . . . . . . . . . . . . . . . . . . . . . . . . . 30
ENVIRONMENT . . . . . . . . . . . . . . . . . . . . . . . . . . . . . . . . . . . . . . . . . . . . . . . . . . . . . . . . . . . . . . . . . . . . . . . . . . . . . . 31
PATENTS . . . . . . . . . . . . . . . . . . . . . . . . . . . . . . . . . . . . . . . . . . . . . . . . . . . . . . . . . . . . . . . . . . . . . . . . . . . . . . . . . . . 31
PARTS LIST . . . . . . . . . . . . . . . . . . . . . . . . . . . . . . . . . . . . . . . . . . . . . . . . . . . . . . . . . . . . . . . . . . . . . . . . . . . . . . . . . 33
1099-01-1751- VERSION '

1
INTRODUCTION
INTRODUCTION
Thank you for choosing the Camso X4S Track
System (hereinafter referred to as the "System").
You have made the right choice. This evolution of
the ATV T4S Track System will provide you with all
the traction, performance and durability you
require for recreational or work purposes and
allows for operation in winter conditions as well as
fall and spring conditions. This hybrid Track
System for ATV and light Side-by-Side vehicle
(hereinafter referred to as the “vehicle”) provides
exceptional floatation with very low ground
pressure. Its strong lightweight steel frame (33 kg),
its internal sprockets, adapted to the vehicle’s
capacity, and its track, specifically designed for all-
terrain vehicles, make it the best system on the
market.
SYMBOLS AND SIGNAL WORDS
This guide uses the following signal words and
symbols to emphasize particular information:
CAUTION: Indicates a potentially hazardous
situation which, if not avoided, may result in
damage to vehicle and Track System components.
NOTE: Indicates supplementary information.
The Prohibition Safety Sign indicates an
action NOT to be taken in order to avoid a
hazard.
The Mandatory Action Sign indicates an
action that NEEDS to be taken to avoid a
hazard.
GENERAL INFORMATION
• All figures, information or photos presented in
this document are up to date at the time of
publication. However, they may change without
notice.
• Read and follow the indications contained in the
vehicle’s user manual and installation guidelines
carefully. Their content remain applicable after
installation of the System.
• This document should be read by everyone
operating the vehicle equipped with the System.
• This document is an integral part of the System.
Pass it along to any new owner of the System.
• Before usage, consult the legal authorities of the
area where you operate your vehicle equipped
with the System to ensure that all applicable
laws and regulations are observed.
• ATV and SxS Track Systems are designed to
reduce ground pressure and increase vehicle
traction. However, during normal operating
conditions, vehicle speed should be reduced
compared to a wheeled vehicle.
SERIAL NUMBER LOCATION
The following figures show the location of the serial
numbers on the Track System frame (Figure 1) and
rubber track (Figure 2).
Figure 1
Figure 2
WARNING
Indicates a potentially hazardous situation which, if
not avoided, could result in death or serious injury.

2
SAFETY
SAFETY
WARNING STICKERS
You will find the warning stickers, shown in the
illustration below, affixed on the Track System
frames. Read the stickers carefully and understand
them before using the Track System. They contain
important information about safety and proper
operation of the System.
CAUTION: Do not remove the warning sticker from
the frame. If a sticker is damaged, have it replaced
at an authorized Camso dealer.
GENERAL WARNING
User Manual - Users must read
the User Manual before attempting
to operate a vehicle equipped with
a Track System.
If the Track System is sold or in any
way transferred to a new user, the
User Manual must also be
transferred to the new user.
Moving Parts - Hands or fingers
caught between moving parts of the
equipment present a danger to life
or limb. Turn motor off before
servicing the Track System.
Maintenance Schedule
- Follow
instructions contained in the User
Manual’s Maintenance Schedule to
ensure safe and long lasting Track
System operation.
TENSIONER WARNING
TENSIONER BOLT WARNING - If track tension
adjustment is required, do not loosen the tensioner
assembly bolt under any circumstance. The bolt is
used to assemble and align the tensioner with the
frame. Tensioner re-alignment is necessary if this
bolt is loosened.
POSITION PICTOGRAM STICKERS
These stickers indicate the position of each Track
System unit: front left, front right, rear left and rear
right. They are located on the top of each frame.
Front left Front right
Rear left Rear right

3
SAFETY
USER NOTICE AND DISCLAIMER
The Camso X4S System was initially designed to
be used in winter conditions and was then adapted
to be used in fall and spring conditions.
This document holds important information
regarding driving an ATV or SxS equipped with the
Camso X4S System by Camso. It is mandatory
that every user takes the time to carefully read,
understand and then consult this reference
manual and user guide as well as the vehicle’s
owner manual as needed. When purchasing either
a new or used Track System, the user must obtain
all documentation related to the System, including
manuals and guides related to the vehicle on
which the System is installed.If need be, contact
the Camso products dealer nearest to you to
obtain any additional information. You may also
consult the Camso Web site at www.camso.co
and contact our technical support by email at
enduser[email protected].
Camso believes that there are certain risks related
to the installation and use of the System. Our
experience shows that the System is safe.
However, the user must be aware of the risks
related with driving an ATV or SxS and of the
particularities if the vehicle is equipped with this
type of System. The vehicle driver must, at all
times, respect all applicable laws and regulations,
the indications of the System manufacturer and
the indications from the vehicle manufacturer fixed
by law, namely when age restrictions exist and
vehicle base equipment is required (headlights,
flashers and brake lights, rear view mirror, etc.).
The user must always wear adequate safety
equipment, such as a helmet, safety glasses (or
visor), protective clothing, boots and gloves. It is
understood that driving while impaired or
intoxicated presents a danger for the ATV or SxS
user and others and is against the law.
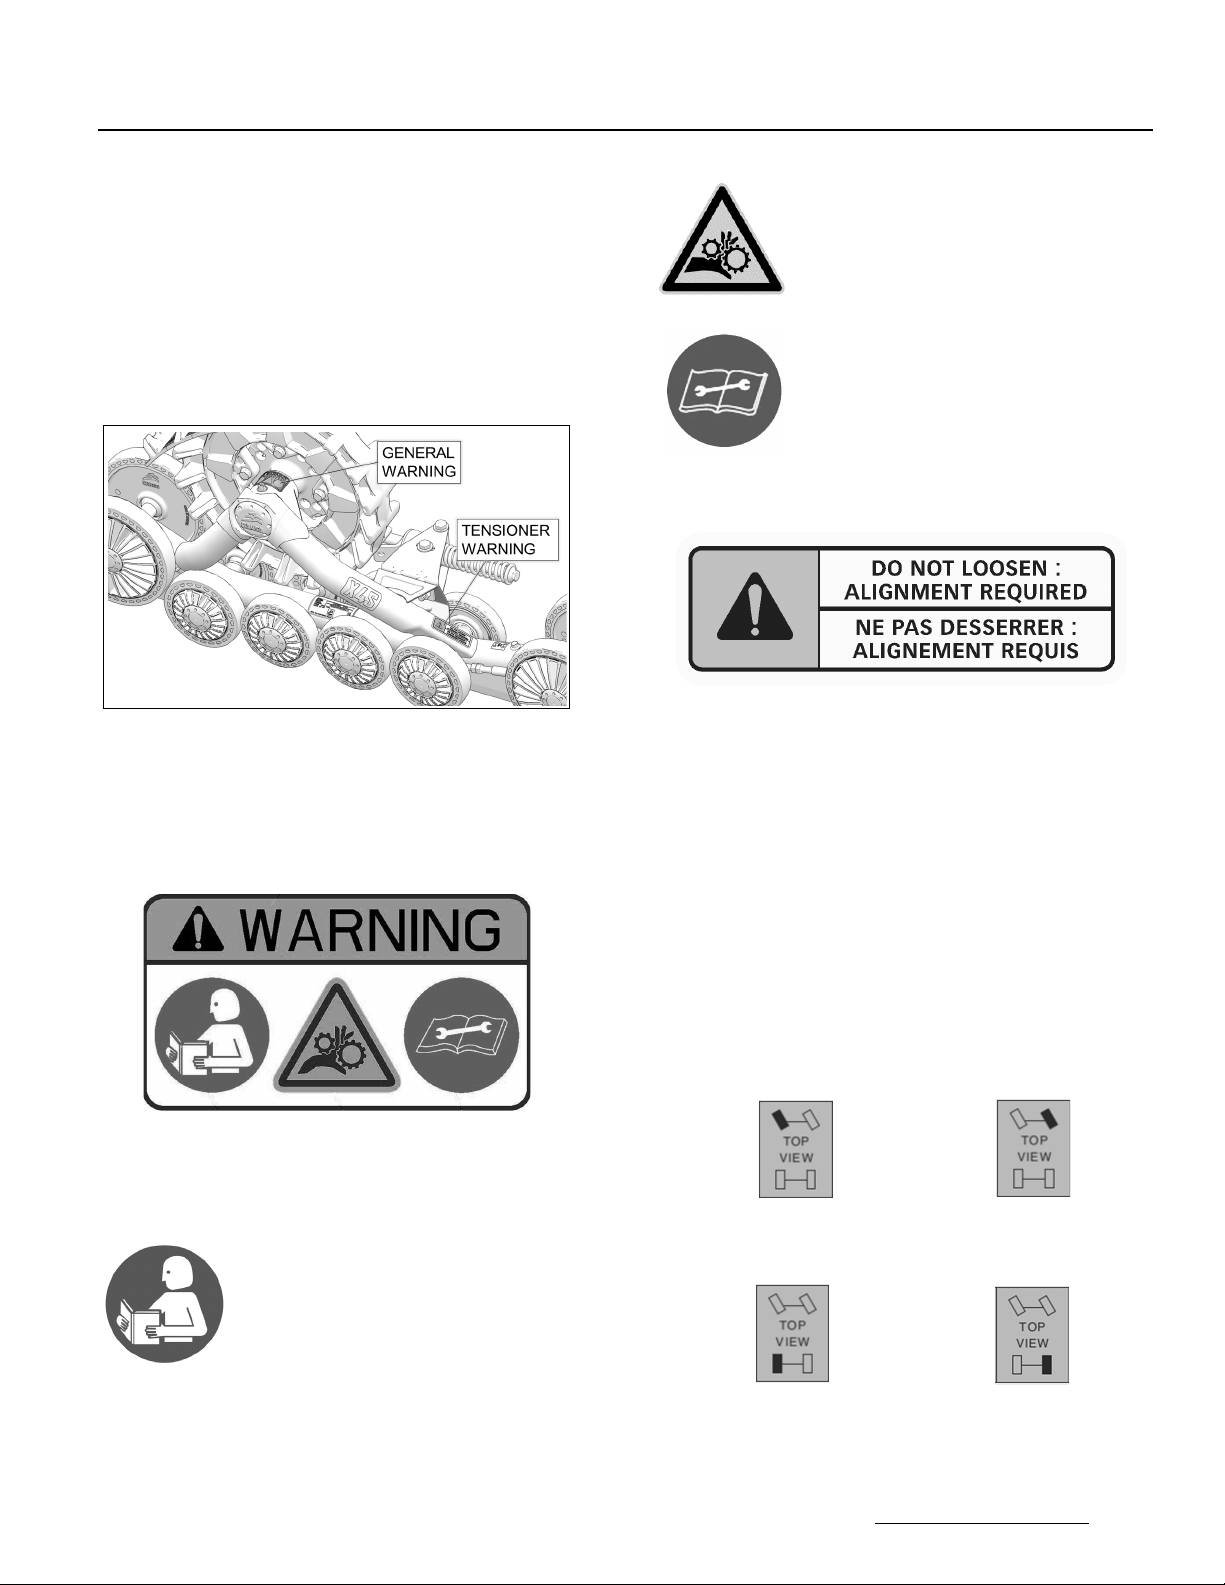
The System consists of many moving parts,
including transmission wheels. If an object lodges
itself or becomes jammed into the System and
blocks the track, it is mandatory to stop the engine
and the vehicle and apply the security brake
before removing said object. By avoiding to do so,
the user exposes himself to sudden movement of
the vehicle or to breakage of a part or component
coming from the System, which could cause
severe injuries. It is also very important to wear full
length clothing and always avoid hanging or
stringy accessories.
Driving a vehicle equipped with such a System
requires particular precautions and a knowledge of
proper driving techniques of such vehicles. An
evaluation by the user of the conditions and terrain
(state of the ground, grade of hill, density of snow,
etc.) is equally essential.
An ATV or SxS equipped with a System cannot
compete and/or be used to perform stunts,
acrobatics or other exploits, as these could result in
loss of control or severe injuries.
Insufficient knowledge of the ATV or SxS during
down hill riding, climbs and crossing of obstacles
and turns can result in tipping or roll over, and can
cause severe injuries.
Carrying a passenger, a load or attaching a tow can
cause the ATV or SxS to be less stable, and affect
usability of the vehicle. Unless otherwise
prescribed by law and by the vehicle manufacturer,
you must not carry a passenger, loads or tow any
objects.
The installation of a System:
• Increases ground clearance.
• Changes the center of gravity.
• Increases the ATV or SxS width and weight.
• Reduces ground pressure.
These parameters will effectively change driving
characteristics of an ATV or SxS equipped with the
System.
Consequently, it is highly recommended that the
user adapt his driving style to the new
characteristics mentioned above. The driver
must always use caution when he crosses
obstacles, circulates through narrow paths, meets
vehicles coming in the opposing direction, etc.
As it was designed, the System will considerably
reduce the ATV or SxS top speed and can falsify
speedometer readings. Generally, the System
transmission wheel diameter is less than that of the
tire. Therefore, the vehicle speed will be less than
that actually displayed. Whether the vehicle is
equipped or not with the System, users must
always adapt the speed to actual driving
conditions. Users must never exceed speed limits
or drive faster than their capacities allow.
Excessive speed remains one of the main causes
of severe accidents on ATV and SxS.
Camso is proud to offer conversion kits for ATV
and light SxS within its wide range of products.
Camso X4S Track Systems are not only reliable,
but safe. However, there are risks inherent to
driving a vehicle equipped with the System. It is
therefore very important that a driver familiarize
himself with proper driving techniques of a vehicle
equipped with a System, and that he adapt his
driving to his level of experience and continually
evaluate operating conditions and terrain to safely
and efficiently make the best of the Camso X4S
Track System.

4
OPERATING INSTRUCTIONS
HINTS AND TIPS
• Before leaving for an excursion, make sure to
bring with you the following: 13 mm, 14 mm, 15
mm, 16 mm, 17 mm, and 19 mm wrenches and
sockets, an ax, a shovel, a tow cable, a lifting
jack and an adjustable wrench.
• Generally, the slower you go, the better the
traction will be.
• If an excursion on unknown or remote terrain is
planned, make sure to have in your possession
a cellular or satellite phone, a first aid kit and
spare parts.
• If you drive off trails, always beware of hidden
obstacles.
• If you ride in deep snow, do not intentionally spin
the tracks (tracks are rotating but the vehicle is
not moving).This could cause the vehicle to get
stuck.
BREAK-IN PERIOD
CAUTION: A break-in period is necessary to allow
the components of the system to settle and adjust
themselves to each other.
During the break-in period (4 hours or 80
kilometers), follow these recommendations:
CAUTION: Avoid running under dry and clean
conditions. (For example: asphalt, hay or straw
field, etc.). Start sharp turns at very low speed: (10
km/h maximum real speed).
• A GOOD break-in period must be done in a
lubricated environment such as water, mud,
snow, soft soil, sand, dust, etc.
• A BAD break-in period can generate smoke,
odors of burned rubber as well as plastic deposits
on the sprocket and/or the frame.
CAUTION: Non-compliance with the usage
recommendations can lead to a warranty claim
refusal.
PRE-USE VERIFICATION
CAUTION: Before each ride make sure that the
System’s wheels and moving parts are free and that
they are not frozen or stuck on the frame.
CAUTION: Track systems installed on an ATV or SxS
project more snow, dirt, water, or mud than tires.
The owner/driver is responsible for adapting engine
and CVT air intakes to minimize the risks of
breakdowns and/or damage to mechanical
components.
VERIFICATION Hr 0 Hr 1
15 km/h* Hr 2
25 km/h* Hr 3
35 km/h*
Visual Inspection xxxx
Track Tension xx x
Angle of Attack xx
Alignment xx
Bolt Torque -
Anchor Brackets x
* Maximum Real Speed
WARNING
Driving a vehicle equipped with Track Systems is
different from driving a vehicle on wheels. It is
strongly recommended that the safety guidelines
provided below are followed to prevent any
accident and/or serious malfunction that could
affect the occupants, the vehicle or the Track
Systems.

5
OPERATING INSTRUCTIONS
STEEP DESCENTS
CAUTION: It is not advisable to change direction
during steep descents. This can lead to a serious
malfunction of the vehicle’s steering system and
Track Systems.
CAUTION: During a steep descent, it is advisable to
keep the handlebars straight and to begin turning
when the vehicle is on flat ground, thus avoiding
subjecting the vehicle components and the System
to any high stress.
CAUTION: Reduce your speed at all times; Track
Systems installed on a vehicle do not have the
same absorption capacity as tires.
DESCENDING AND BEING STUCK IN
REVERSE
CAUTION: If the rear Track Systems get stuck in the
snow, avoid moving or towing the vehicle in reverse
to ease it from its position, as this could lead to a
malfunction of the Systems. If possible, move it in
the forward direction to free it from the snow.
CAUTION: It is advisable to remove the snow from
the top of the rear Track Systems and to compact it
behind the Systems, using your feet, to dislodge the
track. Shoveling remains the best alternative in this
situation.
CAUTION: Always operate in 4x4 mode, this
significantly reduces possibility of derailing in any
conditions.
WARNING
Allow for a greater braking distance and
periodically apply the brakes while driving to
prevent ice build-up on brake components.
WARNING
Adapt your driving style to surrounding conditions
(weather, traffic, etc.) and your driving abilities.

6
OPERATING INSTRUCTIONS
DRIVING OVER AN OBSTACLE TALLER
THAN 30 cm [12 in]
CAUTION: It is not advisable to attempt to drive
over an obstacle taller than 30 cm [12 in], such as a
tree trunk, stump or big rock.
CAUTION: If the situation occurs, insert a log or a
rock to lower the height of the obstacle and
facilitate driving over the obstacle.
CAUTION: In loaded / working mode (100 kg and
over), reduce significantly your speed and be extra
careful on rough terrain.
CAUTION: Never exceed vehicle cargo and tow
capacity specified by your vehicle manufacturer on
any type of terrain.
DRIVING OVER A STEEP RIDGE
CAUTION: It is not advisable to attempt to drive over
an obstacle, such as a tree trunk, big rock or steep
ridge that could lodge itself between the front and
the rear Track Systems and immobilize the vehicle.
The best option is to bypass this type of obstacle.
DRIVING OVER AN OBSTACLE
WARNING
The driver must remain vigilant and cautious at
all times. Snow and mud can hide dangerous
obstacles.
WARNING
Always follow the ATV or SxS manufacturer safety
rules and recommendations regarding,
passengers transportation, maximum loads, etc.
WARNING
When travelling in groups, riders following
vehicles equipped with track systems should be
warned of dangerous objects that can potentially
be propelled by tracks. Be especially cautious on
rocky trails.

7
OPERATING INSTRUCTIONS
LOCATION OF TOWING CABLE
CAUTION: If your vehicle must be towed out of the
snow, do not secure the towing cable on the Track
Systems.
CAUTION: The towing cable must be attached to the
vehicle’s frame.
TOWING A VEHICLE OUT OF THE SNOW
CAUTION: If your vehicle must be towed out of the
snow, never tow it in the direction in which you were
riding when the vehicle got stuck.
CAUTION: Tow the vehicle back in the tracks left
before getting stuck.
JUMPING
WARNING
Jumping with a vehicle equipped with a Track
System is not recommended. The System was
not designed to carry out this type of operation. A
vehicle equipped with the System must never be
used for the following activities: races, rallies,
jumps, stunts, acrobatics or any other extreme
applications.

8
OPERATING INSTRUCTIONS
LOADING AND UNLOADING A VEHICLE
IN A TRUCK
CAUTION: While loading or unloading a vehicle in
truck box, make sure that the front tracks do not
grip the tailgate locking gudgeons to avoid tearing
the tracks.
TRACK SYSTEM OPERATING IN WATER
OR MUD
CAUTION: If the Track System is used in wet
conditions, submerged in water and/or mud, make
sure to consult the Track System’s maintenance
chart and to observe the maintenance intervals
indicated in this manual related to commercial,
industrial and abrasive conditions use.
CAUTION: It is the driver’s responsibility to follow
the recommended scheduled maintenance
described in this manual.
DRIVING ACROSS SLOPES
WARNING
Driving across slopes can be dangerous. On a
slope too steep, your vehicle could rollover. Keep
in mind that mud, snow or ice can modify ground
conditions. In all cases, do not drive across a slope
with a bank angle of more than 15 degrees.

9
SPECIFICATIONS
SPECIFICATIONS
TORQUE SPECIFICATIONS
Refer to the exploded views at the end of the
Manual to obtain torque specifications applied to
bolts at important points on the Track System.
NOTE: Use a thread locker (Loctite 263 type or its
equivalent) at indicated places in the exploded
views of the system.
STORAGE
CAUTION: Contaminants can alter and corrode the
moving parts of Track Systems during storage. It is
strongly recommended to perform the prescribed
maintenance before storing the Track Systems.
Store the System by laying down each frame on its
side, away from direct sunlight. Figure 3.
Figure 3
NOTE: Before storing the System, pour 5 cc of oil under
wheel caps to help prevent corrosion.
OFFSETS ON VEHICLE
Installation of a Track System on a vehicle creates
offsets in length, height and width. The offsets are
illustrated in the figure below and their dimensions
are specified in the accompanying table.
SPEEDOMETER AND TRIP METER
READINGS
Our Track System affects the Speedometer and Trip
meter readings by approximately 35% depending
on the ratio between sprocket and tire size.
DIMENSION GRADE Nm lb-ft
M6-1.0 8.8 10 7
M8-1.25 8.8 25 18
M8-1.25 10.9 33 24
M10-1.5 8.8 50 37
M10-1.5 10.9 70 52
M12-1.75 8.8 90 66
M12-1.75 10.9 125 92
WARNING
Over-tightening bolts may damage parts and
safety features may be affected.
FRONT
24 in (610 mm)
REAR
27 in (686 mm)
POLARIS
7 in (178 mm)
OTHER MODELS
6 in (152 mm)
3 in (76 mm)
OFFSET
(LENGTH)
ORIGINAL TIRE: 24 in
OFFSET
(HEIGHT)
OFFSET
(WIDTH)
2
1
3

10
ADJUSTMENTS
ADJUSTMENTS
CAUTION: After the first use of the vehicle, the
adjustment settings (track tension, alignment and
angle of attack) on each Track System must be re-
verified. Incorrect adjustments can decrease the
performance of the System and produce
premature wear on certain components.
NOTE: To make the following adjustments, position
the vehicle on a flat and level surface.
ANGLE OF ATTACK - FRONT SYSTEMS
To obtain the correct angle of attack on front
Track Systems, perform the following:
• Use handlebars to point tracks straight ahead.
• Temporarily apply pressure to the front of the
track to make stay flat on the ground
•
Stabilizing arm (
1
) must be attached to front
anchor bracket (
2
) mounted on vehicle.
Figure 4.
Figure 4
• Position a flat bar on top of rear wheels of front
track system and measure from the ground up
to flat bar as shown on Figure 5.
.
Figure 5
NOTE : Before each measurement, temporarily apply
light pressure to the front of the track to make
sure that it stays flat on the ground.
• Loosen jam nut (1). Adjust length of rod end (2)
by rotating the steering limiter support plate on
(3) the stabilizing arm. Use a 30 mm wrench to
rotate support plate and obtain 270 mm above
the ground. Refer to Figure 6.
NOTE: The stabilizing arms on front Track Systems
incorporate a steering limiter support plate (3)
that is bent. This plate should be positioned
inwards, towards the vehicle.
Figure 6
• When angle of attack is correctly set, tighten
the jam nut (1) back against the stabilizing arm
to 40 N•m [30lb•ft] of torque. See Figure 7.
CAUTION: Follow the recommended torque when
tightening the jam nut. Over-tightening the nut
might damage the rod end.
Figure 7

11
ADJUSTMENTS
NOTE: Once the angle of attack on the front systems
is set, verify once again to confirm the
adjustment.
Figure 8
BASIC TUNING (Front Track Systems)
• An adjustment of more than 270 mm [10 ⅝ in.],
measured with the flat bar, provides easier
steering but produces a wobbling effect at high
speed.
• An adjustment of less than 270 mm [10 ⅝ in.],
measured with the flat bar, results in harder
steering and more stability at high speed.
ANGLE OF ATTACK - REAR SYSTEMS
To obtain the correct angle of attack on rear Track
Systems, perform the following:
RIGID AXLE OR TRAILING ARM SUSPENSION
CAUTION: Some vehicles require a particular
adjustment. Refer to the Installation Guidelines
specific to your vehicle model to confirm the
adjustment.
• Stabilizing arm (1) must be attached to Track
System and to rear anchor bracket (2) installed
on vehicle. See Figure 9.
NOTE: Actual Rear Anchor bracket (
2
) mounted on
vehicle may differ from the one in the illustration.
Figure 9
• Loosen nut (3) compressing stabilizing rod
spring. See Figure 10.
Figure 10
NOTE: Use narrow part of adjusting template,
provided with stabilizing arm, to make
adjustment.
• Set nut (4) to obtain a distance of 10 mm
between nut and stabilizing arm guide as
shown on Figure 11.
Figure 11
• Turn nut (3) until it comes in contact with
spring, then compress spring by rotating nut
1 1/2 turns. See Figure 12.

12
ADJUSTMENTS
Figure 12
•IMPORTANT: Double-check the 10 mm
minimum distance between nut and stabilizing
arm guide. Re–adjust as needed. Figure 13.
NOTE: Use the provided template to double-check the
adjustment.
Figure 13
INDEPENDENT SUSPENSION (IS)
• Stabilizing arm (
1
) must be attached to rear
anchor bracket (
2
) installed on vehicle. Figure 14.
NOTE: Actual Rear Anchor bracket (
2
) mounted on
vehicle may differ from the one in the illustration.
Figure 14
• Loosen anti-rotation bracket bolts (3) to allow
the anti-rotation retainer (4) to rotate on its axis.
See Figure 15.
Figure 15
• Loosen jam nut (5). Turn stabilizing arm (1) to
adjust length of rod end (6) so that rubber cone
(7) applies light pressure on anti–rotation
retainer (4). Figure 16.
Figure 16
• Re-tighten jam nut (
5
) to 40 N•m [30 lb-ft] of
torque when adjustment is complete. Figure 17.
Figure 17
CAUTION: Tighten the jam nut to the
recommended torque specification. Over-
tightening the nut might damage the rod end.

13
ADJUSTMENTS
• Re-tighten anti-rotation bracket bolts (3) to 50
N•m [37 lb-ft] of torque. See Figure 18.
Figure 18
NOTE: Once the angle of attack on the rear systems
is set, verify once again to confirm the
adjustment.
BASIC TUNING (Rear Track Systems)
• The adjustment is incorrect when the
stabilizing arm’s rubber cone is compressed
and deformed. The stabilizing arm’s spring is
then difficult or impossible to turn by hand.
TRACK SYSTEM REMOVAL
CAUTION: Leaving the anti-rotation anchor
brackets attached to the suspension arms, after
having removed the Track Systems, could cause
interference which might damage the vehicle.
Remove all Track System anti-rotation mechanism
components installed on the vehicle before
reinstalling the wheels.
CAUTION:
Track Systems mounted on an ATV or
SxS increase ground clearance and vehicle
stability. Be careful after re-installing your wheels;
the handling caracteristics of the vehicle will differ
from those produced by Track Systems.
ALIGNMENT
Parallelism must be adjusted with the ATV on the
ground, driving the vehicle forward about 3
meters [10 ft.] and measuring toe–in distance.
Refer to Figure 19.
NOTE: Every time the measurement has to be taken,
drive in reverse, then, drive forward again on
about 3 meters [10 ft.].
CAUTION: Verify condition of steering system
components before adjusting parallelism.
Damaged components can prevent proper
adjustment and impair proper operation of the
system.
CAUTION: Parallelism adjustment of the front
Track Systems is very important and is directly
linked to the longevity of the system components.
Users must follow attentively the adjustment and
verification recommendations of this manual.
Figure 19
Dimension
A
:
distance
between
inner
front
wheels
Dimension
B
:
distance
between
inner
back
wheels
A
-
B = 0
to
3 mm [1/8 inch]
Dimension A
must be equal to or greater than
dimension B
without exceeding
3 mm
[1/8 inch].

14
ADJUSTMENTS
Adjustment Method
To adjust the vehicle’s steering system, first
loosen coupling rod nuts (1), then screw or
unscrew the coupling rod (2) an equal number of
revolutions on both sides of the vehicle. Re-
tighten nuts when adjustment is complete. See
Figure 20 or Figure 21.
NOTE: Starting with an open alignment setting
provides a higher degree of precision of the
adjustment.
CAUTION: Before loosening coupling rod nuts (1)
on the vehicle's steering system, remember that
some nuts have reverse threads. Make sure to
unlock the nut in the proper rotational direction.
ATV
Figure 20
SxS
Figure 21
NOTE: Once parallelism of front Systems is set, verify
once more to confirm adjustment setting.

15
ADJUSTMENTS
Measure A:
Measure the distance inside the front
Ø202 mm wheels on the front Track Systems.
See figures 22, 23 and 24.
Figure 22
Figure 23 (Distance between front wheels)
Figure 24
Measure B
: Measure the distance inside the rear
Ø202 mm wheels on the front Track Systems. See
figures 25, 26 and 27.
Figure 25
Figure 26 (Distance between rear wheels)
Figure 27

16
ADJUSTMENTS
TRACK TENSION
Figure 28
• Loosen jam nut (1) and turn adjusting nut (2) to
set track tension. See Figure 29.
Figure 29
• The table below shows the force (3) applied
and the deflection (4) which must occur to
correctly set track tension. See also Figure 31.
NOTE: The track tension testing tool, shown below in
Figure 30, can be purchased through an
authorized Camso dealer. Part #2000-00-3125.
Figure 30
Figure 31
BASIC TUNING
• Higher rubber track tension reduces the risk of
“derailing” and reduces sprocket “ratcheting”.
NOTE: Track tension set too high could cause
premature wear on system components and
is therefore not recommended.
• Lower rubber track tension provides better
traction, a smoother ride and better fuel
economy.
Final Check
Ride at slow speed on a distance of about 1.5 km
[1 mile]. Re–adjust as required.
WARNING
The tensioner assembly bolt must never be
loosened while adjusting the track tension. This
bolt is designed for assembly and alignment of
the tensioner with the frame. The tensioner must
always be realigned when this bolt is loosened.
SEASON TRACK FORCE DEFLECTION
SUMMER Front 15 kg (33 lb) 19 mm (¾ in.)
Rear 15 kg (33 lb) 19 mm (¾ in.)
WINTER
(snow)
Front 11 kg (24 lb) 19 mm (¾ in.)
Rear 11 kg (24 lb) 19 mm (¾ in.)

17
MAINTENANCE
MAINTENANCE
CAUTION: Regular inspection, adjustment and
lubrication of the Track System is essential to its
good running order and safe operation. Users are
responsible to perform maintenance and regularly
adjust their Track System. The “Maintenance”
section provides the necessary information to
perform adequate maintenance on the Track
System.
CAUTION: Failure to do regular maintenance at
the prescribed intervals and perform the
preventive adjustments indicated in the
maintenance schedule can result in premature
wear and important breakage on the Track System
that will not be covered under the warranty. Users
are responsible to follow the maintenance
schedule provided by the manufacturer.
CAUTION: Camso recommends not using a brake
cleaning solvent to clean the Track System. This
may damage sealing components and stickers.
The maintenance schedule has been established
in order to provide optimum durability for your
Track System. The type of usage and the
conditions in which the Track System is used,
have a direct bearing on the frequency of
maintenance actions to perform. After inspection
of your Track System, you will be able to
determine if the recommended maintenance
intervals are correct or to adjust them as needed.
For optimum performance and maximum
durability, please refer to the maintenance chart
below.
For more details on the maintenance program,
consult the Maintenance specifications on
page 18 and page 19.
WARNING
Do not insert hands or feet into or near the
System unless the engine is off, and the vehicle is
stopped with the security brake engaged.
MAINTENANCE INITIAL INTERVALS
FIRST USE EVERY 25A- 40B HRS EVERY 50A- 75B HRS
EVERY 200 HRS
A
/ ANNUAL
B
SYSTEM - VISUAL INSPECTION CLEAN / INSPECT CLEAN / INSPECT CLEAN / INSPECT
SYSTEM - ADJUSTMENTS ADJUST INSPECT / ADJUST INSPECT / ADJUST
SYSTEM - VEHICLE ALIGNMENT ADJUST INSPECT / ADJUST INSPECT / ADJUST
SYSTEM - BOLT TORQUE INSPECT / ADJUST
TRACK- TENSION ADJUST INSPECT / ADJUST INSPECT / ADJUST
TRACK - WEAR INSPECT
WHEELS - SIDE WEAR INSPECT / REPLACE
WHEELS - BEARINGS INSPECT INSPECT / REPLACE
WHEELS - SEAL LUBRICATION ¤INSPECT / LUBRICATE ¤REPLACE / LUBRICATE ¤
FRAME - HUB BEARINGS ¤INSPECT / REPLACE ¤
FRAME - HUB BEARING SEAL ¤LUBRICATE ¤INSPECT / LUBRICATE ¤
FRAME - TRACK GUIDE WEAR INSPECT / REPLACE
FRAME - STABILIZERS INSPECT / REPLACE
FRAME - CRACKS CLEAN / INSPECT
SPROCKETS - WEAR CLEAN / INSPECT
ANTIROTATION - LUBRICATION CLEAN / LUBRICATE CLEAN / LUBRICATE
ANTIROTATION - BOLT TORQUE INSPECT / ADJUST INSPECT / ADJUST
ANTIROTATION - CRACKS, DEFORMATION INSPECT
VEHICLE - SUSPENSION ARM BOLT TORQUE
INSPECT / ADJUST INSPECT / ADJUST
VEHICLE - STEERING MECHANISM INSPECT / ADJUST INSPECT / ADJUST
A: Commercial use / Industrial use / Abrasives conditions B: Normal winter conditions
¤
Important maintenance
This manual suits for next models
1
Table of contents
Other CAMSO Offroad Vehicle manuals