manuals.online logo
Brands
  1. Home
  2. •
  3. Brands
  4. •
  5. Candela
  6. •
  7. Hair Removal System
  8. •
  9. Candela New GentleYAG Manual

Candela New GentleYAG Manual

New GentleYAGCryogen Spray Alignment Procedure Candela Corporation
8503-01-0845, Revision A Candela Corporation Proprietary Page 1of 10
New GentleYAG
Cryogen Spray Alignment Procedure
New GentleYAGCryogen Spray Alignment Procedure Candela Corporation
8503-01-0845, Revision A Candela Corporation Proprietary Page 2of 10
CRYOGEN SPRAY TESTING AND ALIGNMENT PROCEDURE
You will need the following supplies to perform these tests:
•Laser Safety Glasses
•Cryogen Coverage Template 1301-00-8291 available from Candela Corporation.
•VPYAG distance gauge.
•.050 inch Allen Wrench
The following tests are described in this section
1. Cryogen Alignment: Verifies the cryogen spray nozzle is properly aligned with the
distance gauge ring.
2. Cryogen Coverage: Verifies the spray duration required to fill the distance gauge
ring.
3. Cryogen Air Bubble Detector: Verifies that air bubbles in the cryogen line are
detected and the associated “fault” message is displayed on the system.
New GentleYAGCryogen Spray Alignment Procedure Candela Corporation
8503-01-0845, Revision A Candela Corporation Proprietary Page 3of 10
New GentleYAGCryogen Spray Alignment Procedure Candela Corporation
8503-01-0845, Revision A Candela Corporation Proprietary Page 4of 10
Test #1 Cryogen Alignment
Purpose:
To verify the cryogen spray nozzle is properly aligned with the distance gauge ring
Procedure:
1. Put the laser in “standby”. Caution-laser should remain in “ Standby” mode
for duration of test
2. Select “DCD –on”.
3. Install GentleYAG 12mm distance gauge PN 7122-00-3109
4. Select 30ms of DCD Spray.
5. Point hand piece away from objects and personnel (toward the floor). View
the contact ring of distance gauge, looking from the hand piece.
6. Press purge button.
-DCD Spray should flow completely through the contact ring. There may be a
minimal spray mist seen hitting the contact ring. No spray should be spraying
beyond outside of the contact ring.
Acceptable-No mist on contact ring
Acceptable-Small amount of mist on contact
Unacceptable results-Excess mist on contact ring
No Cryo clipping on 12
mm distance gauge
Cryo clipping on 12
mm distance gauge
Small Cryo clipping on 12
mm distance gauge
New GentleYAGCryogen Spray Alignment Procedure Candela Corporation
8503-01-0845, Revision A Candela Corporation Proprietary Page 5of 10
Results:
Acceptable alignment-no further action needed.
Unacceptable alignment, repeat the test with a different distance gauge
If the test shows acceptable alignment with the new distance gauge discard the
original distance gauge
If the result is still “unacceptable”, Realign the cryogen nozzle.
New GentleYAGCryogen Spray Alignment Procedure Candela Corporation
8503-01-0845, Revision A Candela Corporation Proprietary Page 6of 10
Test #2 -Cryogen Coverage:
Purpose:
To verify the proper spray duration required to fill the distance gauge ring. (Note: the
distance gauge ring is larger than the spot size marking).
•If you use multiple size distance gauges, these checks should be made utilizing
the smallest and largest distance gauges in your product configuration.
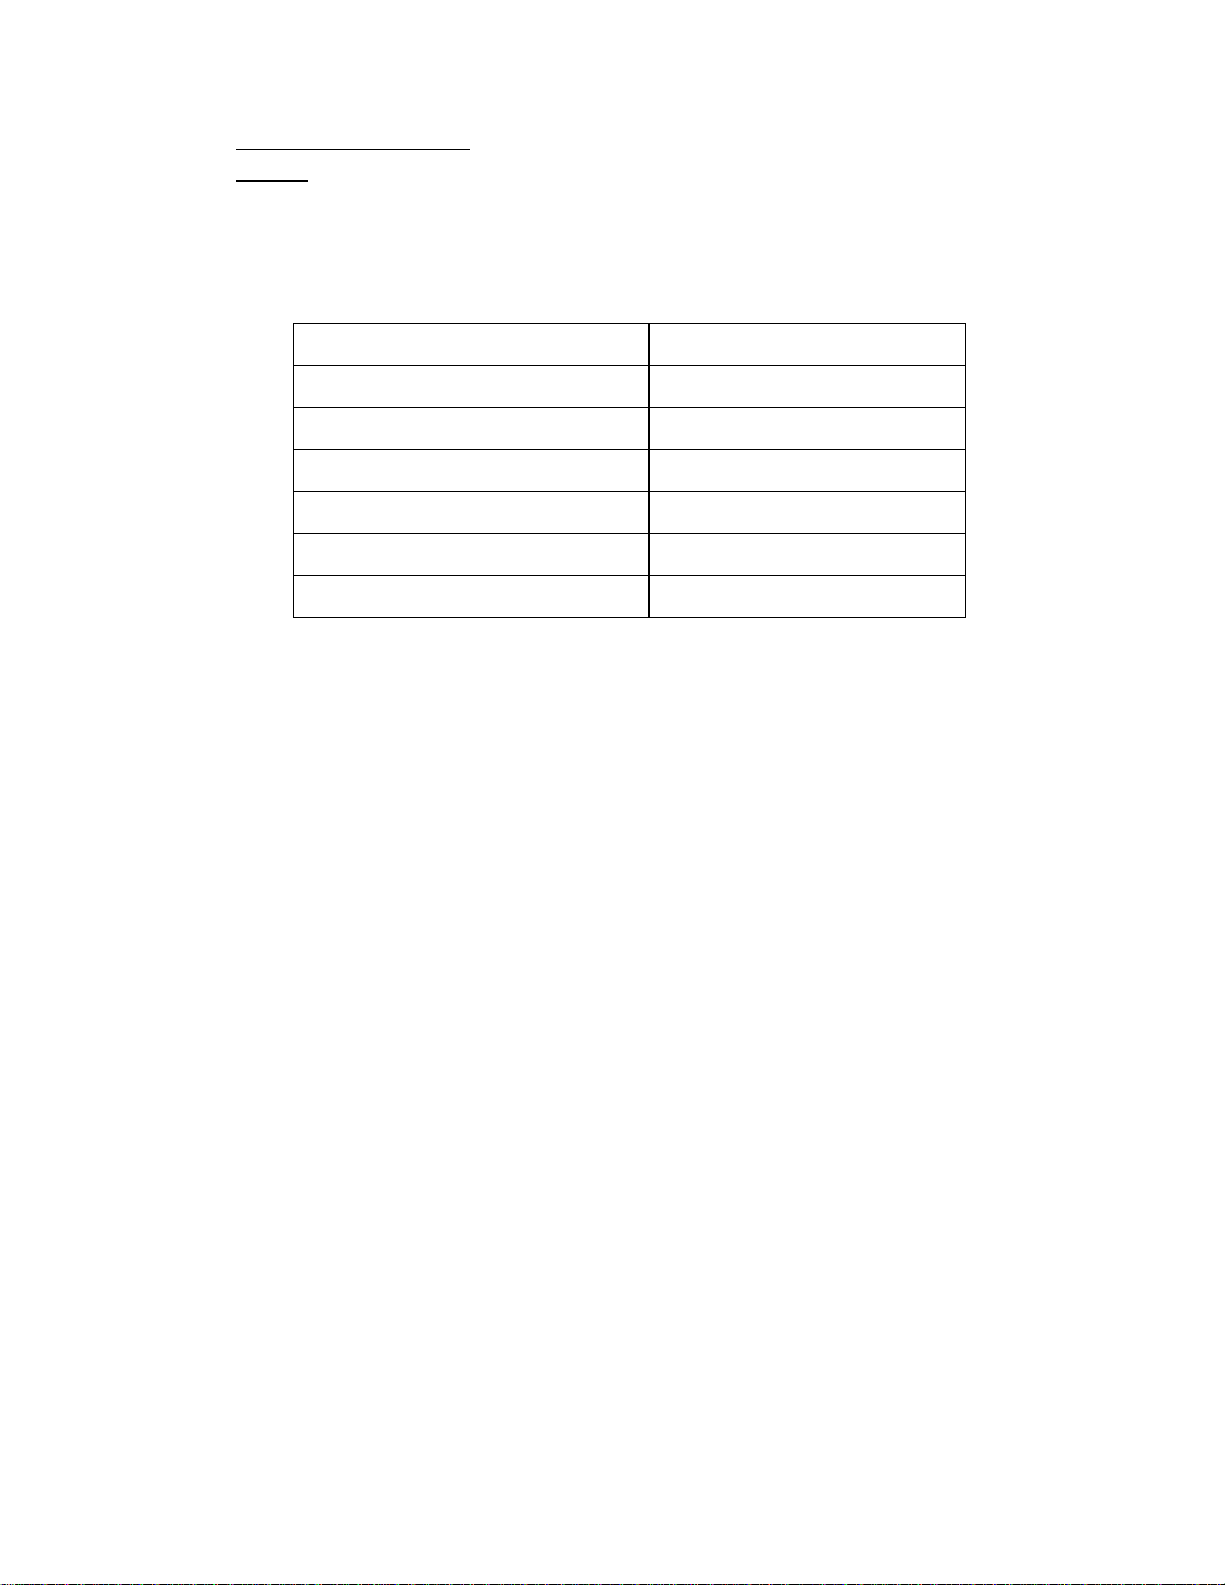
•The following sizes are available
GentleYAGDistance Gauge P/N (5 Pack)
3mm
8mm 7122-00-3502
10mm 7122-00-3503
12mm 7122-00-3109
15mm 7122-00-3504
18mm 7122-00-3505
•Note: The below tests and values are not intended to represent treatment
parameters, but rather provide a check on proper functionality of the handpiece
and provide a reference for the user to help identify changes in the handpiece
operation.
Procedure:
1. Put on appropriate laser safety glasses
2. Put the laser in “standby Caution-laser should remain in “Standby“mode for
duration of test
3. Select “DCD –on”.
4. Install appropriate distance gauge from chart below.
5. Select “Spray Duration” per chart.
6. Place hand piece distance gauge over desired distance gauge spotson template
(1301-00-8291).
7. Press purge button.
8. Remove hand piece QUICKLY from template.
DCD Spray should completely fill inner spot.
•Spray is acceptable to be found outside of spot as long as inner spot is
completely filled. (This spray may be from reflected spray off the paper).
•As a guide-select the respective spray duration from the following table:
VPYAG
New GentleYAGCryogen Spray Alignment Procedure Candela Corporation
8503-01-0845, Revision A Candela Corporation Proprietary Page 7of 10
Distance gauge spot size “Typical” spray duration
to minimally fill the inside
ring spot.
3 mm 30 ms
8 mm 30 ms
10 mm 30 ms
12 mm 40 ms
15 mm 50 ms
18 mm 60 ms
Results: If the spot doesn’t fill or a leak is noted, the handpiece assembly should be
replaced or contact Candela Technical Support.
New GentleYAGCryogen Spray Alignment Procedure Candela Corporation
8503-01-0845, Revision A Candela Corporation Proprietary Page 8of 10
Test #3 Cryogen Air Bubble Detection
Purpose:
To ensure that that air bubbles in the cryogen line are detected and the associated
“fault” message is displayed on the system.
Important: This procedure must be done with each GentleYAG handpiece delivery
system in your possession. The subsystem being tested is inside of each delivery
system, not in the laser system.
Procedure
1Insure that the installed DCD canister is not empty.
Warning: Put on appropriate laser safety glasses
2. Turn on the system and allow the “WARM UP” to
complete.
3. With the Electrical Connector installed, disconnect the Cryogen Connector
(see Figure 3).
Electrical Connector
Cryogen Connector
Figure 3 -Delivery System Connections
4. Set the DCD spray on the front panel to the highest setting.
5. Set the FLUENCE to the lowest setting (this varies by spot size).
6. Enter the “Ready” mode, and calibrate the laser by pressing on the footswitch.
7. Remove the handpiece from the CALPORT and aim in direction away from
personnel (such as the floor).
8. Depress the footswitch to pulse laser continuously until a “PURGE REQUIRED”
window box appears on the user screen and lasing ceases. This should happen
in less than 50 pulses.
New GentleYAGCryogen Spray Alignment Procedure Candela Corporation
8503-01-0845, Revision A Candela Corporation Proprietary Page 9of 10
Results Comments Action
If you get
“PURGE
REQUIRED”
This particular
handpiece
passed the
test
You may continue use
of this handpiece
If “PURGE
REQUIRED”
does not
occur
This particular
handpiece
failed the test
Discontinue use of
this handpiece and
call Candela Tech
Support at (508) –358-
7637 ex 336 or (800) –
733-8550 ex 336
9. Reconnect the Cryogen Connector (see Figure 3) and press reset to use the
system, or repeat the test on other GentleYAG handpiece delivery systems.
10. Depress “purge” may be required until the line is refilled.
New GentleYAGCryogen Spray Alignment Procedure Candela Corporation
8503-01-0845, Revision A Candela Corporation Proprietary Page 10 of
10

Other manuals for New GentleYAG

4

Other Candela Hair Removal System manuals

Candela New GentleYAG Use and care manual

Candela

Candela New GentleYAG Use and care manual

Candela New GentleYAG Manual

Candela

Candela New GentleYAG Manual

Candela MGentleLASE Manual

Candela

Candela MGentleLASE Manual

Candela GentleLASE Manual

Candela

Candela GentleLASE Manual

Candela MGentleLASE Operating and maintenance manual

Candela

Candela MGentleLASE Operating and maintenance manual

Candela New GentleYAG Manual

Candela

Candela New GentleYAG Manual

Candela GentleMax Pro User manual

Candela

Candela GentleMax Pro User manual

Candela MGentleLASE Use and care manual

Candela

Candela MGentleLASE Use and care manual

Popular Hair Removal System manuals by other brands

Philips Lumea Prestige manual

Philips

Philips Lumea Prestige manual

veme Kyanite V701-Pro manual

veme

veme Kyanite V701-Pro manual

mychway HR-F16 user guide

mychway

mychway HR-F16 user guide

Beurer SensEpil HL100 Instructions for use

Beurer

Beurer SensEpil HL100 Instructions for use

Easylife EL1008 instruction manual

Easylife

Easylife EL1008 instruction manual

Silk'n SensEpil Instructions for use

Silk'n

Silk'n SensEpil Instructions for use

Silk'n Freedom quick start

Silk'n

Silk'n Freedom quick start

InnoEssentials MicroNail Instructions for use

InnoEssentials

InnoEssentials MicroNail Instructions for use

Philips SC1996 Faq

Philips

Philips SC1996 Faq

Titan Gold user manual

Titan

Titan Gold user manual

Smoothskin pure mini user guide

Smoothskin

Smoothskin pure mini user guide

Beurer IPL 8800 Instructions for use

Beurer

Beurer IPL 8800 Instructions for use

Philips Lumea SC1997/04 manual

Philips

Philips Lumea SC1997/04 manual

Remington iLIGHT ESSENTIAL Use and care guide

Remington

Remington iLIGHT ESSENTIAL Use and care guide

Smoothskin bare fit IPL user guide

Smoothskin

Smoothskin bare fit IPL user guide

Remington i-Light IpL5000 Service information

Remington

Remington i-Light IpL5000 Service information

Remington i-LIGHT PRO Use and care guide

Remington

Remington i-LIGHT PRO Use and care guide

Philips Visashave HP6390/00 user manual

Philips

Philips Visashave HP6390/00 user manual

manuals.online logo
manuals.online logoBrands
  • About & Mission
  • Contact us
  • Privacy Policy
  • Terms and Conditions

Copyright 2025 Manuals.Online. All Rights Reserved.