Candy TRIO 501-1 UK User manual

1
41022811
GB INSTRUCTIONS FOR USE AND INSTALLATION
~~~
TRIO 501/1 UK

2
Unpacking the appliance........................................................................... 3
RECOMMENDATIONS - SAFETY ADVICES ........................................ 3-4
INSTALLATION
• Safety...................................................................................................... 5
• GAS CONNECTION ............................................................................ 6-7
• ELECTRICAL CONNECTION................................................................. 8
• If modifying gas setting, set the iddle flame............................................ 8
TECHNICAL DATA ................................................................................... 9
USE
• THE HOB
The gas burner........................................................................................ 10
• THE OVEN
Oven equipment...................................................................................... 11
Use..................................................................................................... 11-12
Cooking advices................................................................................. 13-14
• THE DISHWASHER
The controls - The Programmes - Use ............................................... 15-16
Filters - Loading dishes ........................................................................... 17
Loading detergent - Rinse aid -Salt.................................................... 18-20
Programmes selection ............................................................................ 21
Some hints .............................................................................................. 22
Water connection - water drainage .................................................... 23-24
Identifying minor faults ....................................................................... 25-26
CLEANING.............................................................................................. 27
SUMMARY
This appliance is marked according to the European directive 2002/96/
EC on Waste Electrical and Electronic Equipment (WEEE).
By ensuring this product is disposed of correctly, you will help prevent
potential negative consequences for the environment and human health,
which could otherwise be caused by inappropriate waste handling of this
product.
The symbol on the product indicates that this product may not be treated
as household waste. Instead it shall be handed over to the applicable
collection point for the recycling of electrical and electronic equipment
Disposal must be carried out in accordance with local environmental regulations for waste
disposal.
For more detailed information about treatment, recovery and recycling of this product, please
contact your local city office, your household waste disposal service or the shop where you
purchased the product.

3
UNPACKING THE APPLIANCE
Inside the appliance, you will find the booklet and a bag containing :
- if you have to change the type of gas: new jets for the gas modifications, Butane Gas G30
28-30 mbar or Propane Gas G31-37 mbar,
- for connection by soft rubber tube, an end piece for Natural Gas and an end piece for
Butane or Propane gas with seal.
READ THE INSTRUCTIONS CAREFULLY TO MAKE THE MOST OF YOURAPPLIANCE.
We recommend you keep the instructions for installation and use for later reference, and
before installing the appliance, note its serial number below in case you need to get help
from the after sales service.
. Identification plate is located at the back of the Trio.
THE COMPANY SHALL NOT BE LIABLE IF THE INSTRUCTIONS PROVIDED IN
THIS DOCUMENT ARE NOT COMPLIED WITH.
RECOMMENDATIONS
• You should entrust the gas installation of your appliance and its electrical connection
to an approved installer or technician with similar qualifications.
• The Trio consists of three elements, a hob, an oven and a diswasher. For safety reasons
under no circumstances should any modifications be carried out to this appliance.
• This appliance is designed for domestic use only.
• If the Trio shows even the smallest defect, do not connect it. Disconnect from the power
supply and immediately contact an approved service agent.
• There are certain basic safety rules which are valid for any domestic appliance. They are
the following :
- Never touch the appliance when your hands or feet are wet or damp.
- Do not use it when your feet are bare.
- Do not remove the plug from the mains supply socket by pulling the mains cable or the
machine itself.
- Do not leave the appliance exposed to the elements (rain, sun etc...).
- Do not let children (or others incapable of operating it) use the machine without
supervision.
- Do not lean on the doors or not allow children to do so.
SAFETY INSTRUCTIONS

4
• All accessible parts are hot when the Trio is in operation. Take care to not touche these
elements and keep young children away from the Trio when in use, or just after the use.
•After each use we recommend that some cleaning of the Trio is undertaken. This prevents
the accumulation of dirt or grease which gets re-cooked and burns, generating unpleasant
smells and smoke.
• Never use a steam or high pressure spray to clean the appliance.
• Do not store flammable products in the Trio as they can catch fire if the appliance is
inadvertlanty switched on.
• Use oven gloves when placing or removing a dish from the oven.
• Do not line the oven walls with aluminium foil or single-use oven protectors available from
some stores. Aluminium or any other protection, in direct contact with the hot enamel,
risks melting the enamel or causing deterioration to the inside.
• When cooking with fats or oils, always take care to watch the cooking process as heated
fats and oils can catch fire rapidly.
• The dishwasher is designed for normal kitchen utensils. Objects that have been
contamined by petrol, paint, traces of steel or iron, corrosive chemicals, acids or alkalis must
not be washed in the dishwasher.
• There should not be water left in the machine or on the dishes at the end of the wash
programme.
• If you wish to dispose of an old dishwasher be careful to remove the door to eleminate the
risk of children becoming trapped inside it.
• The dishwasher has been made from materials which can be recycled so that it can be
disposed of in an environmentally friendly way.
• Ensure that the dishwasher does not crush power cables.
• It is not advisable to use adaptors, multiple plugs and/or extension cables.
•Any queries regarding the power supply cord should be referred toAfter Sales Service or a
qualified technician.
Any failure to follow the above advice may have serious consequences for the
safety of the appliance.

5
Installing a domestic appliance can be a complicated operation which if not carried out
correctly, can seriously affect consumer safety.
It is for this reason that a professionally qualified person should undertake the task who will
carry it out in accordance with the technical regulations in force.
In the event that this advice is ignored and the installation is carried out by an unqualified
person, CANDY declines all responsibility for any technical failure of the product whether
or not it results in damage to goods or injury to individuals.
---------------------------------------------------------------------------------------------------------------------------
INSTALLATION
---------------------------------------------------------------------------------------------------------------------------
• Before installing the appliance, the technician must :
- Check the compatibility between the Trio and the gas installation.
The Trio is factory set for use with the gas type as stated on the packaging and repeated on
the rating plate affixed to the cooker.
Natural gas G 20-20 mbar / G 25-25 mbar : main gas
- If necessary, change the gas.
To adapt the gas burners cooker fit suitable jets that provide the nominal flow rate go to
page 6.
• For installation the technician must :
The Trio is Class2 - Sub class 1 ; furniture adjacent to the unit must not be higher than the
top of the appliance.
- The cooker has adjustable feet for perfect levelling on the floor.
- Make the gas connection to the installation according to the gas supply, page 7.
- Connect the cooker electrically in compliance with the information given on page 8.
- If the gas type has been changed, adjust the minimum flow of each gas burner on page 8.
- Connect the Trio to the water supply and the water drainage (see pages 23-24).
ANY MODIFICATION MADE TO THE GAS SETTING SHOULD BE NOTED ON THE
RATING PLATE AFFIXED TO THE COOKER.
When the appliance is located on a carpet floor, attention must be paid to ensure that
there is no obstructions to the bottom vents.
INSTALLATION

6
¤ Factory setting : Natural gas = G20-20 mbar/G25-25 mbar
X Gas setting possible according to installation Butane gas G30-29 mbar or Propane gas G 31-37 mbar
CHANGING THE GAS TYPE :
the calorific capacity and pressure of the gas vary according to the type of gas.
When changing the gas, the technician should successively : change the jets, make
the gas connection to the installation and set the minimum flow of all the gas
burner tap.
INSTALLATION: GAS
CHANGING THE JETS OF THE GAS BURNERS
Hob burner jets
To gain access to the jets :
. lift the hob lid,
. remove the top, grills, caps and heads of all burners,
. use a tube spanner (7) inside the burner,
. according to the information given in the table,
install jets suitable for the burner type and gas type supplied.
For reinstallation, fit the heads, burner and top grills.
Each jet is identified with a mark.
JET
Jet kW Jet kW Jet kW Jet kW
G20 20 mbar
1,00
1,75
2,50
3,50
G20 25 mbar
1,20
2,00
2,80
4,00
G25 25 mbar 0,90 1,60 2,30 3,20
G30 29 mbar
1,00
1,75
2,50
3,50
G31 30 mbar
0,90
1,60
2,25
3,20
G31 37 mbar 1,00 1,75 2,50 3,50
50 66 80 94
76 101 118 144
ULTRA-RAPID
front right rear left front left rear right
BURNER AUXILIARY SEMI-RAPID RAPID
CAT. PAYS G20/20 G20/25 G25/25 G30/29 G30/36 G31/30 G31/37 G350/1
3
II 2E+3+ FR, BE XXX X
II 2H3+ CH, ES, GB, GR, IE, IT, PT XXX
II
2H3B/P
CZ, AT, DK, FI, NO, SE
X
X
X
I2E DE
X
II 2H3B/P HU
X
X
X
II 2L3B/P NL
X
X
X
II
2ELs3B/P
PL
X
X
X
GAZ/Pression (mbar)

7
GAS CONNECTION
This must be done in compliance with the regulations in force in the installation country. In
all cases, on the gas feed pipe provide a stopcock, a regulator or regulator release device
for propane gas. Only use valves, regulators ends and flexible tubes, regulators with the
official mark of the installation country.
Gas connection according to installation :
Natural Rigid, Flexible hose with mechanical fittings (1) - Soft rubber tube (3)
Butane Rigid, Flexible hose with mechanical fittings (1) - Soft rubber tube (2)
Propane Rigid, Flexible hose with mechanical fittings (1) - Soft rubber tube (2-3)
1 - provided the flexible hose can be inspected for its entire length.
2 - provided the soft rubber tube can be inspected for its entire length, its length does not
exceed 1.5 metres and it is fitted with suitable clamps at the ends.
1, 2 - soft tubes and flexible hoses with mechancial fittings must be arrange to be away
from any flames, and not deteriorated by the combustion gases, hot cooker parts or by
any spills of hot food.
THREE CONNECTION OPTIONS :
•RIGID PIPE CONNECTION
Connect directly to the manifold fittings.
• CONNECTION BY FLEXIBLE HOSE WITH MECHANICAL FITTINGS
We recommend this type of connection.
Screw the hose nuts directly onto the manifold fitting on the one hand and onto the stop
cock of the piping on the other hand.
• CONNECTION BY SOFT RUBBER
We do not recommend this type of connection.
To be reserved solely for old installations not enabling any other option.
Screw the compliant end piece (2) Butane/Propane gas
Fit the soft tube to the end
piece on the one hand and
to the regulator or to the valve Natural gas
outlet on the other hand.
(2) In all cases, make sure the seal is fitted. Following the connection operations, test
the leak tightness using soapy water, testing by flame is strictly prohibited.

8
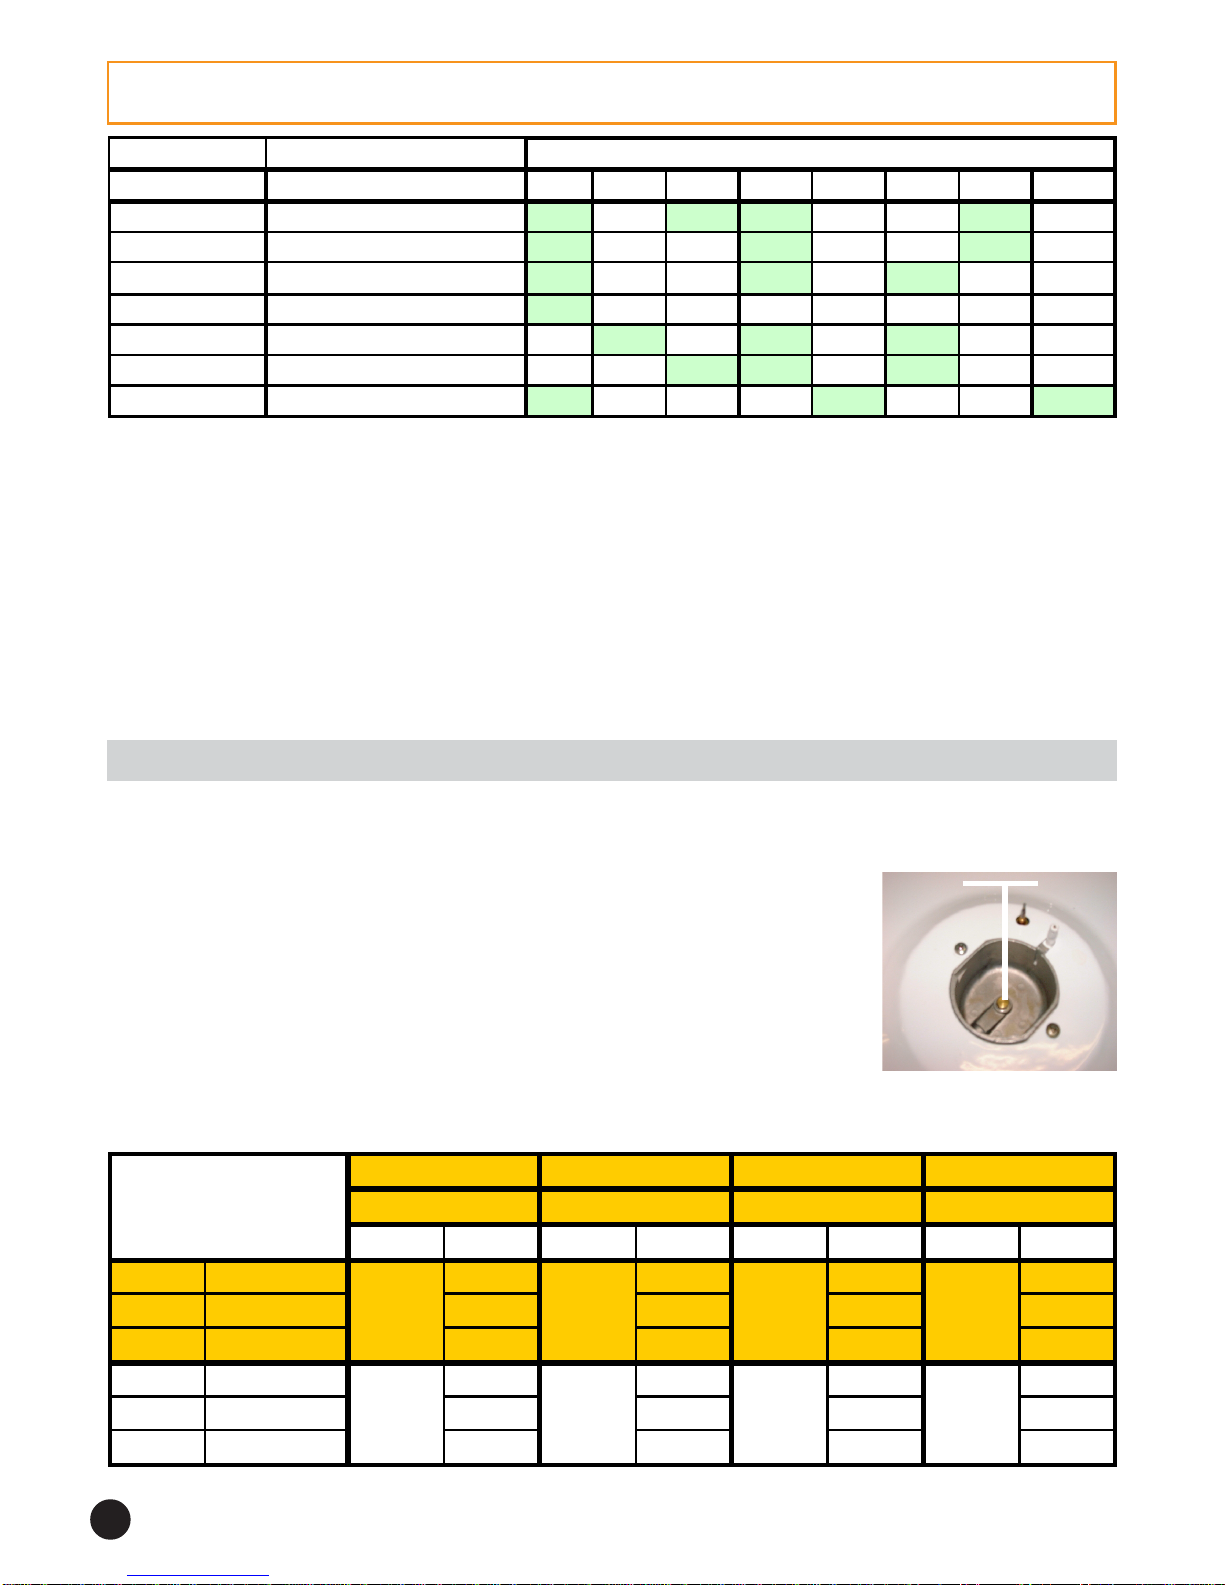
SETTING THE IDDLE FLAME
If the gas type has been altered, the stability of the flame in the minimum flow must be
checked and set by adjusting the by-pass screw.
To access the top burner by-pass screw, remove the control panel knobs. At first, pull the
disc to the front and remove the combined control knob.
a) Butane- propane gas : the setting is done by screwing right in (without forcing) the
by-pass screw whose calibrated hole provides the minimum flow.
b) Natural gas :
. unscrew the by-pass screw one turn,
. replace the combined control-knob, light the burner and set to low flame,
. remove the combined control-knob again, screw the by-pass screw until a reduced flame is
obtained, staying stable when going from high to low position.
. replace the combined control-knob.
Warning : Never loosen the others screws !
"The installation must conform to the standard directives".
CANDY declines all responsibility for any damage that may be caused by unsuitable or
unreasonable use.
Warning :
•Always check before any electrical operation, the supply tension shown on the electricity
meter, the adjustment of the circuit-breaker, the continuity of the connection to earth to
the installation and that the fuse is suitable.
• The electrical connection to the installation should be made via a socket with a plug
with earth, or via an omni pole cut-out switch with an opening gap of at least 3 mm.
If the appliance has a socket outlet, it must be installed so that the socket outlet is
accessible.
CANDY cannot be held responsible for any accidents resulting from the use of an
appliance which is not connected to earth, or with a faulty earth connection continuity.
• Any queries regarding the power supply cord should be referred to After Sales
Service or a qualified technician.
Warning! This appliance must be earthed. In the absence of adequate earthing you
will notice that when touching the metal parts of your appliance an electrical
dispersion can be felt due to the presence of a radio interference suppressor.
A power cord with a plug are supplied with the Trio which allow it to be connected only to a
power supply of 220-240 V between phases, or between phase and neutral.
INSTALLATION - ELECTRICAL CONNECTION

9
TECHNICAL DATA
In order to improve the quality of the products, CANDY may carry out modifications
linked to technical improvements.
Appliance meeting with the standard 89/336/CEE, 73/23/CEE and 90/396/CEE.
rerutcafunaM YDNAC
ledoM KU1/105OIRT
)mc(snoisnemidecnailppA 5,78-5,68thgieHX06htpeDx6,95htdiW
)mc(denepodilhtiw mc341-241
BOHEHT sa
g4
thgirtnorF Wk1esorojimyrailixuA
thgirraeR Wk5,3dipar-artlU
tfeltnorF Wk05,2dipaR
tfelraeR Wk57,1dipar-imeS
NEVOEHT
mroNNE 40305
erom(AssalcycneiciffeygrenE )tneiciffessel(Got)tneiciffe A
noitcnufgnitaeHlanoitnevnoC
l
anoitnevnochtiwnoitpmusnocygrenEhWk87,0
riadecrofhtiwnoitpmusnocygrenE noitcevnoc hWk59,0
emulovelbasUserti
l93
)nevoehtfoezis(ecnailppafoepyTemulovmuideM
daoldradnatsnodesabkoocotemiTnim5,93
teehsgnikabtsegralehtf
oaeraehT²mc0521
rewopboH+nevOixaM W0702
REHSAWHSIDEHT
noitpmusnocygrenEhWk57,0
ssalcycneiciffeygrenEB
ssalcyrd
ygrenEB
sgnittesecalP6
noitpmusnocretaW9

10
USE:eachburnerisfittedwithathermocouplefastsafety.Itisadeviceallowingthe automatic
cut-out of the gas supplying on the burner, in case the flame dies out accidentally.
•Turn on the gas tap,
• A symbol next to each control knob indicates which burner is lit.
•Press and turn the knob to position keeping it pressed
to produce sparks which in turn ignite the burner. Keep the
pressure on the control knob a few seconds to permit the
releasing of the safety device.
•Set the flame according to your cooking requirements. Intermediate positions are available
between the two positions and settings on the control knob.
•To turn the flame out, turn the control knob back to stop position.
Please note : if there is a power cut, the burner can be ignited by pressing and turning the
knob to position and holding a naked flame to the burner.
SOME TIPS ....
• Pans with curved, ridged or warped bottoms are not recommended.
•Avoid boiling food too intensely. Food is not cooked any more quickly this way. In fact, it is
subjected to severe agitation, which may cause the food to lose some of its flavour.
• To save gas, make sure that the flames do not overlap the bottom of the pan.
• Do not use the gas burner with an empty pan.
Caution : when the burners are not in service, the general gas supply tap should always be
turned off.
The various burners : the hob has burners of different dimensions.You should be aware of
the differences in power of each burner.
• use the powerful burner to bring to boil, to fry meat, and in general for any food that should
be cooked quickly.
•use the semi-rapid for slow cooking or for sauces.
• use the small burner for small pans and also for slow cooking.
For a proper use of the burners, choose pans that match the dimensions given below:
ultra-rapid Ø22 cm, semi-rapid Ø12 cm, rapid Ø16 cm, auxiliary mijorose Ø10 cm.
THE GAS BURNER

11
THE OVEN "Use"
VERY IMPORTANT : the oven and the dishwaher cannot be used at the same time.
To use the oven, you have to close the dishwasher.
When the oven is in use, any unused accessories should be removed.
OVEN EQUIPMENT
IMPORTANT : always keep small children away from the Trio while it is in use.
If the Trio is fitted with a lid, lift it up before use.
• THE CIRCUIT-BREAKER TIMER
It takes in charge the functioning of the oven, for between 1 and 120
minutes, with immediate start and automatic stop. When the time is
up, the timer automatically cuts off the power supply to the oven.
However, the oven could be used without programming. In this case,
turn the control knob to the Hand position .
Nota: to set a time,turn the controlknob clockwiseup to the120 minutes mark and thenturn
it back to the required time.
It is necessary to do an initial cleaning of the equipment before the first use of each of
them. Wash them with a sponge. Rinse and dry off.
• THE SHELF : it is for holding dishes, plates, and meat
joints when cooking with the grill. It is fitted with rails
which enables the drip tray to be slid into.
Thankstoitsspecialshape,theshelfalwaysremainshorizontal,evenwhenpulledtoitsfullest
extenttowardsthefrontoftheoven, thusavoidingtheriskof dishesslidingoffortipping over.
• THE DRIP TRAY : collects meat and grilling juices during
grilling. It can be put on the shelf, or slid under it.
Unless used with the grill, the drip tray must not be stored in
the oven while in use.
Never use the drip tray as a roasting tray. This would cause smoke to be produced, fat to be
splashed and the oven would become rapidly stained.
• THE PASTRY TRAY must be placed on the shelf. It is
for cooking small pastries like choux, biscuits, meringues,
etc...
Never place the pastry tray directly on the oven bottom.

12
THE COOKING METHODS
• Conventional cooking : the top and bottom heating elements are used together.
This method is ideal for all traditional roasting and baking, for sealing red meats, roast beef,
legoflamb, bread, flaky pastry.Preheatthe oven for abouttenminutesand place the cooking
meat in the mid shelf position.
• Grill : using the top heating element. Success is guaranteed for mixed grills, kebabs and
"gratin dishes". Five minutes preheating is required to get the element hot.
• Fan assisted grill : using the top heating element with the fan circulating the air inside
the oven. Ideal for cooking thick food items, whole pieces such as roast pork, poultry etc..
Preheating is necessary for red meats but not for white meats. Slide the drip tray under the
shelf to collect juices. Make sure that the food is not too close to the grill. Turn the food over
halfway through cooking.
• Fan cooking : both top and bottom heating elements are used with the fan circulating
the air inside the oven. We recommend you use this method for poultry, pastries, fish and
vegetables.. heat penetrates into the food better and both the cooking and preheating times
are reduced.
USE :
• Turn the control knob on the requesting
cooking method and set a temperature :
Conventional cooking Temperature from 65°C to 230°C
Grill Temperature 230°C
Fan assisted grill Temperature from 190°C to 210°C
Fan cooking Temperature from 65°C to 210°C
• Turn the control knob of the circuit-breaker timer to the Hand position or on a programming
duration.
• The regulator indicator light indicates that the thermostat is working. It goes
on and off regularly during the cooking time.

13
COOKING ADVICES
MEAT :
It is better not to salt meats until after cooking as salt encourages the meat to splatter fat.
This will dirty the oven and make a lot of smoke.
Joints of white meat, pork, veal, lamb and fish can be put into the oven cold. The cooking
time is longer than in a preheated oven, but it cooks through to the centre better as the heat
has more time to penetrate the joint.
CORRECT PRE-HEATING IS THE BASIS OF SUCCESSFUL RED MEAT COOKERY.
CAKE - PASTRIES AND BISCUITS :
Avoid using shiny moulds because they reflect heat and can spoil your cakes. If your cakes
brown too quickly, cover them with greaseproof paper or aluminium foil.
Caution : the correct way to use foil is with the shiny side inwards. If not the heat is reflected
by the shiny surface and does not penetrate the cake.
Avoid opening the door during the first 20 to 25 minutes of cooking : sponge cake, soufflés,
brioche, etc., will tend to fall.
You can check if cakes are done, by pricking the centre with a knife blade or metal knitting
needle. If the blade comes out nice and dry, your cake is ready, and you can stop the
cooking. If the blade comes out moist or with bits of cake attached, continue baking but
slightly lower the thermostat so that it finished off without burning.
The following instructions are for guidance only. You may wish to alter them according
to your own experience or your personal taste.
Pre-heating times :
. 20 minutes between 210 and 230°C
. 15 minutes between 140 and 190°C
. 10 minutes between 65 and 115°C

14
YTITNAUQDOOF nevO erutarepmet C°ni
noitisopflehS mottobehtmorf emitgnikooC setunimni
HSIF
tuorT0021 52/51
gk1gnitihW09
1105
TAEM
gK5,1-1feeb-tsaoR091109
gk1laevtsaoR061/0511051/021
gk2laevfoetteuqnalB091/071109/06
gk5,1-1bmalfogeL061/051157/06
gk5,1-1nottumfogeL061/051106/05
YRTLUOP
gk2snoegiP061/051154
gk4esooG0611 072/042
gk5,2-2kcuD5711 051/09
gk5,1-1nekcihC0711 08/06
SUOIRAV
-engasaL inollennaC 002104
sélffuoS002102
rettirF002102
azziP002102
YRTSAP
ekactaehwkcuB5711 05/04
stiurfhtiwtraT091/0
81103/02
nevael(tiucsiB )hguod 0611 54/04
eugnireM001109
yrtsapffuP002102

15
Technical data :
Place load EN50242 6 Drainage pump power 30 W
Capacity with pans & dishes 4 persons Max power absorbed 2050 W
Water supply pressure (litres) 3 Water pressure mini 0,08 - max 0,8 MPa
Power 1900 W Fuse (amp) 10 A
Wash pump power 150 W
DISHWASHER CONTROLS
A B C D
A Programme selection indicator lights CProgramme description
BProgramme selection button DOn/off button
SELECTING THE PROGRAMMES AND SPECIAL FUNCTIONS
The dishwasher and the oven cannot be used simultaneously.
Setting a programme
Open the door and press the On/off button ; the 4 Program selection LEDs start flashing.
- Set the required programme by pressing Programme selection button, LED of the chosen
programme will turn on (2 LEDs for COLD RINSE programme).
- Close the door (after audible signal), the chosen programme will start automatically.
USE THE DISHWASHER
Opening the door
Grip the handle in the front panel and pull forward. If the machine comes open while it
is working, an electrical safety device automatically switches everything off. For the
machine to work properly, the door should not be opened while it is in operation.
Closing the door
Place the basket in the dishwasher. Make sure that the spray arm is free to rotate and is
not obstructed by cutlery, crockery or pans. Close the door, pressing on it to make sure
it is firmly shut.
Interrupting a programme
ltisnotrecommended that the doorbeopenedwhilea programme is running, andespecially
not during the main wash phase and final drying.
However, the appliance stops automatically when the door is opened.
When the door is closed again, the programme continues automatically.
THE DISHWASHER

16
Ifyouwishtochangeorcancelaprogrammethatisrunning,carryoutthefollowingprocedure:
. open the door, keeping the Programme selection button "P" pressed in until all 4 indicator
lights are flashing. The current programme is cancelled. A new setting can now be made.
Before starting a new programme, you should check that there is still detergent in the
dispenser. If necessary, top up the dispenser.
WARNING: if the door is opened during the drying phase, an intermittent audible signal is
activated to advise that the cycle is not yet completed.
End of programme
The end of the programme is indicated by an audible signal. When the door is opened the
programme selection indicator lights start flashing. Release the On/off button.
Deactivating the audible signal
The audible function can be deactivated in the following way:
- press the On / Off button
- wait till the programme LEDs blink
-within 2minutes, press and keep pressedfor atleast 30 seconds the ProgrammeSelection
button (the programme LEDs will still blink and an intermittent audible signal is heard).
- Once the first two LEDs on the left are illuminated without blinking and the audible signal is
off, release the button (the audible signal function is active).
- Press again the Programme Selection button, the first two LEDs on the left will go off and
the other two LEDs will turn on (the audible signal function is deactivated)
- An audible signal will confirm that the setting is completed
- To set again the audible signal function repeat the whole procedure.
Attention - The dishwasher is equipped with an anti-overflow safety device which in the
event of anomaly intervenes by evacuating water in excess.
Fault Signals
If malfunctions or faults occur when a program is running, the LED that corresponds to the
selected cycle (2 LEDS for COLD RINSE programme) will blink rapidly and an audible signal
will be activated.
In this case, turn the dishwasher off by pressing the On / Off button. After checking to make
sure the water inlet hose tap is open, that the drain hose is not bent and that the siphon or
filters are not clogged, re-start the selected program. If the anomaly persists, contact
Customer Service.
Important !
To ensure the correct operation of the anti-overflow safety device, it is recommended
not to move or to tilt the dishwasher during operation.
If it is necessary to move or to tilt the dishwaher, first make sure the washing cyle is
finished and that no water is left in the tank.

17
PRELIMINARY OPERATIONS AND CLEANING THE FILTER UNIT
The filtering system is composed of :
- a central filter cup which traps the largest food particles.
- a flat filter which continuously filters the washing water.
- the micro filter, situated under the flat filter, which traps the
smallest food particles ensuring a perfect rinse.
For best results, the filter unit should be checked and cleaned after each wash.
To remove the filter unit, simply grip the handle and lift the whole unit out.
The central cup is just resting on top for easy cleaning.
The dishwasher is fitted with a self cleaning micro filter, which only requires checking about
once every 15 days.
However, it is advisable to check after every wash, that the central cup and the flat filter
are not clogged.
NB : After cleaning the filters, make sure that they are correctly reassembled, one inside
the other, and that the flat filter is properly positioned at the bottom of the dishwasher.
A poor seating of the filter unit could have an adverse effect on the efficiency of the
appliance.
Important : Never use the dishwasher without filter.
LOADING DISHES
The basket has been carefully designed to make loading easy.
For good wash performance, remove any debris from the dishes (bones, tooth picks, the
remains of meat and vegetables) to avoid blocking the filters, water outlet and washing
arm nozzle and, as a result, reducing washing efficiency.
Warning ! to avoid any injury from cutlery with blades or sharp points, they can be placed
with the handles upwards.
LOADING A 6 PLACES SETTING (EN 50242)
A- 6 glasses F - 6 flat plates
B- 6 dessert plates G- 6 deep plates
C- 6 saucers H- Medium bowl
D- Small bowl I - Serving dish
E- 6 tea or coffee cups L - Cutlery
LOADING 4 PLACE SETTINGS PLUS CASSEROLES
Casseroles, salad bowls, soup pans, lids etc., can be loaded
on the basket.
It is advisable to arrange the cutlery in the basket provided
for that purpose. If there is any cutlery with narrow handles,
it should be placed with handles upwards, to avoid falling
through the bottom of the basket and blocking the washing
arm. Do not put wooden handled lids in the basket, or any
whose lids are bonded with resin.

18
LOADING THE DETERGENT
It is essential to use a detergent that is specifically designed for dishwashers either
in powder, liquid or tablet form.
Unsuitable detergents, (like those for washing up by hand) do not contain the proper
ingredients for use in a dishwasher and impede the efficient functioning.
Normal wash
The detergent dispenser is inside the door. The dispenser
lid should be closed before every wash.To open it, simply
press the catch. At the end of each wash cycle the lid is
always open and ready for the next time the dishwasher is
used.
The amount of detergent to be used varies according to
how dirty the dishes are and the type of wash. A 15g
dose is normally recommended. If the water is hard or the
dishes are exceptionally dirty, 25g of detergent should be
loaded. After pooring the detergent into the dispenser,
close the lid, since not all detergents are the same and the
instructions on the boxes of detergent can vary.
We should just like to remind users that too little detergent
does not clean the dishes properly whilst too much
detergent not only does not produce better results but is
also a waste. Do not use an excessive amout of detergent
andhelplimitdamagetotheenvironmentatthesametime.
Intensive washing
When using the intensive wash programme, add a second
dose of detergent of about 15g (1 soup spoonful).
This extra dose should be put in the curved part of the
dispenser when it is closed (see diagram).
FILLING THE RINSE AID DISPENSER
The rinse aid dispenser "B" is to the right of the detergent
dispenser and has a capacity of about 130 ml.
Open the lid and pour in enough liquid, which will last
several washes. Try to avoid overloading. Close the lid.
This additive, which is automatically released during
the last rinse cycle, helps the dishes to dry quickly and
prevents spots and stains forming. It is always advisable
to use rinse aid.
Check the rinse aid level through the indicator eye "A"
which is situated in the centre of the dispensers.
FULL - Dark EMPTY - Bright

19
REGULATING THE RINSE AID (from 1 to 6).
The regulator control "B" is below the indicator and can be turned with the finger, the
recommended position is "3".
The hardness of the water can be judged by incrustation or by the level of dryness.
It is therefore important that the correct dosage of Rinse Aid is regulated to give the best
results.
After the wash,
. if streaks occur on the dishes, decrease the amount by one position.
. if whitish spots occur, increase the amount by one position.
LOADING THE SALT
The dishwasher is fitted with a softener that clears the water of lime which could cause scale
and damage the dishwasher.
On the bottom of the diswasher there is a salt dispenser for regenerating the softener.
The filter element of the softener unit should be recharged with a salt specially produced for
dishwashers. This salt can be bought either as tablets or as granules.
To add salt, unscrew the cap of the salt dispenser on
the bottom and refill the dispenser.
Duringthisoperationalittlewaterwilloverflowbutkeep
addingsaltuntilthedispenserisfill,cleanthethreadof
salt residue and retighten the cap.
If the dishwasher is not required straightaway, set
the programme Cold rinse ("Eco+Rapid, 2 Leds")
so that the salt solution which has overflowed is
discharged from the washing tank.
Thesaltdispenserhasacapacityofbetween1.5kgfor
efficient use of the appliance, it should be refilled from
time to time according to the regulation of the water
softener unit.
NB: it is necessary to add water until the dispenser overflows. Only install the dishwasher
completely filling the salt dispenser.

20
Regulating the water softener with electronic programmer
The water softener can treat water with a hardness level of up to 60°Fh (French grading) or
33°Dh (German grading) through 5 settings.
The settings are listed in the panel below:
The softener unit is set in the factory at level 3 (indicator light N.3) as this is suitable for the
majority of users.
Regulate the setting of your water softener unit according to the degree of hardness of your
water as follows: Open the door, press On / Off button, within 2 minutes press and keep
pressed for at least 10 seconds the Programme Selection button; the first three LEDs on the
left turn on for 3 seconds.
TheLEDassociatedwiththesetwatersoftenerstartsflashing;successivebuttonpushingwill
set the water hardness levels (see table).
Information for the test laboratories
General programme comparison
Ref. EN 50242 standards:
1) Normal load
2) Shine setting: "4"
3) Amount of detergent: 18gr. for wash
08
-
0
120
-
230
-
21
340
31
460
-
41
Level
Water
hardness Water
hardness
Use of
regenerating
salt
Water
softener
setting
no
yes
yes
yes
yes
indicator light N.1
indicator light N.1
indicator light N.2
indicator light N.3
indicator light N.4
°dH
(German)
°fH
(French)
P1
N°1
P2
N°2
P3
N°3
P4
N°4
P5
PR.
P1 P2 P3 P4 P5
LEDSPROGRAMME SELECTION BUTTON
Table of contents
Other Candy Hob manuals

Candy
Candy CIS633DTT User manual

Candy
Candy CH63TVT User manual

Candy
Candy CI642C/E1 User manual

Candy
Candy CIS642SCTT/4U User manual

Candy
Candy CIKC30 User manual

Candy
Candy CIES644DC User manual

Candy
Candy CHK46C User manual

Candy
Candy CVG64SPX User manual

Candy
Candy CSG6B/4U2 User manual

Candy
Candy CH64CCTT User manual

Candy
Candy HOBS User manual

Candy
Candy S60HBGS User manual

Candy
Candy CI642CWTT/1 User manual

Candy
Candy CI6DTP User manual

Candy
Candy TRIO TRI 5S Operation manual

Candy
Candy CITT642C/E1 User manual

Candy
Candy DT-01220 User manual

Candy
Candy ESQUEMA 1 User manual

Candy
Candy CLE64KX User manual

Candy
Candy PCI27XCH64CCB User manual