Candy FP 855/1 User manual

1
44001938
GB INSTRUCTIONS OF USING AND INSTALLING
THE FITTED OVEN
~~~
FP 855/1

2
SAFETYINFORMATION ----------------------------------------------------------3
RECOMMENDATIONS-------------------------------------------------------------3
INSTALLATION PART
1•INSTALLATIONOFTHE OVEN
Fittingtheoven-------------------------------------------------------------- 4/5
Electricalconnectionofthe oven --------------------------------------- 6/7
Datasheet ----------------------------------------------------------------------8
USE PART
2 • THE OVEN
Thecontrols --------------------------------------------------------------------9
Ovenequipment ------------------------------------------------------------- 10
Various cooking methods---------------------------------------------- 11/12
3• USING THEOVEN
Beforethe first use
. First cleaning --------------------------------------------------------- 13
. What you should know --------------------------------------------- 13
. Time setting----------------------------------------------------------- 13
Usingtheoven
1 – Instant cooking---------------------------------------------------- 14
2–Programmingtheoven
Programmingwithimmediatestart-------------------- 15/16
Programmingwithdelayedstart --------------------------- 17
Thetimer -------------------------------------------------------- 18
4•COOKINGNOTES
Fish----------------------------------------------------------------------- 19
Meat ------------------------------------------------------------------ 20/21
Vegetables-others --------------------------------------------------- 22
Baking ------------------------------------------------------------------- 23
5•CLEANINGTHE OVEN
Generalovencleaning -------------------------------------------------- 24/25
Thepyrolyser ------------------------------------------------------------- 26/28
CONTENTS

3
SAFETY INFORMATION
•Read the instructions carefully to make the most of your oven. We recommend you
keep the instructions for installation and use for later reference, and before installing the
oven, note its serial number below in case you need to get help from the after-sales
service.
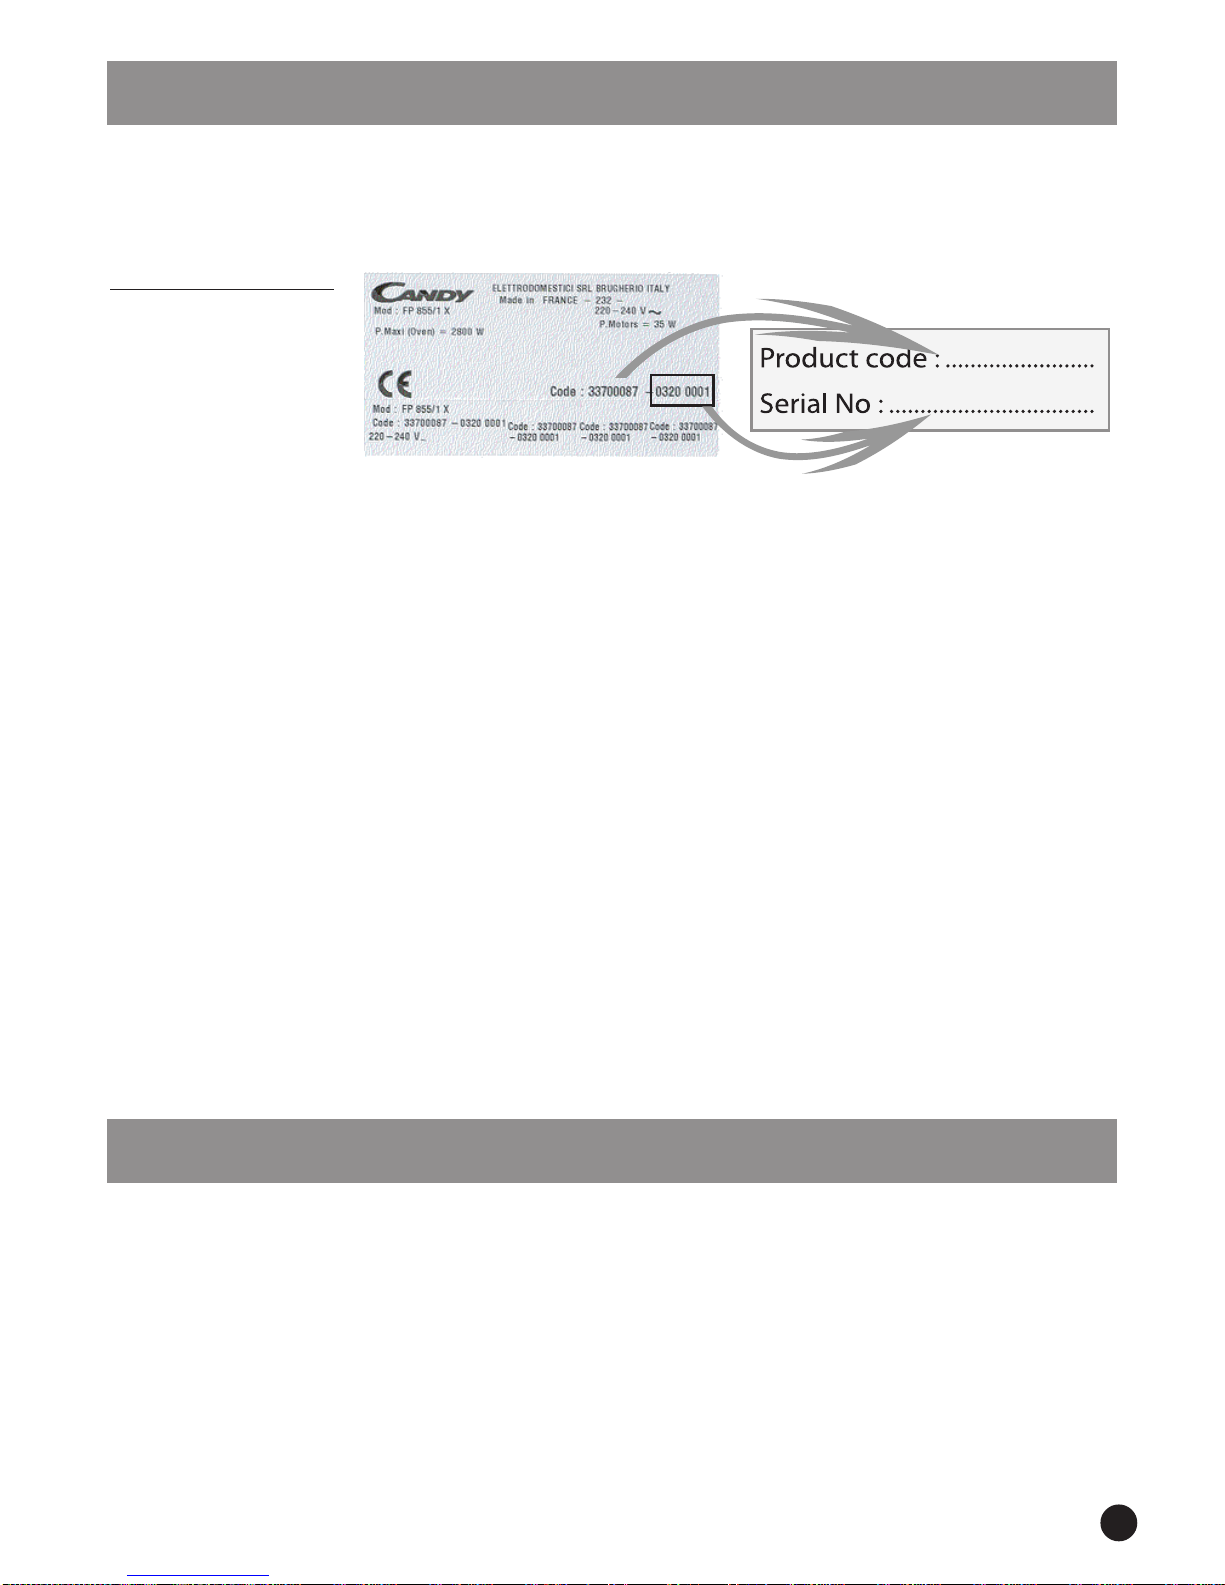
. Identification plate
(located on the side
of the oven)
The company shall not be liable if the instructions provided in this document are
not complied with.
• You should entrust the installation of your appliance and its electrical connection
to an approved fitter or technician with similar qualifications.
• The oven you have just acquired has the described technical characteristics and you
must not make any modifications to it.
•While the oven is operating and during the pyrolyser cycle, the oven door becomes hot.
Keep children away from it.
•Before operating the pyrolyser cycle, it is much important to remove any of the larger
quantities of grease. Too many large greasy deposits could catch fire under the effect of
the high heat pyrolyser cycle.
• Never use a steam or high-pressure spray to clean the oven.
• If your oven shows any defect whatever, do not connect it or disconnect it from the
power supply and immediately contact an approved CANDY service agent.
• Do not store flammable products in the oven ; they can catch fire if the oven comes on
accidentally.
• Do not press on and do not let children sit on the oven door.
• Use kitchen oven gloves, when putting into or removing a dish from the oven.
RECOMMENDATIONS
•After each use of the oven, a minimum of cleaning will help keep the oven perfectly
clean.
• Do not line the oven walls with aluminium foil or single-use protection available from
stores. Aluminium foil or any other protection, in direct contact with the hot enamel, risks
melting and deteriorating the enamel of the insides.
• In order to prevent excessive dirtying of your oven and the resulting strong smoky smells,
we recommend not using the oven at too high a temperature. It is better to extend the
cooking time and lower the temperature a little.
• In addition to the accessories supplied with the oven, we advise you only use dishes
and baking moulds resistant to very high temperatures (i.e. earthenware dishes).

4
1 - INSTALLATION OF THE OVEN
THE OVEN SHOULD BE INSTALLED BY AN APPROVED CONTRACTOR OR
TECHNICIAN WITH SIMILAR QUALIFICATIONS.
The kitchen unit in which the oven is to be fitted must be made of material resistant to
temperatures of at least 70°C.
The oven can be located high in a column or under a worktop.
Before fixing: you must ensure good ventilation in the oven space to allow proper
circulation of the fresh air required for cooling and protecting the internal parts. Make the
openings specified on page 4 or 5 according to the type of fitting.
1 - Oven in column
(Dimensions mm.)
Opening for
power
supply cable
Opening
Opening

5
3 - Fixing in the location
Inside the oven is a bag with fixing screws.
Fixing:
when the oven door is open, two holes
are accessible, they are located on
each side of the side uprights.
Use the screws provided to fix the
oven.
1 - INSTALLATION OF THE OVEN
2 - Oven fitted under worktop
(dimensions mm.)
SCREWS
Opening
Opening
OVEN
TOP

6
1 - ELECTRICAL CONNECTION
THE ELECTRICAL CONNECTION SHOULD BE CARRIED OUT BY AN APPROVED
CONTRACTOR OR TECHNICIAN WITH SIMILAR QUALIFICATIONS.
The installation receiving the appliance must comply with the standard in force in the
installation country.
CANDY does not accept any responsibility if this provision is not complied with.
Connection to the network must be by earthed socket outlet, or by means of a multi-pole
circuit-breaker having a distance between contacts of at least 3 mm.
The installation must be protected by suitable fuses, and have wires with a large
enough cross-section to supply the oven normally.
CONNECTION:
The oven is fitted with a power lead for connecting exclusively to a voltage of 230 V AC
across the phases or across phase and neutral.
Connection must be carried out in compliance with the diagram on the next page,
having first checked:
. the supply voltage indicated on the meter,
. the circuit-breaker setting.
The lead protection wire (green/yellow) connected to the earth terminal of the oven must be
connected to the earth terminal of the installation.
Caution:
. Have the earth continuity of the installation checked by an electrician
before making the connection.
. The manufacturer will not be liable for any incident, or the possible
consequences that may arise from the use of the oven not earthed, or
connected to an earth with defective continuity.
NB: do not forget that the oven may require after-sales service.
Also, locate the socket outlet so that the oven can be connected once it is removed
from its space.
Power supply cable: if the power supply cable has to be changed, please have this
done by the after-sales service or by someone with similar qualifications.

7
1 - ELECTRICAL CONNECTION

8
1 – DATA SHEET
All data is given for information only. In order to improve the quality of its products, CANDY
may modify its appliances with technological developments which adhere to the
conditions set out in the Consumer Code.
Appliances comply with Directives 89/336/EEC, 73/23/EEC and
89/109/EEC.
mroN
NE 40305
rerutcafunaM YDNAC
ledoM 1/558PF
ssalcycneiciffeygrenE )tneiciffessel(Got)tneiciffeerom(A B
noitcnufgnitaeH lanoitnevnoC
lanoitnevnochtiwnoitpmusnocygrenE hWk89,0
riadecrofhtiwnoitpmusnocygrenE noitcevnoc hWk91,1
emulovelbasUsertil84
)nevoehtfoezis(ecnailppafoepyT muidememulov
daoldradnatsnodesabkoocotemiT nim05
teehsgnikabtsegralehtfoaeraehT ²mc0521
rewopixaM0082
rewoplirG0512
elcycsisylorypehtfonoitpmusnoC setunim08 hWK05,3

9
1 . Temperature selector for choosing a temperature in a range between 60°C and
280°C (MAX).
2 . Display :
. indicates current time,
. indicates the cooking or the pyrolysis programmation.
3 . Regulation indicator lamp comes on when the selector function and the
thermostat are operating. As long as the oven temperature centre has not reached
the selected temperature, the indicator lamp comes on. When the temperature is
reached, it comes on and goes off regularly during all the cooking time.
4 . Pyrolysis indictor lamp comes on at the beginning and at the end of the pyrolysis
cycle, when the door can be opened.
5 . Programming buttons
audible timer independent of the oven
display of cooking or pyrolysis duration
display of cooking or pyrolysis ending time
AUTO "on" : the programmer is in charge of the oven's operation
AUTO "off" : the oven operates in manual position
"-" and "+" programming adjustment buttons
6 . Function selector for choosing a cooking method or the pyrolysis cycle.
2 – INTRODUCTION to the «Controls»
2 - Display
1 - Temperature selector 6 - Function selector
5 - Programming buttons
3 - Regulation
indicator lamp 4 - Pyrolyser indicator lamp

10
Before the first use of the accessories, we recommend a cleaning using a sponge
with a little washing up liquid. Rinse and dry.
The simple shelf can take moulds and dishes.
The tray holder shelf is especially good for grilling things.
Use it with the drip tray.
The special profile of the shelves means they stay
horizontal even when pulled right out. There is no risk of a dish sliding or spilling.
The drip tray catches the juices from grilled foods.
It can be put on a shelf, or slid under the rails. It is only used
with the Grill, Rotisserie, or Fan Assisted Grill. Remove it
from the oven for other cooking methods.
Never use the drip tray as a roasting tray as this creates
smoke and fat will spatter your oven making it dirty.
The turnspit comprises one skewer, two forks and a spit holder.
. Take all the accessories out of the oven.
. Place the deep tray at the bottom.
. Put the food on the skewer, well centred between the two forks.
. Put the skewer onto the holder.
. Slide the holder and skewer into the second shelf position from the bottom.
. The end of the turnspit should be opposite the opening of the drive device.
. Engage the turnspit in the drive device.
Fitting the turnspit crosswise:
Boss to back
Drive device
2 – OVEN EQUIPMENT
When the oven is in use, any unused accessories should be removed from the oven.

11
2 - THE COOKING METHODS

12
DEFROST : the cooking fan runs to circulate the air inside the oven. Ideal for
defrosting before cooking.
CONVENTIONAL COOKING : both top and bottom heating elements are used.
Preheat the oven for about ten minutes. This method is ideal for all traditional
roasting and baking. For seizing red meats, roast beef, leg of lamb, game, bread, foil-
wrapped food (papillotes), flaky pastry. Place the food and its dish on a shelf in mid
position.
FAN COOKING : both top and bottom heating elements are used with the fan
circulating the air inside the oven. We recommend you use this method for poultry,
pastries, fish and vegetables. Heat penetrates into the food better and both the cooking
and preheating times are reduced. You can cook different foods at the same time with or
without the same preparation in one or more positions. This cooking method gives even
heat distribution and the smells are not mixed.Allow about ten minutes extra when cooking
foods at the same time.
FAN + LOWER ELEMENT : the bottom heating element is used with the fan
circulating the air inside the oven. This method is ideal for juicy fruit flans, tarts,
quiches and pâté. It prevents food from drying and encourages rising in cakes, bread
dough and other bottom-cooked food. Place the shelf in the bottom position. With this
method, a fan cooking preheating is necessary during 10 minutes.
GRILL :use the grill with the door closed. The top heating element is used alone
and you can adjust the temperature. Five minutes preheating is required to get
the elements red-hot. Success is guaranteed for grills, kebabs and dishes cooked "au
gratin". White meats should be put at a distance from the grill; the cooking time is longer,
but the meat will be tastier. You can put red meats and fish fillets on the shelf with the drip
tray slid underneath.
FAN ASSISTED GRILL : use the turbo-gril with the door closed. The top heating
element is used with the fan circulating the air inside the oven. Preheating is
necessary for red meats but not for white meats. Ideal for cooking thick food items, whole
pieces such as roast pork, poultry, etc. Place the food to be grilled directly on the shelf
centrally, at the middle level. Slide the drip tray under the shelf to collect the juices. Make
sure that the food is not too close to the grill. Turn the food over halfway through cooking.
ROTISSERIE : use the turnspit with the door closed. The top heating element
is used with the turnspit rotating the food to be cooked. The heating temperature
can be adjusted as required. The turnspit is best used for medium-sized items. Cook
larger pieces in the oven in the “turbo-grill” position, and they’ll cook better. Ideal for
rediscovering the taste of traditional roast. No preheating is required for turnspit cooking.
2 - THE COOKING METHODS

13
INITIAL CLEANING
. Clean the oven once before putting it to use:
Wipe over the external surfaces of the oven with a damp soft cloth.
Wash the accessories and the inside of the oven using a sponge and a little
washing up liquid.
Heat the empty oven at maximum temperature for about an hour to get rid of the new
smell. Make sure the room is well ventilated when you do this.
POINTS TO REMEMBER
•Cooking fan
This is for cooking with air
circulation inside the oven.
• Cooling fan
This fan cools the front of the oven and its electronic components.
It is linked to the operation of the oven.
According to the oven temperature, it starts and stops automatically, which explains why
it continues to function some minutes after the oven has stopped.
• Oven lighting : the oven lighting operates in cooking mode or when positionning the
function selector control knob on .
CLOCK
When the oven is powered up, the programmer shows :
Blinking display
Press buttons and , then release.
Use the or setting buttons to display the right time.
3 – BEFORE THE FIRST USE
Cookingfan

14
3 - USING THE OVEN
HOW TO COOK DIRECTLY ?
DThe oven must be in Manual position (Auto symbol off) : if not, press the button .
DTurn the function selector to the cooking position you want.
The oven comes on.
DSet the thermostat to the required temperature following the information given
below :
COOKING METHOD RECOMMENDED TEMPERATURES
Defrost temperature selector to stop position
Conventional cooking from 60 to 280°C
Fan cooking from 60 to 230°C
Fan + Lower element from 60 to 240°C
Grill from 220 to MAX (280°C)
Turbo grill from 180 to 230°C
Rotisserie from 220 to MAX (280°C)
Regulation indicator lamp comes on when the selector function and the thermostat
are operating. As long as the oven temperature centre has not reached the selected
temperature, the indicator lamp comes on. When the temperature is reached, it
comes on and goes off regularly during all the cooking time.
DThe oven starts to cook.
DWhen you think it is necessary, stop the oven by setting the temperature and
function selector to the stop position.
The lighting in the oven and the indicator lamps go off.

15
PROGRAMMING
Programming the oven for a period and immediate start ?
DThe oven must be in Manual position (Auto symbol off) : if not, press the button .
DSelect a cooking method and the appropriate temperature.
The indicator lamp comes on.
DProgram a cooking period :
. Press the button .
The symbol is displayed.
. Set a period using the and
buttons (maximum 24 hours).
. The programmer records the period and
automatically calculates the end-of-cooking
time.
The oven is in Auto mode (Automatic).
The current time is displayed.
DDuring the cooking period, you can view or change :
. the programmed period : press the button .
. the end time : press the button .
DThe oven stops automatically once the time has elapsed. The symbol
disappears. The lighting in the oven and the indicator lamp go off. An audible beep
sounds as a warning. To interrupt it, press one of the buttons "1" "2" "3" or "4".
The "Auto" symbol blinks; to stop it, reset to Manual position by pressing button
.
DReturn the two selectors to the stop position.
3 - USING THE OVEN

16
Programming the oven for a period and immediate start ?
DThe oven must be in Manual position (Auto symbol off): if not, press the button .
DSelect a cooking method and the appropriate temperature.
The indicator lamp comes on.
DProgram a cooking end time :
. Press button .
The symbol is displayed .
. Press the button :
the programmer displays the current
time and the Auto symbol.
. Set an end-of-cooking time using the
buttons and (current time
+ maximum 24 hours).
. The programmer records the end-of-cooking time and automatically calculates
the cooking period. It is in Auto mode (Automatic). The current time is displayed.
DDuring the cooking period, you can view or change :
. the programmed period : press the button .
. the end time : press the button .
DThe oven stops automatically once the end-of-cooking time is reached. The
symbol disappears. The lighting in the oven and the indicator lamps go off.
An audible beep sounds as a warning. To interrupt it, press one of the buttons "1"
"2" "3" ou "4".
The "Auto" symbol blinks; to stop it, reset to Manual position by pressing the .
DReturn the two selectors to the stop position.
3 - USING THE OVEN
PROGRAMMING

17
Programming the oven for a delayed start ?
DThe oven must be in Manual position (Auto Symbol off) : if not, press the button .
DSelect a cooking method and the appropriate temperature.
The indicator lamp comes on.
DProgram a cooking period :
. press the button , then set a period with the button and .
DProgram an end of cooking time :
. Press the button then the button : the programmer displays the current
time and the Auto symbol.
. Set an end-of-cooking time using the buttons and (current time + maximum
24 hours).
The Auto symbol is steady. The symbol disappears. The current time is
displayed.
DThe programmer calculates the cooking start time. It automatically starts the cooking
and then displays the symbol .
DAt any time, you can view or change the programmed period (press the button
or the end time pressing the button .
DThe oven stops automatically once the end-of-cooking time is reached. The symbol
disappears. The lighting in the oven and the indicator lamps go off.
An audible beep sounds as a warning. To interrupt it, press one of the buttons
"1" "2" "3" or "4".
The "Auto" symbol blinks ; to stop it, reset to Manual position by pressing the
button .
DReturn the two selectors to the stop position.
3 - USING THE OVEN
PROGRAMMING

18
THE TIMER
The timer operation is independent and does not affect oven operation. It is just an audibe
reminder. However, you can use it when cooking.
DPress the button and then release.
The symbol is displayed and the clock shows :
DDisplay the time required using the and buttons (maximum 24 hours).
DThe display again shows the time of day with the Timer symbol .
When the set time has elapsed, an audible beep sounds for 60 seconds. To interrupt
the beep, press one of the buttons "1" "2" "3" or "4".
The display disappears.
Whenever you want to check or change the programmed time, press again on the
button .
3 - USING THE OVEN
PROGRAMMING

19
Temperatures and cooking times are given for information only to facilitate using the
oven. Personal experience should then let you adapt these settings to your taste and
habits.
Remember that cooking at higher temperatures causes more spattering, and the oven
can become dirty and smoky. It is better to slightly reduce the cooking temperature,
even if it means increasing the cooking time.
FISH
------------------------------------------------------------------------------------------------------------------------------
Recipes Cooking Quantity Cooking Cooking Shelf position
method °C time from bottom
------------------------------------------------------------------------------------------------------------------------------
Tilefish or bream 1kg whole 220°C 30 min 1
Monk fish or
Salmon 1kg braised 220°C 30 min 1
Salmon steak 6 pieces 140-160°C 10-15 min 1
Fillet of sole 6 pieces 160°C 15-20 min 1
Grilled fish 6 fillets MAX 2 X 5 min 4
------------------------------------------------------------------------------------------------------------------------------
4 - COOKING TIPS
.5
.4
.3
.2
.1
SHELFPOSITION The sides of the oven are equipped
with different positions numbered
from the bottom.

20
MEAT
——————————————————————————————————————
It is better not to salt meats until after cooking as salt encourages the meat to spatter
fat. This will dirty the oven and make a lot of smoke.
Joints of white meat, pork, veal, lamb and fish can be put into the oven cold. The cooking
time is longer than in a preheated oven, but it cooks through to the centre better as the
heat has more time to penetrate the joint.
Correct preheating is the basis of successful red meat cookery.
GRILLS
• Before loading the grill:
Remove the meat from the refrigerator a few hours before grilling. Lay it on several layers
of kitchen paper: this improves seizing, making it tastier and avoids it staying cold at the
centre.
Add pepper and spices to the meat before grilling, but add any salt after cooking. This way
it will seize better and stay juicy. Baste all the food to be cooked with a little oil. This is
best done with a wide flat basting brush. Then sprinkle with more pepper and herbs (thyme,
etc.).
Load the grill.
• During cooking:
Never pierce the food during cooking even when you turn it. This lets the juice out and it
becomes dry.
4 - COOKING TIPS
Table of contents
Other Candy Oven manuals

Candy
Candy FPE6096X User manual

Candy
Candy FIDC B676 User manual

Candy
Candy FCTS886XL WIFI User manual

Candy
Candy Oven User manual

Candy
Candy FXP649X User manual

Candy
Candy FUS 100-40 W User manual

Candy
Candy FCP605NXL/E User manual

Candy
Candy FIDCP X696 User manual

Candy
Candy FCM856B User manual

Candy
Candy FXIDC X615 User manual

Candy
Candy FCT615WXL User manual

Candy
Candy FCT858 XRWF User manual

Candy
Candy F242-3X User manual

Candy
Candy FCPKS816X User manual

Candy
Candy FXP609X User manual

Candy
Candy FCDP818VX User manual

Candy
Candy FCPK626W User manual

Candy
Candy FL856X User manual

Candy
Candy Watch-Touch User manual

Candy
Candy FCNE825XRWF User manual