manuals.online logo
Brands
  1. Home
  2. •
  3. Brands
  4. •
  5. Canon
  6. •
  7. Digital Camera
  8. •
  9. Canon VIXIA HFR60 User manual

Canon VIXIA HFR60 User manual

Using an iOS/Android device to control the camcorder from
another location after setting it up in your home (Remote
Control+Streaming) (VIXIA HF R60/R62)
With this function of CameraAccess plus, you can leave the camcorder home and monitor the streamed
image while you are away. You can even use your iOS/Android device to start recording on the
camcorder.
When using an NFC-compatible Android device, you can connect the camcorder and the device with a
simple operation.
The procedures for using Remote Control+Steaming are explained in the following five steps. Proceed in
order from step 1.
Step 1: Installing CameraAccess plus
Step 2: Performing camcorder password and port configuration settings
Step 3: Connecting the camcorder to an access point
Step 4: Registering the camcorders ID in the iOS/Android device
Step 5: Controlling the camcorder with the iOS/Android device
NOTE
The CameraAccess plus app, provided by PIXELA, is available for free from the App Store (for iOS
devices) and Google Play (for Android smartphones).
In this example, setting procedures are shown in iOS 7 and Android 4.0.
The setting items and procedures may differ depending on the iOS/Android device you use and its
operating system.
The CameraAccess plus application may not be supported by some iOS/Android devices depending on
the model or installed operating system. For more information, please refer to System Requirements for
Smartphone Applications (HF R62).
REFERENCE
Using the Remote Monitoring Checker utility program (for Windows only), you can check whether your
home networks access point and Internet connection meet the requirements for using the Monitor
while Out function*. For details about this program and links to the download page, visit PIXELAs Web
site.
http://pixela.jp/cermc
* To use the Monitor while Out Function, an access point compatible with UPnP (Universal Plug and
Play) and an Internet connection that can acquire global IP addresses are required.
Step 1: Installing CameraAccess plus
1. iOS/Android device: Access the App Store (for iOS devices) or Google Play (for Android smartphones)
via your device to download and install the CameraAccess app. If your device supports NFC, you can
easily pair the camcorder and the device simply by touching the NFC touchpoints on both devices
together.
REFERENCE
NFC-compatible devices
: NFC touchpoint.
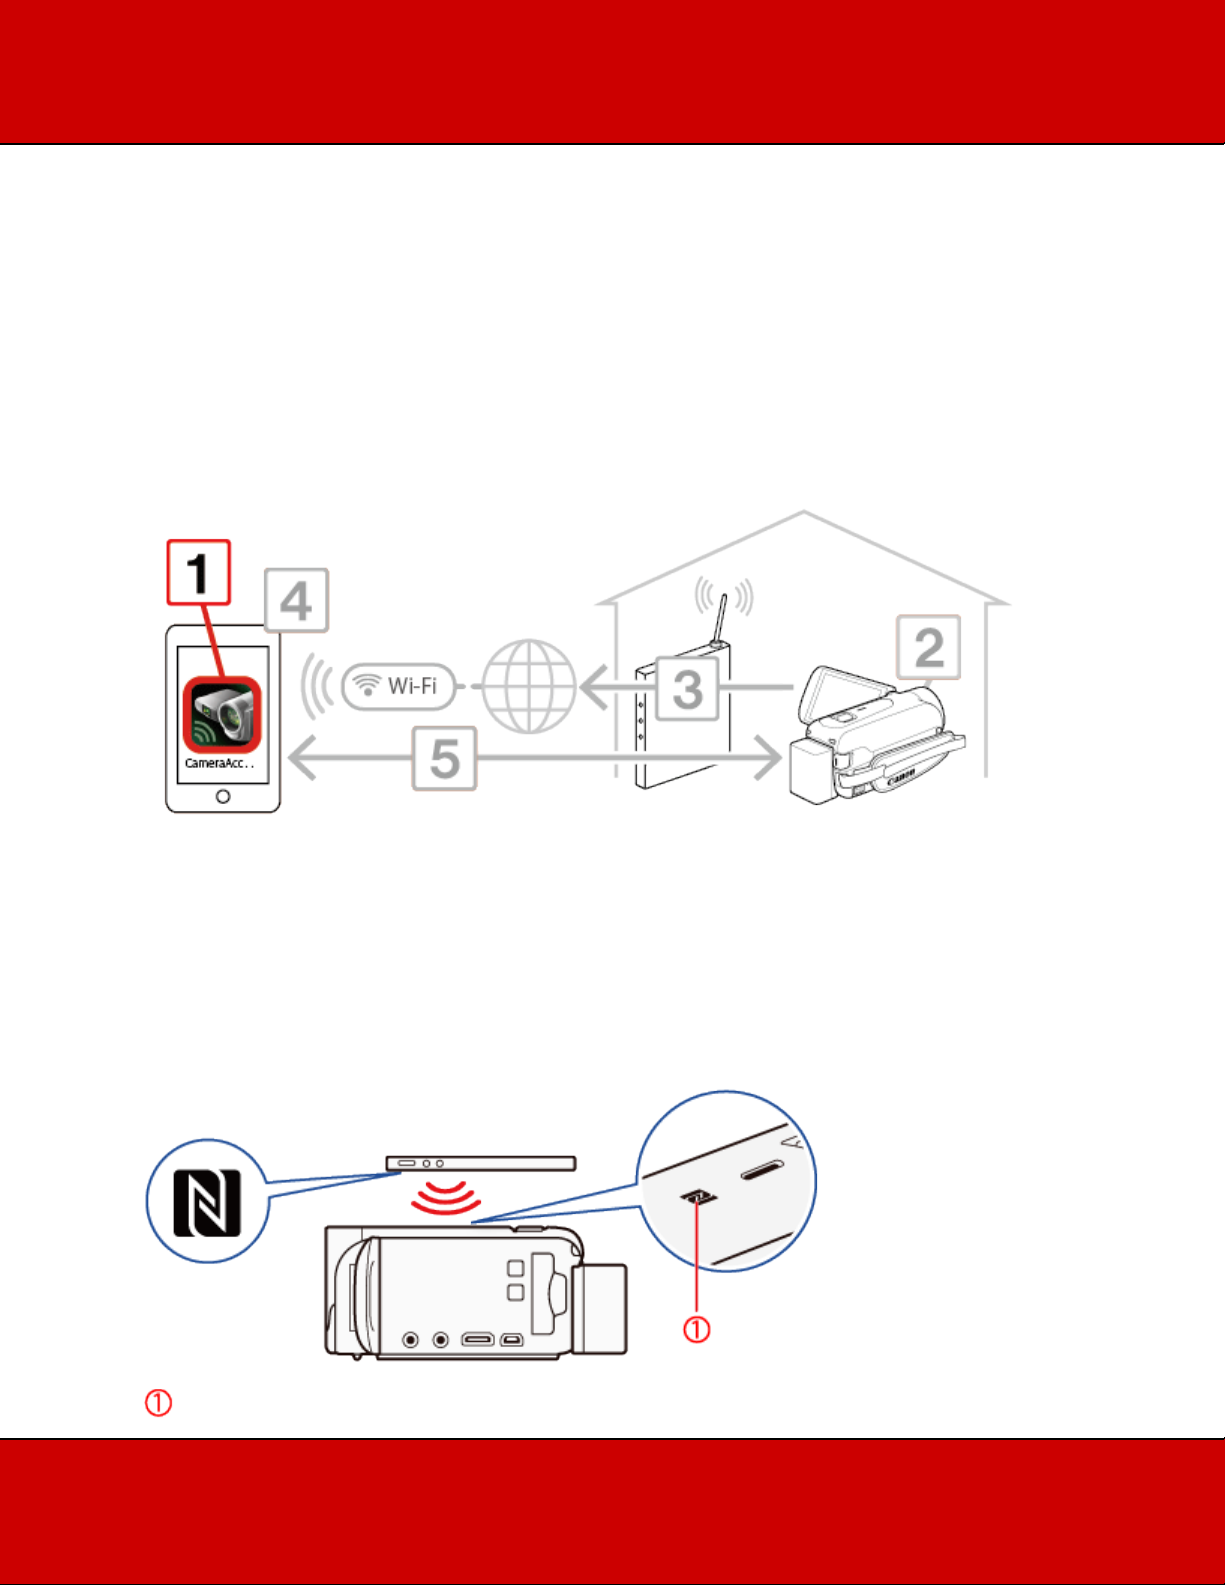
Touch the NFC touchpoint on the Android device* to the NFC touchpoint on the camcorder.
•Align the center of the NFC touchpoints on both devices. If there is no reaction, try changing the
position of the Android device slightly while it is touching the camcorder.
•When the device is recognized, the Android device will emit a sound** and the CameraAccess
plus app will start automatically.
* For illustration purposes only. For details about the devices NFC function and the location/mark of the
NFC touchpoint, refer to the instruction manual of the Android device used.
** Depending on the settings and specifications of the Android device used, no sound may be emitted.
NOTE
When using NFC-compatible devices.
- When touching an NFC-compatible device to the camcorder, be careful not to forcibly hit the device
against the camcorder. Using excessive force may damage the camcorder or NFC-compatible device.
- If the NFC-compatible device or the camcorder is covered by a protective case, the devices might not
be able to connect wirelessly.
- If the camcorder unintentionally comes into contact with an NFC-compatible device (for example,
inside a carrying bag), the camcorder may turn on on its own. You can set > > > [NFC] to [Off]
to prevent this.
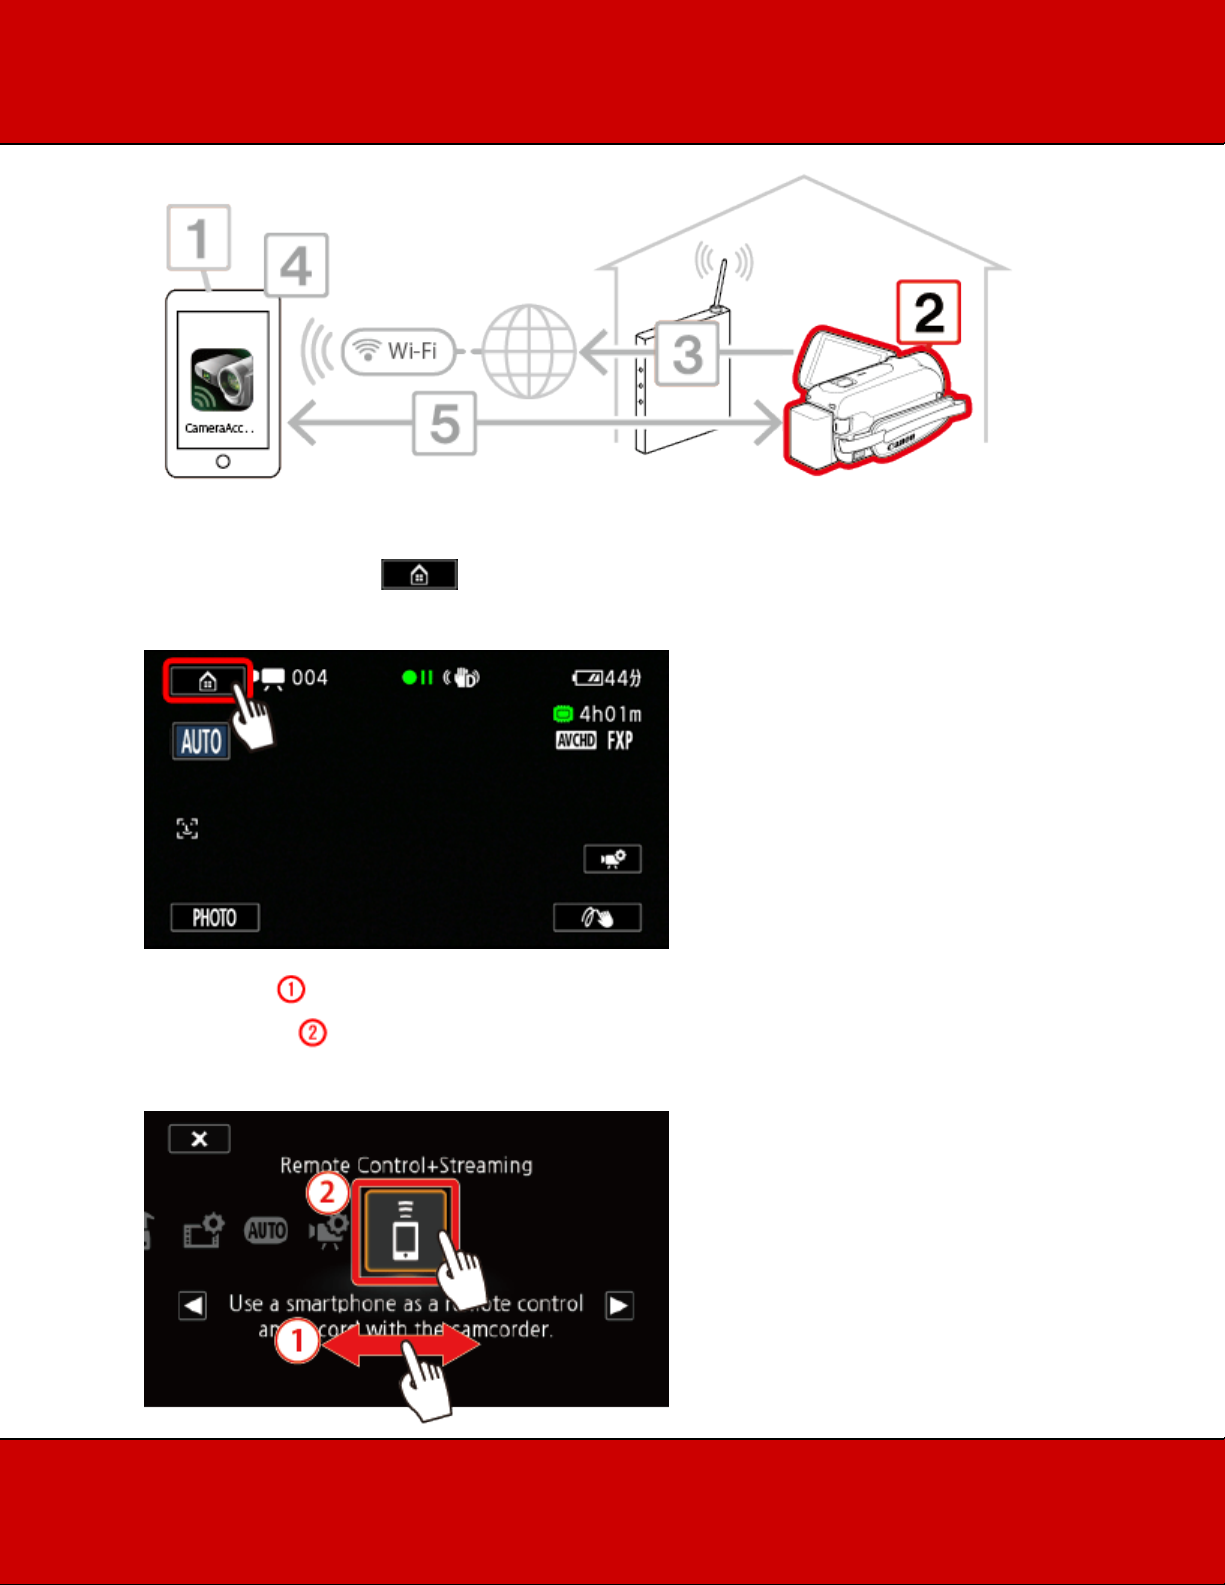
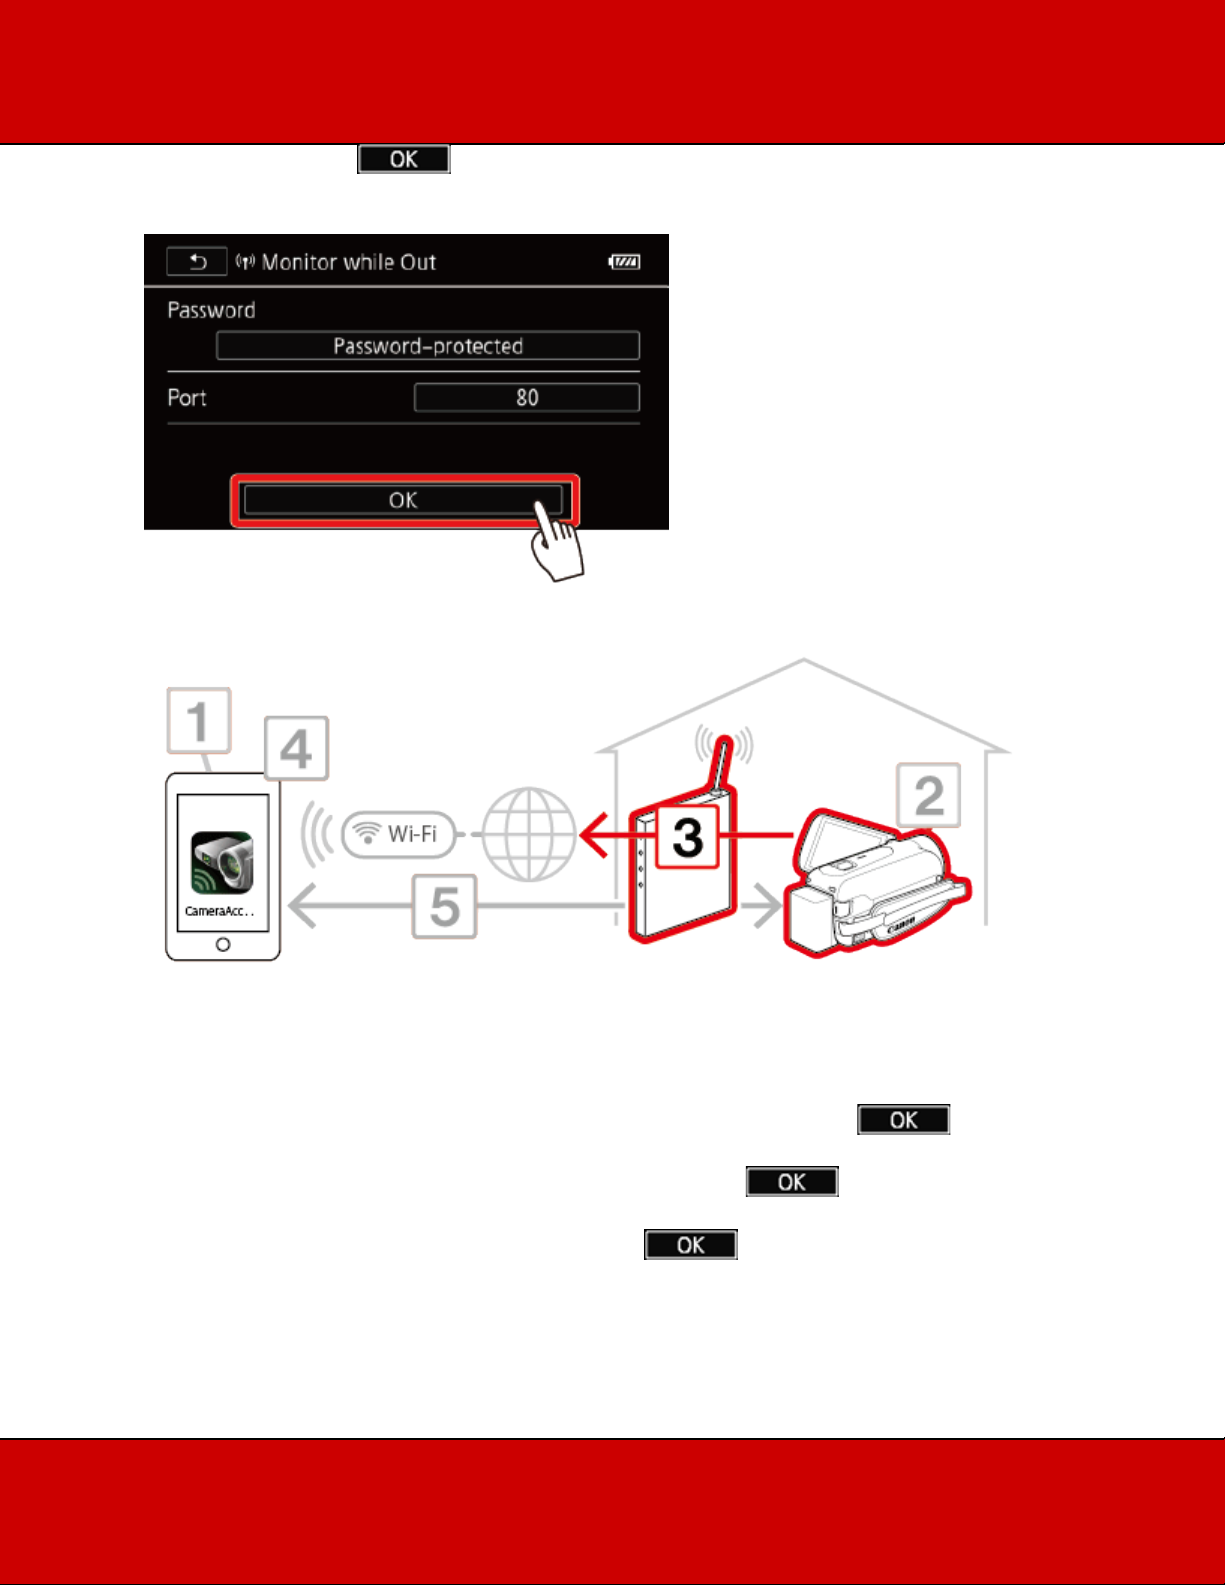
•When the camcorder is in Monitor from Home or Monitor while Out mode, the shooting mode
will be set automatically to .
•Even if the frame rate was set to 24P, video recorded in Monitor from Home or Monitor while
Out mode will be recorded at 30P.
•This function is not available in the following cases.
- When the video quality is 60P.
- When > > [Dual recording] or [Relay recording] is activated.
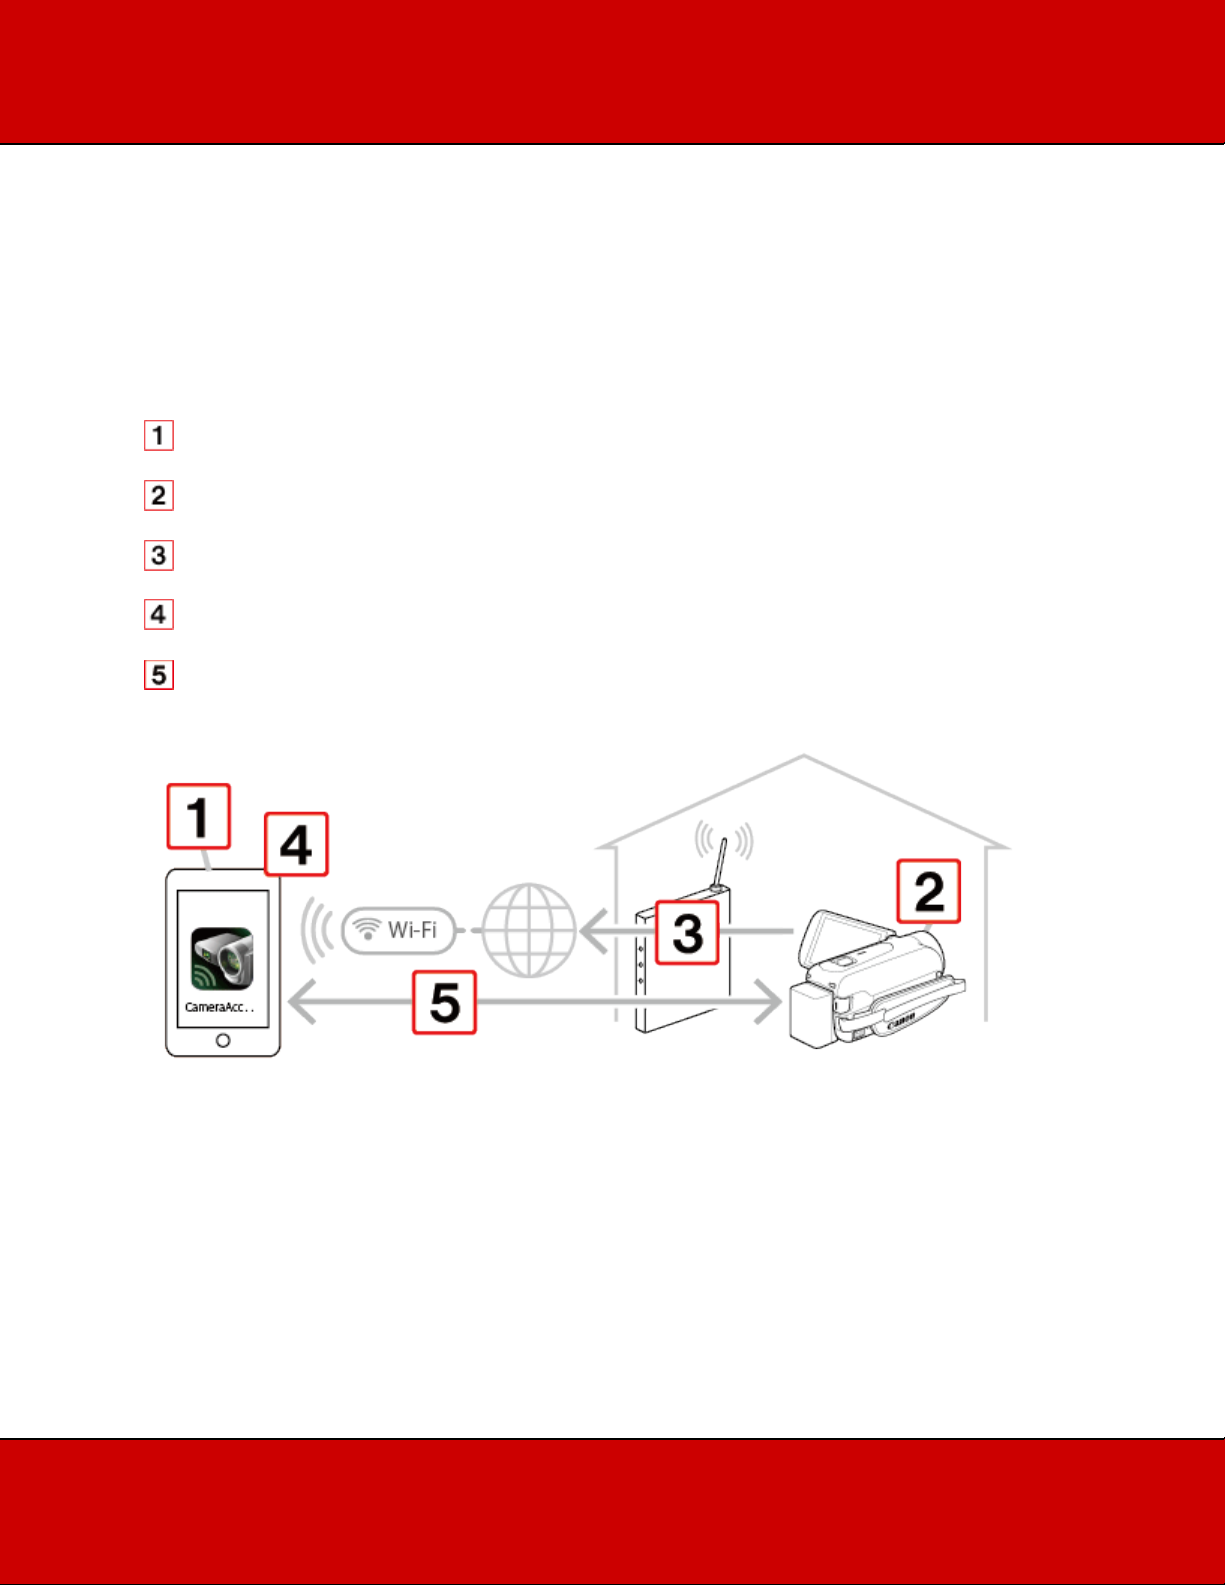
•Depending on the connection and the strength of the wireless signal, there may be interruption
in the live video image or the response may be slow.
•Installation is not necessary for users who have previously installed the application.
Step 2: Performing camcorder password and port configuration settings
2. Camcorder: Turn on the camcorder and make sure it is set to a recording mode.
3. Camcorder: Touch the [ ] icon displayed on the screen.
4. Camcorder: Drag your finger left/right to bring the [Remote Control+Streaming] menu to the
center, and then touch the icon to open it.
5. Camcorder: Bring [ ] (Monitor while Out) to the center, and then touch [ ].
6. Camcorder: Touch [ ].
7. Camcorder: Touch the password field.
8. Camcorder: Enter a unique 4 and 8 character password for the Monitor while Out function, and then
touch [ ].
For more information on entering a password, please refer to the 'Using the virtual keyboard' below.
NOTE
We recommend using an 8-character password using a mix of numbers and uppercase/lowercase
letters.
REFERENCE
Using the virtual keyboard
When you need to enter text for various settings, touch the text field and a virtual keyboard will appear
on the screen. You must use the touch screen to operate the virtual keyboard. The illustrations below
explain the various keys you can use.
: (Press to exit after entering the information.)
: Text field
: Letter/number keys
: / (Switch between letters and numbers/special characters.)
: Space key
: Backspace (Delete the character to the cursors left.)
: / / Caps Lock. When the numerical keyboard is displayed, [#%?] switches
between set 1 and set 2 of special characters.
: (Change the position of the cursor.)
: Cancel
9. Camcorder: Touch the port number entry field.
10. Camcorder: Enter the port number, and touch [ ].
REFERENCE
By default, the port number is set to 80 but you can change it if necessary.
11. Camcorder: Touch [ ].
Step 3: Connecting the camcorder to an access point
12. If necessary, set up a connection to an access point.
•If you have previously configured and saved only one connection to an access point, the
camcorder will automatically connect to that access point.
•If you have saved more than one connection to an access point, touch [ ] to use the
access point displayed on the screen, and then continue. To use a different access point instead,
touch [Change Connection Point] > desired access point > [ ], and then continue.
•If no connections to access points have been saved in the camcorder, the message [Save the
access point] will appear on the screen. Touch [ ] to configure and save a new access
point connection.
NOTE
If you have previously configured and saved a connection to an access point, the camcorder will connect
automatically to the last access point used.
Touch [ ] twice, and then proceed to step 15.
13. Camcorder: Touch the desired connection method.
You can select from the following four connection methods.
For more information on your access point, please refer to its Instruction Manual.
WPS:
Button*
Simply press and hold the WPS button on your wireless router and then touch the
camcorders screen. This is the easiest connection method if you are using a WPS
-
compatible router.
WPS: PIN
Code*
Access the access points configuration screen using your Web browser. The camcorder
will give you a PIN code, which you will enter into the browser. You will need a WPS
-
compatible router and a computer or other device connected to it.
Search for
Access Points
Following the camcorders onscreen instructions, you select the desired access point from
a list and then enter your password.
Manual
Setup
You manually enter the access points name, password and other network settings. This
method is recommended only for advanced users of Wi
-Fi networks.
* WPS, which stands for Wi-Fi Protected Setup, is a standard that makes connecting to a wireless router
easier.
If your access point is WPS-compatible , connecting the camcorder to it can be very easy. If you cannot
successfully connect the camcorder using WPS, try using the [Search for Access Points] method.
[WPS: Button] method: Please proceed to step 14-a-1.
[WPS: PIN Code] method: Please proceed to step 14-b-1.
Search for Access Points: Please proceed to step 14-c-1.
Manual Setup: Please proceed to step 14-d-1.
REFERENCE
The camcorder can connect to a Wi-Fi network using a wireless router (access point) and even
remember the settings for the 4 most recently used access points.
IMPORTANT
General requirements for Wi-Fi connections.
•Correctly configured router that complies with the 802.11b/g/n protocol and is Wi-Fi certified
(bears the logo shown below) and a home network.
14-a-1. [WPS: Button] method
Press and hold the WPS button on the wireless router.
•Depending on the router, the amount of time required may differ.
•Make sure the routers WPS function is activated.
14-a-2. Camcorder: Within 2 minutes, touch [OK] on the camcorders screen.
The camcorder will connect to the access point.
You can touch [Stop] and then [OK] to interrupt the Wi-Fi Protected Setup while it is in progress.
When the Wi-Fi Protected Setup is finished, [Configuration completed] will appear on the screen.
Please proceed to step 15.
14-b-1. [WPS: PIN Code] method
From a computer or similar device connected to the access point, use the Web browser to open the
routers WPS settings screen. After the 8-digit PIN code appears on the camcorders screen, enter it into
your routers WPS settings screen.
14-b-2. Camcorder: Within 2 minutes, touch [OK] on the camcorders screen.
The camcorder will connect to the access point.
You can touch [Stop] and then [OK] to interrupt the Wi-Fi Protected Setup while it is in progress.
When the Wi-Fi Protected Setup is finished, [Configuration completed] will appear on the screen.
Please proceed to step 15.
14-c-1.Search for Access Points
After you touch [Search for Access Points], the camcorder will take a few seconds to detect access points
available in the vicinity and will display the first one.
14-c-2. Confirm the access points setting information.
Make a note in advance of the network name (SSID) and password (encryption key) of the access point
you want to use.
14-c-3. Camcorder: Select the desired access point.
The network name (SSID) of the desired access point appears.
Touch [ ] or [ ] to select the desired access point from the list.
Touch [ OK ].
14-c-4. Camcorder: Enter the access points password (encryption key).
If the access point selected in step 2-c-3 did not have a [ ] icon, this step is not necessary.
To enter the [Encryption Key] field, touch [Not configured] , and then enter the access points
password (encryption key).
Touch [OK].
14-c-5. Camcorder: Touch [ OK ].
The screen will change once the setting is complete.
Please proceed to step 15.
14-d-1. Manual Setup
Perform this procedure to manually configure the wireless connection settings. This may be necessary,
for example, if your access points network name (SSID) cannot be detected due to the stealth function
being enabled. Manual setup is for advanced users of Wi-Fi networks.
14-d-2. Camcorder: Enter the SSID.
Touch the [SSID] field.
Enter the SSID, touch [OK], and then touch [Next].
14-d-3. Camcorder: Touch the [Authentication/Encryption Method] field.
Touch [OPEN NONE].
14-d-4. Camcorder: Touch the desired method.
If you selected [OPEN WEP], the WEP index is 1.
14-d-5. Camcorder: Enter the encryption key.
If you selected [OPEN NONE] in step 14-d-4., this step is not necessary.
Touch the [Encryption Key] field, and then enter the encryption key (password).
Touch [Next].
14-d-6. Camcorder: Select how to obtain the IP address.
Touch [Automatic] or [Manual].
If you selected [Automatic], please proceed to 14-d-12.
14-d-7. Camcorder: To enter the [IP Address] field, touch [0.0.0.0].
Touch the first field.
14-d-8. Camcorder: Touch [ ] or [ ] to change the value. Change the rest of the fields in
the same way and touch [OK].
14-d-9. Enter the [Subnet Mask] field in the same way and touch [Next].
14-d-10. Enter the [Default Gateway] field in the same way and touch [Next].
14-d-11. Enter the [Primary DNS Server] and [Secondary DNS Server] fields in the same way and touch
[Next].
14-d-12. Camcorder: Save the configuration.
Touch [ OK ].
The screen will change once the setting is complete.

Other manuals for VIXIA HFR60

2

This manual suits for next models

1

Other Canon Digital Camera manuals

Canon SD30 - PowerShot Digital ELPH Camera Instruction Manual

Canon

Canon SD30 - PowerShot Digital ELPH Camera Instruction Manual

Canon Ixus Z70 User manual

Canon

Canon Ixus Z70 User manual

Canon FT QL User manual

Canon

Canon FT QL User manual

Canon Pixma Pro 9500 Mark II series User manual

Canon

Canon Pixma Pro 9500 Mark II series User manual

Canon AE-1 User manual

Canon

Canon AE-1 User manual

Canon Powershot A650 IS User manual

Canon

Canon Powershot A650 IS User manual

Canon EOS 60D User manual

Canon

Canon EOS 60D User manual

Canon PowerShot D30 User manual

Canon

Canon PowerShot D30 User manual

Canon EOS REBEL T6 (W) Installation guide

Canon

Canon EOS REBEL T6 (W) Installation guide

Canon EOS 5D Mark II Installation and operation manual

Canon

Canon EOS 5D Mark II Installation and operation manual

Canon Powershot S70 User manual

Canon

Canon Powershot S70 User manual

Canon POWERSHOT SX240 HS User manual

Canon

Canon POWERSHOT SX240 HS User manual

Canon PowerShot ELPH 150 IS User manual

Canon

Canon PowerShot ELPH 150 IS User manual

Canon REBEL SL1 EOS 100D User manual

Canon

Canon REBEL SL1 EOS 100D User manual

Canon PowerShot A530 User manual

Canon

Canon PowerShot A530 User manual

Canon PowerShot SX60 HS Instruction Manual

Canon

Canon PowerShot SX60 HS Instruction Manual

Canon EOS Rebel T3 Installation guide

Canon

Canon EOS Rebel T3 Installation guide

Canon PowerShot S200 User manual

Canon

Canon PowerShot S200 User manual

Canon PowerShot SD880 IS Digital ELPH User manual

Canon

Canon PowerShot SD880 IS Digital ELPH User manual

Canon PowerShot A560 Operating and maintenance manual

Canon

Canon PowerShot A560 Operating and maintenance manual

Canon PowerShot A550 Instruction Manual

Canon

Canon PowerShot A550 Instruction Manual

Canon Sure Shot 115U User manual

Canon

Canon Sure Shot 115U User manual

Canon POWERSHOT SD4500 IS User manual

Canon

Canon POWERSHOT SD4500 IS User manual

Canon N10-W02 User manual

Canon

Canon N10-W02 User manual

Popular Digital Camera manuals by other brands

Olympus DIGITAL CAMERA TG-805 instruction manual

Olympus

Olympus DIGITAL CAMERA TG-805 instruction manual

Visioneer MX 230 user guide

Visioneer

Visioneer MX 230 user guide

Primos 63163WM instruction manual

Primos

Primos 63163WM instruction manual

FujiFilm X-H1 user manual

FujiFilm

FujiFilm X-H1 user manual

Sony 4-149-235-11 (1) instruction manual

Sony

Sony 4-149-235-11 (1) instruction manual

Kyocera Finecam L3v release note

Kyocera

Kyocera Finecam L3v release note

Ricoh Pentax K-3 III operating manual

Ricoh

Ricoh Pentax K-3 III operating manual

JAI TM-6760 Series Operation manual

JAI

JAI TM-6760 Series Operation manual

Olympus E-M1 MARK II instruction manual

Olympus

Olympus E-M1 MARK II instruction manual

FujiFilm FINEPIX SL240 SERIES owner's manual

FujiFilm

FujiFilm FINEPIX SL240 SERIES owner's manual

Panasonic DMC-GF3CPP Service manual

Panasonic

Panasonic DMC-GF3CPP Service manual

Archos 100 series user guide

Archos

Archos 100 series user guide

Olympus Camedia D-230 quick start guide

Olympus

Olympus Camedia D-230 quick start guide

Samsung PL221 user manual

Samsung

Samsung PL221 user manual

Swann HD PenCam Brochure & specs

Swann

Swann HD PenCam Brochure & specs

Toshiba teli CSB1100CL-10 Specification sheet

Toshiba teli

Toshiba teli CSB1100CL-10 Specification sheet

Samsung Vluu PL20 Manual Del Usuario

Samsung

Samsung Vluu PL20 Manual Del Usuario

OPTO-EDU A59.3509 instruction manual

OPTO-EDU

OPTO-EDU A59.3509 instruction manual

manuals.online logo
manuals.online logoBrands
  • About & Mission
  • Contact us
  • Privacy Policy
  • Terms and Conditions

Copyright 2025 Manuals.Online. All Rights Reserved.