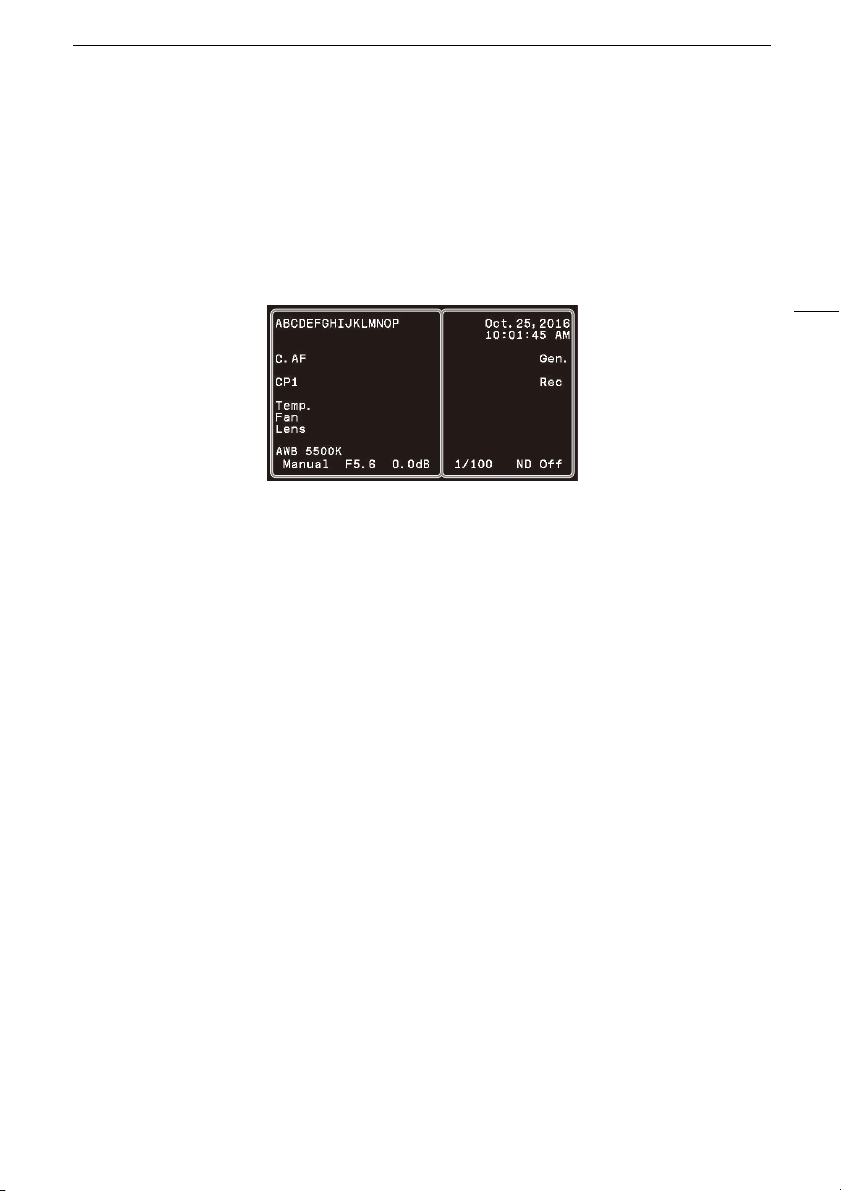
Showing Onscreen Displays
8
Left side and center of the screen
Right side of the screen
• Press the CANCEL button to stop showing the camera's onscreen displays on the shooting screen; press the
button again to show all onscreen displays again.
• For external monitors that support only 480P or 576P input, connect the camera using the HDMI OUT
teminal.
• When the output signal is 480P or 576P, onscreen displays will not be superimposed on the video signal.
Display Description Custom Display
ABCDEFGHIJKLMNOP Camera name (A40). [Camera Name]
AF Autofocus operation (one-shot AF, A22). –
CP1 to CP4, EOS, WDR, C.Log, Blue,
Green, Crisp
Currently selected custom picture file (A29). [Custom Picture]
Temp. (in red) Temperature warning (A42). [Temperature Warning]
Fan (in red) Fan warning (A42). –
Lens (in red) Lens error warning (A42). [Lens Error]
AWB, WB-A, WB-B, Dylt, Tung, Kelv
00000K, ±0
White balance (A19). [White Balance]
Auto, Tv, Av, AGC, Manual Camera mode (A11). [Camera Mode]
F0.0, Clsd Aperture value (A13).
• Grayed out when the camera mode is set to [Tv]; not displayed when it is
set to [Auto].
• [Clsd] (fully closed iris) appears only when a compatible EF Cinema lens
(ASetup Guide) is attached to the camera.
[Iris]
00.0dB Gain value (A16).
• Grayed out when the camera mode is set to [Tv], [Av] or [AGC]; not
displayed when it is set to [Auto].
[Gain]
Display Description Custom Display
Date/time Date and time. [Date/Time]
Rec Recording command being output to an external recorder
(ASetup Guide).
–
1/0000 Shutter speed (A17).
• Grayed out when the camera mode is set to [Av]; not displayed when it
is set to [Auto].
[Shutter Speed]
ND Off, ND 1/8, ND 1/64 ND filter setting (A18).
• Grayed out when the camera mode is set to a mode other than [Manual]
and the ND mode is set to [Automatic]. Not displayed when the camera
mode is set to [Auto] and the ND mode is set to [Automatic].
[ND Filter/Infrared]
IR Infrared mode (A26). [ND Filter/Infrared]