Capital fireplaces CONTOUR Series User manual

The CONTOUR
CONTOUR5MW, CONTOUR5PW, CONTOUR5LW
Manual
Operation & Installation
www.capitalreplaces.co.uk

Contour 5W Series Manual - V4.0 © Capital Fireplaces 2017
2
IMPORTANT
READ BEFORE USE
We use Stove Bright® High Temperature Paint on all of our stoves and it is important that the paint
is cured properly during the rst burn of the stove. This is done to ensure the paint nish will be able
to withstand the high temperatures needed. Curing is done by following the instructions below. If this
process is not done properly during the rst burn of your stove, you may experience issues with the
paint peeling over time, especially when the stove is operated at a high heat.
Set / Cure the paint
For wood burning, follow these guidelines:
1. Build a small kindling re to start. The kindling re should be kept burning for 10 to 15
minutes.
2. Add fuel to build a medium size re to bring the stove surface temperature to about 450°F.
3. The medium size re should be kept burning for about 60 minutes.
4. For the nal stage of curing, add fuel to this re to make it a very hot re (surface temperature
above 600°F) and keep it at this level for about 60 minutes.
Once this initial process has been completed, the paint will be properly cured and you can operate
your stove normally according to the instructions provided in this manual. If any peeling of the paint
occurs on your stove this will only be as a result of improper curing or misuse of the stove such as
over fuelling or running the stove too hot. Therefore any peeling is not covered by your warranty.
NOTE: During the nal higher temperature burn phase there may be some visible smoke near the
stove surface. There may also be an unpleasant odour. To mitigate this effect, ventilate the room
with open windows and doors to provide airow.
HEALTH WARNING: The smoke from the curing process displaces oxygen. Small children, the
elderly and persons with existing breathing problems should vacate the area during the hot burn to
avoid the discomfort of lost oxygen. The smoke is primarily Carbon Dioxide, and therefore non-toxic
but uncomfortable.
Trouble Shooting: Paint Curing
Take care to build slowly to the medium temperature re. Building a hot re immediately will “shock”
the paint and cause it to release from the surface. The only remedy to this problem is to remove the
paint, prepare the surface for repainting, and repaint. To avoid problems during the curing process,
do not touch the surface with anything until the paint is fully cured.

Contour 5W Series Manual - V4.0 © Capital Fireplaces 2017
3
Introduction
Thank you for purchasing a Capital Fireplaces stove, we know that our stove will provide your home with many years of
heat and good service. We assure you that you have purchased a quality product that has been built to last, designed
and manufactured in the UK with an Eco-Cleanburn system to ensure a clean and efcient performance.
Please read the operation and installation guide carefully before commencing the installation and remember to keep this
manual safe for future reference.
Contents
EC Declaration Of Conformity 4
Technical Information 5
Operating Instructions
Recommended Fuels 6
Setting The Air Control Management 7
Lighting The Stove 8
Operating The Stove With The Door Open 9
Controlling The Stove 9
Refuelling 9
Cleaning & Maintenance 10
Ash Clearance 10
Throat, Bafe Plate & Flueway Cleaning 10
Chimney Sweeping 11
Combustion Air Supply 11
Seasonal Use 11
Troubleshooting 12
Placement & Fixing Advice 13
Installation Instructions
Health & Safety Precautions 15
Chimney 15
Hearth & Fire Surround 15
Flue Connection 16
Connecting The Flue 16
On Delivery Of The Stove 16
After Installation 16
Contour 5W Dimensions 17
Contour 5W Parts List 18
Maintenance 19
Warranty & Guarantee 20
DEFRA Requirements 21
WARNING!
The appliance will
become very hot.
During operation, the entire stove
unit becomes very hot and will cause
burn injuries if touched. Heat is also
radiated from the stove, especially
the glass, and high temperatures
will be emitted. Always take care
when near the re and that there
are no ammable materials closer
than the recommended distance
specied.
NOTE:
Ensure you report the installation
of your stove to your local
authority.
The owner of the property is
personally responsible for ensuring
compliance with all mandatory
safety requirements and that the
installation is carried out by an
approved and qualied installer.

Contour 5W Series Manual - V4.0 © Capital Fireplaces 2017
4
EC Declaration Of Conformity
MANUFACTURER
Name Oak Stoves
Address 11 Village Farm Industrial Estate
Village Farm Road, Pyle
West Glamorgan, CF33 6BL
Telephone +44 (0)845 644 2815
Place Of Manufacture West Glamorgan, South Wales, United Kingdom
PRODUCT
Product Type Multi-Fuel Stoves red by solid fuel
Series Contour 5W Series (Log Store, Pedestal & Midi)
Materials Used In Construction Plate Steel, Vermiculite Board, Ceramic Glass, Fire Rope.
Model Numbers
MODEL CONTOUR5LW CONTOUR5PW CONTOUR5MW
NAME Contour 5W Log Store Contour 5W Pedestal Contour 5W Midi
CE Ref.
No. CONTOUR5LW CONTOUR5PW CONTOUR5MW
Standard EN 13240 : 2001
Intended for use Heating of living accommodation
Fuels Wood logs & solid mineral fuel
Special conditions None
Date of issue 10/03/2017 - Version 4.0
WOOD SOLID MINERAL
FUEL
NOMINAL OUTPUT 4.9kW 4.1kW
ENERGY EFFICIENCY (NET) 76.7% 77.7% (Ancit)
CO EMISSION AT 13%
OXYGEN 0.47% 0.21%
CLEARANCE TO
COMBUSTIBLE MATERIAL
(MINIMUM)
75mm - REAR
500mm - SIDE
75mm - REAR
500mm - SIDE
AVERAGE FLUE GAS
TEMPERATURE 231oC 174oC
Manufacturer’s Declaration
The stove has been type tested by BSRIA Ltd. and fulls the applicable rules for EN-13240:2001 & CE
marking. Manufacture of the product has taken place in accordance with those specications. This forms
the relevant type approval certication and the required manufacturing processes and checks.
Richard Heatherill
Technical Director (Europe) - Oak Stoves
RECOMMENDED FUELS
WOOD LESS THAN 20%
MOISTURE
BRIQUETTED CLOSED FIRE
FUEL
THIS APPLIANCE IS CAPABLE
OF INTERMITTENT OPERATION
AND SHOULD ONLY BE USED
IN ACCORDANCE WITH THE
USER’S INSTRUCTIONS,
BURNING ONLY
RECOMMENDED FUELS.
THIS APPLIANCE IS NOT FOR
USE ON A SHARED FLUE
IMPORTANT
The CE plate can either
be found on the underside
of the door or log store.

Contour 5W Series Manual - V4.0 © Capital Fireplaces 2017
5
Technical Information
All local regulations, including those referring to national and European Standards need to be complied with
when installing the appliance.
This manual is for the following models in the Contour series:
MODEL CONTOUR5LW CONTOUR5PW CONTOUR5MW
NAME Contour 5W Log Store Contour 5W Pedestal Contour 5W Midi
RANGE 4-6kW 4-6kW 4-6kW
EFFICIENCY 77.7% 77.7% 77.7%
MASS 140kg 130kg 130kg
THE MINIMUM FLUE DRAUGHT
FOR NOMINAL HEAT OUTPUT* 12pa (Pascals) 12pa (Pascals) 12pa (Pascals)
*where applicable, with open and closed redoors.
RECOMMENDED FUELS
WOOD LESS THAN 20% MOISTURE
BRIQUETTED CLOSED FIRE FUEL
THIS APPLIANCE IS CAPABLE OF INTERMITTENT OPERATION AND SHOULD ONLY BE USED IN
ACCORDANCE WITH THE USER’S INSTRUCTIONS, BURNING ONLY RECOMMENDED FUELS.
THIS APPLIANCE IS NOT FOR USE ON A SHARED FLUE
PLEASE COMPLETE ALL THE DETAILS BELOW AS THIS COULD AFFECT YOUR WARRANTY
SERIAL NUMBER DATE OF INSTALLATION
HETAS INSTALLER REGISTRATION NUMBER INSTALLER NAME
INSTALLER ADDRESS
Important To Remember
Installation By Authorised Technician
This manual contains instructions on how the stoves must be assembled, maintained and installed. To ensure the
function and safety of the stove, the installation must be carried out by an authorised technician. Contact one of our
dealers to nd a suitable tter.
Structural Support
Check that the wood joists are strong enough to bear the weight of the stove and chimney. The stove and chimney can
usually be placed on a normal wooden joist in a single occupancy house, if the total weight does not exceed 400kg.
Building Permission
Before installing a stove or erecting a chimney, it is necessary for you to make an application for building permission to
your local authority. Ask your local authority for advice regarding building regulations and the application.
Hearth Plate
Due to the risk of embers falling out, a ammable oor must be protected by a hearth plate. It must extend 300mm in
front of the stove and 300mm on each side of the stove, or have a 200mm extension on each side of the opening. The
hearth plate can consist of natural stone, concrete, metal plate or glass. 12mm light duty hearths are acceptable.

Contour 5W Series Manual - V4.0 © Capital Fireplaces 2017
6
Operating Instructions
NOTE: All multi-fuelled stoves must be installed by an approved installer, and all
necessary checks described in the Installation Instructions need to be carried out.
Only use the recommended fuels detailed below.
Recommended Fuels
The Contour stoves are Multi-Fuel appliances, meaning they can burn a number of different
fuels, however you must ensure that you follow the instructions specic to your chosen type
of fuel and that your chimney is suitable for all the types of fuel you will use.
Wood
The wood you use to burn in this stove should only be dry and well seasoned. To prepare the
wood for burning ensure it is cut, split and then left to season in a dry, well ventilated area for
at least one year before burning. The ideal types of wood for this stove are hard woods such
as Ash, Beech or Oak. We recommend that all wood has a moisture content of less than 20%,
Log Moisture Meters are available to purchase separately.
The rebox should have a bed of ash at the base for the wood to be placed on. The use of
unseasoned wood in this appliance can result in heavy tar deposits in the stove, on the glass
and within the chimney. Also unseasoned wood will produce lower outputs from the re.
Peat
Cut peat must be dried before using in the stove in order to reduce the amount of tar deposits
produced. You should burn Peat in the same way as wood fuel, on a bed of ash at the base
of the stove.
Smokeless Fuel (Solid Mineral Fuels)
A variety of smokeless fuels may be used in this stove, however you must check the necessary
precautions for each specic fuel to prevent damage. These fuels include:
• Ancit
• Anthracite Large Nuts
• Centurion
• Extracite
• Homere
• Maxibrite
• Phurnacite
Only smokeless fuels may be burnt in smoke control areas. Petroleum Coke and House Coal
is not suitable for use on this appliance, it’s use will void your warranty.
There are a few additional points to consider when lighting smokeless fuel res, please refer
to the ‘Burning solid mineral fuels’ section on the next page. Also when burning smokeless
fuels, the upper bafe vermiculite board (throat plate reboard) must be removed. Please
refer to page 19 for instructions on how to do this.
Operating Instructions

Contour 5W Series Manual - V4.0 © Capital Fireplaces 2017
7
Operating Instructions
Setting The Air Control Management
The following is a recommendation only for maximum efciency.
When burning wood only or solid mineral fuels (smokeless fuels) the following settings are
recommendations only as it is all dependent on the moisture content of the material to be
burnt.
So if the moisture content (wood) is above 16 to 20% which is the recommended level in any
of these products you may well need to make adjustments to get the optimum burn efciency
out of this stove. So the following is a guide only to the position of the primary, secondary and
tertiary air controls.
Please note that wood burns from the top of the re box down so more control is gained from
the secondary and tertiary slider control bar. These operate the clean glass air wash system
which assists in helping to prevent the glass blackening up and the Eco-Cleanburn at the
rear of the re box which helps to insure that all of the gases given off from the wood and
solid mineral fuels are fully burnt prior to being exhausted up the chimney, therefore giving
maximum heat output and efciency to the stove.
As you open and close the single slider for the clean glass air wash (secondary) and the Eco-
Cleanburn (tertiary) there is a balancing valve (which you never need to touch) tted into the
rear of the stove that automatically manages the volume of air being fed to each of the outlet
air controls so the optimum airow is delivered to the clean glass air wash down the front of
the glass and the Eco-Cleanburn afterburn at the rear of the re box.
However, solid mineral fuels burn from the bottom up so you require air ow from the primary
air slider on the door and less from the secondary and tertiary control.
Please refer to the table below as a guide only to the position of the 2 air controllers.
Burning wood only
Position of air
management controls
Lighting the stove Once alight & burning
well
To shut the stove off
1Primary control slider
(on front of door)
Open fully to the right Slider to the middle Close completely (to
the left)
2Secondary slider
(in middle of stove)
Pull slider out 75%
towards you
Push slider in to
approx 50%
Push in fully to close
Burning solid mineral fuels
Position of air
management controls
Lighting the stove Once alight & burning
well
To shut the stove off
1Primary control slider
(on front of door)
Open fully to the right Slider to the middle Close completely (to
the left)
2Secondary slider
(in middle of stove)
Pull slider out 75%
towards you
Push slider in
between 50% - 25%
Push in fully to close

Contour 5W Series Manual - V4.0 © Capital Fireplaces 2017
8
Lighting The Stove
When lighting the stove for the rst time your appliance may give off an odour, this is caused
by the paint inside the stove reacting to the heat. This is completely normal and will cease
after a short time, however the room should be kept well ventilated while this is still occurring.
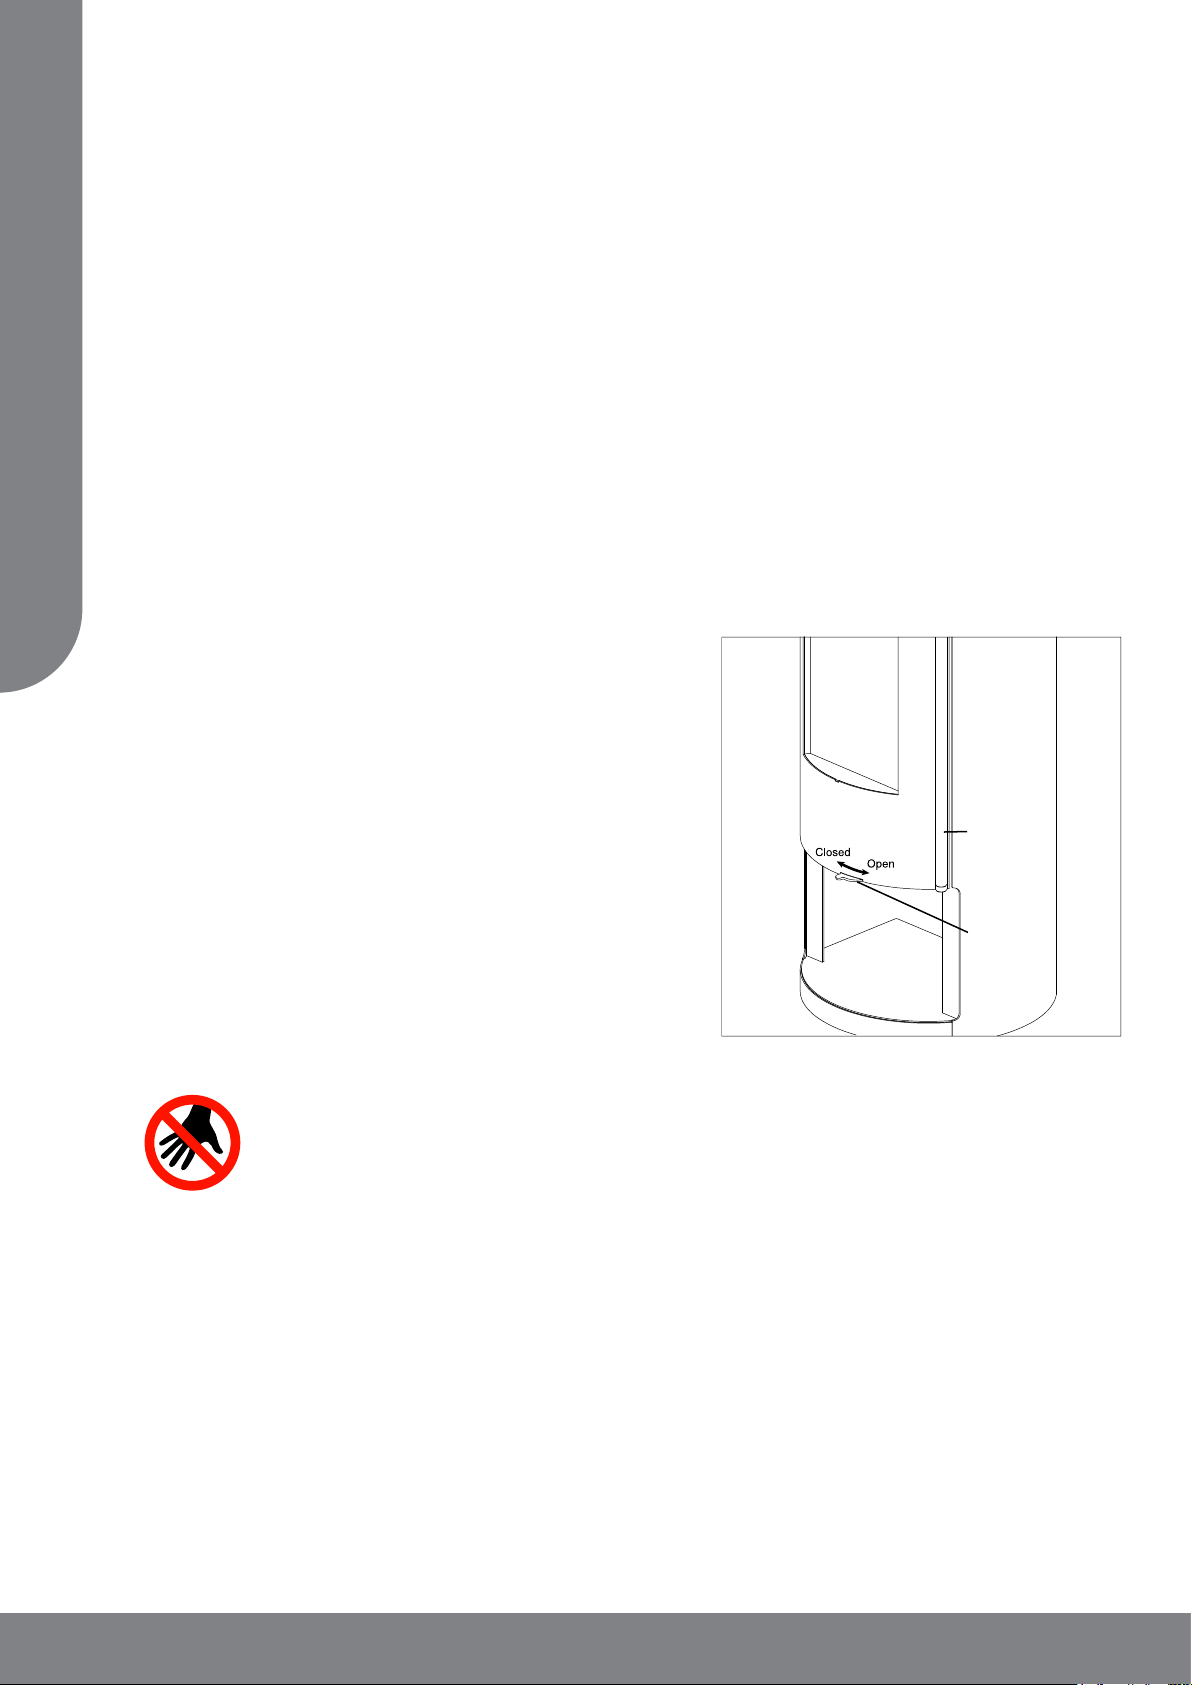
The stove door handle bar is located on the right of the door, pull the handle (see Fig. 1) left
to open the door and insert your fuel. When closing the door push the handle left to ensure
the mechanism is open while closing, then push the handle to lock. Be careful not to slam
it shut to avoid damage to the closing mechanism or glass, also when opening the door be
careful of any pieces of fuel or embers that may be resting on the door. To begin you should
only light a small re and allow it to burn slowly for at least two hours. This initial re will
evaporate any residual moisture contained within the vermiculite bricks, allowing you to use
the re as normal from then onwards.
When burning wood or peat ensure that there is a layer of ash at the base of the rebox
to prevent overheating and damage to the base. If there is no ash available when you rst
light the stove, you can add a layer of sand approximately 13mm (1/2 inch) thick to the base
instead.
Lighting the stove
To start the re you can use dry kindling wood with
either paper or re lighters. Place the paper or re
lighters along with the kindling on the base of the
rebox and cover with approximately 50mm of fuel.
Light the paper or re lighters to start the re, then
ensure the primary air vent is open on the door (Slide
to the right to open. See Fig. 1) of the stove before
closing it and pull the Air Wash control towards you
to open the rear Air Wash vent (see Fig. 2b). Allow
the re to be fully ignited before adjusting the air
vents to the preferred position, as detailed on page
7. Once fully lit, you can close down the primary
air slider.
Always take care when touching any
part of the stove to prevent burning yourself and we always advise using
an appropriate glove when adjusting the air vent, opening/closing the re
door and when refuelling. Please note that the stove can remain hot for long
periods after the re has been extinguished.
When relighting the stove leave the ash from previous res on the base of the rebox, however
some may be removed if the build up starts to block the front grill. You should always ensure
there is enough ash at the bottom of the rebox to protect the stove’s base before lighting a
re.
Burning smokeless fuels
When loading the re with smokeless fuels it is advised not to put all the required fuel in at
once, load in two stages to ensure that the re will not be smothered and wait between each
stage for the ames to grow before adding the remaining fuel. Certain fuels may produce
more soot deposits than others, therefore it is essential for you to regularly clean the throat
plates to avoid build up. When relighting a smokeless fuel re ensure you have cleared the
Door Handle
Bar
Fig. 1
Primary Air
Slider
Operating Instructions

Contour 5W Series Manual - V4.0 © Capital Fireplaces 2017
9
grate and emptied the ashpan before starting a new re.
Operating The Stove With The Door Open
This stove should not be operated with the door open, we do not recommend this. This stove
is designed to be operated with the door closed as this gives improved efciency and air
ows. Certain fuels such as wood and peat will burn better this way but it is vitally important
that you do not leave the re unattended with the door open at any time. Always keep
the door closed and the handle in the locked position.
Controlling The Stove
The primary air vent slider on the front of the
stove door and the secondary and tertiary slider
bar under the door (see Fig. 2) control the rate
of burning and in turn the heat output. The clean
air wash is known as the secondary air control
and the Eco-Cleanburn is known as the tertiary.
These are fully controlled by the slider bar in the
centre of the stove. The front primary air control
slider should only be left fully open when lighting
or when rapid burning is needed. If the slider is
left open for long periods then over-ring may
occur. Once lit we recommend the front primary
air slider be left slightly open (1-2cm only), and
adjust accordingly to control the re. The slider
should be moved to the left to open the vent, and to the right to close the vent (see Fig. 1).
The door handle, control bar (air wash) and primary slider will heat up when the
re is lit and running. But when you need to touch them to adjust or reload the re
you must wear gloves. Therefore to avoid injury please wear appropriate hand
protection when touching any part of the stove as the body, the glass and the
primary air slider can get very hot.
Refuelling
Keep the rebox well lled to maintain the re
but for safety reasons it is important not to overll
the stove, your fuel must not be spilling over the
top of the front grill or touching the door or glass
panel. Doing this could cause the re to spill out
when opening the door. Overlling can also cause
the glass to black up. Do not ll past the ll line,
which is 50mm below the tertiary holes as this
may restrict airow to the Eco-Cleanburn bar.
(see Fig. 3).
When adding fuel ensure that the appropriate
protection is worn such as a heat resistant glove
and tools such as re poker, tong or shovel are
used.
Fig. 2
Fill Line
(50mm below
tertiary holes)
Fig. 3
A
B
Operating Instructions

Contour 5W Series Manual - V4.0 © Capital Fireplaces 2017
10
Cleaning & Maintenance
Our stoves are nished with high temperature resistant paint which can withstand the
temperatures expected in normal use. You may clean the stove with a damp lint-free cloth,
but ensure the stove is completely cold throughout before doing so.
To clean the glass on the door, again use a damp lint-free cloth to clean and ensuring that
you wipe with a dry cloth afterwards. Do not use any chemicals to clean the glass, this will
cause permanent damage to the glass. You may get deposits on the glass after the re has
run, most of these will burn off if you run the re again at a fast rate for a few minutes. Do not
use abrasive cloths on the glass or paintwork as these can cause scratching and permanent
damage to the stove.
Ash Clearance
With wood or peat res you should allow some build up of ash at the base of the rebox,
however it is necessary to remove some ash once the build up gets too much. This will only
be needed when the build up starts to restrict the airow by blocking the front grill. Burning
smokeless fuels will require the ashpan to be emptied regularly, it is very important to do this
as this ash must not be allowed to overow over the grate.
Be sure not to completely empty the base of ash.
It is very important that all ash is cool before attempting to remove it from either the base or
the ashpan. We advise emptying the cold ash into a bin liner and sealing it before disposing.
Throat, Bae Plate & Flueway Cleaning
It is very important that the throat, bafe plates and the ueway are kept clean and obstruction
free, failure to do so could result in dangerous emissions not escaping correctly. These fumes
can pose a serious health risk to occupants therefore it is necessary to clean both the throat
and bafe plates and the ueways at least weekly, or more frequently if needed.
To clean the throat and bafe plates, rst remove the side bricks to enable you to easily
remove the throat plate. To access the ueway, remove the two saddle clips to release the
upper bre board that covers the ueway. Any build up of soot should then be swept off the
plate down onto the re. Ret parts in reverse order when cleaning is nished, for more detail
please refer to page 19.
Operating Instructions

Contour 5W Series Manual - V4.0 © Capital Fireplaces 2017
11
Chimney Sweeping
Your chimney should ideally be swept at least twice a year. Depending on your installation
you may be able to sweep your chimney through your appliance, if not your installer would
have inserted a soot door to access the chimney once the stove has been moved clear. When
sweeping through your appliance you will rst need to remove the throat plate, upper bre
board and front grill from the stove.
Your installer will advise on what tools you will need to sweep your chimney. After sweeping
you must ensure that all ueways are clear and no soot deposits have collected to form a
blockage particularly on any horizontal surfaces.
Combustion Air Supply
In order for the stove to work efciently and safely there needs to be an adequate supply of
combustion air in the room where the stove is installed. This is necessary where the room
is double glazed or where a ue draught stabiliser is operating in the room where the stove
has been installed. Provision of air to the stove must be in accordance with current Building
Regulations Approved Document J. An open window is not appropriate. Any air inlets must
be positioned in such a way as they cannot be blocked.
Seasonal Use
If the stove is not used for a long period of time (e.g. Summer) then it must be thoroughly
cleaned with ash and unburned fuel being removed. It is important to leave air controls fully
open when the stove is not being used, this will prevent build-up of condensation / corrosion.
It is important that the ue connections, any bafes, throat plate and chimney are swept clean
prior to lighting again.
Adverse Weather Conditions
If, due to adverse weather conditions, your stove does not operate properly and smoke is
emitted into the room, DO NOT treat this as a minor problem. Smoke indicates that Carbon
Monoxide (CO) is entering the room. Should this happen, turn your stove controls to their
minimum setting (still allowing the re to burn) open windows to ventilate the room. DO NOT
close the windows before the re has burned out.
The smoke entering the room is probably due to a poor draught or a blocked ue. It is advisable
to have the ue pressure checked. The minimum operating pressure for a ue is 12 Pascals.
Operating Instructions

Contour 5W Series Manual - V4.0 © Capital Fireplaces 2017
12
Troubleshooting
Fire will not burn
Check that:
• the air inlets are obstruction free
• chimneys and ueways are clear.
• you are using a suitable fuel.
• an adequate air supply is entering the room.
• an extractor fan is not tted in the same room as the stove.
• the chimney has a sufcient draw. A draught reading of at least 2.5mm water gauge
should be seen (once the chimney is warm).
Door glass blacks up
Because chimneys differ greatly the best draught settings will take a few trials to gure out,
but the following tips should help:
• When re-fuelling place the fuel towards the back of the rebox, keeping it as far as
possible from the front grill and avoid over lling.
• The primary air vent on the door may be kept slightly open to assist in keeping the
glass clean or open up the secondary and tertiary slider bar further.
• Unseasoned wood will cause more deposits on the glass if the moisture level is more
than 20%.
Bear in mind it tends to be more difcult to keep the glass panel clean if you’re running the
stove very slowly for a long period of time. If blackening of the glass still occurs ensure that
all ue connections are well sealed with re cement, as this can decay over a long period of
time and may need resealing. Also the chimney draw needs to be sufcient and not affected
by down-draught.
When burning certain smokeless fuels you may notice some blackening of the glass below
the grill level, this is to be expected and shouldn’t obscure your view of the re or affect the
performance of the stove.
Fume emission
IMPORTANT: If this appliance is properly installed and operated it will not emit fumes.
Occasional fumes when de-ashing or re-fuelling are to be expected, but fumes during normal
use are NOT usual. Persistent fume emission can be very dangerous and should NOT be
ignored. If you notice persistent fume emission you should immediately:
• Open all doors and windows in order to ventilate the room.
• Let the re go out and safely dispose of the remaining fuel from the appliance.
• Check for any blockage to the ue or chimney and clean if required.
• DO NOT attempt to re-light the re until the cause of the fumes has been identied
and resolved. Seek professional advice if necessary.
The most likely cause of fume emission would be due to ue or chimney blockages. For your
own safety it is vital that you regularly check and clean your ue and chimney.
Operating Instructions

Contour 5W Series Manual - V4.0 © Capital Fireplaces 2017
13
Free Standing
Fire blazing out of control
Check that:
• the door is tightly closed, the handle is locked and the seal is intact.
• the air vents are closed fully (primary, secondary and tertiary).
• a suitable and well prepared fuel is being used.
Chimney res
If your chimney is properly installed and regularly swept, chimney res should not occur.
However, if a chimney re does occur the rst step would be to ensure the door is tightly
closed and the air vents are fully shut (primary, secondary and tertiary), doing this should
cause the chimney re to extinguish itself. After this you must keep the door and air vents
closed until the stove’s re has gone out completely to prevent the chimney re reigniting.
Once this has happened and the stove has cooled you must then clean the chimney and
ueways to prevent the chimney re from reoccurring next time you light the stove.
If the chimney re does not extinguish after closing all the vents and door then you must
contact the re brigade immediately, do not attempt to ght the re yourself. After any chimney
re your chimney should be carefully examined for damage before you attempt to relight your
stove, contact a professional for advice if necessary.
Placement & Fixing Advice
The placement of the stove is very important not only for safety reasons, but also to get the
best performance out of your appliance. The below diagram shows an example of a free
standing installation. For more information see the Hearth & Fire Surround section.
Operating Instructions
75mm
COMBUSTIBLE WALL

Contour 5W Series Manual - V4.0 © Capital Fireplaces 2017
14
The minimum distance from the rear of the stove to a wall is 75mm, and 500mm to either side
of the appliance. No combustible material should be within this area (see below).
We recommend at least 1000mm clearance around the stove (excluding hearths), this is
indicated by the Hot Zone in the diagram below. This extends 1000mm from all the windows
and ends where it meets the wall behind the stove. This area can be 90oC, so we do not
recommend any combustibles in this area.
Fixing Points
If you would like to x the stove to the ground, you can do this using the xing points shown
below. For anchoring the Pedestal model to your hearth you will need x4 M12 bolts and x4
M12 nuts (not supplied).The Log Store model has M12 nuts built into the base, therefore you
will only require x4 M12 bolts (not supplied) for this model.
Log Store Model Pedestal Model
x4 M12 Nuts
x4 14mm Holes
Views from underneath of the stoves
Operating Instructions
75mm
500mm
500mm
COMBUSTIBLE WALL
HOT ZONE
DOOR
1000mm
HEARTH
C
L
E
A
R
A
N
C
E
T
O
C
O
M
B
U
S
T
I
B
L
E
M
A
T
E
R
I
A
L
300mm
300mm

Contour 5W Series Manual - V4.0 © Capital Fireplaces 2017
15
Installation Instructions
Health & Safety Precautions
Before you begin the installation process there are a number of things to consider:
• Avoid installing extract ventilation in the same room, if mechanical extraction is unavoidable then
seek specialist advice to ensure the installation is tested for the safe operation of the appliance. A
suitable test would be to check for spillage when appliances are subjected to the greatest possible
depressurisation. A prerequisite for this condition is that all external doors, windows and other
adjustable ventilators to outside are closed. The depressurisation at the appliance will depend
on the particular combination of fans in operation (fans in the room containing the appliance
and fans elsewhere in the building) and the pattern of open internal doors, hatches etc. which
is established at the time of the test (when fans should be on their maximum useable setting),
and the specic combination causing the greatest depressurisation at the appliance depends
upon the circumstances in each case. Several tests (which should include a test with the door
leading into the room of installation closed and all fans in that room switched on) may therefore
be necessary to demonstrate the safe operation of the appliance with reasonable certainty. The
effect of ceiling fans should be checked during the tests. Extra ventilation should be supplied if
tests show that this is necessary.
• If work needs to be carried out that could potentially disturb any asbestos in your home then
ensure appropriate protection is worn before commencing work.
• The room you are tting the stove in needs to have an adequate air supply, especially if the room
has double glazed windows. We recommend you check this with your local building control ofcer
and adhere to the building regulations requirements for providing oxygen into the room (your
installer will conrm this with you).
• The requirements of both the BS 8303 and BS EN 15287-1:2007+A1:2010 standards must be
fullled.
• We recommend you only use a HETAS Approved Installer to carry
out the stove installation. See hetas.co.uk.
• All local authority laws and building regulations must be adhered to
before installation and the required permission to install must be obtained.
• Ensure you have a carbon monoxide and smoke alarm tted in the same room as the appliance.
Chimney
For the stove to perform correctly and safely your chimney height must not be less than 4 metres high,
this height is taken from the outlet of the stove body to the very top of the chimney. The outlet on our stove
is 5 inches in diameter, therefore your chimney must have a minimum width of 5 inches but preferably be
7-8 inches wide. Your chimney can be either square or circular, as long as it meets the minimum width
specications.
If installing a stove into an existing replace, it must be swept and inspected to ensure that it is in good
condition and suitable for the type of stove you are installing. If any cracks, blockages or excessive cross
sections are found then you should consult a professional regarding getting your chimney lined. The type
of fuel you wish to burn needs to be considered before getting your chimney lined so that a suitable lining
is used.
If there is an excessive draw with the chimney then we recommend a draught stabilizer be tted. Alternatively
if there is too little draw or down-draught then you must consult a professional before lighting your stove.
You should have a minimum draw of 2.5mm water gauge.
Installation Instructions

Contour 5W Series Manual - V4.0 © Capital Fireplaces 2017
16
Hearth & Fire Surround
The stove must be installed on a at reproof hearth for stability and the area in front and around the re
must be clear of any combustible materials. The stove should not be at against a wall, we recommend
a minimum clearance of 75mm to prevent restricting airow.
Building regulations regarding these appliances govern that the hearth must extend at least 300mm
out in front of the stove and 250mm to each side. For safety we recommend that you ensure there is a
minimum of 300mm clearance around the entire appliance. This appliance needs a good amount of air
circulation around it, however if you are installing the stove in a replace ensure that there is at least
250mm gap to each side and at least 300mm above the top of the stove in order to prevent overheating
and allow for good heat output.
You may wish to connect the rear Air Wash vent up to an external supply of air, this can be done provided
the connection is secure and doesn’t prevent the Air Wash Control from opening and closing fully. A rear
clearance of 75mm is still recommended in these circumstances. Also you will need to consider how
close your mantelpiece or any other objects directly above the replace are, to prevent damage due to
high temperatures.
Flue Connection
The Contour Series has a top output connection, the type of installation that is best for your home will
depend on the chosen location for the stove. You must ensure that all building and health and safety
regulations that apply to your chosen type of installation are conformed to before you begin to use the
stove.
Your stove will normally be delivered assembled ready for connection.
Connecting The Flue
The ue collar must be sealed with re cement and all ue connections must be well sealed. Any horizontal
sections of ue must not be longer than 150mm.
With most ue connections your installer should t a soot door in your chimney to allow access to sweep
it, alternatively this chimney can be swept through the stove (see Chimney Sweeping section).
On Delivery Of The Stove
Please ensure that the vermiculite bricks, throat plate and bafe plate have not moved in transit (see
page 19) and that the glass window is intact. Also check that you have all the required parts (see back
page) before installation.
After Installation
Upon completion of the installation you should allow time for the re cement and mortar to dry out and
set properly. Once dry you may begin preparing the re for its rst re. Ensure that the throat plate, bafe
plate and front grill are in place and that the door and vents close properly before lighting.
When you’re ready to start the re, follow the instructions detailed in the Lighting section relevant to
your type of fuel. Once alight, check that the fumes and smoke are being drawn up through the chimney
correctly and that all joints and seals are not emitting fumes.
Your installer should advise on the operation and maintenance of your stove and chimney and retain this
manual for future reference.
Installation Instructions

Contour 5W Series Manual - V4.0 © Capital Fireplaces 2017
17
Contour 5W Dimensions
All dimensions shown are in mm
Contour Log Store
5kW
Model CONTOUR5LW
A1070mm
B 125mm
C 300mm
D675mm
E 420mm
F470mm
G 200mm
H 100mm
I 150mm
J 420mm
Contour Pedestal
5kW
Model CONTOUR5PW
A1070mm
B 125mm
C 300mm
D800mm
E 500mm
F420mm
G 470mm
H 195mm
I 240mm
J 150mm
K 420mm
Front View Side View
Contour Midi
5kW
Model CONTOUR5MW
A860mm
B 125mm
C 300mm
D675mm
E 460mm
F420mm
G 470mm
H 100mm
I 150mm
J 420mm
Front View Side View
Installation Instructions
B
E
D
C
A
B
E
D
C
A
B
D
C
A
F
G
I
H
K
J
E
F
G
H
F
I
J
F
G
H
J
I

Contour 5W Series Manual - V4.0 © Capital Fireplaces 2017
18
Item Qty Part No. Description Warranty
1 1 C501 Secondary Regulator Assembly Y
2 1 C502 Grate Support Y
3 1 C503 Grate Plate Y
41C504 Curved Front Plate Assembly Y
51C505 Log Retainer Teeth N
61C506 Throat Plate Fireboard N
71C507 Rear Fireboard (2 Parts) N
8a 1C508a Left Fireboard N
8b 1C508b Right Fireboard N
91C509 Throat Plate Retaining Bar N
10 1C510 Bafe Deector Fireboard N
11 2C511 Flat Inner Side Window N
12 1 C512 Regulator Cover Plate Y
Contour Parts List
Item Qty Part No. Description Warranty
13a 1 C513a Left Curved Side Window N
13b 1C513b Right Curved Side Window N
14 1C514 Ash Pan N
15 1C515 Contour 5 Curved Glass N
16 1C516 Ash Pan Handle Y
17 1C517 Stove Body Y
18 1C518 Stove Door & Handle Y
19 1C519 Door Fire Rope N
20 1C520 Glass Sealer Tape N
21 1 C521 Fire Grate Retainer Bar N
22 2 C522 Side Grate Retainer Bars N
23 1 C523 CE Plate N
Installation Instructions

Contour 5W Series Manual - V4.0 © Capital Fireplaces 2017
19
Maintenance
Fig. 5
Fire Brick Removal
1. The two rear reboards can be removed by
pulling out from the middle.
2. Remove both Side Bolts from inside the
rebox to free the top of the Side Fireboards,
remove these carefully as they are very fragile.
3. Lift the Top Fireboard up to slide it off its
retainers and remove.
4. Remove the Retaining Plate by pulling
towards you to get it off the retainers each side.
You can now slide the Throat Plate Fireboard
backwards, then forward to allow it to drop out.
5. Firebox is now ready to clean.
NOTE: All screws removed at this time must be
renewed.
Plate Bolt
Side Fireboard
Retaining Plate
Throat Plate
Fireboard
Rear Fireboards
Fire Brick Assembly
1. Place Throat Plate Fireboard against the roof of the rebox and slide forward over the
location pins then x in position by slotting the Retaining Plate under it.
2. Place Top Fireboard in position on its retainers.
3. Put the two Rear Fireboards back into position.
4. Lastly reposition the Side Fireboards one at a time using the Side Bolts to keep them in
place.
Recommended Periodic Checks
Check The Following If Fault Found Recommended
Frequency For Checks
Chimney is swept Arrange a sweep Every 6 months
Check the glass is not cracked Replace Before every use
Check re bricks have not deteriorated Replace Weekly
Check bafe plate and throat plate are clean and clear Unblock / Clean Weekly
Check none of the door seal re ropes have worn excessively Replace Weekly
Check the riddle grate is not blocked Unblock Weekly
Check ue pipe for blockages Unblock Monthly
Check all chimney / ue joint seal cement hasn’t deteriorated
or is leaking Reseal Monthly
If you discover any issues or require replacement parts, please call your retailer / installer.
Top Fireboard
Retainer
Installation Instructions

Contour 5W Series Manual - V4.0 © Capital Fireplaces 2017
20
Warranty & Guarantee
This stove is manufactured to the highest quality levels and if operated correctly as detailed in
this manual will give you many years of care free operation and minimal periodic maintenance.
The overall construction of the stove is guaranteed for a minimum of 10 years.
Some of the items which are deemed as consumable are not part of this guarantee or warranty
please refer to the parts list on page 21 and the column marked warranty as this clearly
shows which items are covered under the warranty and which are deemed as consumable
and not covered.
The overall paint nish of the stove is not covered by the warranty, you will nd you might
well wish to repaint the body after a period of time. We recommend purchasing this heatproof
paint from Capital Fireplaces as this will ensure there is no chemical reaction with another
heat proof paint.
Only certied heatproof paint can be used on the exterior of the stove which are certied up
to a minimum temperature of 650°C.
The terms and conditions for this warranty to apply are as follows:
The stove is professionally tted by a HETAS approved and registered engineer
and you have registered your stove with Capital Fireplaces and completed the
registration details on page 5 of this manual.
The stove is operated fully in accordance with this operating manual.
The warranty only covers fair wear and tear only, it does not cover any abuse or
any issues of over fuelling or miss fuelling as this will totally void this warranty and
guarantee. Misuse of the stove which could be caused by over loading the stove or
burning products that are not listed within this manual. No general waste products
including food, plastics, rubber products or aerosols of any description (this list is
not exclusive) should be burnt on this stove only the recommended fuels.
Capital Fireplaces takes no liability whatsoever for not operating this stove in
accordance with this manual.
Capital Fireplaces has no responsibility for the installation of this stove, but for any
element of this stove to be covered by warranty it must have been tted by HETAS
approved installer in line with the current and up to date building regulations as
dened by the current building control legislation.
If you require any of the consumable parts for this stove please contact our helpline
or email our customer service department or contact the retailer who you purchased
this stove from.
Installation Instructions
This manual suits for next models
3
Table of contents
Popular Wood Stove manuals by other brands

Heta
Heta SCAN-LINE TURIN CLASSIC Operating and installation instructions

FRANCO BELGE
FRANCO BELGE MONTFORT 134 06 01 Technical manual

Century Heating
Century Heating S244 Installation and operation manual

Drolet
Drolet MILLENIA DB03130 Technical data

Henley Stoves
Henley Stoves Zurich user manual

Nordpeis
Nordpeis CC-RIO00-1XA user manual

barbas
barbas UNIVERSAL-6 70 Instructions for use & maintenance manual

Quadra-Fire
Quadra-Fire 3100 Series owner's manual

Heat & Glo
Heat & Glo CURVE 100 owner's manual

SCAN
SCAN Andersen 8-2 Instructions for installation and use

Nobis
Nobis FLAT Instructions for installation, use and maintenance manual

Wood master
Wood master LT 90 owner's manual