Caple RFZ70WH User manual

Model code: RFZ70WH

N
ames o
f
the Components
Please read this manual before use.
Thank you for purchasing this Caple product.
Attention:
* Please understand the safety instructions before use.
* Please keep this manual for future reference.
* Due to continued product development and improvement the actual product may vary slightly.
WARNING
1. WARNING Keep ventilation openings in the appliance enclosure or in the built-in structure clear of obstruction.
2. WARNING Do not use mechanical devices or other means to accelerate the defrosting process, other than those
recommended by the manufacturer.
3. WARNING Do not damage the refrigerant circuit.
4. WARNING Do not use electrical appliances inside the food storage compartments of the appliance, unless they are of the
type recommended by the manufacturer.
5. The appliance must be unplugged after use and before carrying out user maintenance on the appliance.
6. This appliance is not intended for use by persons (including children) with reduced physical, sensory or mental capabilities,
or lack of experience and knowledge, unless they have been given supervision or instruction concerning use of the appliance
by a person responsible for their safety.
7. Children should be supervised to ensure that they do not play with the appliance.
8. If the supply cord is damaged, it must be replaced by Caple, its service agent or similarly qualified persons in order to avoid
ahazard.
9. Please dispose of the freezer according to local regulators for it use flammable blowing gas and refrigerant.
10. Disconnect the power supply before replacing the lamp.
11. Please adhere to local regulations regarding disposal of the appliance for it contains flammable refrigerant and blowing
gas. Before you scrap the appliance, please remove the doors to prevent children trapped.
Due to continued product development some features and accessories may vary slight to what is detailed below. Please refer
to the packing list.
Note: If the top cover, door tray, ice maker, ice collector and freezing drawer are removed according to the instructions, a
larger volume can be available, and there is no effect on the normal functions of this product.
1
Upper door-mounte
d
tra
y
Display control panel
Top cover
Ice maker
Ice collector
Freezing drawer
Glass shelf
Freezing drawer
Freezing drawer
Freezing drawer
Lower drawer
Adjusting foot

Preparation
b
efore using Correct application of the refrigerator
Warning
·Unless recommended by the manufacturer, no machinery equipment or other means can be adopted to speed up the
defrosting process.
·Unless recommended by the manufacturer, no electrical appliances can be used in the food compartments.
·The R600a refrigerant and cyclopentane foaming materials used in this freezer are all flammable materials, so old freezers
should be isolated from any fire, disposal by burning is forbidden.
New Freezer
· Before using a new freezer, remove all packaging materials, including the base pad, as well as the foam pads and adhesive
tape in the freezer.
·Use a damp cloth to clean the freezer inside and outside (A small amount of detergent can be added to the warm water and
finally clean water should be used to clean the product).
·A separate socket with two poles grounded should be prepared, and it should not share the same multipurpose socket with
other appliances.
·Please be sure to connect the earth wire well. The socket must have reliable earth connection.
Transport and placement
Transport
·Do not have the appliance upside down, horizontally placed, compressed or shaken. When moving the fridge, do not tilt the
product more than a 45 degree angle.
·When moving, do not use excessive pressure on the door or top cover to avoid deformation.
·The freezer can be drawn backwards slightly (no more than 20 degrees), so that it could be moved in a short distance using
the rear casters for rolling.
Placement
·The appliance should be placed in a well-ventilated place. Keep it away from heat and direct sunlight. Do not situate it close
to damp or water to prevent rusting or the insulation becoming weakened.
·The space above the product should be no less than 30cm and its two sides and back must be kept no less than 10cm away
from the walls to facilitate the door opening and closing and to allow heat dissipation.
·The freezer should be placed on a flat and solid ground. (If not, it can be leveled by adjusting the leveling toes)
Note
The power line should not be compressed by the appliance or other objects, to avoid any accident caused by damage of the
power line.
Before connecting to the power source, please carefully check whether the appliance has its voltage range identical to the
power supply.
Make sure the freezer is correctly and steadily placed on stable flooring, and that all safety precautions are
clearly understood.
1. Power on
NOTE:
THE PRODUCT MUST STAND IN SITUE FOR 12 HOURS BEFORE SWITCHING ON.
After power on, the freezer will automatically enter the factory default status.
2. Adding food to the freezer
Recommended
: Allow the freezer to work for a period of time and the required temperature to be reached or the compressor
has stopped working for the first time, and then add the food into the freezer, which is conducive to the first food
preservation.
Tips: When the temperature setting is changed or new food is added, the freezer
needs a period of time to have its internal temperature balanced. The time length
depends on the change of the temperature setting, the ambient temperature, the
door-opening frequency and the amount of stored food, etc.
·The freezer should have its temperature below –18ćfor long-time preservation of food.
·After purchasing pre-frozen food it be kept in the freezer as soon as possible before it defrosts.
·The hot food should be cooled to the room temperature before adding to the freezer.
·Fruit and vegetables should not be kept in the freezer to avoid frost damage, and no glass containers filled with liquid should
be kept in the freezer to avoid the glass bottle or container from smashing when the liquid expands.
·The frozen food should be sorted with the similar food kept together, to help prevent the doors being unnecessarily open for
a long time, wasting cold energy.
Freezer drawers
The drawers are used to keep the food frozen, and pieces of meat can be cut into small pieces before storage to facilitate
eating. When taking food, first pull the drawer open, push the tray above the drawer in horizontally, and then take out the
food in the lower drawer.
Note: Remember to shut the freezer drawer after use.
2 3

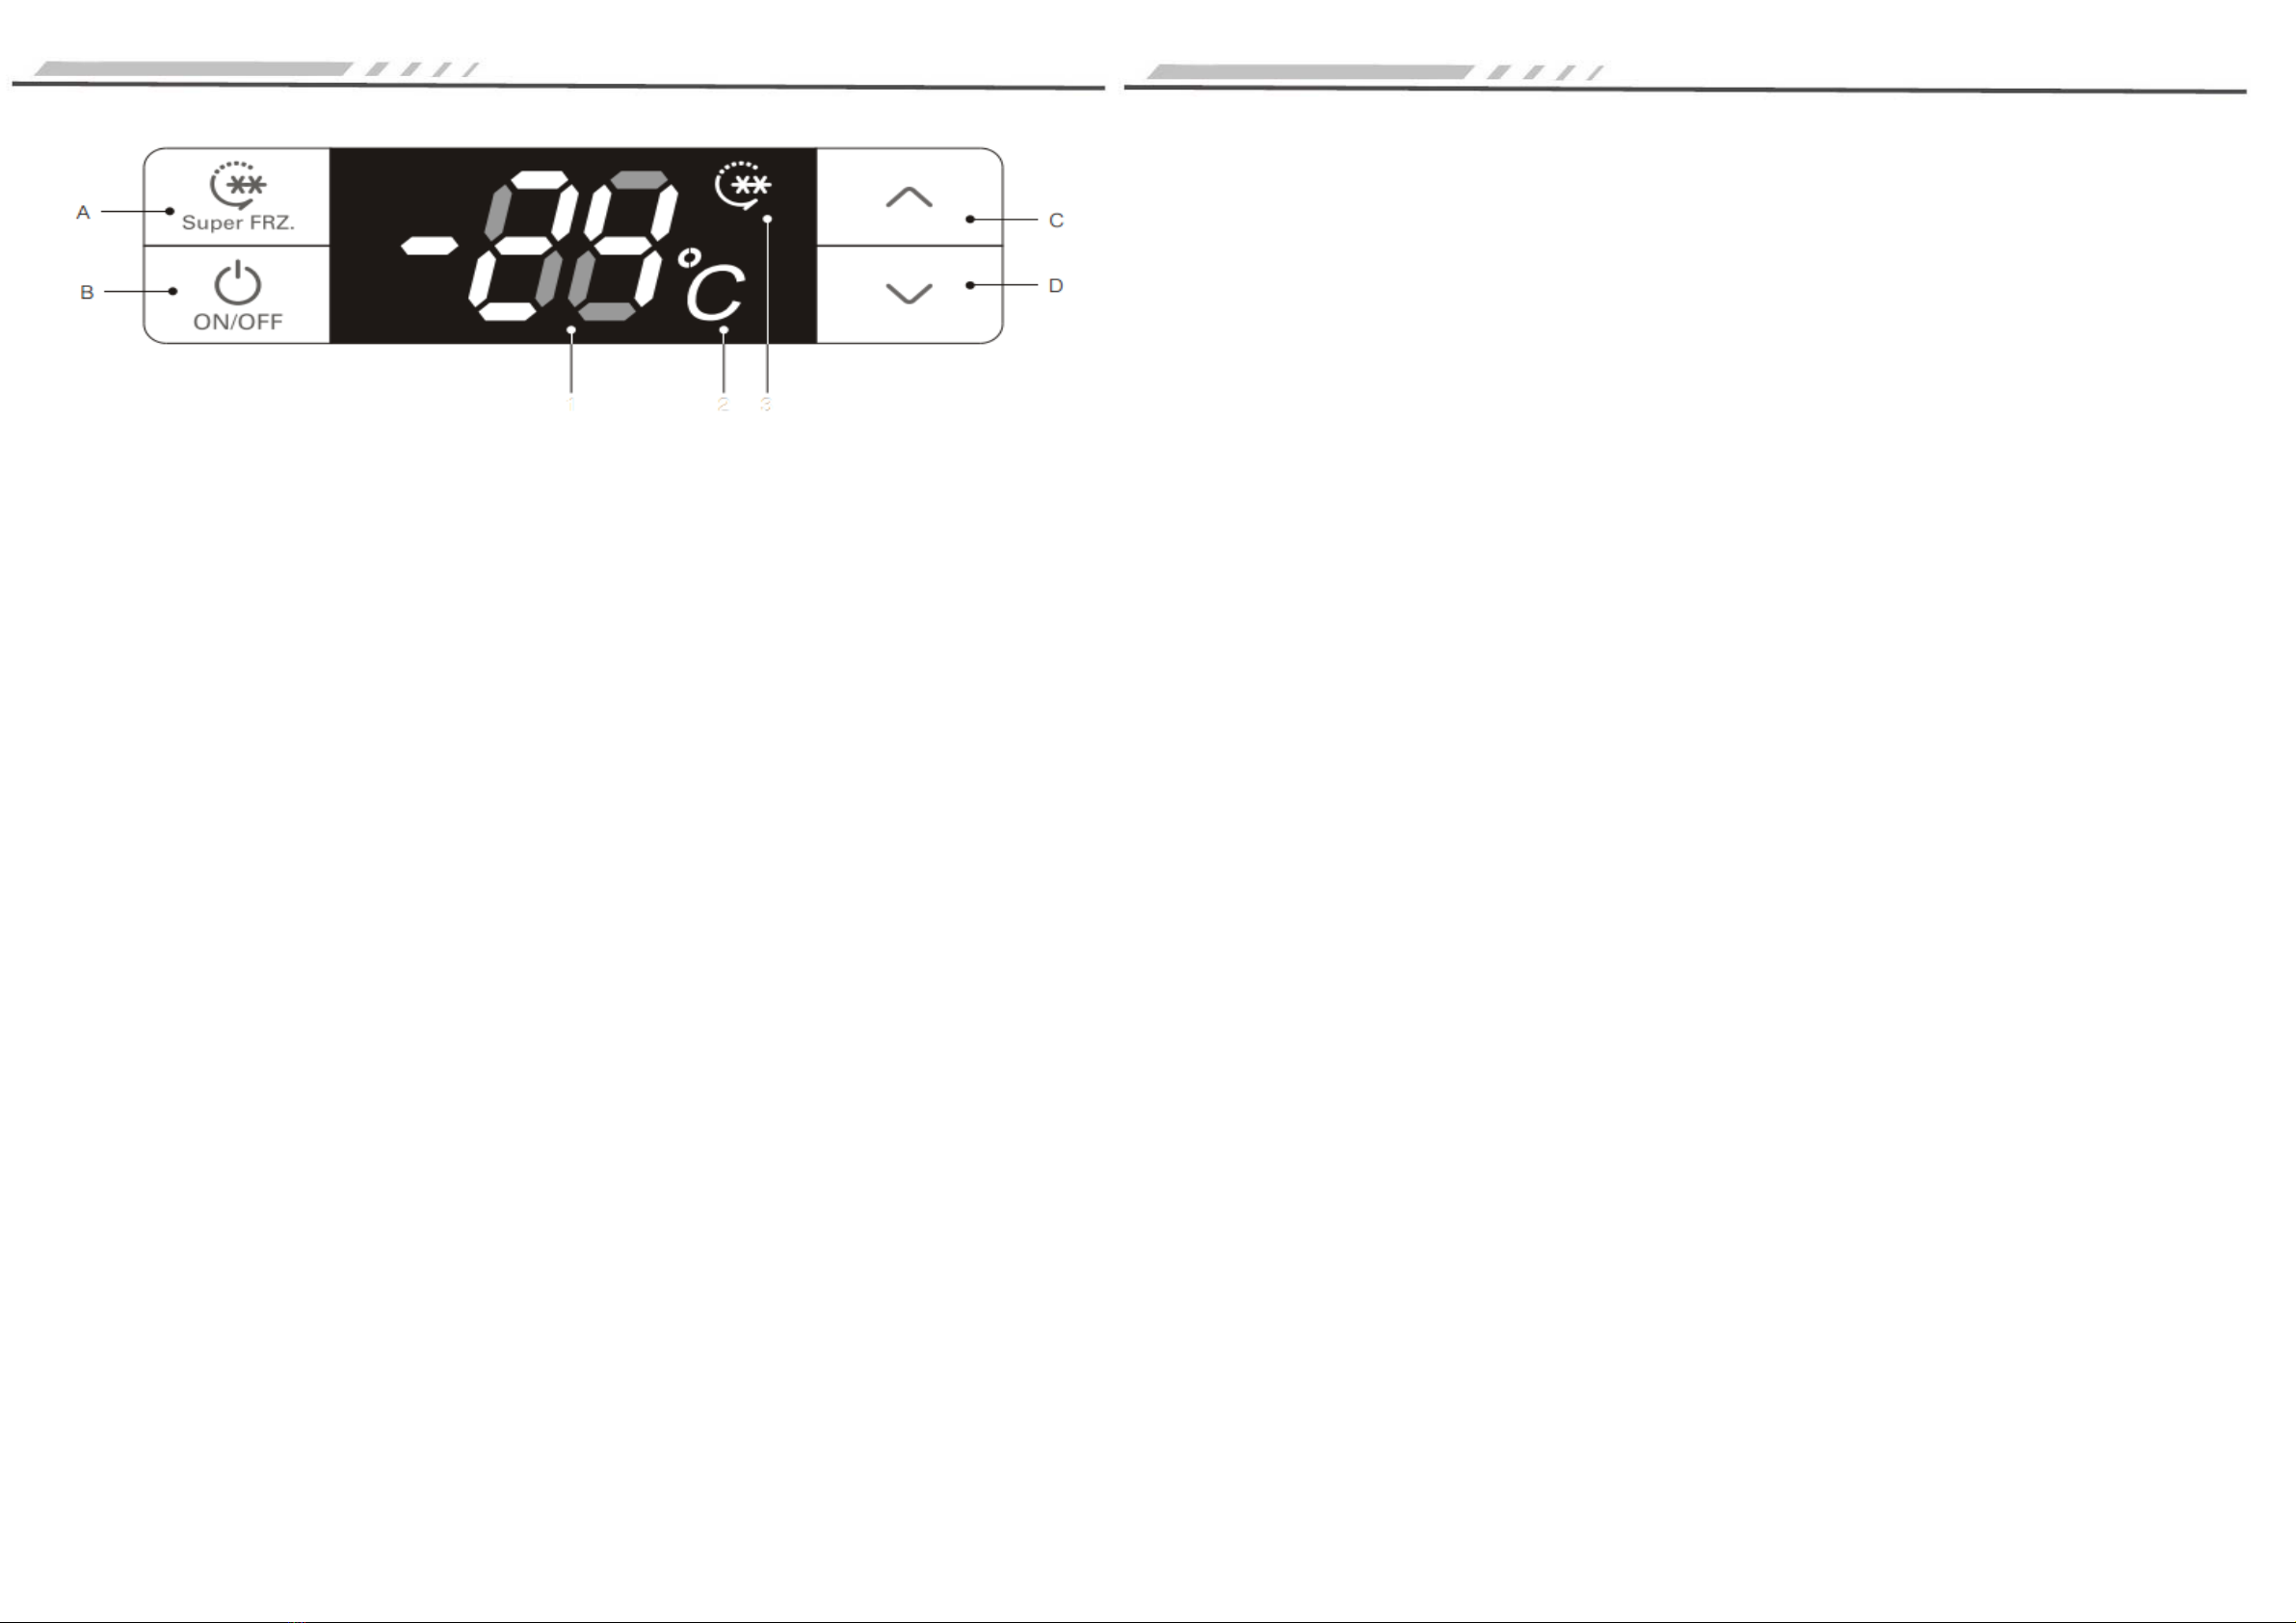
Function introduction Function introduction
1. Buttons
A. Super FRZ – Quick-freeze mode
B. ON / OFF - Power ON / OFF
C. ġtemperature adjustment UP / Quick-freeze adjustment UP
D. Ģtemperature adjustment DOWN / Quick-freeze adjustment DOWN
2.Display functions
1. Temperature zone digital display
2. Centigrade icon
3. Super-freeze icon
3. Display control
· Initial power on: Full display for 3 seconds, at the same time a starting-up tone can be heard and the display with show the
freezer default temperature of -18ȋC.
· Display for normal operation:
Temperature display: will show the set temperature, if there is a malfunction it will display the error code as a priority.
· Display control:
1. In the normal mode, if the door is not opened and there is no operation of any button, the screen will go out after 30
seconds;
2. If the door is open, the display screen will always be light, and 30 seconds after the door is closed, the screen will go out;
3. When the “visible failure code” type failure occurs, the screen will automatically display once, and go out in 30 seconds (If
the buzzer continues to ring once you have been alerted to the malfunction, press any button to cancel it).
4. Operation
·Start up and shutdown
In the ON mode, if the ON / OFF key (B-key) is pressed for 3 seconds, the OFF tone will sound with the OFF setting effective
immediately;
In the OFF mode, if the ON / OFF key (B-key) is pressed for 3 seconds, the ON tone will sound with the ON setting effective
immediately;
If the ON / OFF key is pressed continuously for 3 seconds to enable the OFF function, the display screen will go out, except for
the ON / OFF key (B-key), other keys will stop functioning, and the compressor, defrosting heater, door lamp and other
functions will immediately shut down; press the ON / OFF key continuously for 3 seconds to enable the ON function, and if it
was working in the super-freeze mode before shutdown, the display screen will show the super-freeze initially set; otherwise,
the display screen will show the temperature previously set, and all the functions will work based on the settings before
shutdown.
The following function operations must be completed in the ON status.
·Enter the Super-Freeze mode
If the Super FRZ (A-key) is pressed continuously for 3 seconds, it will enter the Super-Freeze mode, the Super-Freeze icon will
light up, the display screen will show the default Super-Freeze time of 6 hours, and you can press the temperature adjustment
ġ(C-key) or the temperature adjustment Ģ(D-key) to adjust the Super-Freeze time by 6 hours within the range of 6-48
hours. If there is no key pressed in 5 seconds, it will automatically recognize to show “- 24ć”; within 5 seconds, you can press
the Super FRZ key (A-key) for manual confirmation to show “- 24ć”, and the freezer will be working in the Super-Freeze
mode.
Note: The refrigerating capacity marked in the nameplate is the test result when the above Super-Freeze mode is set as 48
hours.
Quit the Super-Freeze mode
After the S
Super-Freeze
mode is enabled, the set S
Super-Freeze
time is over, or the Super FRZ key (A-key) is pressed continuously
for 3 seconds, or the user presses the key to change the set temperature, the S
Super-Freeze
mode can be quitted and the
Super-Freeze
icon will go out.
If the S
Super-Freeze
mode is quitted, it will work based on the mode previously set.
Note: During operation in the S
Super-Freeze
mode, if the OFF button is pressed or the power supply is cut off, it will still be
workingintheS
Super-Freeze
mode when started again later.
Temperature setting
Press the temperature adjustment ġkey (C-key) orĢkey (D-key) to set the temperature. The temperature icon will flash in
time of temperature setting, with the range between -16 and -24ć(circulating adjustment unavailable); in 5 seconds, it will
quit to have the setting effective. (Within 5 seconds after setting of the temperature, you can also manually confirm the set
state by pressing the A key or B key to have the setting effective).
5. Lighting control
When the freezer door is opened, the lamp will light up; when the freezer door is closed, the lamp will go out.
6. Door open and door open alarming control
When the door is opened a bell can be heard. If the door is open for a consecutive 120 seconds, it will sound the alarm as a
prompt once every 2 seconds until the door closed. Press any key to disable the door open alarm.
7. Power-off memory and Initial power-up
·When the power supply is lost to this appliance the fridge has an internal memory that will remember the last settings before
the power was lost. When the refrigerator is switched back on the last settings will be selected.
·Initial power-up: The fridge has the set temperature of – 18ć.
·Memory: It includes the set temperature, High Humidity mode and the cumulative working time of the compressor.
For example: If the power is cut off in the Super Freeze state, it will be working based on the “Super Freeze” mode after
power-on.
4 5

Function introduction Considerations
8. High temperature warning
When the temperature is above ˉ8ćfor 6 hours or more, the high-temperature warning will sound. The buzzer will beep
10 times once every second, and 10 times every 30 min. The temperature display area will flash to show the failure code (E9);
the warning will be disabled when the temperature is below ˉ12 ć. Press any key to cancel the warning, but the failure
code display state is not cancelled, until the failure is solved.
9. Failure prompts
Failure
Code
Description Failure
Code
Description
E2 Temperature sensor failure E6 Communication failure
E5 Defrosting sensor failure E9 F high-temperature alarm
E7 Ambient temperature sensor
failure
EC EEPROM circuit failure
Note: When a failure occurs, it will alternatively display the failure code, and after the failure is solved, the alarm will be
automatically cancelled or any display control icon can be pressed to cancel the alarm. When a failure occurs, it will take the
priority to display the failure code until the failure is solved, or the set temperature and the Super-Freeze icon cannot be
displayed.
If the failure continues and cannot restore automatically, please contact the Caple after-sales department or professional
service engineer for maintenance.
10. Compulsory defrosting
Press the temperature adjusting “ġ” key and the temperature adjusting “Ģ” key for 3 seconds to enter the compulsory
defrosting mode. The LED temperature zone always displays “3” at the top, but there is no display at the bottom. After the
compulsory defrosting mode is enabled, the compressor and fan will stop immediately; in time of compulsory defrosting
operation, press the temperature adjusting “ġ” key and the temperature adjusting “Ģ” key for consecutive 3 seconds or the
conditions for exit is satisfied, it will quit the compulsory defrosting mode.
Do not dismantle or attempt a
repair on this appliance. Please
contact Caple service to
arrange a call out.
Use the 10A or above standard
three-hole power socket. The socket
must be well earthed
Please do not use any
flammable solvent in the
vicinity of the freezer, so as to
avoid fire.
Please do not keep flammable,
explosive, volatile or corrosive goods
into the refrigerator, to cause
damage or fire accident.
Please do not put any bottle or
closed container filled with liquid
into the freezer to avoid other
damages due to the container
bursting.
Do not allow any child climb
into or climb on the appliance
to prevent the child being
trapped in the freezer or hurt
due to falling.
Please do not put heavy
things on the refrigerator.
Otherwise, it may easily fall
and cause damages, when
the door is closed.
Please do not keep too much
food in the freezer.
Please do not have the door
or drawer open long or
frequently to avoid
weakening the efficiency of
the whole machine and
increasing the load of its
operation.
When the freezer is damaged or not
in normal operation, do make sure
to cut off the power supply and
notify the local service centre.
Please do not splash any water onto
the top and rear, so as not to
weaken the effect of electrical
insulation.
6
Note:
This product is for household use only, as the national standard requires, the household refrigerators can only be used to store
food, but for other purposes, such as storing blood, drugs and biological products, etc.
7

Maintenance Changing the door handing
Cleaning
Use dry towels to wipe off the fingerprints left on the panel.
Regularly clean the freezer rear part and the ground.
The freezer should have its interiors frequently cleaned in order to avoid odour. While cleaning, pleas
e
unplug the power, use soft towels and neutral detergents, and finally use clear water to clean it.
Do not use the following materials to clean the freezer:
·Alkaline or weakly alkaline cleaning agent; (The container and the plastic components may crack)
·Soap powder, light gasoline, banana oil, alcohol and so on; (The plastic parts may be damaged)
·If dirtied with edible oil or sauce, please erase it. (The plastic components may crack)
Light and replacement
If the lights fail, please contact Caple service (the number can be found on the front of the manual).
Shutdown
No use for a prolonged period:
You should unplug the power, so as to avoid electric shocks or fires due to power line aging;
clean the freezer inside; let the doors open for a period of time until the interior is completely dry.
Power failure:
When the power fails, do try to reduce the number of times the door is opened; it is not appropriate to add
fresh food.
Disposal
: If a freezer is discarded, its door seal must be removed to prevent any child entering and being sealed in the freezer.
1. Remove the two screw caps and the two hinge end caps on the top decorations (when the door is opened to the right.)
2 Remove the roof decorative components
3. Remove the two screws to fix the top hinge, draw the top hinge out from the side, remove it together with the door, and
finally take the hinge out from the door.
8 9
Left hinge endcap
Right hinge endcap
Roof decoration
Screw cap
Roof decoration
Roof decoration
Harness
Two screws Hinge

Changing the doo
r
handing Changing the door handing
4. Reassemble the bottom hinge shaft: remove the original shaft of the hinge and relocated it as shown in the figure.
5. Reassemble the top hinge shaft: first remove the hinge shaft and screw this shaft from the other end of the screw hole.
6. Mount the left top hinge fixation column on the right.
7. Mount the bottom hinge on the right side of the cabinet.
8. First mount the top hinge in the corresponding shaft hole on the right side of the door upper cover, place the door body
on the bottom hinge, and press the top hinge into the hinge fixation column to fix the hinge.
9. Mount the roof decoration, the screw caps and the hinge end cap.
10 11
Bottom hinge

R & F connecting
12


Requesting assistance or service
If you have any doubt or require extra assistance, please call:
Caple Service:
Telephone: 0844 800 3830
Email: [email protected]
Caple
Fourth Way
Avonmouth
Bristol
BS11 8DW
www.caple.co.uk
Correct Disposal of this product
This marking indicates that this product should not be disposed with other household wastes throughout
the EU. To prevent possible harm to the environment or human health from uncontrolled waste disposal,
recycle it responsibly to promote the sustainable reuse of material resources. To return your used device,
please use the return and collection systems or contact the retailer where the product was purchased. They
can take this product for environmental safe recycling.
15
Table of contents
Other Caple Freezer manuals