Preparation before using Correct application of the refrigerator
Warning
WarningWarning
Warning
·Unless recommended by the manufacturer, no machinery equipment or other means can be adopted to speed up the
defrosting process.
·Unless recommended by the manufacturer, no electrical appliances can be used in the food compartments.
·The R600a refrigerant and cyclopentane foaming materials used in this refrigerator are all flammable materials, so old
freezers should be isolated from any fire, disposal by burning is forbidden.
N
NN
New refrigerator
ew refrigeratorew refrigerator
ew refrigerator
· Before using a new refrigerator, remove all packaging materials, including the base pad, as well as the foam pads and
adhesive tape in the refrigerator.
·Use a damp cloth to clean the refrigerator inside and outside (A small amount of detergent can be added to the warm water
and finally clean water should be used to clean the refrigerator).
·A separate socket with two poles grounded should be prepared, and it should not share the same multipurpose socket with
other appliances.
·Please be sure to connect the earth wire well. The socket must have reliable earth connection.
Transport and placement
Transport and placementTransport and placement
Transport and placement
Transport
TransportTransport
Transport
·Do not have the refrigerator upside down, horizontally placed, compressed or shaken. When moving the fridge, do not tilt
the product more than a 45 degree angle.
·When moving, do not use excessive pressure on the door or top cover to avoid deformation.
·The refrigerator can be slightly drawn backwards (no more than 20 degrees), so that it could be moved in a short distance
using the rear casters for rolling.
Placement
PlacementPlacement
Placement
·The refrigerator should be placed in a well-ventilated place. Keep it away from heat and direct sunlight. Do not situate it close
to damp or water to prevent rusting or the insulation becoming weakened.
·The space above the refrigerator should be no less than 30cm and its two sides and back must be kept no less than 10cm
away from the walls to facilitate the refrigerator door opening and closing and to allow heat dissipation.
·The refrigerator should be placed on a flat and solid ground. (If not, it can be leveled by adjusting the leveling toes)
Note
NoteNote
Note
The power line should not be
The power line should not be The power line should not be
The power line should not be compressed
compressedcompressed
compressed
by the r
by the rby the r
by the refrigerator or other objec
efrigerator or other objecefrigerator or other objec
efrigerator or other objects,
ts, ts,
ts, to
toto
to
avoid any accident
avoid any accident avoid any accident
avoid any accident caused by
caused bycaused by
caused by
damage of the
damage of the damage of the
damage of the
power line.
power line.power line.
power line.
Before
Before Before
Before connecting
connectingconnecting
connecting
to the power source, please carefully check whether the re
to the power source, please carefully check whether the reto the power source, please carefully check whether the re
to the power source, please carefully check whether the refrigerator has its voltage range identical to the
frigerator has its voltage range identical to the frigerator has its voltage range identical to the
frigerator has its voltage range identical to the
power supply.
power supply.power supply.
power supply.
Make sure the refrigerator is correctly and steadily placed
Make sure the refrigerator is correctly and steadily placedMake sure the refrigerator is correctly and steadily placed
Make sure the refrigerator is correctly and steadily placed
on stable flooring
on stable flooringon stable flooring
on stable flooring,
,,
,
a
aa
an
nn
nd
dd
d
t
tt
th
hh
ha
aa
at
tt
t
a
aa
al
ll
ll
ll
l
s
ss
sa
aa
af
ff
fe
ee
et
tt
ty
yy
y
p
pp
pr
rr
re
ee
ec
cc
ca
aa
au
uu
ut
tt
ti
ii
io
oo
on
nn
ns
ss
s
are clearly understood.
are clearly understood.are clearly understood.
are clearly understood.
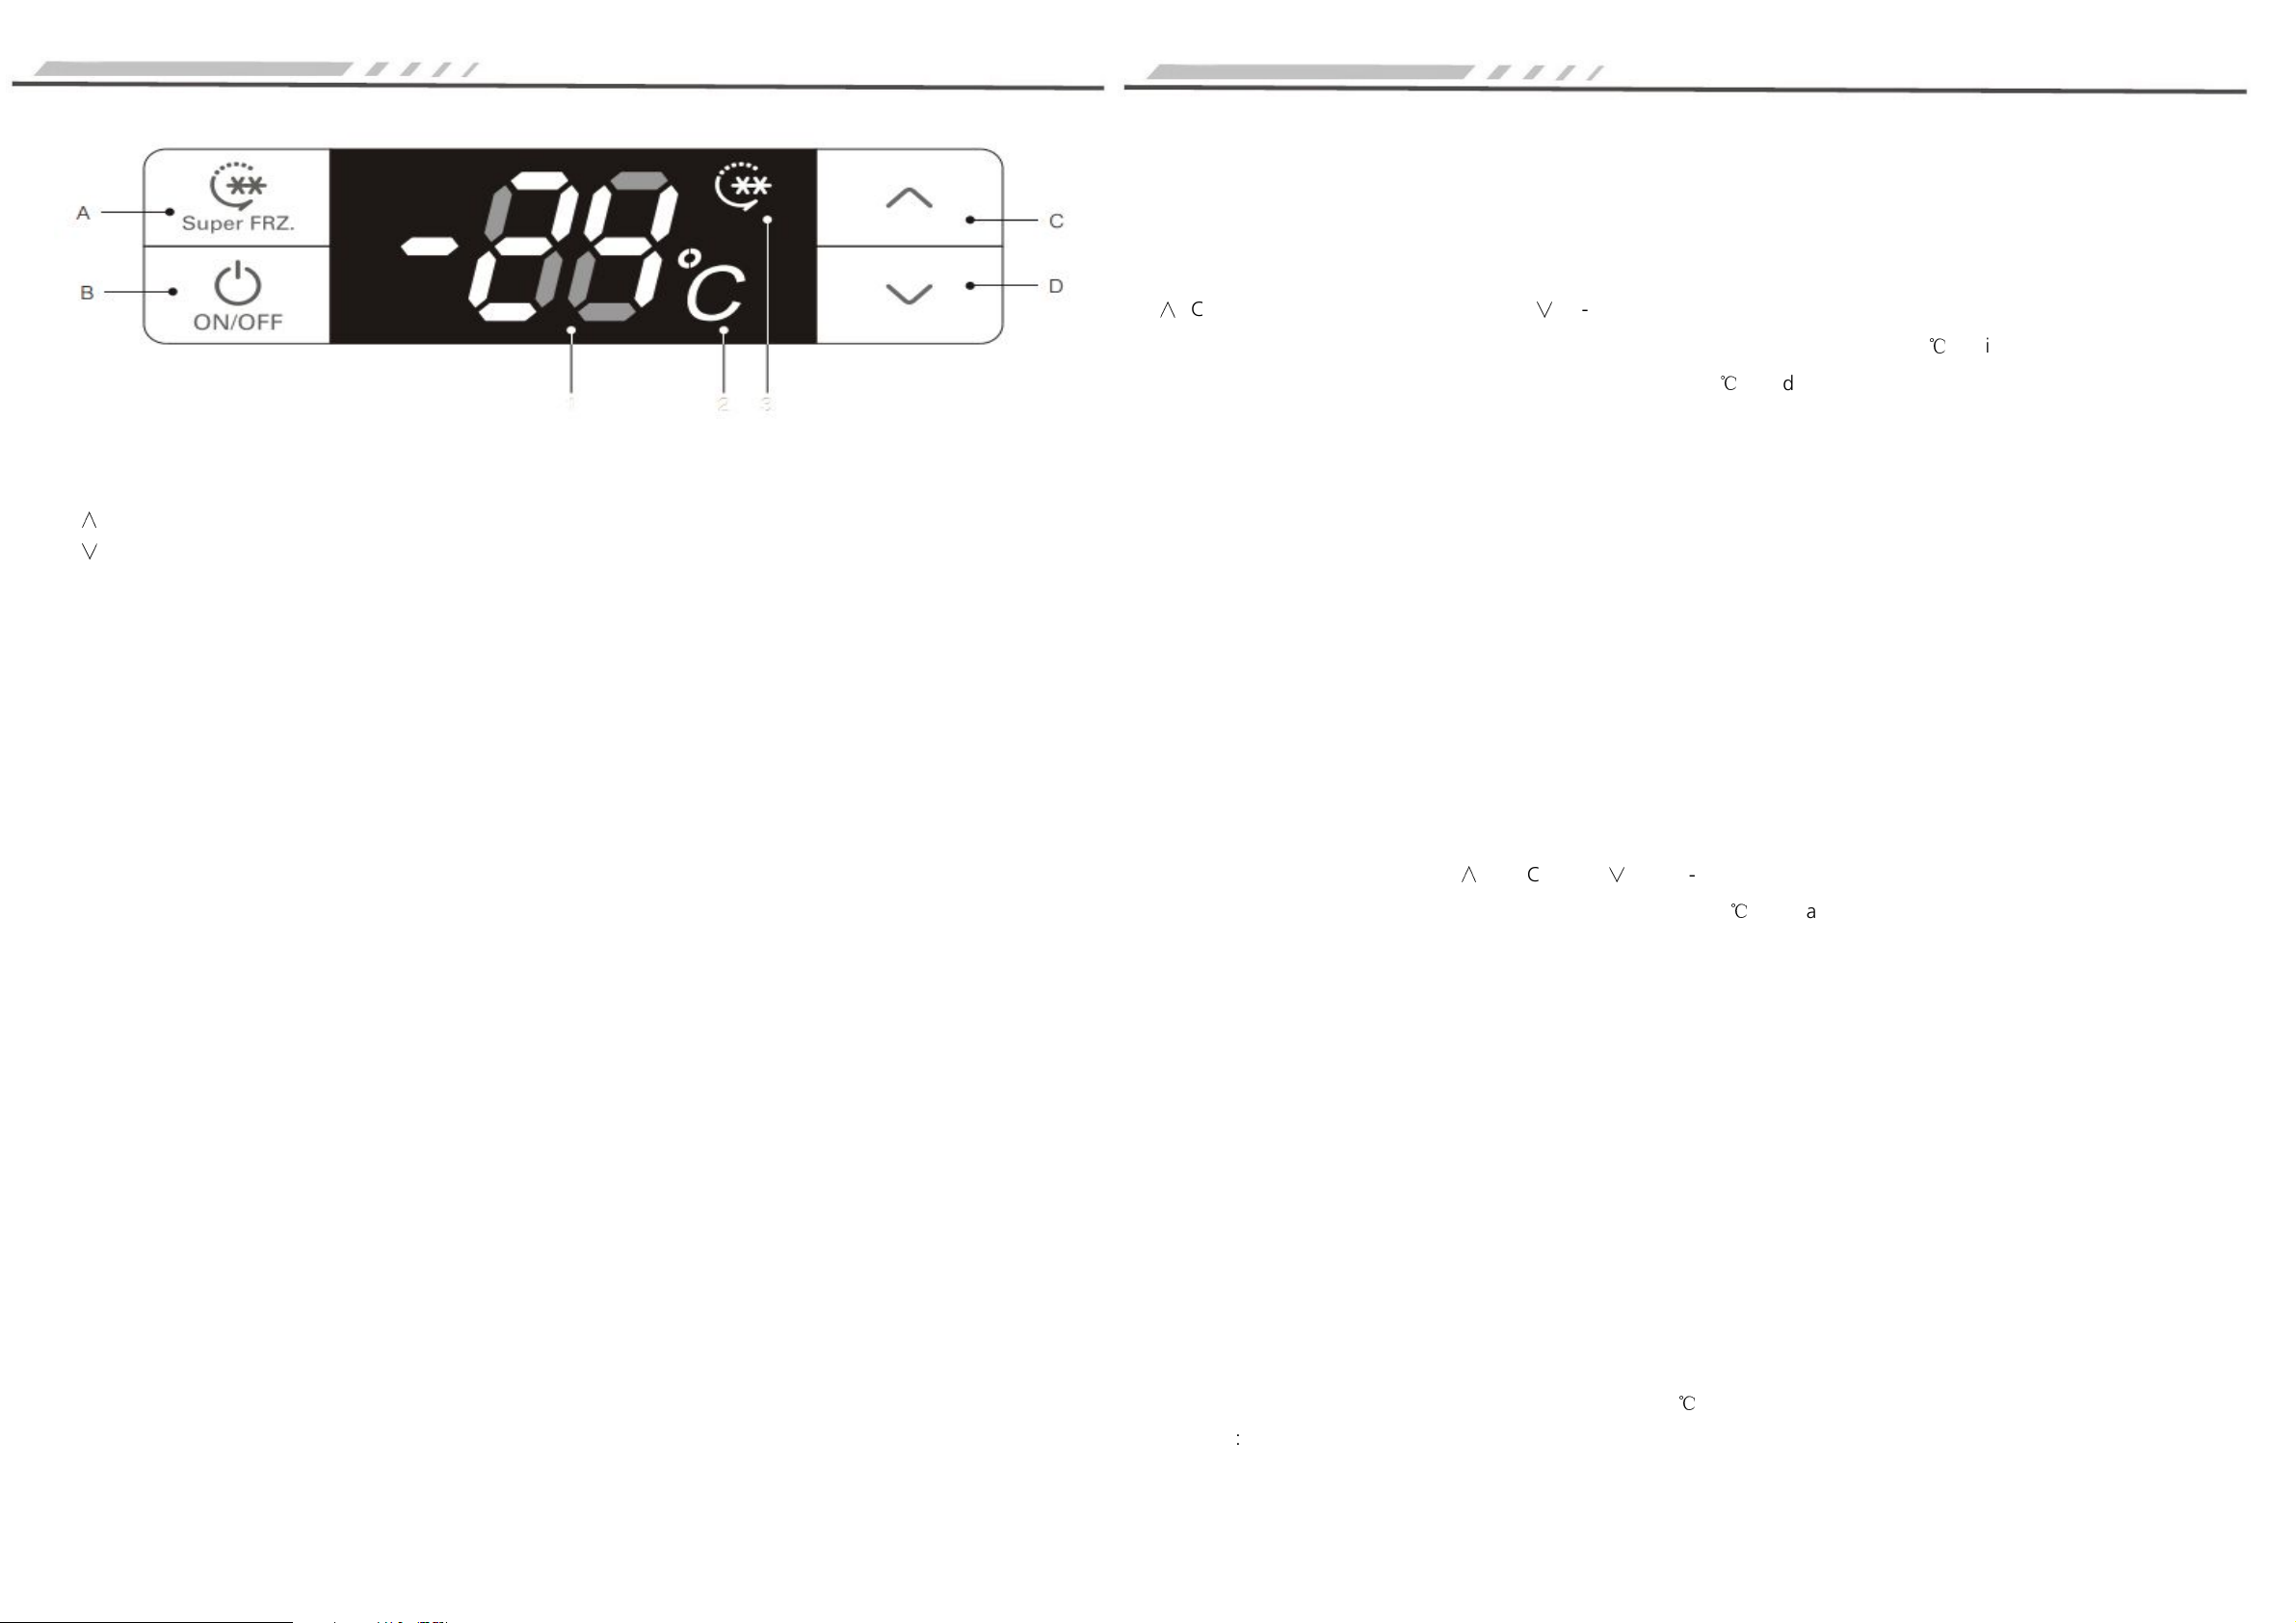
1. Power on
1. Power on1. Power on
1. Power on
NOTE:
NOTE:NOTE:
NOTE: THE PRODU T MUST STAND IN SITUE FOR 12 HOURS BEFORE SWIT HING ON.
After power on, the refrigerator will automatically enter the factory default status.
2.
2. 2.
2. Adding
AddingAdding
Adding
food
food food
food to
toto
to
the refrigerator
the refrigeratorthe refrigerator
the refrigerator
Recommended
RecommendedRecommended
Recommended: Allow the fridge to work for a period of time and the required temperature to be reached or the compressor
has stopped working for the first time, and then add the food into the refrigerator, which is conducive to the first food
preservation.
Tips: When the temperature setting is changed or new food is added, the
Tips: When the temperature setting is changed or new food is added, the Tips: When the temperature setting is changed or new food is added, the
Tips: When the temperature setting is changed or new food is added, the
refrigerator needs a period of t
refrigerator needs a period of trefrigerator needs a period of t
refrigerator needs a period of time to have its internal temperature balanced. The
ime to have its internal temperature balanced. The ime to have its internal temperature balanced. The
ime to have its internal temperature balanced. The
time length depends on the change of the temperature setting, the ambient
time length depends on the change of the temperature setting, the ambient time length depends on the change of the temperature setting, the ambient
time length depends on the change of the temperature setting, the ambient
temperature, the door
temperature, the doortemperature, the door
temperature, the door-
--
-opening frequency and the amount of stored food, etc.
opening frequency and the amount of stored food, etc.opening frequency and the amount of stored food, etc.
opening frequency and the amount of stored food, etc.
·The freezer should have its temperature below –18
℃
for long-time preservation of food.
·After purchasing pre-frozen food it be kept in the freezer as soon as possible before it defrosts.
·The hot food should be cooled to the room temperature before adding to the freezer.
·Fruit and vegetables should not be kept in the freezer to avoid frost damage, and no glass containers filled with liquid should
be kept in the freezer to avoid the glass bottle or container from smashing when the liquid expands.
·The frozen food should be sorted with the similar food kept together, to help prevent the doors being unnecessarily open for
a long time, wasting cold energy.
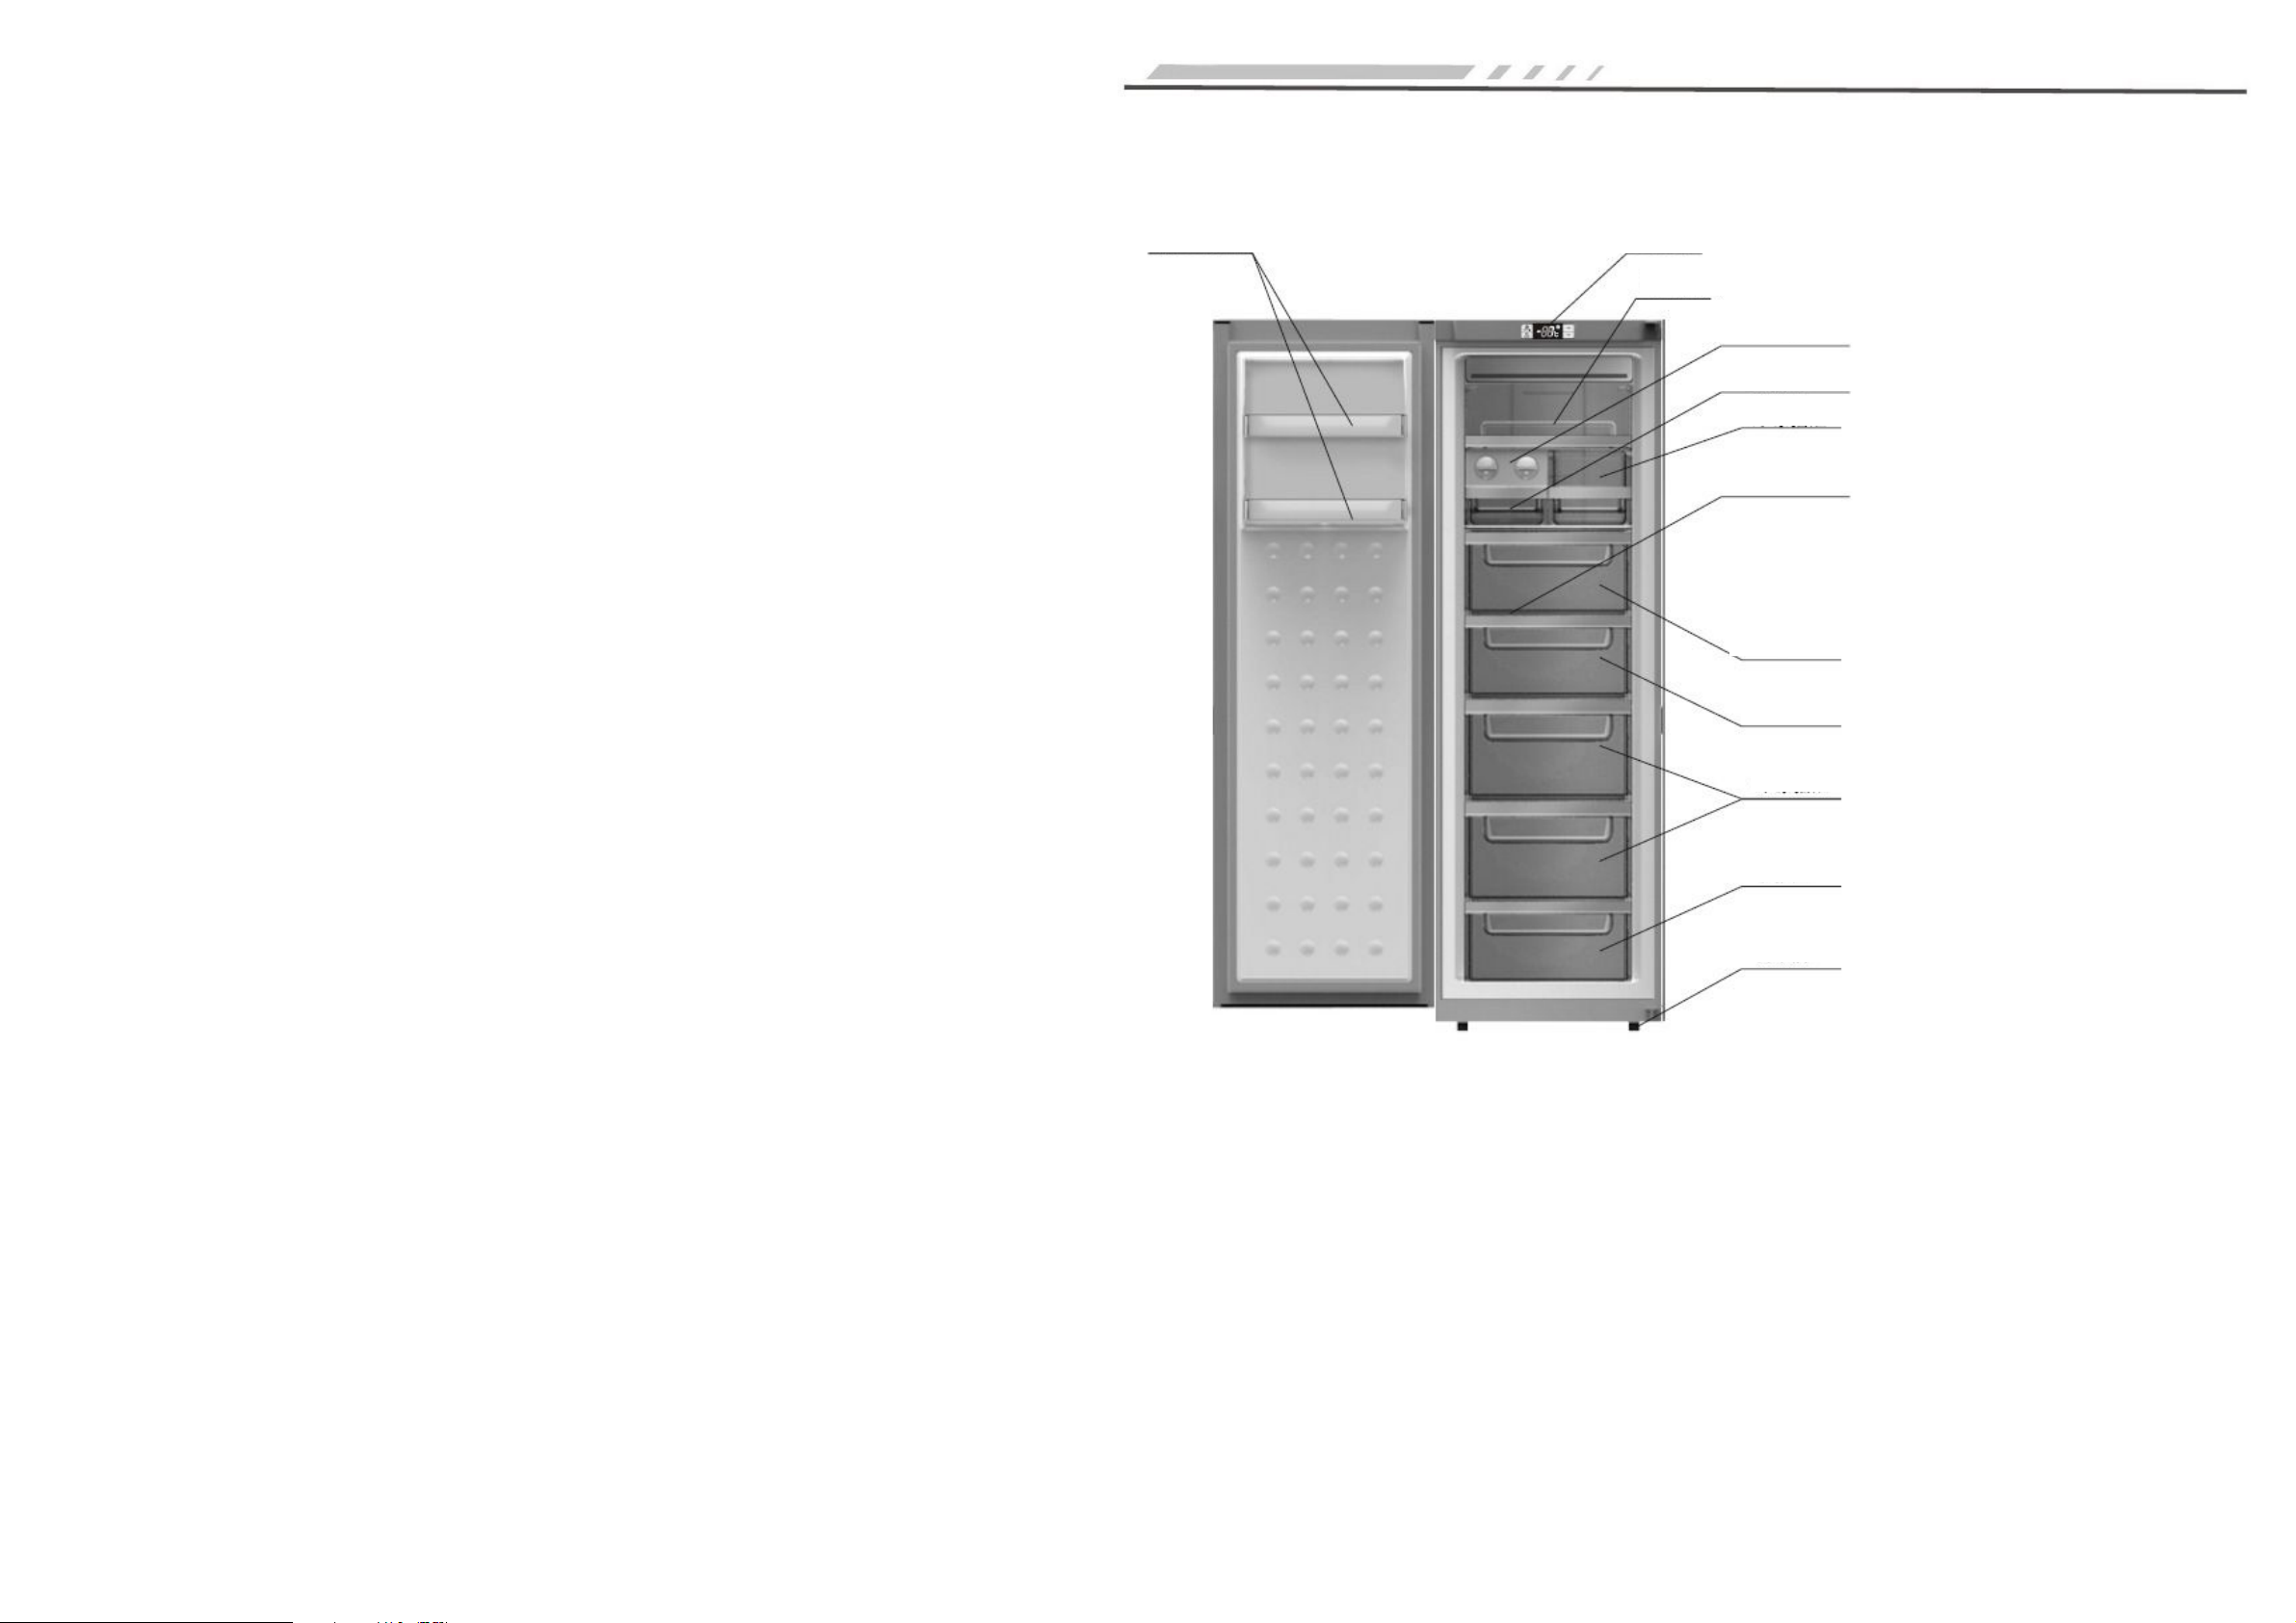
F
FF
Freezer
reezerreezer
reezer
drawers
drawersdrawers
drawers
The drawers are used to keep the food frozen, and pieces of meat can be cut into small pieces before storage to facilitate
eating. When taking food, first pull the drawer open, push the tray above the drawer in horizontally, and then take out the
food in the lower drawer.
Note: Remember to shut the freezer drawer after use.
Note: Remember to shut the freezer drawer after use.Note: Remember to shut the freezer drawer after use.
Note: Remember to shut the freezer drawer after use.
2 3