Carbine 46CR User manual

1
OWNER ’S MANUAL
®

2
Congratulations
Congratulations on the purchase of this CARBINE keyless entry
and remote start system.
Reading this owners guide prior to using the system will familiarize
you with it’s many features. If issues arise or you have questions,
contact your installing dealer first. Additionally, you can contact us
online at www.carbine.com or call 310-735-2000.

3
Replacement Remote Controls
To purchase replacement remote controls, please
see your authorized dealer/installer or visit us at
www.carbine.com
Remote part numbers are found on the back of
the remote control.

4
Contents
Congratulations ............................................................................. 2
Replacement Remote Controls....................................................... 3
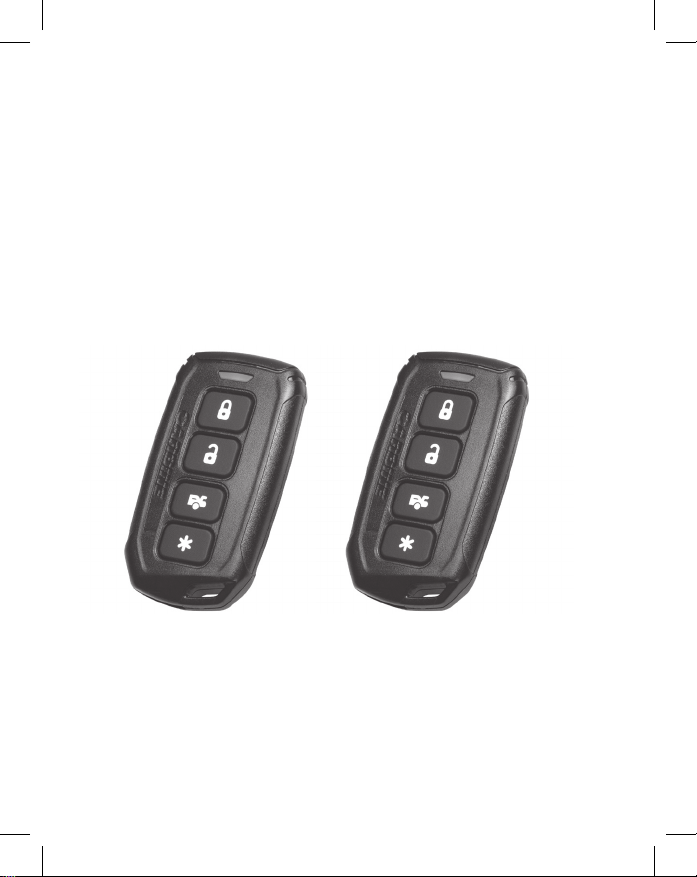
Remote Control Functions.............................................................. 5
Default 4-Button Remote Configuration.......................................... 6
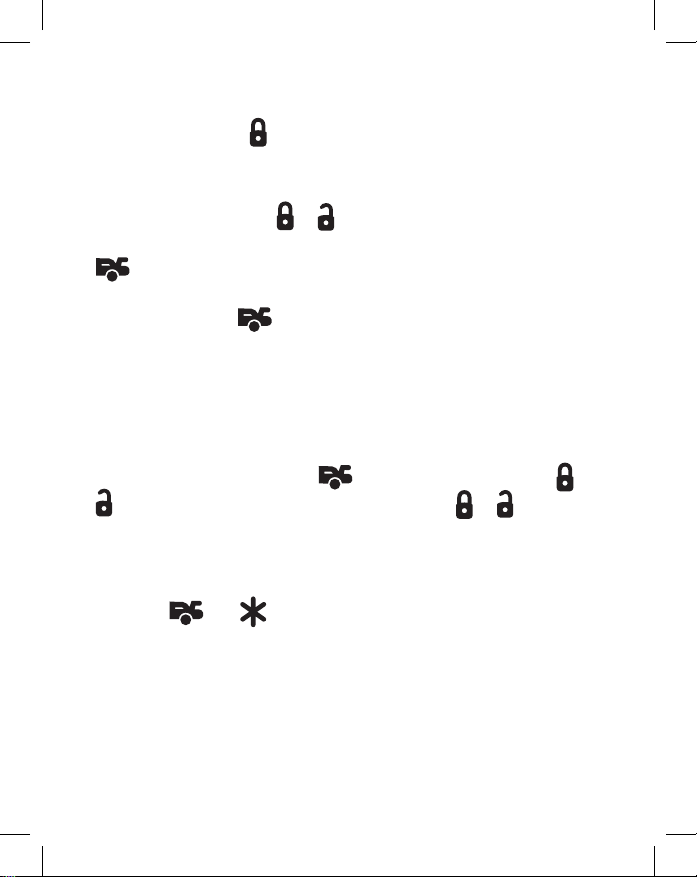
Panic Mode.................................................................................... 7
Silent Mode ................................................................................... 7
Car Finder...................................................................................... 7
Rear Defrost Activation .................................................................. 8
Star Button .................................................................................... 8
Garage Mode ................................................................................. 9
Remote Starting the Vehicle ......................................................... 10
Key Takeover ............................................................................... 11
Quick Stop Mode ......................................................................... 12
Disabling the Remote Start System.............................................. 12
Pairing a Replacement Remote Control ........................................ 13
Safety Features............................................................................ 14
Battery Replacement ................................................................... 15

5
Remote Controls
4-Button Functions
Button Feature Comment
Lock the doors Press and Release
Panic Mode Press and Hold for 1.5 sec
Silent Mode Lock Press button first then press
button for Silent Locking.
Unlock the Doors Press and Release
Stop the Panic Mode Press and Release
Silent Unlock Press button first then press
button for Silent Unlocking.
+Car Finder Press together and release
Trunk/ Hatch Release Press and hold for 1.2 sec
Initiate Remote Start
Sequence Press and Release
+
Initiate Timer Start
Mode
Press both at the same time.
4 Parking Light Flash, Engine will start.
Press to stop engine
++
Defrost Output
Activation
After Remote Start, press buttons at
the same time.

6
Default Configuration (4 Button Remote)
Button
- Press and release the button to lock the doors.
The parking lights will flash one time.
(door lock control must be installed)
Button
- Press and release the button to unlock the doors.
The parking lights will flash two times.
(door lock control must be installed)
Timer Start Mode
Press the and buttons at the same time to activate timer
start mode. When timer start mode is activated, the parking lights
will flash four times. After a one second delay, the engine starts.
Use the button to turn the engine off without existing the
timer start mode.
With timer mode active, the engine will auto start every (3) hours
for a maximum of (6) start cycles. Turning ON the ignition key or
pressing the bake will shut off the timer start mode. When the timer
mode is shut down, the parking lights will flash (4) times.

7
Panic Mode
- Press and hold the button for 3 seconds to activate panic mode.
Once activated, the panic mode will sound the horn or siren and
flash the parking lights for 30 seconds.
- Press and release the or button to stop the panic mode
Button
Trunk Release
Press and hold the button for 3 seconds to release
the trunk/ hatch lid.
- The vehicle must have electronic trunk control
- The trunk release control option must be installed
Silent Mode
Quickly press and release the button before pressing the or
button to initiate silent mode. The system will or without a
sound indication.
Car Finder
Press the and buttons at the same time to initiate the
Car Finder function. The parking lights will flash slowly five times.
Note: This feature can be activated whether the vehicle
is locked or not.

8
Rear Defrost Activation
To activate the rear defrost control, remote start the vehicle first.
Press the , and buttons at the same time.
- When the rear defrost control is activated, the parking
lights will flash three times.
- When the rear defrost control is de-activated, the parking
lights will flash two times
- The rear defrost control can only be initiated once the
vehicle is running by remote start.
Note: Defrost control is an optional feature and must be
installed for proper operation.
Button
Press and release the button to initiate the
remote start sequence.
Once the engine is running, press and release the button
again to stop the remote start operation if needed.
Note: The default setting for the button is one press.
This control can be re-programmed by the installer to require
up to three presses to initiate the remote start function.

9
Garage Mode
Garage mode is a safety feature that disables the remote start
function if the vehicle is parked in a garage for a long period of time
or if the vehicle is being serviced. When the garage model is active,
any attempt to start the engine by remote control, timer start or
Quick Stop mode will be denied.
Garage Mode Operation
1. Turn the ignition key On then Off.
2. Press and release the RCC button one time.
- The RCC LED will turn On.
3. The parking lights will flash
- 9 Times fast to indicate Garage Mode is Active
- 9 Times slow to indicate that Garage Mode is Off
4. Repeat 1 and 2 turn Garage Mode off.

10
Remote Starting the Vehicle
Warning!
1) Never remote start your vehicle when the keys
are in the ignition.
2) Never start the vehicle unless the transmission
is in PARK or NEUTRAL.
3) Never start your vehicle while it is inside a
building that has minimal ventilation.
1. Make sure the parking brake is set ON.
2. Press and release the one time (or the amount
of times programmed by the installer).
3. The parking lights will flash once to confirm the vehicle
will attempt to start the engine.
- Gasoline vehicles will begin the starting procedure
4 seconds after the parking lights flash.
- Diesel vehicles will begin the starting procedure after the
“Wait to Start” timer has expired or a pre-set delay timer elapses.
4. Once the vehicle’s engine has started, it will run for a
pre-programmed period of time (12, 24 or 60 minutes).

11
Key Takeover:
When you are ready to drive the vehicle
1. Unlock the door using the CARBINE remote control.
2. Enter the vehicle and do not step on the foot brake.
3. Insert the ignition key and turn it to the RUN position.
4. Step on the foot brake. The remote starter will shut off and the
parking lights will turn off.
5. Disengage the parking brake and begin driving.
Note 1: If the foot brake is pressed before the ignition key is
placed in the RUN position, the remote starter will
disengage, and you will have to re-start the engine
using the normal starting procedure.
Note 2: If your vehicle uses a Smart Key or PTS (Push To Start)
starting system. Step on the brake (the engine will stop)
and press the button to re-start the engine
as normal.

12
Quick Stop Mode:
The CARBINE remote starter can also keep the engine running
during short trips away from the vehicle.
To Enable Quick Stop Mode
1. Park in a well ventilated area
2. With the engine running, set the transmission in park
and set the parking brake.
3. Press and release the (star icon) one time
(or the amount of times programmed by the installer).
4. Turn the ignition key off and remove the ignition key.
The engine will continue to run.
Note: If your vehicle uses a Smart Key or PTS (Push To Start)
starting system, press the start button once. DO NOT
press the foot brake.
5. Exit the vehicle and lock the doors using the
CARBINE remote control.
Note: This feature will not work of the foot brake
is pressed at any time.
Disabling the Remote Start System
Activate the Garage Mode (explained earlier) to stop the operation of
the remote starter. This should be done any time the vehicle is being
serviced or is being driven by someone not familiar with the remote
start operation.

13
Pairing a Replacement Remote Control
Your CARBINE system remote controls are already paired to the
control module. If you are replacing or adding remotes to your
system, they must be programmed (paired) to the control module
before they will operate the system. In order to perform remote
control pairing, you must know where your “Receiver/Control Center
(RCC) is as you will use the button and the LED indicator to perform
the pairing function.
Remote Pairing Procedure
1. Open the driver’s door.
2. Insert the ignition key into the key cylinder.
Turn ON the ignition key
3. Press and release the valet button then press and hold the valet
button for 1.5 seconds. The LED flashes and the horn chirps
(if connected). Release the valet button. The system will stay in
Pairing mode for 60 seconds.
5. Press and hold the button on the new remote control.
6. Press and release the button 5 times. The LED on the remote
will begin a steady flash. Release all buttons. The LED
will flash for 15 seconds.
7. Press and release the button on the new transmitter.
The horn/siren chirps and the LED flash pauses to indicate
that the new remote is programmed.
8. Turn the ignition key to the Off position. A long chirp from the
horn confirms that the pairing mode is off.
Note: Your CARBINE security system will accept codes from
up to (4) transmitters.

14
Safety Features
The following safety features will disable the remote start system
when they are activated or not allow the engine to start if not
properly set before attempting to remote start the vehicle.
- The foot brake is depressed
- The hood is open
- The system is in Valet Mode
- The pre-programmed run time (12, 24 or 60 minutes) has elapsed.
- The remote start activation procedure is repeated
- Engine over-rev detection is activated
(Wired Tach Detection Mode Only)

15
separate here with
dime or small flat blade
screwdriver
Replacing the Remote Controller Battery
The CARBINE remote controllers are powered by a CR2032 Lithium
battery. When the battery begins to weaken, the operating range of
the remote control is reduced and the LED indicator on the remote
will begin to dim.
To replace the battery, follow the enclosed procedure.
1. There is a slot built into the remote case. Use a dime or small
flat blade screwdriver to separate the top and bottom cases of
the transmitter.
2. Use a pencil to remove the battery from it’s holder.
3. Insert the new battery with the (+) pole of the battery facing up.
4. Re-assemble the top and bottom cases and snap them
back together.
5. Press the buttons to make sure the LED indicator flashes.

®
© Copyright 2021 Magnadyne Corporation. All Rights Reserved. No part of this publication may
be produced without the expressed written permission of Magnadyne Corporation.
Carbine is a registered trademark of Magnadyne Corporation.
For Warranty Information, please visit our website at www.carbine.com
www.carbine.com | call 310-735-2000 | UM-46CR_Rev-B
GOVERNMENT REGULATIONS
This device complies with Part 15 of FCC rules.
Operation is subject to the following two conditions:
(1) This device may not cause harmful interference,
and (2) This device must accept any interference
received, including interference that may cause
undesirable operation.
This equipment has been tested and found to com-
ply with the limits for a class B digital device, pur-
suant to Part 15 of the FCC Rules. These limits are
designed to provide reasonable protection against
harmful interference in a residential installation.
This equipment generates and can radiate radio
frequency energy and, if not installed and used in
accordance with the instruction manual, may cause
harmful interference to radio communications.
However, there is no guarantee that interference
will not occur in a particular installation. If this
equipment does cause harmful interference to radio
or television, which can be determined by turning
the equipment OFF and ON, the user is encouraged
to try to correct the interference by one or more of
the following measures:
• Reorient or relocate the receiving antenna.
• Increase the separation between the
equipment and receiver.
• Connect the equipment into an outlet on a
circuit different from that to which the receiver
is connected.
• Consult the dealer or an experienced
radio / TV technician for help.
WARNING! Changes or modifications not
expressly approved by the party responsible
for compliance could void the user’s authority
to operate this device.
Table of contents
Other Carbine Remote Starter manuals
Popular Remote Starter manuals by other brands

Cojali
Cojali JT3013 instruction manual

Sealey
Sealey POWERSTART PSTART1000HD instructions

Ultra Start
Ultra Start 90 Series owner's guide

Gallo Tech
Gallo Tech GStarter I Operation & installation manual

iDataLink
iDataLink ADS-AL-FM install guide

Black & Decker
Black & Decker Start-It 90550872 instruction manual