Casada AEROTRONIC 360 User manual

AEROTRONIC 360
460
600

2 3
since
2000
Seit der Gründung im Jahr 2000 steht der Name CASADA für hochwertige Produkte
im Bereich Wellness und Fitness.
Heute sind CASADA Produkte in weltweit 37 Ländern erhältlich. Kontinuierliche Weiter-
entwicklung, unverwechselbares Design und die strikte Ausrichtung auf eine Verbesserung
der Lebensqualität zeichnen die CASADA Produkte ebenso aus, wie die zuverlässige und
hervorragende Qualität.
www.casada.com
Inhaltsverzeichnis
Herzlichen Glückwunsch,
Sicherheitshinweise ..............................................................................................4
Inbetriebnahme....................................................................................................6
Display............................................................................................................... 7
Bedienung...........................................................................................................8
Reinigung............................................................................................................9
Filterpflege........................................................................................................ 11
Technische Daten............................................................................................... 11
Störungssuche ................................................................................................... 12
EU-Konformitätserklärung.................................................................................... 13
Gewährleistungsbestimmungen............................................................................ 13
DE
DE
INHALTSVERZEICHNIS
Vielen Dank, dass Sie sich für den Aerotronic von Casada medical entschieden haben!
Damit Sie auf lange Zeit die Vorzüge Ihres Aerotronics nutzen können, möchten wir Sie
bitten, die Sicherheitshinweise aufmerksam zu lesen und zu beachten. Zur Vermeidung
eventueller Sicherheitsrisiken stellen Sie bitte sicher, dass Kinder dieses Produkt nur unter
Aufsicht von Erwachsenen verwenden, da es Kabel und anderes elektronisches Zubehör
enthält.
Wir wünschen Ihnen viel Freude mit Ihrem persönlichen Aerotronic.

4 5
Sicherheitshinweise
Bevor Sie dieses Gerät in Betrieb nehmen, lesen Sie bitte die folgenden Hinweise
sehr sorgfältig, um die einwandfreie Funktion und optimale Wirkungsweise zu
gewährleisten. Bitte bewahren Sie diese Bedienungsanleitung auf!
Dieses Produkt ist nur für den Gebrauch in Innenräumen bestimmt.
Wichtige Vorsichtsmaßnahmen für die Verwendung Ihres Luftreinigers
Warnung: Halten Sie sich an die Anweisungen in dieser Betriebsanleitung, um das Risiko
eines Stromschlags, Kurzschlusses und/oder Brandes zu verringern.
• Nehmen Sie keine Reparaturen oder Änderungen am Gerät vor, es sei denn, dies wird
in dieser Betriebsanleitung ausdrücklich empfohlen.
• Alle anderen Reparaturen sollten von einem qualizierten Techniker durchgeführt werden.
• Verwenden Sie das Gerät nicht, wenn das Netzkabel oder der Netzstecker beschädigt
oder die Verbindung zur Wandsteckdose locker ist.
• Beschädigen Sie das Netzkabel nicht, brechen Sie es nicht, biegen Sie es nicht ge-
waltsam, ziehen Sie nicht, verdrehen Sie es nicht, binden Sie es nicht, ummanteln Sie
es nicht, drücken Sie es nicht ein und platzieren Sie auch keine schwereren Objekte auf
dem Netzkabel.
• Entfernen Sie regelmäßig Staub aus dem Netzstecker. Dies verringert die Gefahr von
Stromschlägen.
• Wenn der Netzstecker beschädigt ist, muss er durch den Hersteller oder einen quali-
zierten Techniker ersetzt werden.
• Ziehen Sie den Netzstecker aus der Steckdose, bevor Sie das Gerät reinigen. Fassen Sie
beim Herausziehen des Netzsteckers am Stecker selbst an, niemals am Kabel.
• Ziehen Sie den Netzstecker aus der Steckdose, wenn Sie das Gerät nicht verwenden.
• Fassen Sie den Netzstecker nicht mit nassen Händen an.
• Betreiben Sie das Gerät nicht, wenn in Innenräumen raucherzeugende Insektizide ver-
wendet werden.
• Reinigen Sie das Gerät nicht mit Benzol oder Farbverdünner.
• Sprühen Sie keine Insektizide auf das Gerät.
• Verwenden Sie das Gerät nicht an Orten, an denen es feucht ist oder wo das Gerät nass
werden kann, wie z. B. im Badezimmer.
• Stecken Sie keine Finger oder Fremdkörper in den Luftein- oder auslass.
• Verwenden Sie das Gerät nicht in der Nähe von brennbaren Gasen.
• Verwenden Sie das Gerät nicht in der Nähe von Zigaretten, Räucherstäbchen oder
anderen funkenerzeugenden Gegenständen.
• Das Gerät entfernt kein Kohlenmonoxid, das von Heizgeräten oder anderen Quellen
abgegeben wird.
SICHERHEITSHINWEISE
SICHERHEITSHINWEISE
WARNUNG!
Befolgen Sie diese Anweisungen, um das Risiko schwerer Verletzungen oder
tödlicher Unfälle und die Gefahr einer Beschädigung des Geräts zu verringern.
• Ziehen Sie nicht am Netzkabel, wenn der Netzstecker aus der Steckdose
gezogen wird.
• Während des Betriebs des Geräts das Netzkabel nicht binden oder knoten.
• Wird das Gerät versehentlich von Wasser umgeben, ziehen Sie den Netzstecker
und wenden Sie sich an den Kundendienst.
• Ziehen Sie den Netzstecker nicht aus der Steckdose und bewegen Sie das Gerät
nicht, wenn es in Betrieb ist. Ziehen Sie den Netzstecker aus der Steckdose,
wenn das Gerät längere Zeit nicht in Betrieb ist.
• Berühren Sie den Stecker nicht mit nassen Händen.
• Das Kabel kann durch gewaltsames Biegen, Ziehen, Verdrehen, Knicken, Binden,
Quetschen oder Auegen schwerer Gegenstände beschädigt werden.
• Blockieren Sie die Einlass- oder Auslassöffnungen nicht.
• Verwenden Sie das Gerät nicht in der Nähe von heißen Gegenständen, wie z.B. einem
Herd. Verwenden Sie das Gerät nicht dort, wo es mit Dampf in Berührung kommen kann.
• Halten Sie sich von Produkten fern, die ölige Rückstände erzeugen, wie z. B. einer
Friteuse.
• Betreiben Sie das Gerät nicht ohne Filter.
Stellen Sie sicher, dass Sie die Filter einsetzen, bevor Sie das Gerät in Betrieb nehmen. Die
Verwendung des Geräts ohne Filter kann die Lebensdauer verkürzen und einen elektri-
schen Schlag oder Verletzungen verursachen.
Achten Sie darauf, dass KEINE Fremdkörper in die Lüftungsöffnungen des Geräts gelan-
gen. (z.B.: Stifte, Stäbchen, Münzen etc.)
Berühren Sie keine Teile im Geräteinneren mit nassen Händen. Die hohe Spannung kann
einen elektrischen Schlag verursachen.
Achten Sie da auf, dass die Lüftungsöffnungen am Ein- und Ausgang des Geräts nicht
blockiert werden. Eine Blockade kann zu erhöhten Temperaturwerten im Inneren des
Geräts führen, wodurch das Produkt versagen und sich verformen kann.
Verwenden Sie das Gerät nicht als Hocker oder stellen Sie keine schweren Gegenstände
darauf ab. Dies kann zu Verletzungen oder Produktausfall und -verformung führen.

6 7
Display
DISPLAY
INBETRIEBNAHME
1. PM2.5 Display
2. Temperatur
3. Luftfeuchtigkeit
10. Fehler Alarm
11. Remote
Signalempfänger
4. Power On/Off
5. Modus
6. Timer
7. Luftgeschwindigkeit
8. Hochvolt-Plasma*
9. UV Photokatalysator
Inbetriebnahme
Stromanschluss
Verbinden Sie den Netzstecker des Netzteils fest mit der entsprechenden Buchse an der
Seite des Geräts und stecken Sie dann den Netzstecker in eine Steckdose. Es ertönt ein
Signal, das Gerät schaltet in den Standby-Modus und Anzeige des Netzschalters leuchtet
rot auf.
Einschalten
Drücken Sie die „Power-On/Off“-Taste auf dem Bedienfeld, das Gerät piept beim Ein-
schalten. Daraufhin leuchtet die Anzeige grün auf und das Gerät wechselt in den „Ar-
beitsmodus“. Zeitgleich leuchten die Tasten PM2.5-Index, Temperatur, Luftfeuchtigkeit und
Luftqualität auf.
Modus-Auswahl
Tippen Sie auf die Taste „Modus“ auf dem Bedienfeld. Wenn die „Smart“-Taste leuchtet,
bendet sich das Gerät im Smart-Modus, wenn die „Manuell“-Taste leuchtet, bendet sich
das Gerät im manuellen Modus. Bei Auswahl des Smart-Modus werden die Zeitschaltuhr
und der Luftmengenschalter auf dem Bedienfeld automatisch gesperrt. Das Gerät passt die
entsprechende Reinigungswindgeschwindigkeit automatisch an die aktuelle Luftqualität
an. Bei Auswahl des manuellen Modus kann die Geschwindigkeit durch Einstellen der
zugehörigen Funktionstasten entsprechend den gewünschten Anforderungen konguriert
werden.
Photokatalysatorfunktion
Wählen Sie den Smart- oder manuellen Modus und tippen Sie auf die Photokatalysator-
Taste am Bedienfeld, um sie ein- oder auszuschalten.
Hochvolt-Plasma (nur in den Modellen 460 und 600)
Tippen Sie im Smart-Modus oder im manuellen Modus auf die Taste „Plasma“ am Bedien-
feld, um diesen ein- oder auszuschalten.
Einstellung der Luftgeschwindigkeit
Im manuellen Modus wird durch Drücken der Taste „Luftgeschwindigkeit“ die Geschwin-
digkeit von „sleep“ auf „niedrig“, „mittel“ und „hoch“ geändert. Sobald der Wert „hoch“
erreicht ist, wird durch erneutes Drücken der Taste der „ Sleep“-Zustand wiederhergestellt.
Timer
Bei Bedarf der Timer-Funktion wechseln Sie in den manuellen Modus und tippen Sie auf
die Taste „Timer“, um wahlweise „2H“, „4H“, „6H“ oder „8H“ einzustellen.
Abschalten
Drücken Sie die „Power-On/Off“-Taste auf dem Bedienfeld, um das Gerät auszuschalten.
Die Anzeige leuchtet rot auf und wechselt in den Standby-Modus.
Stromversorgung unterbrechen
Wenn das Gerät vorübergehend oder für längere Zeit nicht benutzt wird, ziehen Sie das
Netzteil aus der Steckdose. *Nur bei den Modellen 460 und 600 vorhanden.
1
3
8
9
10
2
4
5
6
7 11
*

8 9
BEDIENUNG
Bedienung
TASTE BESCHREIBUNG
Power On/Off
• Betätigen Sie die „Power On/Off“-Taste auf dem Bedienfeld, das Gerät
gibt einen Signalton. Die Anzeige „Power“ leuchtet grün auf und das
Gerät wechselt in den Betriebsmodus. Gleichzeitig leuchten der PM2.5-
Index, die Temperatur, die Luftfeuchtigkeit und die Luftqualität auf und
werden auf dem Hauptbedienfeld angezeigt.
• Betätigen Sie erneut die „Power On/Off“-Taste des Bedienfeldes, um
das Gerät auszuschalten. Die Anzeige „Power“ leuchtet rot auf und das
Gerät wechselt in den Standby-Modus.
Modus Auswahl
• Durch Betätigen der „Modus“-Taste wechselt das Gerät zwischen dem
Smart-Modus („Smart“-Taste leuchtet) und dem manuellen Modus („Ma-
nuell“- Taste leuchtet).
• Wenn der „Smart“-Modus ausgewählt ist, werden die Funktionen Timer
und Luftgeschwindigkeit auf dem Bedienfeld automatisch gesperrt. Das
Gerät passt die entsprechende Reinigungsgeschwindigkeit automatisch
an die aktuelle Luftqualität an.
• Bei Auswahl des manuellen Modus kann die Luftgeschwindigkeit durch
Einstellen der entsprechenden Funktionstasten nach Ihren Wünschen kon-
guriert werden.
Timer
• Falls Sie eine Timer-Funktion benötigen, wechseln Sie in den manuellen
Modus und betätigen Sie die Taste „Timer“, um je nach Bedarf „2H“,
„4H“,„6H“ oder „8H“ zu wählen.
Luftgeschwindigkeit
• Im manuellen Modus wird durch Betätigen der Taste „Luftgeschwindig-
keit“ die Geschwindigkeit von „sleep“ auf „niedrig“, „mittel“ und „hoch“
geändert. Wenn die Geschwindigkeitsstufe „hoch“ erreicht ist, wird sie
durch erneutes Betätigen der Taste wieder in den „Schlafmodus“ zurück-
gesetzt.
Hochvolt-Plasma (nur bei den Modellen 460 und 600 vorhanden)
• Betätigen Sie im „Smart-“ oder „Manuell-“ Modus die Taste „Hochvolt-
Plasma“ auf dem Bedienfeld, um diesen ein- oder auszuschalten.
UV Photokatalysator Funktion
• Wählen Sie den „Smart-“ oder „Manuell-“ Modus und betätigen Sie die
„Photokatalysator“-Taste auf dem Bedienfeld, um diesen ein- oder aus-
zuschalten.
REINIGUNG
Reinigung
Wir empfehlen die Filter alle 3 Monate zu reinigen.
Schritt 1: Öffnen Sie die beiden Türverriegelungen des Luftreinigers, indem Sie die Ver-
riegelungen nach unten drücken. Ziehen Sie danach die Tür des Luftreinigers
langsam heraus.
Schritt 2: Entfernen Sie die vier Schrauben, die sich an der Rückwand benden, und
entnehmen Sie die Rückwand.
Schritt 3: Entnehmen Sie langsam das Elektrostatikmodul, in dem der Zweizonen-Ionen-
feld- und der Negativ-Ionen-Generator untergebracht sind.
Schritt 4: Nehmen Sie langsam den Primär-Filter heraus.
Schritt 5: Sprühen Sie sowohl das Modul als auch den Filter mit Reinigungsmittel ein.
Hinweis: Bitte verwenden Sie ausschließlich ein neutrales Reinigungsmittel, besprühen Sie
alles gleichmäßig und vollständig und lassen Sie es dann 15 Minuten lang einwirken.
Schritt 1 Schritt 2 Schritt 3
Schritt 4 Schritt 5

10 11
Schritt 6: Reinigen Sie sowohl das Modul als auch den Filter vorsichtig mit einer wei-
chen Reinigungsbürste.
Schritt 7: Spülen Sie das Modul und den Filter gründlich mit destilliertem oder gel-
tertem Wasser.
Schritt 8: Das Modul und den Filter gründlich mit einem Föhn oder unter natürlichem
Sonnenlicht trocknen. Anschließend lassen Sie beide Teile 12-15 Stunden
nachtrocknen.
Schritt 9: Den Aktivkohlelter, den Ozonabbau-Netzwerklter und den UV photokataly-
tischen Filter nicht mit Wasser reinigen. Diese Filter mit einer weichen Reini-
gungsbürste und einem Föhn vorsichtig trocken reinigen.
Schritt 10: Setzen Sie alle Filter und das Modul nacheinander langsam wieder an ihren
entsprechenden Platz zurück.
REINIGUNG
Reinigung
Schritt 6 Schritt 7
Schritt 8 Schritt 9 Schritt 10
FILTERPFLEGE | TECHNISCHE DATEN
Technische Daten
Modell: AEROTRONIC 360 AEROTRONIC 460 AEROTRONIC 600
Gerät: CRF-040 CRF-041 CRF-042
Netzspannung: 100 ~ 240V 100 ~ 240V 100 ~ 240V
Nennfrequenz: 50/60 Hz 50/60 Hz 50/60 Hz
CADR: 360m 3/h 460m 3/h 600m 3/h
Ozon: 10ppb 10ppb 10ppb
Geräuschpegel (max.): 25db 25db 25db
Nennleistung: 20W 35W 35W
Gewicht netto: 14,5 kg 21,5 kg 31 kg
Maße: 36,5 * 24 *60,5 cm 36,5 * 24 *78,5 cm 43,5 * 26 *92 cm
Raumgröße (max.): 40 m260 m2100 m2
Filterstufen: 677
Zertikate:
Filterpege
Filter Reinigungszyklus Ersatzzyklus
Elektrostatisches Modul Reinigung alle
3 Monate
5–8 Jahre
Primärer Filter 2–3 Jahre
Aktivkohlelter Trockenreinigung alle
3 Monate. Darf NICHT
nass gereinigt werden. 2–3 JahreOzonabbau-Filter
Photokatalytischer UV-Filter
• Die Abstände zum Austausch des Filters können je nach den Umgebungsbedingungen
variieren.
• Für eine optimale Leistung sollten für dieses Gerät nur Aerotronic-Filter verwendet
werden.
• Die Lebensdauer der Filter variiert je nach Schadstoffgehalt der Luft. Je staubreicher
die Umgebung ist, desto größer ist die Verschmutzung der Filter.

12 13
Das Gerät lässt sich nicht einschalten.
Ist der Netzstecker richtig eingesteckt? – Vergewissern Sie sich, dass die Steckdose
mit Strom versorgt wird, und stellen Sie sicher, dass der Stecker richtig sitzt.
Gibt es einen Stromausfall? – Prüfen Sie, ob andere Geräte und Lichtquellen funktio-
nieren und versuchen Sie es erneut.
Ist die Rückwand ordnungsgemäß am Gerät befestigt? – Vergewissern Sie sich, dass
der Sicherheits-Kontrollstift richtig justiert ist. Er sollte beim Drücken der Rückwand auf
den inneren Netzschalter drücken.
Das Gerät vibriert und macht eine Menge Lärm.
Steht das Gerät schräg oder uneben? – Stellen Sie das Gerät auf eine feste, ache,
ebene Bodenäche.
Häug gestellte Fragen
Der Aerotronic verwendet Hochspannung. Ist sie sicher für den Hausgebrauch? Aero-
tronic basiert auf einem fortschrittlichen elektronischen Konzept, bei dem die Sicherheit
im Mittelpunkt steht. Die Energiezufuhr von Aerotronic entspricht der einer kleinen
Glühbirne. Das Innere hat eine hohe Spannung, aber einen sehr niedrigen Stromwert
in der Größenordnung von Mikroampere. Die Hochspannung wird mit Gleichstrom
betrieben, um mögliche elektronische Störungen zu vermeiden.
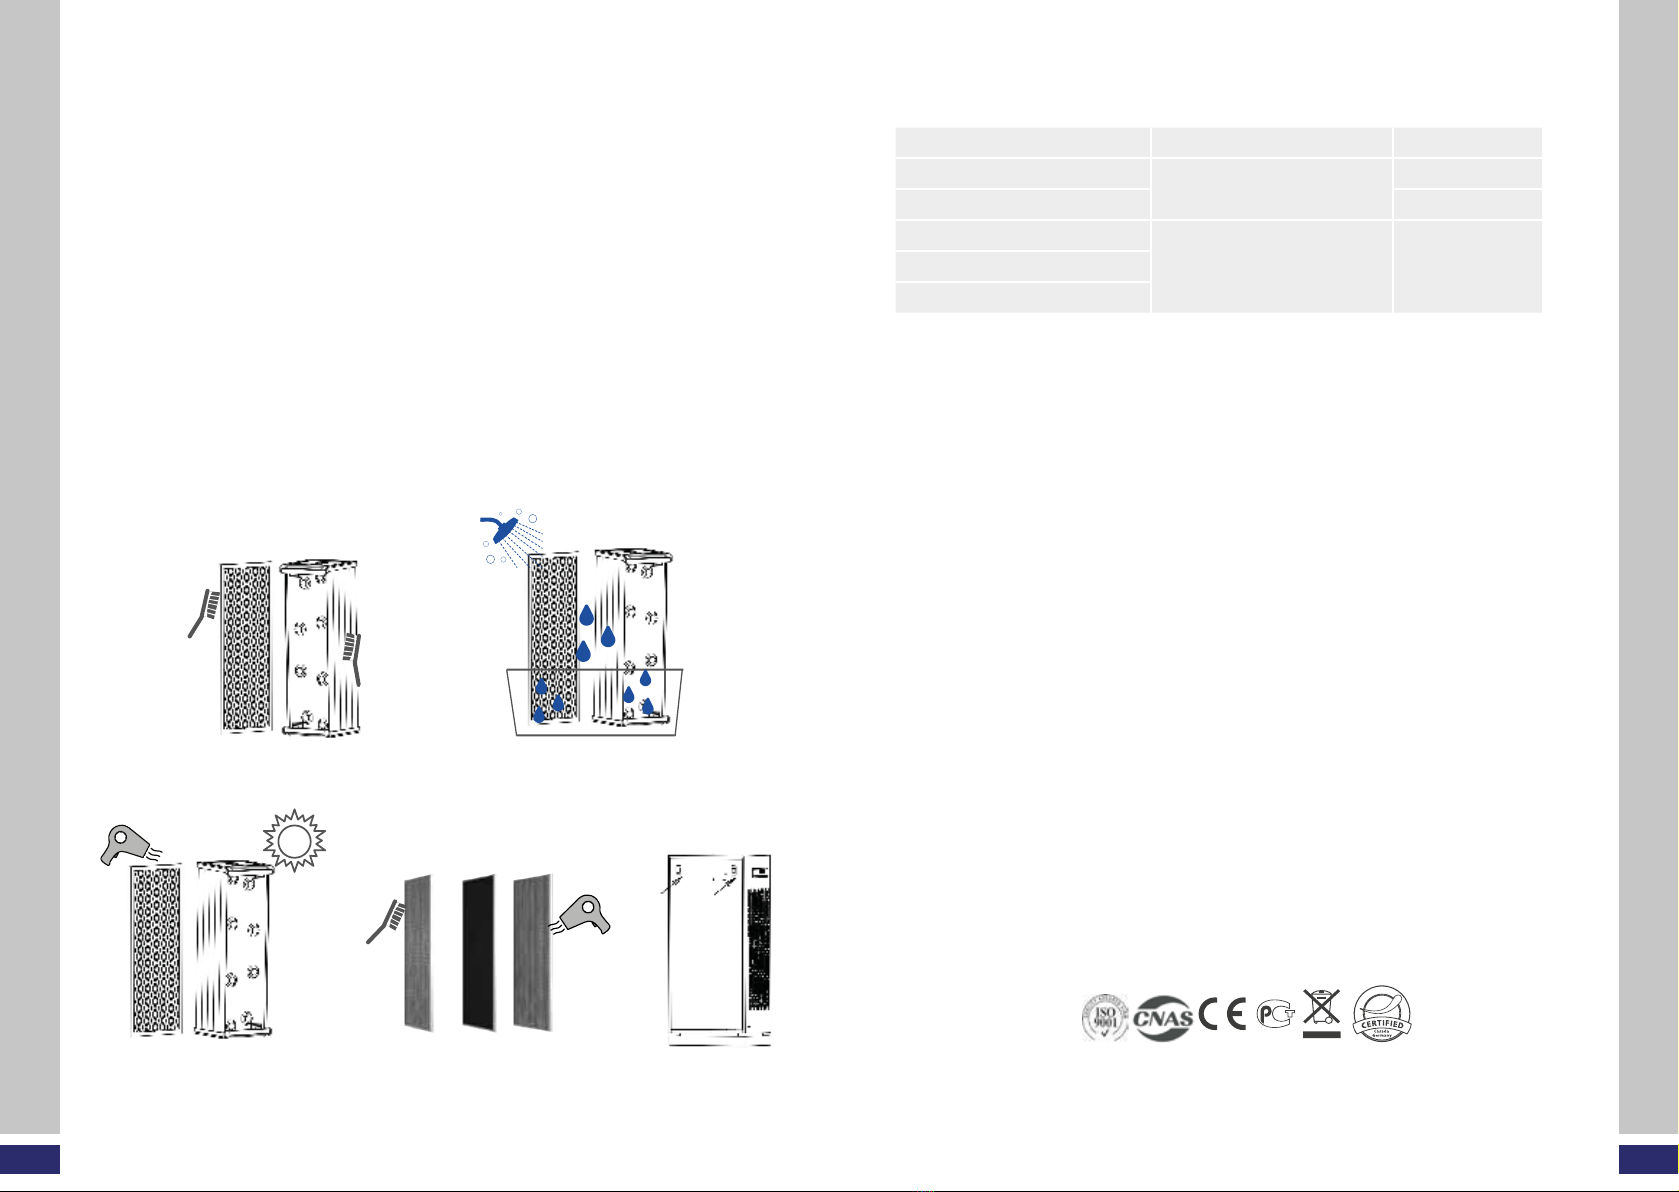
Woher weiß ich, dass er die Luft reinigt? Sie werden feststellen, dass die AQI-Zahl
(Luftqualitätsindex) abnimmt, wenn der Luftreiniger eingeschaltet ist. Nachdem Sie den
Aerotronic einige Wochen lang verwendet haben, können Sie außerdem viele der
Schadstoffe sehen, die auf den Sammelplatten absorbiert werden, sobald Sie die
Filterplatten zur Reinigung aus dem Aerotronic herausnehmen.
Im Gerät war ein „Knacken“ oder „Zappen“ zu hören. Ist das normal? Das gelegent-
liche „Zappen“ oder „Knacken“ ist normal, wenn größere Partikel in den Luftreiniger
gelangen und durch die elektrische Spannung vernichtet werden, ähnlich wie wenn
ein Insekten-Zapper ein Insekt einfängt. Wenn das „Knacken“ oder „Zappen“ jedoch
konstant ist, sollten Sie das Gerät reinigen und sicherstellen, dass alle Teile im Gerät
vollständig getrocknet sind, nachdem Sie das Gerät gereinigt haben. 80% der Ge-
räuschprobleme werden durch Staubansammlungen auf den Filterplatten und/oder
der Innenkammer oder durch nasse Filterplatten verursacht. In der Regel wird Sie ein
vollständiger Reinigungszyklus vollständig von diesen Problemen befreien.
Wie nutzt man die Funktion des Hochvolt-Plasmas und der UV photokatalytischen
Funktion? Das Hochspannungsplasma und die UV photokatalysefunktion sollten idea-
lerweise täglich oder jeden zweiten Tag 30 Minuten lang eingeschaltet werden, um
Bakterien und Krankheitserreger wirksam zu vernichten.
Störungssuche
STÖRUNGSSUCHE
since
2000
Entspricht den europäischen Richtlinien EMC 2014/30/EU, LVD 2014/35/EU und RoHS.
Gewährleistungsbestimmungen
Der Händler gewährt auf das umseitig beschriebene Produkt eine gesetzlich vorgeschriebene Gewähr-
leistungszeit. Die Gewährleistung gilt ab dem Kaufdatum. Das Kaufdatum ist mit dem Kaufbeleg nachzu-
weisen.
Der Händler wird die innerhalb Deutschlands erfassten Produkte, bei denen Fehler festgestellt wurden,
kostenlos reparieren bzw. ersetzen. Voraussetzung dafür ist die Einsendung des fehlerhaften Geräts mit
Kaufbeleg vor Ablauf der Gewährleistungs- oder Garantiezeit. Der Gewährleistungsanspruch entfällt, so-
fern nach Feststellung eines Fehlers, dieser z.B. durch äußere Einwirkung oder als Folge von Reparatur
oder Änderung, die nicht vom Hersteller oder einem autorisierten Vertragshändler vorgenommen wurde,
aufgetreten ist.
Folgende Punkte sind nicht Teil der Gewährleistung:
• Abnutzung durch unsachgemäßen Gebrauch
•Gewerbliche Nutzung z.B. Messenutzung, mehrmalige Nutzung ohne zwischenzeitliche Ruhepausen
•Aussetzen des Gerätes in Hitze, Feuchtigkeit oder Flüssigkeiten
•Schäden durch spitze und/oder scharfkantige Gegenstände
•Mutwillige Zerstörung, Zweckentfremdung, Überlastung oder Unfallschäden
•Schäden und Verschmutzung durch Haustiere
•Verschmutzung durch z.B. Körper- oder Haarpflegemittel
•Schäden durch Nutzung mit säure-, lösungs- und/oder alkoholhaltiger Mittel
Die vom Verkäufer gewährte Gewährleistung beschränkt sich auf Reparatur bzw. Austausch des Produktes.
Im Rahmen dieser Gewährleistung übernimmt der Hersteller bzw. Verkäufer keine weitergehende Haftung
und ist nicht verantwortlich für Schäden, welche durch die Missachtung der Bedienungsanleitung und/oder
missbräuchliche Anwendung des Produktes entstehen. Stellt sich bei Überprüfung des Produktes durch
den Verkäufer heraus, dass das Gewährleistungsverlangen einen nicht von der Gewährleistung erfassten
Fehler betrifft oder dass die Gewährleistungsfrist abgelaufen ist, sind die Kosten der Überprüfung und
Reparatur vom Kunden zu tragen. Casada garantiert als Hersteller die Auslieferung einwandfreier Ware
an den Käufer/Partner. Nachgewiesene Produktionsfehler sind nach Anmeldung und Bestätigung zum
Austausch berechtigt.
Rechtlicher Hinweis: Sämtliche Inhalte sind keine Heilaussagen. Die Diagnose und Therapie von Erkrankun-
gen und anderen körperlichen Störungen erfordert die Behandlung durch Ärzte/Ärztinnen, Heilpraktiker
oder Therapeuten. Die Angaben sind ausschließlich informativ und sollen nicht als Ersatz für eine ärztliche
Behandlung genutzt werden. Jeder Benutzer ist angehalten, durch sorgfältige Prüfung und gegebenenfalls
nach Konsultation eines Spezialisten festzustellen, ob die Anwendungen im konkreten Fall förderlich sind.
Jede Anwendung oder Therapie erfolgt auf eigene Gefahr des Benutzers. Wir distanzieren uns von jegli-
chen Heilaussagen oder Versprechen.
Casada International GmbH
Obermeiers Feld 3
33104 Paderborn, Germany
info@casada.com | www.casada.com
Bilder und Texte unterstehen dem Copyright von Casada International GmbH und dürfen ohne ausdrück-
liche Bestätigung nicht weiterverwendet werden.
Copyright © 2021 CASADA International GmbH. Alle Rechte vorbehalten.
EU-Konformitätserklärung
EU-KONFORMITÄTSERKLÄRUNG | GEWÄHRLEISTUNGSBESTIMMUNGEN

14 15
Congratulations
Thank you for choosing the Aerotronic from Casada medical!
To ensure that you can enjoy the benets of your Aerotronic for a long time to come, we
would ask you to read the safety instructions carefully and follow them. To avoid possible
safety risks, please ensure that children only use this product under adult supervision, as
it contains cables and other electronic accessories.
We wish you much pleasure with your personal Aerotronic.
since
2000
www.casada.com
Table of Contents
Safety instructions .............................................................................................. 16
Operation ......................................................................................................... 18
Display............................................................................................................. 19
Usage............................................................................................................... 20
Cleaning........................................................................................................... 21
Filter Care......................................................................................................... 23
Specifications.................................................................................................... 23
Troubleshooting ................................................................................................. 24
EU Declaration of Conformity .............................................................................. 25
Warranty conditions...........................................................................................25
DE
GB
TABLE OF CONTENTS
Since its foundation in 2000, the name CASADA has stood for high-quality products in
the field of wellness and fitness.
Today CASADA products are available in 37 countries worldwide. Continuous develop-
ment, unmistakable design and a strict focus on improving the quality of life distinguish the
CASADA products as well as the reliable and outstanding quality.

16 17
Safety instructions
Please read the following instructions very carefully before using this device in
order to ensure proper function and optimum performance. Keep these manual
in a safe place!
This product is for indoor use only.
Important precautions for using your air Purier warning
Warning: Follow the instructions in this manual to reduce the risk of electric shock, short
circuit, and/or re.
• Do not repair or modify the unit unless specically recommended in this manual.
• All other repairs should be completed by a qualied technician.
• Do not use if the power cord or plug is damaged or the connection to the wall outlet is
loose.
• Do not damage, break, forcefully bend, pull, twist, bundle, coat, pinch, or place heavy
objects on the power cord.
• Periodically remove dust from the power plug. This will reduce the risk of shock due to
humidity build up.
• If the power plug is damaged, it must be replaced by the manufacturer or a qualied
technician.
• Remove the power plug from the outlet before cleaning the unit. When removing the
power plug, grasp by holding the plug itself, never hold by the cord.
• Remove the power plug from the outlet when not in use.
• Do not handle the power plug with wet hands.
• Do not operate the unit when using indoor smoke-generating insecticides.
• Do not clean unit with benzene or paint thinner. Do not spray insecticides on the unit.
• Do not use the unit where it is humid or where the unit may become wet, such as the-
bathroom.
• Do not insert ngers or foreign objects into air intake or outlet.
• Do not use the unit near ammable gases. Do not use near cigarettes, incense, or other
spark-creating items.
• Unit will not remove carbon monoxide emitted from heating appliances or other sources.
• Do not block the intake or outlet vents.
• Do not use near hot objects, such as a stove. Do not use where the unit may come into
contact with steam.
• Keep away from products that generate oily residue, such as a deep fryer.
• Do not operate without a lter.
SAFETY INSTRUCTIONS
SAFETY INSTRUCTIONS
Ensure filters are inserted before running device. Running this device without filters can
shorten it‘s life and cause electric shock or injury.
Be sure foreign objects are NOT inserted into the vents on the device. Objects can
include pins, rods, and coins.
Do not touch any part of the interior of the device with wet hands. The high voltage
may cause electric shock.
Make sure that the ventilation openings at the inlet and outlet of the machine are
not blocked. Blockage may lead to increased internal temperatures causing product
failure and deformation.
Do not use the device as a step stool or place heavy objects on it. Personal injury may
occur or product failure and deformation.
WARNING!
Follow these instructions to reduce the risk of serious injury or death and to
reduce risk of damaging the device.
• Do not pull on the power cord when unplugging the device.
• Do not tie or knot power cord when device is in operation.
• If the device becomes submerged in water, unplug it and contact customer service.
• Do not unplug or move the device while in operation.
• Unplug the device when not in operation for extended periods of time.
• Do not touch the plug with wet hands.
• Cord can become damaged by forcefully bending, pulling, twisting, bundling,
pinching or placing heavy objects on it.

18 19
Display
DISPLAY
OPERATION
1. PM2.5 Display
2. Temperature
3. Humidity
10. Fault Alarm
11. Remote Signal
Receiver
4. Power On/Off
5. Modus
6. Timer
7. Wind Speed
8. High Voltage Plasma*
9. UV Photocatalyst
Operation
Power Connection
Insert the DC plug of the power adapter rmly into the corresponding DC-jack on the
side of the machine, then insert the AC plug into a power outlet. At this time, the machine
makes a beep sound and goes into standby mode, and the power switch key indicator
lights up in red.
Power On
Tap the “Power On/Off” key on the main control panel, and the machine makes a beep
sound. This will make the key indicator light up in green and then the machine enters into
“working” mode. At the same time, PM2.5 index, temperature, humidity and air quality
are lit and displayed on the main control panel.
Mode-Selection
Tap on the “Mode” key on the main control panel. If the “Smart” lights up, the machine
is under “Smart” mode, and if the “Manual” lights up, the machine is under “Manual”
Mode. When “Smart” mode is selected, the “Timer” switch and the “Air Volume” switch on
the operation panel will automatically be locked. The machine will automatically adjust the
corresponding purication wind speed according to the current air quality. When select-
ing the “Manual” mode, wind speed can be congured by adjusting the corresponding
function keys according to your desired requirements.
Photocatalyst Function
Selecting the Smart or “Manual” mode, tap on the photocatalyst key on the main control
panel to turn it on or off.
High Voltage Plasma (only models 460 und 600)
Under Smart or “Manual” mode, tap on the “High Voltage Plasma“ key on the main con-
trol panel to turn it on or off.
Wind Speed Adjustment
Under the “Manual” mode, pressing the “Wind speed” key will change the wind speed
from “Sleep” to “Low,” “Medium,” and “High.” When it reaches “High,” tapping the key
again returns it to “Sleep” level.
Timer
If timer function is required, switch to “Manual” mode and tap on the “Timer” key to
choose “2H,” ”4H,” ”6H” or “8H” as needed.
Turn off
Touch the “Power On/Off” key of the operation panel to turn the machine off. The power
indicator lights up in red and will enter into standby mode.
Disconnect Power Supply
If the machine will not be used temporarily or for a long time, unplug the adapter plug
from the power outlet.
*only models 460 und 600
Temperature Humidity
High Voltage
Plasma
Wind speed
Fault Alarm
Remote
Signal Receiver
UV
Photocatalyst
1
3
8
9
10
2
4
5
6
7 11
*

20 21
USAGE
Usage
Button Description
Power On/Off button
• Tap the “Power On/Off“ button on the main control panel, and the ma-
chine makes a beep sound. This will make the key indicator light up in
green and then the machine enters into “working” mode. At the same
time, PM2.5 index, temperature, humidity and air quality are lit and
displayed on the main control panel.
• Touch the “Power On/Off“ button of the operation panel to turn the ma-
chine off. The power indicator lights up in red and will enter into standby
mode.
Mode selection
• Tap on the “Mode” key on the main control panel. If the “Smart” lights
up, the machine is under Smart Mode, and if the “Manual” lights up, the
machine is under Manual Mode.
• When Smart Mode is selected, the Timer Switch and the Air Volume
Switch on the operation panel will automatically be locked. The machine
will automatically adjust the corresponding purication wind speed ac-
cording to the current air quality.
• When selecting the Manual Mode, wind speed can be congured by
adjusting the corresponding function keys according to your desired re-
quirements.
Timer
• If timer function is required, switch to manual mode and tap on the “tim-
er” key to choose “2H,” ”4H,” ”6H” or “8H” as needed.
Wind Speed Adjustment
• Under the Manual Mode, pressing the “wind speed” key will change
the wind speed from “sleep” to “low,” “medium,” and “high.” When it
reaches “high,” tapping the key again returns it to “sleep” level.
Hochvolt-Plasma (only models 460 und 600)
• Under Smart or Manual Mode, tap on the “high voltage plasma“ key on
the main control panel to turn it on or off.
UV Photokatalysator function
• Selecting the Smart or Manual Mode, tap on the photocatalyst key on the
main control panel to turn it on or off.
CLEANING
Cleaning
We recommend to clean the lters every 3 months.
Step 1: Open the two door locks of the Aerotronic Purier by pressing down the locks.
Afterwards, slowly pull out the purier door.
Step 2: Remove the four screws located at the backplate and then take the backplate
down.
Step 3: Slowly remove the electrostatic module that houses the two-zone ion eld and
negative ion generator.
Step 4: Slowly take out the primary lter.
Step 5: Spray both the module and the lter with cleaning detergent.
NOTE: Use ONLY a neutral detergent for cleaning. Spray evenly and fully, then leave 15
minutes.
Step 1 Step 2 Step 3
Step 4 Step 5

22 23
Step 6: Slowly clean both, the module and lter with a soft cleaning brush.
Step 7: Rinse the module and lter thoroughly with distilled or ltrated water.
Step 8: Dry the module and the lter thoroughly with a dryer or under natural sunlight.
Afterwards leave both parts to dry for 12-15 hours.
Step 9: Do not use water to clean the activated carbon lter, the ozone depletion network
lter and the UV photocatalytic lter. Carefully dry-clean these lters with a soft
cleaning brush and a blow-dryer.
Step 10: Replace all lters and the module gradually one after the other.
CLEANING
Cleaning
Step 6 Step 7
Step 8 Step 9 Step 10
FILTER CARE | SPECIFICATIONS
Specications
Model: AEROTRONIC 360 AEROTRONIC 460 AEROTRONIC 600
Item: CRF-040 CRF-041 CRF-042
Rated voltage: 100 ~ 240V 100 ~ 240V 100 ~ 240V
Rated frequency: 50/60 Hz 50/60 Hz 50/60 Hz
CADR: 360m 3/h 460m 3/h 600m 3/h
Ozon: 10ppb 10ppb 10ppb
Noise (max.): 25db 25db 25db
Rated power: 20W 35W 35W
Weight netto: 14,5 kg 21,5 kg 31 kg
Dimension: 36,5 * 24 *60,5 cm 36,5 * 24 *78,5 cm 43,5 * 26 *92 cm
Coverage (max.): 40 m260 m2100 m2
Filter levels: 677
Certicates:
Filter Care
Filter Cleaning cycle Replacement cycle
Electrostatic Module Cleaning every
3 months
5–8 Years
Primary Filter 2–3 Years
Activated Carbon Filter Dry cleaning every 3
months. NEVER clean wet. 2–3 YearsOzone Decomposition Filter
UV Photocatalytic Filter
• Intervals between filter replacement may vary depending on environment.
• For optimal performance, only Aerotronic filters should be used with this unit.
• The filters’ life varies depending on the level of pollutants in the air. The more dust
present in the environment, the more dust accumulates in the filters, shortening the life.

24 25
The device does not turn on.
Is the plug securely attached to the outlet? – Make sure the outlet has power going to
it, and ensure the plug is secured.
Is there a power outage? – Check to see if other lights and electrical equipment are
working and try again.
Is the back cover properly attached to the unit? – Make sure the safety control pin
is properly aligned. It should hit the inside power button when pressed by the back
cover.
The device vibrates and makes a lot of noise.
Is it running on a slanted or uneven surface? – Move the unit to a hard, at, even area
of the oor.
Frequently asked questions
Aerotronic uses high voltage. Is it safe for home use? Aerotronic uses an advanced
electronic design built around safety. The power consumption of Aerotronic is equivalent
to a small light bulb. It has high voltage inside but very low current in the order of
micro-amps. The high voltage runs on direct current to avoid any possible electronic
perturbation.
How could I know it is cleaning the air? You will notice the AQI (Air Quality Index)
number decreasing when the air purier is on. Also, after using Aerotronic for a few
weeks, you can actually see many of the pollutants absorbed on the collecting plates
when you take the plates out of Aerotronic to clean.
I heard a „cracking“ or „zapping“ noise inside the device. Is that normal? The occa-
sional “zapping” or “cracking” is normal when the bigger particles enter the air pu-
rier, being zapped by the high voltage, similar to when a bug zapper traps a bug.
However, if the “cracking” or “zapping” noise is constant, you should clean the unit
and make sure that all parts in the unit are fully dried after you clean the unit. 80%
of the noise issues are caused by dust accumulation on the collecting plates and/or
inner chamber, or by wet collecting plates. Normally a full clean cycle will take care
of this all.
How to use the High Voltage Plasma and UV photocatalytic function? The High Volt-
age Plasma and UV photocatalytic function should ideally be used and turned on 30
minutes each day or every other day to effectively destroy bacteria and pathogens.
Troubleshooting
TROUBLESHOOTING
since
2000
Complies with European Regulatory Standards 2014/30/EU and 2011/65/EU.
Warranty conditions
EU-Declaration of conformity
EU-DECLARATION OF CONFORMITY | WARRANTY CONDITIONS
The retailer guarantees a statutory period of warranty for the product described on the reverse.
Warranty is valid from the date of purchase. The purchase date must be documented with proof of pur-
chase. The retailer will repair or replace free-of-charge all items covered in Germany for which faults
have been discovered. A prerequisite is that you send the faulty device with proof of purchase before the
guarantee or warranty period expires. The warranty claim shall not be applicable if a fault is established
which has arisen e.g. due to external influences or as a consequence of a repair or modification which
was not carried out by the manufacturer or an authorised dealer.
The following points are not part of the warranty:
• Wear caused by improper use
• Commercial use e.g. exhibition use, repeated use without intermediate breaks of 40 minutes
• Exposing the device to heat, humidity of liquids
• Damage due to sharp and/or sharp-edged objects
• Wanton destruction, misappropriation, overloading or accidental damage
• Damage and soiling by domestic animals
• Contamination caused by body or hair care products
• Damage caused by use of acids, solvent or alcohol agents
The warranty granted by the retailer is limited to repair and exchange of the product. Under this warranty,
the manufacturer or the retailer shall have no further liability and are not responsible for damages that
have arisen due to disregard of the operating instructions and /or improper use of the product.Where upon
examination of the product by the manufacturer it is found that the warranty request does not concern a
defect covered by the warranty or that the warranty period has expired, the customer must bear the costs
for the inspection and repair.
As manufacturer, Casada ensures the delivery of faultless goods to buyers/partners. Proven production
faults are entitled to an exchange after registration and confirmation.Legal note: All contents do not con-
tain healing statements. The diagnosis and treatment of illnesses and other physical disorders require a
treatment by a physician, non-medical practitioner or therapist. The statements are strictly informative and
may not be used as a substitute for a professional medical treatment. Every user is beholden to ascertain
by accurate examination and, if required, after consultation of a specialist, if the application is the right
one for their specific cases. Each dose or application takes place at the risk of the user. We dissociate
ourselves from any healing statements or promises.
Casada International GmbH
Obermeiers Feld 3
33104 Paderborn, Germany
info@casada.com | www.casada.com
Images and texts are subject to the copyright of Casada International GmbH and may not be used for other
purposes without express confirmation.
Copyright © 2021 Casada International GmbH. All rights reserved.

26 27
since
2000
www.casada.com
Od momentu powstania w 2000 roku, marka CASADA jest synonimem wysokiej jakości pro-
duktów w dziedzinie wellness i tness.
Obecnie produkty CASADA są dostępne w 37 krajach na całym świecie. Ciągły rozwój, niepo-
wtarzalny design, skupienie się na poprawie jakości życia, niezawodna i wyjątkowa jakość, to
cechy które wyróżniają produkty CASADA.
Gratulacje
Dziękujemy za wybranie Aerotronic marki Casada Medical!
Aby móc cieszyć się zaletami Aerotronica przez długi czas, należy uważnie przeczytać in-
strukcję obsługi oraz przestrzegać jej. Aby uniknąć możliwych zagrożeń bezpieczeństwa,
upewnij się, że dzieci używają tego produktu tylko pod nadzorem osoby dorosłej. Produkt
zawiera okablowanie oraz inne akcesoria elektroniczne.
Życzymy dużo przyjemności z korzystania z Twojego osobistego oczyszczacza powietrza
Aerotronic.
Spis treści
DE
PL
SPIS TREŚCI
Instrukcja bezpieczeństwa..............................................................................................................................28
Obsługa. ................................................................................................................................................................30
Wyświetlacz.........................................................................................................................................................31
Użytkowanie....................................................................................................................................................... 32
Czyszczenie............................................................................................................................................ ............. 33
Pielęgnacja filtra .......... .....................................................................................................................................35
Specyfikacje .......................................................................................................................................................35
Rozwiązywanie problemów..... ........................................................................................................... ......... 36
Deklaracja zgodności UE .......... ............................................................................................................ .........37
Warunki gwarancji..............................................................................................................................................37

28 29
Instrukcja bezpieczeństwa
Przeczytaj uważnie poniższą instrukcje przed użyciem tego urządzenia
w celu zapewnienia prawidłowego funkcjonowania i optymalnej wydajności.
Zachowaj tą instrukcję w bezpiecznym miejscu!
Ten produkt jest przeznaczony wyłącznie do użytku w pomieszczeniach. Ważne środki
ostrożności dotyczące korzystania z oczyszczacza powietrza
Ostrzeżenie: Postępuj zgodnie z zaleceniami zawartymi w niniejszej instrukcji, aby zmniej-
szyć ryzyko wystąpienia porażenia prądem, zwarcia i / lub pożaru.
• Nie należy naprawiać ani modyfikować urządzenia, chyba że jest to wyraźnie zalecane w
niniejszej instrukcji.
• Wszystkie naprawy powinny być wykonywane przez autoryzowany punkt serwisowy.
• Nie należy używać urządzenia, jeśli przewód zasilający lub wtyczka są uszkodzone lub jego
połączenie z gniazdkiem ściennym jest luźne.
• Nie należy niszczyć, łamać, zginać na siłę, ciągnąć, skręcać, wiązać ani nie umieszczać cięż-
kich przedmiotów na przewodzie zasilającym.
• Okresowo usuwaj kurz z wtyczki zasilania. Zmniejszy to ryzyko porażenia prądem przy
gromadzeniu się wilgoci.
• Jeśli wtyczka zasilania jest uszkodzona, musi zostać wymieniona przez producenta lub spe-
cjalistę.
• Przed czyszczeniem urządzenia wyciągnij wtyczkę z gniazdka. Podczas wyciągania wtyczki
z zasilania, należy chwycić za samą wtyczkę, nigdy nie wolno ciągnąć za kabel.
• Wyjmij wtyczkę z gniazdka, gdy urządzenie nie jest używane..
• Nie dotykaj wtyczki mokrymi rękami.
• Nie używaj urządzenia w przypadku stosowania wewnątrz pomieszczeń środków owado-
bójczych wytwarzających dym.
• Nie należy czyścić urządzenia benzenem ani rozpuszczalnikiem do farb. Nie rozpylaj środ-
ków owadobójczych na urządzenie.
• Nie używaj urządzenia w miejscach, w których jest wilgotno lub w miejscach, w których
może zostać zmoczone, na przykład w łazience.
• Nie wolno wkładać palców ani ciał obcych do wlotu lub wylotu powietrza.
• Nie używaj urządzenia w pobliżu łatwopalnych gazów. Nie używaj oczyszczacza w po-
mieszczeniach, gdzie jest emitowany dym papierosowy, dym z kadzideł ani innych przed-
miotów tworzących iskry.
• Urządzenie nie eliminuje tlenku węgla emitowanego z urządzeń grzewczych lub innych
źródeł.
• Nie blokuj otworów wlotowych ani wylotowych.
• Nie należy używać urządzenia w pobliżu gorących przedmiotów, takich jak piec. Nie uży-
waj w miejscach, gdzie urządzenie może mieć kontakt z parą.
• Trzymaj z daleka od produktów wytwarzających tłuste pozostałości, takich jak frytkownica.
• Nie używaj urządzenia bez filtrów.
INSTRUKCJA BEZPIECZEŃSTWA
Upewnij się, że filtry są odpowiednio włożone przed uruchomieniem urządzenia. Uru-
chomienie tego urządzenia bez filtrów może skrócić jego żywotność i spowodować poraże-
nie prądem lub obrażenia.
Upewnij się, że w otworach wentylacyjnych urządzenia NIE znajdują się obce przed-
mioty takie jak szpilki, pręty, monety. Nie dotykaj żadnej części wnętrza urządzenia mo-
krymi rękami. Wysokie napięcie może spowodować porażenie prądem.
Upewnij się, że otwory wentylacyjne na wlocie i wylocie maszyny są niezablokowane.
Zablokowanie może prowadzić do wzrostu temperatury wewnętrznej produktu, co może
skutkować jego awarią i deformacją.
Nie używaj urządzenia jako podnóżka ani nie stawiaj na nim ciężkich przedmiotów.
Może dojść do obrażeń ciała lub uszkodzenia i odkształcenia produktu.
OSTRZEŻENIE!
Postępuj zgodnie z niniejszą instrukcją, aby zmniejszyć ryzyko poważnych obrażeń
lub śmierci, a także aby zmniejszyć ryzyko uszkodzenia urządzenia.
• Nie ciągnij za przewód zasilający podczas odłączania urządzenia.
• Nie należy wyginać/wiązać przewodu zasilającego podczas pracy urządzenia.
• Jeśli urządzenie zostanie zanurzone w wodzie, odłącz je i skontaktuj się z obsługą
klienta.
• Nie odłączaj ani nie przemieszczaj urządzenia podczas jego pracy.
• Odłącz urządzenie, jeśli nie jest używane przez dłuższy czas.
• Nie dotykaj wtyczki mokrymi rękami.
• Kabel może ulec uszkodzeniu w wyniku silnego zginania, ciągnięcia, skręcania, zwi-
jania lub umieszczania na nim ciężkich przedmiotów.

30 31
Wyświetlacz
WYŚWIETLACZ
OBSŁUGA
1. Wyświetlacz PM2.5
2. Temperatura
3. Wilgotność
4. Włącznik/Wyłącznik
Obsługa
Podłączenie zasilania
Podłącz kabel zasilający do urządzenia, a następnie włóż wtyczkę do kontaktu.Urządzenie za-
cznie wydawać sygnał dźwiękowy i przejdzie w tryb czuwania, a następnie włączy się wskaź-
nik zasilania, który świeci się na czerwono.
Włącznik zasilania
Naciśnij przycisk„Power On/O” na głównym panelu sterowania, a urządzenie wyemituje sy-
gnał dźwiękowy. Spowoduje to zaświecenie się wskaźnika klucza na zielono, a następnie włą-
czy się „tryb pracy’’. Jednocześnie indeks PM2,5, temperatura, wilgotność i jakość powietrza
wyświetlą się na głównym panelu sterowania.
Wybór trybu
Stuknij przycisk „Mode” na głównym panelu kontrolnym. Jeśli zaświeci się przycisk ,,Smart”,,
urządzenie jest w trybie „Inteligentnym”, a jeśli zaświeci się przycisk ,,Manual’’, urządzenie jest
w trybie „Ręcznym’’. Po wybraniu trybu„Smart” włącza się przełącznik„Timer” i przełącznik„Air
Volume”, a panel sterowania zostanie automatycznie zablokowany. Urządzenie automatycz-
nie dostosuje odpowiednią prędkość nawiewu zgodnie z aktualną jakością powietrza. Przy
wyborze trybu ręcznego „Manual” prędkość nawiewu można skongurować, dostosowując
odpowiednio klawisze funkcyjne zgodnie z wymaganiami.
Funkcja fotokatalizatora
Dotknij przycisku fotokatalizatora, aby go uruchomić lub wyłączyć. Funkcja działa w trybie
„Smart” i„Manual”.
Plazma wysokonapięciowa (tylko dla modeli 460 i 600)
Dotknij przycisku„High Voltage Plasma”, aby uruchomić lub wyłączyć funkcję plazmy wysoko-
napięciowej. Funkcja działa w trybie„Smart” i„Manual”.
Regulacja prędkości nawiewu
W trybie „Manual” naciśnięcie przycisku „Wind speed” spowoduje zmianę prędkości nawiewu
ze„Sleep”, czyli trybu uśpienia na„Low”, czyli niski, ,,Medium”, czyli średni i„High”, czyli wysoki.
Kiedy osiągnie„High”, czyli poziom wysoki, stuknij klawisz ponownie, a prędkość nawiewu po-
wróci do poziomu„Sleep”, czyli uśpienia.
Regulator czasu
Aby wybrać funkcję timera (ustawienia czasowego), timera, przełącz na tryb„Manual”i naciśnij
przycisk„Timer”, aby wybrać czas„2H”,„4H”,„6H” lub„8H”.
Wyłącznik zasilania
Użyj przycisku„Power On / O”na panelu obsługi, aby wyłączyć urządzenie.
Wskaźnik zaświeci się na czerwono i przejdzie w tryb czuwania.
Odłącz zasilanie
Jeśli urządzenie nie będzie używane tymczasowo lub przez dłuższy czas, odłącz wtyczkę zasi-
lacza z gniazdka elektrycznego.
*tylko dla modeli 460 i 600
Temperature Humidity
High Voltage
Plasma
Wind speed
Fault Alarm
Remote
Signal Receiver
UV
Photocatalyst
1
3
8
9
10
2
4
5
6
7 11
*
5. Tryb
6. Czas
7. Regulacja prędkości nawiewu
8. Plazma wysokonapięciowa*
9. Fotokatalizator UV
10. Alarm błędu
11. Zdalny odbiornik sygnału

32 33
UŻYTKOWANIE
Użytkowanie
Przycisk Opis
Przycisk włączania / wyłączania zasilania
• Naciśnij przycisk„Power On/O”na głównym panelu sterowania, urządzenie
zacznie wydawać sygnał dźwiękowy. Spowoduje to zaświecenie się wskaźni-
ka klucza na zielono, a następnie urządzenie przejdzie w tryb pracy. W tym
samym czasie zaświecą się przyciski: ,,Timer”, ,,PM2,5 Display’’, ,,Temperature’’,
,,Humidity’’ i jakość powietrza, wyświetlane na głównym panelu sterowania.
• Dotknij przycisku „Power On / O” na panelu sterowania, aby włączyć urzą-
dzenie. Wskaźnik zasilania zaświeci się na czerwono i przejdzie w tryb czu-
wania.
Wybór trybu
• Naciśnij przycisk „Mode” na głównym panelu kontrolnym. Jeśli zaświeci się
„Smart”urządzenie jest w trybie inteligentnym, a jeśli zaświeci się komunikat
„Manual”, urządzenie jest w trybie ręcznym.
• Po wybraniu trybu inteligentnego, przełącznik czasu i prędkości nawiewu
zostanie automatycznie zablokowany. Urządzenie automatycznie dostosuje
odpowiednią prędkość nawiewu powietrzem oczyszczonym zgodnie z aktu-
alną jakością powietrza.
• Po wybraniu trybu ręcznego, prędkość nawiewu można skongurować za
pomocą dostosowania odpowiednich klawiszy funkcyjnych do żądanych
wymagań.
Regulator czasu
• Aby ustawić wybrany czas pracy urządzenia, przełącz na tryb ręczny i dotknij
przycisk„Timer”, aby wybrać„2H”,„4H”,„6H” lub„8H”w zależności od potrzeb.
Regulacja prędkości powietrza:
• Naciśnięcie przycisku „Wind speed” w trybie ręcznym spowoduje zmianę
prędkość nawiewu od uśpienia „Sleep” do niskiej „Low”, średniej „Medium”
i dużej „High”. Kiedy urządzenie pracuje na poziomie „High”, ponowne naci-
śnięcie klawisza przywraca go do poziomu uśpienia„Sleep”.
Plazma wysokonapięciowa (tylko dla modeli 460 i 600)
• W trybie inteligentnym ,,Smart’’ lub ręcznym ,,Manual’’ naciśnij przycisk pla-
zma wysokonapięciowa„High voltage plasma’’ na głównym panelu sterowa-
nia, aby włączyć lub wyłączyć funkcję plazmy wysokonapięciowej. .
Funkcja fotokatalizatora UV
• W trybie ,,Smart’’ lub ,,Manual’’, dotknij przycisk fotokatalizatora na głównym
panelu sterowania, aby go włączyć lub wyłączyć.
CZYSZCZENIE
Czyszczenie
Zalecamy czyszczenie ltrów co 3 miesiące.
Krok 1: Otwórz dwa zamki drzwi oczyszczacza Aerotronic, naciskając je. Następnie powoli
wyciągnij drzwiczki oczyszczacza.
Krok 2: Odkręć cztery śruby znajdujące się na tylnej płycie, a następnie wyciągnij ją.
Krok 3: Powoli wyjmij moduł elektrostatyczny, w którym znajduje się dwustrefowe pole jono-
we i generator jonów ujemnych.
Krok 4: Powoli wyjmij główny ltr.
Krok 5: Spryskaj zarówno moduł, jak i ltr detergentem czyszczącym.
UWAGA: Do czyszczenia używaj WYŁĄCZNIE neutralnego detergentu. Spryskać równomier-
nie i całkowicie, a następnie pozostawić na 15 minut.
Krok 1 Krok 2 Krok 3
Krok 4 Krok 5

34 35
Krok 6: Powoli wyczyść moduł i ltr miękką szczoteczką.
Krok 7: Przepłucz moduł i dokładnie wypłucz wodą destylowaną lub ltrowaną.
Krok 8: Dokładnie osusz moduł i ltr suszarką lub w naturalnym świetle słonecznym. Następ-
nie pozostaw obie części do wyschnięcia na 12-15 godzin.
Krok 9: Nie używaj wody do czyszczenia: ltra z węglem aktywnym, ltra ozonu i ltra fotoka-
talitycznego UV. Ostrożnie wyczyść te ltry miękką ściereczką i szczotką.
Krok 10: Zamontuj wszystkie ltry i moduł stopniowo jeden po drugim.
CZYSZCZENIE
Czyszczenie
Krok 6 Krok 7
Krok 8 Krok 9 Krok 10
PIELĘGNACJA FILTRA | SPECYFIKACJA
Specykacja
Model: AEROTRONIC 360 AEROTRONIC 460 AEROTRONIC 600
Pozycja: CRF-040 CRF-041 CRF-042
Napięcie: 100 ~ 240V 100 ~ 240V 100 ~ 240V
Częstotliwość
znamionowa:
50/60 Hz 50/60 Hz 50/60 Hz
Wskaźnik czystości
powietrza (CADR):
360m 3/h 460m 3/h 600m 3/h
Ozon: 10ppb 10ppb 10ppb
Głośność (maks.): 25db 25db 25db
Moc znamionowa: 20W 35W 35W
Waga netto: 14,5 kg 21,5 kg 31 kg
Wymiar: 36,5 * 24 *60,5 cm 36,5 * 24 *78,5 cm 43,5 * 26 *92 cm
Zakres ltracji
(maks.):
40 m260 m2100 m2
Ilość ltrów: 677
Certykaty:
Pielęgnacja ltra
Filtr Częstotliwość czyszczenia Częstotliwość wymiany
Moduł elektrostatyczny Czyszczenie co 3 miesiące 5 – 8 lat
Filtr podstawowy 2 – 3 lat
Filtr z węglem aktywnym Czyszczenie na sucho co 3
miesiące. NIGDY nie wolno
czyścić na mokro.
2 – 3 lat
Filtr niwelujący
występowanie ozonu
Filtr fotokatalityczny UV
• Okresy między wymianami ltrów mogą się różnić w zależności od środowiska.
• Aby uzyskać optymalną wydajność, należy używać tylko ltrów Aerotronic.
• Żywotność ltrów jest różna w zależności od poziomu zanieczyszczenia powietrza. Im wię-
cej kurzu obecnego w środowisku, tym więcej kurzu gromadzi się w ltrach, skracając ich
żywotność.

36 37
Urządzenie nie włącza się.
Czy wtyczka jest prawidłowo podłączona do gniazdka? – Upewnij się, że w gniazdku
jest napięcie,a także, że wtyczka jest zabezpieczona.
Czy nastąpiła przerwa w dostawie prądu? – Sprawdź, czy inne urządzenia elektryczne
działają prawidłowo, a następnie spróbuj ponownie uruchomić Aerotronic.
Czy tylna pokrywa jest prawidłowo przymocowana do urządzenia? – Upewnij się, że
zawleczka zabezpieczająca jest prawidłowo wyrównana. Zawleczka powinna uderzyć
w wewnętrzny przycisk zasilania po naciśnięciu tylnej pokrywy.
Urządzenie wibruje i hałasuje.
Czy urządzenie porusza się po nierównej powierzchni? – Przenieś urządzenie na twar-
dą, płaską i równą powierzchnie.
Często zadawane pytania
Aerotronic wykorzystuje wysokie napięcie. Czy jest bezpieczny do użytku domowego?
Aerotronic to urządzenie wykorzystujące zaawansowany system bezpieczeństwa. Zuży-
cie energii Aerotronic jest równoważne do małej żarówki. Wykorzystuje wysokie napięcie
wewnątrz, przy bardzo niskim poborze prądu rzędu mikroamperów. Wysokie napięcie
jest zasilane prądem stałym, aby uniknąć ewentualnej perturbacji.
Czy Aerotronic faktycznie oczyszcza powietrze? Aerotronic posiada AQI (wskaźnik jako-
ści powietrza) – liczba maleje, gdy oczyszczacz powietrza jest włączony. Również po kilku
tygodniach korzystania z Aerotronic, można zobaczyć wiele zanieczyszczeń na ltrach,
kiedy wyjmujesz je w celu wyczyszczenia.
Usłyszałem „trzaskanie” lub „stukanie” wewnątrz urządzenia. Czy to normalne? Oka-
zjonalne „stukanie” lub „trzaskanie” jest zjawiskiem normalnym, w przypadku gdy więk-
sze cząsteczki dostaną się do oczyszczacza powietrza, wtedy występuje uderzanie przez
wysokie napięcie. Jeśli jednak odgłosy „trzaskania” lub „stukania” są stałe, należy wyczy-
ścić urządzenie i upewnić się, że wszystkie części w urządzeniu są całkowicie wysuszone
po wyczyszczeniu urządzenia. 80% problemów dotyczących hałasu jest spowodowanych
nagromadzeniem się kurzu na płytach zbierających i / lub komorach wewnętrznych lub
mokrych płytach ltrujących. Zwykle wystarczy pełny cykl czyszczenia ltrów.
Jak korzystać z funkcji fotokatalitycznej plazmy wysokonapięciowej i UV? Zaleca się,
aby funkcja fotokatalityczna plazmy wysokonapięciowej i UV była włączana 30 minut
każdego dnia lub co drugi dzień, aby skutecznie zniszczyć bakterie i patogeny.
Rozwiązywanie problemów
ROZWIĄZYWANIE PROBLEMÓW
since
2000
Urządzenie jest zgodne z europejskimi normami regulacyjnymi 2014/30 / UE i 2011/65 / UE.
Warunki Gwarancji
Deklaracja zgodności UE
DEKLARACJA ZGODNOŚCI UE | WARUNKI GWARANCJI
Produkt objęty jest przez dystrybutora ustawowym czasem gwarancji. Bieg okresu gwarancji rozpoczyna
się w dniu dokonania zakupu urządzenia. Wymogiem do roszczenia gwarancji jest okazanie dowodu zakupu.
W okresie gwarancji dystrybutor dokonuje naprawy lub wymiany oryginalnego urządzenia nieodpłatnie.
Następujące usterki nie są objęte gwarancją:
• Zużycie spowodowane niewłaściwym użytkowaniem
• Użytek komercyjny, np. częste, długotrwałe użytkowanie bez 40-minutowych przerw pośrednich
• Wystawienie urządzenia na działanie ciepła, wilgoci i cieczy
• Uszkodzenia spowodowane przedmiotami o ostrych krawędziach
• Nieuzasadnione zniszczenie, przywłaszczenie, przeciążenie lub przypadkowe uszkodzenie
• Uszkodzenia i zabrudzenia przez zwierzęta domowe
• Zanieczyszczenia spowodowane produktami do pielęgnacji ciała lub włosów
• Uszkodzenia spowodowane użyciem kwasów, rozpuszczalników lub środków alkoholowych
Wymogiem do roszczenia gwarancji jest dostarczenie uszkodzonego urządzenia wraz z dowodem zakupu
przed upływem obowiązującego czasu gwarancji. Prawo do gwarancji nie obowiązuje, jeśli uszkodzenie urzą-
dzenia spowodowane zostało np. przez czynniki zewnętrzne, wskutek dokonywania naprawy lub modyfikacji
przez osoby nieupoważnione do takich czynności przez autoryzowanego dystrybutora. Obowiązki gwaran-
cyjne dystrybutora ograniczone są do naprawy lub wymiany urządzenia. Na podstawie niniejszej gwarancji
ani producent, ani dystrybutor nie ponoszą odpowiedzialności za szkody spowodowane wskutek niezgod-
nego z instrukcją lub nieprawidłowego użytkowania urządzenia. Jeśli w trakcie przeglądu reklamowanego
urządzenia okaże się, że istniejące uszkodzenie nie jest objęte gwarancją, lub że upłynął okres gwarancji
klient zostanie obciążony kosztem przeglądu urządzenia i jego naprawy.
Niniejsze treści nie stanowią zaleceń medycznych. Postawienie diagnozy oraz leczenie schorzeń i zaburzeń
natury medycznej powinno być przeprowadzane przez lekarza lub terapeutę. Niniejsze treści mają charakter
informacyjny i nie mogą być traktowane jako alternatywa dla terapii medycznych. Każdy użytkownik powi-
nien kontrolować swój stan zdrowia, a jeśli zachodzi taka konieczność – skonsultować możliwość i sposób ko-
rzystania z urządzenia z lekarzem lub terapeutą. Użytkownik korzysta z urządzenia na własną odpowiedzial-
ność. Producent nie gwarantuje, że nastąpi poprawa stanu zdrowia, ani tym bardziej – całkowite wyleczenie.
Casada International GmbH
Obermeiers Feld 3
33104 Paderborn, Niemcy
info@casada.com | www.casada.com
Obrazy i teksty podlegają prawom autorskim Casada International GmbH i nie mogą być wykorzystywane
do innych celów bez wyraźnego potwierdzenia.
Prawa autorskie © 2021 Casada International GmbH. Wszelkie prawa zastrzeżone.

38 39
since
2000
www.casada.com
2000. évi alapítása óta a CASADA név kiváló minõségû wellness és tnesz termékeket jelöl.
Ma a CASADA készülékek világszerte kaphatók. A megbízható és kiváló minõség mellett a fo-
lyamatos továbbfejlesztés, az összetéveszthetetlen design és az életminõség javítására való
szigorú törekvés tüntetik ki a CASADA termékeit.
Gratulálunk!
Köszönjük, hogy a Casada medical Aerotronic készülékét választotta!
Annak biztosítása érdekében, hogy még sokáig élvezhesse Aerotronic készülékének elõnyeit,
arra kérnénk, hogy gyelmesen olvassa el és kövesse biztonsági utasításokat. A balesetek
elkerülése érdekében kérjük, gyõzõdjön meg arról, hogy a gyermekek csak felnõtt felügyelet
mellett használják ezt a terméket, mivel kábeleket és egyéb elektronikus kiegészítõket tar-
talmaz.
Sok örömet kívánunk személyes Aerotronic-hoz.
Tartalomjegyzék
DE
HU
TARTALOMJEGYZÉK
Biztonsági utasítások...... ..................................................................................................................................40
Mûveletek............................................................................................................................................... ..............42
Kijelzõ.....................................................................................................................................................................43
Használat.................................................................................................................................... ......................... 44
Tisztítás.................................................................................................................................................... ............. 45
Szûrõápolás .......... ..............................................................................................................................................47
Mûszaki adatok .................................................................................................................................... .............47
Hibaelhárítás.............................................................................................................................................. ......... 48
EU-megfelelési nyilatkozatok .......... ................................................................................................... .........49
Garanciális feltételek.........................................................................................................................................49
This manual suits for next models
2
Table of contents
Languages:
Popular Air Cleaner manuals by other brands

Hoover
Hoover H-PURIFIER Series user manual

Beurer
Beurer LR 310 Instructions for use

AllerAir
AllerAir AirMedic+ none Operation and maintenance manual

CLIVET
CLIVET ELFOFresh EVO CPAN-YIN Manual for installation, use and maintenance

Honeywell
Honeywell HPA830 owner's manual

IDEAL
IDEAL AP140 PRO operating instructions