Casals GEN1000 User manual

GEN1000
GENERATOR
GENERADOR
GÉNÉRATEUR
GERADOR

2
3
4
5
781011
6
1
9
12
13
Fig 3 Fig 4
Fig 1
Fig 2
Fig 5
Fig 7

English ORIGINAL instructions
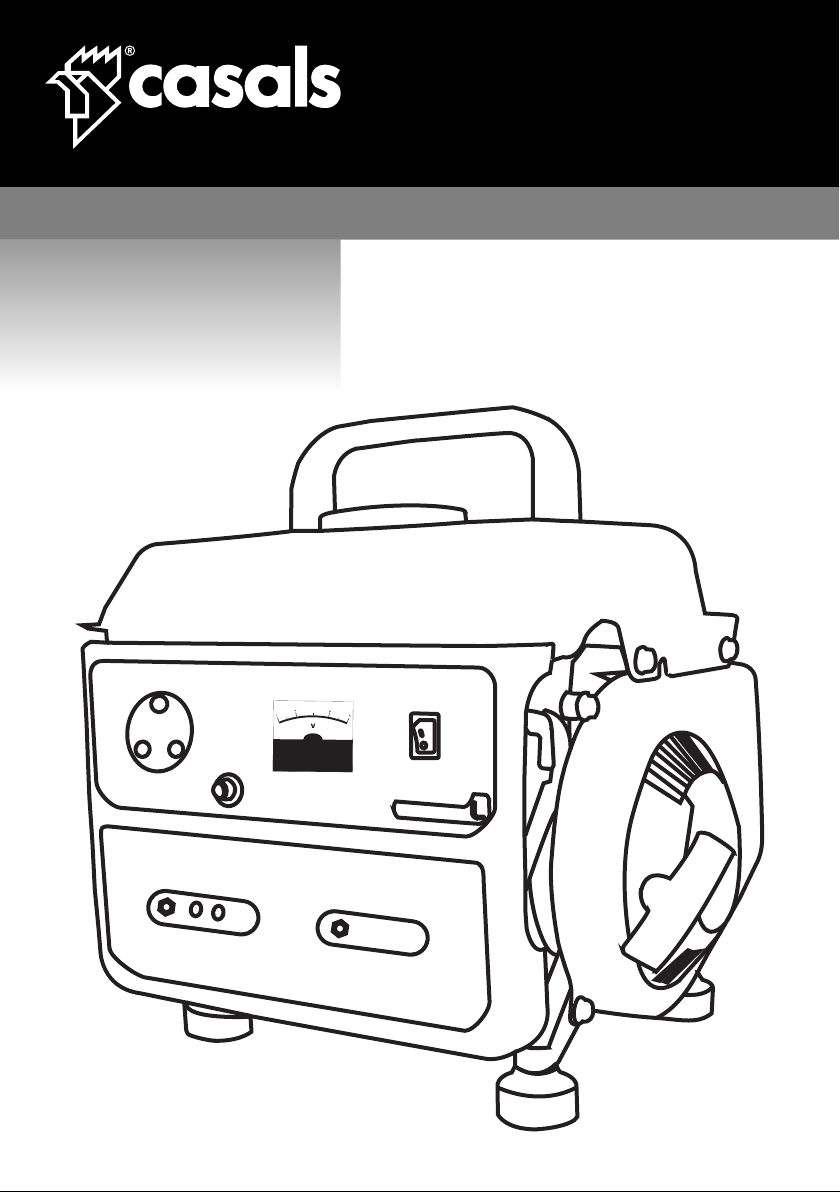
GENERATOR
GEN1000
Dear Customer,
Many thanks for trusting to Casals.
Thanks to its continuous effort, our innovation
and the strictest quality controls, Casals develops
electric Power Tools for the toughest jobs.
IMPORTANT:
Thank you for purchasing a Casals Petrol Generat-
ing Set (hereinafter referred to as the “generator”).
This manual will assist you in operating and main-
taining your generator. This manual is the latest
version.
With the continuous improvement and upgrading of
this product, the manufacturer reserves the right to
modify this manual without notice. The manufactur-
er shall assume no liability for incorrect information
contained in this manual.
This manual is an integral part of the generator.
When the generator is transferred to others, this
manual should be handed over to the new owner.
Some important information in this manual will be
indicated in the following way (please see below).
The users should pay special attention to these
instructions.
The range of CASALS GENERATORS is safe and
reliable, but incorrect use of these products may
cause personal injury and or damage to your ma-
chine. Please read this manual thoroughly before
operation as this product is required to operate
strictly in accordance with this manual.
IMPORTANT NOTICES:
PLEASE PAY SPECIAL ATTENTION TO STATE-
MENTS PRECEDED BY THE FOLLOWING
WORDS:
1. GENERAL SAFETY PRECAUTIONS:
1.1. This generator is not intended for use by
persons (including children) with reduced physical,
sensory or mental capabilities, or lack of experi-
ence and knowledge, unless they have been given
supervision or instruction concerning use of the
generator by a person responsible for their safety.
1.2. The generator may only be operated observ-
ing the regulations of the operation documentation
and under permanent supervision.
1.3. The generator must not be used indoors!
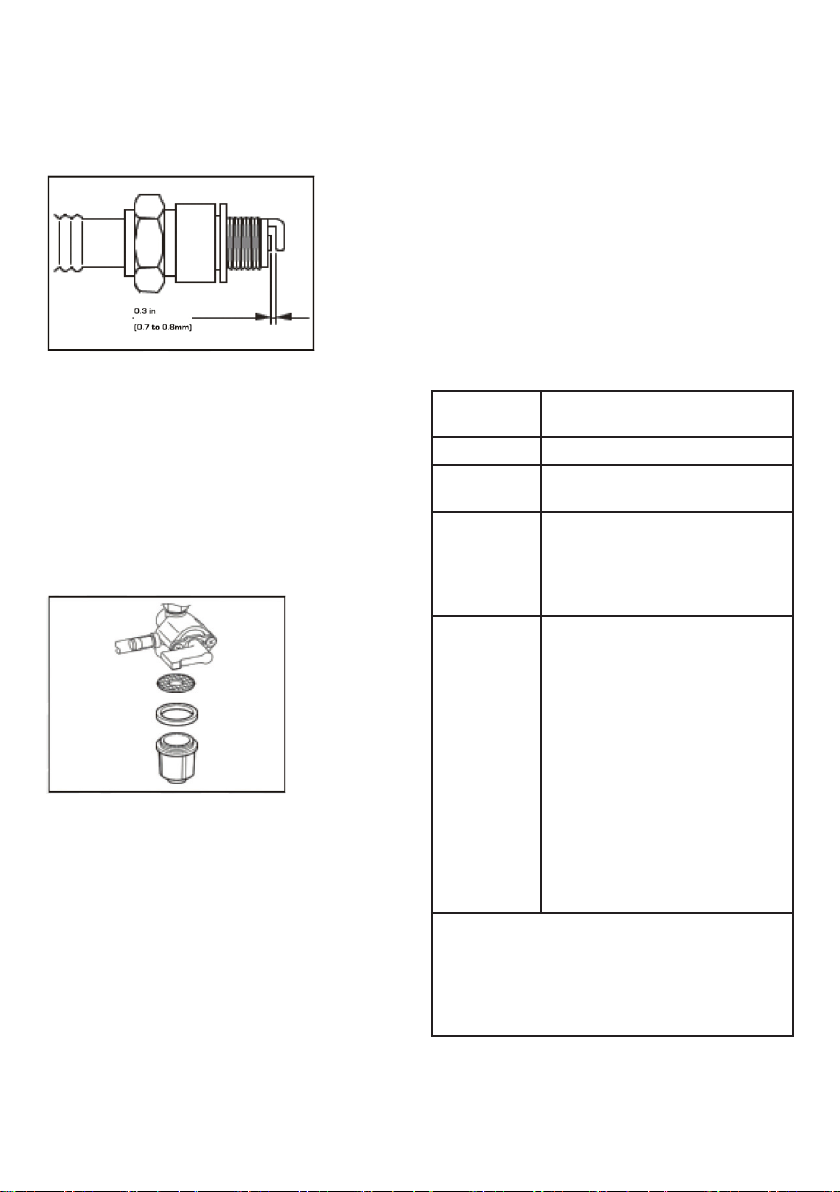
1.4. Fuel (Petrol) is combustible and easily ignited.
Do not perform refuelling while in operation.
1.5. Only use the specied fuel when operating the
generator. (95 Unleaded mixed with 2 stroke oil.
Mix 1litre petrol with 25ml 2 stroke oil)
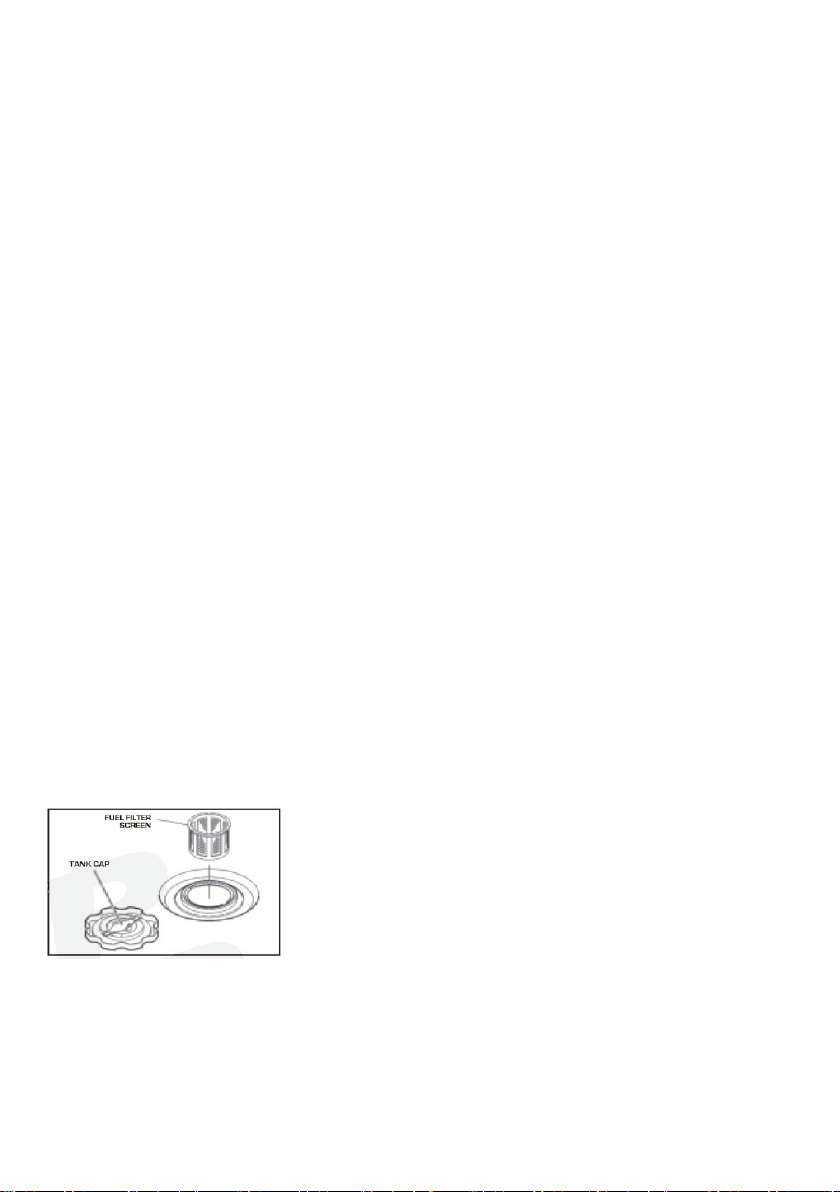
1.6. Do not refuel whilst smoking or near naked
ames. Do not overll or spill fuel. If this happens
clean the fuel on and around the generator prop-
erly before operating.
1.7. Be careful around the generator as some parts
of the internal combustion engine are hot and may
cause burns, Pay attention to all warning signs
displayed on the generator set.
1.8. Engine exhaust gases are toxic. Do not oper-
ate the generator in an unventilated room
1.9. Regularly check that the bolts and nuts are
properly tightened as they may become lose due
to vibration of the generator whilst in use.
1.10. Before using the generator ensure that you
have checked the periodic maintenance schedule
in the operator’s manual.
1.11. Pay attention to the wiring or extension cords
from the generator to the connected device. If the
wire is under the generator or in contact with a
vibrating part, it may break and possibly cause a
re, generator burnout, or electric shock hazard.
Replace damaged or worn cords immediately.
1.12. Ensure that the specications of the exten-
stion cord you are using is compatible with the
generator.
1.13. Do not operate in rain, wet or damp condi-
tions, or with wet hands. The operator may suffer
severe electric shock if the generator is wet.
1.14. If wet, wipe and dry it well before starting.
Do not pour water directly over the generator, nor
wash hit with water.
1.15. Do not connect the generator to the mains
power grid.
1.16. Keep children and all bystanders at a safe
distance from the generator whilst in use.
1.17. It is absolutely essential that you know and
understand the safe and proper use of the power
tool or appliance that you intend to connect to the
generator. All operators must read, understand
and follow the tool/ appliance operators’ manual.
The tool and appliance applications and limitations
must be understood. Keep all instruction manuals
and in a safe place for future reference.
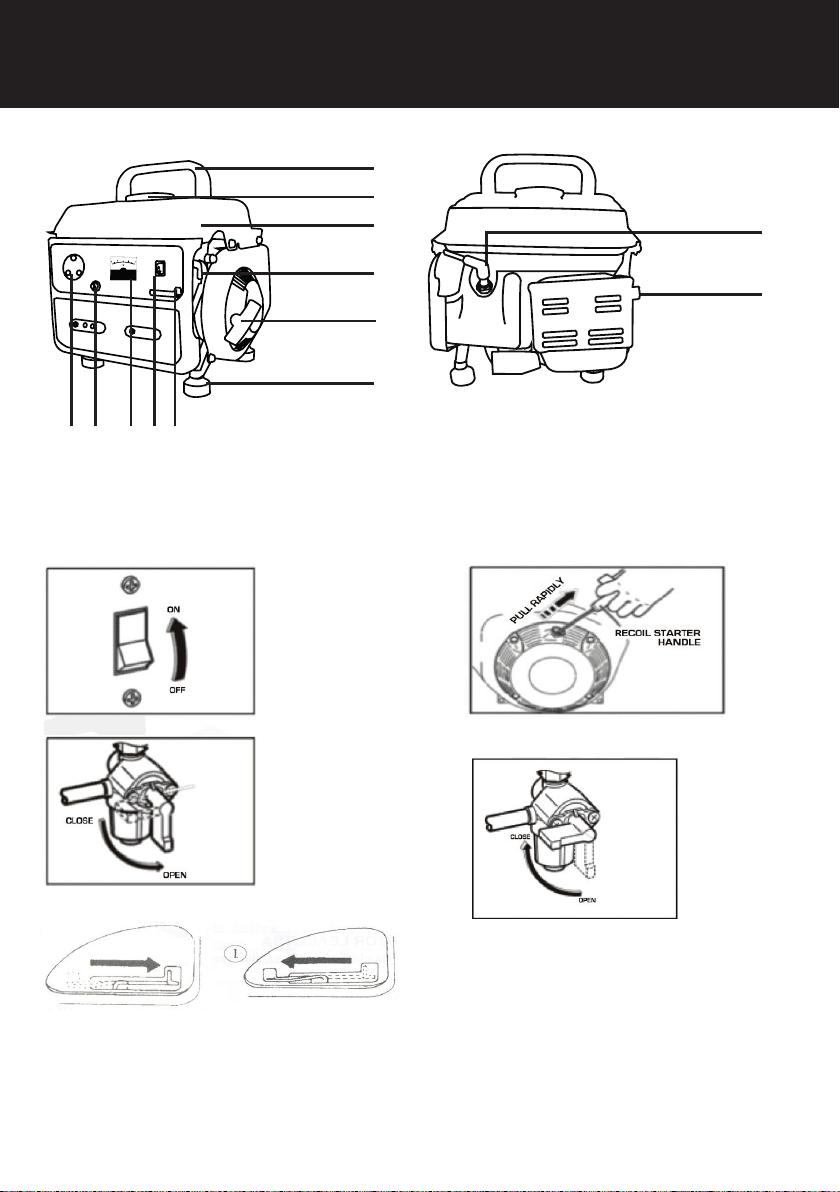
1.18. Always switch off the circuit breaker on the
generator when not in use.
2. ELECTRICAL SAFETY INFORMATION:
2.1. Electrical equipment including cable, cords

and plug connection must not be defective. Please
check before using.
2.2. Do not plug the generator directly into a wall
socket-outlet.
2.3. The generator should not be connected to
other sources such as the power company supply
mains. In special cases where stand-by connection
to existing electrical systems or integration there-
with is intended, note that it is a legal requirement
that such connections or integration may only be
performed by a qualied technician.
2.4. Protection against electrical shock depends on
circuit-breakers that are specially matched to the
generator. If a circuit breaker requires replace-
ment, it shall be replaced by a circuit breaker that
has identical ratings and performance character-
istics.
2.5. Due to high mechanical stresses only tough,
exible cable should be used.
2.6. If the generator is of CLASS II construction
then the generator does not have to be eathed.
2.7. Cord Extension Sets:
2.7.1. A 1mm2 exible cable can draw a maximum
of 10A provided that the cable is no longer than
25m.
2.7.2. A 1.5mm2 exible cable can draw a maxi-
mum of 10a provided that the cable is no longer
than 35m
2.7.3. A 1.5mm2 exible cable can draw a maxi-
mum of 16a provided that the cable is no longer
than 20m
2.7.4. A 2.5mm2 exible cable can draw a maxi-
mum of 10a provided the cable is no longer than
65m
2.7.5. A 2.5mm2 exible cable can draw a maxi-
mum of 16a provided that the cable is no longer
than 45m
2.7.6. A 4mm2 exible cable can draw a maximum
of 10a provided that the cable is no longer than
100m
2.7.7. A 4mm2 exible cable can draw a maximum
of 16a provided that the cable is no longer than
65m
2.8. DROP IN ELECTRIC EXTENSION CORDS:
When a long electric extension cord is used to con-
nect an appliance or tool to the generator, a certain
amount of voltage drop or loss occurs in the
extension cord which reduces the effective voltage
available for the appliance or tool.
3. SAFETY STICKERS AND EXPLANATIONS:
Front panel warning
label
Do not allow open
ames near the
generator
Fuel type warning
label
Operation warning label
Air lter maintenance information label
Fuel mixture label
Horsepower Indicator
Heat warning label

4. SPECIFICATIONS:
Petrol fueled generator Gen1000
Generated power (AC) 220V 50Hz
Maximal nominal per-
formance
W 750
Permanent perfor-
mance
W 650
Rotation/idle (+/-5%) RPM 3000/minute
Nominal Performance
of the engine
HP 2.0
Type of engine 2-stroke
Cubic capacity cm3 63
Cooling System Air cooled
Protection degree IP23
Ignition system TCI
Fuel consumption l/h 1.3
Fuel tank l 4
Fuel type 1:50 mixture
Weight kg 15
Dimensions cm 38x32x32
Noise level dB(A) 85
Protection class I
Specications are subject to change without notice.

5. COMPONENTS:
1- Easy grip handle
2- Fuel ller cap
3- Fuel tank
4- Fuel cork
5- Recoil starter motor handle
6- Rubber foot
7- Choke
8- Power switch
9- Voltmeter
10- Reset switch
11- Mains power inlet
12- Sparkplug
13- Exhaust outlet
Please note that no grounding rod is supplied
with this generator.
6. PRE-OPERATION CHECKS:
6.1. CHECKING THE ENGINE OIL:
6.1.1. The GEN1000 is a 2 stroke model which
means that you have to mix 2-stroke oil to the
unleaded petrol.
6.1.2. Mixing recommendation is for every 1 litre of
unleaded petrol add 25ml of 2-stroke oil.
6.2. CHECKING THE ENGINE FUEL:
WARNING: Do not refuel while smoking or near
an open ame or other potential re hazards.
6.2.1. Remove the fuel cap at the top of the gen-
erator to check the fuel level.
6.2.2. If petrol is too low, only add the mixed fuel
and 2-stroke oil solution.
6.2.3. Ensure that you use the fuel lter screen on
the fuel lter.
6.3. FUEL CAPACITY FOR THE GEN1000:
6.3.1. GEN1000 – 4L
WARNING:
Make sure you review each warning in order to
prevent re hazards. Do not rell the fuel tank
whilst the engine is running or hot. Please ensure
that the fuel valve is closed before refuelling. Be
careful not to contaminate the fuel with any dust,
dirt, water or other foreign liquids/objects. Please
clean all spilt fuel thoroughly before starting the
generator.
Ensure that the generator is clear from any open
ames. Do not smoke whist refuelling the genera-
tor.
6.4. CHECKING COMPONENT PARTS:
Before starting the generator please check the
following:
6.4.1. Check for any fuel leaking from any part of
the generator.
6.4.2. Check that all the nuts and bolts are se-
curely tightened on the generator.
6.4.3. Check for any visible damaged components
on the generator.
6.4.4. Check that the generator is not resting on or
adjacent to any electrical wiring.
6.5. CHECK THE GENERATOR SURROUND-
INGS:
WARNING:
Make sure you review each warning in order to
prevent re hazards. Keep the surrounding area
clear of ammables or other hazardous materials.
Keep the generator at least 3 feet (1 meter) away
from all buildings and or other structures. Only
operate the generator in a dry, well-ventilated area.
Keep the exhaust pipe clear of all foreign objects.
Keep the generator away from open ames. Do
not smoke in close proximity to the generator.
Keep the generator on a at and level surface.
Do not attempt to block the generator air vents with
any paper or other material/objects.
7. OPERATING PROCEDURES:
7.1. STARTING THE GENERATOR ENGINE:
7.1.1. Turn the engine “KEY” to the “ON/START”
position. FIG.1
7.1.2. Open the fuel valve. FIG.2
7.1.3. Turn the choke lever to “CLOSED” position if
the generator engine is cold. Fig.3
7.1.4. Pull the recoil starter until resistance is felt.
FIG.5
7.1.5. This is the “compression” point. Return the
handle to its original position, and then pull swiftly.
7.1.6. If the generator engine fails to start after
several attempts, repeat above the procedures
with the choke knob returned to the “OPEN” posi-
tion. FIG.4
7.1.7. Do not pull the rope of the recoil starter out

completely.
7.1.8. After starting the generator allow the starter
handle to return to its original position whilst still
holding on to the handle.
7.2. USING ELECTRIC POWER:
WARNING:
Make sure that the appliance is switched OFF
before connecting it to the generator.
Do not move the generator while it is running.
7.3. STOPPING THE GENERATOR:
7.3.1. Turn off the power switch of the electric
equipment and unplug the cord from the receptacle
of the generator.
7.3.2. Turn the switch to the “OFF” position. Fig 6
7.3.3. Close the fuel valve. Fig 7
8. WATTAGE INFORMATION:
8.1. Some appliances need a “surge” of energy
when starting. This is commonly known as a “LAG-
GING” Load.
8.2. This means that the amount of electrical
power needed to start the appliance may exceed
the amount needed to maintain its use.
8.3. Electrical appliances and tools normally come
with a label indicating voltage, cycles/Hz, amper-
age (amps) and electrical power needed to run the
appliance or tool.
8.4. Check with your nearest branch with questions
regarding power surges of certain appliances or
power tools.
8.5. Electrical loads such as incandescent lamps
and hot plates require the same wattage to start as
is needed to maintain their use. This is commonly
known as a “LEADING” Load
8.6. Loads such as uorescent lamps that makes
use of starters require1.5 to 2 times the indicated
wattage during start-up.
8.7. Electrical motors require a large starting
current. Power requirements depend on the type
of motor and its use. Once enough “power” is at-
tained to start the motor, the appliance will require
only +-50% of the wattage in order to continue
running.
8.8. Most electrical tools require 1.5 to 3 times their
wattage for running under load during use. Loads
such as submersible pumps and air compressors
require a very large force to start. They need 3 to 5
times the normal running wattage in order to start.
9. MAINTENANCE SCHEDULE:
FOR ALL YOUR SERVICE, MAINTENANCE
AND WARRANTY QUERIES PLEASE CONTACT
CREATIVE HOUSEWARES. PLEASE REFER TO
THE BACK PAGE FOR CONTACT DETAILS.
9.1. DAILY INSPECTION:
Before staring the generator please check the fol-
lowing service items:
9.9.1. Check if there is enough fuel
9.9.2. Excessive vibration, noise
9.9.3. Loose or broken bolts
9.9.4. Fuel leakage
9.9.5. Safe surroundings
9.2. PERIODIC MAINTENANCE:
Periodic maintenance is vital for the safe and ef-
cient operation of the generator. Check the table
below for periodic maintenance intervals.
IT IS ALSO NECESSARY FOR THE USER
OF THIS GENERATOR TO CONDUCT THE
MAINTENANCE AND ADJUSTMENTS ON THE
EMISSION-RELATED PARTS LISTED BELOW
TO KEEP THE EMISSION CONTROL SYSTEM
EFFECTIVE.
The emission control system consists of the follow-
ing parts:
(1) Carburettor and internal parts
(2) Cold start enrichment system, (if applicable)
(3) Intake manifold, (if applicable)
(4) Air cleaner elements
(5) Spark plug
(6) Magneto or electronic ignition system (if ap-
plicable)
(7) Spark advance/retard system, (if applicable)
(8) Exhaust manifold, (if applicable)
(9) Hoses, belts, connectors and assemblies
The maintenance schedule indicated in the table
is based on normal generator operation. Should
the generator be operated in extremely dusty
conditions or in heavier loading conditions, the
maintenance intervals must be shortened. This will
dependent on the contamination of oil, clogging of
lter elements and the wear and tear of parts.
9.2.1. Periodic Maintenance Table
10. “HOW – TO” MAINTENANCE
10.1. CLEANING AIR FILTER:
CAUTION
Do not wash the elements with kerosene, petrol
or oil.
A dirty air lter element will make the starting of the
generator difcult. It will also cause the generator
to under- perform and may cause permanent dam-
age. Always keep the air lter element clean.

10.1.1. The urethane foam element must be
washed with a cleaning detergent. After cleaning it
ensure that it is dried properly before reinstalling.
Please clean every 100 hours.
10.1.2. Clean the paper element by tapping and
blowing it gently to remove dirt and dust. Never
use oil to clean the paper element. Please clean
every 50 hours and replace every 200 hours.
Please clean the air lter elements more often
when operating in dusty environments.
Maintanace Items Every 8
hours
(Daily)
Every 20
hours
Every 100
hours
(Weekly)
Every 200
hours
(Monthly)
Every 500
hours
Every 1000
hours
Clean Generator
and check bolts
and nuts
Clean spark plug
Clean air lter
Replace air lter
element
Clean fuel strainer
Clean and adjust
spark plug and
electrodes
Replace spark
plug
Remove carbon
from cylinder head
(note 1)
Clean and adjust
valve clearance
(note 2)
Clean and adjust
carburetor (note 2)
Clean and replace
carbon brushes
Replace fuel lines
Overhaul engine
(note 2)
If and when needed

10.2. CLEANING AND ADJUSTING SPARK
PLUG:
10.2.1. If the spark plug is clogged with carbon
please clean it using a plug cleaner or wire brush.
10.2.2. Always check electrode gap after cleaning.
Adjust gap to 0.03 inches (0.7mm to 0.8mm).
10.3. CLEANING FUEL STRAINER:
Please note that dirt and water in the fuel are
removed by the fuel strainer.
10.3.1. Remove the strainer cup and clean it prop-
erly by removing the water and dirt collected.
10.3.2. Clean the screen and strainer cup with
petrol.
10.3.3. Fasten the cup tightly to the main body and
ensure that there are no fuel leaks.
10.4. FUEL HOSE REPLACEMENT:
WARNING
Please take extreme caution when replacing the
fuel hose as petrol is extremely ammable and
dangerous.
DO NOT SMOKE OR EXPOSE TO OPEN
FLAMES whilst doing this.
10.4.1. Please ensure that the fuel hose is re-
placed every 500 hours. Do not attempt to do this
whilst there fuel valve is open.
10.4.2. Please replace the fuel hose immedi-
ately should a leak develop or if the fuel hose is
perished.
11. TRANSPORTING AND STORAGE:
11.1. Before transporting the generator please
ensure that the fuel valve is in the “OFF” position.
Contact with a hot engine or exhaust system can
cause severe burns and or res, always allow for
the engine to cool down prior to transporting and
or storing.
Always ensure that the generator is transported
and or stored in a at horizontal position. Tilting of
the unit may cause fuel spillage which may result
in a re.
11.2. Before storing the generator for an extended
period of time please ensure that the area of stor-
age is free from excessive water, dust and humid-
ity. Please follow the table below:
Storage
Time
Recommended Maintencance
0-1 Month •No preparation required
1-2 Months •Drain out original fuel in the fuel
tank and replace with clean fuel
2-12 Months •Drain out original fuel in the fuel
tank and replace with clean fuel
•Empty fuel from the carburetor
•Empty fuel from the fuel sedi-
ment cup
>12 Months •Drain out original fuel in the fuel
tank and replace with clean fuel
•Empty fuel from the carburetor
•Empty fuel from the fuel sedi-
ment cup
•Remove the spark plug and
pour a teaspoon of 2 stroke
engine oil into the cylinder. Turn
the engine slowly by pulling on
the recoil starter. Reinstall the
spark plug
•After removal from storage,
drain the stored fuel into a suit-
able container and replace with
fresh fuel before starting.
•Drain the carburetor by loosening the drain
screw. Drain the fuel into a suitable container.
Reinstall the drain plug.
•Having switched the fuel cork off, remove the
sediment cup, empty the fuel, then reinstall the
cup and secure it properly.

NEVER STORE THE GENERATOR INSIDE A
HOUSE OR OFFICE. DO NOT STORE THE GEN-
ERATOR WHERE IT
IS SUSEPTABLE TO RAIN OR WATER.
12. TROUBLESHOOTING:
If the generator engine fails to start after several
attempts and if there is no electricity available at the
output socket then please check the chart below. If
the generator still fails to start or generate electricity
the please contact CREATIVE HOUSEWARES (see
the back page of this manual for the contact details)
When the engine fails to start:
Check if the choke lever is in it’s proper posi-
tion
Set the choke lever to the “CLOSED” position
Check if the fuel cork is open If it is closed, open it
Check the fuel level If the fuel tank is empty, rell it. CAUTION: Do
not overll
Check if the engine switch is in the “OFF”
position
Turn the engine switch to the “ON” position.
Ensure that the generator is not connected to
an appliance
If it is connected to an appliance, turn off the
power switch on the appliance and unplug it.
Test to see if the spark plug cap is loose. If it is loose, push the spark plug cap back
tight
Check the spark plug for carbon build up

Español Instrucciones ORIGINALES
GENERADOR
GEN1000
IMPORTANTE:
Gracias por comprar un Grupo generador de gaso-
lina de Casals (en adelante, el “generador”).
Este manual lo ayudará a operar y mantener
su generador. Este manual es la última versión.
Con la mejora continua y la actualización de este
producto, el fabricante se reserva el derecho de
modicar este manual sin previo aviso. El fabri-
cante no asumirá ninguna responsabilidad por la
información incorrecta contenida en este manual.
Este manual es una parte integral del generador.
Cuando el generador se transere a otros, este
manual debe entregarse al nuevo propietario.
Alguna información importante en este manual se
indicará de la siguiente manera (ver más abajo).
Los usuarios deben prestar especial atención a
estasinstrucciones.
La gama de generadores de CAS ALS es segu-
ra y conable , pero el uso incorrecto de estos
productos puede causar lesiones personales o
daños a su máquina.
Lea este manual detenidamente antes de
utilizarlo, ya que este producto debe funcionar
estrictamente de acuerdo con este manual.
NOTICIAS IMPORTANTES
POR FAVOR PAGA LA ATENCIÓN ESPECIAL A
LAS DECLARACIONES PRECEDIDAS POR LAS
SIGUIENTES PALABRAS:
Consejos de seguridad y advertencias!
Lea estas instrucciones cuidadosamente antes de
encender el generador portátil y guárdelo para fu-
turas referencias . El incumplimiento y el cumplim-
iento de estas instrucciones podría provocar un
accidente. El uso de esta máquina solo será
seguro y duradero si sigue estas instrucciones. El
uso de este generador portátil NO se recomienda
para nes comerciales e industriales.
1. PRECAUCIONES GENERALES DE SEGURI-
DAD:
1.1. Este generador no está diseñado para ser uti-
lizado por personas (incluidos niños) con capaci-
dades físicas, sensoriales o mentales reducidas, o
por falta de experiencia y conocimiento, a menos
que una persona responsable de su seguridad les
haya dado supervisión o instrucciones sobre el
uso del generador.
1.2. El generador solo puede ser operado obser-
vando las regulaciones de la documentación de
operación y bajo supervisión permanente.
1.3. ¡El generador no debe utilizarse en interiores!
1.4. El combustible (gasolina) es combustible y
se enciende fácilmente. No realice el reabastec-
imiento de combustible mientras esté en funcion-
amiento.
1.5. Solo use el combustible especicado cuando
opere el generador. (95 Sin plomo mezclado con 2
tiempos de aceite.
Mezcla 1 litro de gasolina con 25 ml de aceite de
2 tiempos)
1.6. No cargue combustible mientras esté fumando
o cerca de llamas desnudas. No llene en exceso
ni derrame combustible. Si esto sucede, limpie el
combustible en y alrededor del generador adecu-
adamente antes de operar.
1.7. Tenga cuidado con el generador, ya que algu-
nas partes del motor de combustión interna están
calientes y pueden causar quemaduras. Preste
atención a todas las señales de advertencia que
se muestran en el grupo electrógeno.
1.8. Los gases de escape del motor son tóxicos.
No opere el generador en una habitación sin
ventilación.
1.9. Verique regularmente que los pernos y las
tuercas estén bien apretados, ya que pueden per-
derse debido a la vibración del generador mientras
está en uso.
1.10. Antes de usar el generador, asegúrese de
haber vericado el programa de mantenimiento
periódico en el manual del operador.
1.11. Preste atención al cableado o los cables de
extensión del generador al dispositivo conectado.
Si el cable está debajo del generador o está en
contacto con una parte vibrante, puede romperse
y posiblemente provocar un incendio, un quemado
del generador o un peligro de descarga eléctrica.
Reemplace los cables dañados o desgastados
inmediatamente.
1.12. Asegúrese de que las especicaciones del

cable de extensión que está utilizando sean com-
patibles con el generador.
1.13. No lo haga funcionar bajo la lluvia, en
condiciones húmedas o mojadas, o con las manos
mojadas. El operador puede sufrir una descarga
eléctrica severa si el generador está mojado.
1.14. Si está mojado, límpielo y séquelo bien antes
de comenzar. No vierta agua directamente sobre
el generador, ni lave el golpe con agua.
1.15. No conecte el generador a la red eléctrica.
1.16. Mantenga a los niños y todos los espectado-
res a una distancia segura del generador mientras
esté en uso.
1.17. Es absolutamente esencial que conozca y
comprenda el uso seguro y correcto de la her-
ramienta eléctrica o el dispositivo que pretende
conectar algenerador. Todos los operadores deben
leer, comprender y seguir el manual del operario
de la herramienta / dispositivo . Las herramientas y
aplicaciones deaplicación y las limitaciones deben
ser entendidas. Guarde todos los manuales de
instrucciones y en un lugar seguro para futuras
referencias.
1.18. Siempre apague el interruptor de circuito en
el generador cuando no esté en uso.
2. INFORMACIÓN DE SEGURIDAD ELÉCTRICA:
2.1. El equipo eléctrico, incluido el cable, los
cables y la conexión del enchufe, no debe estar
defectuoso. Por favor, compruebe antes de usar.
2.2. No enchufe el generador directamente a una
toma de corriente.
2.3. El generador no debe estar conectado a otros
Fuentes como la red eléctrica de suministro de la
compañía eléctrica. En casos especiales en los
que se pretende la conexión en espera con siste-
mas eléctricos existentes o la integración con los
mismos, tenga en cuenta que es un requisito legal
que dichas conexiones o integración solo puedan
ser realizadas por un técnico calicado.
2.4. La protección contra descargas eléctricas
depende de los interruptores automáticos espe-
cialmente adaptados al generador. Si un disyuntor
requiere reemplazo, debe ser reemplazado por un
disyuntor que tenga calicaciones y características
de desempeño idénticas.
2.5. Debido a las altas tensiones mecánicas , solo
se debe usar un cable exible y exible .
2.6. Si el generador es de construcción CLASE II,
el generador no tiene que estar conectado a tierra.
2.7. Conjuntos de extensión de cable:
2.7.1. Un cable exible de 1mm2 puede dibujar un
máximo de 10A siempre que el cable no supere
los 25 m.
2.7.2. Un cable exible de 1.5mm2 puede dibujar
un máximo de 10a siempre que el cable no supere
los 35 m .
2.7.3. Un cable exible de 1.5mm2 puede dibujar
un máximo de 16a siempre que el cable no supere
los 20 m .
2.7.4. Un cable exible de 2,5 mm2 puede dibujar
un máximo de 10a siempre que el cable no sea
más largo que 65m .
2.7.5. Un cable exible de 2,5 mm2 puede dibujar
un máximo de 16a siempre que el cable no supere
los 45 m.
2.7.6. Un cable exible de 4mm2 puede dibujar un
máximo de 10a siempre que el cable no supere los
100 m .
2.7.7. Un cable exible de 4mm2 puede dibujar un
máximo de 16a siempre que el cable no sea más
largo que 65m.
2.8. GOTA EN LOS CABLES DE EXTENSION
ELECTRICA:
Cuando se usa un cable de extensión eléctrico
largo para conectar un aparato o herramienta al
generador, se produce una cierta caída o pérdida
de voltaje en el cable de extensión, lo que reduce
el voltaje efectivo disponible para el dispositivo o
herramienta.
3. ETIQUETAS Y EXPLICACIONES DE SEGU-
RIDAD:
Panel frontal de ad-
vertencia l abel
Etiqueta de advertencia de operación
Etiqueta de mezcla de
combustible

Generador de gasolina Gen1000
Potencia generada (C.A) 220V 50Hz
Rendimientonominal máximo W 750
Perforaciónpermanentemance W 650
Rotación / inactividad (+/- 5%) RPM 3000/minuto
Desempeñonominal del motor HP 2.0
Tipo de motor 2-tiempos
Capacidad cúbica cm3 63
Sistema de refrigeración Aire enfriado
Grado de protección IP23
Sistema de encendido TCI
El consumo de combustible l/h 1.3
Depósito de combustible l 4
Tipo de combustible 1:50 mezcla
Peso kg 15
Dimensiones cm 38x32x32
Nivel de ruido dB(A) 85
Clase de protección yo
No permita llamas
abiertas cerca del
generador
Etiqueta de advert-
encia de tipo de
combustible
Etiqueta de información de mantenimiento del ltro
de aire
Etiqueta de adverten-
cia de calor
Etiqueta de adverten-
cia de calor
4. ESPECIFICACIONES:
Las especicaciones están sujetas a cambios sin
previo aviso.

5. COMPONENTES:
1- Mango de fácil agarre
2- Tapón de llenado de combustible
3- Tanque de combustible
4- Corcho de combustible
5- Empuñadura del motor de arranque de
retroceso.
6- Pie de goma
7- Choke
8- Interruptor de encendido
9- Voltímetro
10- Interruptor de reinicio
11- Entrada de red eléctrica.
12- Bujía
13- Salida de escape
Tenga en cuenta que no se suministra ninguna
varilla de conexión a tierra con este generador.
6. CONTROLES PREVIOS A LA OPERACIÓN:
6.1. CONTROL DEL ACEITE DE MOTOR:
6.1.1. El GEN1000 es un modelo de 2 tiempos, lo
que signica que tiene que mezclar aceite de oke
de 2 cuerdas con la gasolina sin plomo.
6.1.2. La recomendación de mezclado es por cada
1 litro de gasolina sin plomo ; Añadir 25 ml de
aceite de 2 tiempos.
6.2. CONTROL DEL COMBUSTIBLE DEL MO-
TOR:
ADVERTENCIA: No cargue combustible mien-
tras esté fumando o cerca de una llama abierta
u otros peligros potenciales de incendio.
6.2.1. Retire la tapa del combustible en la parte
superior del generador para vericar el nivel de
combustible.
6.2.2. Si la gasolina es demasiado baja, solo
agregue el combustible mezclado y Solución de
aceite de 2 tiempos.
6.2.3. Asegúrese de utilizar la pantalla del ltro de
combustible en el ltro de combustible.
6.3. CAPACIDAD DE COMBUSTIBLE PARA EL
GEN1000:
6.3.1. GEN1000 - 4L
ADVERTENCIA:
Asegúrese de revisar cada advertencia para evitar
riesgos de incendio. No vuelva a llenar el tanque
de combustible mientras el motor esté en marcha
o caliente.Asegúrese de que la válvula de combus-
tible esté cerrada antes de repostar. Ten cuidado
de no contaminar el combustible con polvo,
suciedad, agua u otros líquidos u objetos extraños.
Limpie bien todo el combustible derramado antes
de encender el generador.
Asegúrese de que el generador esté libre de
llamas abiertas. No fume whist repostando el
generador.
6.4. COMPROBACIÓN DE PARTES COMPO-
NENTES:
Antes de arrancar el generador, compruebe lo
siguiente:
6.4.1. Compruebe si hay fugas de combustible de
cualquier parte del generador.
6.4.2. Compruebe que todas las tuercas y pernos
estén bien apretados en el generador.
6.4.3. Compruebe si hay componentes dañados
visibles en el generador.
6.4.4. Verique que el generador no esté apoyado
o adyacente a ningún cableado eléctrico.
6.5. COMPRUEBE EL ENTORNO DEL GENERA-
DOR:
ADVERTENCIA:
Asegúrese de revisar cada advertencia para evitar
riesgos de incendio. Mantenga el área circundante
libre de materiales inamables u otros materiales
peligrosos. Mantenga el generador al menos a 3
pies (1 metro) de distancia de todos los edicios
u otras estructuras. Solo opere el generador en
un lugar seco y bien ventilado. Mantenga el tubo
de escape libre de objetos extraños. Mantenga el
generador alejado de llamas. No fume cerca del
generador. Mantenga el generador en una super-
cie plana y nivelada.
No intente bloquear las salidas de aire del genera-
dor con ningún papel u otro material / objeto.
7. PROCEDIMIENTOS OPERATIVOS:
7.1. ARRANCAR EL MOTOR GENERADOR:
7.1.1. Gire el motor “KEY” a la posición “ON /
START”. FIGURA 1
7.1.2. Abra la válvula de combustible. FIGURA 2
7.1.3. Gire la palanca del estrangulador a la

posición “CERRADO” si el motor del generador
está frío. Fig. 3
7.1.4. Tire del arrancador de retroceso hasta sentir
una resistencia. FIG.5
7.1.5. Este es el punto de “compresión”. Vuelva a
colocar el asa en su posición original y, a continu-
ación, tire rápidamente.
7.1.6. Si el motor del generador no arranca
después de varios intentos, repita por encima de
los procedimientos con el botón del estrangulador
devuelto a la posición “ABIERTO”. FIG.4
7.1.7. No tire de la cuerda del arrancador de ret-
roceso completamente.
7.1.8. Después de arrancar el generador, permitir
el arranque. empuñadura para volver a su posición
original sin soltarla. 7.2. USANDO EL PODER
ELÉCTRICO:
ADVERTENCIA:
Asegúrese de que el aparato esté apagado antes
de conectarlo al generador.
No mueva el generador mientras está funcion-
ando.
7.3. Deteniendo el generador:
7.3.1. Apague el interruptor de encendido del
equipo eléctrico y desenchufe el cable del recep-
táculo del generador.
7.3.2. Gire el interruptor a la posición “OFF”. Fig 6
7.3.3. Cierre la válvula de combustible. Fig 7
8. INFORMACIÓN SOBRE LA VIGILANCIA:
8.1. Algunos aparatos necesitan una “oleada” de
energía al arrancar. Esto se conoce comúnmente
como una carga “LAGGING”.
8.2. Esto signica que la cantidad de energía eléc-
trica necesaria para encender el aparato puede
exceder la cantidad necesaria para mantener su
uso.
8.3. Los aparatos y herramientas eléctricas
normalmente vienen con una etiqueta que indica
el voltaje, ciclos / Hz, amperaje (amperios) y la
energía eléctrica necesaria para hacer funcionar el
aparato o la herramienta.
8.4. Consulte con su sucursal más cercana si
tiene preguntas con respecto a las sobrecargas
de energía de ciertos aparatos o herramientas
eléctricas.
8.5. Las cargas eléctricas, como las lámparas
incandescentes y las placas calientes, requieren la
misma potencia de arranque que la necesaria para
mantener su uso. Esto se conoce comúnmente
como una carga “LÍDER”
8.6. Las cargas como las lámparas uorescentes
que utilizan los arrancadores requieren de 1.5 a 2
veces el vataje indicado durante el arranque.
8.7. Los motores eléctricos requieren una gran
corriente de arranque. Los requisitos de potencia
dependen del tipo de motor y su uso. Una vez que
se alcanza la “potencia” suciente para arrancar
el motor, el aparato requerirá solo un -50% de la
potencia para continuar funcionando.
8.8. La mayoría de las herramientas eléctricas
requieren de 1.5 a 3 veces su vataje para fun-
cionar bajo carga durante el uso. Cargas tales
como bombas sumergibles y compresores de aire
requieren
Una fuerza muy grande para empezar. Necesitan
de 3 a 5 veces la potencia normal de funcionami-
ento para comenzar.
9. HORARIO DE MANTENIMIENTO:
PARA TODO SU SERVICIO, MANTENIMIENTO
Y CONSULTAS DE GARANTÍA, POR FAVOR
CONTACTE CON EL HOGAR CREATIVO. POR
FAVOR, CONSULTE LA PÁGINA POSTERIOR
PARA LOS DETALLES DE CONTACTO
9.1. INSPECCIÓN DIARIA:
Antes de encender el generador, compruebe
los siguientes elementos de servicio:
9.9.1. Compruebe si hay suciente combustible
9.9.2. Vibración excesiva, ruido.
9.9.3. Tornillos sueltos o rotos
9.9.4. Fuga de combustible
9.9.5. Entorno seguro
9.2. MANTENIMIENTO PERIÓDICO:
El mantenimiento periódico es vital para el
funcionamiento seguro y eciente del generador.
Consulte la siguiente tabla para ver los intervalos
de mantenimiento periódico.
TAMBIÉN ES NECESARIO QUE EL USUARIO
DE ESTE GENERADOR REALICE EL MAN-
TENIMIENTO Y LOS AJUSTES EN LAS PIEZAS
RELACIONADAS CON LAS EMISIONES LIS-
TADAS A CONTINUACIÓN PARA MANTENER
EL EFECTIVO DEL SISTEMA DE CONTROL DE
EMISIONES.
El sistema de control de emisiones consta de las
siguientes partes:
(1) Carburador y piezas internas.
(2) Sistema de enriquecimiento de arranque en
frío, (si corresponde)
(3) Colector de admisión, (si corresponde)
(4) Elementos del ltro de aire
(5) Bujía
(6) Sistema de encendido magneto o electrónico
(si corresponde)
(7) Sistema de avance / retardo de chispa, (si cor-

responde)
(8) Colector de escape, (si corresponde)
(9) Mangueras, correas, conectores y montajes.
El programa de mantenimiento indicado en la tabla
se basa en el funcionamiento normal del gen-
erador. Si el generador se opera en condiciones
de mucho polvo o en condiciones de carga más
pesadas, los intervalos de mantenimiento deben
reducirse. Esto dependerá de la contaminación del
aceite, la obstrucción de los elementos del ltro y
el desgaste de las piezas.
9.2.1. Tabla de mantenimiento periódico
10. MANTENIMIENTO DE “COMO - A”
10.1. FILTRO DE AIRE DE LIMPIEZA:
PRECAUCIÓN
No lave los elementos con queroseno, gasolina o
aceite.
Un elemento de ltro de aire sucio dicultará el
arranque del generador. También hará que el gen-
erador no funcione correctamente y puede causar
daños permanentes. Mantenga siempre limpio el
elemento del ltro de aire.
10.1.1. El elemento de espuma de uretano debe
lavarse con un detergente de limpieza. Después
de limpiarlo, asegúrese de que esté seco adecu-
adamente antes de volver a instalarlo. Por favor
limpie cada 100 horas.
10.1.2. Limpie el elemento de papel tocándolo y
soplando suavemente para eliminar la suciedad
y el polvo. Nunca utilice aceite para limpiar el
elemento de papel. Por favor limpie cada 50 horas
y reemplace cada 200 horas.
Articulos de Main-
tanace
Cada 8 ho-
ras (diario)
Cada 20ho-
ras
Cada100
horas (se-
manal)
Cada 200
horas (Men-
sual)
Cada
500horas
Cada 1000
horas
Limpie el gen-
erador y revise los
pernos y tuercas
Bujia limpia
Filtro de aire
limpio
Reemplace el
elemento del ltro
de aire
Filtro de combus-
tible limpio
Limpiar y ajustar
la bujía y los elec-
trodos
Reemplace la bujía
Retire el carbón de
la culata (nota 1)
Limpiar y ajustar
laseparación de la
válvula(nota 2)
Limpiar y ajustar
el carburador
(nota 2)
Limpiar y reempla-
zar las escobillas
de carbón.
Reemplace las
líneas de combus-
tible
Motor de revisión
(nota 2)
Si y cuando sea necesario
Limpie los elementos del ltro de aire con más
frecuencia cuando
Operando en ambientes polvorientos.

10.2. LIMPIEZA Y AJUSTE DEL ENCHUFE DE
CHISPA:
10.2.1. Si la bujía está obstruida con carbón,
Límpielo utilizando un limpiador de tapones o un
cepillo de alambre.
10.2.2. Siempre revise la separación del electrodo
después de limpiar.
Ajuste la separación a 0.03 pulgadas (0.7 mm a
0.8 mm).
10.3. LIMPIEZA DEL COLADOR DE COMBUS-
TIBLE:
Tenga en cuenta que el ltro de combustible
elimina la suciedad y el agua del combustible.
10.3.1. Retire la copa del colador y límpiela
adecuadamente eliminando el agua y la suciedad
acumulada.
10.3.2. Limpie la rejilla y la copa del colador con
gasolina.
10.3.3. Sujete rmemente la copa al cuerpo
principal y asegúrese de que no haya fugas de
combustible.
10.4. REEMPLAZO DE LA MANGUERA DE
COMBUSTIBLE:
ADVERTENCIA
Tenga mucho cuidado al reemplazar la manguera
de combustible, ya que la gasolina es extremada-
mente inamable y peligrosa.
NO FUME NI EXPONGA A LAS LLAMAS ABIER-
TAS mientras hace esto.
10.4.1. Asegúrese de cambiar la manguera de
combustible cada 500 horas. No intente hacer esto
mientras la válvula de combustible esté abierta.
10.4.2. Reemplace la manguera de combustible
inmediatamente si se produce una fuga o si la
manguera de combustible se ha perdido.
11. TRANSPORTE Y ALMACENAMIENTO:
11.1. Antes de transportar el generador, asegúrese
de que la válvula de combustible esté en la
posición “OFF” (apagado).
El contacto con un motor caliente o con un sistema
de escape puede causar quemaduras graves o
incendios, siempre permita que el motor se enfríe
antes de transportarlo o almacenarlo. Siempre
asegúrese de que el generador sea transportado
o almacenado en una posición horizontal plana.
La inclinación de la unidad puede provocar un
derrame de combustible que puede provocar un
incendio.
11.2. Antes de almacenar el generador por un
período de tiempo prolongado, asegúrese de que
el área de almacenamiento esté libre de exceso de
agua, polvo y humedad. Por favor siga la siguiente
tabla:

Tiempo de
almacenami-
ento
Mantenimiento recomendado
0-1 meses • No requiere preparación
1-2 meses • Drene el combustible original
en el tanque de combustible y
reemplácelo con combustible
limpio.
2-12 meses • Drene el combustible original
en el tanque de combustible y
reemplácelo con combustible
limpio
• Vaciar combustible del car-
burador.
• Vacíe el combustible de la copa
de sedimentos de combustible
>12 meses • Drene el combustible original
en el tanque de combustible y
reemplácelo con combustible
limpio
• Vaciar combustible del car-
burador.
• Vacíe el combustible de la copa
de sedimentos de combustible
• Retire la bujía y vierta una
cucharadita de aceite de motor
de 4 tiempos en el cilindro. Gire
el motor lentamente tirando del
arrancador de retroceso.Vuelva
a instalar la bujía.
• Después de retirarlo del alma-
cenamiento, drene el combusti-
ble almacenado en un recipiente
adecuadoy reemplácelo con
combustible nuevo antes de
comenzar.
• Drene el carburador aojando el tornillo de
drenaje. Escurrir el combustible en un recipiente
adecuado. Vuelva a instalar el tapón de drenaje.
• Después de haber apagado el corcho de com-
bustible, retire la taza de sedimentación , vacíe
el combustible, vuelva a instalar la taza y
asegúrela correctamente.
NUNCA GUARDE EL GENERADOR DENTRO
DE UNA CASA O OFICINA. NO GUARDE EL
GENERADOR DONDE ES SUSTENTABLE A LA
LLUVIA O AL AGUA.
12. SOLUCIÓN DE PROBLEMAS:
Si el motor del generador no arranca después de
varios intentos y si no hay electricidad disponible
en la toma de salida, verique la tabla a continu-
ación. Si el generador aún no arranca o genera
electricidad, contáctese con CREATIVE HOUSE-
WARES (vea la página posterior de este manual
para obtener los detalles de contacto)
Cuando el motor no arranca:
Check if the
choke lever
is in it’s prop-
er position
Set the choke lever to the
“CLOSED” position
Check if the
fuel cork is
open
If it is closed, open it
Check the
fuel level
If the fuel tank is empty, rell it.
CAUTION: Do not overll
Check if
the engine
switch is in
the “OFF”
position
Turn the engine switch to the
“ON” position.
Ensure that
the gen-
erator is not
connected to
an appliance
If it is connected to an appliance,
turn off the power switch on the
appliance and unplug it.
Test to see
if the spark
plug cap is
loose.
If it is loose, push the spark plug
cap back tight
Check the
spark plug
for carbon
build up

Français Notice ORIGINALE
GÉNÉRATEUR
GEN1000
IMPORTANT:
Merci d’avoir acheté un groupe électrogène à
essence Casals (ci-après dénommé le «généra-
teur»).
Ce manuel vous aidera à utiliser et à entrete-
nir votre groupe électrogène. Ce manuel est la
dernière version. Avec l’amélioration continue et la
mise à niveau de ce produit, le fabricant se réserve
le droit de modier ce manuel sans préavis. Le
fabricant n’assume aucune responsabilité pour
les informations incorrectes contenues dans ce
manuel.
Ce manuel fait partie intégrante du générateur.
Lorsque la génératrice est transférée à d’autres
personnes, ce manuel doit être remis au nouveau
propriétaire.
Certaines informations importantes dans ce ma-
nuel seront indiquées de la manière suivante (voir
ci-dessous). Les utilisateurs doivent prêter uneat-
tention particulière à ces instructions.
La gamme de générateurs CAS ALS est sûre et
able , mais une utilisation incorrecte de ces
produits peut provoquer des blessures et / ou
endommager votre machine.
Veuillez lire attentivement ce manuel avant de
l’utiliser car ce produit est tenu de fonctionner
strictement conformément à ce manuel.
AVIS IMPORTANTS:
VEUILLEZ PORTER UNE ATTENTION PARTICU-
LIÈRE AUX DÉCLARATIONS PRÉCÉDENTES
PAR LES MOTS SUIVANTS:
Conseils de sécurité et avertissements!
Lisez attentivement ces instructions avant de
mettre la génératrice portable en marche et
conservez-les pour référence ultérieure . Le non
respect de ces instructions peut entraîner un ac-
cident. L’utilisation de cette machine ne sera sûre
et durable que si vous suivez ces instructions.
L’utilisation de cette génératrice portable n’est
PAS recommandée à des ns commerciales et
industrielles.
1. PRECAUTIONS GENERALES DE SECURITE:
1.1. Ce générateur n’est pas destiné à être utilisé
par des personnes (y compris des enfants) ayant
des capacités physiques, sensorielles ou men-
tales réduites, ou manquant d’expérience et de
connaissances, à moins qu’une surveillance ou
des instructions concernant leur utilisation par une
personne responsable de leur sécurité ne leur ait
été fournies.
1.2. La génératrice ne doit être utilisée que dans le
respect des prescriptions de la documentation de
fonctionnement et sous surveillance permanente.
1.3. Le générateur ne doit pas être utilisé à
l’intérieur!
1.4. Le carburant (essence) est combustible et
s’enamme facilement. Ne pas effectuer de ravi-
taillement en carburant pendant le fonctionnement.
1.5 N’utilisez le carburant spécié que lorsque
vous utilisez le générateur. (95 sans plomb mé-
langé avec de l ‘huile 2 temps.
Mélanger 1 litre d’essence avec 25 ml d’huile à 2
temps)
1.6. Ne pas faire le plein en fumant ou à proximité
de ammes nues. Ne pas trop remplir ni renverser
de carburant. Si cela se produit, nettoyez correcte-
ment le carburant sur et autour du générateur
avant de l’utiliser.
1.7. Faites attention autour de la génératrice car
certaines parties du moteur à combustion interne
sont chaudes et peuvent causer des brûlures.
Faites attention à tous les signes d’avertissement
afchés sur le groupe électrogène.
1.8. Les gaz d’échappement du moteur sont tox-
iques. Ne pas faire fonctionner la génératrice dans
une pièce non ventilée
1.9. Vériez régulièrement que les boulons et les
écrous sont correctement serrés car ils pourraient
perdre à cause des vibrations du générateur pen-
dant l’utilisation.
1.10. Avant d’utiliser le générateur, assurez-vous
que vous avez vérié le programme d’entretien
périodique dans le manuel d’utilisation.
1.11. Faites attention au câblage ou aux rallonges
du générateur au périphérique connecté. Si le l
est sous la génératrice ou en contact avec une
pièce vibrante, il peut se casser et éventuellement
provoquer un incendie, un épuisement de la géné-
ratrice ou un risque de choc électrique. Remplacez
immédiatement les cordons endommagés ou usés.
1.12. Assurez-vous que les spécications de la
rallonge que vous utilisez sont compatibles avec le

générateur.
1.13. Ne pas utiliser sous la pluie, dans des condi-
tions humides ou mouillées ou avec des mains
mouillées. L’opérateur peut subir un choc élect-
rique grave si le générateur est humide.
1.14. S’il est humide, essuyez-le bien avant de
commencer. Ne pas verser de l’eau directement
sur le générateur, ni laver avec de l’eau.
1.15. Ne connectez pas le générateur au réseau
électrique.
1.16. Gardez les enfants et tous les passants à
une distance de sécurité du générateur lors de leur
utilisation.
1.17. Il est absolument essentiel que vous con-
naissiez et compreniez l’utilisation sûre et ap-
propriée de l’outil ou de l’appareil électrique que
vous souhaitez connecter au générateur. Tous les
opérateurs doivent lire, comprendre et suivre le
manuel d’ utilisation de l’outil / de l’appareil . Les
applications et les limites des outils et des ap-
pareils doivent être comprises. Conservez tous les
manuels d’instructions et dans un endroit sûr pour
pouvoir vous y référer ultérieurement.
1.18. Toujours éteindre le disjoncteur de la généra-
trice quand il n’est pas utilisé.
2. INFORMATIONS DE SÉCURITÉ ÉLECT-
RIQUE:
2.1. Les équipements électriques, y compris
les câbles, les cordons et les ches, ne doivent
pas être défectueux. S’il vous plaît vérier avant
d’utiliser.
2.2. Ne branchez pas le générateur directement
dans une prise murale.
2.3. Le générateur ne doit pas être con-
necté à d’autres sources telles que le réseau
d’alimentation de la compagnie d’électricité. Dans
les cas particuliers où une connexion en attente
avec des systèmes électriques existants ou une
intégration avec ceux-ci est souhaitée, notez qu’il
est légalement obligatoire que ces connexions ou
cette intégration ne puissent être effectuées que
par un technicien qualié.
2.4. La protection contre les chocs électriques
dépend des disjoncteurs spécialement adaptés à
la génératrice. Si un disjoncteur doit être remplacé,
il doit être remplacé par un disjoncteur ayant des
caractéristiques nominales et des performances
identiques.
2.5. En raison de fortes contraintes mécaniques,
n’utilisez que des câbles robustes et exibles .
2.6 Si le générateur est de construction de classe
II, le générateur ne doit pas nécessairement être
mis à la terre.
2.7 Ensembles de rallonge de cordon:
2.7.1. Un câble exible de 1 mm2 permet de tirer
un maximum de 10A à condition que le câble ne
dépasse pas 25 m.
2.7.2. Un câble exible de 1,5 mm2 permet de tirer
un maximum de 10a à condition que le câble ne
dépasse pas 35 m .
2.7.3. Un câble exible de 1,5 mm2 permet de tirer
un maximum de 16a à condition que le câble ne
dépasse pas 20 m .
2.7.4. Un câble exible de 2,5 mm2 permet de tirer
un maximum de 10a à condition que le câble ne
dépasse pas 65 m .
2.7.5. Un câble exible de 2,5 mm2 permet de tirer
un maximum de 16a à condition que le câble ne
dépasse pas 45 m
2.7.6. Un câble exible de 4mm2 permet de tirer
un maximum de 10a à condition que le câble ne
dépasse pas 100 m .
2.7.7. Un câble exible de 4mm2 permet de tirer
un maximum de 16a à condition que le câble ne
dépasse pas 65 m .
2.8. DROP DANS LES CORDONS D’EXTENSION
ÉLECTRIQUES:
Quand une longue rallonge électrique est utilisée
pour connecter un appareil ou un outil au géné-
rateur, une certaine chute ou perte de tension
survient dans la rallonge, ce qui réduit la tension
efcace disponible pour l’appareil ou l’outil.
3. STICKERS DE SÉCURITÉ ET EXPLICATIONS:
Panneau
d’avertissement avant
l abel
Étiquette d’avertissement de fonctionnement
Étiquette du mélange
de carburant
Table of contents
Languages:
Other Casals Portable Generator manuals
Popular Portable Generator manuals by other brands

Generac Power Systems
Generac Power Systems IX1600 owner's manual

Predator
Predator 59206 Owner's manual & safety instructions

Siemens
Siemens Standby Generators manual

Benchmark
Benchmark BM Series manual

COMPANION
COMPANION 580.327112 owner's manual

Agilent Technologies
Agilent Technologies ESG series quick start guide

Atlas Copco
Atlas Copco QAS38 Yd(S) instruction manual

Robin America
Robin America RGV2800 Instructions for use

Goodyear
Goodyear GY 2300I owner's manual

Huck
Huck HOWMET AEROSPACE Powerig 964B instruction manual

Briggs & Stratton
Briggs & Stratton 030248-0 Operator's manual

Siemens
Siemens SINAMICS S120 manual