Casio 2376 Configuration guide

2376-1
Module No. 2376
GENERAL GUIDE
•Press Cto change from mode to mode. Each mode is explained in detail on the following pages.
•In any mode, press Lto illuminate the display.
Timekeeping Mode
Time Date
Press D.
Sensor
Month Day of
week
Date
▲
▲
▲
Altimeter Mode Altitude
Differential Mode
Data Recall
Mode
Barometer ModeStopwatch ModeAlarm Mode
▲
▲
▲
▲
▲
▲
TIMEKEEPING MODE
•In the Timekeeping Mode, press Dto switch between
time and date displays.
To set the digital time and date
1. Hold down Awhile in the Timekeeping Mode until the
seconds digits start to flash on the display. The seconds
flash because they are
selected
.
2. Press Cto change the selection in the following
sequence.
Seconds Hour Minutes
Date Month Year 12/24-Hour
Format
Crown
Minutes hand
Seconds hand
Hour hand
PM
indicator
Hour
Minutes
Seconds
Barometric activity indicator
3. While the seconds digits are selected (flashing), press Dto reset the seconds to
“00”. If you press Dwhile the seconds count is in the range of 30 to 59, the
seconds are reset to “00” and 1 is added to the minutes. If the seconds count is in
the range of 00 to 29, the minutes count is unchanged.
4. While any other digits (besides seconds) are selected (flashing), press Dto
increase the number or Bto decrease it. Holding down either button changes the
current selection at high speed.
While the 12/24-hour setting is selected, press Dor Bto switch between the two
formats.
5. After you set the time, format, and date, press Ato return to the Timekeeping
Mode.
•If you do not operate any button for a few minutes while a selection is flashing,
the flashing stops and the watch goes back to the Timekeeping Mode
automatically.
•The day of the week is automatically set in accordance with the date.
•The date can be set within the range of January 1, 1990 to December 31, 2029.
To set the analog time
1. Pull the crown out to stop the seconds hand. If you plan to restart analog
timekeeping on some time signal (from the radio or television), pull the crown out
when the seconds hand is at the 12 o’clock position.
2. Set the hands by turning the crown.
3. Push the crown back in to restart timekeeping.
•Analog time is kept by a mechanical timepiece. Because of this, the seconds
hand may not start to move exactly when you push the crown back in.
About the Barometric Activity Indicator
This watch is equipped with an atmospheric pressure
monitor that takes atmospheric readings. Regardless of
the mode the watch is in, the monitor measures the
atmospheric pressure every three hours (starting from
midnight). Two readings are taken and their average is
applied as the measured value.
Barometric activity
indicator
The direction of the barometric activity indicator is determined using the last two
readings taken by the atmospheric pressure monitor. The last two readings are
compared, and the barometric activity indicator indicates their difference as shown in
the following table.
•This indicator appears on the display in the Timekeeping Mode.
•Some countries refer to the barometric pressure unit hecto-pascal (hPa) as millibars
(mb). It really makes no difference, because 1 hPa = 1 mb. In this manual, we use
hPa/mb or hPa (mb).
Change Indicator
Increase of 3 hPa/mb
Decrease of 3 hPa/mb
Within ±3 hPa/mb None
ALTIMETER MODE
A built-in altimeter uses a pressure sensor to detect the current air pressure, which is
then used to estimate the current altitude in accordance with ISA (International
Standard Atmosphere) values for altitude and air pressure. The readout from the
pressure sensor can be switched between meters (m) and feet (ft.).
•If you do not press any button for one hour in the Altimeter Mode, the display returns
to the Timekeeping Mode automatically.
About Altimeter Mode measurements
The Altimeter Mode automatically measures your current altitude. As soon as you
enter the Altimeter Mode, measurements are taken every three seconds for the first
five minutes. After that, measurements are taken every minute.
Important!
•This watch estimates altitude based on air pressure. This means that altitude
readings for the same location may vary if air pressure changes.
•Sudden changes in the weather make it impossible to produce accurate altitude readings.
•Do not use this watch while participating in sports where there are sudden altitude
changes. Also, do not use this watch for applications that demand professional or
industrial level precision. This watch should not be used while engaging in the
following activities: sky diving, hang gliding, paragliding, gyrocopter riding, glider
riding, etc.
•In order to avoid measurement problems caused by differences in the watch’s
temperature, be sure to wear the watch so that it comes into direct contact with your
skin.
Application
Measurement of altitudes during hiking or mountain climbing.
Reading the Altimeter Mode display
•While an altitude measurement is in progress, the unit of measurement (M or F)
flashes on the display.
•The display shows the message “FULL” if a measured value falls outside the
measuring range. The normal display returns as soon as the pressure falls within the
allowable range again.
Altitude differential display
(displayed in the Altitude
Differential Mode)
Hold down D.
Release
Mode indicator
Current altitude
•Hold down Dto show the altitude differential display. If a measurement is in
progress, the current altitude measurement is shown. If no measurement is in
progress, the display shows “– – – –”.
Switching between meters and feet
1. In the Altimeter Mode, hold down Auntil the altitude
value starts flashing on the display.
2. Press Cto select the meters/feet settings (Mor F
flashing).
3. Press Bor Dto select either meters “M” or feet “F”.
4. After you select Mor F, press Ato return to the
Altimeter Mode.
Calibrating the Altimeter
The altitude measurements produced on this watch may be affected by atmospheric
pressure. Because of this, we suggest that you calibrate the altimeter using
information available from a map or other source.

2376-2
To calibrate the altimeter
1. In the Altimeter Mode, hold down Auntil the altitude
value starts flashing on the display.
2. Each press of Dincreases the displayed altitude value
by 5 m, while pressing Bdecreases it. Holding down
either button changes the value at high speed.
•If you have selected feet as your unit of
measurement, the above operations change the
reading by 20 ft.
•You can calibrate the altitude within the range of 0 m
to 4,000 m (or 0 ft. to 13,120 ft.).
3. After calibrating the altimeter, press Ato return to the Altimeter Mode.
•After you press A, the numbers on the display indicate that the watch is making
internal adjustments. This operation takes about nine seconds. Once adjustments
are finished, the altitude display appears.
ALTITUDE DIFFERENTIAL MODE
In the Altitude Differential mode, the watch displays the
difference between a starting altitude and each
subsequent measured altitude value. Differential data
from the start of the measurement to the end is stored in
memory.
When you start a new measurement, the initial
measurement is set as 0 (meters or feet). Each
subsequent measurement is compared with zero, and the
difference is shown on the display. Measurements are
taken every three seconds.
•If you do not press any button for three hours in the Altitude Differential Mode, the
display automatically returns to the Timekeeping Mode display.
•The unit of measurement used in the Altitude Differential Mode is the same as that
specified in the Altimeter Mode. To change this unit, use the procedure in “Switching
between meters and feet”.
Mode indicator
Applications
•Measurement of the height of a building
•Measurement of changes in altitude while hiking or mountain climbing
How measurements are taken
The Altitude Differential Mode can be used to measure total altitude differential and
point-to-point differentials.
To measure total altitude differential, start the operation and let the watch take
automatic measurements every three seconds. In such a case, the display is updated
every two measurements (six seconds), and the final value shown is the total altitude
differential.
For point-to-point altitude differential measurements, you press a button at the point
up to which you want the differential measured and shown on the display.
Note
•Before performing an Altitude Differential Mode measurement, make sure that the
display shows “– –––M”or “– –––F”. If it doesn’t, hold down the Dbutton in the
Altitude Differential Mode until the above described display appears.
Point-to-point
measurement
End
Total
measurement
Start
To perform a total altitude differential measurement
1. To start the measurement, hold down Duntil “M”or “F”
appears flashing on the display.
•Measurements start to be taken every three seconds.
The display is updated every six seconds with the
average value of the last two measurements.
•The unit of measurement (“M”or “F”) flashes on the
display while a measurement is in progress.
•The display shows “FULL”if a measured value falls
outside the measuring range. The normal display
returns as soon as the pressure falls within the
allowable range again.
2. To clear the displayed data and store it into memory, hold down Duntil the display
shows “– –––M”or “– –––F”.
•For details on the memory, see “About altitude differential memory management”.
Altitude differential
To perform a point-to-point differential measurement
1. To start the measurement, hold down Duntil “M”or “F”appears flashing on the
display.
2. When you reach the point up to which you want to measure the altitude differential,
press B. The altitude differential from your starting point (altitude zero) and your
current position flashes on the display for about six seconds.
•After six seconds, the display returns to the normal altitude differential display.
3. Repeat step 2 as many times as you like.
•When you repeat step 2, remember that the resulting value is not the difference
between your starting point and your current position, but rather between the
point where you last pressed Band your current position.
4. To clear the displayed data and store it into memory, hold down Duntil the display
shows “– –––M”or “– –––F”.
•For details on the memory, see “About altitude differential memory management”.
Maximum Ascent/Maximum Descent
Pressing the Abutton in the Altitude Differential Mode while a measurement is in
progress shows the maximum altitude reached (maximum ascent) during the current
measurement. Press Aagain and the display changes to the maximum negative
altitude reached (maximum descent). These values are calculated in relation to the
start point (altitude zero) of the measurement.
•If you do not press a button for about six seconds while the maximum ascent or
maximum descent value is shown, the display automatically returns to the altitude
differential display.
Altitude Differential Display
Maximum Ascent Maximum Descent
About altitude differential memory management
You can store up to three sets of altitude data in memory. Once memory is full, the
next set of data recorded causes the oldest set of data in memory to be deleted. Note
that no data is stored in memory if the maximum ascent/maximum descent does not
exceed ±15 meters (40 feet).
Memory 2 Memory 3
Memory 1
Newest data Cleared from memory
The following table shows the data that makes up each set.
Data
Total Altitude
Differential
Maximum Ascent
Maximum Descent
Total Ascent
Total Descent
Description
Differential between the end point and the starting point
(altitude zero).
Maximum differential between the end point and the starting
point (altitude zero).
Maximum negative differential between the end point and the
starting point (altitude zero).
Total of ascent values
Total of descent values
Total Ascent = Ascent 1 + Ascent 2
Total Descent = Descent 1 + Descent 2
•The measured data can be recalled and manually deleted in the Data Recall Mode.
Ascent 1
Descent 1
Ascent 2 Maximum Ascent
Start
End
Total Altitude
Differential
Maximum Descent Descent 2
DATA RECALL MODE
Use the Data Recall Mode to recall and delete altitude
differential data from memory. Whenever you enter the
Data Recall Mode from another mode, the newest data is
displayed first.
To recall data from memory
1. In the Data Recall Mode, press Bto scroll through
displays for altitude differential memory data sets 1, 2,
and 3.
2. While any one of the memory data set displays is shown, press Dto scroll through
the data contained in that set in the following sequence.
Mode indicator
Memory number
[ Memory Number Display ]

2376-3
•For details on the meanings of the data contained in each display, see the data
description table.
Memory Number Display Total Altitude Differential Maximum Ascent
Maximum DescentTotal AscentTotal Descent
To delete data from memory
1. In the Data Recall Mode, display the memory number of the data you want to
delete.
Important!
The delete operation erases the entire set of data you have selected. You cannot
delete parts of a set of data.
2. Holding down Auntil the memory number starts to flash.
3. To clear all of the data in the currently displayed set, holding down Cand D
simultaneously until the display shows “CLEAR”.
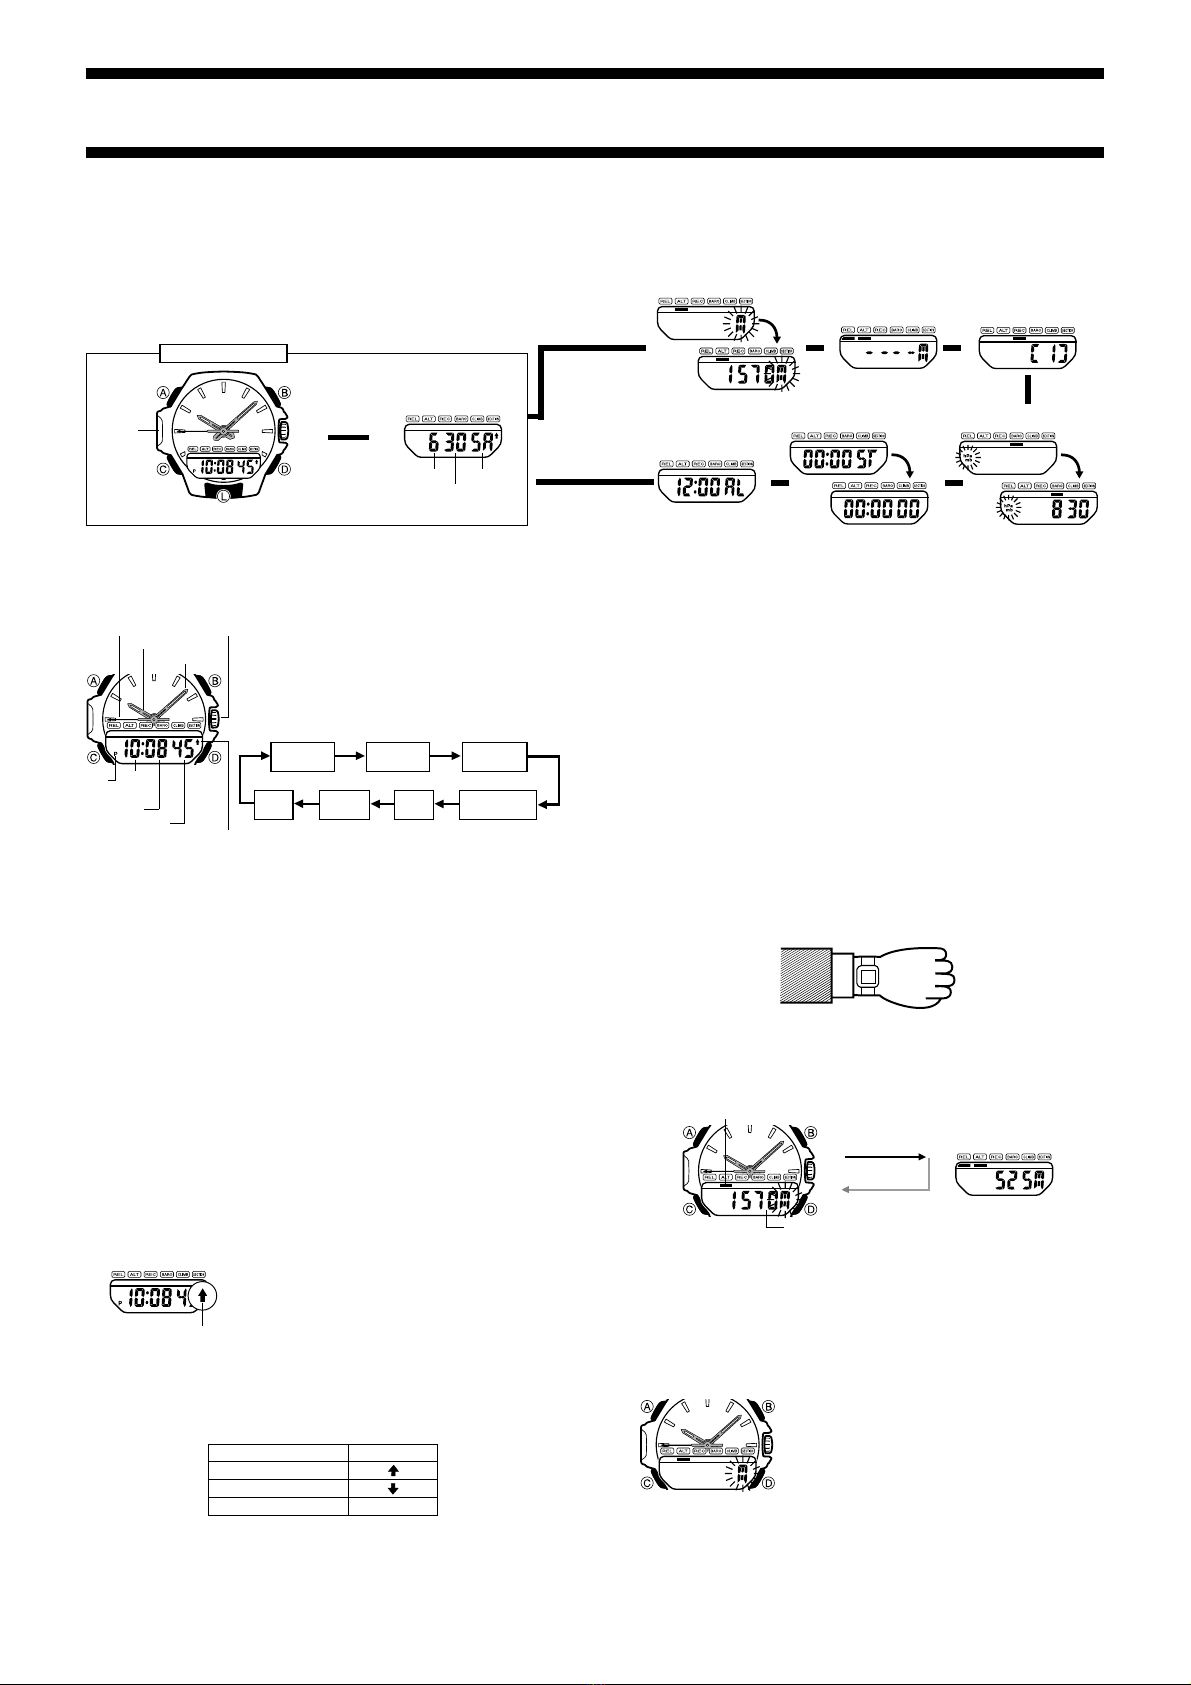
BAROMETER MODE
This watch uses a pressure sensor to measure
atmospheric pressure. In addition to readings taken for
the Barometric Activity Indicator, there is also a Barometer
Mode that you can use for measuring atmospheric
pressure. The readout from the pressure sensor can also
be switched between hecto-pascal/millibars (hPa/mb) and
inches/Hg (inHg). The barometer can be calibrated to
correct for measurement error.
•The unit “hPa/mb”or “inHg”flashes on the display while
the measurement operation is in progress.
•If you do not press any button for one hour in the
Barometer Mode, the display returns to the Timekeeping
Mode automatically.
Mode indicator
Atmospheric
pressure
Important!
The barometer that is built into this watch measures changes in atmospheric
pressure, which you can then apply to your own weather predictions. It is not intended
for use as a precision instrument in official weather prediction or reporting
applications.
How to interpret atmospheric readings
•Atmospheric pressure indicates changes in atmospheric conditions, and you can
predict weather with reasonable accuracy by monitoring these changes. Rising
atmosphere pressure indicates good weather, while falling pressure indicates
deteriorating weather conditions.
•The atmosphere pressure you see in the newspaper and on TV weather reports are
measurements that are corrected to 0 m sea level values.
Applications
•Measurement of atmosphere changes while hiking to predict coming weather.
•Prediction of weather for golf or other outdoor activities.
About the Barometer Mode measurement
As soon as you enter the Barometer Mode, measurements are taken every 3 seconds
for the first five minutes. After that, measurements are taken every minute. The
display unit for Barometer Mode measurements is 1 hPa/mb (or 0.05 inHg) and the
display range is 600 hPa/mb to 1,099 hPa/mb (or 17.70 inHg to 32.45 inHg).
•The display shows “FULL”if a measured value falls outside the range of 600
hPa/mb to 1,099 hPa/mb (or 17.70 inHg to 32.45 inHg). The normal display will
return as soon as the pressure returns within the allowable range.
Switching between hecto-pascal/millibar and inches/Hg
In the Barometer Mode, press Dto select either hecto-pascal/millibar (hPa/mb) and
inches/Hg (inHg).
Calibrating the Atmospheric Pressure Measurement
The sensor of this watch is calibrated at the factory before shipment and further
adjustment is normally not required. If noticeable error is found in the atmospheric
pressure readings produced by the watch, you can adjust it to correct the error.
Important!
Incorrectly adjusting the atmospheric pressure measurement of this watch can result
in incorrect readings. Compare the readings produced by the watch with those of
another reliable, accurate barometer.
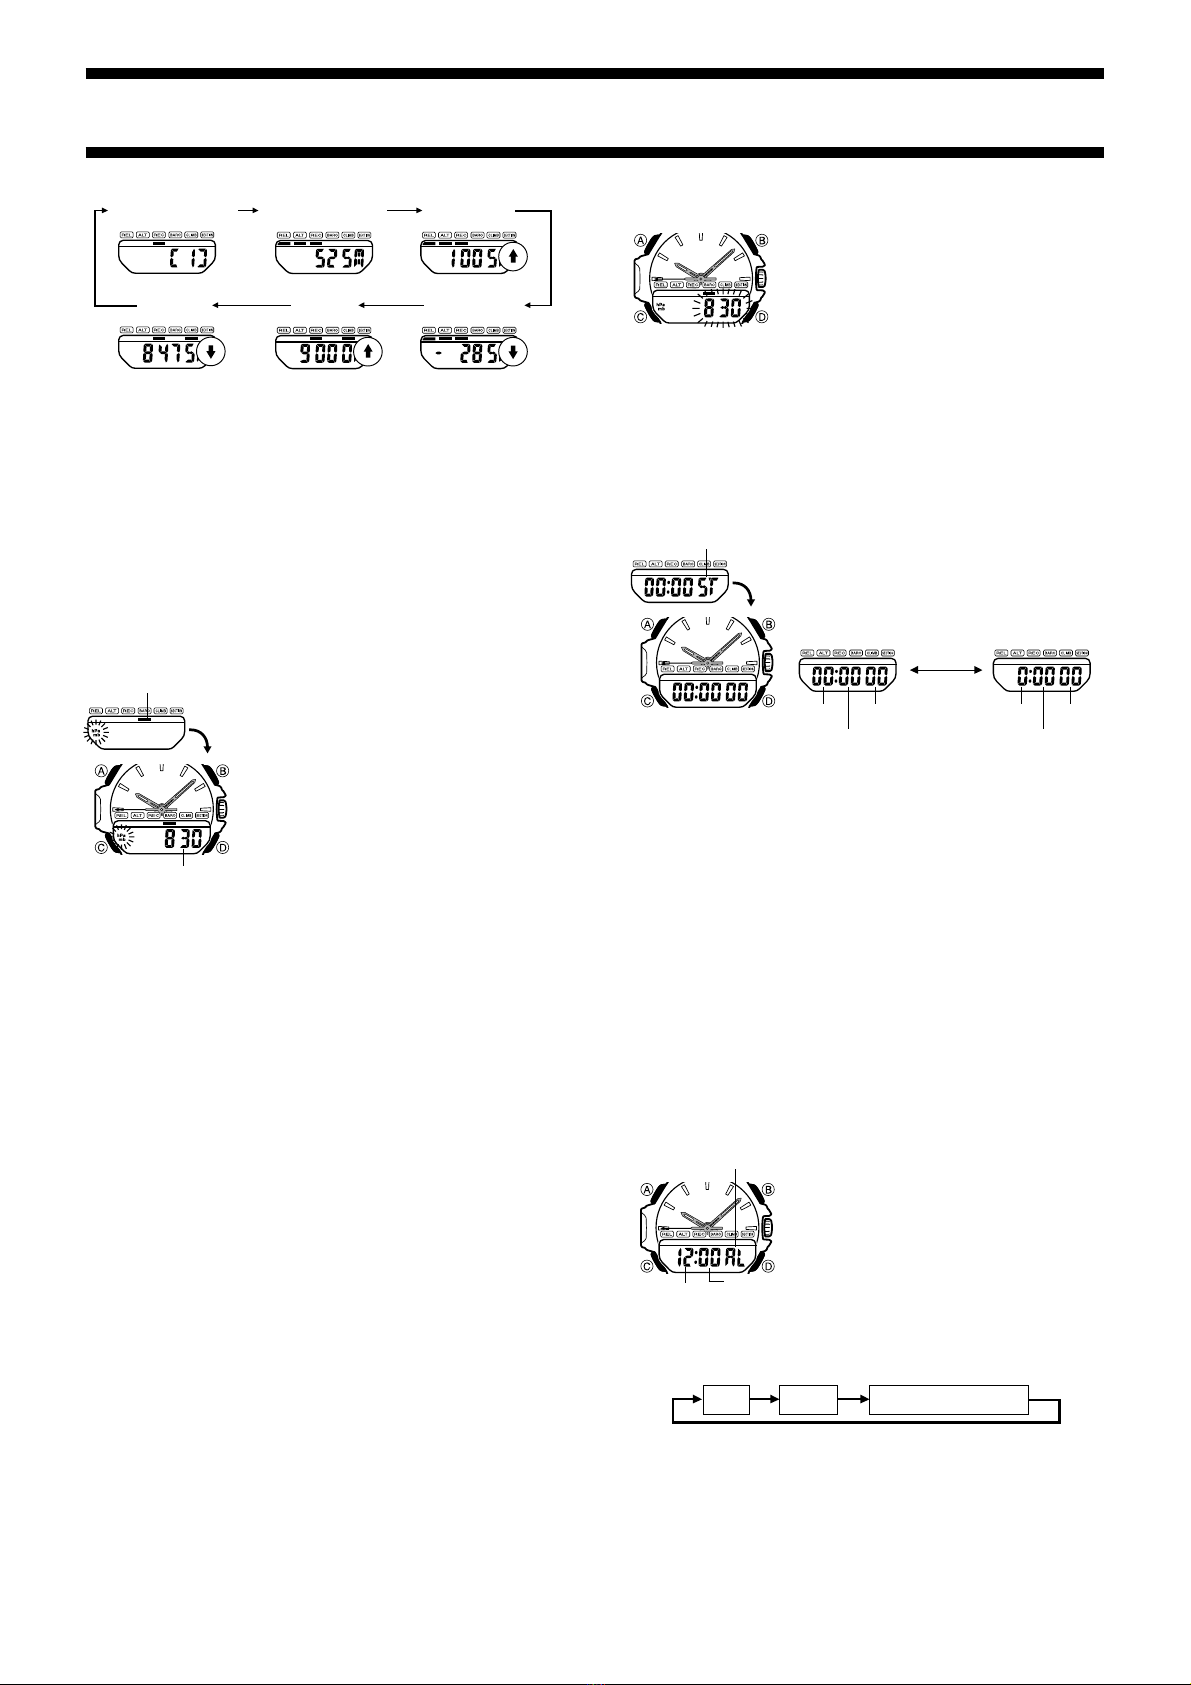
To calibrate the barometer
1. In the Barometer Mode, hold down Auntil the
atmospheric pressure value should start flashing on the
display.
2. Each press of Dincreases the displayed atmospheric
pressure by 1 hPa/mb, while pressing Bdecreases it.
Holding down either button changes the value at high
speed.
•If you have selected inHg as your unit of
measurement, the above operations change the
reading by 0.05 inHg.
•Atmospheric pressure can be calibrated within the range of 600 hPa/mb to 1,099
hPa/mb (17.70 inHg to 32.45 inHg).
3. After calibrating the barometer, press Ato return to the Barometer Mode display.
•After you press A, the numbers on the display indicate that the watch is making
internal adjustments. This operation takes about nine seconds. Once adjustments
are finished, the Barometer Mode display appears.
STOPWATCH MODE
The Stopwatch Mode lets you measure elapsed time, split
times, and two finishes. The range of the stopwatch is 23
hours, 59 minutes, 59.99 seconds.
To change the measured time format
In the Stopwatch Mode, press Ato change the measure
time display format between minutes (00:00 00) and
hours (0:00 00).
Mode indicator
Press A.
Minutes
Seconds
1/100 second Hours
Minutes
Seconds
To measure elapsed time
1. Press Dto start the stopwatch.
2. Press Dto stop the stopwatch.
•You can resume the measurement operation by pressing Dagain.
3. Press Bto clear the stopwatch to all zeros.
To record split times
1. Press Dto start the stopwatch.
2. Press Bto display the timing up to that point. Stopwatch timing continues
internally.
3. Press Bto clear the split time and to continue time measurement on the display.
•You can repeat steps 2 and 3 as many times as you want.
4. Press Dto stop the time measurement.
5. Press Bto clear the stopwatch to all zeros.
To time first and second place finishes
1. Press Dto start the stopwatch.
2. Press Bwhen the first finisher crossed the line, and record the time.
3. Press Dwhen the second finisher cross the line.
4. Press Bto display the finishing time of the second finisher.
5. Press Bagain to clear the stopwatch to all zeros.
ALARM MODE
When the Daily Alarm is switched on, the alarm sounds
for 20 seconds at the preset time each day. Press any
button to stop the alarm after it starts to sound.
When the Hourly Time Signal is switched on, the watch
beeps every hour on the hour.
Note that the Daily Alarm and the Hourly Time Signal
operate based on the digital time setting.
To set the alarm time and switch the Hourly Time Signal on and off
1. Hold down Awhile in the Alarm Mode until the hour digits start to flash on the
display. The hour digits flash because they are
selected
. At this time the Daily Alarm
is switched on automatically.
Mode indicator
Hour Minutes
2. Press Cto change the selection in the following sequence.
Hour Minutes Hourly Time Signal Setting
3. Press Dto increase the selected hour or minutes digits or Bto decrease them.
Holding down either button changes the selection at high speed.
•The format (12-hour and 24-hour ) of the alarm time matches the format you
select for normal timekeeping.
•When setting the alarm time using the 12-hour format, take care to set the time
correctly as morning (am) or afternoon (pm).

2376-4
4. While the Hourly Time Signal setting is selected, press Bor Dto switch the
hourly time signal on and off.
5. After you set the alarm time, press Ato return to the Alarm Mode.
On Off
To switch the Daily Alarm on and off
While in the Alarm Mode, press Dto switch the Daily Alarm on and off.
About the alarm
There are two different alarm sounds to choose from: high and low.
To test the alarm
Hold down Bwhile in the Alarm Mode to sound the alarm. Each time you test the
alarm (by holding down B) a different alarm sounds. The sound produced the last
time you test the alarm is the one used for the alarm.
On Off
ERROR WARNING FUNCTION
This watch is designed to automatically stop taking measurements when there is a
sensor malfunction, when battery power drops below a certain level, or when
temperature drops below –10°C (or 14°F).
Sensor malfunction Low battery or Low temperature
Timekeeping Mode Timekeeping Mode
Alarm function disabled.
Important!
There may be cases where the “SENSOR Error”or “HELP”message is cleared once
you change modes. In this case, you can continue using the watch normally unless
the error warning message reappears.
Whenever you have a sensor malfunction, be sure to take the watch back to the
store or dealer where you purchased it. If the appearance of the “HELP”message
is caused by extremely low temperature, the message should clear from the
display when normal temperature returns.
THINGS TO KNOW ABOUT ALTITUDES
Relationships between altitude, barometric pressure, and temperature
Generally, atmospheric pressure and temperature decrease as altitude increases.
This watch bases its altitude measurements on International Standard Atmosphere
(ISA) values stipulated by the International Civil Aviation Organization (ICAO), which
define relationships between altitude, atmospheric pressure, and temperature.
0 m 500 m
1000 m
1500 m
2000 m
2500 m
3000 m
3500 m
4000 m
899 hPa/mb
795 hPa/mb
701 hPa/mb
616 hPa/mb
8.5°C
2°C
–4.5°C
–11°C
15°C1013 hPa/mb
About 6.5°C
per 1000 m
About 8 hPa/mb per 100 m
About 9 hPa/mb per 100 m
About 10 hPa/mb per 100 m
About 11 hPa/mb per 100 m
About 12 hPa/mb per 100 m
ALTITUDE ATMOSPHERIC PRESSURE TEMPERATURE
Source: International Civil Aviation Organization
0 ft 2000 ft
4000 ft
6000 ft
8000 ft
10000 ft
12000 ft
14000 ft
25.84 inHg
22.23 inHg
19.03 inHg
44.7°F
30.5°F
16.2°F
59.0°F29.92 inHg
About 3.6°F
per 1000 ft
About 0.15 inHg per 200 ft
About 0.17 inHg per 200 ft
About 0.192 inHg per 200 ft
About 0.21 inHg per 200 ft
Source: International Civil Aviation Organization
ALTITUDE ATMOSPHERIC PRESSURE TEMPERATURE
How altitude is expressed
There are two standard methods of expressing altitude: Absolute altitude and relative
altitude. Absolute altitude expresses an absolute height above sea level. Relative
altitude expresses the difference between the height of two difference places.
Height of building 130 m
(Relative altitude)
Rooftop at an altitude of
230 m above sea level
(Altitude above sea level)
Sea
Example: To obtain readings that are close to absolute altitude.
When you are out hiking or mountain climbing, calibrate the altimeter using an altitude
value from another source (a signpost or map, for example). Do this just before you
start your altitude measurements.
1. At Point A, calibrate the altimeter to 400
meters.
2. Proceed from Point Ato Point B, taking
altimeter measurements along the way.
•If you also have altitude data for Point B, you
should again calibrate the altimeter there.
•Be sure to recalibrate at Point Bif changing
weather conditions produce altitude reading
errors.
•The following conditions will prevent you from
obtaining accurate readings.
When atmospheric pressure changes because of changes in the weather
Extreme temperature changes
When the watch itself is subjected to strong impact
400
A
B
BACKLIGHT PRECAUTIONS
In any mode, Press Lto illuminate the display for about two seconds.
•The illumination provided by the backlight may be hard to see when viewed under
direct sunlight.
•The battery that powers the backlight is different from the battery that powers other
watch operations.
•Frequent use of the backlight shortens the battery life.
•The backlight of this watch illuminates the analog face only.
Other Casio Watch manuals

Casio
Casio Baby-G BG1001-1V User manual

Casio
Casio 3560 User manual

Casio
Casio 2477 User manual

Casio
Casio LW-24HB-2AV Configuration guide

Casio
Casio 3461 User manual

Casio
Casio W211-2BV User manual

Casio
Casio 5015 User manual

Casio
Casio 3057 User manual

Casio
Casio 3527 User manual

Casio
Casio 5605 User manual