MI/1455 - 12aed. DEU - 10/2016
1
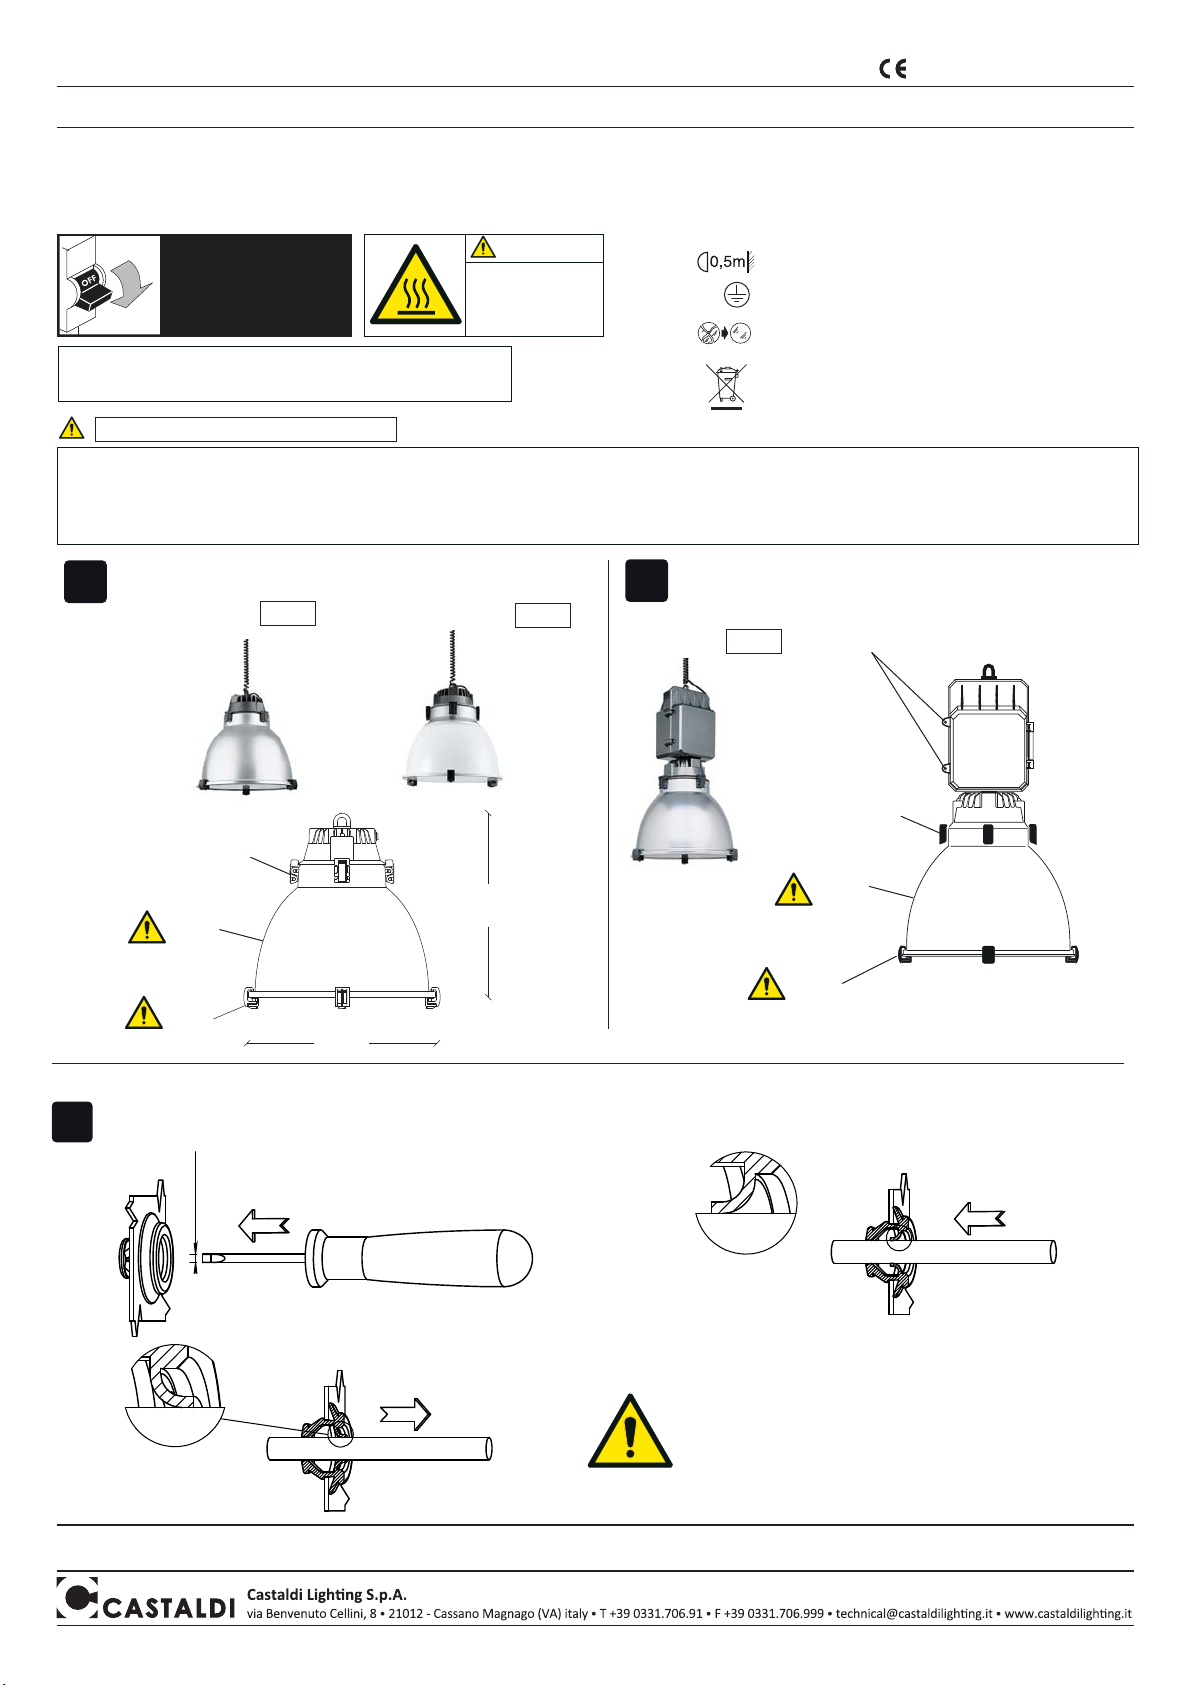
Eigenschaften - Bedeutung der Symbole auf dem Typenschild:
ATTENTION Heiße Oberfläche.
NICHT anfassen.
Vor dem Berühren
abkühlen lassen.
ACHTUNG
ACHTUNG
Trennen sie das gerät von
der netzspannung, bevor
sie arbeiten jeder art
ausführen!
Schutz gegen Staubablagerungen
Schutz gegen Spritzwasser aus allen Richtungen
Das Entsorgen im Hausmüll ist verboten!
Bei Ablauf der Lebensdauer bitte beachten:
Abfalltrennung ist Pflicht
IP54
Minimalabstand zwischen Leuchtkörper und beleuchtetem Gegenstand
Klasse I mit Schutzleiteranschluss
die beschädigten Schutzgläser ersetzen
Sosia Sosia Opal
407
Ø420
IP65
Absolut staubdicht
Schutz gegen Wasserstrahlen aus allen Richtungen
Sosia Box
A
AB
Temperiertes Sicherheitsglas
LED VERSION:
Die Lichtquelle dieses Geräts darf nur vom Hersteller, dem Kundendienst des Herstellers oder
einem sonstigen Elektrofachbetrieb ausgewechselt werden
8,5 Kg
Hinweis: Werkzeuge, Schrauben, Unterlegscheiben und Dübel sind nicht im Lieferumfang enthalten
5 Kg
6 Kg
1
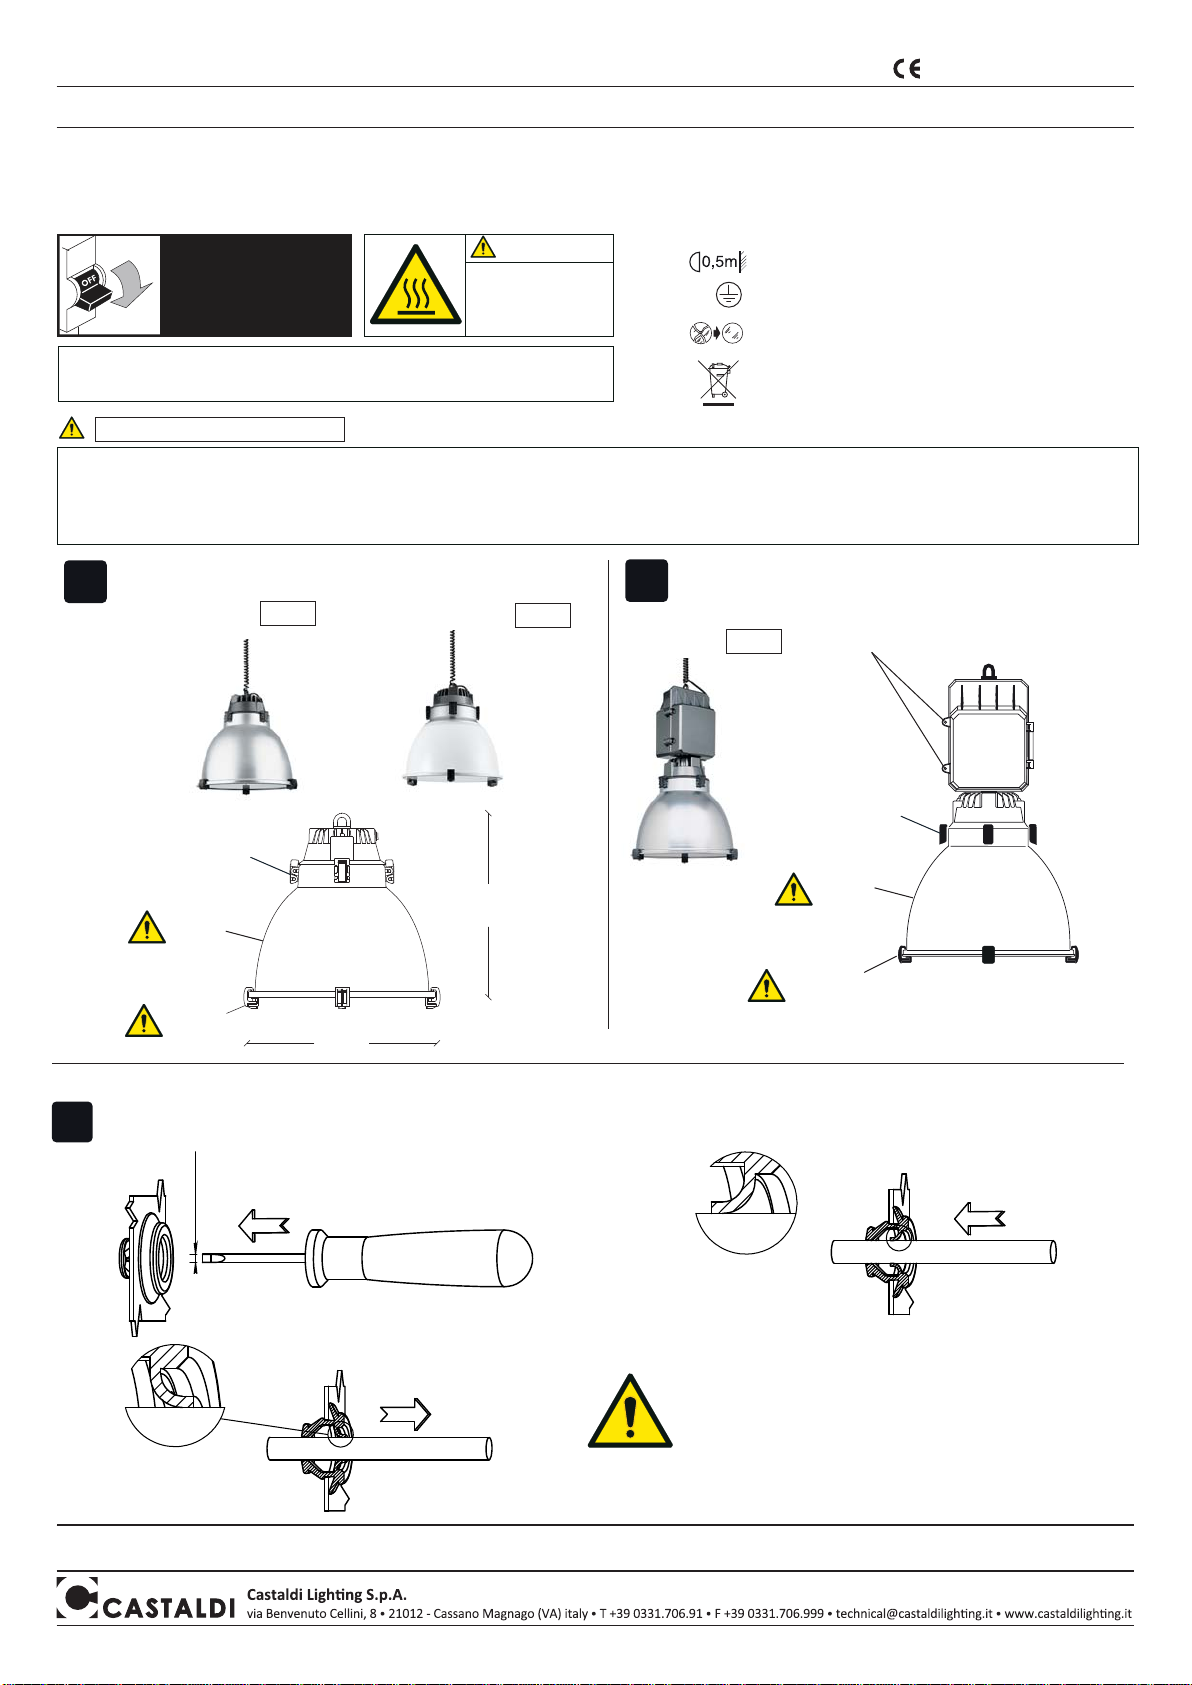
INSTALLATION
1)
max 3mm
2)
3. + max. 3sec; ~10mm
3)
NEIN
JA
Das Produkt entspricht den Richtlinien
der Europäischen Gemeinschaft
Montageanleitung - Instandhaltung
WICHTIGER HINWEIS: diese Montageanleitung informiert den Anwender über die korrekten Wartungsmaßnahmen und den Austausch der Lampen. Jede Manipulation und/
oder Veränderung des Geräts, das in dem gelieferten Zustand installiert und verwendet werden muss und den nationalen Normen für Anlagen entspricht, ist verboten.
Bei unsachgemäßer Installation verfallen jegliche Garantieansprüche und die Firma haftet nicht für Schäden aufgrund einer unsachgemäßen Installation. DIE INSTALLATION
MUSS VON QUALIFIZIERTEM FACHPERSONAL DURCHGEFÜHRT WERDEN.
Qualitätskontrolle: Sollten Sie Reklamationen haben, wenden Sie sich an unsere Firma oder an unsere Verkaufsorganisation unter Angabe des Bestelldatums
und der Kennummer des Geräts.
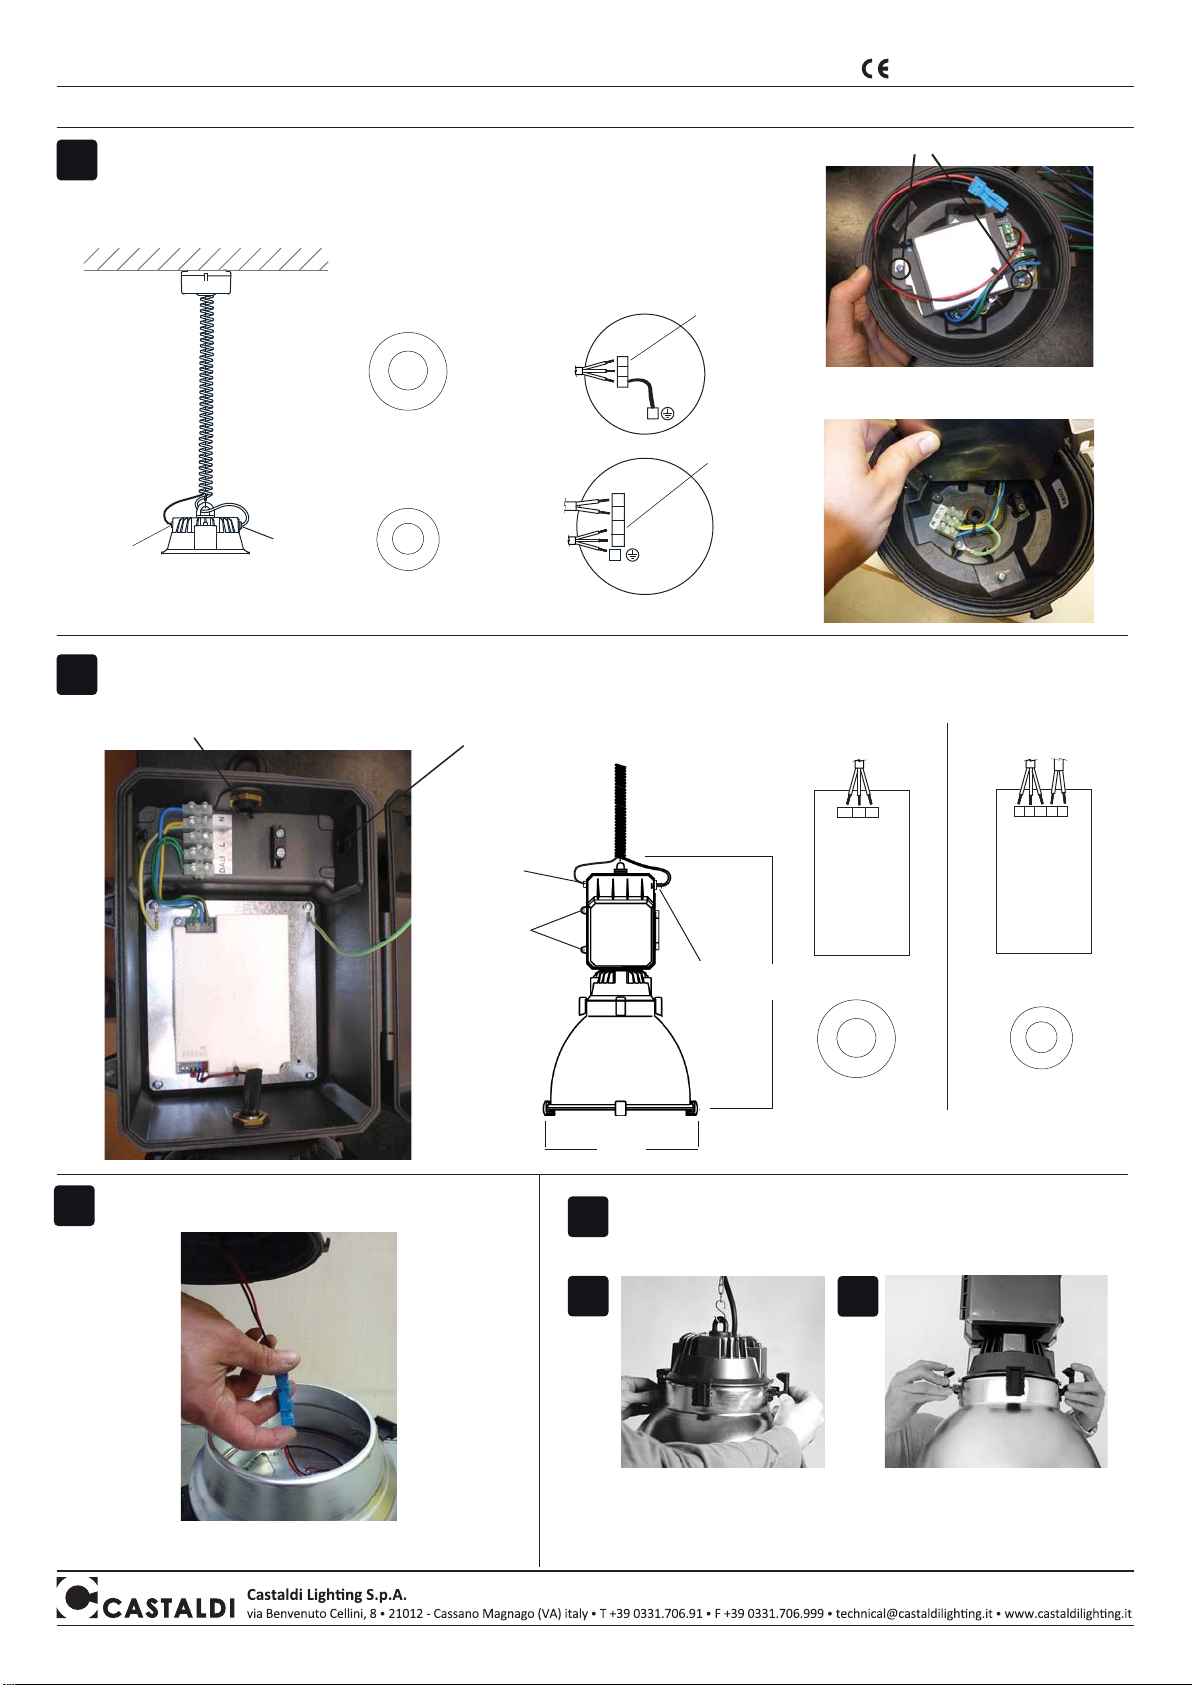
Die Spannklammern lösen
und die Stromkabel der
Leuchte anschließen. Den Reflektor
vorsichtig
handhaben.
Diese Klammern
öffnen und die LED
anschließen.
Spannklammern
der Glasscheibe.
Den Reflektor
vorsichtig
handhaben.
Glasscheibe und Außenseite des Geräts müssen regelmäßig von Erde und Schmutz gesäubert werden, damit sich keineAblagerungen bilden. Derartige
Ablagerungen können eine gefährliche Überhitzung bewirken und verhindern die vorschriftsgemäße Lichtabstrahlung und korrekte Wärmeableitung. Der
Wartungseingriff muss von einem Fachmann ausgeführt werden. Zur Wartung und Reinigung der Leuchte den Reflektor am Endstück aushängen. Zuerst zwei
Klammern lösen, dann den Reflektor von unten abstützen und die restlichen Klammern lösen. Nach der Reinigung der Glasscheibe sicherstellen, dass die
Spannklammern der Scheibe wieder korrekt angebracht sind. Die Dichtung, falls sie verformt oder schadhaft ist, auswechseln.
Spannklammern
der Glasscheibe.
Mit einem Inbusschlüssel öffnen und
die Stromkabel anschließen.
PFLEGE UND WARTUNG
Kabel
ACHTUNG: DIE MEMBRAN DER
KABELDURCHFÜHRUNG
DURCHSTECHEN UND DAS KABEL
WIE IN DEN ABBILDUNGEN
GEZEIGT EINZIEHEN.
D06 - SOSIA (MODELLFAMILIE)