CBC ZC-OH5 User manual

ZC-OH5 TAMPER-RESISTANT
INDOOR/OUTDOOR HOUSING
INSTRUCTION MANUAL
Please carefully read and observe all instructions and warnings contained in this manual
or on the product. Improper installation may damage the device and void the warranty.
FOR USE WITH GANZ ZC-D5000 SERIES MINIDOME CAMERAS

2
IMPORTANT
Installation should be performed by a qualified service person and
conform to all local codes.
DESCRIPTION
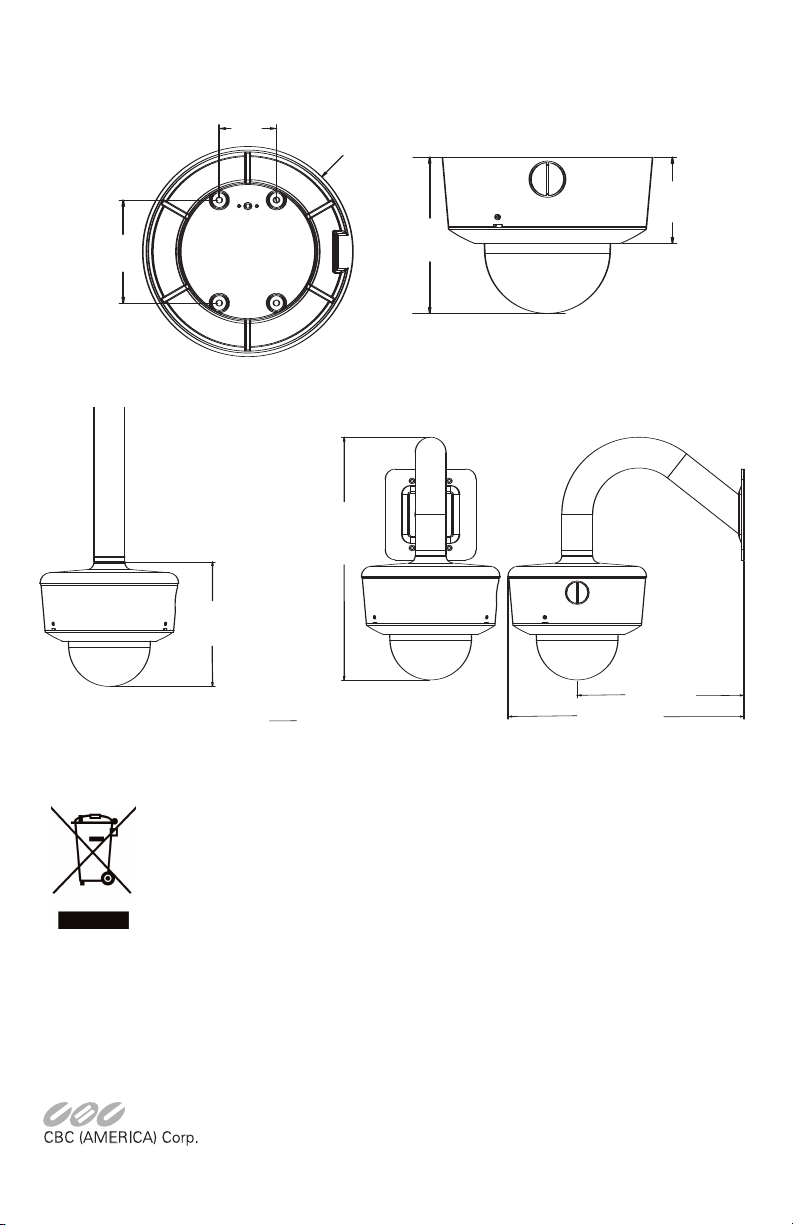
Model ZC-OH5 is a tamper resistant indoor or outdoor housing that is
designed to accommodate all CBC ZC-D5000 series mini-dome cameras.
This housing will accept the following camera models:
MAJOR FEATURES
•Polycarbonate dome with rugged cast aluminum housing withstands the
blow from a 10 pound sledgehammer
•O-ring sealed housing meets IP66 standards for use in virtually any
weather conditions
•Quick-Lock tabs for easy installation and removal of camera module
•Built-in conduit access in dome base accepts 3/4” conduit
•Quick and easy installation utilizing 6 different dome camera options
•Housing mounts directlyto anywall, ceiling or 4S Electrical box.
ZC-D5029NHA/PHA 1/3" Color hi-res dome, 540 TVL, 2.9-8.2mm
AI varifocal
ZC-D5212NHA/PHA 1/3" Color hi-res dome, 540 TVL, 2.8-12mm
AI varifocal
ZC-D5550NHA/PHA 1/3" Color hi-res dome, 540 TVL, 5-50mm
AI varifocal
ZC-DN5029NHA/PHA 1/3" Color hi-res TRUE DAY/NIGHT dome, 540
TVL, 2.9-8.2mm AI varifocal
ZC-DN5212NHA/PHA 1/3" Color hi-res TRUE DAY/NIGHT dome, 540
TVL, 2.8-12mm AI varifocal
ZC-DN5840NHA/PHA 1/3" Color hi-res TRUE DAY/NIGHT dome, 540
TVL, 8.5-40mm AI varifocal
INSTALLATION
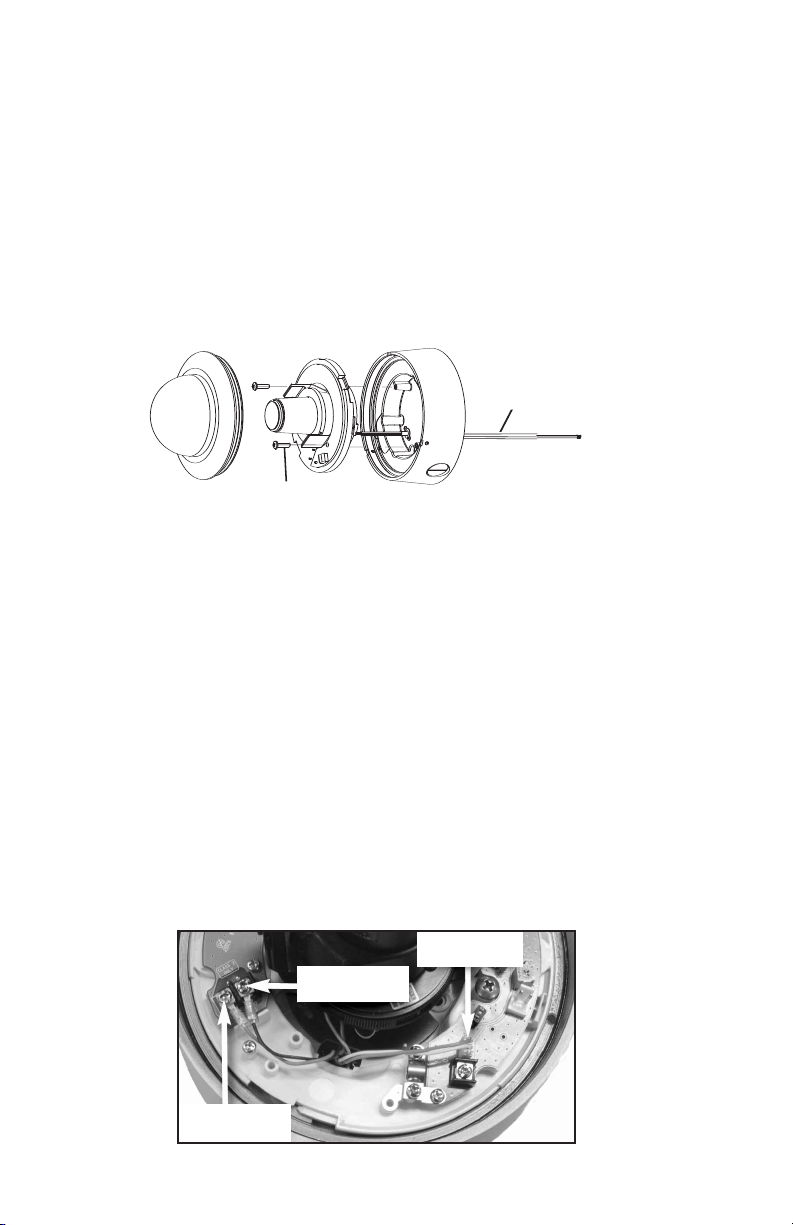
1) Standard Housing Installation
a) CAUTION:Do Not Remove Screws. Loosen the 3 set screws
from the dome base using the supplied key and remove the dome
cover (see FIGURE 1).The O-Ring makes a tight seal, so a thin-bladed
screwdriver may be needed to separate the dome cover from the
housing base byusing the pryslots to seperate.

3
b) Using a minimum 1/2” drill bit, drill the cable feed hole and feed the
video/power cable through the mounting surface or attach 3/4”
conduit fitting to the hole in the side and seal with pipe thread tape
(see FIGURE 2).
FIGURE 1
FIGURE 3
DOME REMOVAL
INSIDE BASE MOUNTING HOLES
Mounting holes for camera base (2)
Mounting holes for housing,
covered by rubber plugs (4)
c) Holding the dome against the mounting surface, mark and drill the 4
mounting holes (see FIGURE 3). Fasten the base to the mounting
surface using the supplied #8 Phillips screws, rubber washers and
plastic anchors (anchors for dry wall only), (see FIGURE 1).
Depending on the mounting surface other hardware may be needed.
Add rubber gasket seal to the back of the housing for sealing on a
flat surfaces. For uneven surfaces a bead of silicone sealant is
recommended.
FIGURE 2
BACK VIEW CONDUIT HOLE
Built-in Conduit Hole
Note: If using other mounting hardware; apply silicone sealant
around the inside of the 4 mounting holes before inserting screws or
bolts to prevent damage from leakage.
Loosen (x3) Set Screws
to remove trim ring and
bubble.
Mounting
Screws (x4)
Plastic anchors (x4)
for drywall only.
Cable Assembly
Rubber mounting
washers (x4)

4
FIGURE 4
FIGURE 5
Camera Mounting Screws (x2)
Cable Assembly
2) Install ZC-D5000 Series Dome Camera
a) Remove the two camera mounting screws (see FIGURE 4).
b) Place the camera base into the housing, making sure that the 6
power and video wires feed through the hole in the camera base.
c) Rotate camera slightly to lock in place, then install 2 supplied
mounting screws to secure camera to the housing base (see FIGURE
3for locations).
d) Make the wiring connections in accordance with the instructions
below.
3) Connect Power
IMPORTANT
Make wiring connections only after it has been determined that
power has been disconnected. Failure to do so could lead to
permanent damage to the camera and void the warranty.The ZC-
D5000 Series Dome Cameras will accept either 12 Volts DC or 24
Volts AC power supply marked class 2. If using 12VDC, be sure to
determine the polarity before connection.
The Red wire connects to 12VDC (+) Positive terminal and the Black wire
connects to the Ground terminal (see FIGURES 5 & 6).When using 12VDC,
use only a regulated power supply with a minimum 500mA output, (model
C12DCR-500 recommended). For 24VAC input, connect the Red and Black
wires to the 2 power input terminals.
12VDC positiveor
24VAC (RED)
12VDC ground or
24VAC(Black)
Video Signal with
2-pin connector

5
4) Connect Video
Connect the White connector to the Video-Out Terminal on the board. (see
FIGURE 5).
Note: If necessary, needle nose pliers can be used to make power
and video connections.
Note: Special focusing Instructions when using 5-50mm dome.
If the 5-50mm lens is set to a focal length of 20mm or greater, the
dome cover must be held in front of the lens while focusing to
obtain proper focus.
RED 12VDC+ OR 24VAC
BLACK 12VDC GROUND OR 24VAC
WHITE VIDEO SIGNAL OUT
GREEN VIDEO GROUND
BLUE B/W FIX
BROWN GROUND }OPTION For
True Day/Night
models only
5) Install the Desiccant Pack
After the camera has been installed, attach the supplied desiccant pack
to the camera.
a) Remove the desiccant pack from its storage bag.
b) Remove plastic from the double-sided tape and attach to the inside
of camera bracket (see FIGURE 7).The desiccant pack is used to
absorb any moisture trapped inside the dome during installation.To
avoid excessivemoisture buildup, it is recommended that the camera
not be installed in rainy or excessively damp conditions.The
desiccant pack can be replaced if condensation develops inside the
housing. Replacement packs and other replacement parts are
available through CBC (AMERICA) Corp.
FIGURE 6
FIGURE 7
Attach desiccant
pack here

6
OPTIONS
1. Pendant Mount
Apendant mount adapter is available for applications that require the
dome to be dropped from the ceiling from a pipe. The pendant
mount adapter accepts a 1” NPT pipe thread (Model ZC5-PM2).
2. Wall Mount
The wall mount combines the pendant mount with a wall mount
bracket for various wall-mounting applications (Model ZC5-WM2).
3. Heater
A24VACheater option is available. Contact CBC (AMERICA) Corp.
for details and specifications.
4. Housing Color
Different housing colors (either painted or anodized) are available for
aminimum order lot and custom paint charge.
6) Re-Install Dome Cover
a) Place the dome cover on the housing base.
b) Push the cover lightly onto the base, rotate the liner or dome cover
to align with lens and tighten the 3 tamper resistant set screws (see
FIGURE 1)until the cover seals tight against the housing base.
CAUTION: Do Not Over Tighten!
Changing the Polycarbonate Dome
The ZC-OH5 housing is supplied with a clear dome and black plastic liner.
If damaged, the dome can be replaced by removing the 4 flat head screws
inside the dome cover. Due to a tight seal, some pressure may be required
to the top of the dome to break the seal. After installing the new dome,
replace the retaining ring and tighten the 4 flat head screws until the
retaining ring is flush with the adjacent surface.
MAINTENANCE NOTES
If the housing cover is opened frequently or if the O-Ring dries out, apply a
light coat of good quality silicone based grease to the O-Ring to maintain a
watertight seal. Replacement O-rings and other replacement parts are
available through CBC (AMERICA) Corp.

7
HOUSING SPECIFICATIONS
Construction: Cast Aluminum, stainless steel hardware, polycarbonate
dome.
Finish: Off-White Powder Coat Paint
Ratings: Designed to meet NEMA 5, IP66
Dimensions: 6.66” diameter, 4.95” overall height
Unit Weight: 2lb. 5oz.
*Temp Range: +10 degrees to +140 degrees F without heater
-25 to +140 degrees F with heater (ZC-D5000 Series
Dome Cameras)
*TemperatureRange recommendations are based on proper installation and
maintenance procedures outlined in this manual. Improper installation or
maintenance may alter the camera’s operational limits, damage the device
and void the warranty.
Design and product specifications subject to change without notice.
FIGURE 8FIGURE 9
OPTIONAL WALL MOUNT
OPTIONAL PENDANT MOUNT

NEW YORK:55 MALL DRIVE • COMMACK,NY 11725
TEL 1-800-422-6707 • 631-864-9700 • FAX 631-543-5426
CALIFORNIA:20521 EARL STREET •TORRANCE, CA90503
TEL 1-800-888-0131 • 310-793-1500 • FAX 310-793-1506
www.cbcamerica.com ©2007 CBC America Corp., All Rights Reserved. 01/08
100 0200 001 CBC 01/08
Data subject to change without notice.
Printed in USA
Disposal of your old appliance
1.When this crossed-out wheeled bin symbol is attached to a product it
means the product is covered by the European Directive 2002/96/EC.
2.All electrical and electronic products should be disposed of separately from
the municipal waste stream via designated collection facilities appointed by
the government or the local authorities.
3.The correct disposal of your old appliance will help prevent potential
negative consequences for the environment and human health.
4. For more detailed information about disposal of your old appliance, please contact your city
office, waste disposal service or the shop where you purchased the product.
OPTIONAL WALL MOUNT
OPTIONAL PENDANT MOUNT
ZC-OH5
DIMENSIONAL OUTLINES
6.07
154,2[]
11.82
300,3[ ]
8.13
206,4]
11.50
292,1[ ]
[
in
mm
6.66
169,2[]
4.95
125,7[ ]
2.73
69,3[]
3.26
82,8[]
1.81
46
[]ø
Table of contents
Other CBC Camera Accessories manuals