CDA-TEK PBC User manual

PBC
USER GUIDE
PBC USER GUIDE
WWW.CDATEK.COM
1

Thank you for purchasing the PBC by CDA-TEK.
With the PBC, you will be able to control and monitor the primary controls of your
Blackmagic Pocket Cinema Camera wirelessly via Bluetooth LE.
The PBC uses a simple two button interface to control all of these parameters within your
camera and has a bright daylight readable colour screen to monitor their current settings.
Despite only having this very simple interface, both the Aand Bbuttons can be configured
to control up to six different functions of your camera at any one time from a selection of
sixteen possibilities.
The PBC is fitted with an internal high capacity battery that provides a continuous run time
of up to five hours and is re-charged from its USB-C port using the supplied cable and can
also be powered directly from this port whilst it is re-charging.
In addition, the PBC can also be used as an interface hub to allow wireless focus control
of your camera using either the Tilta Nucleus Nano Focus wheel or our own forthcoming
PXP expander unit.
As well as the PXP, we will be releasing additional expansion options in the future that will
also use the PBC in this interface hub mode.
PBC USER GUIDE
WWW.CDATEK.COM
2
WELCOME TO THE PBC

Battery charging and power on.
The internal battery of the PBC is charged using the supplied USB-C cable and a full
charge from flat should take approximately two hours and we recommend doing this
before following the rest of the guide.
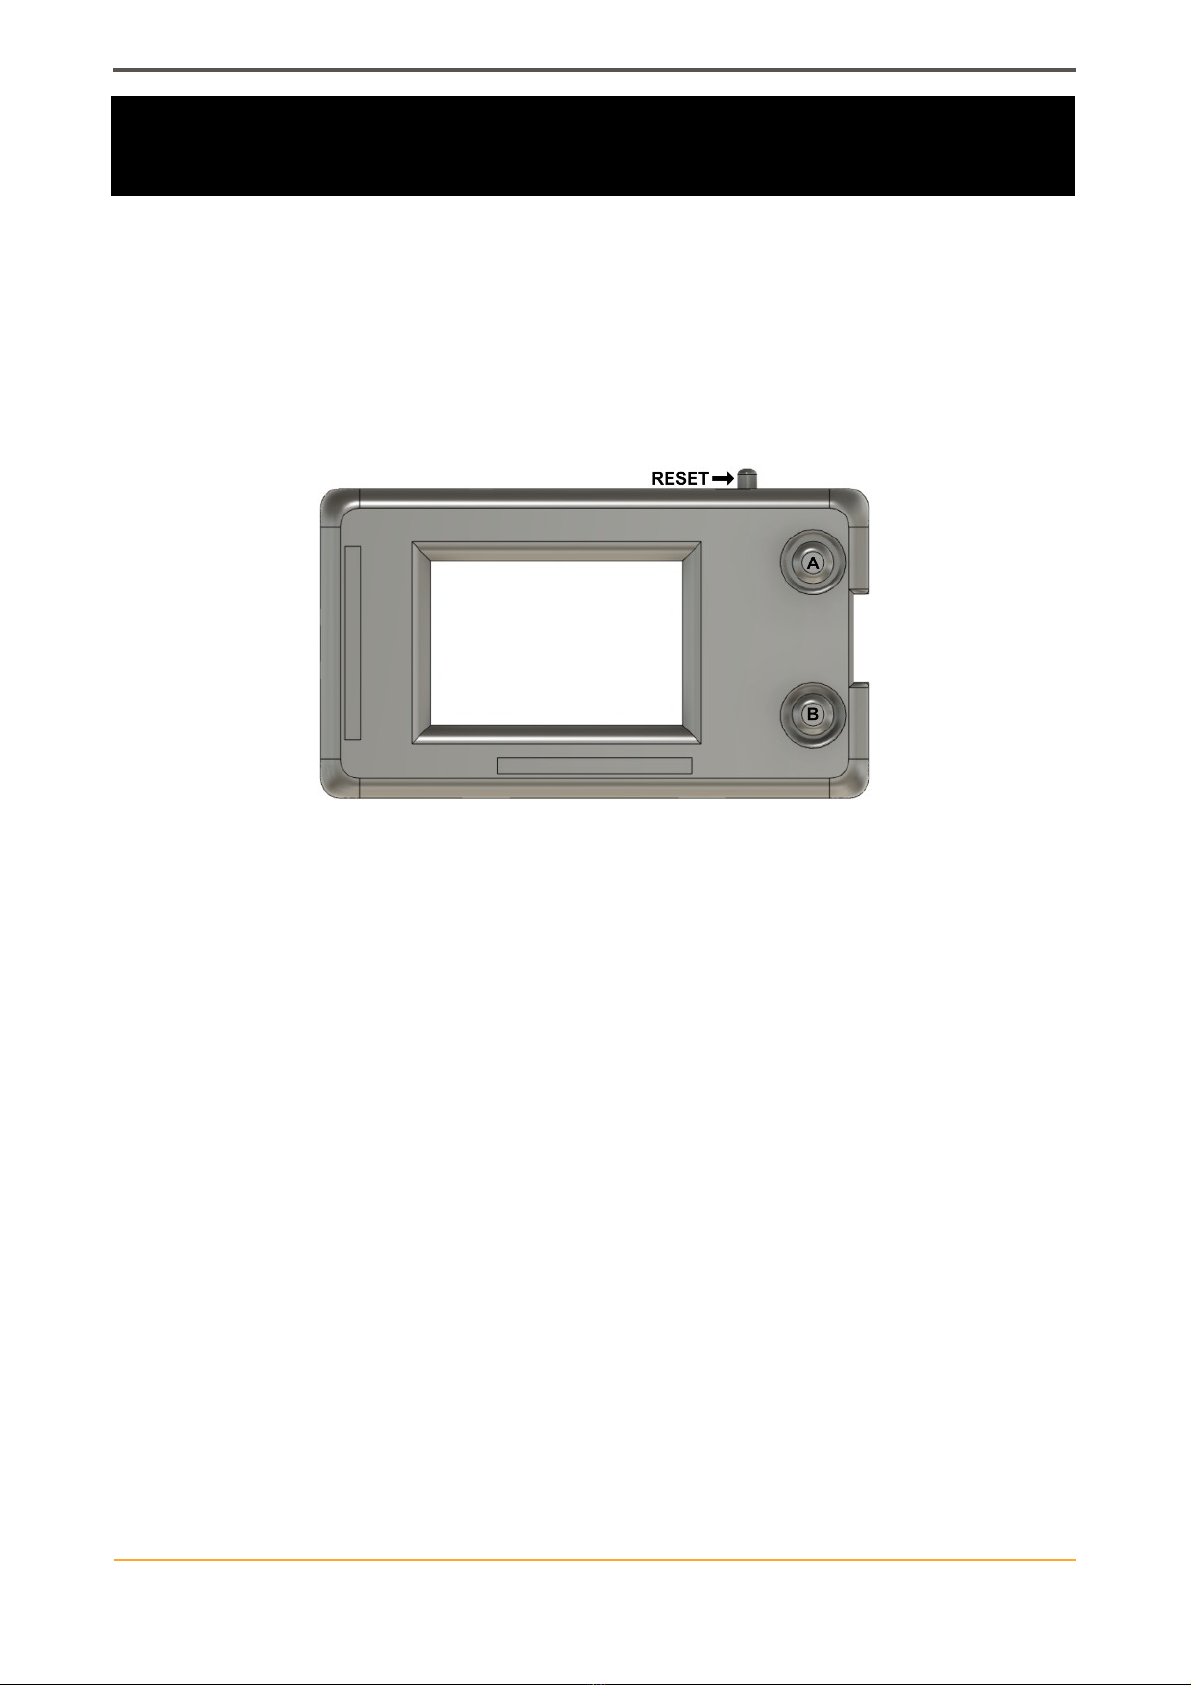
The PBC is powered on using the reset switch, by pressing the Bbutton if it is in
Hibernate mode or automatically by applying USB power when the battery is empty.
Bonding the PBC to your Blackmagic Pocket Cinema Camera.
Before you can use the PBC to control your camera for the first time, you must first
perform the initial bonding process.
To initiate this process, with PBC powered on, switch your camera on, navigate to the
Bluetooth control page of its SETUP menu and ensure that Bluetooth is set to ON.
When the PBC finds you camera and connects to it, your camera will display a PIN
number to be entered and the PBC will invoke the PIN entry screen below.
Use the Abutton on the PBC to increase the value of the number to match the first one in
the requested PIN, then press the Bbutton to move to the and repeat the process until
you match all six numbers. Finally, move to the OK field and press the Abutton to submit
the PIN after which you should see a confirmation message on the camera screen and the
PBC will reboot and you will be able to control your camera.
If you make a mistake, simply wait for the PBC to reboot and the camera will display a
new PIN for you to try again. This bonding process is only performed the very first time
you connect to your camera and all subsequent connections will be automatically
authorised.
PBC USER GUIDE
WWW.CDATEK.COM
3
GETTING STARTED

Monitoring your camera status.
When you have connected your PBC to your Blackmagic Pocket Cinema Camera you will
be presented with its single screen display interface which shows you the current settings
of the camera in the following order :
•Top Left - Lens Aperture
•Top Right - Shutter Angle
•Middle Left - ISO
•Middle Right - Control Layer (*only applicable when using focus controller)
•Bottom Left - Temperature
•Bottom Right - Tint
As this is a live status display, any changes made by you using the PBC or on the camera
itself will automatically be updated and will turn Red whenever the camera is in Record to
give you a high visibility status confirmation.
PBC USER GUIDE
WWW.CDATEK.COM
4
BASIC OPERATION PART 1

Controlling your camera functions.
The Aand Bbuttons of your PBC can be configured to control up to six different functions
of your camera at any one time from a selection of sixteen possibilities.
To achieve this, different functions are individually assigned to be activated on a single
press, a double press or a long press of the Aand Bbuttons.
As a default, these are setup as follows :
Therefore when you boot your PBC for the first time, pressing the Abutton once will
increase the Aperture of your lens, double pressing the Bbutton will decrease the ISO and
doing a long press of the Abutton will toggle the camera between Record and Stop.
We will detail how to change these configurations in the next section of the User Guide."
BUTTON
PRESS TYPE
FUNCTION
A
SINGLE
APERTURE UP
A
DOUBLE
ISO UP
A
LONG
RECORD START/STOP
B
SINGLE
APERTURE DOWN
B
DOUBLE
ISO DOWN
B
LONG
AUTO FOCUS
PBC USER GUIDE
WWW.CDATEK.COM
5
BASIC OPERATION PART 2

How to activate and navigate the Setup Menus.
When you boot your PBC, you are provided with the option to access the Setup menus by
pressing the Abutton before it begins the connection process to the camera.
If you do not press either the Abutton to access the Setup menu or the Bbutton to put the
PBC into Hibernate mode, it will continue the connection process to the camera
automatically after a few seconds.
If you have pressed the Abutton then you will be presented with the main Setup Menu
screen.
The menu is navigated using the Bbutton to move to the next item and then pressing the
Abutton will action that choice. In the case of items with multiple options, pressing the A
button will activate the next option.
Navigating to Restart and pressing the Abutton will save all configuration changes and
reboot the PBC."
PBC USER GUIDE
WWW.CDATEK.COM
6
CONFIGURING YOUR PBC : PART 1

How to select your camera and expansion option.
You should only change this option if you are using either a Tilta Nucleus Nano wheel or
our own upcoming PXP. As the focus control system is different between the Pocket 4K
and Pocket 6K, it is important that you choose the correct option.
At the main Setup Menu screen, use the Bbutton to navigate to Expansion Module and
then use the Abutton to cycle through the options.
These are :
•NONE#: If you are not using a Tilta Nucleus Nano or our upcoming PXP.
•P4K-Tilta : If you are using a Pocket 4K with a Tilta Nucleus Nano.
•P6K-Tilta : If you are using a Pocket 6K with a Tilta Nucleus Nano.
•P4K-PXP : If you are using a Pocket 4K with our upcoming PXP.
•P6K-PXP : If you are using a Pocket 6K with our upcoming PXP.
How to select your Display Scheme option.
With the Display Scheme option, you can choose from any one of four different
background colour for your PBC.
To change this, at the main Setup Menu screen, use the Bbutton to navigate to
Expansion Module and then use the Abutton to cycle through the options of CYAN,
ORANGE, BLUE and BLACK."
PBC USER GUIDE
WWW.CDATEK.COM
7
CONFIGURING YOUR PBC : PART 2

How to select your camera and expansion option.
How to change your button assignment.
The PBC can have different functions assigned to each of its three different types of
button pressing action for both its Aand Bbuttons.
To configure these, at the Setup Menu screen, use the Bbutton to navigate to Button
Assignment and then use the Abutton to activate the Button Assignment Menu.
To change an assignment, navigate to the required button action using the Bbutton and
use the Abutton to cycle through the options. These options are :
•AP + : Aperture up
•AP - : Aperture down
•ISO + : ISO up
•ISO - : ISO down
•SHR + : Shutter angle up
•SHR - : Shutter angle down
•TMP + : Temperature up
•TMP - : Temperature down
•TINT + : Tint up
•TINT - : Tint down
•WB + : Cycle through White Balance presets
•HFR : Toggle HFR on/off
•AWB : Automatic White Balance
•AEX : Auto Exposure
•AF : Auto Focus
•REC : Record start/stop
When you have completed your selection, navigate to Save, press the Abutton and the
PBC will reboot with your new configuration active."
PBC USER GUIDE
WWW.CDATEK.COM
8
CONFIGURING YOUR PBC : PART 3

How to select your camera and expansion option.
How to remove lenses from the lens database.
This option is only applicable if you are using a Pocket 6K camera with either a Tilta
Nucleus Nano wheel or our own upcoming PXP module.
As the focus control system of the Pocket 6K is entirely different to the Pocket 4K and due
to the variance in the focus control resolution of different lenses, each lens must be
calibrated individually and the results stored in the PBC's LENS DATABASE.
When the PBC is connected to a Pocket 6K and detects a lens change it automatically
checks to see if the lens exists in its database and if it isn't then it prompts you to instigate
the automated calibration process and then adds it to the database.
The LENS DATABASE option enables you to delete any number of the stored calibrations
to enable you to re-calibrate them when you next connect it to the camera and is
accessed by navigating in the main Setup Menu to Lens Database and pressing the A
button.
With the LENS CALIBRATIONS screen open, navigate to Lens using the Bbutton and
then select the required lens for deletion using the Abutton.
When you have selected the lens, use the Bbutton to navigate to Delete and then to save
these changes use the Bbutton again to navigate to Save and press the Abutton to
remove it from the LENS DATABASE and the PBC will then automatically restart.
The next time you attach the deleted lens to the camera, you will automatically be
prompted to re-calibrate it using the automated calibration function.
Selecting Abort will abort the changes made to the LENS DATABASE.
PBC USER GUIDE
WWW.CDATEK.COM
9
CONFIGURING YOUR PBC : PART 4

How to select your camera and expansion option.
How to perform maintenance operations.
The MAINTENANCE MENU gives you access to several maintenance operations for your
PBC.
The first option in this menu is Double Click Tune and enables you to fine tune the timing
interval (in milliseconds) to register as a double click that best suits your operational style.
Different timing intervals can be cycled through using the Abutton and then navigate to
Save to update the preference and reboot your PBC.#
Clear Bonds is a function that enables you to clear all Bluetooth bonding information from
the PBC to your Pocket Cinema Camera.
This function is only required you have used the CLEAR ALL option (either intentionally
or accidentally) in your camera Setup to delete all bonded devices.
If you use the Clear Bonds function then you must also use the CLEAR ALL function in
the camera Setup before attempting to connect again and bond again.
The final option in the MAINTENANCE MENU#is Firmware Update which will instigate
the update process to enable you to upgrade your PBC for future features and
enhancements.
Full instructions regarding updating PBC using Firmware Update will be provided with the
release notes for any version.
PBC USER GUIDE
WWW.CDATEK.COM
10
CONFIGURING YOUR PBC : PART 5

How to select your camera and expansion option.
Methods for powering your PBC on and off with Hibernate mode.
The PBC has several different ways in which it is powered on and off.
The RESET button on the PBC causes an immediate reboot and, from the initial start
screen, offers the opportunity to power off by pressing the Bbutton.
To enable its very fast restart and reconnection to your camera, the Power Off state of the
PBC is actually a Hibernate mode and the unit can then be woken up immediately when
you need to use it again by pressing the Bbutton again.
For convenience and also to conserve battery life, the PBC features and additional two
automatic methods for entering Hibernate mode.
The first method happens during the Scanning process where if the PBC cannot find an
available camera to connect to it will switch to Hibernate mode.
When the PBC is connected to the camera, the second automatic method is invoked if the
camera breaks communication for a period of 20 seconds.
This second method provides a very convenient way to put the PBC into Hibernate mode
as you simply switch off your camera and the PBC will automatically enter it 20 seconds
later.
Whether you have put the PBC into Hibernate mode manually or it has been done by the
two automatic methods, pressing the Bbutton will wake it up immediately and begin the
connection process to your camera.
PBC USER GUIDE
WWW.CDATEK.COM
11
POWER MANAGEMENT

How to select your camera and expansion option.
Methods for attaching your PBC to other equipment.
To maintain its pocket form factor, the PBC does not have an integral tripod mount but
instead uses the supplied mount adapter type below.
The PBC case has two sets of integral channel slots on the front and back to
accommodate the adapter to enable you to have the flexibility of connecting it to any
standard 1/4” 20 mount from either below or from the side.
The adapter is connected by loosening the screw and placing the grips into the required
channel slots on the PBC and then tightening the screw again.
PBC USER GUIDE
WWW.CDATEK.COM
12
MOUNT ADAPTER

How to select your camera and expansion option.
Configuring your PBC to integrate an external focus controller.
The PBC can act as an interface hub to control the focus and record control of your
camera from either a Tilta Nucleus Nano wheel or our own upcoming PXP module.
On the Pocket 4K, focus control works with both native Micro 4/3rds and adapted EF
lenses with a compatible smart adapter and with the Pocket 6K it works with native EF
lenses only.
Due to differences in the focus control system between the Pocket 4K and Pocket 6K, it is
important that you choose the correct combination that you are using in the Expansion
Module section of the main Setup Menu.
You must also ensure that your Tilta Nucleus Nano wheel has its BLUETOOTH mode set
to ON and this is done by holding down the UP triangle on the wheel to enter the
configuration menu, followed by navigating to the BLUETOOTH entry, double pressing the
UP triangle again and then pressing the DOWN triangle to toggle it to ON.
As the Nucleus Nano wheel does not store the Bluetooth mode setting on power off, you
must switch it to ON prior to using it with the PBC again if you have powered the wheel
down in the meantime.
Once configured, the PBC will now find both the camera and the Nucleus Nano wheel
during the Scanning process and automatically connect to them both.
Once connected you are able to use the Nucleus Nano wheel to control the entire focus
range of the attached lens as well as use its REC button to start and stop recording on the
camera.
The REC button status on the Nucleus Nano will also be updated automatically by your
PBC should you put the camera into or out of record directly on the camera or from the
PBC itself."
PBC USER GUIDE
WWW.CDATEK.COM
13
FOCUS CONTROL : OVERVIEW & SETUP

How to select your camera and expansion option.
Accessing additional functionality when using a Nucleus Nano wheel with the PBC.
When the PBC is being used with a Nucleus Nano focus wheel, you also have access to a
secondary Control Layer for additional specific functionality related to focus.
This layer is accessed with a TRIPLE CLICK of the A button, at which point the PBC will
indicate it is in the secondary layer with the number 2 being displayed beneath the shutter
angle indicator.
When this layer is active, the functionality
of the Aand Bbuttons changes to enable
you to control the focus memories and lock
functionality.
A DOUBLE CLICK of the Abutton, stores
the current focus position as the NEAR
position and double clicking the Bbutton
stores the current focus position as the
FAR position.
With these focus points stored, a LONG
PRESS of the Bbutton toggles in and out
of FOCUS LOCK mode, indicated by LK
on the display.
When you are in FOCUS LOCK mode,
the Nucleus Nano wheel will only affect
the focus when it is positioned within the
range of the two stored NEAR and FAR
positions.
When you are in the secondary Control Layer, the functions assigned to the SINGLE
CLICK of the Aand Bbuttons are still maintained so if, for example, you have Aperture
Up and Aperture Down assigned to the SINGLE CLICK of Aand Bthen you will still have
control of these when you are in either layer.
Similarly, the functionality assigned to the LONG PRESS of A also remains active in this
mode.
The TRIPLE CLICK of the Abutton will also return you back to the standard Control
Layer, indicated by the number 1 being displayed beneath the shutter angle indicator."
PBC USER GUIDE
WWW.CDATEK.COM
14
FOCUS CONTROL : OPERATIONAL

How to select your camera and expansion option.
Calibrating lenses when using a Pocket 6K with a Nucleus Nano wheel with the
PBC.
Due to the variances in focus control resolution between different EF lenses even from the
same manufacturer, the PBC has a calibration procedure to map the ranges of the
individual lenses to Nucleus Nano focus wheel.
The PBC stores these calibrations in its LENS DATABASE and each time you connect to
the Pocket 6K or change lens when connected to it, the PBC reads the lens and it is
checked against the database and the calibration screen is automatically invoked if it is
not found.
To calibrate the lens, you must first manually move the lens focus position to its minimum
point and then use the Bbutton to navigate to Calibrate and press the Abutton to begin.
The PBC will then automatically move the lens focus position step by step towards the
infinity focus position and when it reaches that point you must press Bto stop it.
Once you have done this, navigate to Save with the B button, press Ato complete and the
lens will be added to the LENS DATABASE and its individual calibration will automatically
be activated whenever the PBC detects it in all subsequent uses.
If you pressed the Bbutton before it reached the infinity point or didn’t press it soon
enough after it reached it then choose Abort and try again.
Similarly, if you saved the calibration but would like to change it then follow the steps in
the Configuration part of this guide to delete it from the LENS DATABASE and you will
be prompted to calibrate it again the next time you connect to the camera with it attached.
PBC USER GUIDE
WWW.CDATEK.COM
15
FOCUS CONTROL : LENS CALIBRATION
Table of contents
Other CDA-TEK Professional Video Accessories manuals