CDA PC51 Quick start guide

Customer Care Department • The Group Ltd. • Harby Road • Langar • Nottinghamshire • NG13 9HY
T : 01949 862 012 F : 01949 862 003 E : customer.care@cda.eu W : www.cda.eu
www.cda.eu
PC51 American
Style Fridge
Freezer
Installation, Use and Maintenance

2
Important
The CDA Group Ltd cannot be held responsible for injuries or losses
caused by incorrect use or installation of this product. Please note
that CDA reserve the right to invalidate the guarantee supplied with
this product following incorrect installation or misuse of the appliance.
Under no circumstances should any external covers be removed for
servicing or maintenance except by suitably qualified personnel.
Appliance information:
Please enter the details on the appliance rating plate below for
reference, to assist CDA Customer Care in the event of a fault with
your appliance and to register your appliance for guarantee purposes.
Appliance Model
Serial Number
CE Declarations of Conformity:
This appliance has been designed, constructed and marketed in
compliance with safety requirements of EEC Directive 2006/95/EEC
(Low voltage) and requirements of EMC Directive 2004/108/EEC.
This appliance has been manufactured to the strictest standards and
complies with all applicable legislation, including Electrical safety (LVD)
and Electromagnetic interference compatibility (EMC). Parts intended
to come into contact with food conform to EEC/89/109.4.

3
IMPORTANT INFORMATION FOR CORRECT DISPOSAL OF THE
PRODUCT IN ACCORDANCE WITH EC DIRECTIVE 2002/96/EC.
At the end of its working life, the product must not be disposed
of as urban waste. It must be taken to a special local authority
dierentiated waste collection centre or to a dealer providing this
service.
Disposing of a household appliance separately avoids possible
negative consequences for the environment and health deriving from
inappropriate disposal and enables the constituent materials to be
recovered to obtain significant savings in energy and resources. As a
reminder of the need to dispose of household appliances separately,
the product is marked with a crossed-out wheeled dustbin .
Before First Use of the Fridge/Freezer
You must allow the fridge to settle for at least twenty four hours
prior to switching the power on.
It is recommended that you clean the interior of the appliance prior to
first use, using a solution of bicarbonate of soda and warm water then
thoroughly dry the interior.
The fridge may have an odour to it at first use. This will disappear
as the appliance cools.

4
Please note:
The appliance will work continuously until it comes down to the
correct temperature.
If the appliance is switched o, you should allow five minutes
before switching it on again to prevent unnecessary damage to the
compressor.
Fridge Use
• Never put liquids in the refrigerator uncovered.
• Never put hot foods in the refrigerator. Warm food should
be allowed to cool to room temperature before being put
into the refrigerator.
• Nothing should rest against the rear wall of the
refrigerator, as this will cause frost and possible
condensation problems which will be dicult to remove.
• Make sure food is clean and any extra water is wiped
away before putting into the fridge.
• Wrap or cover food before putting into the fridge. This
will help prevent the loss of moisture, keep food fresh and
avoid unpleasant odours.
• Sort foods prior to storing. Any foods to be used soon
should be stored at the front of the shelf to prevent
deterioration caused by the door being open for
prolonged periods.
• Do not overfill the fridge. There should be sucient space
between the foods to allow the cool air to circulate.
• Thawing frozen foods in the fridge compartment will help
to keep the temperature low and save energy.

5
Freezer Use
• The freezer compartments are designed to store only
frozen food.
• Never put hot or warm foods in the freezer, allow them to
cool fully before putting them into the freezer.
• Follow the instructions on the food packaging for storage
of frozen food. If no information is provided, foods
should not be stored for more than three months after the
purchase date.
• Store food in small packages (ideally less than 2.5kg).
This reduces the freezing time and improves the quality of
the food after thawing.
• Wrap food before putting into the freezer. To stop the
wrapping sticking together, ensure it is dry.
• Label the food before freezing with information including
type of food and dates of storage and expiry.
• Once food is thawed, it must not be refrozen. Only defrost
as much food as is required to prevent wastage.
• Bottled or canned drinks should not be stored in the
freezer compartments as they could explode.
• The maximum amount of fresh food that can be frozen
within a 24 hour period is 10 kg.
• Do not attempt to freeze more than the maximum amount.
• To freeze fresh food more quickly, switch on the fast
freeze function a few hours prior to placing the food in the
freezer.

6
• Do not use the fast freeze function for more than 48 hours.
Use over the recommended time will place unnecessary
strain on the refrigeration system.
7
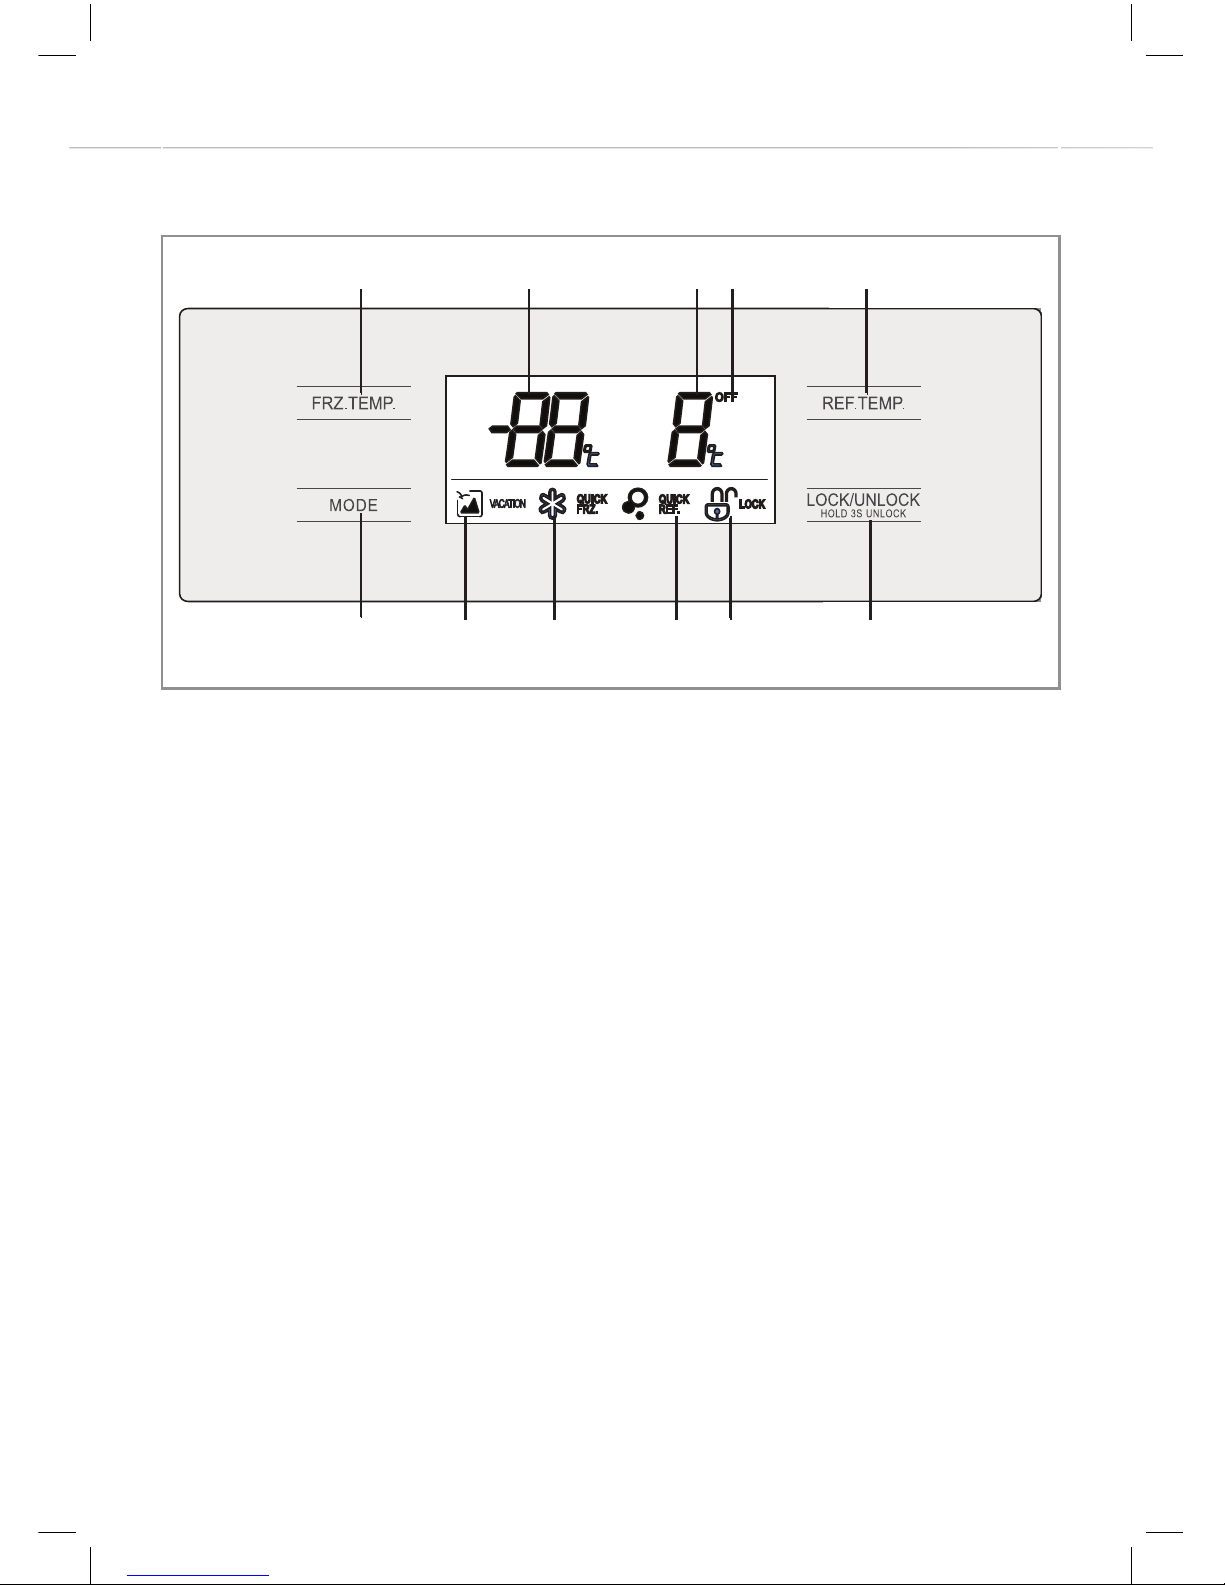
Control Panel
A: Freezer temperature key G: Holiday/Vacation
mode icon
B: Freezer temperature display H: Fast/Quick freeze
icon
C: Fridge temperature display J: Super cooling/Quick
refrigeration icon
D: Fridge deactivation icon K: Lock/unlock icon
E: Fridge temperature key L: Lock/unlock key
F: Function selector key
NOTE:
The control panel has a standby mode which means that the display
dims automatically 30 seconds after the last key was touched and
will give the impression of the appliance being o. Simply touch any
key briefly to re-activate the display and then unlock the control panel
before attempting any adjustments.
Fig. 1
A B C D E
F G H J K L

8
NOTE:
Before attempting to adjust the temperature or function of your
appliance, ensure the appliance is not in “Lock” mode - make sure the
“Lock” icon (K) is not illuminated and that the “Unlock” icon (K) is
illuminated instead. If it is in “Lock” mode touch the “Lock/Unlock” key
(L) for three seconds to switch the “Lock” mode o. You will see the
“Unlock” icon (K) is now illuminated.
Setting the Fridge Temperature
• Touch the “Fridge temperature” key (E) once so the fridge
temperature display flashes.
• While the fridge temperature display is still flashing, touch the
“Fridge temperature” key (E) to scroll through the available
temperatures. This may be set between 2°C and 8°C.
• Leave the display for around five seconds to stop flashing and the
temperature is set.
Setting the Freezer Temperature
• Touch the “Freezer temperature” key (A) once so the freezer
temperature display flashes.
• While the freezer temperature display is still flashing, touch the
“Freezer temperature” key (A) to scroll through the available
temperatures. This may be set between -16°C and -24°C.
• Leave the display for around five seconds to stop flashing and the
temperature is set.

9
Holiday/Vacation Mode
This appliance is equipped with a holiday mode function which
allows you to switch the fridge o and leave the freezer running. This
maintains frozen food during a holiday, without running the fridge as
well. The freezer will operate at -18°C and cannot be adjusted.
To switch the holiday mode on
• Touch the “Function selector” key (F) to cycle through the function
options. Stop when the “Holiday/Vacation mode” icon (G)
illuminates.
• The “Holiday/Vacation mode” icon (G) will stay on and the holiday
mode will be activated. The fridge deactivation icon (D) will show
‘O ’.
NOTE: Adjusting the temperature of either the fridge or the
freezer will cancel holiday mode.
To switch the holiday mode o
• Touch the “Function selector” key (F) to cycle through the function
options. Stop when no other icons except for the “Unlock” icon (K)
are illuminated.
• The holiday mode will now be o and the fridge will return to normal
function. The temperature of the freezer will have reverted to -18°C
and the fridge temperature to 4°C.

10
Fast/Quick Freeze Function
The fast/quick freeze function can be used to freeze large quantities
of fresh food as quickly as possible. For best results, switch the fast
freeze function on 12 hours prior to introducing large quantities of
food to be frozen.
To switch the fast freeze function on
• Touch the “Function selector” key (F) to cycle through the function
options. Stop when the “Fast/Quick Freeze” icon (H) illuminates.
• The “Fast/Quick Freeze” icon (H) will stay on and the fast freeze
mode will be activated.
NOTE: Adjusting the temperature of the freezer will cancel fast
freeze mode.
To switch the fast freeze function o
• Touch the “Function selector” key (F) to cycle through the function
options. Stop when no other icons except for the “Unlock” icon (K)
are illuminated.
• The fast freeze mode will now be o and the fridge will return to
normal function. The temperature of the freezer will have reverted
to -18°C and the fridge temperature to 4°C.
NOTE: It is possible to operate both the fast freeze and super
cooling functions simultaneously but adjusting the temperature of
either compartment will cancel the related function.
Table of contents
Other CDA Refrigerator manuals


