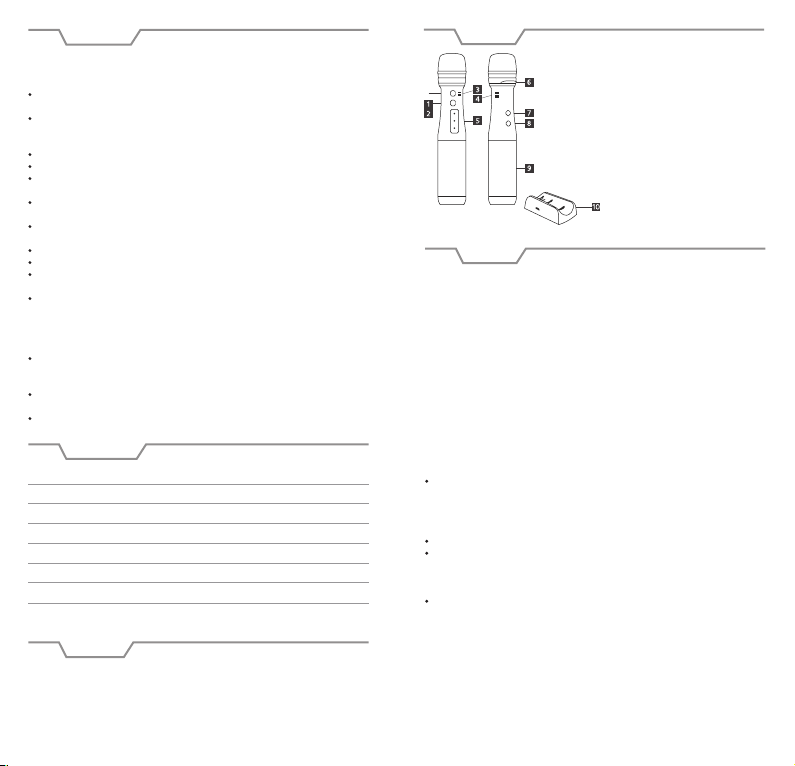
Overview
In the box
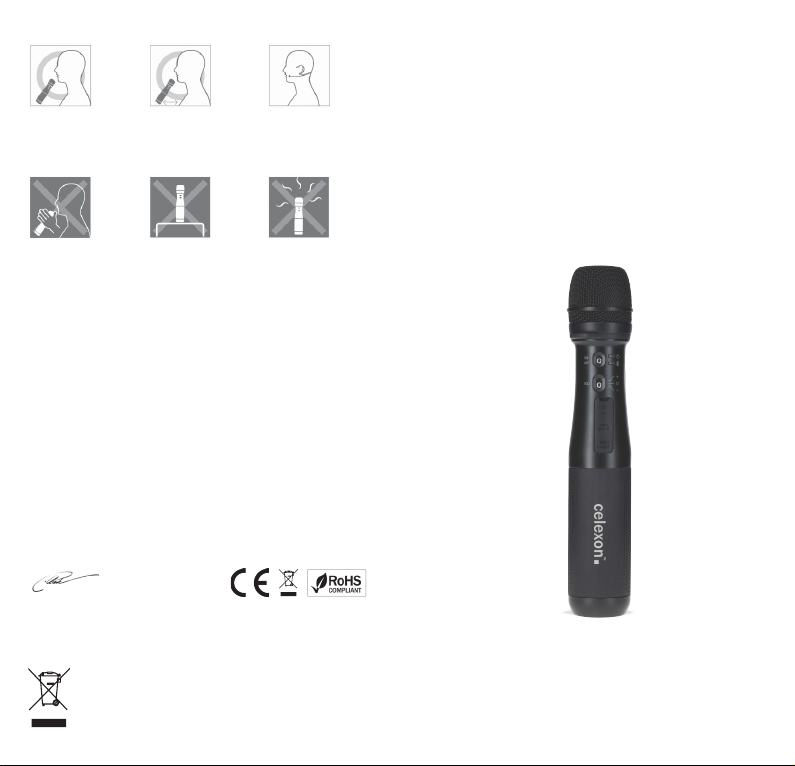
Initial use
Specification
1. Power Switch
2. Volume Selection Switch (3-level)
3. Indicator Lamp (Power, Charging)
4. Charging Terminal (Cradle connection part)
5. External Device Connection (MIC, AUX, USB-C)
6. Ring for lanyard
7. Echo Switch
8. Buzzer Switch
9. Dual Speaker
10. Cradle
1x microphone
1x charging station
1x carrying bag
1x lanyard
Power supply rechargeable battery
Power consumption
Battery life at full charge
Frequency range
Charging station
Charging time
Dimensions
Weight
7.4V 1100mAh Li-ion battery
10W
6 hours
200Hz ~ 15KHz ± 2dB
DC5V 1A with USB-C connection
2.5 hours
260 x 45 x 45mm (WxHxD)
300g
1x USB-C cable 1m long
1x instruction manual
Optionally required:
USB TYPE DC 5V power supply unit
Before starting, check the battery status by sliding the ON / OFF switch (1) to ON.
If the battery status light comes on, the battery is weak and must be charged as
follows.
Option 1: Connect the supplied USB-C cable to the external device connector
panel (5) and connect it to a USB TYPE DC 5V power supply.
Option 2: Connect the cradle (10) with the supplied USB-C cable and a USB TYPE
DC 5V power supply. Then insert the microphone with the docking point (4) on
the charging station (10).
In both cases please make sure that the battery status light is switched on as
soon as the charging unit is inserted.
Battery Status Light: Red = Charging | Green = Charging complete
After a long time without use, the built-in battery can become discharged. Please
check the battery charge status before using.
With the various setting options you can adjust the microphone to any presen-
tation situation:
2. Volume adjustment: You can choose between three volumes (Maximum
| medium 0 | minimum -).
ATTENTION: Use a lower volume in small rooms, otherwise the sound from
the microphone can be detected and a feedback arises. This will cause the
microphone to roll over and create an unpleasant howling.
7. Echo Switch: With this special effect you can provide the desired echo effect.
8. Buzzer switch: With this special effect a noise is generated to attract
attention.
Key press <1 second = short beep, Key press> 1 second = continuous beep,
Key press from 3 seconds = Three beeps
(5) External connection
MIC: Here you can connect a headset microphone | Optionally available celexon
Voice Booster Headset Professional.
AUX: Here you can connect another audio output source via AUX cable.
CHARGE: Here you can connect a USB-C cable and charge the microphone via
USB TYPE DC 5V power supply.
This manual is intended to familiarize you with the operation of this product.
Please keep this manual so you can access it at any time.
To ensure trouble-free operation, the device may only be used indoors,
it is NOT for outdoor use
Use of the equipment and accessories is prohibited for children under 16
years of age without supervision. Make sure that no children play with the
devices.
Modification of the product will affect product safety.
Attention risk of injury! Never open the product or carry out repairs yourself!
Attention risk of injury! Do not use the product next to the ear of other
persons, otherwise hearing damage could occur.
After a long period of no usage, the built-in battery can become discharged.
You can check the battery charge status before use.
Handle the product carefully. It can be damaged by bumps, blows or falls,
even from a low height
Keep the product away from moisture and heat.
Never immerse the product in water or other liquids.
Use the product only in its intended manner. Any other use may damage the
product.
Should you see any external damage to the device or experience unexpected
or unusual operation, the product should not be used. In these cases, switch
off the product immediately and contact the dealer where you have purcha-
sed the product or celexon directly (Web: www.celexon.co.uk, Mail:info@
celexon.co.uk) for more information.
Failure to comply with the above instructions may result in personal injury
and damage to the product or devices connected to it. Also, in case of faulty
installation or use, the warranty may expire.
If you are unsure about using the product, contact a specialist, your dealer or
We reserve the right to make technical changes.
Precautions