Cellini CAP200W User manual

1
Model No. 型號: CAP200W
Please read this instruction manual carefully before use and keep it for future reference.
請於使用前細閱本說明書並加以保存。

2

3
Pre-lter
Remove the large particles from the air and is easy to clean with brush on your vacuum cleaner.
4-IN-1 lter
4-IN-1 lter with Anti-virus, Anti-mould, Anti-bacteria, Anti-allergy functions.
HEPA lter (99.97%)
Remove particles from the air down to 0.3 microns including most species of dust mites.
The efciency is as high as 99.97%.
HIMOP lter
Quickly break down the poison gas caused by house decorations or vehicle exhaust
gases such as formaldehyde, benzene, TVOC, NH3, SO2 and break them down into
water and CO2. Especially effective to formaldehyde.
Active carbon lter
The particle like active carbon lter can absorb many aromatic compounds,
formaldehyde
and chemicals
at a molecular level.
Nano photocatalyst lter
Photocatalyst lter with deodorizing, antibacterial and light desorption regeneration functions
under light condition because the photocatalytic lter will be restored in the sun light effect
which can purify the air and keep the air fresh.
UV lamp sterilizer
UV light in 365nm density can excite the photocatalyst lter to improve its activity, because
the UV light in sun can excite and recycle the lter to break down bacteria quickly into in-
nocuous substances effectivity
Cool plasma
Generates a large number of negative and positive charged ions that quickly neutralize
charged particles aids in reducing air born allergens. Negative ions also boost serotonin
levels in human body.
Model : CAP200W
Voltage : 220-240V~ 50Hz
Power (W) : 50
Rated air ow (m3/h) : 70-120
Applicable area (m2) : 30
Net weight (kg) : 6.8
Product Dimension (mm) : 360(W) X 180(D) X 500(H)
Thank you for purchasing this product. The product is a unit of air purier tted with high
efciency lters. To get familiarized with your new product, please read the manual carefully
and retain this booklet for future reference.
* Two set of Multi-lters are equipped with this product:
One is already installed in the machine and the other one is packed in a separate box.
4
• Please disconnect the power if the unit will not be used for a long time.
• Do not place/insert foreign objects into inlet and outlet ducts to avoid damage.
• Please unpack the lters before usage otherwise there will be no ltering effect.
• Please do not cover the outlet duct with anything.
• Never use the product in any area which may have water splashing on the unit.
• Please do not wash the unit with gasoline or pesticide, otherwise the plastic parts may
crack and cause electric shock.
POWER
FUNCTION
SPEED TIMER
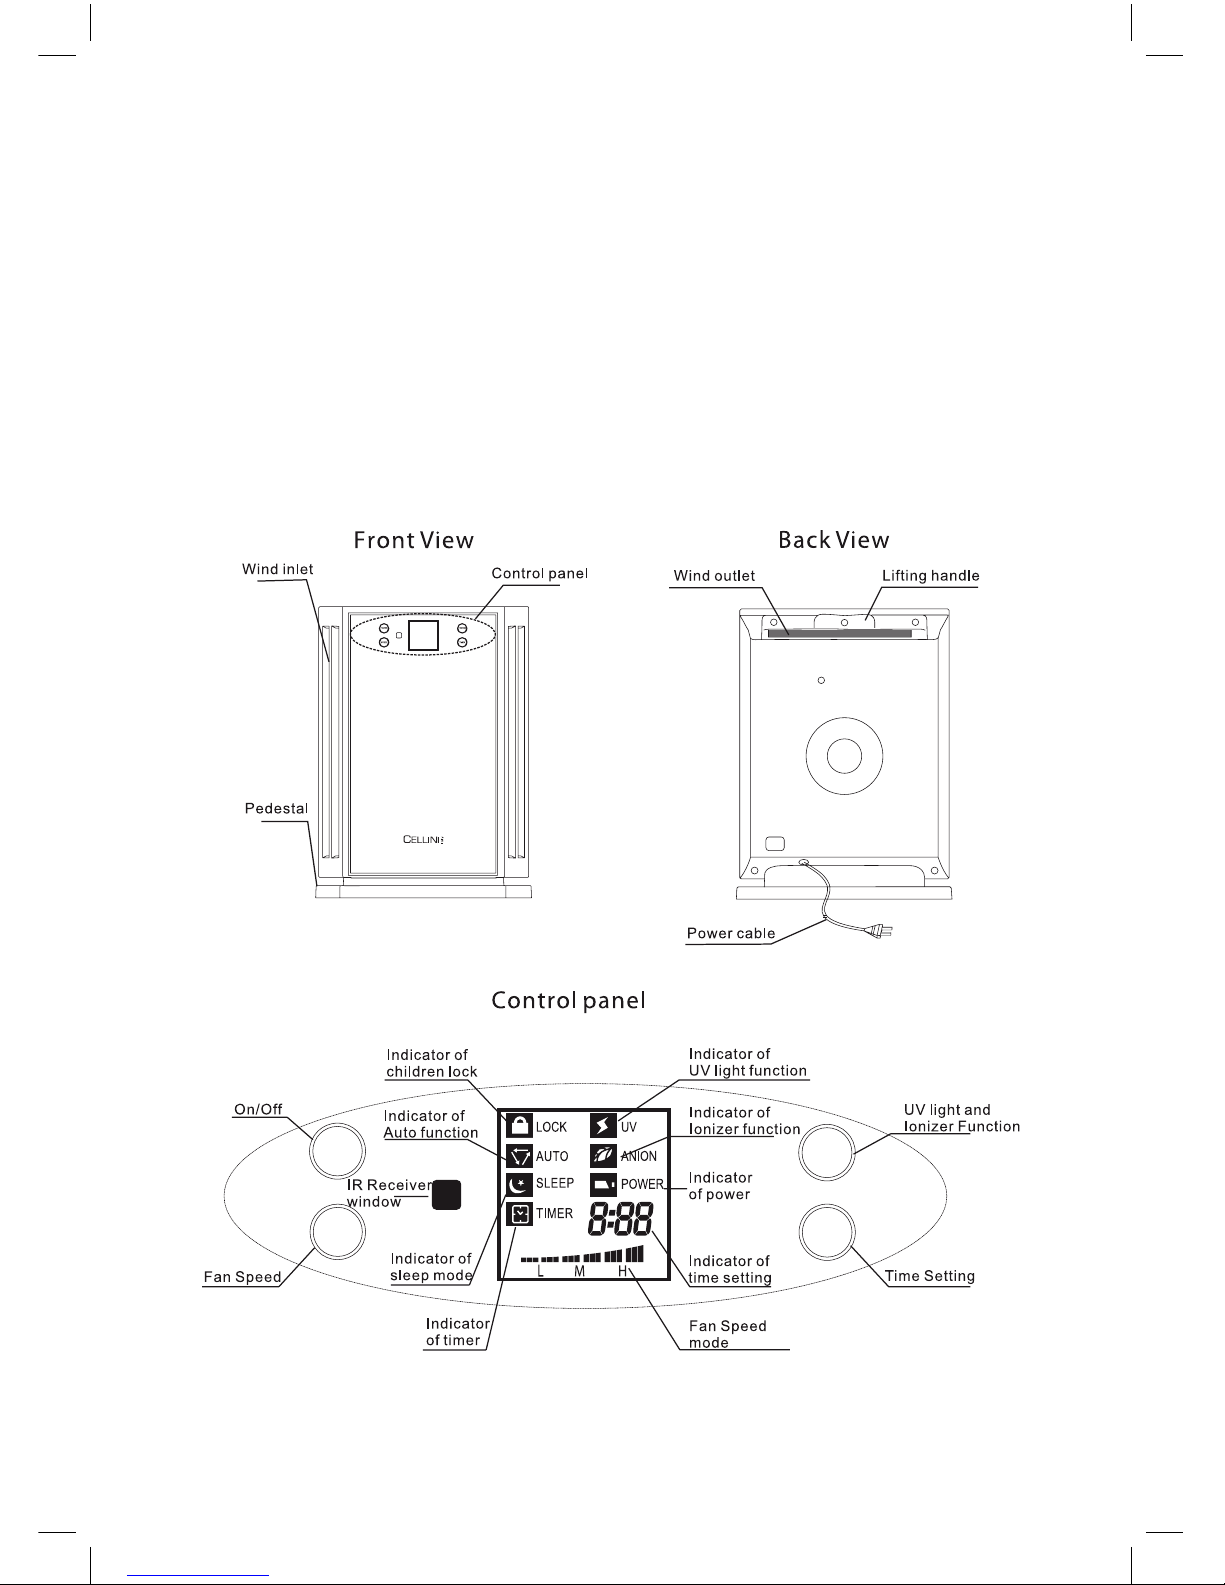
5
Method of Operation
1. Connect the power
Connect the power, the button of power light on the LED screen. Unit is ready for operation.
2. On/Off
Touch the button of power on the control panel, the fan blows in low speed. The
indicator of power and low speed will light up. Press the button again, the LED screen is
dark with only the sign of power light up.
3. Fan Speed adjustment
Touch the button for selection of fan speed. The LED screen will indicate one sign
(L) for low speed, two (M) for medium and three (H) for high.
4. UV light and Ionizer function
Touch the button for UV light and Ionizer, the indicator will be shown on the control
panel, indicating the selection preferred.
5. Time setting
To enable the timer function, touch the button once to get the time ashing as 0:00
on the LED screen. With further touch the time of button will increase in an interval of 30
mins till 8 hours. The unit will submit the setting in 3 seconds with the signs of clock and
0:00 will then light up steadily.
To make the best use of the air purier, please place and adjust it properly according to
air pollution period and area.
POWER
SPEED
TIMER
FUNCTION
6
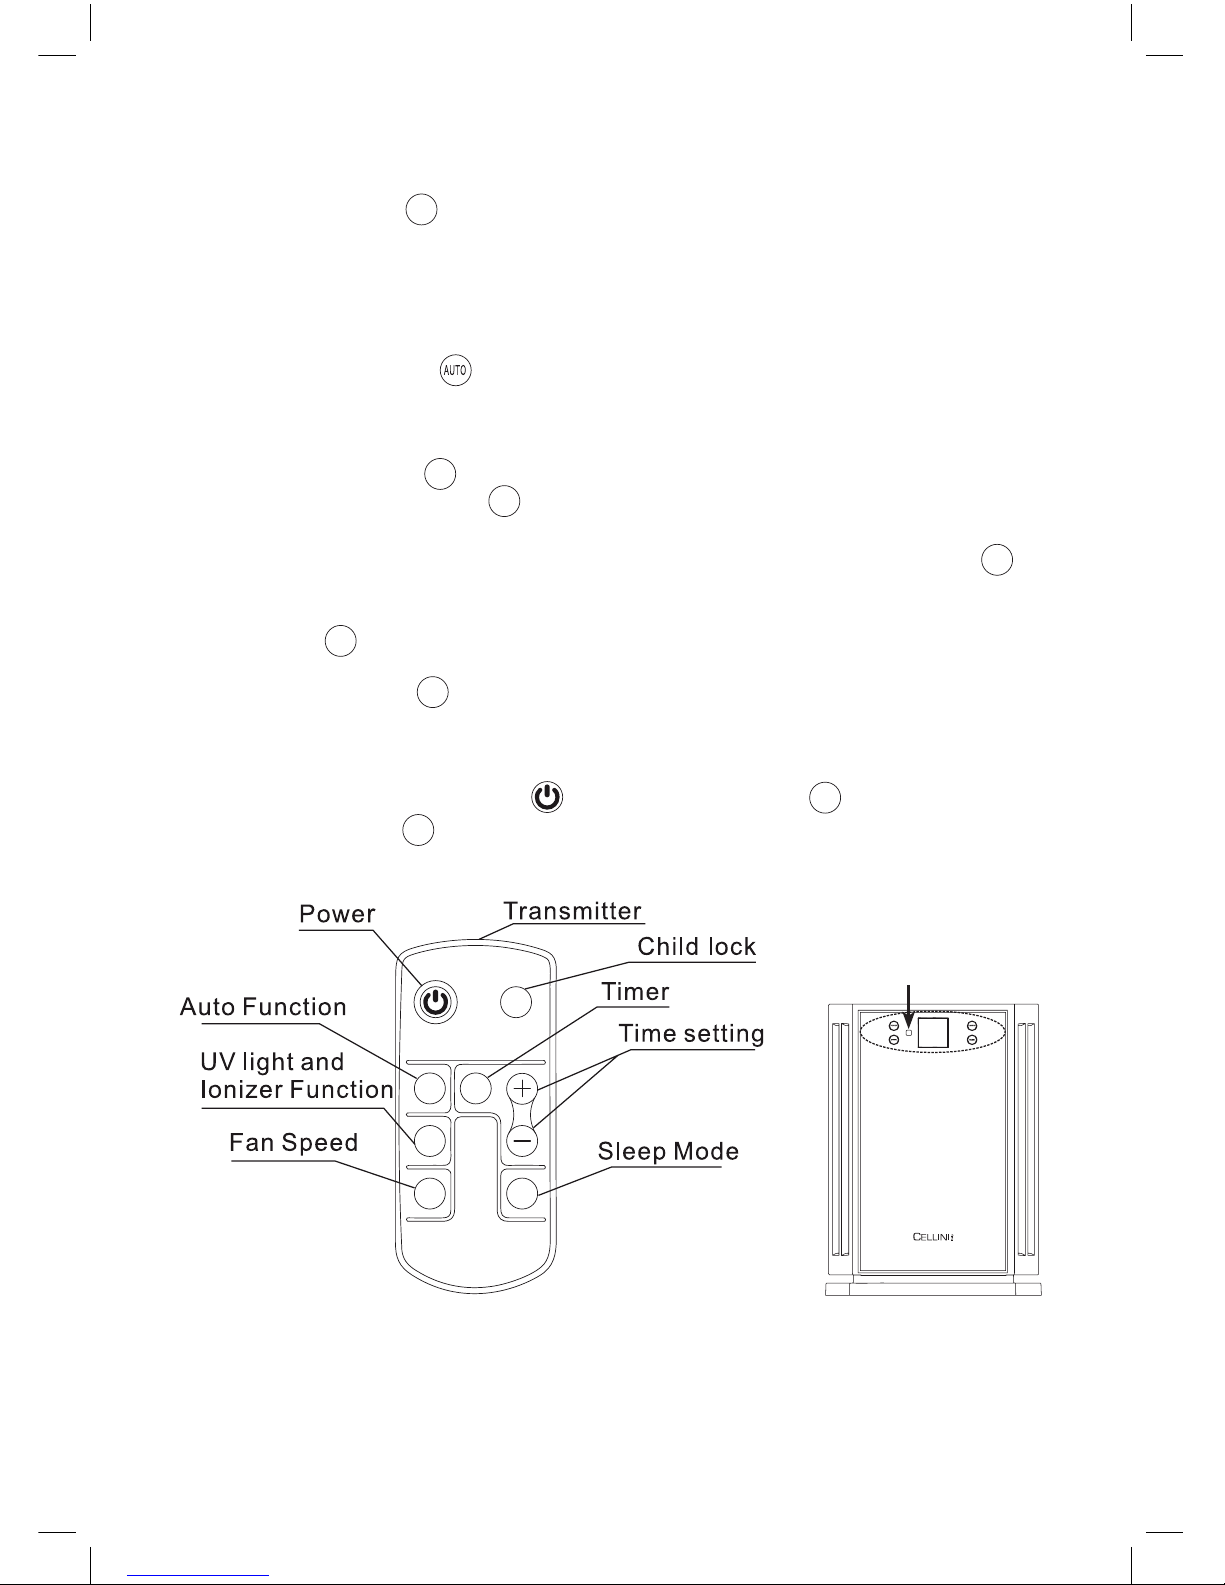
Operation of Remote Controller
1. Child Lock Button
The Child Lock function enables the air purier to be locked, (which will also lock the
power button), and avoid any accidental operation by children or unauthorized usage. To
reset the unit to unlock Mode, the unit needs to be switched off and switched on again.
During locked mode, the lock indicator will be shown on the display.
2. Auto Function Button
The Auto function button, which is on the remote controller, allow the UV light and Ionizer
function to be switched on at a 30 minutes intervals.
3. Time Setting Button
Press the Time Setting Button , the ashing signs of clock and 0:00 will appear on
the LED screen. Press “+” or “-” for desired time setting, the time will increase from 30
minutes to 8 hours. Once the desired time has been set, press the time button to
activate. The sign of clock and 0:00 will then light up steadily. If the time setting button is
not pressed, the time set will not be activated. To reset the time, you may press the time
setting button again.
4. Sleep Mode Button
The Sleep Mode Button will enable the unit to work in low speed mode with the sleep
indicator light displayed on the unit and the fan speed mode indicator light dimmed.
5. The usage of the Power button , UV Light and Ionizer as well as the Fan
Speed Mode buttons on the remote controller are the same as those on the unit’s
control panel.
Notice
1. Please take off the isolating plate of the batteries before usage of the remote controller.
2. Please direct the remote controller to the IR receiver window on the unit.
3. Take out the batteries from the remote controller if it is not in use for a long time.
IR signal receiver
TIMER
SPEED SLEEP
AUTO
UV
&
ANION
LOCK
LOCK
TIMER
TIMER
TIMER
TIMER
SLEEP
UV
&
ANION
SPEED

7
Keep it at least 10cm away from the wall. Do not place it near the window
where the curtain may cover the
intake and outow of the air.
For better performance of air
purifying, please place the machine
where air circulation is good.
Place the air purier near the
source of the polluted air for
more effective results.
1. Lay down the machine with the
control panel facing upward, hold
the handle of the lter frame and
press inwards to release the frame
from the unit.
2. Hold the handles of the lter frame
and pull the lters out following the
direction of the diagram below.
3. Unpack the packaging of the new
Multi-lter and take it out. Mark
down the start date of operation
on the label placed at the side of
frame. Disassemble the Pre-lter
and the Frame parts, then take out
the used Multi-lter and replace
with a new one.
Pre-lter
Multi-lter
(4 in 1 + HEPA + HIMOP +
Active carbon and Nano
photocatalyst lters)
Frame
8
NOTE - Never clean the set of Multi-lter (4-IN-1, HEPA, HIMOP, Active carbon and Nano
photocatalystare lters) with water to avoid changes to the shape of the lters.
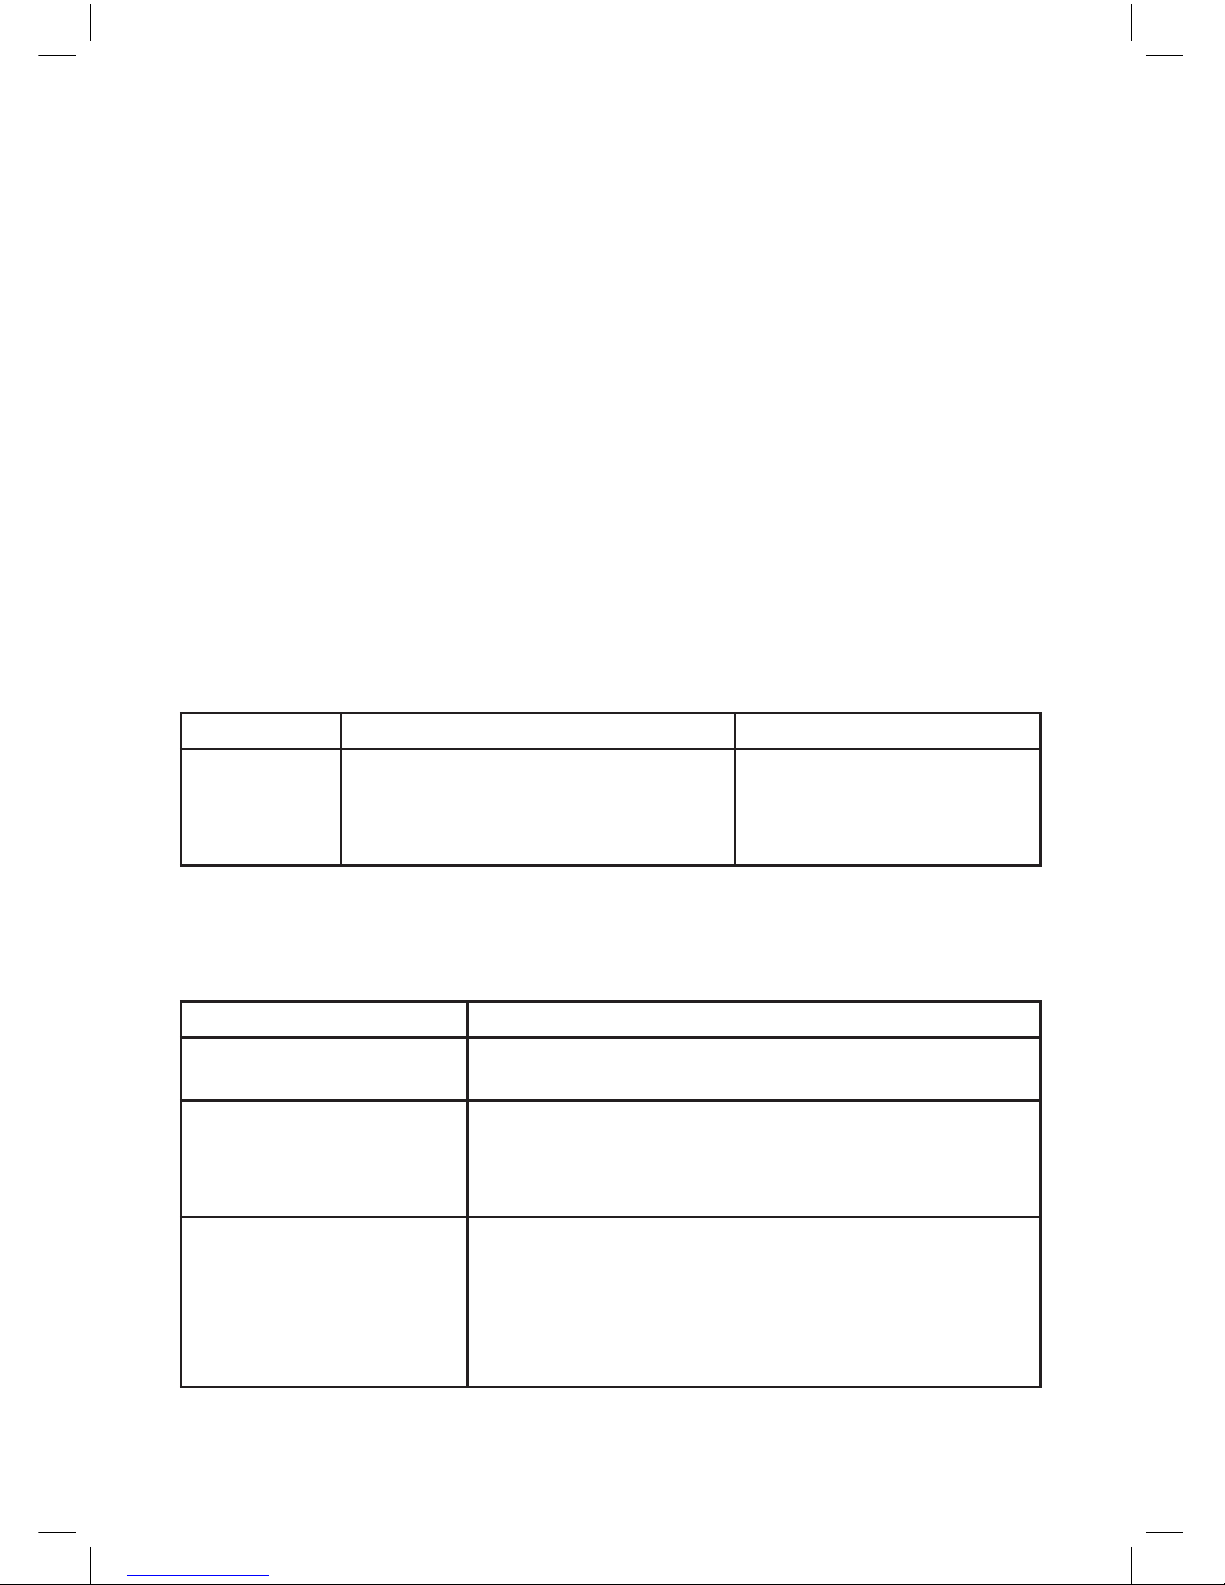
Structure Function
Standard
equipments
Pre-lter, 4-IN-1 lter, HEPA lter,
HIMOP lter, Active carbon lter,
Nano photocatalyst, Cool plasma,
UV lamp sterilizer
Removing formaldehyde
odour, VOC, bacteria, n
dust and negative ions
generations.
Filter Replacement
• The standard lifespan of the lters is one year. However, it will also depend on the
duration of usage and air pollution level of the surroundings.
• The lters are recommended to be cleaned using a vacuum cleaner after 3 to 4
months of usage. Only Pre-lter can be washed by water.
• The lters are also recommended to be changed after two years not being used.
• Please contact the authorized retailers for purchase of replacement lters.
(Besides the lter of Cool plasma and UV lamp sterilizer cannot be replaced, the others
can be replaced by a new one.)
Power Cable Replacement
• For replacement of damaged power cable, please contact the service center.
Problem Checklist
Unit does not operate Please check whether the power plug is properly
inserted into the socket.
Remote Controller does
not operate
• Please check whether the batteries are still usable.
• The batteries are placed in the correct poles.
• The remote controller must be directed/ aimed at the
unit’s receiver panel when it is to be used.
Unable to remove odour /
Unable to remove the dirt
in the air /
Loud operational noise
• The air intake may be blocked. Please clean both the
air intake ducts.
• Pre-lter is recommended to be cleaned if they are too dirty.
• The set of 4-IN-1, HEPA, HIMOP, Active carbon and Nano
photocatalystare lters are recommended to be replaced
with a new one if the unit is still not functioning properly.
Please refer to the following before contacting the Customer Service Centre for service / repair:
Please send the air purier to the service center for repair if the problems cannot be
solved or when water or foreign objects/particles get into the air purier and is affecting
its operation.

9
感謝您購買本產品
,
本產品配備高效能過濾網
,
使用前請先細閱本說明書
,
把說明書收
藏好以便日後使用
。
*另附送2套多重過濾網,一套安裝在產品內,一套用紙盒獨立包裝
。
- 初步過濾網
去除空氣中大顆粒、毛髮,可水洗或用吸塵器清潔
- 4-IN-1 濾網
防病毒、防霉菌、防細菌、防過敏四合一濾網
- HEPA高效過濾網 (99.97%)
過濾空氣中0.3微米以上的細菌、煙霧及粉塵等微粒,過濾效率達99.97%以上
- HIMOP濾網
快速分解從裝修或汽車癈氣造成的有害氣體如甲醛、苯、TVOC、氨氣、二氧化硫,並
將其分解為二氧化碳和水,對去除低濃度甲醛尤為有效
- 活性炭過濾網
吸收煙霧、甲醛、乙硫醇、氨等其他多種不良氣味和有害氣體
- 光觸媒過濾網
光觸媒濾網在光照條件下具有除臭、抗菌和光脫附再生的功能。因把它放於陽光下,光
催化過濾器將會再生及恢復。使能夠淨化空氣及保持空氣清新
- 紫外線殺菌
365納米的紫外線燈可以激發光觸媒濾網,提高其活性,因為太陽的紫外線光可以激發
過濾器及將細菌迅速分解成無毒無害的物質
- 正負離子釋放
等離子發生器釋放大量的正、負離子,使室內空氣更清新
功能及特性
技術資料
型號 : CAP200W
電壓 : 220-240V~50Hz
功率(W) : 50
標示空氣流量(m3/h) : 70-120
可用範圍(m2) : 30
淨重(kg) : 6.8
產品尺寸 (mm) : 360(闊)X180(深)X500(高)

10
安全規則
主要部件
-如果長時間不使用,請把電源插頭拔除。
-不要把任何物件放入入風或出風口以免發生危險。
-確保使用前已把濾網的包裝移除,否則是沒有過濾效果的。
-不可把出風口蓋住。
-本產品不可放置在有可能被水潑到的地方。
-不可用汽油或殺蟲劑清潔外殼,這會使膠殼裂開或引至觸電。
前面 背面
控制面板
POWER
FUNCTION
SPEED TIMER
Table of contents
Other Cellini Air Cleaner manuals


