Centrum Elektroniki SP54 User manual

SP54 Manual
Technical data:
▸ Radio controlled Clock via DCF frequency
▸ Manual time setting.
▸ Continuous calendar up to year 2099.
▸ Date and weekday display.
▸ emperature alternatively in ℃
or ℉
.
▸ ime in optional 12/24 hour format.
▸ Weekday display in 7 languages: English,German,Italian,French,Spanish,Netherlands,and Danish
▸ Automatic snooze function (5 minutes).
▸ hermometer: Indoor measurement ranges: 0°C (32°F) ~ 50°C (122°F)
outdoor measurement ranges: -19.9°C (-3.8°F) ~ 59.9°C (139.8°F)
▸ Display Hi/Lo Outdoor emperature
▸ Hygrometer: measurement range: 20% ~ 95% RH. Separate display of indoor use.
▸ LED back light display (auto off after 5 seconds).
▸ Battery: 2 x AAA /LR6 (not Included).
LCD SCREEN AND SETTINGS:
Wireless remote sensor (transmitter)
▸ ransmitter frequency: 433.92 MHz.
▸ Range of transmission is up to 60m (200feet).
▸ Iinsert the 2 batteries in to the transmitter, Pay attention to observe the correct polarity.
Initial operation:
▸ Obstacles can severely impair the of the transmission
▸ Protect the transmitter against any direct sunlight penetration
▸ Open the battery compartment on the rear side of the outdoor remote sensor and insert the batteries.
Pay attention to observe the correct polarity. Select the °C/°F display by pushing the button inside the
compartment. Close in the battery compartment
▸ Open the battery compartment on the rear side of the receiver and insert the batteries. Pay attention
to observe the correct polarity. Close the battery compartment.

SP54 Manual
▸ When you insert the batteries, all the icon on the LCD display will briefly light up for 3 seconds, and
you will hear a beep tone, and detect indoor temperature & humidity.
▸ he receiver will now start to make a connection to the outdoor remote sensor. his operation takes
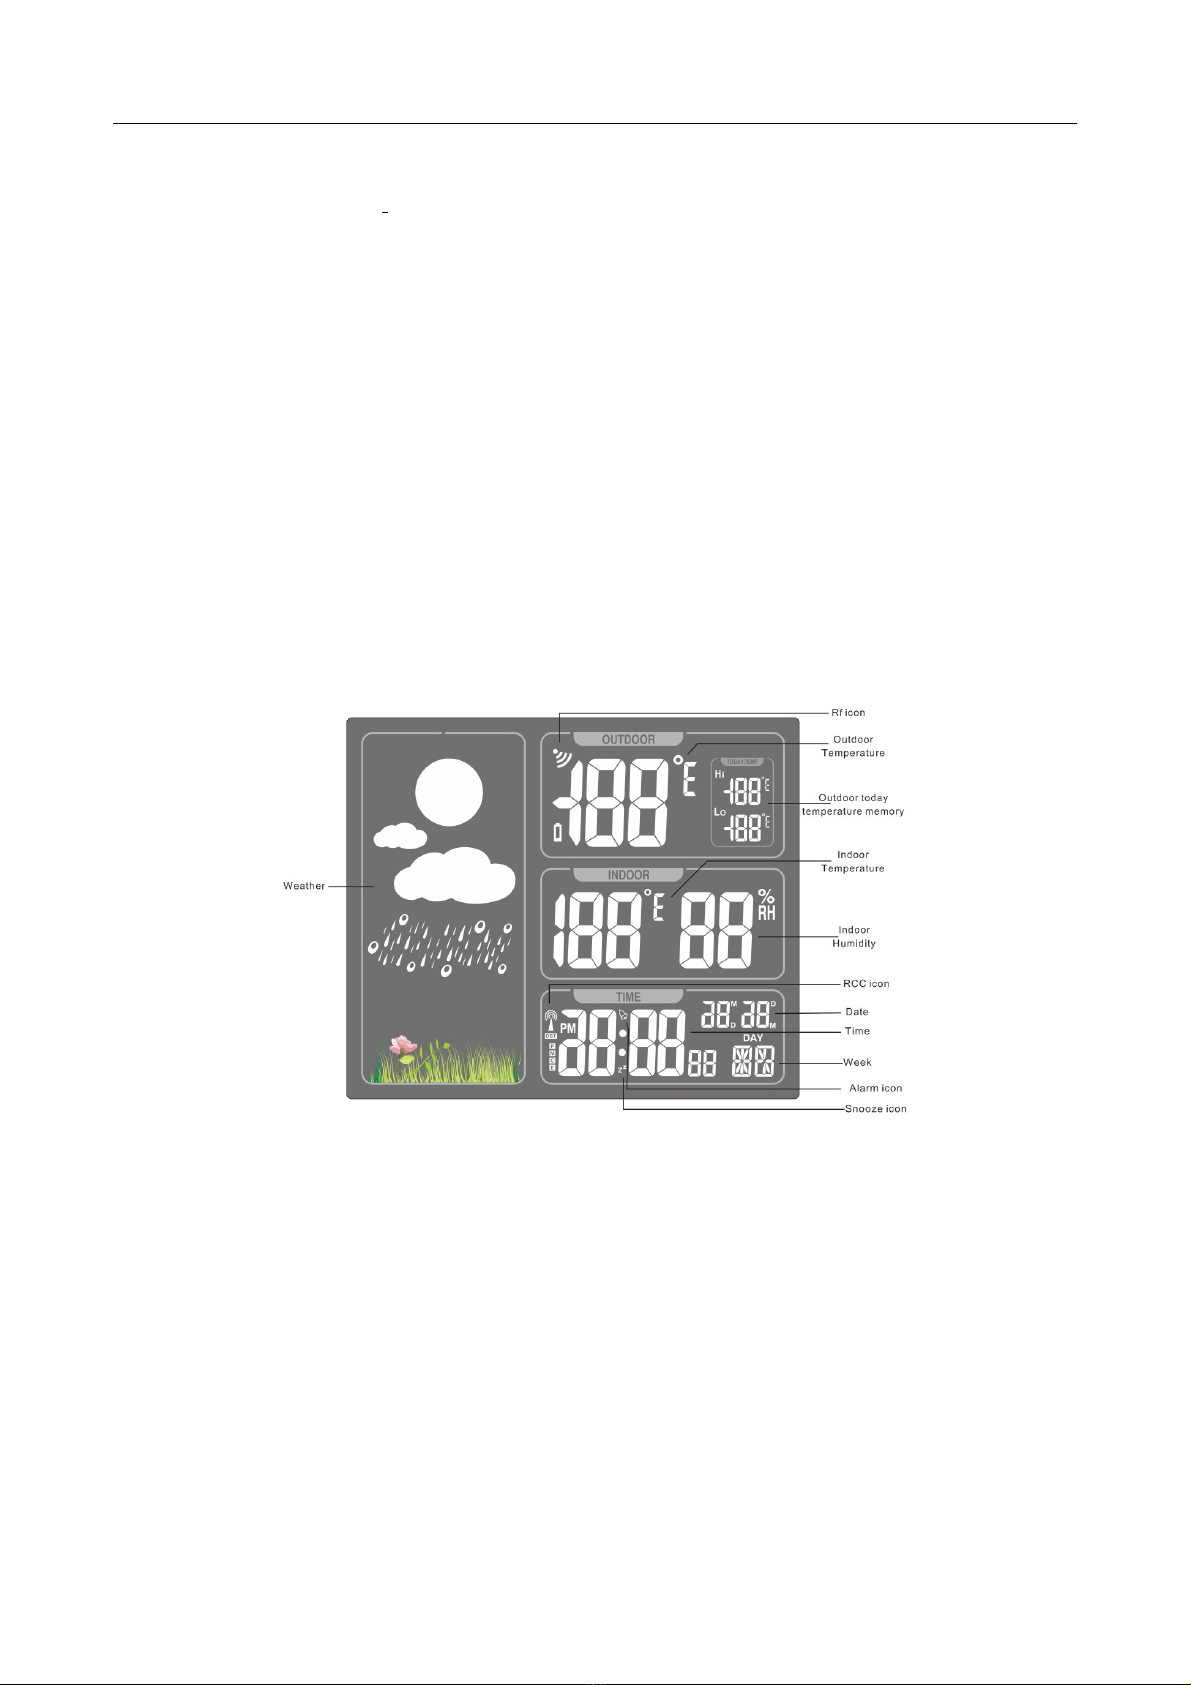
about 3 minutes and is displayed by a flashing reception RF antenna symbol in the “OU DOOR”
display area on the receiver.
▸ After receiver has created a connection to the outdoor remote sensor, it will then b enters the clock
mode.
Man al time setting:
▸ Press and hold down the “SET” button for 2 seconds, the Year display 2012 starts to flash. Now use
“▲” and “▼” buttons to set the correct year.
▸ Press SET to confirm your setting, the Month display starts to flash. Now use “▲” and “▼” buttons to
set the correct month.
▸ Press “SET” to confirm your setting, the Date display starts to flash. Now use “▲” and “▼“buttons to
set the correct date.
▸ Press “SET” to confirm your setting, the language selection for the Weekday displays starts to flash.
Now use “▲” and “▼“buttons to select a language.
▸ Press“SET”to confirm your setting, the ime zones start to flash, Now use” ▲” and “▼” buttons to set
a correct time zone (-12 to +12).
▸ Press “SET” to confirm your setting, the 12/24 hour mode display starts to flash. Now use “▲” and
“▼ “buttons to set the correct 12/24 hour mode.
▸ Press “SET” to confirm your setting, the Hour display starts to flash. Now use “▲” and “▼“buttons to
set the correct hour.
▸ Press “SET” to confirm your setting, the Minute displays starts to flash. Now use “▲” and “▼“buttons
to set the correct minute.
▸ Press “SET” to confirm your setting and to end the setting procedures, enter the clock mode.
F.Y.I.:
▸ After 7 seconds without pressing any button, the clock switches automatically from Set Mode to
Normal ime Mode.
▸ here are 7 languages of Weekday: English,German,Italian,French,Spanish,Netherlands,and Danish.
Setting the daily alarms:
▸ under the clock mode, press once ALARM button, LCD display the “” icon.
▸ Press and hold down the ALARM button for 2 seconds until Alarm ime flashing icon is displayed.
Now use the “▲” and “▼“ buttons to select the alarm time you require and briefly press the ALARM
button to set this Alarm time.
▸ he Hour display of the Alarm time starts to flash. Use the “▲” and “▼“buttons to set the required
hour. Press ALARM button to confirm your setting
▸ he Minute display of the Alarm time starts to flash. Use the “▲” and “▼“buttons to set the required
minute. Press ALARM button to confirm your setting and to end the setting procedure.
▸ o activate or deactivate the daily alarms, briefly press the “ALARM” button once.
F.Y.I.:
▸ After 7 seconds without pressing any button the clock switches automatically from setting mode to
Normal clock mode.
▸ he alarm will sound for 1 minutes if you do not deactivate it by pressing any button. In this case the
alarm will be repeated automatically after 24 hours.
▸ Rising alarm sound (crescendo, duration: 1 minutes) changes the volume 4 times whilst the alarm

SP54 Manual
signal is heard.
Automati SNOOZE fun tion:
▸ o activate the automatic snooze function: While the alarm is sounding, press the “SNOOZE/LIGHT”
button to activate the snooze function. When the snooze function is activated, the “Zz” symbol
appears in the display.
▸ his operation moves the alarm back by 5 minutes and the alarm will restart at this time.
°C/°F temperature display:
▸ he temperature is displayed either in °C or °F. Briefly pressing the“▼“button allows you to switch
between the individual models.
Radio onne tion to outdoor sensor:
Iinsert the 2 batteries in to the transmitter, Pay attention to observe the correct polarity.
One sensor is suplied with your receiver
▸ Press and hold down the “▼“ button for 2 seconds to search for outdoor sensors (to erase the current
data inside the RC clock).
Re eiving of the RCC signal:
▸ After power on, the unit will automatically receive RCC signal for Max. 7 minutes, and the RCC icon
flash at 1Hz.
▸ At 1:00 /2:00 / 3:00 am, RCC receiving will be turned on automatically, and the clock will be
synchronized if receive successfully. If this receiving fail (the radio mast icon disappears from the
display), the system will automatically attempt another synchronization at the next full one hour. his
procedure is repeated automatically up to total 5 times per day.
▸ Press and hold the “WAVE“ key also can enable or disable the RCC receiving. If no signals received
within 7 minutes, then the DCF signal search stops (the radio mast icon disappears) and start again
at the next full one hour.
F.Y.I.:
▸ A flashing radio mast icon indicates that the unit is receiving RCC signal.
▸ A continuously displayed radio mast icon indicates that the DCF signal was received successfully, the
radio mast icon will disappear if receiving fail.
▸ We recommend a minimum distance of 2.5 meters to all sources of interference, such as televisions
or computer monitors
▸ Radio receiving is weaker in rooms with concrete walls (e.g.: in cellars) and in offices. In such
extreme circumstances, place the unit close to the window.
Ba klight:
▸ Briefly press the SNOOZE/LIGHT button to activate the display lighting for 5 seconds.
Weather fore ast
▸ he weather station uses the air pressure data for weather forecast,When forecasting the weather,
the station has 4 icons: sunny, light cloudy, cloudy and rainy
sunny light cloudy cloudy rainy

SP54 Manual
Table of contents
Popular Weather Station manuals by other brands

Columbia Weather Systems
Columbia Weather Systems Orion 531 user manual

La Crosse Technology
La Crosse Technology WS-9520U instruction manual

Oregon Scientific
Oregon Scientific BAA968HG user manual

Radio Shack
Radio Shack 6300333 user guide

Goddess
Goddess WEA 431 user manual

TFA
TFA RAIN PRO instruction manual

Adexi
Adexi WH0270A manual

LEXIBOOK
LEXIBOOK Meteoclock SM880 owner's manual

Digoo
Digoo DG-8291B user manual

La Crosse Technology
La Crosse Technology WS-7211U instruction manual

La Crosse Technology
La Crosse Technology WS-2812-IT Quick setup manual

SE Controls
SE Controls Stand Alone Rain Sensor Technical information and operating instructions