cercacor Ember User manual
ember
non-invasive hemoglobin tracking system
user guide

Welcome!
We are very excited you have chosen EmberTM to fulll your training and exercise
needs. If at any time you have questions, please feel free to reach out to us at
Cercacor. We are committed to doing what we can to ensure you become an advocate
of Ember and Cercacor technology.
Sincerely,
The Ember Team at Cercacor
*Cercacor, the Cercacor logo and Ember are Trademarks of Cercacor Laboratories. Apple, the Apple logo, iPhone and iPod touch
are trademarks of Apple Inc., registered in the U.S. and other countries. App Store is a service mark of Apple Inc.

Contents
Indication for Use ...............................................................................................................
Safety ...................................................................................................................................
Getting Started ............................................................................................................
Taking a Measurement ......................................................................................................
Hemoglobin and Pulse Rate Descriptions ........................................................................
Reviewing Features .............................................................................................................
Troubleshooting..........................................................................................................................
1
3
5
7
10
15
21

Indication for Use
Ember is intended for use by athletes or their trainers to help measure and track
hemoglobin and pulse rate. It is intended to be used by individuals 13 years or older
with a nger width of 22mm or less. This product is not a medical device.*
The Ember system consists of the device, sensor, and mobile app. The Ember Device
requires a smartphone with Bluetooth 4.0 capabilities to operate, running iOS8.2 or
newer. For a list of devices and operating systems that the Ember system works with,
please visit www.cercacor.com
*This product is not intended to monitor or alleviate a physiological condition or disease state. Individuals who need a
device to monitor a medical condition should contact their physician.
1

2

WARNING:
• Reduce possibility of entanglement or strangulation when using and storing
sensor cable.
• Explosion hazard. Do not use the Ember device in the presence of ammable
substances, or in combination oxygen environments, or nitrous oxide.
• Avoid risk of an electric shock by only plugging in Cercacor compatible sensors
into the device sensor port. Also, do not plug the Cercacor sensor into any other
equipment except Cercacor devices.
• Only use a UL Listed power adapter that meets LPS or Class 2 limits rated 5V,
minimum 0.5A.
• Do not incinerate battery.
Safety
3

CAUTION:
• Do not lift the Ember device by the cable or sensor.
• Discontinue use of the product if it appears to be damaged in any way.
Immediately contact customer support.
• Do not attempt to adjust, repair, open, or disassemble the device and/or sensor
in order to avoid injury or damage to device.
• Do not submerge device and/or sensor under water or cleaning solution, which
will cause severe damage.
• To prevent electric shock, avoid placing device on surfaces with visible liquid
spills. Do not soak or immerse the device in liquids, and only use cleaning
solutions sparingly.
• Ember device and sensor should be properly disposed as electronic waste
4
5
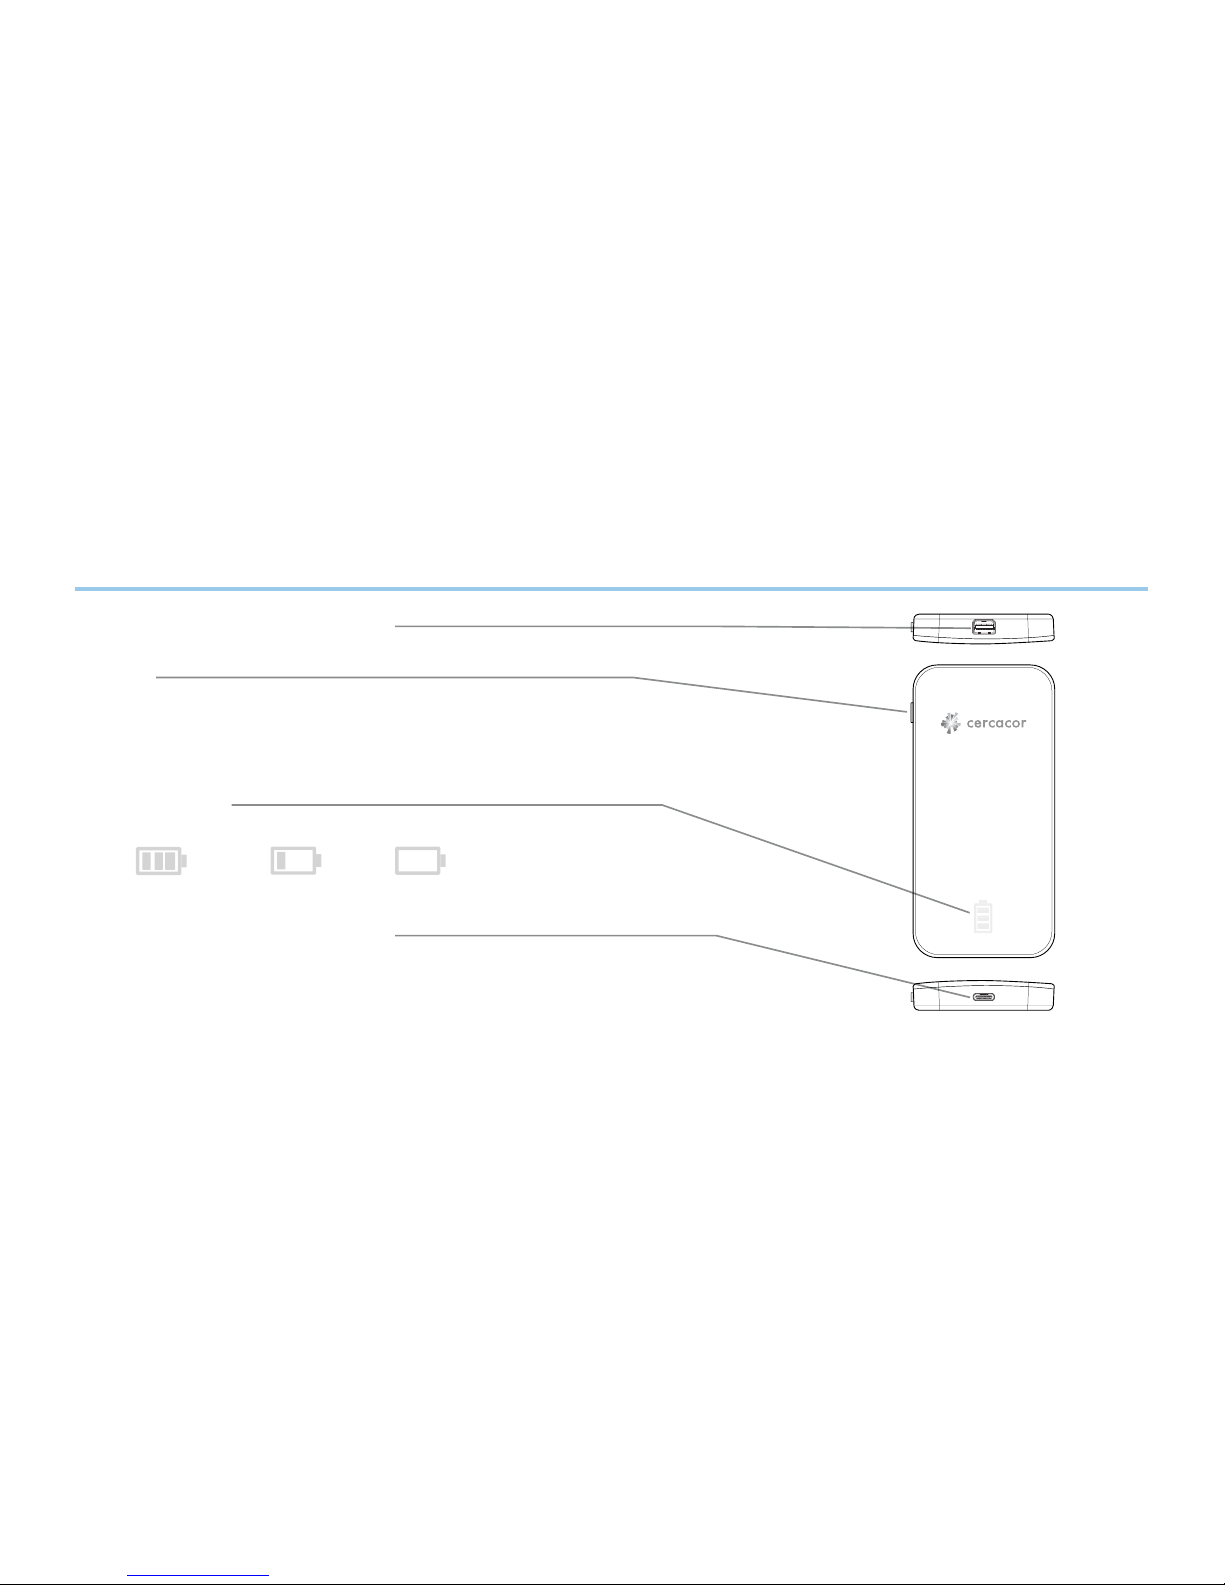
Getting Started
Sensor Port: Mini DP 20 Pin
Button
Press once for Battery Status
Status Lights
Charging Port: USB Type C
Charge the battery by connecting Ember device to your computer using
the included USB Type C cable, or connecting Ember device to a power
outlet using a UL Listed power adapter (LPS or Class 2).
full battery low battery needs charging
Press and hold for 3 seconds for Bluetooth pairing
Press and hold for 6 seconds for a Hard Reset

6
Create an Account
• Be sure to download the free Ember app from the Apple App Store.
• After you open the app, tap the Sign Up text at the bottom of the page to create an
account. Follow the screen prompts until your account is created.
• Congratulations! You have now created an account. Next lets connect Ember to
your smartphone.
Connecting Ember to your smartphone
• The Ember device is shipped in sleep mode when you rst receive it. To wake it up
press the button for 3 seconds and then a series of blinking rectangles will appear.
Now it is visible for the Ember by Cercacor App.

7
1 Begin by placing the sensor on a nger free of deformities. It is best to use the ring or
middle nger of your non dominant hand. It is recommended to not use nail polish for
best accuracy and repeatability of consistent measurements. Blue and Green nail polish
signicantly affect the accuracy of the measurement. Always use the same nger for every
measurement. To ensure proper placement:
• The cable should be on top of your hand in a straight line as far as possible.
• Your nger should be all the way in the sensor
• Use the same posture and remain still during measurement
Taking a Measurement

8
2Once you are ready, tap the Start button within the app. The measurement time varies
and can range from 60 to 90 seconds. Be patient, the system will ask you to try again if
it cannot get a result within 120 seconds.
• During testing be sure to not move around
• Refrain from talking, coughing, or sneezing during measurement
• During the measurement, a question related to the activity will be displayed.
Please be sure to answer all activity questions to allow you to get better data
reviewing power in your graphs.
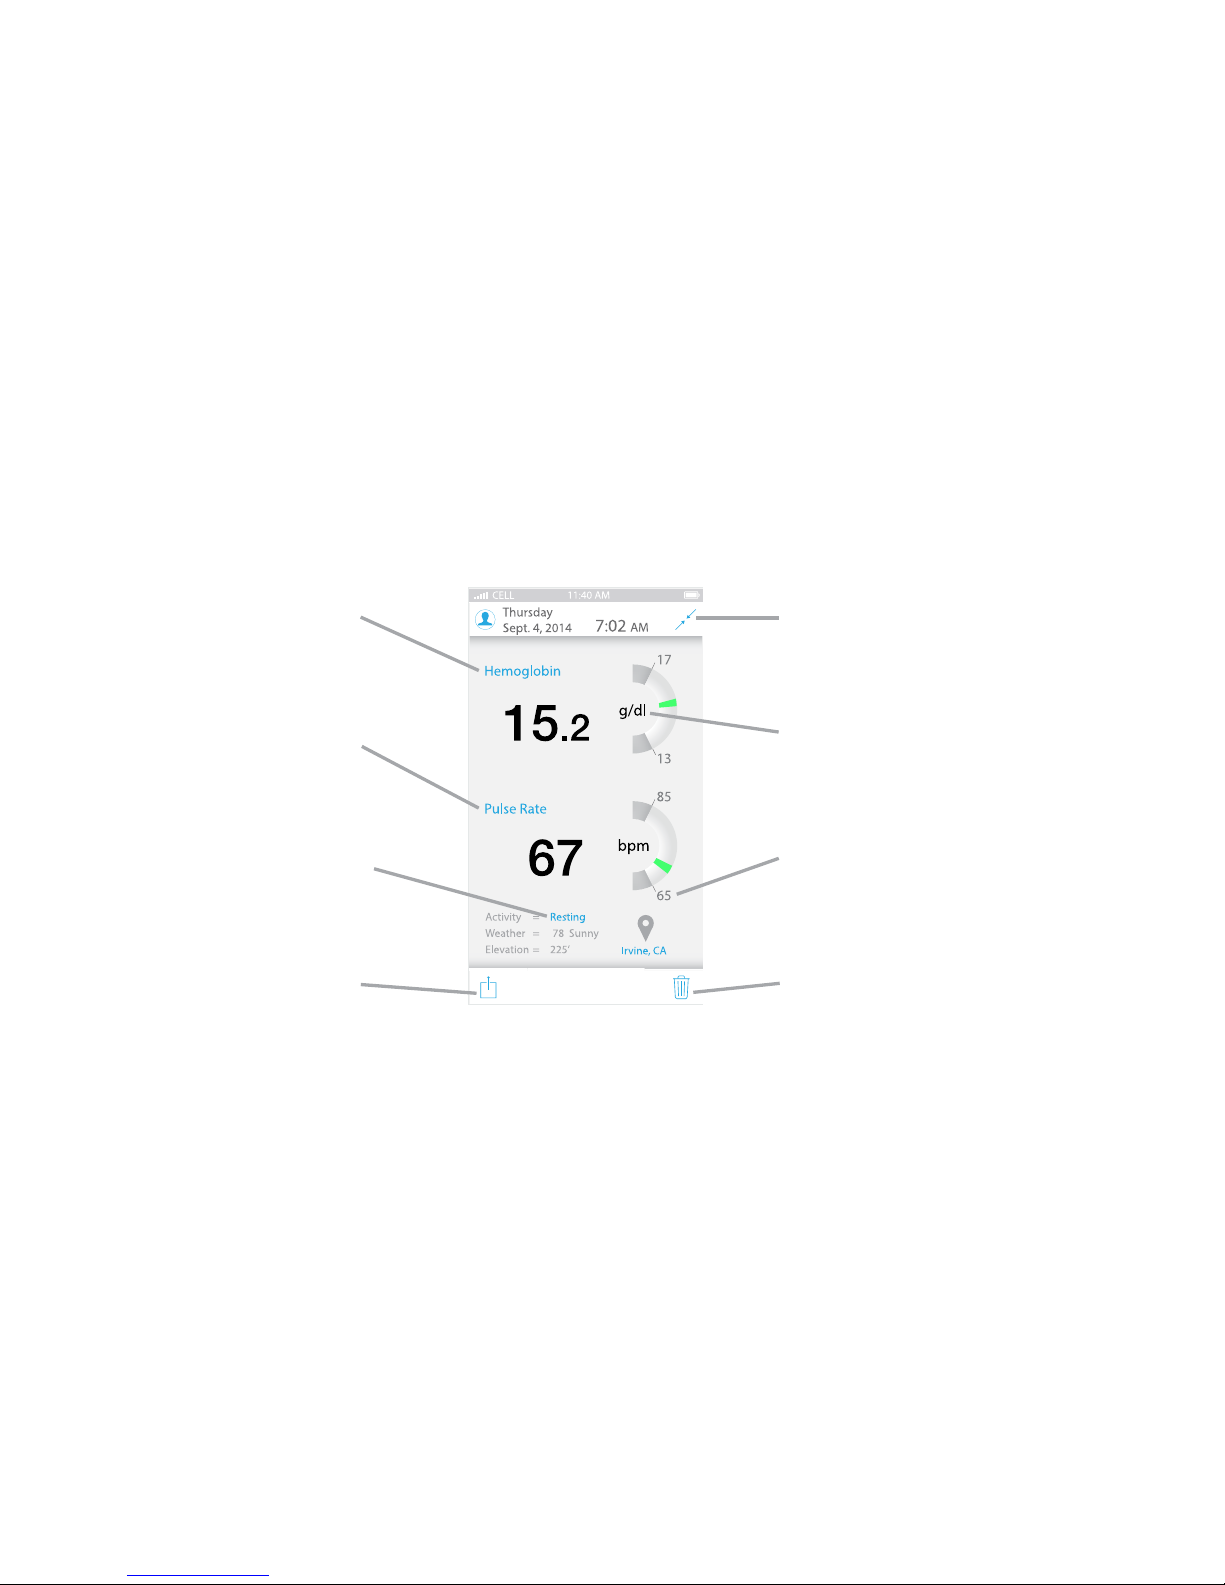
3Your measurement result values will display on the screen. When you tap the Capture
button, the numbers displayed will be saved in your history. The gauge to the right of
the display tells you your target range based on your age and biological sex. You can
customize the target range based on your individual goals by accessing the Options tab
of the app.
9
Tap this to learn more
about Hemoglobin
The ranges for normal
can be adjusted in the
Options tab
Tap this to learn more
about Pulse Rate
Tap this to change the
type of activity associated
with this measurement
Tap this to share your
result.
Tap this to delete this test.
Units of Measure can be
adjusted in the Options
tab
Tap this to minimize this
test and return to the
measure tab
Viewing Results

10
Hgb and Pr - Descriptions
Hemoglobin (Hgb)
Is the protein contained in red blood cells that is responsible for delivery of oxygen to
the tissues. The Ember device will display values between 10 - 24 g/dl
Pulse Rate (Pr)
The number of times your heart beats per minute as monitored from the pulsations at
your ngertip. The Ember device can measure a range from 25 - 240 bpm.

11
Range Adjustment
The normal ranges displayed on your results screen
can be adjusted within the Options area of the
Ember app. The default values are from published
sources on general population ranges based on
biological sex and age.
We recommend you set your own custom ranges
on input from your trainer or your own personal
knowledge or goals.

12
• Externally applied coloring (such as nail polish)
• Any substance containing dyes, that change usual blood pigmentation may cause
erroneous readings.
• Electromagnetic Interference (EMI) from items such as computer displays and/or
LCD TVs
• High intensity lights (including pulsating strobe lights and sunlight) directed on the
sensor
• Hemoglobin synthesis disorders, Hemoglobinopathy, Vascular disease
• Elevated Bilirubin, Carbon Monoxide (CO) and/or Methemoglobin (Met)
• Low arterial perfusion or low arterial oxygen saturation levels
• Moving or talking during a measurement
• Improperly placed sensor on nger
• Using the sensor on a deformed nger
Inaccurate readings can be caused by:
13
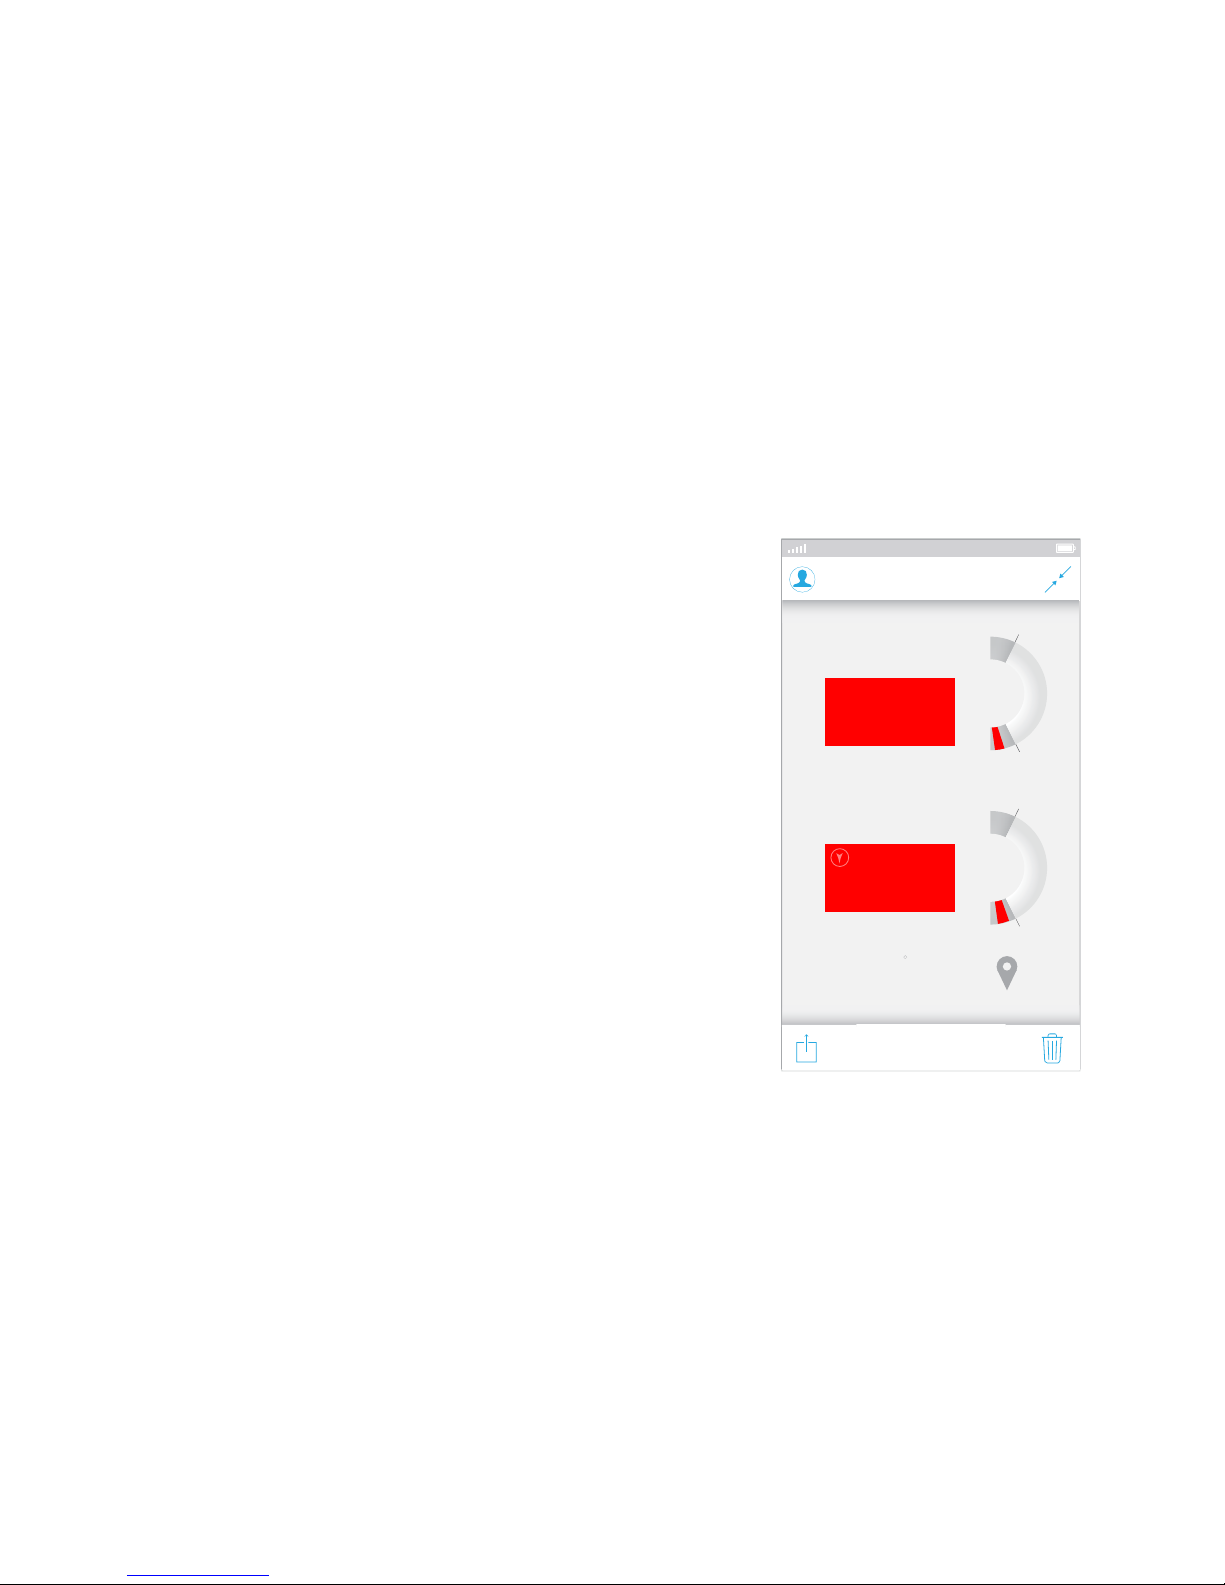
If you take a measurement and receive the phrase
Low instead of a numeric value for Hemoglobin, it
indicates that your value was below 10 g/dl and
is too low to present a number. If you receive the
phrase High instead of a numeric value, it indicates
that your value was above 24 g/dl and is too high
to present a number.
If your Pulse Rate result has a red box behind it the
value is out of your set ranges. These ranges can be
adjusted to your specic needs in the Options area
of the App.
Out of Range Results
Measure HistoryT eam Options
Hemoglobin
Pulse Rate
Thursday
Sept. 4, 2014 7:02 AM
Low g/dl
bpm
41
12
17
50
160
Activity
Weather
Elevation
Resting
78 Sunny
225’
=
=
=Irvine, CA
CELL 11:40 AM

14
Incomplete Measurement
If you take a test and receive the incomplete popup
dialogue, please check the following and try your
measurement again.
• Reduce excessive motion or interference to
the device and sensor during test.
• Check sensor placement, reduce ambient
light, and remove nail polish
• Use a nger with no deformities or nail
abnormalities and always use the same nger.
• Make sure your hands are not cold by
rubbing your hands together vigorously for
10 seconds.
CELL 11:40 AM
Friday
Sept. 4, 2015 7:02 AM

15
Reviewing Features
A very exciting feature about the Ember device is the ability to review your historical
data in different ways. The more you participate, by measuring frequently and choosing
activities associated with each measurement, the more powerful your graphs become.
We recommend you measure 3 times per day. Using these activities: 1st of day, Pre
Workout, and Post Workout.
Explore and enjoy graphs by using pinch to zoom, pan and even rotate your device to
take advantage of landscape view. Graphs can be shared via SMS, email, and popular
social networking sites to share your progress with friends, coaches, trainers, and
teammates.
Sharing test results can be done one at a time or by sharing all results from the history
table view. To share all results, tap the share button a .csv le can then be sent via email.

16
Elevation Graph Seasonal GraphTrend Graph
18
19
g/dl g/dl
g/dl
g/dl
18
19
g/dl g/dl
g/dl
g/dl

Activities
17
Every time you take a measurement, the app will ask you to associate an activity
with your measurement. By using a consistent nger and by practicing consistency in
your measuring technique, along with associating measurements with activities, this
will allow you to have a more powerful and precise historical review of your data.
Consistency is vitally important to get reliable trends in Hemoglobin.
We recommend measuring the rst thing every day before you get out of bed. We
also recommend measuring 5 minutes before a workout and then 1 minute Post
Workout. All of the graphs and tables in the History tab allow you to lter your
measurement data by the activities associated with your measurements. For example,
if you always take a measurement right after a heavy training session around the
same time every day and associate that measurement with “Post Workout”, then you
can observe the historical trend just for those measurements.
Other manuals for Ember
1
Table of contents


