Cerio DT-300N User manual

CERIO Corporation
DT-300N
2.4Ghz 300Mbps 11nbg 1000mW
High Power Wireless Router
User Manual

Table of Contents
1. Introduction...................................................................................................................................................5
1.1 Overview ......................................................................................................................................5
1.2 Package Content.........................................................................................................................6
1.3 Applications in Wireless Network .............................................................................................6
1.4 Features .....................................................................................................................................10
1.5 Panel Function Description......................................................................................................12
1.6 Hardware Installation Procedures...........................................................................................12
1.7 Software Configuration ............................................................................................................14
1.8 Wizard Setup .............................................................................................................................18
2. Router AP Mode Configuration.................................................................................................................23
2.1 Chose Your Operating Mode ( Router AP Mode )..................................................................23
2.2 External Network Connection..................................................................................................23
2.3 Configure DDNS Setup.............................................................................................................28
2.4 Configure DT-300N LAN IP Address .......................................................................................29
2.5 Wireless General Setup............................................................................................................31
2.6 Configure Wireless Advanced Setup......................................................................................33
2.7 Create Virtual AP – Virtual AP Setup ......................................................................................38
2.8 Virtual AP General Configuration............................................................................................38
2.9 WDS Setup - Expand your Wireless Network.........................................................................47
2.10 WDS Status................................................................................................................................47
2.11 Associated Clients....................................................................................................................48
3. AP Mode Configuration..............................................................................................................................49
3.1 Chose Your Operating Mode ( AP Mode )...............................................................................49
3.2 External Network Connection..................................................................................................49
3.3 Configure DT-300N LAN IP Address .......................................................................................50
3.4 Wireless General Setup............................................................................................................51
3.5 Configure Wireless Advanced Setup......................................................................................53
3.6 Create Virtual AP – Virtual AP Setup ......................................................................................58
3.8 WDS Setup - Expand your Wireless Network.........................................................................68
3.9 WDS Status................................................................................................................................68
3.10 Associated Clients....................................................................................................................69
4. WDS Mode Configuration..........................................................................................................................69
4.1 Chose Your Operating Mode ( WDS Mode )...........................................................................69
4.2 External Network Connection ( Network Requirement ).......................................................70
4.3 Configure DT-300N LAN IP Address .......................................................................................70
4.4 Wireless General Settings........................................................................................................73

4.5 Configure Wireless Advanced Setup......................................................................................75
4.6 WDS Setup.................................................................................................................................80
4.7 WDS Status................................................................................................................................81
5. Client Bridge + Repeater AP Mode Configuration ..................................................................................82
5.1 Chose Your Operating Mode(Client Bridge + Repeater AP).................................................82
5.2 External Network Connection ( Network Requirement ).......................................................82
5.3 Configure DT-300N LAN IP Address .......................................................................................83
5.4 Wireless General Setup............................................................................................................85
5.5 Configure Wireless Advanced Setup......................................................................................86
5.6 Site Survey.................................................................................................................................92
5.7 Station Profile............................................................................................................................93
5.8 Remote AP Status.....................................................................................................................95
5.9 Repeater AP Setup....................................................................................................................96
5.10 Repeater AP MAC Filter Setup...............................................................................................100
6. WISP + AP Mode Configuration..............................................................................................................101
6.1 Chose Your Operating Mode ( WISP + Repeater AP Mode )...............................................101
6.2 External Network Connection ( Network Requirement ).....................................................101
6.3 Configure CPE(WAN) Setup...................................................................................................102
6.4 Configure DT-300N LAN IP Address .....................................................................................107
6.5 Configure DDNS Setup...........................................................................................................109
6.6 Wireless General Setup..........................................................................................................110
6.7 Configure Wireless Advanced Setup....................................................................................111
6.8 Site Survey...............................................................................................................................117
6.9 Station Profile..........................................................................................................................118
6.10 Remote AP Status...................................................................................................................120
6.11 Repeater AP Setup..................................................................................................................120
6.12 Repeater AP MAC Filter Setup...............................................................................................125
7. System Management................................................................................................................................126
7.1 Configure Management..........................................................................................................126
7.2 Configure System Time..........................................................................................................129
7.3 Configure UPnP Setup............................................................................................................130
7.4 Configure SNMP Setup...........................................................................................................130
8. Configure Advance Setup........................................................................................................................132
8.1 DMZ...........................................................................................................................................132
8.2 IP Filter .....................................................................................................................................133
8.3 MAC Filter ................................................................................................................................135
8.4 Virtual Server...........................................................................................................................136
8.5 Parental Control ......................................................................................................................138

8.6 QoS...........................................................................................................................................140
8.7 IP Routing ................................................................................................................................142
8.8 Time Policy ..............................................................................................................................144
9. Configure Utilities Setup..........................................................................................................................145
9.1 Profile setting ..........................................................................................................................145
9.2 Firmware Upgrade...................................................................................................................146
9.3 Network Utility.........................................................................................................................147
9.4 PoE Bridge...............................................................................................................................148
9.5 Reboot......................................................................................................................................148
10. Configure Status..............................................................................................................................149
10.1 Overview ..................................................................................................................................149
10.2 DHCP Client.............................................................................................................................150
10.3 Extra Info..................................................................................................................................150
10.4 Event Log.................................................................................................................................153
Appendix A. Windows TCP/IP Settings......................................................................................................154
Appendix B. WEB GUI Valid Characters ....................................................................................................156
Appendix C. MCS Data Rate ........................................................................................................................159
Appendix D. Enabling UPnP in Windows XP.............................................................................................160
Appendix E. Specifications..........................................................................................................................162

1. Introduction
1.1 Overview
DT-300N In/Outdoor Router AP Bridge utilizes a 1000mW high power with plastics housing
weatherproof and Built in 2.4 GHz 2x2 omni directional antennas.And Build in lightning
arrester (15kV ESD) DT-300N may connect to the WiFi mesh or WDS infrastructure and provides
the subscriber with an Ethernet connection for a local access .to extend the range and increase
the performance of our wireless network. The SOHO in/outdoor AP/bridge may connect to the
WiFi Mesh or WDS infrastructure and provides the subscriber with an Ethernet connection for a
local access. also with included PoE power and data are supplied to the unit using CAT5
Ethernet cable. Furthermore the DT-300N have support PoE power supply function, and Support
PoE Bridge, Can provide PoE Power to the next DT-300N PoE unit .
The CERIO DT-300N 2.4Ghz 300Mbps 11nbg 1000mW SOHO In/Outdoor Router AP/ AP Bridge
of connection to Wireless In/Outdoor Network for service provider deploying last mile services to
Home SOHO or business or residential broadband subscribers. Network administrators can create
multiple subscriber service tier using per-subscriber rate limiting features, and manage centrally.
The DT-300N Structure (Form Factor ) Support Wall Mount, Pole Mount and desktop. Design the
Plastics Housing with Weatherproof.
Wall mounting
Sample for mounting on wall
Pole mounting
Sample for mounting on bat
Desktop Stand
Sample for desktop on blister inner stand

1.2 Package Content
DT-300N Main Unit x1
RJ-45 UTP Cable x1
Power Adapter (Power Supply) x1
PoE Adapter x1
Wall Mounting kit x1
Desktop Blister Stand x1
Self Locking Cable Ties for Stand or Pole Mounting x2
CD Manual x1
Quick Installation Guide x1
Warranty Card x1
1.3 Applications in Wireless Network
Smart of PoE Bridge application
CERIO DT-300N 2.4Ghz 300Mbps 11nbg 1000mW Design smart PoE Bridge function, the PoE
Bridge function support provide next AP power. Can will be structure become very convenience.
And the PoE bridge support CERIO WM-series AP or OW-series to be dual band budle wireless
soultion.

CERIO DT-300N 2.4Ghz 300Mbps 11nbg 1000mW High Power SOHO In/Outdoor AP/ Bridge
supports six operational modes, the Router AP mode / Pure AP mode / AP+WDS mode / Pure
WDS mode / Client Bridge + Repeater AP Mode and WISP Repeater + AP mode etc.
respectively with built-in remote management features simplify the deployment and reduce cost
for continued maintenance of the outdoor bridge .
Wireless Architecture Mode
Router AP Mode (Gateway + Access Point + WDS)
Router AP without WDS , It can be deployed as a gateway with wireless Access Point
Router AP with WDS, It can be deployed as a gateway with wireless Access Point and
provides WDS link for network extension

Pure AP Mode & AP/ AP+WDS Mode
It can be deployed as a tradition fixed wireless Access Point
It allow wireless clients or Stations(STA ) to access
This enables the wireless interconnection of Access Point in an IEEE802.11 network . and
accept wireless clients at the same time
Pure WDS Mode
This enables the wireless interconnection of Access Point in an IEEE802.11 network
It allows a wireless network to be expanded using multiple access point without the need for
a wired backbone to link them
This also be referred to as repeater mode It cannot allow wireless clients or Stations (STA)
to access

Client Bridge + Repeater AP Mode
It can be used as an Client Bridge + Repeater AP to receive wireless signal over last mile
applications, helping WISPs deliver wireless broadband Internet service to new residential
and business customers.
In this mode, DT-300N is enabled with DHCP Server functions. The wired clients of DT-300N
are in the same subnet from Main Base Station and it accepts wireless connections from
client devices, You can disabled the mode extend repeater AP function, will be do to “AP
Client ” function.
WISP + Repeater AP Mode
It can be used as an Outdoor Customer Premises Equipment (CPE) to receive wireless signal
over last mile application, helping WISPs deliver wireless broadband Internet service to
residents and business customers
In the CPE mode, DT-300N is a gateway enabled with NAT and DHCP Server functions. The
wired clients connected to DT-300N are in different subnet from those connected to Main
Base Station, and, in CPE mode, it does not accept wireless association from wireless clients.

1.4 Features
Operation Modes : Router AP Mode, AP Mode, WDS Mode, AP+WDS Mode, Client Bridge +
Repeater AP Mode and WISP Repeater + AP Mode
1000mW at 2.4Ghz Output High Power
IEEE 802.11n 2Tx / 2Rx Design, Bandwidth of up to 300Mbps(Tx), 300Mbps(Rx) link rate
Maxmum Security with 802.1X, WAP, and WPA2
Support Over load current protection for the board design . and 3 LEDs Wireless Signal
Strength
Weater-Proof RJ45 Connector, Integragted Power over Ethernet (PoE)
Support PoE Bridge by LAN Port funtion.
Build in lightning arrester (15kV ESD)
Support 8 Multiple-BSSID. And Support IEEE802.11f IAPP
Support Static Routing and RIP and OSPF Dynamic Routing
Support Layer-7 Protocol Filter and Content Filter
QoS(Quality of Service) for bandwidth management and traffic prioritization
Support IEEE802.1d Spanning Tree
Waterproof IPX6 EN60529/IEC529 stand.
Integragted IGMP v1/v2/v3 snooping functions and Support Web management and SNMP
MIB-II
Built-in software interface allows for communicating with CERIO AM-Series AP Management
WLAN Switch or Access Controller of network management servers.
Networking
Support Static IP, Dynamic IP(DHCP Client) and PPPoE on WiFi WAN Connection
Support VPN Pass Throughput ( PPTP , IPSec , L2TP ) and MAC Cloning
Proxy DNS ,Dynamic DNS ,NTP Client
Virtual DMZ, Virtual Server (IP / Port Forwarding) and
Support IP / MAC Filter and Support Bandwidth trafic Shaping
Wireless Feature
Transmission power control : Layer 1~9
Channel selection : Manual or Auto
No of associated clients per AP : 32
Setting for max no associated clients : Yes
Support 8 virtual BSSID and associated clients per AP to 32 and the Pure WDS Max. 8
Setting for transmission speed
Dynamic Wireless re-transmission
IEEE 802.11i Preauth (PMKSA Cache )
IEEE 802.11h - TPC(Transmission Power Control)

IEEE 802.11d -Multi country roaming
Channel Bandwidth setting : 20MHz or 20/40MHz
HT Tx/Rx Stream selection : 1 or 2
Short Slot support
Authentication/Encryption (Wireless Security)
Blocks client to client discovery within a specified VLAN
WEP 64/128 bit /EAP-TLS + Dynamic WEP , EAP-TTLS + Dynamic WEP
PEAP/MSPEAP + Dynamic WEP
WPA-PSK/TKIP,WPA-802.1x/TKIP, 802.11i WPA2-PSK/CCMP/AES 128/256bit,
WPA2 (802.1x /CCMP / AES 128/256bit ), No. of registered RADIUS servers : 1
Setting for TKIP/CCMP/AES 128/256bit (ASCII 63 & HEX 64 )key’s refreshing period
Hidden SSID broadcast support, and VLAN assignment on BSSID
Access Control list (ACL) by MAC Address
Quality of Service
Download and Upload traffic control and support Traffic Analysis and Statistics
Packet classifications via DSCP (Differentiated Services Code Point) and Support
IEEE802.11e WMM
Control Policy by IP/IP Ranges/ MAC/ Service , Layer-7 Protocol Support
No. of Max. Policy setting : 10
DiffServ/TOS , IEEE 802.11p/COS, IEEE 802.1Q Tag VLAN priority control
Parental Control
Blocking Control Policy by IP Range / MAC Group / Port / Layer-7 Protocol
URL Blocking
Management
Web-Based management interface, Intuitive Web Management Interface,
Administrative Access : HTTP and HTTPS and support CLI access via Telnet and SSH
Support Firmware Upgrade via Web , Reset to Factory Defaults,
Support SNMP v1/v2c/v3 , MIB II
UPnP (Universal Plug and Play)
NTP Time Synchronization
SNMP Traps to a List of IP Address
Support Event log

1.5 Panel Function Description
There is several LED indicators on the front of the DT-300N. Please refer to the definitions below :
(1) The Ethernet connect of LAN Port
(2) The LED indicator of LAN Port
(3) Reset button
(4) The Ethernet connect of WAN / PoE Port
(5) The LED indicator of WAN Port
(6) Power LED
(7) Ground connection
(8) The three LED’s for strong or weakly indicator on signal bridge, and the three LED’s only
support “Client Bridge + Repeater AP and WISP + Repeater AP modes”.
1.6 Hardware Installation Procedures
Please follow the instructors as below to finish the hardware installation.
1) LAN Port for PC, WAN Port for PoE adapter.
1
2
3
4
5
6
7
8

2) Grounding coble con be protect DT-300N from lightning strikes and buildup of static
electricity. Grounding cable not included in the package. Suggested that you use 16 to
18 AWG grounding cable.
3) Please install the cover.
4) For xDSL user’s
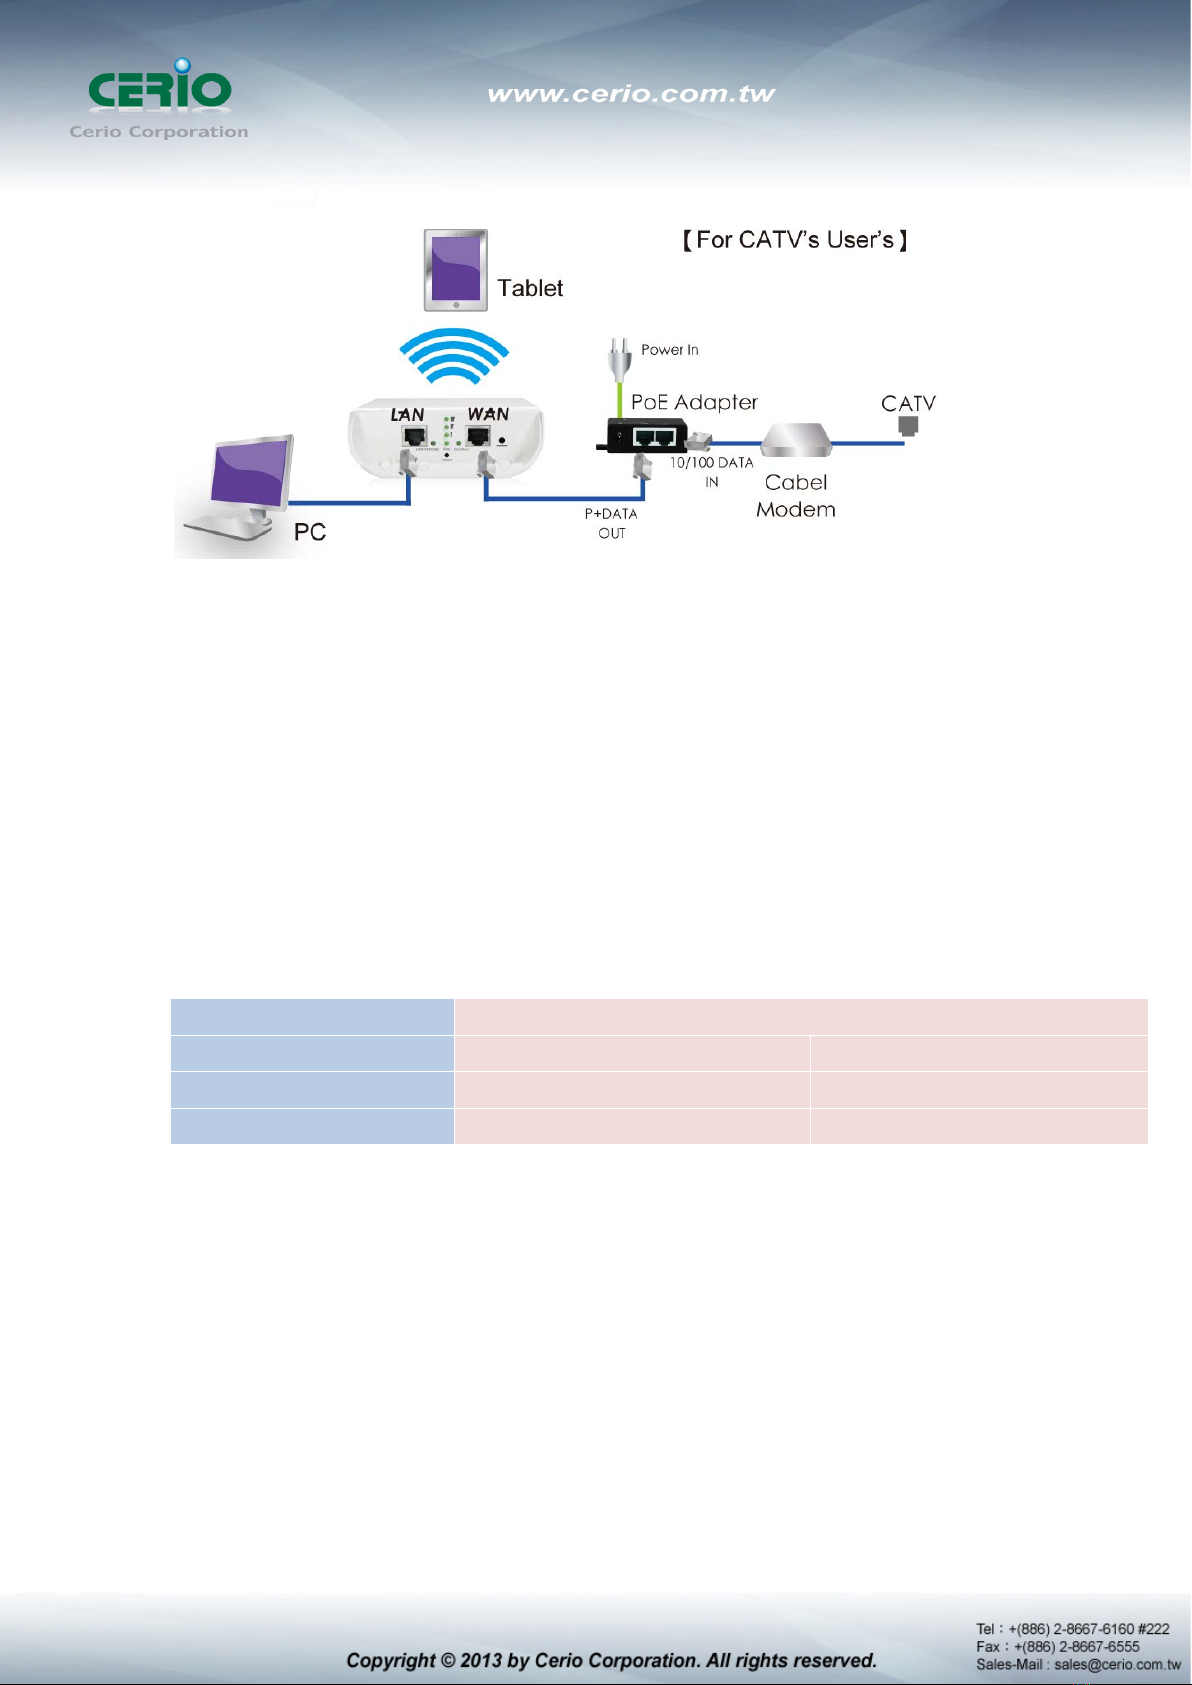
5) For CATV User’s
1.7 Software Configuration
DT-300N supports web-based configuration. Upon the completion of hardware installation,
DT-300N can be configured through a PC/NB by using its web browser such as Internet Explorer
6.0 or later.
Default IP Address: 192.168.2.254
Default Subnet Mask: 255.255.255.0
Default Username and Password
MODE Router , AP , WDS , ( WISP / Client Bridge )+ Repeater AP
Management Account Root Account Admin Account
Username root admin
Password default admin
IP Segment Set-up for Administrator's PC/NB
Set the IP segment of the administrator's computer to be in the same range as DT-300N for
accessing the system. Do not duplicate the IP Address used here with IP Address of DT-300N or
any other device within the network.
Example of Segment: (Windows XP)
Click Start -> Settings -> Control Panel, and then “Control Panel” window appears.
Click on “Network Connections”, and then “Network Connections” window appears.
Click right on “Local Area Connection”, and select Properties.

In “Local Area Connection Properties” window, select “Internet Protocol (TCP/IP)”
and click on Properties button.

Select “Use the following IP address”, and type in
Launch Web Browser
Launch as web browser to access the web management interface of system by entering the
default IP Address, http://192.168.2.254, in the URL field, and then press Enter.
System Login

System Overview page will appear after successful login.

1.8 Wizard Setup
The setup wizard is designed to be an 'easy to use' utility that allows quick modification of the
DT-300N UI Web-based GUI interface settings . The wizard should take no longer than 5 minutes
to use. Please be aware that the wizard doesn't give full access to all the setup options in DT-300N
in/Outdoor PoE Bridge Router AP.
This is purely because the wizard has been designed for a quick and easy setup aimed at all users.
More advanced users can configure the remaining settings using the advanced settings options
from the setup menu.
Chose Your Operating Mode
DT-300N supports six operational modes, AP and AP+WDS mode, WDS mode, Client Bridge +
Repeater AP mode,WISPand WISP + Repeater AP mode etc. respectively with built-in remote
management features
Wizard Guide
Please click on System
Setup Wizard Next and follow the below guide.

1) Follow And Guide Continuing Setting
Internet Connection type
Please base on ISP type to choose WAN connection type.
Cable Modem ISP Type use dynamic IP type. xDSL ISP use PPPoE type and key in your ISP
username and password for xDSL type.
2) DNS If you don’t know for your ISP correct DNS IP address, Please click “No default
DNS server” to follow your ISP DNS related IP address.

3) LAN setup Here are the instructions for setup your DT-300N local LAN IP address and
netmask. If you don’t want change the default DT-300N IP 192.168.2.254 address,
please keep the default and go next setup.
4) DHCP Server Devices connected to system can obtain an IP address automatically
when this DHCP Server service is enabled, Specify the range of IP address to be used by
the DHCP server when assigning IP address to clients, you can keep the default value
and go next setup.
This manual suits for next models
1
Table of contents
Other Cerio Wireless Router manuals


