Certina CHRONOGRAPH User manual
• The seconds sweep hand shows “seconds
elapsed” for chronograph
TIME, CALENDAR, CHRONOGRAPH
This chronograph watch has three functions:
TIME
TO SET THE TIME:
1) PULL out Crown to “C” position
2) TURN Crown either way to correct time
3) PUSH in Crown to “A” position
CALENDAR
TO SET THE CALENDAR
1) PULL out Crown to “B” position
2) TURN Crown clockwise to correct position
3) PUSH in Crown to “A” position
23
ENGLISH
CHRONOGRAPH MODELS
Review all chronographs to determine your watch type
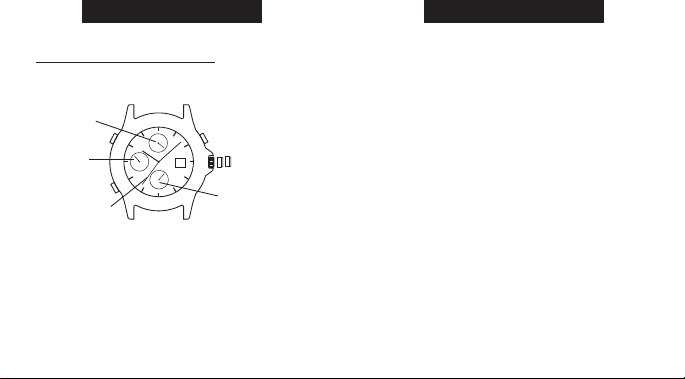
TYPE 1
• Crown position “A”, “B” & “C”
• Pusher “A” (right) & “B” (left)
• Hour, minute and small second hands (6 o’clock
eye) show time
• 12 o’clock eye shows “minutes elapsed” for
chronograph
• 9 o’clock eye shows “hours elapsed” for chrono-
graph
22
ENGLISH
C
B
A
PUSHER “A”
PUSHER “B”
STOPWATCH
SECOND HAND
SMALL
SECOND HAND CROWN POSITION
PUSHER “C”
STOPWATCH
HOUR HAND
STOPWATCH
1/20 SEC. HAND
W223_Analog2_NA_EN.qxd 6/5/09 9:19 AM Page 22

NOTE: PRESSING and HOLDING either pusher “A” or
“B” will cause the hands to move continually until the
pusher is released.
STANDARD CHRONOGRAPH
MEASUREMENT:
1) PRESS pusher “A” to start timing
2) PRESS pusher “A” to stop timing
3) PRESS pusher “B” to reset
25
ENGLISH
CHRONOGRAPH
• The Chronograph is capable of measuring:
• Minutes elapsed up to 1 hour (12 o’clock eye)
• Hour elapsed up to 12 hours (9 o’clock eye)
• Seconds elapsed up to 1 minute (seconds sweep
hand)
BEFORE USING THE CHRONOGRAPH:
Adjust all the chronograph hands to the “0” or 12 hr.
position.
TO ADJUST THE CHRONOGRAPH HANDS:
1) PULL out CROWN to “C” position
2) PRESS pusher “A” intermittently until the seconds
sweep hand resets to “0” or 12-hr. position
3) PRESS pusher “B” intermittently until the hands in
the 12 o’clock eye reset to “0” or 12-hr position
4) PUSH in Crown to “A” position
NOTE: Make sure that the chronograph is stopped
and reset before adjusting.
24
ENGLISH
W223_Analog2_NA_EN.qxd 6/5/09 9:19 AM Page 24

SETTING THE DATE
1) PULL the crown out to the 1st position “B”.
2) Turn the crown counter-clockwise to set the date.
*If the date is set between the hours of around
9:00 PM and 1:00 AM, the date may not change
on the following day.
3) After the date has been set, push the crown back
to the normal position “A”.
USING THE CHRONOGRAPH
This chronograph is able to measure and display
time in 1/1 second up to maximum of 11 hours
59 minutes 59 seconds. The chronograph second
hand keeps continuously for 11 hours 59 minutes
59 seconds after starting.
MEASURING TIME WITH THE
CHRONOGRAPH
1) The chronograph can be started and stopped
each time pusher “A” is pressed.
2) Pressing pusher “B” resets the chronograph and
the chronograph second hand, chronograph
27
ENGLISH
CHRONOGRAPH MODELS
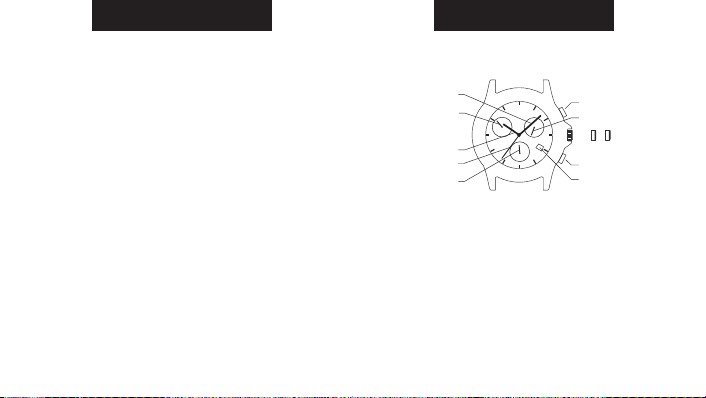
TYPE 2
SETTING THE TIME
1) PULL the crown out to the 2nd position “C”.
2) Turn the crown to set hour and minute hands.
3) When the crown is pushed back to the normal
position “A”, small second hand begins to run.
26
ENGLISH
B C
PUSHER “A”
DATE
CHRONOGRAPH
SECOND
CROWN
POSITION
PUSHER “B”
SMALL SECOND
CHRONOGRAPH
HOUR
CHRONOGRAPH
MINUTE
HOUR
MINUTE HAND
7
NORMAL POSITION “A”
W223_Analog2_NA_EN.qxd 6/5/09 9:19 AM Page 26
*Do not push crown to normal position while the
chronograph second hand returns to zero position.
It stops on the way when crown is returned to
normal position and its position is recognized as
zero position.
29
ENGLISH
minute hand, and chronograph hour hand return
to zero position.
CHRONOGRAPH RESET
(INCL. AFTER REPLACING BATTERY)
This procedure should be performed when the
chronograph second hand does not return to zero
position after the chronograph has been reset,
including after the battery has been replaced.
1) Pull the crown out to the 2nd position “C”.
2) Press pusher “A” to set the chronograph second
hand to the zero position. The chronograph hand
can be advanced rapidly by continuously pressing
pusher “A”.
3) Once the hand returns to zero position, return the
crown to the normal position.
28
ENGLISH
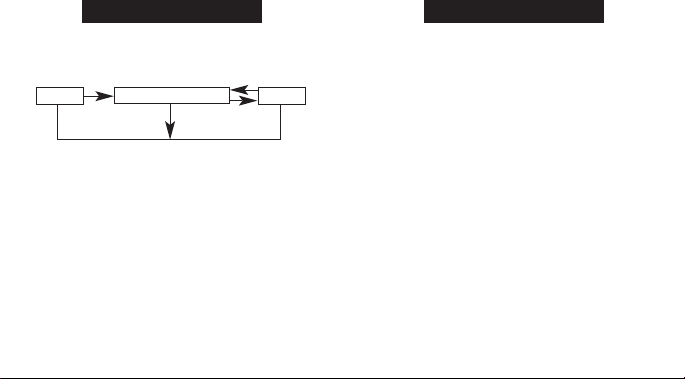
TIME MEASUREMENT
RESET STOP
W223_Analog2_NA_EN.qxd 6/5/09 9:19 AM Page 28
TIME
TO SET THE TIME:
1. PULL crown out to “C” position.
2. TURN crown either way to correct time.
3. PUSH crown in to “A” position.
TO ADJUST TO A NEW TIME ZONE:
1. PULL crown out to “B” position.
2. TURN crown either way to move the hour hand in
hour increments.
CALENDAR
TO SET THE CALENDAR:
1. PULL crown out to “B” position.
2. TURN crown either way to move hour hand. Two
complete revolutions relative to the 12 o’clock
position will move the date forward or backward.
This will correct both date and 24-hour time.
3. PUSH crown in to “A” position.
NOTE: The date changes automatically every 24
hours.
31
ENGLISH
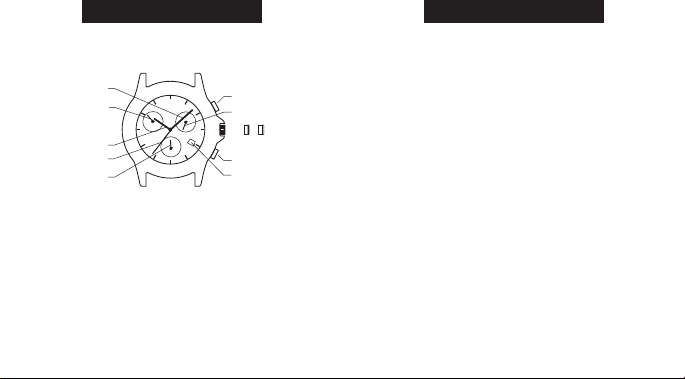
TYPE 3
BASIC OPERATIONS
• 6 o’clock eye shows seconds.
• 10 o’clock eye shows “minutes elapsed” for
chronograph.
• 2 o’clock eye shows “1/20 seconds elapsed” for
chronograph.
• Chronograph second hand shows “seconds
elapsed” for chronograph.
30
ENGLISH
B
D
A
C
PUSHER “A”
DATE
CHRONOGRAPH
1/20 SECOND
CROWN
POSITION
PUSHER “B”
SECOND
CHRONOGRAPH
SECOND
CHRONOGRAPH
MINUTE
HOUR
MINUTE
你
W223_Analog2_NA_EN.qxd 6/5/09 9:19 AM Page 30

TO ADJUST CHRONOGRAPH HANDS:
1. PULL crown out to “B” position.
2. PRESS pusher “B” until the hand at the 10 o’clock
eye resets to the “30” position.
3. PULL crown out to “C” position.
4. PRESS pusher “A” until the chronograph second
hand resets to the “0” or “60” or 12-hour position.
5. PRESS pusher “B” until the hand at the 2 o’clock
eye resets to the “0” position.
6. PUSH in Crown to “A” position.
NOTE:
• Make sure the chronograph is stopped and reset
before adjusting.
• PRESSING and HOLDING either pusher “A” or “B”
for 2 seconds will cause the hands to move
continuously until the pusher is released.
33
ENGLISH
CHRONOGRAPH
THE CHRONOGRAPH IS CAPABLE OF
MEASURING:
• 1/20 seconds elapsed up to 1 second (2 o’clock
eye).
• Seconds elapsed up to 1 minute (chronograph
second hand).
• Minutes elapsed up to 30 minutes (10 o’clock
eye).
NOTE: Chronograph will operate continuously for
4 hours, after which it will automatically stop and
reset.
NOTE: The 1/20th of a second hand does not
move during chronograph function, the 1/20th
seconds are indicated when chronograph is
stopped and not yet reset.
BEFORE USING THE CHRONOGRAPH, adjust all
the chronograph hands to the “0” or 12-hour
positions.
32
ENGLISH
W223_Analog2_NA_EN.qxd 6/5/09 9:19 AM Page 32

NIGHT-MODE®FEATURE
TO USE NIGHT-MODE®FEATURE:
1. PUSH and HOLD Crown to “D” position for 4 sec-
onds to activate NIGHT-MODE®feature
(U.S. pat. 4,912,688). PRESSING any pusher will
cause the INDIGLO®night-light to stay on for 3
seconds.
2. NIGHT-MODE®feature will last for 8 hours.
3. Or PUSH and HOLD Crown to “D” position for 4
seconds to deactivate Night-Mode®feature.
IF STOPWATCH HANDS DO NOT RETURN TO
“0 POSITION” WHEN THE STOPWATCH IS
RESET:
1) PULL crown out to “B” position
2) PRESS pushers “A” or “B” repeatedly to move
hands to “0” position
3) PUSH in crown to “A” position
35
ENGLISH
STANDARD CHRONOGRAPH
MEASUREMENT:
1. PRESS pusher “A” to start timing.
2. PRESS pusher “A” to stop timing.
3. PRESS pusher “B” to reset.
SPLIT TIME MEASUREMENT:
1. PRESS pusher “A” to start timing.
2. PRESS pusher “B” to split.
3. PRESS pusher “B” to resume timing.
4. PRESS pusher “A” to stop timing.
5. PRESS pusher “B” to reset.
INDIGLO®NIGHT-LIGHT
With the crown in the “A” position, PUSH crown to
the “D” position. Entire dial will be illuminated.
Patented (U.S. pat 4,527,096 and 4,775,964) electrolu-
minescent technology used in INDIGLO®night-light
illuminates entire watch face at night and in low light
conditions.
34
ENGLISH
W223_Analog2_NA_EN.qxd 6/5/09 9:19 AM Page 34

TIME
TO SET THE TIME:
NOTE: The stopwatch must be stopped and reset to
the zero position prior to setting the time.
1. Pull the crown out to position 2.
2. Rotate the crown either direction until the
24-hour, hour, and minute hands display the
correct time.
3. Push Crown in to position 1.
TO ADJUST THE STOPWATCH HANDS TO
THE ZERO POSITION:
1. Pull the crown out to position 2.
2. Press pusher “A” to move the stopwatch minute
and second hands counter clockwise to the zero
position. Press pusher “B” to move the stop-
watch minute and second hands clockwise to the
zero position.
3. Push Crown in to position 1.
37
ENGLISH
TYPE 4
BASIC OPERATIONS
• 6 o’clock eye displays “seconds elapsed” for the
chronograph
• 9 o’clock eye displays “minutes elapsed” for the
chronograph
• 3 o’clock eye displays the current time in a
24 hour format
36
ENGLISH
21
HOUR HAND
STOPWATCH
MINUTE HAND
STOPWATCH
SECOND HAND
SECOND HAND
PUSHER “A”
MINUTE HAND
CROWN
POSITION
NORMAL POSITION “1”
PUSHER “B”
24-HOUR HAND
W223_Analog2_NA_EN.qxd 6/5/09 9:19 AM Page 36

ELAPSED TIME RING
If your watch is equipped with a rotatable outer ring
on the face, with numbers corresponding to minutes,
you can use this Elapsed Time Ring to time an activity
from the start, or to mark the ending time for the
duration of an activity.
TO TIME AN ACTIVITY FROM THE START:
Set the Start/Stop triangle at the time (hour or
minute) when you start the activity (As shown on the
left in the illustration shown below). At completion,
you can see how long the activity took.
39
ENGLISH
CHRONOGRAPH
THE CHRONOGRAPH IS CAPABLE OF
MEASURING:
• Seconds elapsed up to one minute (6 o’clock eye)
• Minutes elapsed up to one hour (9 o’clock eye)
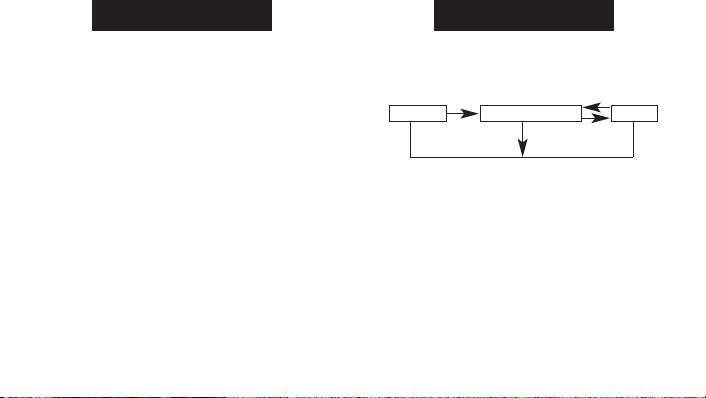
STANDARD CHRONOGRAPH
MEASUREMENT
• Press pusher “A” to start timing
• Press pusher “A” to stop timing
• Press pusher “B” to reset the chronograph to the
zero position
SPLIT TIME MEASUREMENT
• Press pusher “A” to start timing
• Press pusher “B” to split
• Press pusher “B” to resume timing
• Press pusher “A” to stop timing
• Press pusher “B” to reset the chronograph to the
zero position
38
ENGLISH
W223_Analog2_NA_EN.qxd 6/5/09 9:19 AM Page 38

MODELOS DE CRONÓGRAFO
Revise todos los cronógrafos para determinar su tipo de
reloj
TIPO 1
• Posiciones “A”, “B” y “C” de la corona
• Botones “A” (derecha) y “B” (izquierda)
• Las manecillas de horas, minutos y el segundero
pequeño (esfera de las 6) muestran la hora
• La esfera de las 12 muestra los “minutos
transcurridos” para el cronógrafo
135
ESPAÑOL
C
B
A
BOTÓN “A”
BOTÓN “B”
SEGUNDERO DEL
CRONÓGRAFO
SEGUNDERO
PEQUEÑO
POSICIÓN
DE LA CORONA
BOTÓN “C”
MANECILLA
HORARIA DEL
CRONÓGRAFO
MANECILLA
DE 1/20 SEGUNDO
DEL CRONÓGRAFO
3) PULSE la corona hasta la posición “A”.
NOTE: Recuerde fijar la hora para am/pm (mañana
o tarde, sol o luna).
PARA FIJAR LA FECHA:
1) TIRE de la corona hacia afuera hasta la
posición “B”.
2) GIRE la corona en sentido horario hasta la
fecha correcta.
3) PULSE la corona hasta la posición “A”.
PARA FIJAR EL DÍA:
1) TIRE de la corona hacia afuera hasta la
posición “C”.
2) Adelante la hora 24 horas para cambiar el día.
3) PULSE la corona hasta la posición “A”.
134
ESPAÑOL
W223_Analog2_NA_SP.qxd 6/5/09 9:28 AM Page 134

CRONÓGRAFO
• Su cronógrafo puede medir:
• Minutos transcurridos hasta 1 hora (esfera de las 12)
• Horas transcurridas hasta 12 horas (esfera de las 9)
• Segundos transcurridos hasta 1 minuto
(segundero de barrido)
ANTES DE USAR EL CRONÓGRAFO:
Ajuste todas la manecillas a la posición de “0” o
12 horas.
PARA AJUSTAR LAS MANECILLAS DEL
CRONÓGRAFO:
1) TIRE de la CORONA hacia afuera hasta la posición
“C”
2) PULSE el botón “A” en forma intermitente hasta
que el segundero se ajuste a la posición “0” o
12 horas
3. PULSE el botón “B” en forma intermitente hasta
que las manecillas de la esfera de las 12 se
ajusten a la posición “0” o 12 horas
4) PULSE la corona hasta la posición “A”
137
ESPAÑOL
• La esfera de las 9 muestra las “horas transcurridas”
para el cronógrafo
• El segundero de barrido muestra los “segundos
transcurridos” para el cronógrafo
HORA, CALENDARIO, CRONÓGRAFO
Este reloj con cronógrafo tiene tres funciones:
HORA
PARA FIJAR LA HORA:
1) TIRE de la corona hacia afuera hasta la posición
“C”
2) GIRE la corona en cualquiera de los dos sentidos
para corregir la hora
3) PULSE la corona hasta la posición “A”
CALENDARIO
PARA FIJAR EL CALENDARIO
1) TIRE de la corona hacia afuera hasta la posición “B”
2) GIRE la corona en sentido horario hasta la
posición correcta
3) PULSE la corona hasta la posición “A”
136
ESPAÑOL
W223_Analog2_NA_SP.qxd 6/5/09 9:28 AM Page 136

MODELOS DE CRONÓGRAFO
TIPO 2
PARA AJUSTAR LA HORA
1) TIRE de la corona hacia afuera hasta la 2ª
posición “C”.
2) Gire la corona para ajustar las manecillas de hora
y minutos.
3) Cuando se pulsa la corona de vuelta a la posición
normal “A”, la manecilla pequeña de segundos
empieza a correr.
139
ESPAÑOL
NOTA: Asegúrese de que el cronógrafo esté
detenido e inicializado antes de ajustarlo.
NOTA: PULSAR y MANTENER los botones “A” o “B”
hará que las manecillas se muevan en forma
continua hasta que se suelte el botón.
MEDIDA ESTÁNDAR DE CRONÓGRAFO:
1) PULSE el botón “A” para iniciar el cronometraje
2) PULSE el botón “A” para detener el cronometraje
3) PULSE el botón “B” para reiniciar
138
ESPAÑOL
B C
BOTÓN “A”
FECHA
SEGUNDERO DEL
CRONÓGRAFO
POSICIÓN DE
LA CORONA
BOTÓN “B”
SEGUNDERO
PEQUEÑO
MANECILLA HORARIA
DEL CRONÓGRAFO
MINUTERO DEL
CRONÓGRAFO
HORA
MINUTERO
7
POSICIÓN NORMAL “A”
W223_Analog2_NA_SP.qxd 6/5/09 9:28 AM Page 138
2) Pulsando el botón “B” se reinicia el cronógrafo,
y las manecillas de segundos, minutos y hora se
devuelven a la posición cero.
REINICIO DEL CRONÓGRAFO
(INCLUIDO EL DEL CAMBIO DE PILA)
Este procedimiento se debe realizar cuando la
manecilla de segundos no vuelve a cero después de
haber sido reiniciado el cronógrafo, incluso después
que la pila se ha cambiado.
1) TIRE de la corona hacia afuera hasta la 2ª
posición “C”.
2) Pulse el botón “A” para fijar el segundero del
cronógrafo en la posición 0. Se puede avanzar
rápidamente la manecilla oprimiendo el botón
“A” en forma continua.
141
ESPAÑOL
PARA FIJAR LA FECHA
1) TIRE de la corona hacia afuera hasta la 1ª
posición “B”.
2) Gire la corona en sentido antihorario para fijar
la fecha. *Si la fecha se fija entre las 9:00 PM
y la 1:00 AM, la fecha puede que no cambie al
día siguiente.
3) Después que se haya fijado la fecha, pulse la
corona de vuelta a la posición normal “A”.
USO DEL CRONÓGRAFO
Este cronógrafo está habilitado para cronometrar y
mostrar el tiempo en fracciones de 1/1 de segundo
hasta un máximo de 11 horas, 59 minutos, 59
segundos. La manecilla de segundos sigue
marcando continuamente durante 11 horas,
59 minutos, 59 segundos después de comenzar.
CRONOMETRANDO EL TIEMPO CON EL
CRONÓGRAFO:
1) El cronógrafo puede ser iniciado y detenido cada
vez que se pulsa el botón “A”.
140
ESPAÑOL
CRONOMETRAJE
REINICIAR PARAR
W223_Analog2_NA_SP.qxd 6/5/09 9:28 AM Page 140
TIPO 3
OPERACIONES BÁSICAS
• La esfera de las 6 muestra segundos.
• La esfera de las 10 muestra los “minutos
transcurridos” para el cronógrafo.
• La esfera de las 2 muestra “las vigésimas de
segundo transcurridas” para el cronógrafo.
• El segundero del cronógrafo muestra “los
segundos transcurridos” para el cronógrafo.
143
ESPAÑOL
B
D
你
A
C
BOTÓN “A”
FECHA
VIGÉSIMAS DE
SEGUNDO DEL
CRONÓGRAFO
POSICIÓN DE
LA CORONA
BOTÓN “B”
SEGUNDERO
SEGUNDERO DEL
CRONÓGRAFO
MINUTERO DEL
CRONÓGRAFO
HORA
MINUTERO
3) Una vez que retorne a cero la manecilla, vuelva la
corona a la posición normal.
*No pulse la corona a la posición normal mientras
el segundero del cronógrafo está retornando a la
posición cero. Esto lo detiene en el recorrido
cuando la corona es devuelta a la posición normal,
y su posición es reconocida como la posición cero.
142
ESPAÑOL
W223_Analog2_NA_SP.qxd 6/5/09 9:28 AM Page 142

2. GIRE la corona en cualquiera de los dos sentidos
para corregir la manecilla horaria. Dos rotaciones
completas con respecto a la posición de las 12 en
punto adelantarán la fecha o la retrasarán. Así
corregirá tanto la fecha como las horas durante
las 24 horas.
3. PULSE la corona hasta la posición “A”.
NOTA: La fecha cambia automáticamente cada
24 horas.
CRONÓGRAFO
EL CRONÓGRAFO PUEDE MEDIR:
• Vigésimas de segundo transcurridas hasta un
segundo (esfera de las 2).
• Segundos transcurridos hasta 1 minuto
(segundero del cronógrafo).
• Minutos transcurridos hasta 30 minutos
(esfera de las 10).
NOTA: El cronógrafo funcionará continuamente
durante 4 horas, luego se detendrá y pondrá a
cero.
145
ESPAÑOL
HORA
PARA FIJAR LA HORA:
1. TIRE de la corona hacia afuera hasta la posición
“C”.
2. GIRE la corona en cualquiera de los dos sentidos
para corregir la hora.
3. PULSE la corona hasta la posición “A”.
PARA AJUSTAR UNA ZONA HORARIA
DISTINTA:
1. TIRE de la corona hacia afuera hasta la posición
“B”.
2. GIRE la corona en cualquiera de los dos sentidos
para mover la manecilla horaria en incrementos
de una hora.
CALENDARIO
PARA FIJAR EL CALENDARIO:
1. TIRE de la corona hacia afuera hasta la posición
“B”.
144
ESPAÑOLESPAÑOL
W223_Analog2_NA_SP.qxd 6/5/09 9:28 AM Page 144

6. PULSE la corona hasta la posición “A”.
NOTA:
• Asegúrese que el cronógrafo se haya detenido y
reiniciado antes de ajustarlo.
• El PULSAR y MANTENER los botones “A” o “B” por
dos segundos hará que las manecillas se muevan
en forma continua hasta que se suelte el botón.
MEDIDA
ESTÁNDAR DEL CRONÓGRAFO:
1. PULSE el botón “A” para iniciar el cronometraje.
2. PULSE el botón “A” para detener el cronometraje.
3. PULSE el botón “B” para reiniciar.
TIEMPO ACUMULATIVO:
1. PULSE el botón “A” para iniciar el cronometraje.
2. PULSE el botón “B” para tomar una fracción.
3. PULSE el botón “B” para continuar el cronometraje.
4. PULSE el botón “A” para detener el cronometraje.
5. PULSE el botón “B” para reiniciar.
147
ESPAÑOL
146
ESPAÑOL
NOTA: La aguja de vigésimos no se mueve
durante la función del cronógrafo, se indican las
vigésimas de segundo cuando el cronógrafo está
detenido y no ha vuelto a cero.
ANTES DE UTILIZAR EL CRONÓGRAFO, ajuste
todas las manecillas del cronógrafo a las posiciones
“0” o 12 horas.
PARA AJUSTAR LAS MANECILLAS DEL
CRONÓGRAFO:
1. TIRE de la corona hacia afuera hasta la posición
“B”.
2. PULSE el botón “B” hasta que la manecilla de la
esfera de las 10 vuelva a la posición “30”.
3. TIRE de la corona hacia afuera hasta la posición
“C”.
4. PULSE el botón “A” hasta que el segundero del
cronógrafo vuelva a las posiciones “0”, “60” ó
12 horas.
5. PULSE el botón “B” hasta que la manecilla de la
esfera de las 2 vuelva a la posición “0”.
ESPAÑOL
W223_Analog2_NA_SP.qxd 6/5/09 9:28 AM Page 146
Table of contents
Languages:
Other Certina Watch manuals

Certina
Certina Precidrive DS-8 User manual

Certina
Certina PRECIDRIVE User manual

Certina
Certina DS Multi-8 User manual

Certina
Certina Analog Watches User manual

Certina
Certina IA User manual

Certina
Certina PRECIDRIVE GMT Quartz User manual

Certina
Certina PRECIDRIVE Flyback DS-2 User manual

Certina
Certina Quartz Chronographs G10 User manual

Certina
Certina Multifunction Watches User manual

Certina
Certina Chronographs with alarm User manual


