Ceru vu+ ultimo User manual

Large Graphic Type VFD Display (256x64 pixels)
Tripple Pluggable Tuner System for DVB-S2 or DVB-C/T
Advanced Blind Scan
1GB NAND Flash Memory
QWERTY Keyboard RCU
High Speed Wi-Fi USB Dongle (300Mbps)
Temperature Sensor based Automatic FAN Speed Control
Vu+® is a registered trademark of Ceru Co. Ltd.
User Manual
English

(A) PRECAUTION!!!
(B) Packaging Contents
(C) Product Descriptions
(D) Conditional Access
(E) Remote Control
(F) Main Features
(G) Technical Data
I. Installation of Vu+
1. Connecting Signal Cable
2. Connecting TV
3. Connecting Power
4. Power ON/OFF
II. First Time Installation (using Wizard)
Step 1. Language Selection
Step 2. Configuring Satellite Connection
Step 3. Installing Default Satellite List
Step 4. Parental Control Option
III. Basic Operations
1. Switching Channel
2. Volume Control
3. Selecting Audio Track
4. Subtitle
5. Teletext
6. Program Information (Infobar)
7. Channel List
8. Electronic Program Guide (Event View)
9. Timeshift
10. Recording
11. Recording Play
12. Managing Recording Files
13. Media Player
14. Plug-ins
15. Sleep Timer
Contents
4
6
7
9
11
14
15
16
17
19
19
20
20
26
26
27
27
28
28
29
30
31
33
36
37
41
42
43
44
45

IV. System Configuration
1.Main Menu
2.System Setup
2-1. Service Searching
A. Tuner Configuration
B. Loading Default Service Lists
C. Automatic Scan of Services
D. Manual Scan of Services
E. Selecting Tuner Type (for DVB-C/T Tuner)
2-2. System Configuration
A. A/V Settings
B. Language Selection
C. Customization
D. Selecting Time Zone
E. Hard Disk Set Up
F. Front Display Setup
G. Network Setup
H. Skin Change
2-3. Checking CAM
2-4. Parental Control
2-5. Factory Reset
2-6. Checking H/W and S/W Information
A. Service Information
B. System Information
2-7. Wi-Fi dongle installation
2-8. Inserting Tuner
2-9. HDD Mounting
2-10. Remote Control Unit (RCU) Set-up
A. User Guide of Vu+ Universal RCU
B. Function Key Table
C. TV Code List
V. Copyright - GNU GPL
VI. Menu Structure
VII. Troubleshooting
VIII. Glossary
46
47
47
47
48
48
49
51
53
53
55
55
57
58
58
59
61
61
62
64
65
65
66
67
70
71
72
72
74
75
87
91
92
93

4Vu :Your Smart Linux TV Player
+
Vu User Manual
+
This Product has been designed and manufactured in compliance with EU consumer safety requirements (CE).
Please read the following safety precautions carefully.
1. Connecting Power
• This product operates only in the range of AC100-240V and 50Hz/60Hz. Please check first your power
supply to see if it fits this range.
• Please be noted that you need to disconnect from the mains before you start any maintenance or
installation procedures.
• Make sure that the power cord is placed in a position where it is easy to unplug it from the mains in an
emergency.
2. Overloading
• Do not overload a wall outlet, extension cord or adapter as this may cause electrical fire or shock.
3. Liquid
• This product is not water-proof and should not be exposed to dripping, splashing, or any type of liquid.
• No objects filled with liquid such as base shall be placed on the product.
• Please do not clean the product with wet cloth, which may cause a short circuit.
• No wet objects should be placed near the product.
4. Ventilation
• Allow a sufficient space between the product and other objects to make sure air ventilation of the product.
• Do not block the top or rear of the product with an object, which will close the ventilation holes and lead to
a high temperature of the system. This may cause a failure of the product.
• Do not stack other electronic devices on top of the product.
• Do not insert any kind of pointed objects like screw, gimlet, etc. into the ventilation holes of the product.
This will damage the product.
5. Connecting the Satellite Cable.
• Disconnect the power of the product before you connect the satellite cable to the product.
Otherwise, it may cause damage to the LNB.
6. Grounding
• The LNB must be earthed to the system earth for the satellite dish.
7. Location
• Place the product indoor.
• Do not expose the product to rain, sun or lightening.
• Do not place the product near any heat appliances as a radiator.
• Ensure that there is more than 10 cm distance from any electrical devices and wall.
(A) PRECAUTION!!!

5
Vu User Manual
+
8. Lightening, Storm or Not In Use.
• Unplug the product and disconnect the antenna cable during a thunderstorm or lightening, especially
when left unattended and unused for a long period of time. This will prevent possible damages from
power surges or lightening.
9. Replacement of Parts
• Unauthorized part replacements, especially by one who is not a qualified technician may result in
damage to the product.
• Ensure that when part replacements are necessary qualified technicians perform the task using the
components specified by the manufacturer.
10. Hard Disk Drive
• Do not move the product or turn the power off suddenly while the Hard Disk Drive (HDD) is still running.
This may result in damage to the HDD and thus the system.
• The company shall not be liable for any corruption of data on the HDD caused by careless use or
misuse of users.
11. Battery
• There is danger of explosion if batteries are incorrectly replaced.
• Replace batteries only with the same or equivalent type.
Dolby Digital Plus :
Manufactured under license from Dolby Laboratories. Dolby and the double - D symbol are trade marks
of Dolby laboratories.
DTS 2.0+Digital OutTM
Manufactured under license under U.S. Patent Nos: 5,956,674; 5,974,380; 6,487,535 & other U.S. and
worldwide patents issued & pending. DTS, the Symbol, & DTS and the Symbol together are registered
trademarks & DTS 2.0+Digital Out is a trademark of DTS, Inc. Product includes software. © DTS, Inc. All
Rights Reserved.
"WEEE" Symbol instructions.
This product should not be disposed with other house hold wastes at the end of its working life.
Please separate this from other types of wastes and recycle it responsibly to promote the sustainable
reuse of material resources. This will help prevent harm to the environment or human health from un-
controlled waste disposal.

6Vu :Your Smart Linux TV Player
+
Vu User Manual
+
(B) Packaging Contents
Please check all package contents before using your product.
• Ultimo RCU (with two coin batteries inserted)
• User Manual
• First Installation Guide
• HDMI cable
• Power cable
• Loop-through cable (for Satellite only)
• SATA cable
• HDD mount screws and rubber washers
NOTE : Two coin batteries(2xCR2032) are used for the remote control.
Please pull out the plastic battery cover to use the remote control.
7
Vu User Manual
+
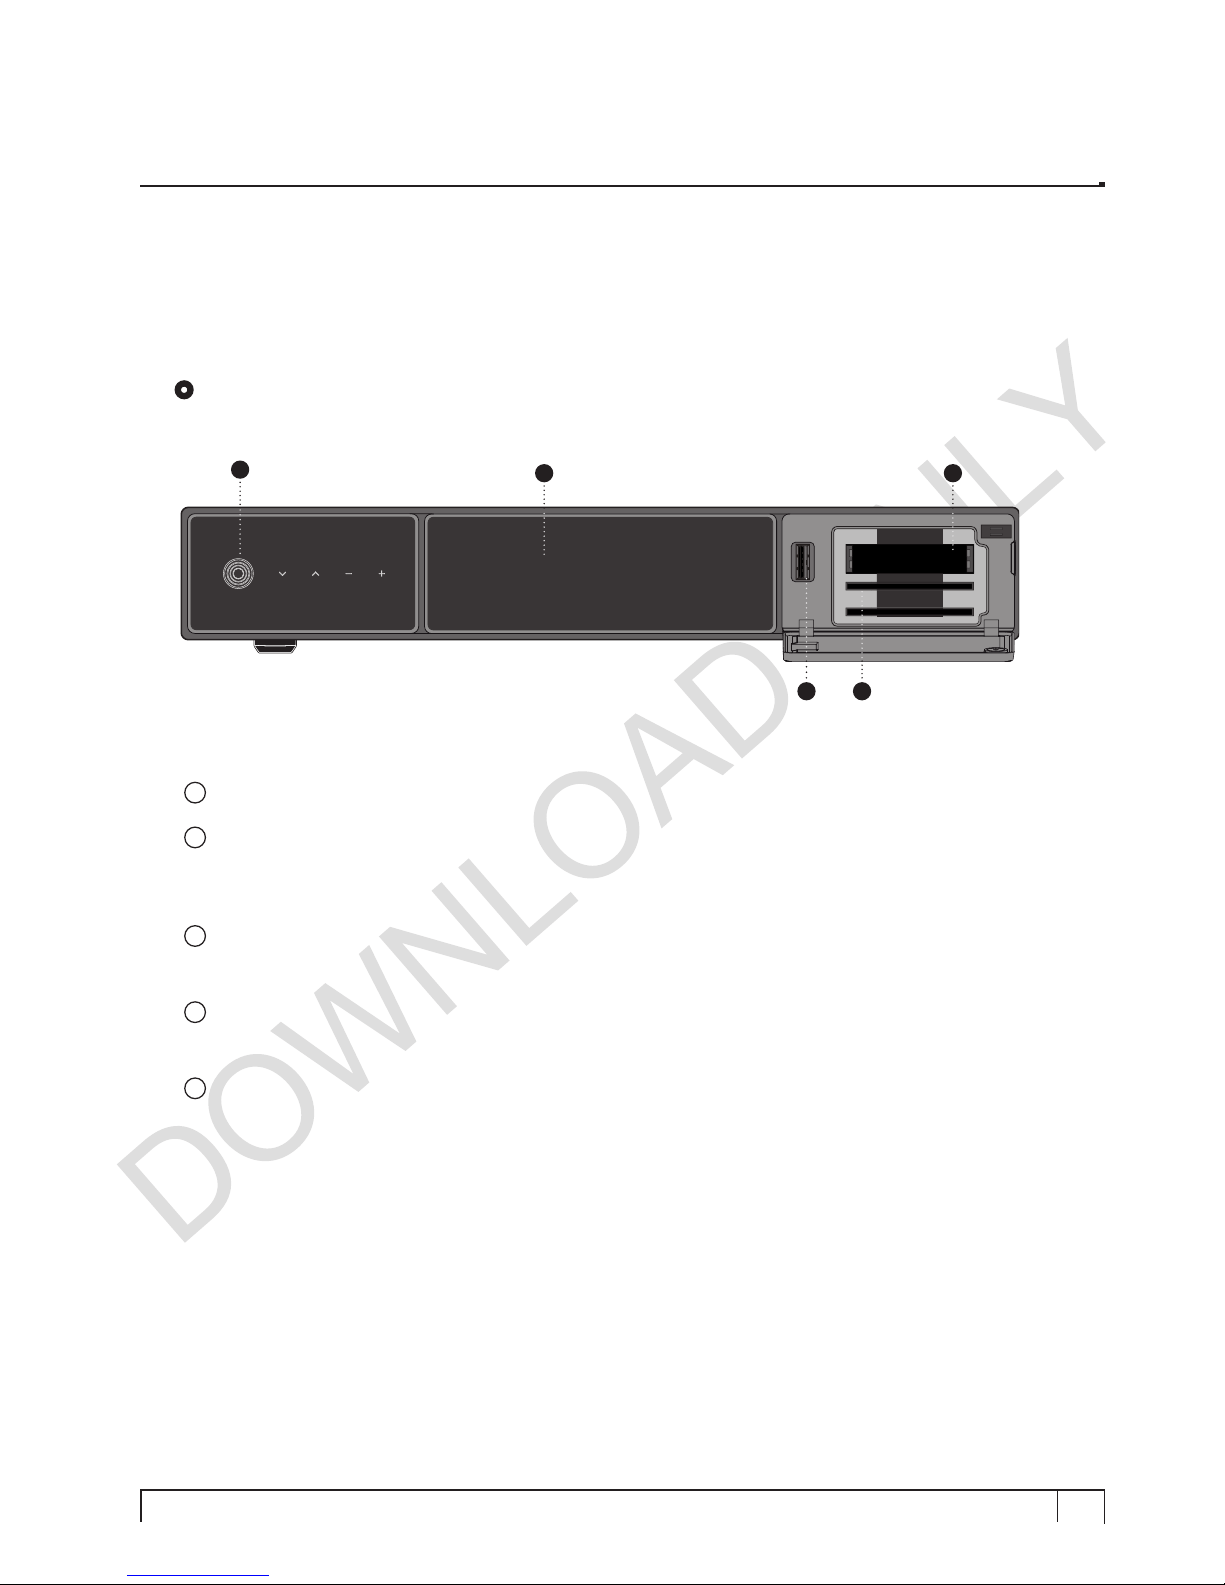
(C) Product Descriptions
Front Panel
1Buttons (STANDBY, Ch–/+, Vol–/+)
2Display
Displays the current menu and program information.
Large Graphic VFD(256x64 pixels)
3USB Host
Connects to the USB memory stick or external HDD.
4Smartcard reader slot
Two Smartcard slots are provided.
5CI Module slot
Two CI module slots are provided.
VU+ Ultimo
VU+ Ultimo
43
2 5
1

8Vu :Your Smart Linux TV Player
+
Vu User Manual
+
Rear Panel
1Three Pluggable Tuner Slots
Pluggable Type DVB-S2 and DVB C/T Hybrid Tuner available.
2SCART
One SCART connector is provided for TV using SCART cable.
3Video output
Connects to TV using RCA cable(composite YPbPr)
4Component (YPbPr)
Connects to TV using a component cable
5Audio output
Connects to TV using RCA cable.
6HDMI
Connects to TV using a HDMI cable for both audio and video signals.
7e-SATA
Connects the external HDD using e-SATA cable.
8Ethernet
Connects the PC or another set top box of Vu+.
9USB
Connects the USB memory stick or external HDD.
10 S/PDIF
Connects to a digital audio system using S/PDIF cable.
11 RS232
RS232 data port is provided.
12 FAN
13 Power Inlet
Connects the detachable power cord.
14 On/Off Switch
Powers on/off.
53 7 13
12414
12
106 8
9 11
9
Vu User Manual
+
Amongst the channels that are scanned via Vu+, some channels can be properly tuned in only with the
corresponding Smartcard and/or CAM (Conditional Access Module). Vu+ provides two Smartcard Reader
slots and two Conditional Interface slots and users need to purchase those Smartcards and CAMs that are
required for viewing such subscription based services.
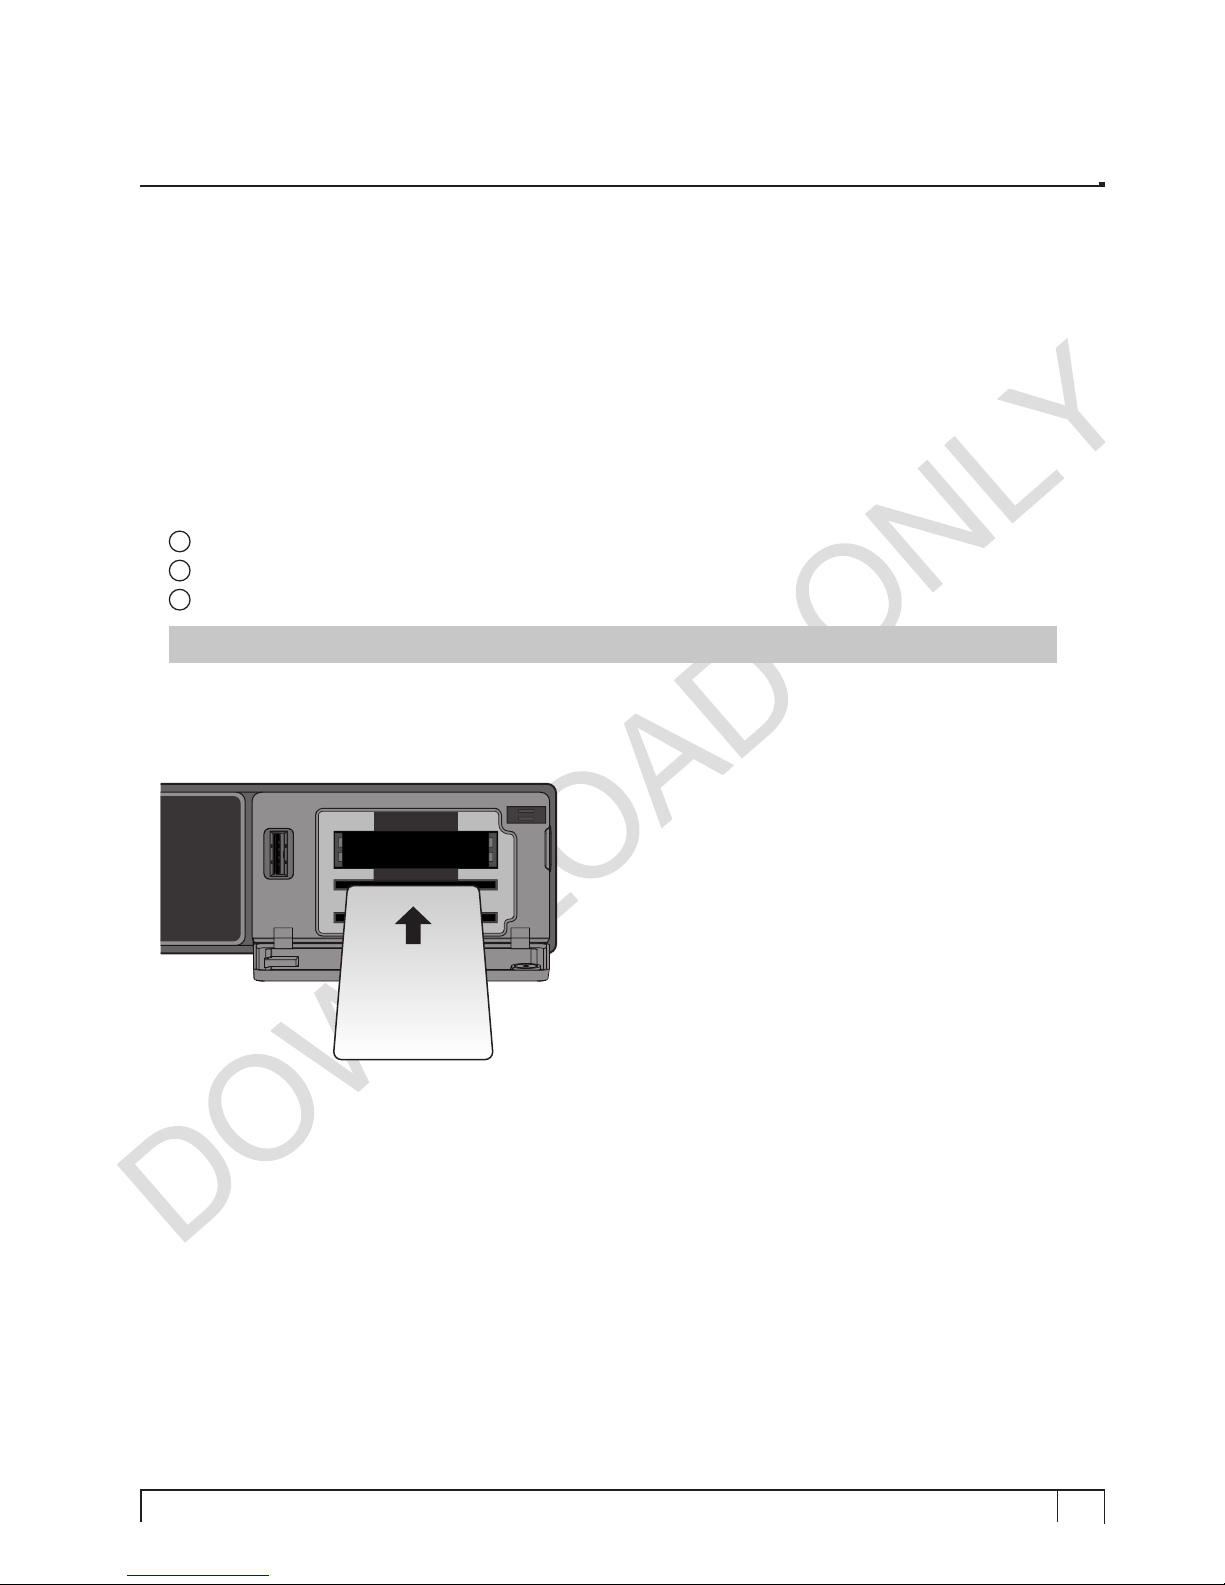
Insertion of Smartcard
Vu+ supports Xcript. Users need to buy only these Smartcards without having to buy additional CAMs to
watch those channels that are encrypted in Xcrypt.
1Open the door on the left side.
2Insert Xcrypt Smartcard as in the following instruction.
3Make sure that the Smartcard remains inserted while viewing.
NOTE : Insert the card while the smart card IC is downward.
Insertion
(D) Conditional Access
Smartcard

10 Vu :Your Smart Linux TV Player
+
Vu User Manual
+
Insertion of CAM (Conditional Access Module)
There are several Conditional Access Systems (CAS), other than Xcrypt that Vu+ supports. To be able
to watch channels that are encrypted in such CAS as Nagravision, NDS, Irdeto, Viaccess, etc, users
need to purchase a CAM that is corresponding to each CAS, as well as Smartcard to decrypt those
encrypted channels.
1Insert a Smartcard into the CAM as in the below picture.
2Once the Smartcard inserted into the CAM, insert the CAM into the CI slot.
3Make sure that the CAM remains inserted while viewing.
Insertion
Smartcard
CI-Module
11
Vu User Manual
+
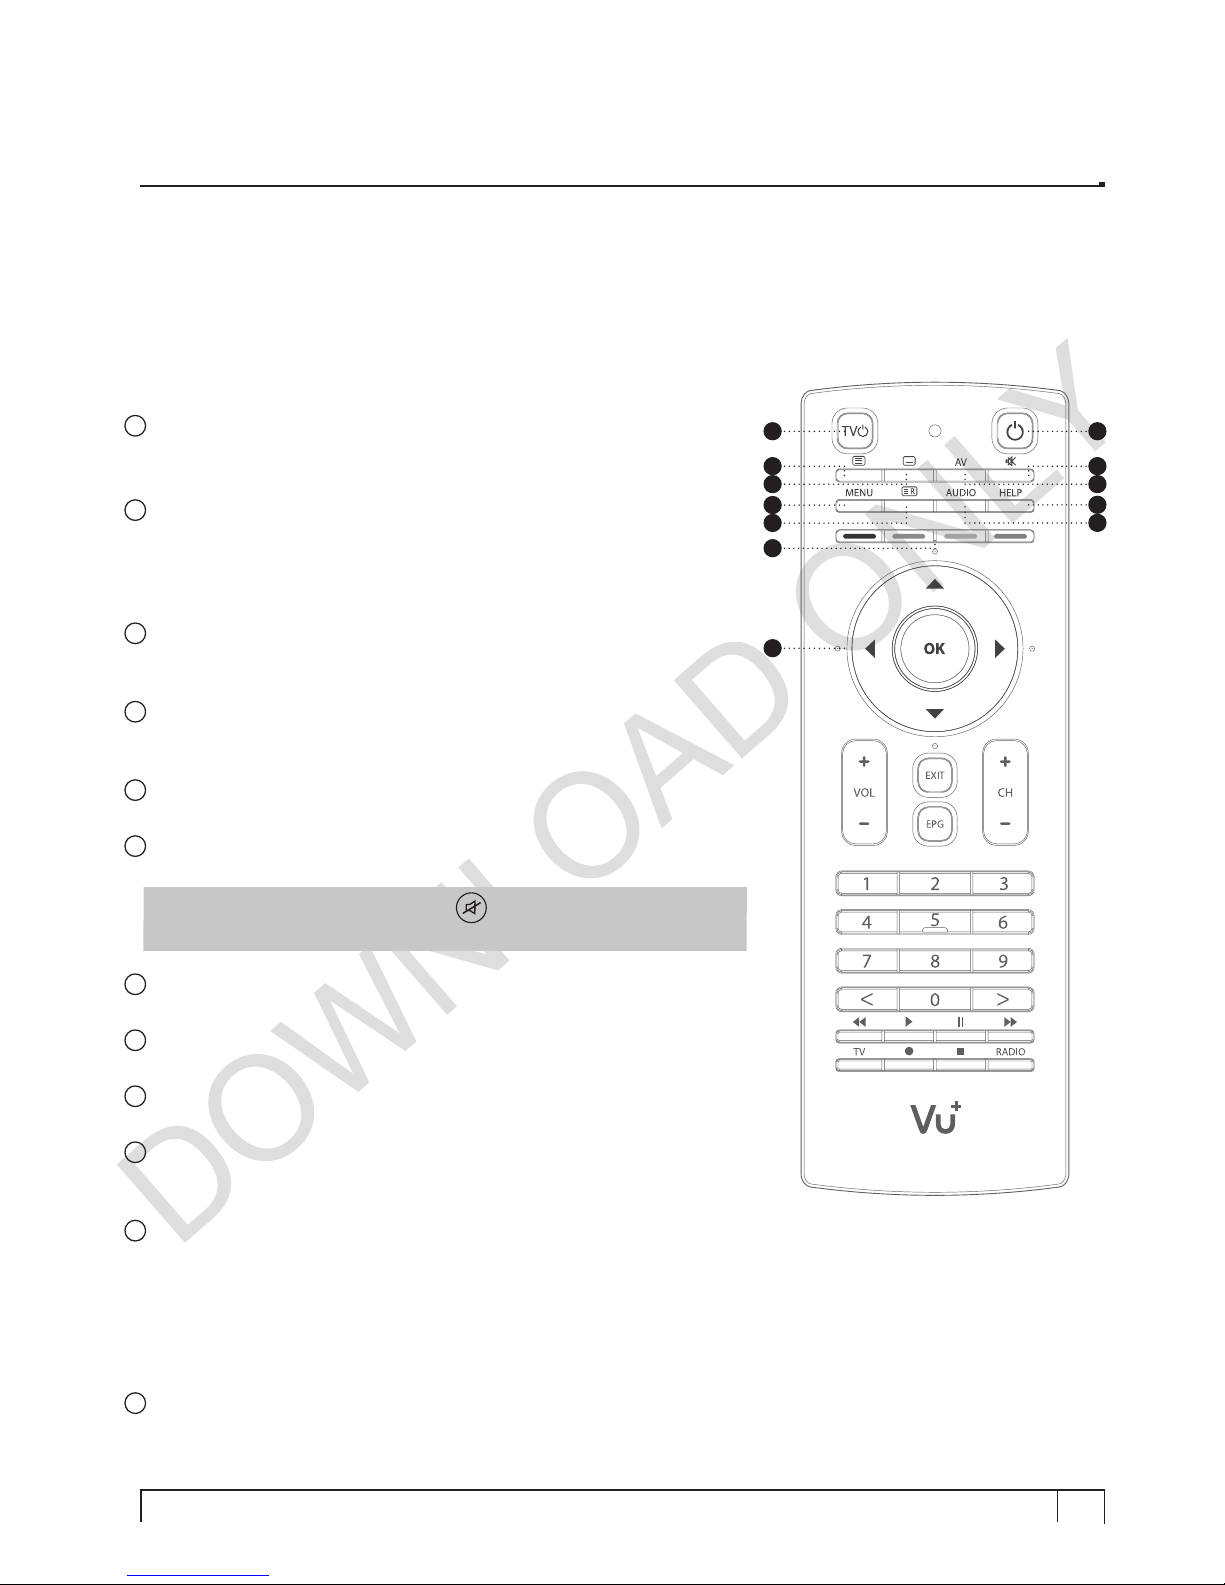
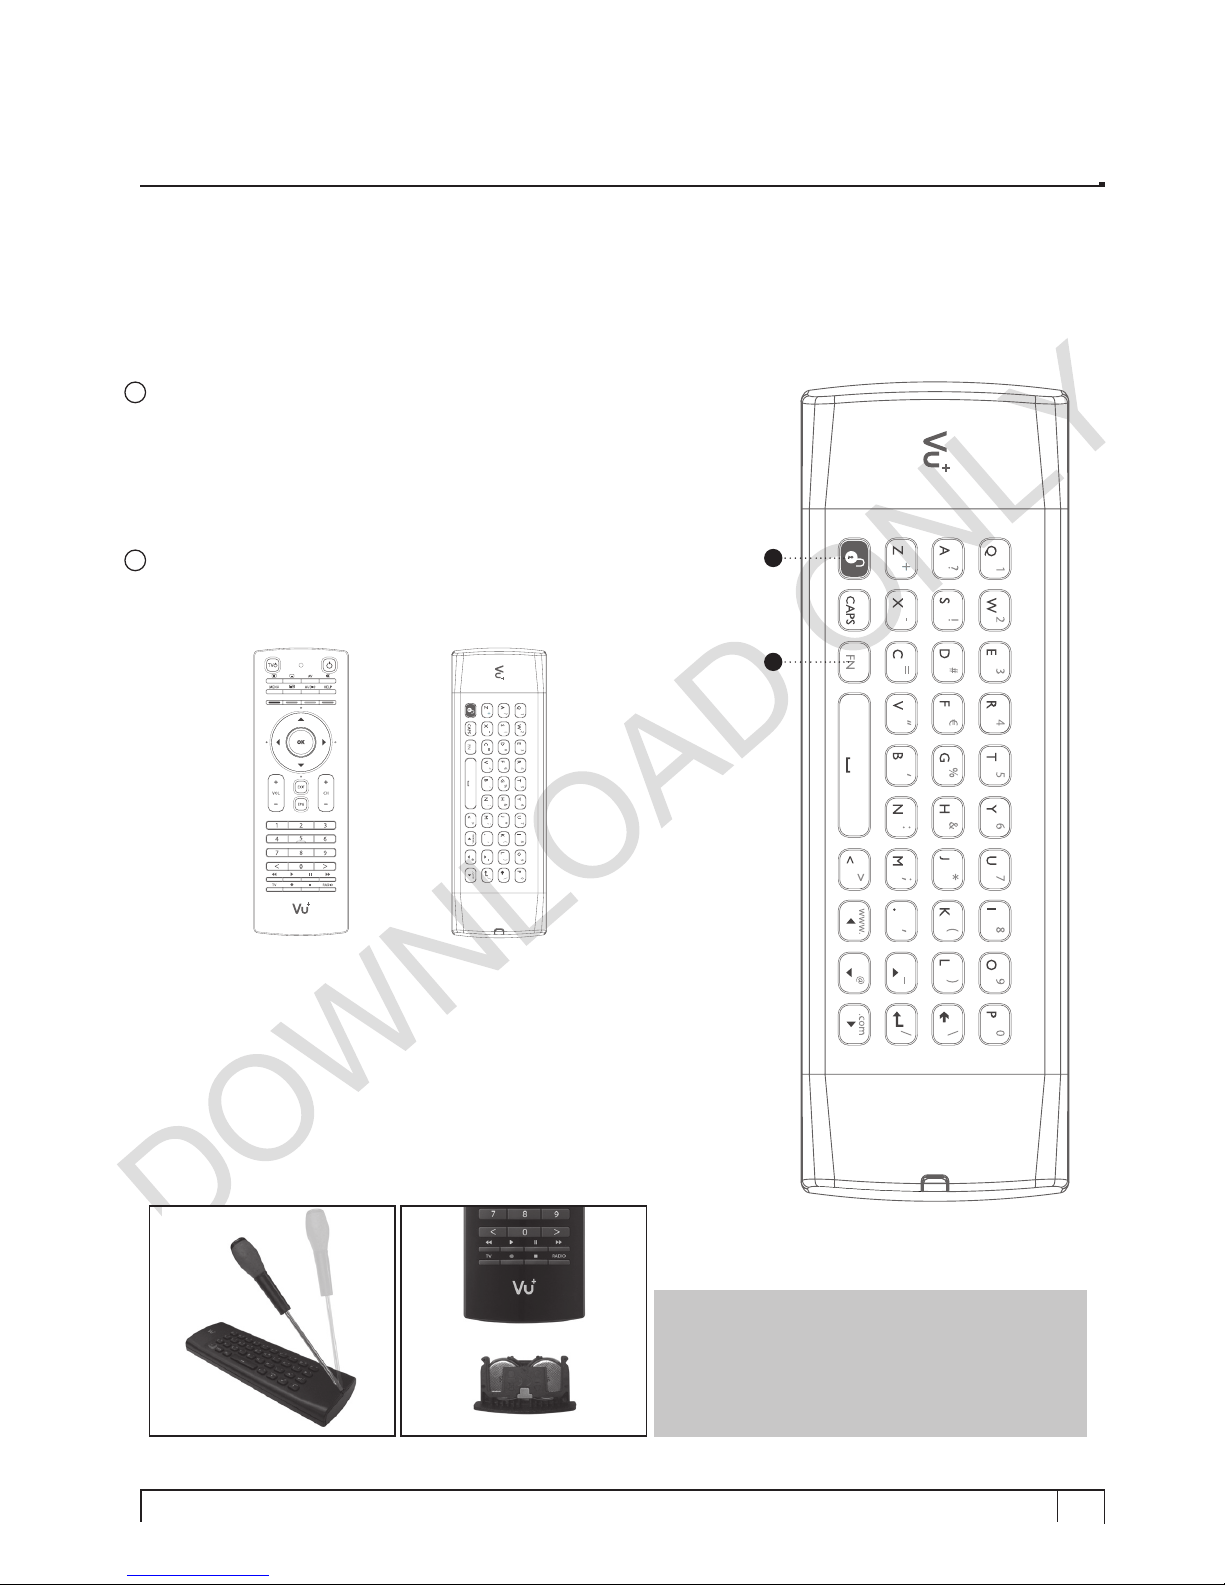
(E) Remote Control
Ultimo Remote Control(RCU) is a universal and QWERTY keyboard
RCU and users can control Ultimo and TV. The double sided design of
Ultimo RCU makes typing on TV easier than ever.
Please refer to IV. System Conguration 2.9 Remote Control Unit Set-
up section for more explanation.
1TV Power
Once configured for TV remote control, this button is for TV power on/
off.
2STB Power
When the STB is turned on, normal press of this button puts the STB
into standby mode instantly. When the STB is turned off, normal press
of this button turns the STB on instantly.
Long press activates Standby /Restart menu.
3Teletext
Displays the teletext information of the current channel if the channel
provides subtitles.
4Subtitle
Displays the subtitle of the current channel if the channel provides
subtitle.
5AV
This button is used when selecting video source of TV.
6Mute
Silences the audio temporarily.
NOTE : when Teletext is activated, key is also used when
toggling between the Teletext page and the live mode.
7Menu
Displays the main menu.
8Recording List
Displays the list of recordings stored on the internal HDD if any.
9Audio
Displays the audio track option to choose (e.g. ACS, Stereo).
10 Help
Displays major important operation methods of Vu+.
This provides users with a quick guide of using Vu+.
11 Color Keys
Each key is assigned a specific function that may be different in
each menu.
• Red – mainly used for REC, Cancel, etc.
• Green – mainly used for OK
• Yellow
• Blue
12 Navigation Keys
Navigates up/down and left/right on the menu options.
Up/down keys are used to call up the channel list.
1
3
7
4
8
5
9
6
10
2
11
12
12 Vu :Your Smart Linux TV Player
+
Vu User Manual
+
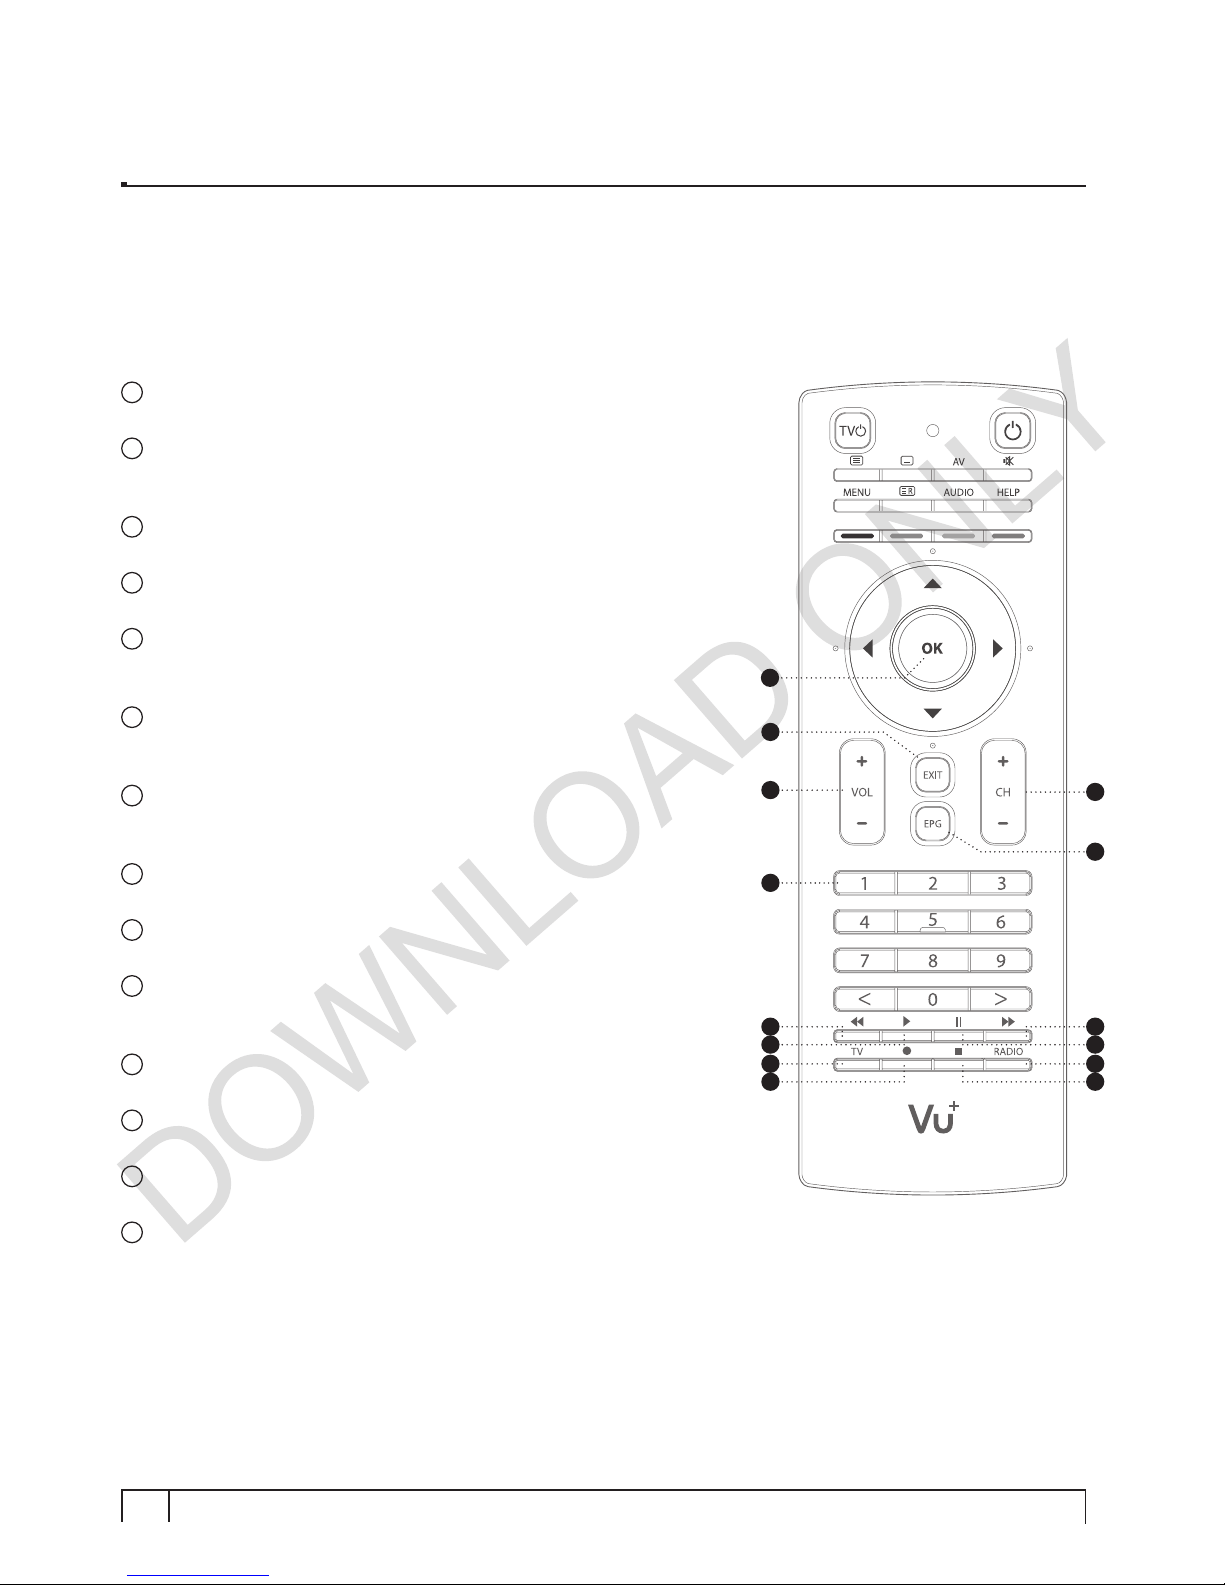
13 OK
Confirms the selected menu option.
14 EXIT
Exits the current menu option into the live mode, or switches one step
back of the menu.
15 Volume + / -
Adjusts the audio volume.
16 Channel + / -
Navigates through the scanned channel list.
17 EPG
Displays the Electronic Program Guide (EPG) information if
provided.
18 Numeric Keys
Enters a channel number or numbers required to be input according
to menu options.
19 Fast Rewind
Fast rewinds at up to 128 times faster than the normal speed
(x2 / 4 / 8 / 16 / 32 / 64 / 128).
20 Play
Plays the selected file (e.g. recording) at the normal speed.
21 Pause
Pauses the live program or recording play.
22 Fast Forward
Fast forwards at up to 128 times faster than the normal speed
(x2 / 4 / 8 / 16 / 32 / 64 / 128).
23 TV
Displays the TV Channel list.
24 Recording
Displays instantly the recording menu.
25 Stop
Stops playing of a recording and goes to the live mode.
26 Radio
Displays the Radio channel list.
19
23
20
24
21
25
22
26
16
17
15
14
18
13
13
Vu User Manual
+
27 Unlock
This button is used to unlock the operation of keyboard.
Any touch on any of the buttons on the remote control side is to lock
the operation of keyboard.
• To unlock the keyboard - Press the unlock.
• To lock the keyboard - Press any button on the remote control side.
28 FN
Function button to activate function buttons in blue.
(Remote control side) (Keyboard side)
27
28
NOTE : Two coin batteries (CR2032) are used
in the remote control.
The estimated battery lifetime is around 1year.
To replace batteries use a screwdriver to pry
open the lid.

14 Vu :Your Smart Linux TV Player
+
Vu User Manual
+
•405 MHz MIPS Processor
•Linux Operating System
•Media Player
•Downloadable Plug-ins supported
•2 x Smartcard Readers (Xcrypt)
•2 x Common Interface
•MPEG2 / H.264 Hardware Decoding
•Three pluggable tuner system for DVB-S2 and/or DVB C/T hybrid tuner.
•Large graphic type VFD - 256x64 pixels
•1GB NAND Flash / 512 MB RAM
•External SATA supported
•10/100MB Ethernet Interface
•3 x USB 2.0
•RS232
•HDMI
•Composite Video / Component Video
•1 x SCART
•SPDIF for digital bit stream out (optical)
•EPG supported
•Automatic & Manual Service Scan supported
•Multiple LNB control (DiSEqC) supported
•Skin change supported
•Stable SMPS integrated
•Automatic temperature sensor based FAN speed control system.
(F) Main Features

15
Vu User Manual
+
(G) Technical Data
Vu+ Technical Specifications
Front
Panel
Display 256x64pixel large graphic VFD with status icons displaying
channel names and program information
Smart card slot 2
Common Interface 2
USB 2.0 1
Key Ch+/-, Vol+/-, Standby
Rear
Panel
Power switch 1
Sat-IF input/output 3 x F-type (or DIN) Socket
Connection TV 1 x Scart socket
Video output (analogue) 3 x Cinch socket(Y/Pb/Pr) / 1 x Cinch-socket
Video/audio output (digital) 1 x HDMI
Audio output (analogue) 2 x Cinch socket
Audio output (digital) Standard optical (SPDIF)
USB 2.0 2
eSATA 1
Ethernet 1
RS 232 1
Power
Mains voltage AC100-250V / 50-60Hz
Power consumption
(Max./typ. operation/stand-by) 65/25/1W
RF RF range 950-2,150 MHz
Modulation, FEC, de-multiplexer DVB-S/DVB-S2 standard
Video
Video resolution CCIR 601 (720 x 576 lines), 576p, 720p, 1080i
Video decoding MPEG-2, MPEG-4 compatible
Input data rate 2-45 MSymb/s
S/N > 53 dB
Decoding
Decoding Dolby Digital, MPEG-4 (AAC-HE), MPEG-1, Layer 1, 2 and 3
Sampling rate 32/4.1/48 kHz
S/N > 65 dB
LNB LNB supply (horiz./vert.) 14/18V / Max.400mA
Control signal 22kHz ; ToneBurst ; DiSEqCTM1.0/1.1/1.2
General Dimensions (W x H x D) 380 x 290 x 60 mm
Weight (without HDD) 3kg (Without HDD)

16 Vu :Your Smart Linux TV Player
+
Vu User Manual
+
This chapter will guide you through the whole installation process of Vu+. Please read each section
carefully to make sure that the system runs properly.
1. Connecting Signal Cable
Vu+ Ultimo is designed to integrate three pluggable tuners. For the best use of Vu+ Ultimo the
following tuner combinations are recommended.
A. DVB-S2 + DVB-S2 + DVB-S2
C. DVB-S2 + DVB-C/T + DVB-C/T
NOTE : Loop-through connection
Instead of using two or three separate signal cables, it is also possible to connect cables in
loop-through mode.
example A.
If two DVB-S2 tuners are mounted.
example B.
If two DVB-C/T tuners are mounted.
I. Installation of Vu+
NOTE : imeans Remote control operation order.
B. DVB-S2 + DVB-S2 + DVB-C/T
NOTE : Using tuner A & C without tuner B
is not supported.
A loop-through cable for
satellite is included in
the accessory box.
You need to purchase
a loop-through cable for
DVB-C/T
tuner.

17
Vu User Manual
+
2. Connecting the TV
Vu+ provides a variety of audio/video connection methods.
A. Connecting TV via HDMI cable
For the sake of the best picture quality, especially for digital TV, HDMI connection is recommended.
Most HDTVs have HDMI connectors to ensure the highest picture quality. In the rear panel of Vu+
one HDMI connector is available for this purpose. Connect your TV to Vu+ using a HDMI cable as
follows.
HDMI
B. Connecting TV via Composite or Component connection
Vu+ provides Composite and Component connectors for both audio and video.
Connect your TV to Vu+ as follows:
NOTE : When you have an A/V receiver with S/PDIF digital audio input, this connection is recommended
to enjoy the best audio quality, especially for the Dolby Digital sound.
VIDEO
Audio
YPbPr
S/PDIF
or
18 Vu :Your Smart Linux TV Player
+
Vu User Manual
+
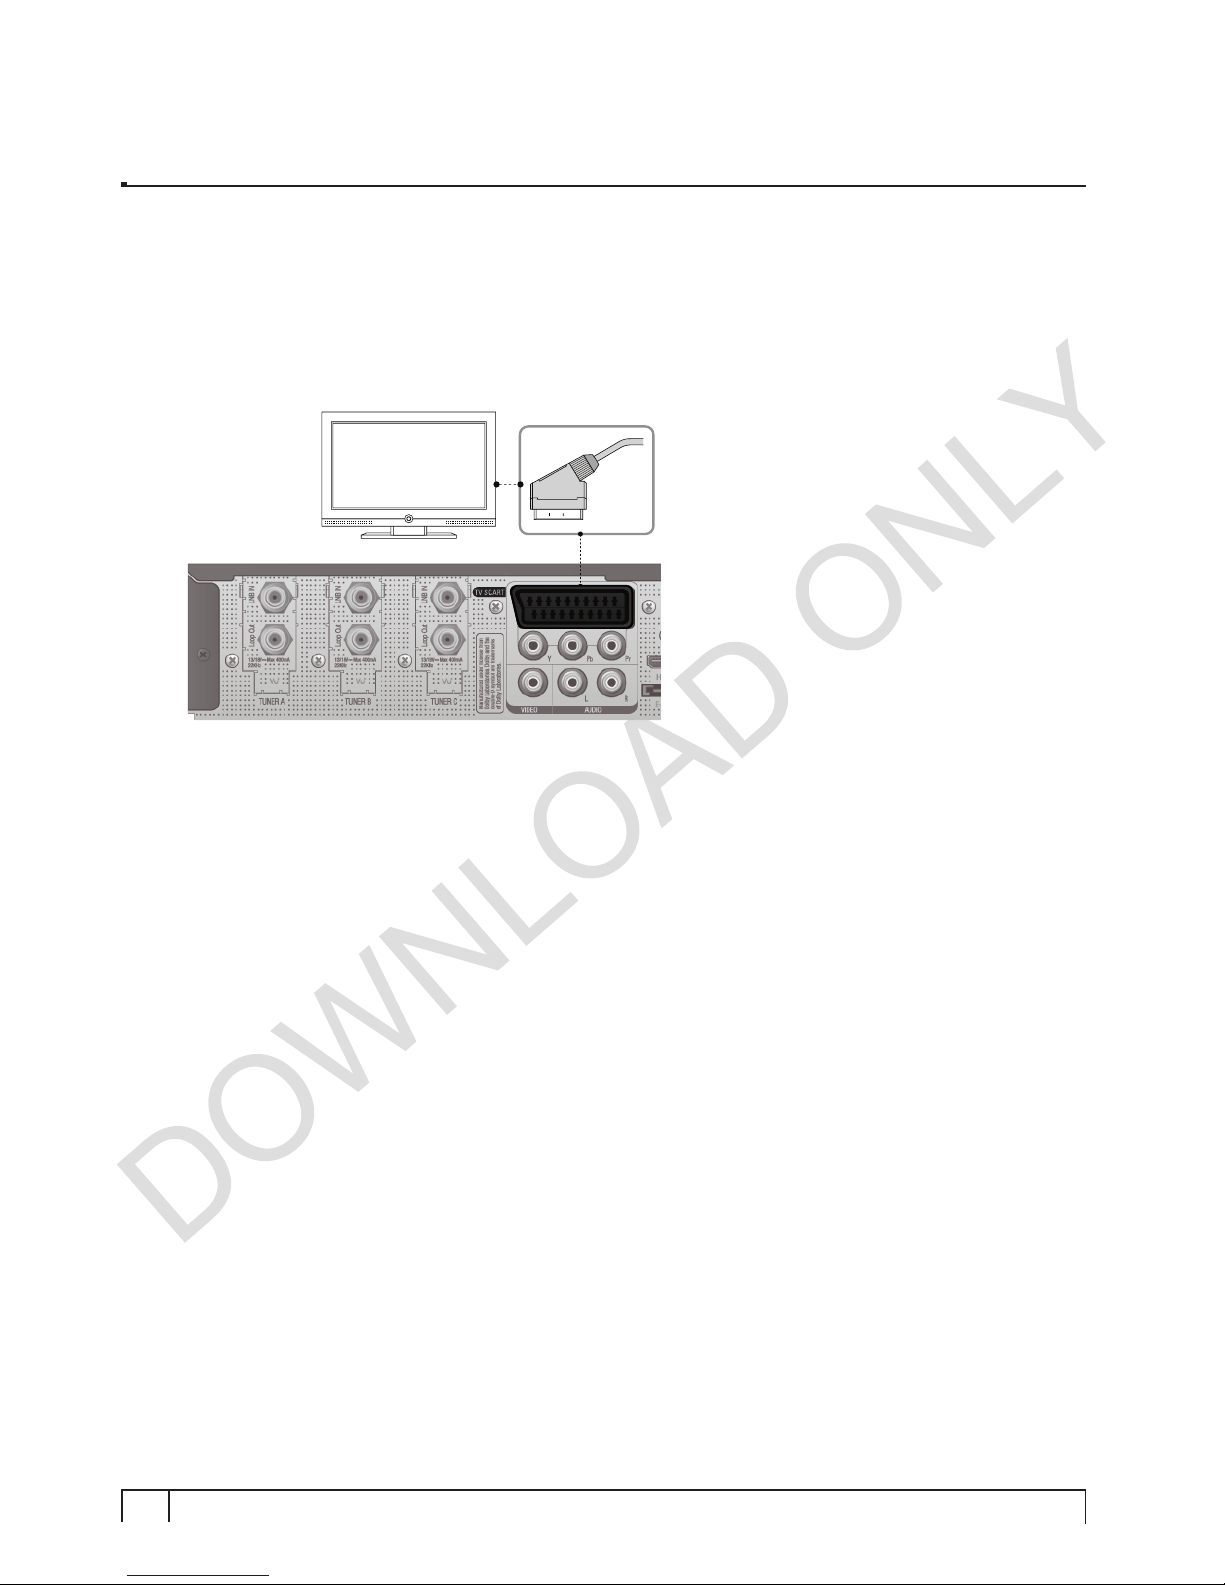
C. Connecting TV via SCART cable.
In case your TV is analogue TV, SCART cable is the most common method. Connect your TV to Vu+
using SCART cable as follows.
TV
SCART
19
Vu User Manual
+
3. Connecting Power
A power cord is provided as one of the basic accessories of Vu+.
1Connect the power cord to the connector at the rear panel of Vu+.
2Connect the power cord to a power outlet.
3Turn on the power switch at the rear panel.
NOTE : AC input condition
• Nominal Voltage Range: 100 – 250 VAC
• Maximum Voltage Range: 90 – 264 VAC
• Nominal Frequency: 50 / 60 Hz
• Maximum Frequency Range: 47 – 63 Hz
NOTE : imeans Remote control operation order.
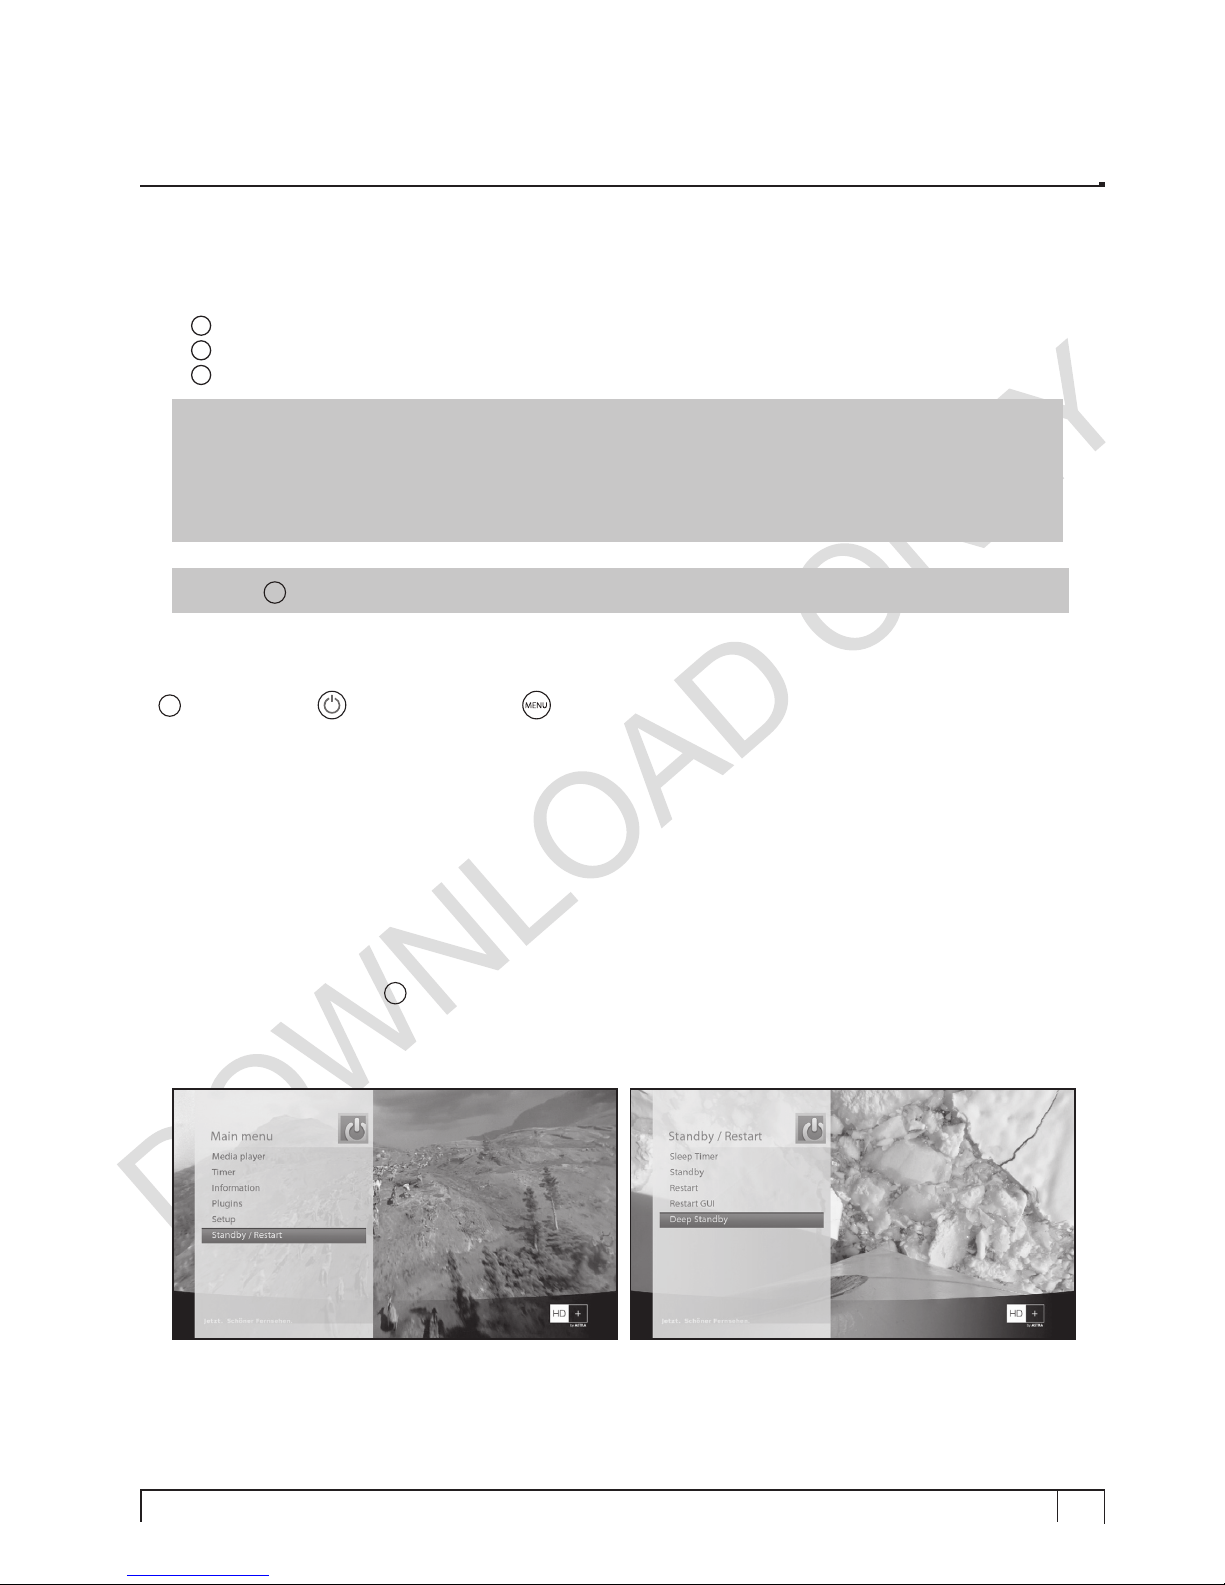
4. Power ON/OFF
[i: Press Power key / Press MENU > Select Standby/Reset]
There are several ways to turn your Vu+ ON or OFF
� Complete Power Shutdown
There is a Power Switch in the rear panel and once it is ON, you do not need to turn it on or off each time.
It takes a longer time to boot the system if you turn it off by this switch.
� Standby Mode
POWER key is normally used to turn the power of Vu+ on or off. If you press POWER, it instantly
switches your Vu+ off or on. In this mode, the system is not completely shutdown and thus it takes a
shorter time to turn it on and off.
� Deep Standby Mode [i: Menu > Standby/Restart > Deep Standby]
Deep Standby is used to reduce the standby power consumption. Vu+ is designed to be energy
efficient and to guarantee the power consumption to be under 1W in the deep standby mode.

20 Vu :Your Smart Linux TV Player
+
Vu User Manual
+
When you turn on Vu+ for the first time after purchase, an installation wizard will begin step by step.
NOTE : OK key is used for confirmation and turns to the next step. Press EXIT key to return to the
previous page.
Step 1. Language Selection
Vu+ provides various languages and here you can choose the main language for your Vu+. Use UP/DOWN
key to scroll up and down to find the language you want.
Step 2. Configuring Satellite Connection
From now on you need to configure the satellite connection. You have two options:
• Use wizard to set up basic features
• Exit wizard
You are strongly recommended to use wizard as it is designed to guide you through the configuration process.
II. First Time Installation (using Wizard)
This manual suits for next models
1
Table of contents
Other Ceru TV Receiver manuals


