TechniSat EUROKLASSIK 1 User manual

+++ DIGITAL +++ DIGITAL +++ DIGITAL +++ DIGITAL +++ DIGITAL +++
Instruction Manual
DigiCamp 1
Camping-Receiver for the reception of
free-to-air DVB satellite programmes
Bedanldi.qxd 11.06.01 10:05 Seite 1

On/standby
Numeric keypad
Programme list on/off
Back
Menu on/off
Sound on/off
EXTERNAL
Language selection
Programme -
Information (blue)
Delete (red)
Programme informa-
tion (yellow)
Transponder
information (green)
Volume +
Programme +
TV/radio mode
MONO1/MONO2
OK
Volume -
Arrow right
Arrow left
Arrow up
Arrow down
Remote Control Options:
For the operating of 2 TechniSat-receiver with same coding,
tv sets and a further future option (e.g. VCR)
To use your digital receiver select with this keys the remote control option SAT1:
> Press SAT1 key and OK key simultaneous !!!
Remote control
FERNBEDIENUNG V1.qxd 07.09.00 10:39 Seite 2

Contents
1 Illustrations . . . . . . . . . . . . . . . . . . . . . . . . . . . . . .3
2 Contents . . . . . . . . . . . . . . . . . . . . . . . . . . . . . .2, 5
3 Important - please read first! . . . . . . . . . . . . . . . .6
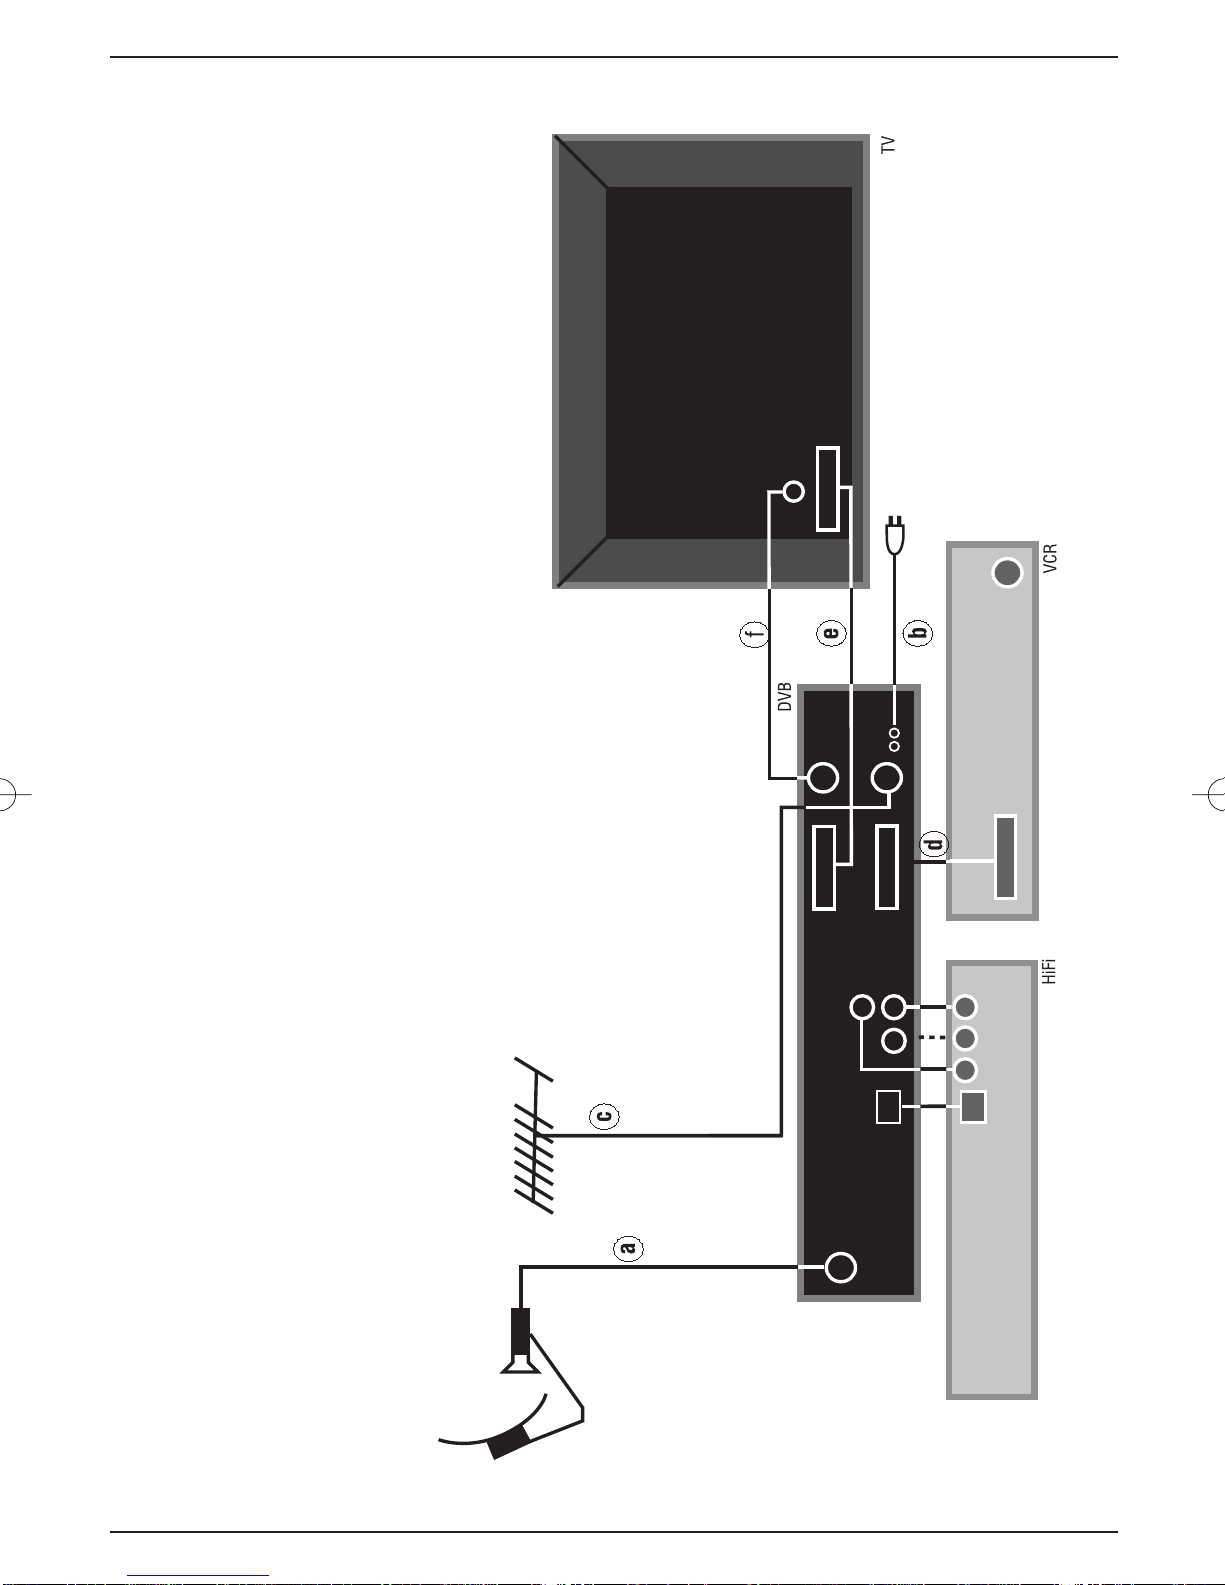
4 Connections8
4.1 Mains connection . . . . . . . . . . . . . . . . . . . . . . . . . . . . . . . . . .9
4.2 External unit . . . . . . . . . . . . . . . . . . . . . . . . . . . . . . . . . . . . . .9
4.3 Connecting to a TV set . . . . . . . . . . . . . . . . . . . . . . . . . . . . . .9
4.4 Adjusting the UHF output channel . . . . . . . . . . . . . . . . . . . .10
4.5 Connecting a video cassette recorder (VCR) . . . . . . . . . . . .11
4.5.1 Connecting a Super-VHS video recorder . . . . . . . . . . . . . . .11
4.6 Amplifier . . . . . . . . . . . . . . . . . . . . . . . . . . . . . . . . . . . . . . . .11
4.7 Serial/parallel connection/interface . . . . . . . . . . . . . . . . . . . .11
5 Installation . . . . . . . . . . . . . . . . . . . . . . . . . . . . .12
5.1 OSD language selection . . . . . . . . . . . . . . . . . . . . . . . . . . . .12
5.2 Basic settings . . . . . . . . . . . . . . . . . . . . . . . . . . . . . . . . . . . .12
5.3 Audio and video settings . . . . . . . . . . . . . . . . . . . . . . . . . . .14
5.4 Adjusting to conform to external unit . . . . . . . . . . . . . . . . . . .15
6 Operation . . . . . . . . . . . . . . . . . . . . . . . . . . . . . .18
6.1 On/off switch . . . . . . . . . . . . . . . . . . . . . . . . . . . . . . . . . . . .18
6.2 Programme selection . . . . . . . . . . . . . . . . . . . . . . . . . . . . . .18
6.2.5 Infobox . . . . . . . . . . . . . . . . . . . . . . . . . . . . . . . . . . . . . . . . .19
6.3 Volume adjustment . . . . . . . . . . . . . . . . . . . . . . . . . . . . . . . .19
6.4 Selecting a different language . . . . . . . . . . . . . . . . . . . . . . .20
6.4.1 Dolby Digital (AC3 mode) . . . . . . . . . . . . . . . . . . . . . . . . . . .20
6.5 TV/radio switching . . . . . . . . . . . . . . . . . . . . . . . . . . . . . . . .20
6.6 Going back to last/previous programme selected . . . . . . . . .20
6.7 Display clock/timer and programme information . . . . . . . . . .20
6.8 Additional programme information . . . . . . . . . . . . . . . . . . . .20
6.9 Transponder information . . . . . . . . . . . . . . . . . . . . . . . . . . . .21
6.10 Videotext . . . . . . . . . . . . . . . . . . . . . . . . . . . . . . . . . . . . . . .21
6.11 Display sub-titles . . . . . . . . . . . . . . . . . . . . . . . . . . . . . . . . .21
6.12 Electronic Programme Guide (EPG) . . . . . . . . . . .22
6.12.1 Entering EPG data . . . . . . . . . . . . . . . . . . . . . . . . . . . . . . . .22
6.12.2 Interrupting the data entry process . . . . . . . . . . . . . . . . . . . .22
6.12.3 Calling up the Electronic Programme Guide . . . . . . . . . . . . .22
6.12.4 Table of current contents . . . . . . . . . . . . . . . . . . . . . . . . . . .23
6.12.5 Table of contents immediately following . . . . . . . . . . . . . . . .23
6.12.6 Preview . . . . . . . . . . . . . . . . . . . . . . . . . . . . . . . . . . . . . . . .23
6.12.7 EPG functions . . . . . . . . . . . . . . . . . . . . . . . . . . .24
6.12.7.1 EPG information . . . . . . . . . . . . . . . . . . . . . . . . . . . . . . . . . .24
6.12.7.2 Pre-selecting a programme . . . . . . . . . . . . . . . . . . . . . . . . .24
6.12.7.3 Activating the VCR (timer mode) . . . . . . . . . . . . . . . . . . . . .24
6.12.7.4 Overview of EPG . . . . . . . . . . . . . . . . . . . . . . . . . . . . . . . . .25
6.12.7.5 Searching the EPG . . . . . . . . . . . . . . . . . . . . . . . . . . . . . . .26
inhalt1.qxd 21.09.00 16:43 Seite 4

6.12.7.6 Manual programming of timer . . . . . . . . . . . . . . . . . . . . . . . .27
7Changing basic programme settings . . . . . . . . . .29
7.1 Adding/deleting programmes . . . . . . . . . . . . . . . . . . . . . . . .30
7.2 Sorting programmes . . . . . . . . . . . . . . . . . . . . . . . . . . . . . . .31
7.3 Blocking programmes (parental control) . . . . . . . . . . . . . . . .32
7.4 Changing the PIN . . . . . . . . . . . . . . . . . . . . . . . . . . . . . . . . .32
7.5 Programming the Electronic Programme Guide . . . . . . . . . .32
7.6 Unblocking reception of specific programmes . . . . . . . . . . . .34
7.7 Programme search . . . . . . . . . . . . . . . . . . . . . . . . . . . . . . . .34
7.7.1 All programmes . . . . . . . . . . . . . . . . . . . . . . . . . . . . . . . . . .35
7.7.2 Satellite programmes . . . . . . . . . . . . . . . . . . . . . . . . . . . . . .35
7.7.3 Transponders . . . . . . . . . . . . . . . . . . . . . . . . . . . . . . . . . . . .36
7.7.4 Programme . . . . . . . . . . . . . . . . . . . . . . . . . . . . . . . . . . . . .37
7.8 Activating factory settings/changing data channels . . . . . . . .37
7.8.1 Activating original factory settings . . . . . . . . . . . . . . . . . . . . .38
7.8.2 Delete total programme memory . . . . . . . . . . . . . . . . . . . . .38
7.8.3 Service channel . . . . . . . . . . . . . . . . . . . . . . . . . . . . . . . . . .38
7.8.4 EPG channel . . . . . . . . . . . . . . . . . . . . . . . . . . . . . . . . . . . .39
7.9 System configuration . . . . . . . . . . . . . . . . . . . . . . . . . . . . . .39
8 Technical Terms . . . . . . . . . . . . . . . . . . . . . . . . .39
9 Technical Data . . . . . . . . . . . . . . . . . . . . . . . . . .42
10 Troubleshooting guide . . . . . . . . . . . . . . . . . . . . .44
5
inhalt1.qxd 21.09.00 16:43 Seite 5

On/standby mode Programme selection
up/down
RS-232 connec-
tion/interface
HF-output
Audio outputs SCART con-
nection VCR
LNB input
Input terrestrial
antenna
SCART connection TV set
Mains power connection
4-digit LED-display
bed_anl_DigiCom1A-1plus-englisch.qxd 11.06.01 10:02 Seite 2

6
3 Please read this first
NOTE:English-speaking customers - the default setting of your receiver is German.
You should go directly to Chapter 5 to change the setting to English (point 5.1
on Page 12).
> Before connecting the receiver, first check that you have received all necessary parts.
The following are included:
1 receiver 1 mains cable 1 remote control unit
1 instruction manual 1 guarantee card 2 batteries (1.5V size AAA)
> Insert the enclosed batteries in the battery compartment of the remote control unit,
ensuring the polarity is correct as indicated
> Before switching on the receiver, please first read the safety hints in Chapter 3.
>Chapters 4 and 5 show you how to adjust and connect the receiver so that it con-
forms to the requirements of the external unit (dish antenna, LNB, etc.) as well as to
those of the TV set, VCR, etc. These settings have to be made only once when com-
mencing operation, and only need to be augmented when you attach additional
equipment to the set-up, or if the specifications of your external unit are changed.
>Chapter 6 describes all functions required for everyday usage, such as volume
adjustment and programme selection.
>Chapter 7 shows you ways of setting additional programmes/channels, and of
changing the order of programmes.
> Technical terms used in the instruction manual are explained in Chapter 8.
> Technical data and specifications are to be found in Chapter 9.
>Hints on finding and correcting faults and malfunctions are described in Chapter 10.
Disposal Instructions:
The packaging used to protect and transport your receiver consists exclusively of recyclable
material. Where available, this should be recycled via the "Dual System" (Germany, Belgi-
um), or according to the regulations of your local authority. Please note that spent batteries
as well as electronic components should not be included in your regular household waste,
and should be disposed of by specialists wherever possible.
Important hints on Usage
The use of a so-called “On Screen Display” (see example of screen shots) simplifies the use
of the receiver, and makes it possible to manage with fewer buttons on the remote control
unit. All functions are displayed on the TV screen, and can be adjusted with a few clicks of
the button.
Functions that logically belong together are combined into a single “MENU”. The function sel-
ected is highlighted in a different colour in the relevant line. A short comment on the selected
function is shown in the lower half of the display. Terms used in the OSD menu are shown in
bold type in this instruction manual.
Example:
> Use the button MENU to open the Main Menu.
bed_anl_DigiCom1A-1plus-englisch.qxd 11.06.01 10:02 Seite 6

Safety Instructions
For your own safety, you should read the safety instructions carefully before switching on
your new receiver for the first time.
The manufacturer can accept no responsibility for damage caused by inappropriate handling,
or by ignoring the safety advice.
> Do not lay any objects on the upper surface of the receiver. This contains cooling
slots, which are essential to ensure heat generated in the receiver can escape freely.
> NEVER open the receiver! You are in danger of receiving an electrical shock. If it is
ever necessary to open the equipment housing this should be done only by appro-
priately trained personnel.
Equipment not in use:
During an electrical storm as well as during extended periods when the equipment is not in
use it is advisable to disconnect it from the electrical mains.
In the following cases you should disconnect the equipment
from the mains and call a specialist for assistance :
>when the mains cable or plug are damaged
> when the equipment has been exposed to extreme damp, or when liquid has entered
the equipment;
> when there are serious malfunctions;
> if there is severe external damage to the receiver.
7
> Now select the line of text OSD LANGUAGE, by marking the appropriate line with
the aid of the arrow up/down controls
>Confirm with OK
bed_anl_DigiCom1A-1plus-englisch.qxd 11.06.01 10:02 Seite 7

8888
bed_anl_DigiCom1A_neutral.qxd 29.06.00 11:54 Seite 8
a. Connection from LNB to LNB IN connection on DVB receiver.
b. Mains connection.
c. Connection from terrestrial antenna input (RF IN) on
DVB receiver.
d. SCART connection between a VCR and the VCR SCART connection
on the DVB receiver.
e. SCART connection between DVB receiver and the TV set.
Optional:
f. Connection from HF output on the DVB receiver to the HF input of
your TV set.
Connecting a DVB receiver
to a satellite installation

DigiCamp1
Addendum to instruction manual
Dear Customer,
Your receiver is based on the DigiCom1A units. As your equipment is designed
to be operated by means of 12V DC (direct current), the paragraph 4.1 “Mains
connections” of the instruction manual supplied does not apply to your unit.
Please, therefore, note the following instructions with regard to
the power supply connections!!!
1. Warning note
When operating your receiver, please use only the original accessories and
connections supplied. Any damage brought about through incorrect connec-
tion of the unit cannot be considered within the framework of our unit guarantee.
2. Operation with 12V connection in motor vehicle
(cigarette lighter)
Once you have connected all components with the receiver, connect the 12V
connection of the receiver with the 12V connection of the motor vehicle (cigarette
lighter), using the connection cable supplied.
3. Operation with domestic mains supply (230V/50Hz)
Once you have connected all components with the receiver, connect the 12V
connection of the receiver with the 12V output of the mains adapter supplied.
Thereafter connect the mains adapter with a 230V/50Hz mains socket.
Technical Data (DC):
10V...14V DC
max 24W (in operation with max 400mA LNB load)
max 5 W (Standby)
DigiCamp1 12V
DigiCamp1 12V
Car cigarette lighter 12V
Mains outlet 230V/50Hz
Mains adap-
ter supplied
DIGICAMP Beiblatt engl1.qxd 11.06.01 10:16 Seite 1

4 Connections
The references in bold type - a b c etc. refer to the diagram on page 8.
4.1 Mains connection
The receiver should only be connected to the mains supply after all connections with other
components and equipment have been made. This helps to eliminate the likelihood of dama-
ge to the receiver or other components.
bOnce all other cable connections have been made, connect the receiver to a mains
supply of 230 V/50 Hz, using the mains cable included.
4.2 External Installation
aUse a suitable coaxial cable to connect the LNB INPUT of the receiver to the LNB
unit of your external installation. Also note Point 5 “Installation”.
4.3 Connection to a Television set
4.3.1 By means of a SCART cable:
In order to obtain the best picture quality possible, we advise you to use a SCART cable to
connect your receiver to the TV set.
The procedure is as follows:
eConnect the receiver (SCART TV connection) with the TV set (SCART connec-
tion), using a SCART cable. If your TV set is fitted with an appropriate connection, the
set will automatically switch to AV mode, and thus receive the satellite signal, whene-
ver the receiver is switched on.
4.3.2 By means of an HF connection
If your TV set is not fitted with a SCART connector, the receiver will have to be connected to
the antenna input of the TV set. If this form of connection is used, sound will only be availa-
ble in mono mode, and not in stereo.
The procedure is as follows:
fUsing a suitable TV connection cable (coaxial), connect the receiver (HF OUT) to
the antenna input connector of your TV set.
cThe cable feeding the terrestrial signal from the antenna should be connected to the
Terrestrial Antenna Input of the receiver.
Now you must tune the TV set to the transmission channel used by the receiver. Select a
free programme slot on your TV set, and select channel 38 (if necessary, refer to the instruc-
tion manual of your TV set for this).
If you do not receive a clear picture on channel 38, this may indicate that either this or a
neighbouring channel are already receiving a programme signal via the antenna. You can
check on this by temporarily disconnecting the antenna cable from the Terrestrial Anten-
na Input of the receiver. If you then temporarily receive a clear picture, you should select a
different transmission channel within the receiver’s range of 21 to 69.
9
bed_anl_DigiCom1A-1plus-englisch.qxd 11.06.01 10:02 Seite 9

4.4 Setting the UHF Output Channel
The procedure is as follows:
> Use the Menu key to select the Main Menu.
>Now select the entry Settings, marking it by using the up/down arrow keys.
>Confirm by pressing OK
The sub-menu Settings will be displayed.
> Now use the up/down arrow keys to mark the line Audio/Video Settings.
>Confirm by pressing OK.
The sub-menu Audio/Video will be displayed.
> Now select the line UHF Output channel, marking it in blue by using the
up/down arrow keys.
>Select a free UHF channel on your TV set in the range between 21 and 69.
> Finally, use the numeric keypad to enter the new output transmission channel in
your receiver’s memory.
The receiver will now transmit the signal on the UHF channel shown in the display.
Should you still experience interference on the channel selected, please repeat the
procedure until you find a suitable channel, free from interference.
10
bed_anl_DigiCom1A-1plus-englisch.qxd 11.06.01 10:02 Seite 10

>Once you have found a UHF channel with optimal quality, please remember to enter it
into the memory of your TV set.
You can now select further settings in the Audio/Video settings menu, or you can
press the Menu key to return to normal operation. The selected setting will be auto-
matically stored in memory when you exit the menu.
> If your TV set is only equipped with an automatic channel scan, select any UHF chan-
nel on your receiver, then start the automatic scan run on your TV set. If necessary,
repeat this procedure until you find a suitable output/transmission channel (as descri-
bed above), and store the selected channel in your TV set’s memory.
It may be necessary to finish off with some fine tuning of the channel on the TV set.
4.5 Video Cassette Recorders (VCR)
dConnect the video cassette recorder to the SCART connection marked VCR on your
receiver. When the video player is set to PLAY, it will send a switching signal to the
receiver, which will transmit the video player signal to the TV set automatically.
If your video recorder is not equipped to provide this switching signal, set your recei-
ver to the external input AV1, using the EXTERNAL key on your remote control.
Pressing this key again will take you back into normal operating mode.
4.5.1 Super VHS Video Cassette Recorders
If you have a Super VHS video recorder, you can use this to make recordings in Super VHS
quality through your DVB receiver. In order to achieve this, make all the necessary settings
as described in 5.3 (Audio/Video Settings).
Note: this setting applies to both the TV and VCR SCART connections of your receiver.
6 Amplifier
4.6.1 Analogue
In order to achieve the best possible sound quality, the receiver can be connected to a hi-fi
amplifier. Use a suitable cable to connect the cinch outputs Audio R and Audio L of the
receiver with an input connection of your hi-fi amplifier (use either CD or AUX inputs, the
Phono connection is not suitable).
4.6.2 Digital
Should your amplifier be equipped with an appropriate electrical or optical input, you may
connect the AUDIO OUT DIGITAL electric resp. the AUDIO OUT DIGITAL optical
connectors with the appropriate inputs of your amplifier.
Sampling rates of 16, 22.05, 24, 32, 44.1 and 48 kHz are available.
Where broadcast, the Dolby Digital signal (AC3) is also available at this ouput.
4.7 Serial Interface RS 232
The RS 232 interface can be used to update the operating software, and in order to pre-pro-
gramme the receiver via a PC.
11
bed_anl_DigiCom1A-1plus-englisch.qxd 11.06.01 10:02 Seite 11

5 Installation
Now that you have made all the necessary connections to and from your receiver, and have
switched it on, you may, if necessary resp. if you wish, optimise the operation of the receiver.
5.1 OSD Language
This menu heading gives you the opportunity of selecting a language of your choice, in
which the menus will be displayed. The receiver is given a default setting of German in the
factory. You have a choice of German, English, French, Italian, Turkish, Norwegian, Finnish,
Danish, Swedish, Portuguese and Spanish.
In order to change the OSD language, please follow these steps:
> Use the Menu key to select the Main Menu.
>Select the entry OSD Language (OSD-Sprache), marking it by using the up/down
arrow keys.
>Confirm by selecting OK
The sub-menu OSD Language (OSD-Sprache) will be displayed
> Select the preferred language by means of the up/down arrow keys. Use the
up/down arrow keys to move the marker by one line at a time, while the
left/right arrow keys are used to scroll to the previous or the following page res-
pectively.
> Press OK to store the selected language.
> Press Back to return to the Main Menu.
5.2 Basic Settings
In order to gain the optimal benefit from your DVB receiver, you can still set several individu-
al preferences.
> Press the Menu key to call up the Main Menu display.
>Use the up/down arrow keys to mark the entry Settings.
> Press OK to confirm this selection
The sub-menu Settings will be displayed.
12
bed_anl_DigiCom1A-1plus-englisch.qxd 11.06.01 10:02 Seite 12

>Use the up/down arrow keys to mark the entry Basic Settings.
> Press OK to confirm this selection
The sub-menu Basic Settings will be displayed.
> You can use the up/down arrow keys to move the marker within the menu, and to
change the individual positions as stated. When selecting a menu item, please also
note any additional screen notices.
The following settings can be made:
Parental lock:
Your receiver is provided with a security circuit to prevent unauthorised use by children. Any
programmes whose reception you have blocked as per points 7.3 and 7.4 can only be recei-
ved after a four-digit PIN is entered. You can enable or disable the parental lock facility by
pressing the OK key while this entry is marked.
Time difference GMT (hours)
Your receiver is provided with an internal clock. This is synchronised to Greenwich Mean
Time by means of satellite signals. If you do not live in the GMT time zone, you must correct
the time display with the aid of the OK key, to correspond to your local time. In Germany,
standard time is GMT + 1 hour, and Daylight Savings Time is GMT + 2 hours. When the
receiver is in stand-by mode, the time is shown on the receiver display.
Country
This function provides an automatic change-over between standard (winter) time and day-
light savings (summer) time. Mark the entry Country to select your home country, and con-
firm by pressing the OK key.
As this information is currently not broadcast by all programme providers, you should initially
retain the default entry None for this setting.
> Press the key Back to return to the menu Settings, or press the Menu key to
return to normal operation. All settings selected will be automatically stored.
Remote control code
Use the OK key in order to decide whether your receiver should be allocated tp the remote
control option SAT1 or SAT2.
Please Note!!
Note that, if you change the remote control option in this menu, the remote control itself must
also be set to the new option.
> Press the Back key in order to return to the Settings menu, or press MENU in
order to return to normal operation. All settings selected will be automatically stored.
13
bed_anl_DigiCom1A-1plus-englisch.qxd 11.06.01 10:02 Seite 13

Search/scan mode
When you are on this line of the menu, decide by means of the OK key whether a program-
me search (see Point 7.7 of this instruction manual) should include only free-to-air or all
(free-to-air and encoded/scrambled) channels.
5.3 Audio/video Settings
In order to further optimise the operation of your receiver in conjunction with your TV set, you
can make further selections in the Audio/Video settings menu.
>Press the Menu key for the Main Menu to be displayed.
> Use the up/down arrow keys to highlight the entry Settings.
> Confirm this selection by pressing the OK key.
The sub-menu Settings will be displayed.
> Now highlight the entry Audio/Video Settings, using the up/down arrow keys.
>Confirm by pressing OK
The sub-menu Audio/Video Settings will be displayed
> Use the up/down arrow keys to move the marker (highlighted entry) within the
menu, and to change the individual positions as indicated. When selecting an option,
please also note any additional on-screen notices.
The following selections are possible:
Picture format TV Set:
Use the OK key to select either the 4:3(standard) or 16:9(widescreen) picture format, in
accordance with the features of your TV set. This function automatically adjusts the picture
format to the specifications of your TV set.
Sound (Audio signal)
Use the OK key to select your preferred language. Where a programme is broadcast with
several language soundtracks, this feature will automatically select your preferred language,
if available.
UHF Output Channel
See Point 4.4
14
bed_anl_DigiCom1A-1plus-englisch.qxd 11.06.01 10:02 Seite 14

SCART Mode
Use the OK key to select either FBAS, RGB or S-VHS, in accordance with the specificati-
ons of your TV set. For standard equipment retain the default setting RGB.
Sub-titles
Your DVB receiver has the facility to display sub-titles. Provided the function Sub-titles has
been enabled, and the preferred language selected in terms of the Audio signal selection is
available, the sub-titles will be superimposed on the picture automatically. If the function has
not been enabled, it can be set manually, Sub-titles are indicated by the symbol in the
information display. Please also refer to Point 6.11 in this instruction manual.
Dolby Digital (AC3)
A number of movies are broadcast in Dolby Digital sound format. This will be shown on scre-
en, as the Dolby logo will be displayed in the information window once the programme
has been selected. Where broadcast, and if you are equipped with a Dolby Digital 5.1 chan-
nel amplifier, you can enjoy the appropriate movies in full 5.1 Dolby Surround Sound.
All you need to do to anjoy this feature is to connect the Audio Out Digital connection of you
DVB receiver (see Point 4.6.2 above) to the digital input of your Dolby Digital 5.1 channel
amplifier.
Where a programme is broadcast in Dolby Digital Sound, the Dolby logo will be displayed in
the information window on screen as soon as the programme is selected. If the option Dolby
Digital (AC3) has been selected in the relevant menu, these broadcasts will automatically be
reproduced in Dolby Digital format.
If the AC3 function has not been selected previously, Dolby Digital Sound can also be selec-
ted manually. Note Point 6.4.1 of the instruction manual for this facility.
5.4 Adjustments for the External Unit
Once you have made all the individual selections, to make the receiver conform to your pre-
ferences, it may still be necessary to make some adjustments for the receiver to work opti-
mally with your antenna/satellite dish. The default factory setting is pre-programmed for
reception of ASTRA and EUTELSAT broadcasts by means of a universal LNB (see Glossary
at end for technical terms). Once the receiver has been connected to an external reception
unit and switched on, these programmes can be received without any further adjustments.
Should you also wish to receive signals from other satellites, or if you have a different type of
LNB, you can make the following adjustments in your receiver to provide for these program-
mes:
> Press the Menu key to display the Main Menu.
>Use the up/down arrow keys to select the entry Settings.
> Confirm by pressing the OK key.
The menu Settings will be displayed.
15
bed_anl_DigiCom1A-1plus-englisch.qxd 11.06.01 10:02 Seite 15

>Now use the up/down arrow keys to select the entry LNB Settings.
Confirm by pressing the OK key.
The menu LNB Settings will be displayed.
The following selections can be made in this sub-menu:
5.4.1 Switching DiSEqC on or off
DiSEqC (Digital Satellite Equipment Control) is a digital signal that can control the functions
of DiSEqC-compatible components via the antenna connection.
If your external installation features DiSEqC components, you should enable the DiSEqC
control function:
> When this entry is highlighted, use the OK key to switch the function DiSEqC on or
off.
5.4.2 Adjusting the Switching Matrix and LNB Properties
The menu reflects the four switching criteria of the DiSEqC control.
Your receiver is pre-programmed to receive ASTRA broadcasts on switch setting A/A, and
EUTELSAT signals on setting B/A of a Multiswitch. Should the switching matrix of your exter-
nal receiving unit be set up differently, or should you wish to receive satellite signals other
than those mentioned, you can adjust the receiver settings as follows:
> Use the up/down arrow keys to select the DiSEqC switch position (1-4) that you
wish to use for allocation to a satellite (e.g. A/B 3 No Satellite), and highlight the
appropriate entry in blue.
> Press the OK key to confirm.
A list of several satellites will be displayed, from which you can make your selection.
> Use the up/down arrow keys to select the appropriate satellite.
Pressing the up/down arrow keys will move the marker by one line at a time, up
or down, while the left/right arrow keys will take you to the previous or following
pages respectively.
Should the satellite you are looking for not be included in the list, please select one of
the spare settings, which are marked User 1 to User 15.
>Confirm by pressing the OK key.
16
bed_anl_DigiCom1A-1plus-englisch.qxd 11.06.01 10:02 Seite 16

The highlighted entry will now be inserted in the menu >Settings>LNB at the pre-
viously selected position.
In this way, you can continue to customise the Menu>Settings>LNB until all the informati-
on in this menu corresponds to that of your receiving unit. For those switching criteria you do
not require you should select the setting No Satellite.
5.4.3 Additional Settings
Now that the switching matrix of your DVB receiver has been adjusted to conform to your
external reception equipment, you should also check on the other settings for your receiving
equipment, and adjust the settings where necessary.
> Use the left/right arrow keys to mark the entry LNB Test.
> Using the up/down arrow keys to move around the field LNB Test, select the
satellite position (1-4) that you wish to adjust resp. check on; mark the entry Pro-
ceed in blue.
> Confirm by pressing OK
The menu >LNB>Test will now be displayed, together with the DiSEqC setting sel-
ected (e.g. A/A 1).
The following settings can be made:
LOF low band
LOF (local oscillator frequency) is the frequency used by the LNB to convert the frequency
received into the so-called 1st Intermediate Frequency, which can then be utilised by the
receiver. So-called universal LNBs utilise 2 LOFs in order to cover the whole frequency
range of 10.7 to 11.8 GHz (low band) and 11.7 to 12.75 GHz (high band). Using the numeric
key pad of your remote control, enter here the LOF frequency corresponding to the low band
of your LNB.
LOF high band
As above - using the numeric key pad of your remote control, enter here the LOF frequency
corresponding to the high band of your LNB.
Switchover LOF low/high
Use the numeric key pad of your remote control to enter the frequency at which your LNB
switches from low band to high band.
Transponder Test
The following points of this menu should only be entered if you want to test a satellite signal
by means of a self-generated satellite (User 1 to 15).
Transponder frequency
Use the numeric key pad to enter a frequency at which digital programmes are broad-
cast.
17
bed_anl_DigiCom1A-1plus-englisch.qxd 11.06.01 10:02 Seite 17

Polarisation
Use the OK key to enter the appropriate polarisation plane (horizontal or vertical) on which
the selected programme is broadcast.
Symbol rate
The symbol rate is an indication of the volume of data being transmitted per second. A typi-
cal rate might be 27000, indicating that 27000 symbols per second are being transmitted.
Use the numeric key pad to enter the appropriate symbol rate.
FEC Rate
The FEC function adjusts error correction to the requirements of the selected transponder.
Use the OK key to enter the appropriate FEC. This can be 1/2, 2/3, 3/4, 5/6, 6/7 or 7/8.
If the FEC rate is not known, use the Auto setting.
Signal
This line will indicate the signal strength, provided the details of the transponder have been
entered correctly.
Red bar: poor reception, digital reception not possible
Yellow bar: good reception
Green bar: excellent reception
6 Operation
6.1 Switching on and off
>Use the key On/standby on the receiver or on the remote control to switch the
receiver on.
> Pressing the same key on the receiver or on the remote control again will switch the
receiver off again.
> The receiver is now in standby mode, the display on the receiver will now show the
time.
If the time is not shown, this must still be acquired by the receiver. In Germany, it is
sufficient to switch the receiver on, and to select Channel 2 (ZDF) of the public servi-
ce broadcast system for approx. 1 minute, for the time to be acquired automatically.
6.2 Programme Selection
6.2.1 Using the Programme up/down keys
> Use the Programme (Channel) up/down keys either on the receiver front panel or
on the remote control to move up or down the list one channel at a time.
6.2.2 Using the Numeric Key Pad
Use the numeric key pad to enter the desired programme/channel number directly:
For example:
1Programme/channel 1
1, followed by 4Programme/channel 14
2, followed by 3, followed by 4Programme/channel 234
When entering programme numbers consisting of more than one digit, you have about 3
seconds after pressing one digit to enter the next digit, in order to complete the entry in such
a way that the receiver recognises all digits as part of one selection.
If you are entering a programme number with only one or two digits, you can speed up the
selection process by pressing OK after entering the last digit.
18
bed_anl_DigiCom1A-1plus-englisch.qxd 11.06.01 10:02 Seite 18

6.2.3 Using the Programme List
> Press the key OK.
A list of programmes will now be displayed.
If the receiver is in TV mode, only TV programmes will be shown, and in Radio mode only
radio programmes will be displayed. The programme currently selected is highlighted in red.
> You can now proceed to mark the desired programme in blue by using the up/down
arrow keys.
>Press the OK key, and the desired programme will be shown.
> Use the up/down arrow keys to move up or down the programme list one line at
a time.
> Use the left/right arrow keys to move forward or back one page at a time.
6.2.4 Selecting blocked programmes
If a programme is selected that is subject to parental lock, the words PIN Number will
appear on the screen.
> Use the numeric key pad to enter your PIN number.
The desired programme can now be viewed.
In order to make this function easy to use, the PIN number needs to be entered only once
during each operational phase. The parental lock feature is only activated again next time
the receiver is switched on.
6.2.5 Information (Info) Box
Every time the programme is changed, an info box will be displayed temporarily, showing the
programme number and name. In addition, any special programme features will be shown,
e.g. TxT for video text, 16/9 for a 16/9 widescreen broadcast, A/B for various audio channels
(e.g. movies with several language soundtracks, or various radio programmes), the Dolby
symbol for Dolby Digital broadcasts, for encoded programmes or the symbol
for sub-titles.
6.3 Adjusting sound volume
You can adjust the volume of your receiver. This facilitates use of the receiver, as it means
you have all important functions combined in one remote control, and will have to revert to
the remote control of your TV set only very rarely. Whenever the receiver is switched on, the
volume setting used last will be set again.
> Use the keys Volume + to increase the sound volume, and Volume - to reduce the
volume.
> Press the key Sound on/Off to mute the sound. Repeated pressing of this key will
restore the sound.
19
bed_anl_DigiCom1A-1plus-englisch.qxd 11.06.01 10:02 Seite 19
Other manuals for EUROKLASSIK 1
2
Table of contents
Other TechniSat TV Receiver manuals

TechniSat
TechniSat Digit ISIO S2 Instruction manual

TechniSat
TechniSat TechniStar K2 ISIO User manual

TechniSat
TechniSat DIGIT ISIO S Instruction manual

TechniSat
TechniSat DigiCom 1 User manual

TechniSat
TechniSat TECHNISTAR K4 ISIO Reference guide

TechniSat
TechniSat DIGIT ISIO STC Instruction manual

TechniSat
TechniSat ASTRASTAR AX 1 User manual

TechniSat
TechniSat DigitMod S1 User manual

TechniSat
TechniSat TechniStar S2 Instruction manual

TechniSat
TechniSat DigiCorder HD S2X User manual