Strong SRT 5015 User manual

User Manual
Digital Terrestrial Receiver SRT 5005/5010/5015
www.strongsat.com

1.0 Safety Instructions 3
2.0 Features & Accessories 4
3.0 Safety Precautions 5
4.0 Storage 5
5.0 Equipment Set-up 5
6.0 Connection 6
6.1 Connecting to Terrestrial Antenna 6
6.2 Connecting to TV & VCR 6
6.3 Connecting to Digital Audio Amplifier 7
6.4 Connecting to PC 7
7.0 Your Receiver 7
7.1 Front Panel 7
7.2 Rear Panel 8
7.3 Remote Control Unit 9
8.0 First Time Installation 10
9.0 Main Menu 12
9.1 Channel Organiser 12
9.2 Channel Search 14
9.3 Installation 27
9.4 Timer 28
9.5 Game 29
10.0 Other operations 31
10.1 Mosaic 31
10.2 EPG function 32
10.3 Teletext function 34
10.4 Information 35
A.1 Trouble Shooting 36
A.2 Specifications 38
A.3 Glossary of terms 40
2
SRT 5005-15 ENG 1/24/06 3:41 PM Page 2

1.0 Safety Instructions
DO NOT INSTALL YOUR RECEIVER:
In a closed or poorly ventilated cabinet;
Directly on top of or under any another equipment;
On a surface which might obstruct the ventilation slots.
DO NOT EXPOSE THE RECEIVER OR ITS ACCESSORIES:
To direct sunlight or near any other equipment that generates heat;
To rain or intense moisture;
To any shock which may cause permanent damage to your receiver;
To any magnetic objects, such as loudspeakers, transformers, etc.;
To intense vibration;
Never open the cover. It is dangerous to touch the inside of the receiver due to high
voltage currents and possible electrical hazards. Your warranty will be void if the receiver
has been opened.
When the receiver is not used for a long period of time, you should unplug the power cord
from the wall socket.
Do not use a damaged power cord. It may cause a fire or an electrical shock.
Do not touch a power cord with wet hands. It may cause an electric shock.
Place the receiver in a well-ventilated environment.
When you are connecting the cables, be sure that the receiver is disconnected from
the mains supply voltage.
Do not use your receiver in a humid environment.
Make sure you read this user manual before installing your receiver.
HOW TO USE THIS MANUAL
This manual provides complete instructions for installing and using this receiver.
The following symbols will serve as follow.
Warning Indicates warning information.
Tips Indicates any other additional important or helpful information.
MENU Represents a button on the remote control or the receiver. (Bold Character)
Move to Represents a menu item within a window. (Italic Character)
PART 1 English
3
SRT 5005-15 ENG 1/24/06 3:41 PM Page 3

2.0 Features & Accessories
SRT 5005/ 5010/ 5015 Digital Terrestrial Receiver:
Multi norm UHF modulator Ch 21-69 (Pal BG-I-DK-MN)
For all digital Free-To-Air TV and Radio programmes (with outdoor- or indoor terrestrial antenna) 1
DVB-T compliant, Digital UHF/ VHF Tuner with Loop-through function
Set-up support for first time installation
Quick and easy installation & user-friendly menu
Multi-lingual support on screen Menu: English, German, French, Italian, Spanish,
Hungarian, Czech
Excellent Audio- and Video quality
Automatic and manual channel scan options
Support of active antenna by 5V output
Support of channel numbering defined by broadcaster
1000 channels memory capacity
Favorite list for TV and Radio
Parental lock function for menu, selectable per channel
Electronic Programme Guide (EPG) for present/ following event information
and up to 7 days for on screen programme information
3 Operation Modes (Digital TV, Digital Radio, Favourite)
Support of Teletext (OSD & UHF modulator)
Multi-lingual subtitling and audio track support
2-SCART Connectors (TV, VCR) 2
Build-in RF modulator 3
S/PDIF output for connection with a digital audio amplifier 2
S-VHS Connector 3
Mosaic function: 9 TV Channels in overview
Automatic clock change: summer/winter time 1
Timer programmable via EPG
NTSC/PAL identification and converting automatically and manually
Separate power switch
Future proof: Over Air Download of the software updates 1
RS 232 port for updating control software and additional services
1Subject of local broadcast condition
2Only in models SRT 5010 and SRT 5015
3Only in model SRT 5015
Accessories:
User’s Manual
1 Remote control unit
2 x Batteries (AAA type)
Note: The batteries should not be recharged, disassembled, electrically short-circuited or be mixed
or used with other types of batteries.
PART 1 English
4
SRT 5005-15 ENG 1/24/06 3:41 PM Page 4

3.0 Safety Precautions
To maintain your receiver’s optimum performance, you are advised to apply the following
safety precautions:
Read this manual carefully and make sure you fully understand the instructions given.
Refer all maintenance or servicing to suitably qualified personnel.
If you wish, you may clean your receiver with a soft lint-free cloth slightly made damp with a
mild soap solution, only after disconnecting from the mains voltage supply.
Do not use alcohol or ammonia based liquids to clean the receiver.
Do not open the receiver cover, as you will be exposed to a shock hazard.
Do not open the receiver cover this will void your warranty.
Do not place any objects on top of the receiver because this might prevent proper cooling
of the components inside.
Make sure no foreign objects fall through the ventilation slots because this could
cause fire or an electric shock.
Wait a few seconds after switching off the receiver before you move the receiver or
disconnect any equipment.
Please ensure that that the electrical power supply corresponds with the voltage on the
electrical identification plate at the back of the receiver.
It is a necessity that you only use an approved extension and compatible wiring that
is suitable for the electrical power consumption of the installed equipment.
If the receiver does not operate normally even after strictly following the instructions
in this user manual, it is recommended to consult your dealer.
4.0 Storage
Your receiver and its accessories are stored and delivered in a packaging, protective against electric
damage and moisture. When unpacking it, make sure that all the parts are included and keep
packaging away from children. When transporting the receiver from one place to another or if you are
returning it under warranty make sure you repack the receiver in its original packaging with its
accessories. Failing to comply with such packaging procedures could void your warranty.
5.0 Equipment Set-up
We recommend you to consult a professional installer to set up your equipment.
Otherwise, please follow the following these instructions carefully:
Refer to the user manual of your TV and your antenna.
Make sure that the SCART cable is in a good condition.
Make sure that the SCART cable connections are well shielded.
Make sure that the outdoor components of the antenna are in good condition.
PART 1 English
5
SRT 5005-15 ENG 1/24/06 3:41 PM Page 5
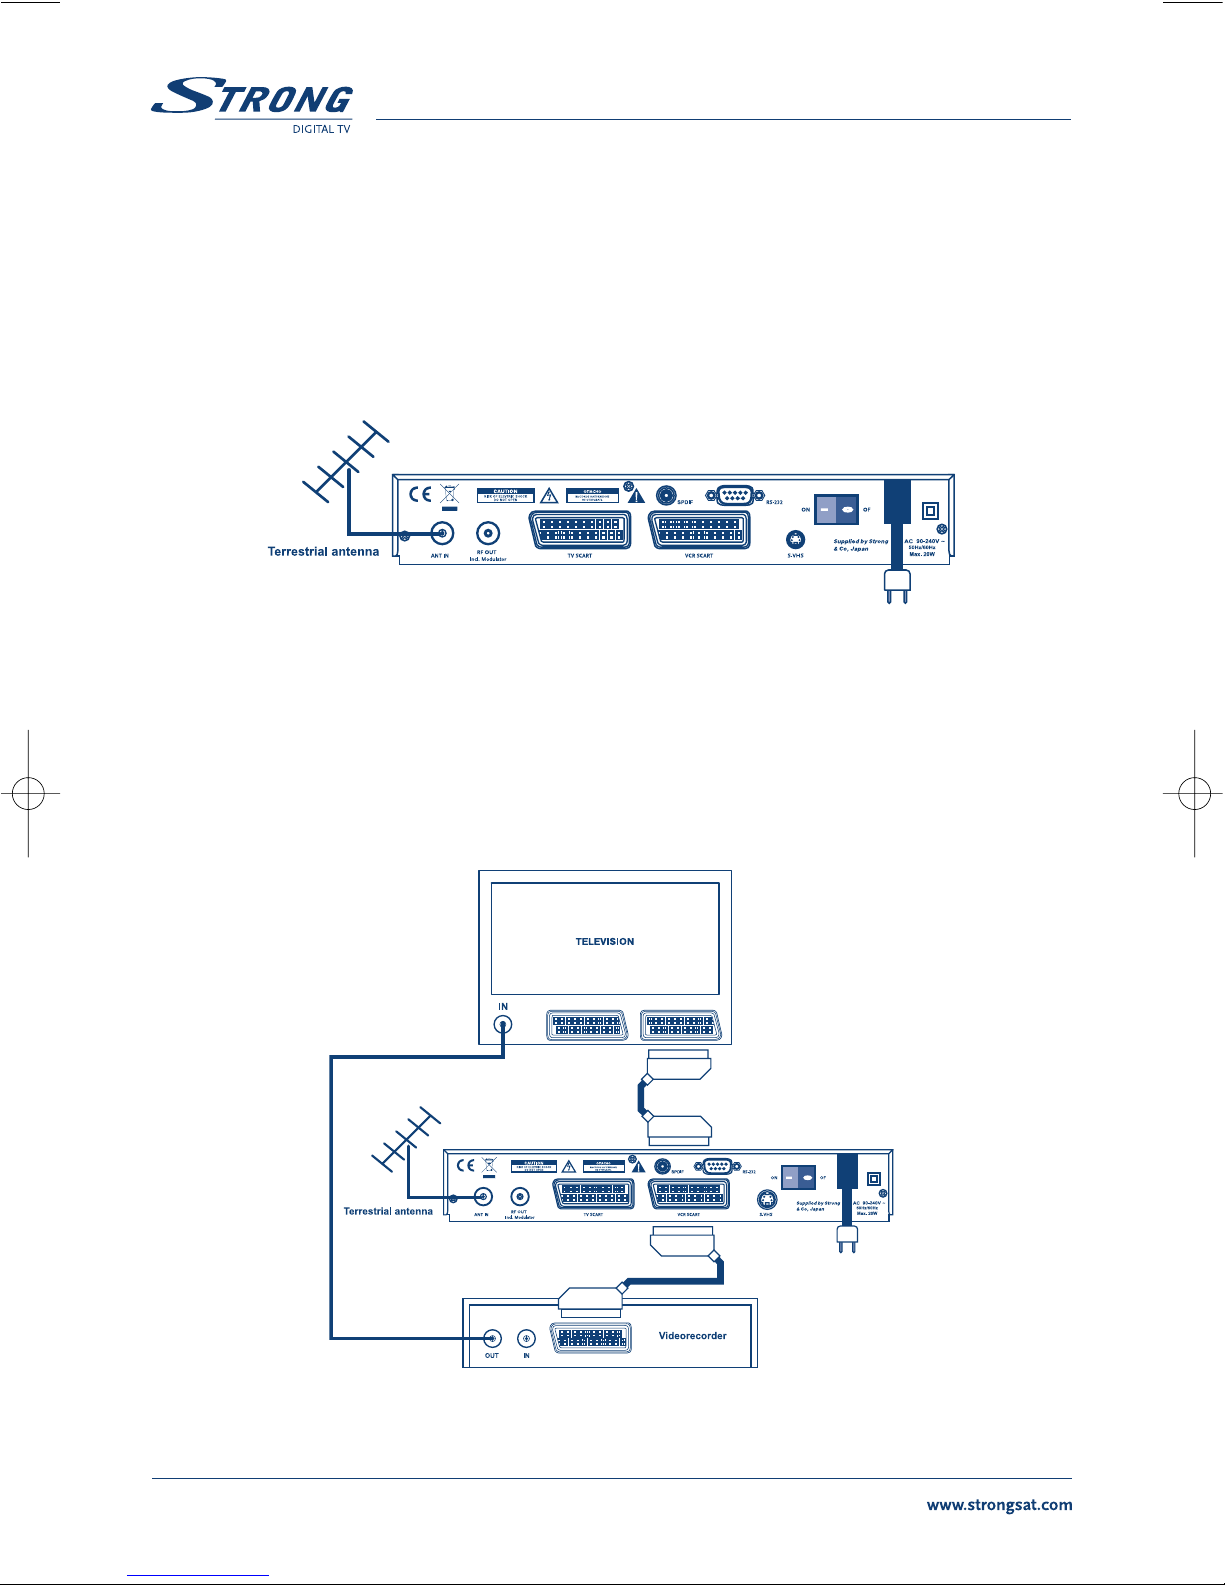
6.0 Connection
6.1 Connecting to Terrestrial Antenna
To receive the broadcast signal, the terrestrial antenna cable should be connected to the ANT IN
connector at the back of the receiver. (FIGURE 1)
FIGURE 1
6.2 Connecting to TV & VCR
The TV set should be connected with the receiver through a SCART cable. This terrestrial receiver may
also be operated together with a VCR using the loop through function. The loop-through function of
this terrestrial receiver is active when the receiver is powered off. As soon as the VCR is turned on,
its video and audio signals are looped through the terrestrial receiver. (FIGURE 2)
FIGURE 2
PART 1 English
6
SRT 5005-15 ENG 1/26/06 10:34 AM Page 6

6.3 Connecting to Digital Audio Amplifier
The Digital Audio Amplifier is connected with the receiver from the S/PDIF connector. (FIGURE 3)
FIGURE 3
6.4 Connecting to PC
The RS-232 connector of the receiver helps to connect to the PC using a serial cable.This serial cable
can be used to connect your PC with your receiver, and allows you to download new versions of
software to your receiver. (FIGURE 4)
FIGURE 4
7.0 Your Receiver
7.1 Front Panel
FIGURE 5. Front Panel
PART 1 English
7
SRT 5005-15 ENG 9/3/06 4:59 PM Page 7
1. Mode indicator
The RED light indicates that the receiver is in STAND-BY mode.
The GREEN light indicates that the receiver is in AWAKE mode.
2. 4 Digits display 1
In STAND-BY mode indicates current time.
In AWAKE mode indicates current channel number.
1Only in models SRT 5010 and SRT 5015
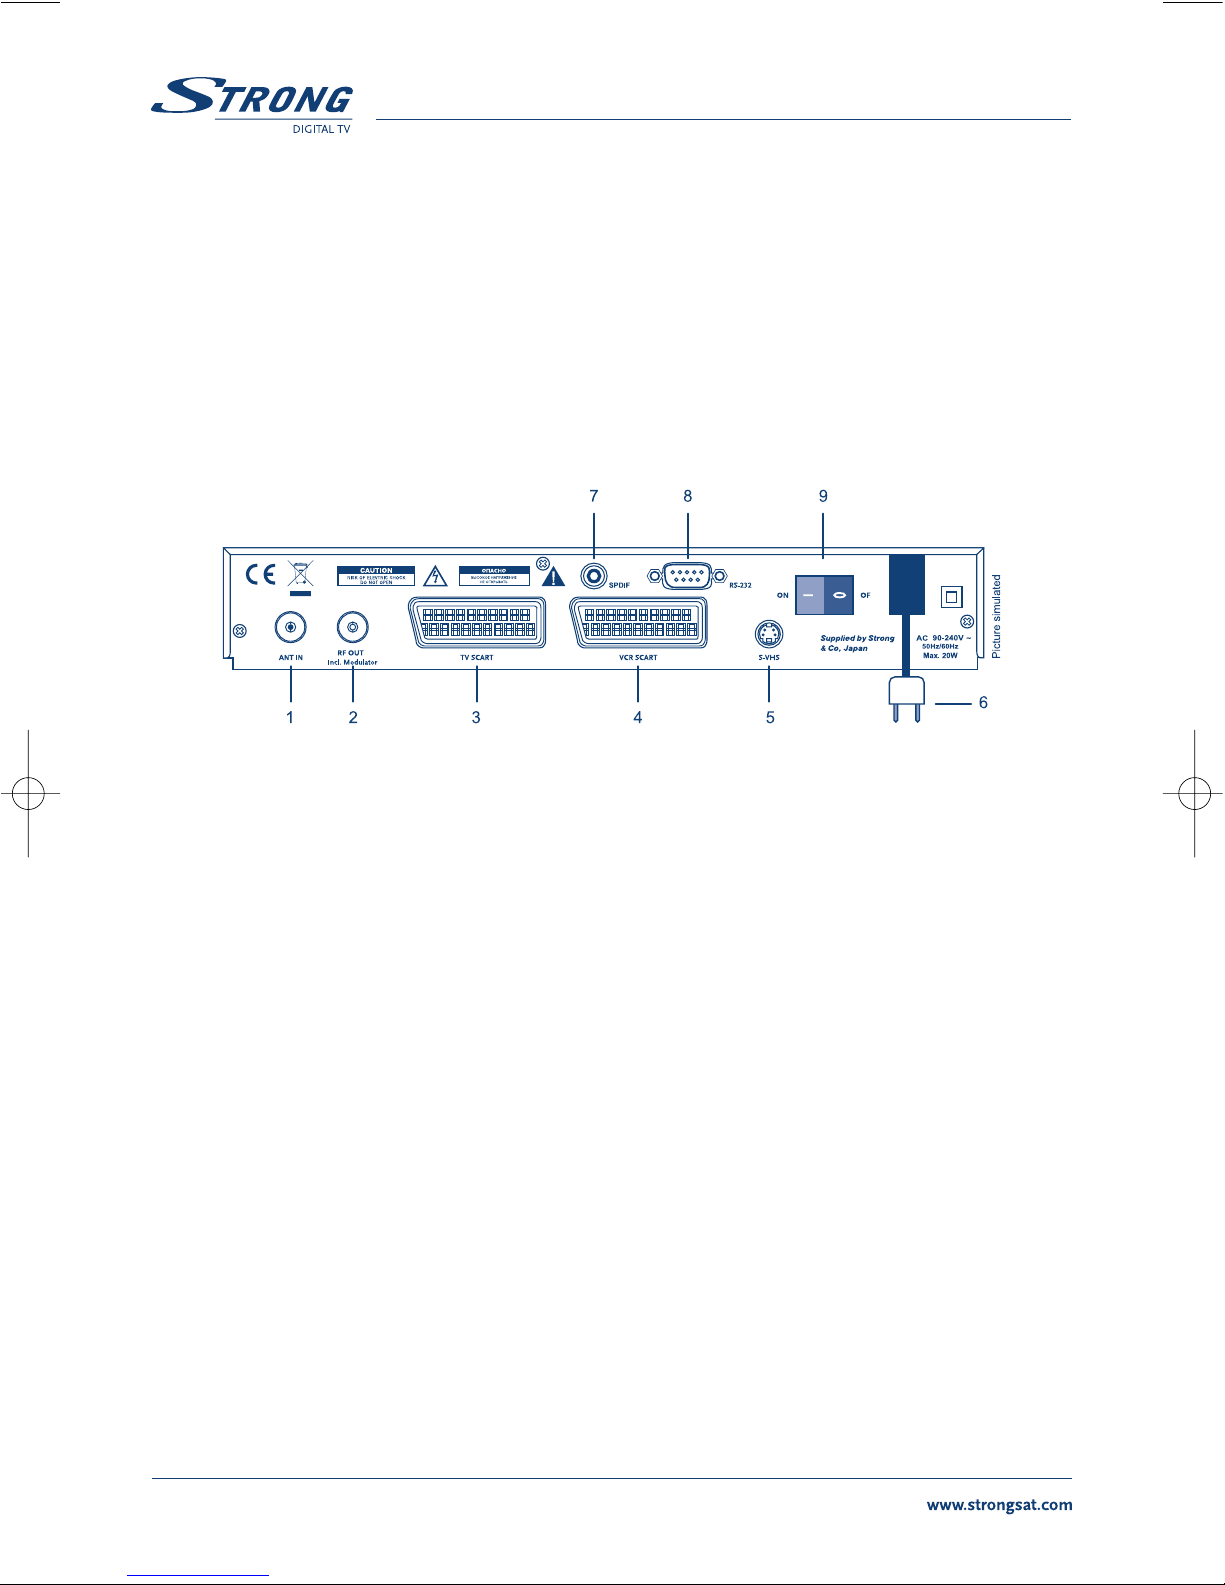
7.2 Rear Panel
FIGURE 6. Real Panel
1. ANT IN
Use to connect a general Aerial Antenna for receiving broadcasting signal.
2. To TV
This gives you the possibility to connect a TV set in order to receive analogue channels or to
an extra receiver. (Includes modulator output in the model SRT 5015).
3. TV SCART Connector
Use this connector to connect your receiver with your TV set using a SCART cable.
4. VCR SCART Connector 1
Use this connector to connect your receiver to your video recorder using a scart cable. Your
video signal will now be looped through the receiver and your video recorder to your TV set.
5. S-VHS 2
Use this connector to connect your receiver to your TV and VCR using S-Video cable for better
picture quality.
6. Power Cord
Your receiver requires a current of 90 ~ 240 V AC (Auto-selectable), 50 ~ 60 Hz +/-5%.
Make sure to check the power specification before connecting your receiver to the wall outlet.
7. S/PDIF Digital audio output 1
Use this coaxial output to connect your receiver to the input of your digital audio amplifier.
8. RS 232 Serial Port
This serial port can be used to connect your PC with your receiver, and allows you to
download new versions of software to your receiver.
9. Power ON/OFF Switch
1Only in models SRT 5010 and SRT 5015
2Only in model SRT 5015
PART 1 English
8
SRT 5005-15 ENG 1/26/06 10:34 AM Page 8

7.3 Remote Control Unit
C. AV
Toggle between TV and AV mode.
D. 0~9
Channel selection.
E. FAV
Toggle Favorite mode ON/OFF.
F. TV/R
Toggle between TV or RADIO mode.
G. MENU
Shows the main menu and exits from any level of menu
to view mode.
H. INFO
Shows information of the current channel.
I. EPG
Shows the EPG (Electronic Program Guide) during
No-menu state only.
J. EXIT
Exits from the menu or sub-menu and cancels
the progressing function if applicable.
K.
Menu Off: Change the current program to the
previous/next program.
Menu On: Moves the cursor up/down.
L.
Menu Off: Increases/decreases the volume level.
Menu On: Change the setting values in specific Menu item.
M. OK
Activates the highlighted menu item. Displays a channel list
according to TV/Radio Mode
N. V+ / V-
Use to increase or decrease the receiver volume level.
O. P+ /P-
Page up and down in menu list.
P. MOSAIC
Show pictures of 9 channels on the screen simultaneously
Q. PAUSE
Freeze/Resume picture.
R. AUDIO
Shows the list of available audio languages for the channel you are watching. In addition it
sets the current channel audio to stereo ((•)), left-mono ((• or right-mono •)).
PART 1 English
9
All features of the set-top box can be controlled with the remote
control unit.
A.
Turns the receiver On/Standby.
B.
Mutes audio output of the receiver.
FIGURE 7.
Remote Control Unit
SRT 5005-15 ENG 1/24/06 3:41 PM Page 9

S. EDIT
Program edit.
T. TEXT
Shows current service’s Teletext on OSD (On Screen Display).
U. SUB
Show the list of subtitled languages the current channel supports.
V. RECALL
Switches back to previous channel.
8.0 First Time Installation
Make sure that your terrestrial receiver correctly connected to your Television and a terrestrial antenna
and that the signal quality is good enough. Confirm that the power plug of the receiver is plugged into
the wall outlet. Turn on the receiver. The following picture is shown at the first time.
SCREEN 1
It is recommended that you perform the first time installation following Installation Wizard step by step. This
will help you easily achieve system configuration and channel installation. If you are a professional installer
then you can skip the wizard by pressing EXIT button and set-up the channels using the Channel Search menu.
Press UP/DOWN to choose your language, press OK to confirm. The preference menu will appear as below.
SCREEN 2
PART 1 English
10
SRT 5005-15 ENG 1/24/06 3:41 PM Page 10
Please select your Country,Antenna Power mode and Channel numbering. Press UP/DOWN to select
the items, press RIGHT/LEFT to change the value of the item.
If you choose BACK, It will go back to SCREEN 1.
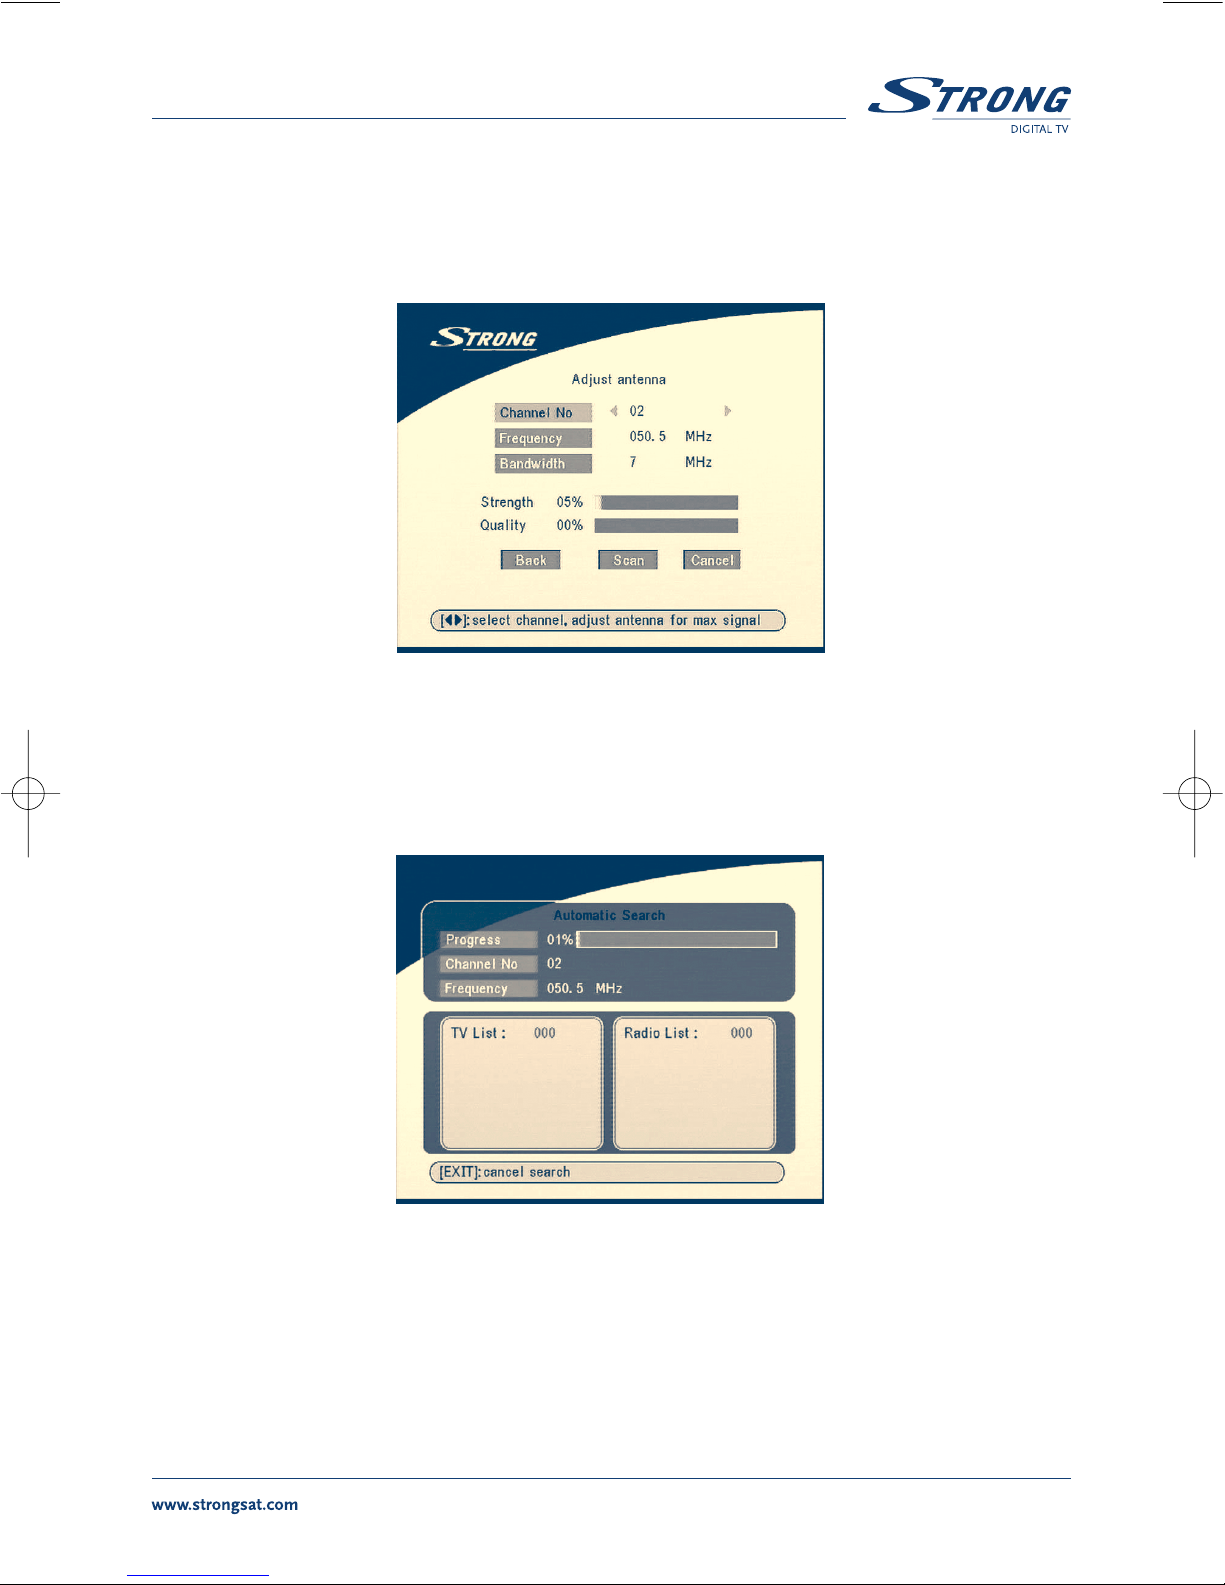
Press OK to confirm those setting and enter the Adjust antenna menu (shown as SCREEN3).
SCREEN 3
Press LEFT/RIGHT to select Channel No, adjust your antenna direction and position (if necessary)
to get maximum levels of the signal level and quality indicators. You can check with your dealer on
which channels digital terrestrial broadcast is available at your location.
Move cursor to Scan, press OK to confirm, The Automatic Search screen will appear as below.
SCREEN 4
Completed search, receiver will save services information automatically and exit to normal play state.
PART 1 English
11
SRT 5005-15 ENG 1/24/06 3:41 PM Page 11

9.0 Main Menu
All the important settings and features of your receiver can be operated in Main Menu. The Main Menu
consists of five sub-menus such as "Channel Organiser", "Channel Search", "Installation", "Timer", "Game".
With Menu off, press MENU key. The MAIN MENU screen will appear (SCREEN 5).
SCREEN 5
9.1 Channel Organiser
In MAIN MENU screen, press UP/DOWN to move the cursor to Channel Organiser, and then press OK
to enter the Channel Organiser menu.
SCREEN 6
The Channel Organiser menu consists of three sub-menus, which are “Edit TV Channel”, “Edit Radio
Channel” and “Sort”.
PART 1 English
12
SRT 5005-15 ENG 1/24/06 3:41 PM Page 12
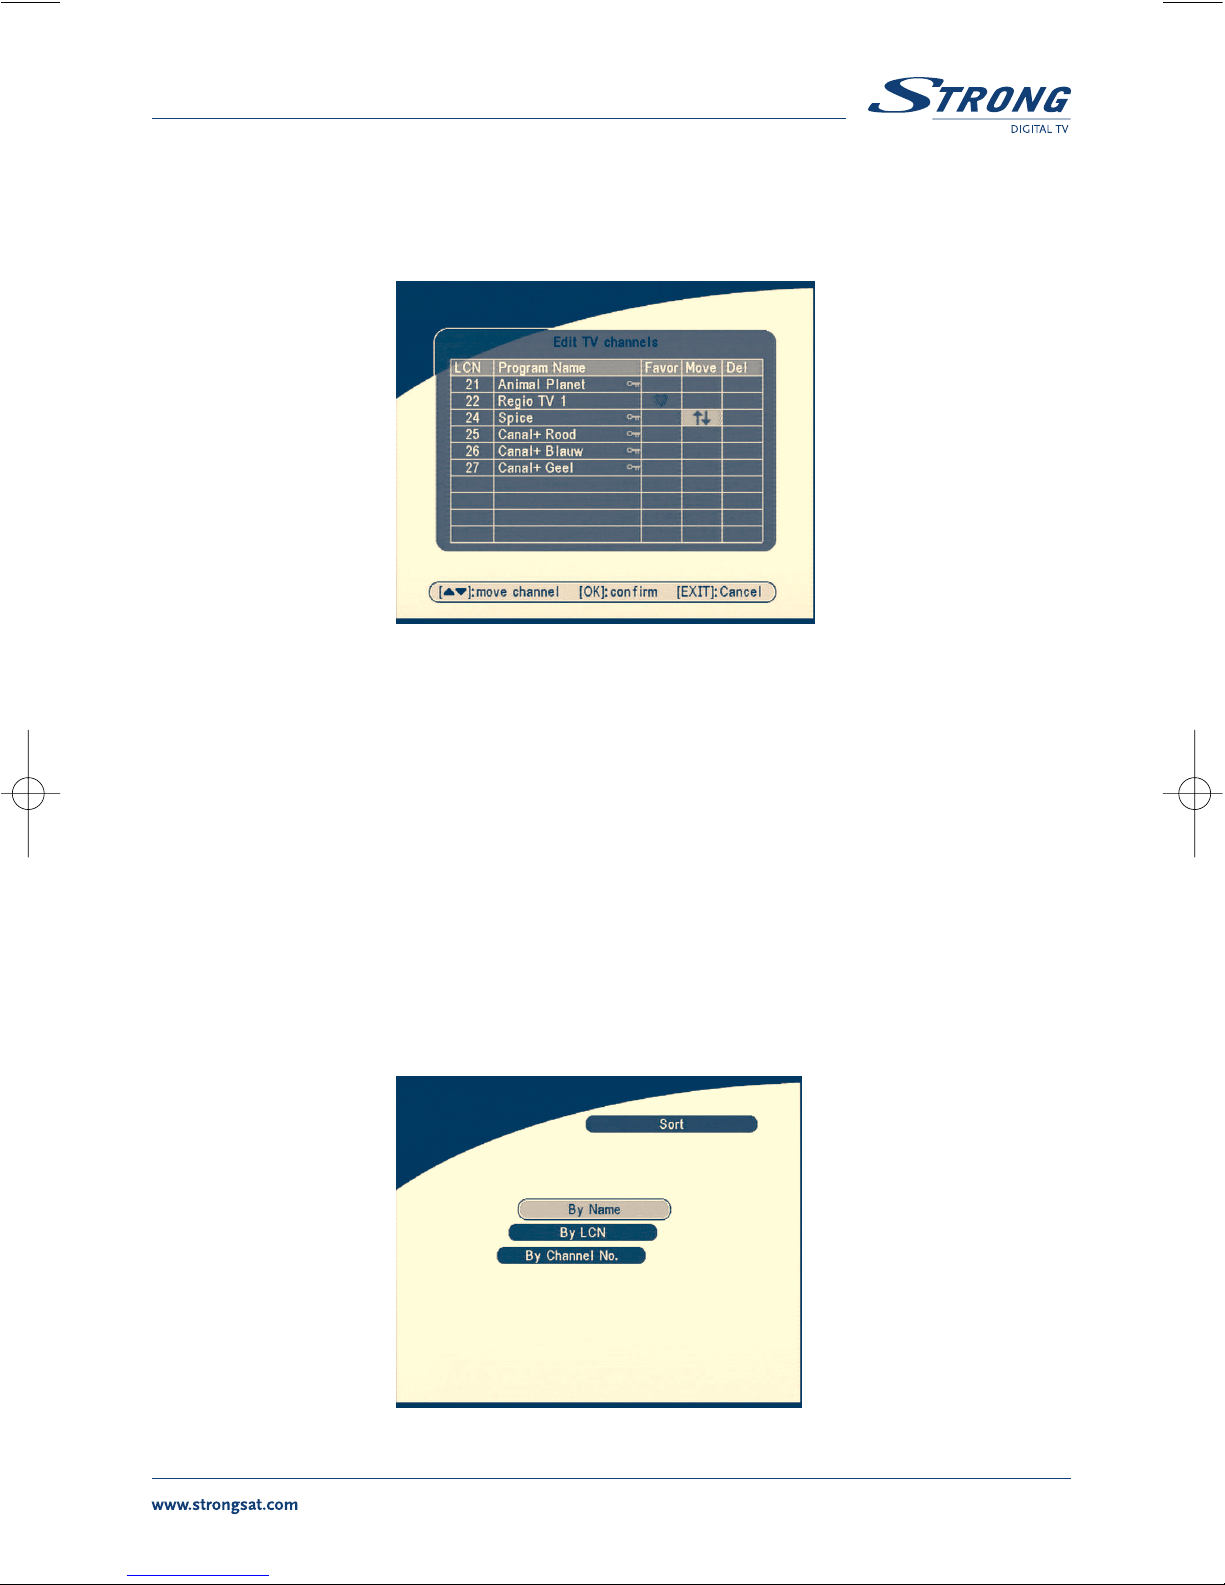
9.1.1 Edit TV channels
In this menu, you can set the favorite channels, change the order of channels and delete channels.
SCREEN 7
Press UP/DOWN keys to point focus of the menu to the channel of your selection.
Press LEFT/RIGHT keys to point focus of the menu to the column with the function, which you want to
apply to the selected channel.
When the focus is on column “Favor”, press the OK button to add selected channel to the Favourite list.
When the focus is on column “Move”, press the OK button to confirm selection of the channel, using UP/DOWN
buttons move channel to new location and press the OK button to confirm new location. Repeat this for every
channel that you want to move. When the focus is on column “Del”, press the OK button to mark the channel as
selected to be deleted from the list. To apply changes press the EXIT button and confirm channel deletion.
9.1.2 Edit Radio Channels
This menu is similar as to 9.1.1 “Edit TV Channels” description.
9.1.3 Sort
SCREEN 8
You can sort the order of the channel list by channel name, LCN (Logical Channel Number) or Channel Number.
PART 1 English
13
SRT 5005-15 ENG 1/24/06 3:41 PM Page 13

9.2 Channel Search
There are 2 items in the channel Search menu:
1. Automatic Search
2. Manual Search
SCREEN 9
9.2.1 Automatic Search
Press OK over the Automatic Search. A warning message will appear.
SCREEN 10
Press LEFT/RIGHT to move the cursor to OK and press OK to continue.
A message will appear. “Please Press LEFT/RIGHT to choose whether to erase your previous channel list”.
PART 1 English
14
SRT 5005-15 ENG 1/24/06 3:41 PM Page 14
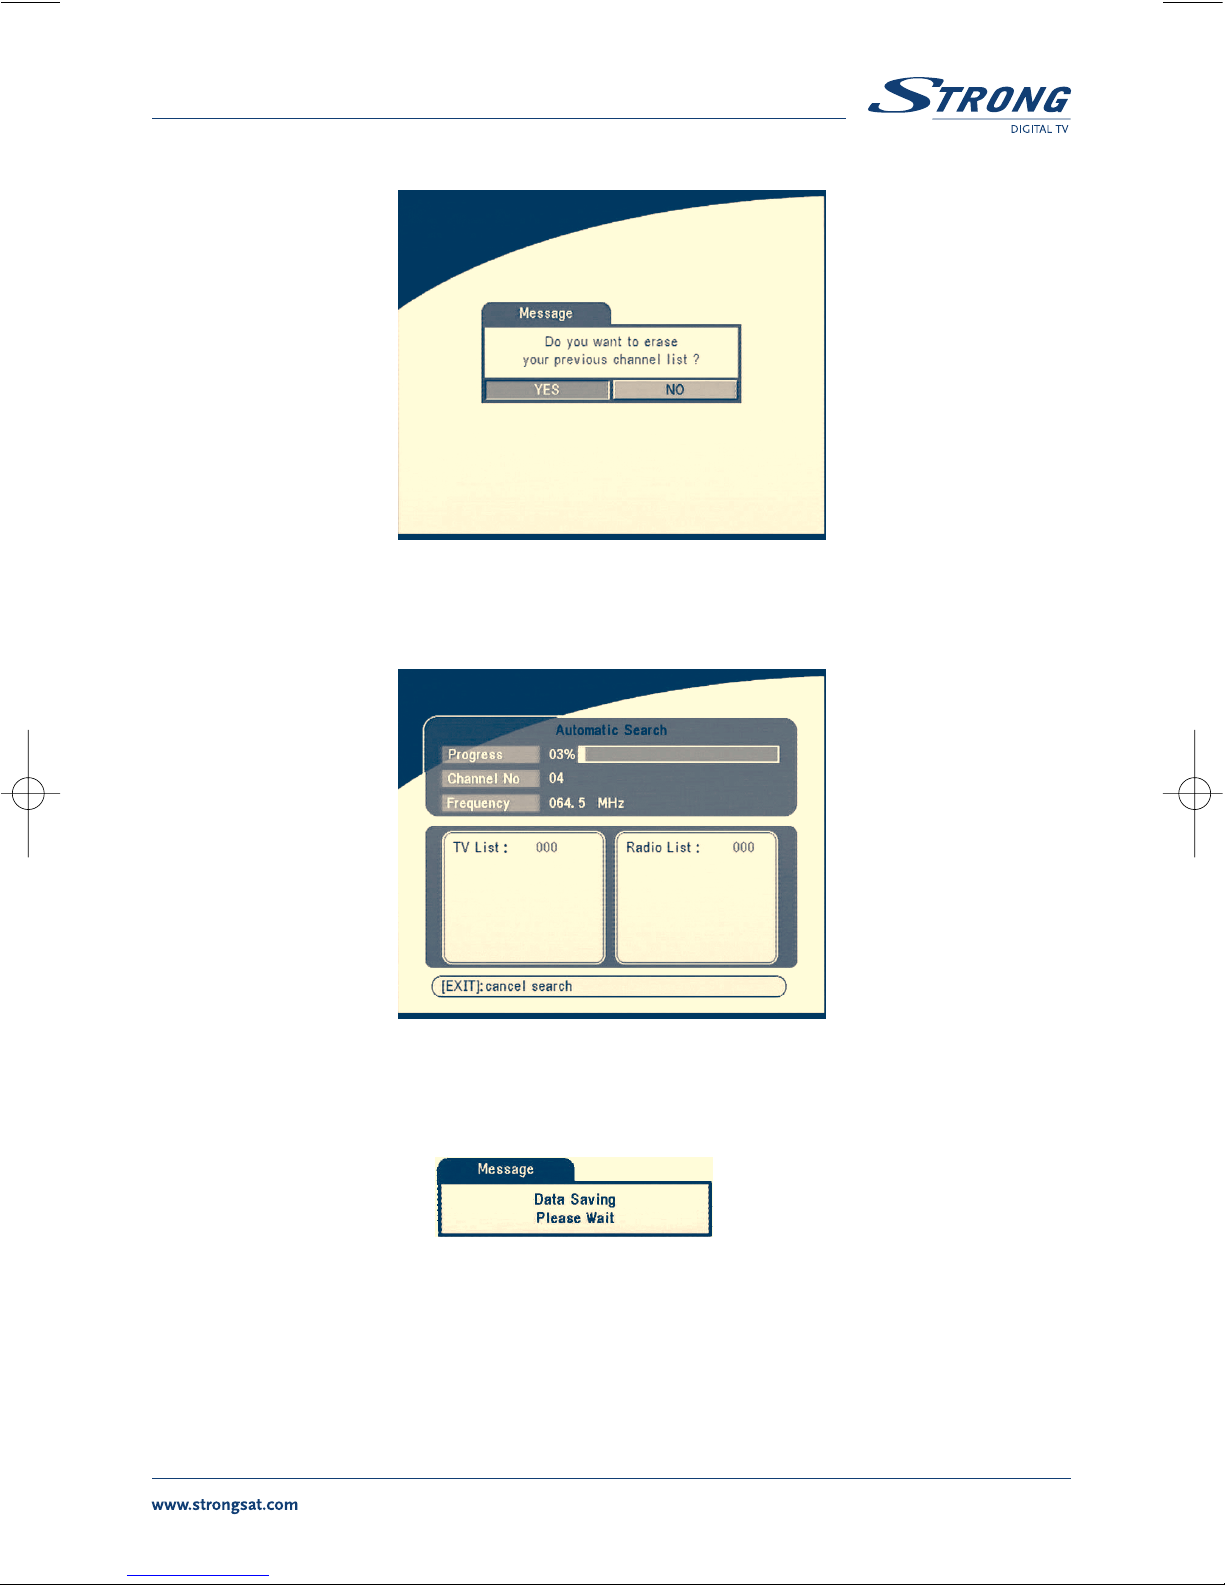
SCREEN 11
Then it will search for the programs automatically. If you want to cancel the channel search you may press
the EXIT button.
SCREEN 12
On completing the search, the receiver will save the services information automatically and exit
to normal play state.
SCREEN 13
PART 1 English
15
SRT 5005-15 ENG 1/24/06 3:41 PM Page 15

9.2.2 Manual Search
Press OK over the Manual Search, the Manual Search Screen will appear.
SCREEN 14
Press LEFT/RIGHT to choose channel No. or press numerical buttons to input channel No.
Or
Press UP/DOWN to move focus to Frequency item and enter frequency value using numerical buttons.
Press UP/DOWN to move focus to Bandwidth and choose bandwidth using LEFT/RIGHT buttons.
Check indicators of the signal level and quality to make sure that values are entered correctly.
Press UP/DOWN to move cursor to Search and press OK to search current channel.
If no service is installed, there will be a warning. Press any key to return.
SCREEN 15
Tips Different countries have different VHF/UHF frequencies plan. It is important
to choose the proper region.
9.3 Installation
9.3.1 System Setting
In this menu, you can configure the systems such as language, TV Settings, Country, Channel
Numbering, Antenna Power, Time Setting, and Factory Default.
PART 1 English
16
SRT 5005-15 ENG 1/24/06 3:41 PM Page 16

SCREEN 16
9.3.1.1 Language
You can change the language of the OSD and Audio.
Press UP/DOWN to select the OSD language or Audio language. Press OK/RIGHT to enter the
language list and Press UP/DOWN to select the language. Press OK to confirm.
SCREEN 17
PART 1 English
17
SRT 5005-15 ENG 1/24/06 3:41 PM Page 17

9.3.1.2 TV settings
You can set TV Standard, TV format, Video output and Modulator Settings.
SCREEN 18
TV Standard
The TV Standard Screen will appear as follows:
SCREEN 19
Press OK/RIGHT to select PAL or NTSC, press OK to confirm. If you don’t know which standard your
TV has, please select AUTO.
PART 1 English
18
SRT 5005-15 ENG 1/24/06 3:41 PM Page 18

TV format
The TV format Screen will appear as follows:
SCREEN 20
Press OK/RIGHT to select 4:3 or 16:9, press OK to confirm.
Video output
The Video output Screen will appear as follows:
SCREEN 21
Press OK/RIGHT to select CVBS/RGB or S-Video, press OK to confirm.
Warning! If RGB is selected > S-VHS output is switched OFF totally.
Note: S-Video option available in model SRT 5015 only.
PART 1 English
19
SRT 5005-15 ENG 1/24/06 3:41 PM Page 19

Modulator Settings (only for model SRT 5015)
The Modulator Settings Screen will appear as follows:
SCREEN 22
Press UP/DOWN to select RF Audio Mode or RF Channel. Use LEFT/RIGHT to set RF Audio Mode and
RF Channel. Press OK to confirm.
9.3.1.3 Country
SCREEN 23
Press OK/RIGHT to select your country in the country list, press OK to confirm. If your country is not
in the list then select Other. It will apply the most common frequency plan for European countries.
PART 1 English
20
SRT 5005-15 ENG 1/24/06 3:41 PM Page 20
Table of contents
Other Strong TV Receiver manuals

Strong
Strong SRT 5001 User manual

Strong
Strong SRT 55 User manual

Strong
Strong SRT 5000 User manual

Strong
Strong SRT 8105 ECO User manual

Strong
Strong SRT 8205 User manual

Strong
Strong PRIMA IV User manual

Strong
Strong SRT 8213 User manual

Strong
Strong SRT 8345 CI User manual

Strong
Strong SRT 5510 MHP User manual

Strong
Strong SRT 5020X User manual

Strong
Strong SRT 5405 User manual

Strong
Strong SRT 8109 User manual

Strong
Strong SRT 82 User manual

Strong
Strong SRT 7004 User manual

Strong
Strong SRT 8215 User manual

Strong
Strong SRT 80 User manual

Strong
Strong SRT 5428S User manual

Strong
Strong SRT 5001 ECO User manual

Strong
Strong SRT 3030 User manual

Strong
Strong SRT 5302 User manual


