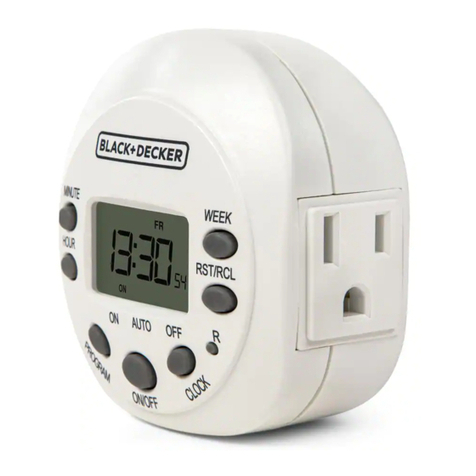
CFGROW GET06A-US Owner's manual

FAQ
1.How long is the warranty for this timer?
We offer 12-month limited warranty on this timer. if your
time is broken or any other problems, please email your
order number and describe the issue. we will deal with a
full refund or arrange a new replacement after
verification.
we believe what makes us different is not just the product
but also our outstanding customer service. we also
believe
the buyer and seller can achieve a win-win outcome
through
mutual effective communication.
2.What should I do if I am having trouble with setting up the
timer?
(eg:adjust to sunday.)
1.Install Setup
Press the reset button “R”. Then the screen will show the reset display,
as the picture shows below.
Tips:
2. Set the digital clock
a. Day Setting
While holding the
"CLOCK" button,
press the "WEEK"
button to adjust
the day you want. ”
b. Hour Setting
While holding the
“clock”button,
press the “Hour”
button to adjust the
Hour you want.
(eg:adjust to 8:30)
C. Minute setting
While holding the
“clock”button,
press the “MIN”
button to adjust the
minute you want.
(eg:adjust to 8:30)
d: Sec Setting
While holding the “clock”
button , press the
“DEL” button to adjust
the sec you want.
(eg: adjust to 08:30:20S.)
Note: Press the "MIN" and the "DEL" button at the same time, you can switch the AM&PM
12H/24 hours display mode, and when in 12-hour clock, the top left of the screen will
shows AM or PM.
3. Set the Timer
a: Press the "PROG" button,
you will see "1ON "shows on
he screen
(as the picture shows)
eg: If you want to set the first
group of "ON" time is
MO~FR 8:30
b: Press the "WEEK" button to
adjust the day you want the
timer "ON" for the group, as
the picture shows, the screen
shows MO~FR days
Note: The group will advance in the sequence
of : MO→TU→WE→TH→FR→SA→SU→MO
TH WE TH FR→SA SU→MO TU WE TH FR
SA→MO WE FR→TU TH SA→MO TU WE→
TH FR SA→MO TU WE TH FR SA SU
C. Press the “HOUR” button
to adjust the hour you want
the timer “ON” for the group.
Keep press the “HOUR”
>3S, The hour fast adjust.
d.Press the"MIN" buttonto adjust
theminute youwant thetimer
"ON"for thegroup.
(eg:wesetthe minutesis 30)
Note:Press the"MIN" buttonone time,
theminuteswilladd 1minute,
andpressthe"MIN" buttonmore
than3s,theminutes willadd rapidly.
cancel/ recover setting time.
(eg:we set the hours is 8)
pree the “DEL” button can
Note:Please don't forgettopress
the " WEEK" button to adjust the
day you want the timer off, thanks.
f.Continue to press the “PROG”,
you can set the other groups if
you need, you just need to
repeat the b to e steps to set
more timer groups.
Note: you can set up to 20
g. You can press “clock” button to
return the clock time when you
set the groups, and you also
can press “PROG” button go
back to set the timer group.
Note: You can press the “DEL”
button to cancel the or
restore the settings.
Please don’t set the overlappedON/OFF
time for the different timer groups!!!
CFGROW
Digital Timer Outlet
Model No.:GET06A-US
Safety Use & Care
Please read this manual .carefully before you set this timer.
DO NOT plug in any appliances that the load exceeds 1800W/15A.
DO NOT attempt to repair, disassemble or modify in any situation.
We designed this timer for indoor use, so please make sure the
timer is dry and far away from water.
1) If the screen is blank, please plug the timer into outlet
for 30 minutes to charge the internal battery first.
2) After reset the timer, all the programs & settings will
be deleted.
e.Follow the a, b, c steps, the time
"1ON" for the group is finished.
Press the " PROG" button agin,
the screen will shows "1OFF",
and please repeat the b, c,
d steps to set the
off time “1OFF”
for the group.

4. Manual Operation
Press “Model” button setting
the mode to Auto(Timer ).
5. Daylight saving Time(Summer time)
6.Anti-theft Random Function
Display d mode
Display d mode
Independent programming is possible to advance the next following
switching command at any given time and turn the timer "ON" or "OFF",
so that make your appliances working as you want.
After you press the " MODE" button, the screen of the timer will shows
below:
OFF: Always off (Timer function disabled, the outlet always turn off)
AUTO OFF: Auto mode (The outlet is turn off at the current time)
ON: Always on (Timer function disabled, the outlet always turn on)
ON AUTO: Auto mode (The outlet is turn on at the current time)
Note:
1.When the mode from OFF change to AUTO, the screen will
shows ”AUTO OFF”, and the outlet will turn off until the next
turn on time comes, the outlet auto turn on, then the timer will
works exactly as you programmed.
2.when the mode from ON change to AUTO, the screen will
shows “ON AUTO”,and the outlet will turn on until the next
off time comes, the outlet turn off, then the timer works
exaxctly as you programmed.
This function will adjust the current clock time of
the timer an hour ahead of time ti adapt to daylight
saving time.
a.Set the daylight saving time:
Press the “HOUR” and “MIN”
button at the same time, there
will has a “s”shows on the
screen. And the current clock
time will add be one hour ahead
of time.
b.Cancel daylight saving time:
Press the “HOUR” and “MIN”
button at the same time, the “S”
will disappear, and the clock
timewill move back one hour,
and the daylight saving time is
cancelled.
1.The timer can operate a plug-in appliance with
random ON/OFF while you are away from home, it can
simulate the scene of you are at home to give your
home a linedin impression. This function is especially
useful during you are not to home.
2.When the timer is set random mode, it will turn on and
off your appliance randomly for 10~42minutes
variation based on the turn on and off schedule you
set.
3.The random function can only working when the timer
is set finished, and the timer in auto mode.
Set Random Function:
a. Check and make sure the
program has been set, and
the mode is AUTO mode.
Note: If the timer is not in
AUTO mode, please
follow 4&5 section to
set it up.
b. Press the “WEEK”and the
“HOUR” button at the same
time, there will has a “R”
shows on the screen, and
the random mode will start.
Cancel the random function:
Press the “WEEK” and the
“HOUR” button again at the
same time, and the “R” will
disappear, and the random
function will be cancelled.
7.Countdown Function:
This function allow a plug-in appliance to turn on
and off with a countdown timer. The user can set the
duration time of the countdown(1sec to 99h 59min
59S).
1. Press the “WEEK” and “DEL”
button at the same time to set
the countdown time, the screen
will showing “d 0:00 00".
2. Press the “MODE” button to switch
the d and the d for the
countdown function.
(as the picture shows)
Note:
a. The d mode is the status of the
countdown funcntion turn on, after
the countdown time finished, the
mode will change to “AUTO OFF”
mode.
b.The d mode is the status of the
countdown funcntion turn off, after
the countdown time finished, the
mode will change to “ON AUTO” .
3.Set countdown time:
a. Press the “HOUR”, “MIN” and
“DEL” button to adjust the hour
minute, sec for countdown
time.
b. Press the “HOUR”, “MIN” and
“DEL” button for more 3s, the
hour ,minute or sec will add
rapidly.
c. Press the “WEEK” button can
cancel/recover the countdown
time setting.
4. Countdown Operation Manual
a. After the countdown time
setting finished, press the
“PROG” button to start the
countdown.
b. In countdown working status,
press the “PROG” can pause
or continue the countdown.
Note:1.If in d mode, the countdown
finished, the output will change
to off (AUTO OFF mode) .
2.If in d mode, the countdown
finished, the output will change
to ON (ON AUTO mode).
5. Cancel countdown mode:
You can cancel the countdown
at any time, press “WEEK” and
“DEL” button at the same time,
the screen will shows back to
clock time, the countdown mode
be cancelled.
ON
OFF
ON
OFF
OFF
ON
ON
OFF
OFF
Popular Timer manuals by other brands

Küchenprofi
Küchenprofi 4 TIME user guide
TFA
TFA Triple time XL instruction manual

Radio Shack
Radio Shack Multifunction LCD Stopwatch owner's manual
BEKA
BEKA BA577E manual
Velleman-Kit
Velleman-Kit High-Q K6200 Illustrated assembly manual
Prince Castle
Prince Castle Merlin II 740-T Series operating instructions
