CGOLDENWALL NDJ-5S User manual

User Manual
—— NDJ-1S-5S-8S-9S
Digital Viscometer

Contents
1. Operating Principles and Applications
2. Key Technical Indexes
3. Environmental Conditions
4. Structures and Installation
5. Operating Procedure
6. Panel Operation
7. Attentions
8. Appendix


1. Operating Principles and Applications
NDJ series digital viscometer (NDJ-1S-5S-8S-9S) is an
intelligent instrument employing 16-bit high performance single chip
micro processing technology. Different with the old method of gear
speed regulation, it uses stepping motor to ensure stable operation
based on set-up program. Torsion sensor drives rotor rotating in a
constant speed. When rotor encounters viscous resistance in the tested
liquid, after detecting and processing, the viscosity of the tested liquid
is shown on the screen.
This instrument features quick and easy operation, high precision
measurement, steady rotating speed, excellent anti-interference ability
and a wide range of working voltages ((110V,220V ,50Hz ,60Hz all
are good.)It can show measured value’s percentage rate of the entire
measuring range, which is convenient for the user to choose
appropriate rotor and speed for accurate measurement. It is widely
used in the measurement of viscosity on solvent-based adhesives,
emulsions, bio-chemicals, paints, coatinsg, cosmetics, printing inks,
paper pulp, food, starch, etc.
2. Key Technical Indexes
1、NDJ-1S,NDJ-5S
Measurement Range:10mPa·S-100.000mPa·S(1mPa·S=1cp)
Measurement accuracy :NDJ-1S±5%,NDJ-5S±3%,
Rotor1, 2, 3, and 4. ( Rotor 0 is an optional accessory)
Rotating Speed:6、12、30、60RPM/ min.
Dimensions:95*130*155(base not included)
Net Weight:2kg(base not included)
2、NDJ-8S
Measurement Range:10mPa·S-200.000mPa·S(1mPa·S=1cp)
Measurement accuracy:±3%
Rotor1, 2, 3, and 4. ( Rotor 0 is an optional accessory)
Rotating Speed:0.3、0.6、1.5、3、6、12、30、60RPM/ min.
Dimensions:95*130*155(base not included)
Net Weight:2kg(base not included)
3、NDJ-9S
Measurement Range:10mPa·S-6000.000mPa·S(1mPa·S=1cp)
Measurement accuracy:±3%
-1-
Rotor1, 2, 3, and 4. ( Rotor 0 is an optional accessory)
The bigger the number of the rotor, the bigger the measurement value.
Rotating Speed:0.1、0.3、0.6、1.5、3、6、12、30、60RPM/ min.
Dimensions:95*130*155(base not included)
Net Weight:2kg(base not included)
3. Environmental Conditions
Environmental Temperature:5℃~35℃
Relative Humidity:≤80%
Power:220V,50Hz;110V,60Hz
No strong electromagnet interference, drastic vibrations, corrosive
gases in the vicinity of the instrument.
4.Structures and Installation
(1)Instrument’s Structure
Shown as the picture
(1)level bubble (2)LCD (3)outer cover (4)rotor protection
bracket (5)base(6)operation panel (7)rotor connector (8)
rotor (9)base adjusting knob
-2-

(2)Installation
1、Take out base, lifting column, handle from the packing box. Screw
the column into the base ( rack side towards the user). Fix handle
onto the lifting block.
2、Adjust lifting button for tightness. Put T-shaped block on the rear
of the instrument into handle and get it fixed, making the instrument
balanced.
3、Adjust 3 screws on the base to keep the level bubble at the center
of the black circle.
4、Take off the protection cap at the bottom of the instrument.
5、Plug in.
5. Operating Procedure
1、Prepare liquid sample to be tested, pour it into beaker or flat
container with diameter no less than 60mm. Control the temperature
of the liquid sample correctly. (Variations of temperature will affect
viscosity directly.)
2、Screw anti-clockwise protection bracket (T-shape) into the bottom
end of the instrument
3、Choose appropriate rotor and screw it anti-clockwise into the
connector. Attention: slightly lift direction connector up when rotor is
installed to avoid damages to the pivot.
4、Turn lifting button to slowly immerse rotor into the liquid until the
marker on the rotor (groove or marking line) is aligned with the liquid
level.
5、Adjust the balance of the instrument again.
6、Should keep testing temperature stable to ensure accurate read out.
Otherwise readout may fluctuate.
6. Panel Operation
Turn on power switch on the back of the instrument and the
instrument is on standby. The following information will be shown on
the panel.
S1 V6 T.....℃
%... CP 000000
If Rotor 1 is used at 6RPM/min, can directly press the start
button on the panel to initiate testing. When display values become
stable, read the CP value. (In order to make readout stable, if viscosity
is relatively low, turn rotor about 3-5 rotations; if viscosity is
relatively high, turn rotor about 1-2 rotations.)
-3-
If what the user chooses is not the default value S1 and V6, press
rotor select and speed select button to enter selecting status, then press
confirm button to confirm. When set-up is done, press start button to
initiate testing.
Rotor S0~S4 and V0.1/V0.3/V0.6/V1.5/V3/V6/V12/V30/V60
will scroll displaying repeatedly.
Explanations:
S: stands for Rotor number. S1 refers to Rotor 1. (default value)
V:stands for rotation speed. V6 refers to 6RPM/min. (default
value)
T:.....℃: Temperature
%........: test value’s percentage rate of the full value of the
measuring range.
Cp: mPa·S Viscosity value
For example: If the viscosity of the liquid to be tested is estimated
3000mPa ·S, it is recommended to choose the
combination S2,V6 or S3,V0.3
For the correlations between the combination of rotor and rotation
speed and the corresponding viscosity range, please refer to the below
table.
NDJ-1S,NDJ-5S measuring range table
1# 2# 3# 4#
1000 5000 20000 100000
500 2500 10000 50000
200 1000 4000 20000
6 rotati ons
12 rotation s
30 rotation s
60 rotation s 100 500 2000 10000
0#
Rotating
speed
Rotor
100
50
20
10
NDJ-8S,NDJ-9S measuring range table
1# 2# 3# 4#
1000 5000 20000 100000
500 2500 10000 50000
200 1000 4000 20000
100 500 2000 10000
0#
100
50
20
10
6 rotations
12 rotations
30 rotations
60 rotations
0.3 rotations
0.6 rotati ons
1.5 rotati ons
3 rotati ons
0.1 rotations
200
400
1000
2000
6000
2000 10000 40000 200000
4000 20000 80000 400000
10000 50000 200000 1000000
20000 100000 400000 2000000
60000 300000 1200000 6000000
Rotating
speed
Rotor
-4-
7. Attentions
1).When this viscometer works under room temperature, the tolerance
of the test temperature should keep within ±0.1 ℃. Otherwise
measurement accuracy will be substantially affected.
2).Pay attention to test values and their percentage rates of the entire
measurement range. When numbers are too high or too low, rotor or
rotating speed should be changed to keep the percentage within
15%~85%. Otherwise measurement accuracy will be affected.
3).Viscometer should be used under allowed voltages and frequencies.
Otherwise measurement accuracy will be affected.
4).Be careful when rotor is assembled or unassembled. Slightly lift up
direction connector. Don’t handle it with big force.
5).Keep rotor and direction connector clean after use.
6).When instrument goes down, it should be held by hands to avoid
vibrations which could do damages to the pivot.
7).When instrument is moved or transported, direction connector
should be covered by protection cap.
8).Many of suspension liquids, emulsions, high polymers and other
high viscosity liquids are non-Newtonian liquids, whose viscosity
values are changing with changes of shear rate and time. It is normal
that the test results could be different on different rotors, rotating
speed, or time.
9).In order to get accurate measurement, please pay attention to the
following points:
A、Control the temperature of the tested liquid accurately.
B、Keep environmental temperature uniform;
C、Keep rotor and liquid to be tested under constant temperature at
the same time so as to keep the same temperature for both.
D、Use bigger rotor with higher rotating speed for low viscosity
liquid; use smaller rotor with lower speed for high viscosity liquid.
E、Keep the surface of the rotor clean.
-5-
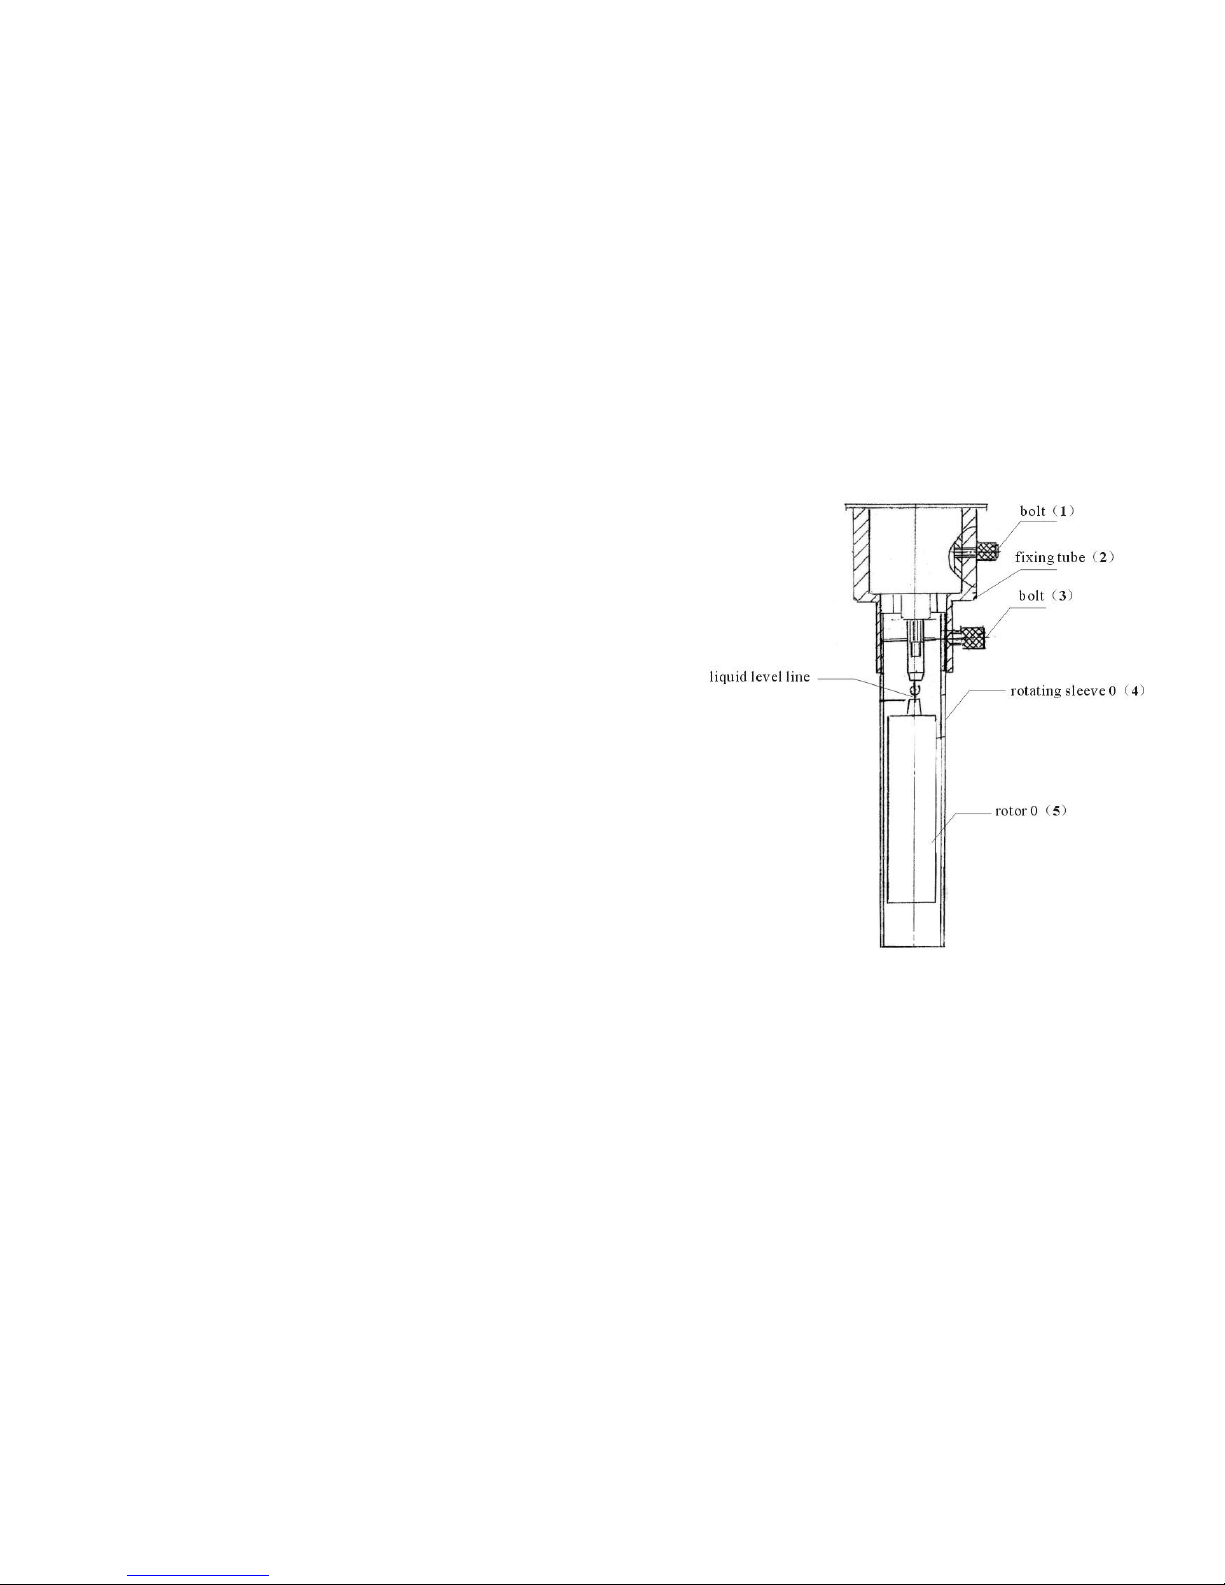
8. Appendix
Installation Procedure:
Screw on rotor 0 (5); put on fixing tube (2); screw on bolt (1) and get
it fixed; put on rotating sleeve 0 (4);screw bolt (3) tight and get it
fixed
-6-

Appendix: Rotor 0 installation procedure and usage
1)Should consider instrument components operation when
Rotor 0 is used. Refer to the picture for details.
2)Pour 25~30ml liquid to be tested into lower sleeve.
3)Gently put outer testing tube from down to up on the fixing
sleeve and get it fixed. (On the testing tube is a V-shaped
groove)
4)The same method as the above applies when bottomless
testing tube is used. Take V-shaped groove on the inner wall
of outer testing tube as the immersed level line for Rotor 0
when outer testing tube and rotor are immersed in the liquid.
Packing List
1、NDJ series digital viscometer (master device) one unit
2、Lifting rod and slider one piece
3、Protection Bracket one piece
4、Rotors (1,2,3,4) one piece for each size
5、Power cord one piece
6、User Manual one copy
7、Certificate of Approval one piece
8、Warranty Card one piece
-7-
This manual suits for next models
3
Table of contents
Other CGOLDENWALL Measuring Instrument manuals


