chaft PU02 User manual

Compresseur sans Fil
Autonome
PU02
NOTICE D’UTILISATION
1
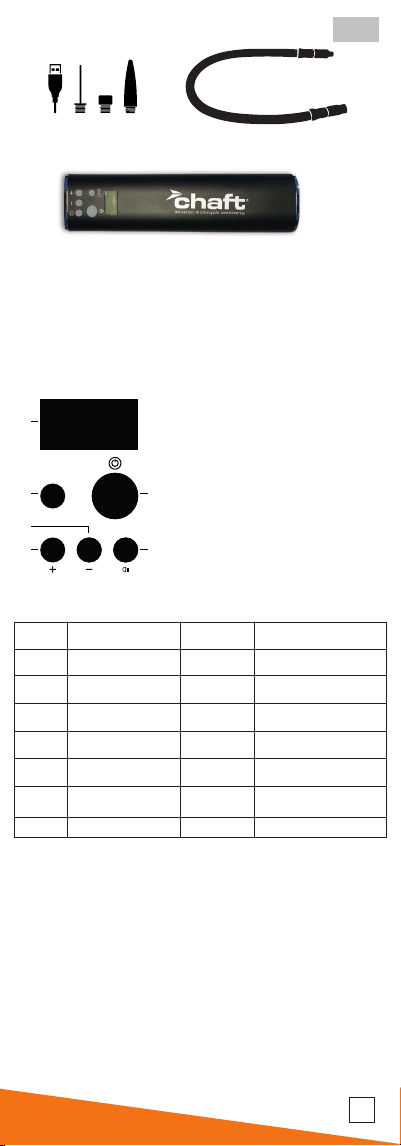
Contenu du produit
2345 6
1
1. Compresseur
2. Chargeur USB
3. Aiguille ballon
4. Adaptateur valve Presta
5. Embout matelas bouées
6. Flexible
A
UNIT
BC
E
D
F
A. Ecran LCD
B. Unité de pression (4 unités)
C. On / O
D. Pression -
E. Pression +
F. Lumière
Schéma technique
Informations techniques
REF
Batterie
Entrée
Unités
Flux
Poids
Package
Garantie
PU02
Lithium Ion
5V DC 1A
PSI KPA BAR KG/CM2
8-12 L/Min
0.45kg
Carton box
12 mois
Matériau
Capacité
Sortie
Pression Max
Courant Max
Précision
Taille
Certication
Alliage aluminium
6.6Wh
15V DC, 0.3A
130 PSI
5A
+/- 1.5 PSI
54(W)*42(H)*209(L)mm
FCC CE RoHS
Attention
Une mauvaise utilisation peut endommager le goneur.
1. Évitez d’utiliser les accessoires d’autres fournisseurs tels que chargeur
USB, chargeur de voiture.
cela pourrait provoquer un incendie et des dégâts imprévisibles.
2. Veuillez utiliser le bon chargeur, ne gonez pas lorsque vous chargez
avec le chargeur ou l’adaptateur USB, cela pourrait brûler le goneur
ou le chargeur.
3. Tenir à l’écart de l’eau. S’il y a de l’eau dans le goneur, arrêtez de
l’utiliser immédiatement. Ne l’utilisez pas dans des zones inammables
et explosives. (ex. station service)
4. Ne pas utiliser pour les gros véhicules tels que les camions, les véhi-
cules lourds, les remorques lourdes, etc.
5. Débranchez le chargeur après avoir complètement chargé
6. Gardez le goneur hors de portée des enfants.
7. Ne démontez pas le goneur vous-même.
8. N’aspirez ou ne respirez jamais l’air sortant du goneur.
FR

2
Étapes d’opération
Connectez le tube à air au goneur, branchez l’autre extrémité à la valve
du pneu.
1. Lorsque l’appareil est hors tension, appuyez rapidement sur le bouton
d’alimentation (C) 3 fois en 1,5 seconde, la pompe est alimentée et l’écran
est allumé.
Cliquez sur le bouton UNIT (B), choisissez l’unité de mesure souhaitée (BAR
étant la plus courante).
Appuyez longuement sur le bouton de préréglage (D) ou (E) jusqu’à ce
que l’écran ache une pression clignotante, puis cliquez sur + (D) ou - (E)
pour ajuster la pression voulue.
Lorsque vous avez déterminé la pression, cliquez sur le bouton d’alimen-
tation (C) pour conrmer ou après 15 secondes sans aucune opération elle
sera conrmée automatiquement.
Lorsque la pression est dénie, le chire à l’écran arrête de clignoter.
2. Une fois la pression dénie, cliquez sur le bouton d’alimentation (C)
pour que la pompe commence à goner.
La pompe cessera de se goner automatiquement lorsque la pression
atteindra la cible.
Pendant le gonage, cliquez sur le bouton (C), la pompe s’arrêtera. En cas
de batterie insusante pendant le gonage, la pompe s’arrête automa-
tiquement.
Si la pompe fonctionne en continu pendant environ 5 minutes, que la
pression voulue soit atteinte ou non, la pompe s’arrêtera automatique-
ment, pour éviter d’endommager le moteur et le cylindre par une sur-
chaue. Ensuite, vous devez le laisser refroidir avant de continuer.
3. Appuyez longuement sur le bouton de l’interrupteur d’alimentation (C)
pendant 3 secondes pour éteindre la pompe.
Ou après 3 minutes sans aucune opération, la pompe s’éteindra automa-
tiquement.
4. A tout moment, appuyez sur le bouton de la lumière (F) et les 2 leds
s’allumeront.
Appuyez à nouveau, les leds s’éteindront. Que la pompe soit sous tension
ou non, l’utilisation de la lumière LED n’aecte pas le fonctionnement de
la pompe.
5. Lorsque la batterie de la pompe est épuisée, la pompe ne peut pas
commencer à se goner et la lumière LED émet une lumière plus sombre
ou même ne peut pas être éclairée. Quand cela se produit, vous devrez la
recharger à l’aide du câble USB.
6. Lors du chargement ou du gonage avec un chargeur de moto/voiture
veuillez laisser le moteur allumé.
7. La limite de courant de charge de la pompe est de 0.5A. Le temps de
charge est de 1.5 à 2 heures environ.
Si elle n’est pas utilisée pendant une longue période, la pompe doit être
chargée au moins une fois tous les 3 mois pour éviter les dommages de la
batterie causés par une insusance de puissance.
Conseils d’utilisation
1. La pression des pneus est basée sur la recommandation du fabricant,
veillez à toujours la respecter.
2. Pour que le goneur ait une longue durée de vie, laissez-le reposer pen-
dant 10 minutes toutes les 5 minutes pour éviter la surchaue.
3. Chargez le goneur tous les 3 mois pour maintenir la batterie en bon
état.
4. Assurez-vous que la batterie soit susante avant d’utiliser le goneur.
et si vous utilisez le câble de charge directement sur le véhicule, laissez
le moteur tourner.
5. Pendant et juste après le gonage, le tuyau peut être très chaud.
Pour éviter les brûlures, veuillez ne pas toucher le tuyau immédiatement.

3
Product Structure
2345 6
1
1. Inator
2. USB charger
3. Ball pin
4. Presta valve
5. Plastic gas nozzle
6. Pipe
A
UNIT
BC
E
D
F
A. LCD screen
B. Pressure unit (4 units)
C. On / O
D. Pressure -
E. Pressure +
F. Light
Device name and role on the panel
Technical Information
REF
Battery
Input
Unit
Airow
Weight
Package
Warranty
PU02
Lithium Ion
5V DC 1A
PSI KPA BAR KG/CM2
8-12 L/Min
0.45kg
Carton box
12 months
Material
Capacity
Output
Max pressure
Max current
Accuracy
Size
Certication
Aluminium
6.6Wh
15V DC, 0.3A
130 PSI
5A
+/- 1.5 PSI
54(W)*42(H)*209(L)mm
FCC CE RoHS
Warning
Improper operation can damage the inator.
1. Avoid using the accessories from other suppliers such as USB charger,
car charger, it may cause re and unpredictable damage.
2. Please use the right charger, don’t inate when charging with the
USB charger or adapter, it may burn the inator or the charger.
3. Keep away from water, if there’s water in the inator, stop using it
immediately. Do not use it at inammable and explosive areas. (eg.Oil
station).
4. Do not use for large vehicles such as container truck, heavy-duty-
vehicles or heavy trailer etc.
5. Unplug the charger after fully charged.
6. Keep the inator away from kids.
7. Do not disassemble the inator by yourself.
8. Do not intake or breathe the air from the pipe.
EN

4
Operation steps
Connect the air tube into inator, plug the other end to tire valve core
1. When power is o, quickly press the power switch button (C)for three
times within 1.5 seconds, the pump starts to stand by, the screen lights up.
Press UNIT button (B) choose the needed unit, then long-press presetting
button (D)or (E) till the number on screen starts ashing, then press (D) or
(E) to adjust the target pressure. After the pressure gets to the target, press
power switch button (C) to conrm. Or after 15 seconds without any ope-
ration it will be conrmed automatically. When pressure is set, the number
on screen stops pressure ashing.
2. After pressure is set, press power switch button (C), the pump starts
inating. The pump will stop inating automatically when the pressure
reachs the target. During inating, press button(C), the pump will stop. In
the situation of insucient battery power during the inating, the pump
will automatically stop. If the pump works continuously for about 5 mi-
nutes, no matter the pressure reaches to the target or not, the pump will
stop forcefully, to avoid damaging the motor and cylinder by overheating.
Then you must have it rest for cooling.
3. Long pressure power switch button (C) for 3 seconds, the pump will
turn o. Or after 3 minutes without any operation, the pump will turn o
automatically.
4. In any time, press light switch button (F), the LED light is on. Press again,
the LED light is o. Whether the pump power is on or not doesn’t aect
the LED light using.
5. When the power of the battery in the pump is used up, the pump can’t
start inating, and the LED light gives out darker light or even cannot be
lightened. When this happens, please charge the pump timely.
6. When charging or inating with car charger, please keep the car engine
on.
7. Charge current limit of the pump is 0.5A. Charging time is 1.5-2 hours.
If not being used for a long time, the pump should be charged at least
once in 3 months, to avoid battery damage caused by power insuciency.
Operation tips
1. The tire pressure is based on the recommendation of the pressure mar-
ked on the tire.
2. To keep the inator’s long lifetime, please have it rest for 10 minutes in
every 5 minutes working time.
3. Charge the inator in every 3 months.
4. Make sure the power is enough before using the inator, and if use car
charger into the cigarette lighter, do not stop the car engine when it in-
ating.
5. During and right after the inating, the pipe can be very hot. To avoid
being injured, please do not touch the pipe immediately.
Table of contents
Languages:
Popular Air Compressor manuals by other brands

GENTILIN
GENTILIN CS 240/03 instruction manual

Airpress
Airpress LMO 50-270 Silent Instruction manual for owner's use

Trane
Trane R410a installation guide

Bavaria
Bavaria BAC 380/50 V Original operating instructions

Jun-Air
Jun-Air 87R-4P Operation & maintenance manual

Ingersoll-Rand
Ingersoll-Rand RS15ie Product Maintenance Information

Atlas Copco
Atlas Copco PTS 800 T3 Cud instruction manual

Draper
Draper DA25/190 instructions

Danfoss
Danfoss VRJ Application guidelines

Worcraft PROFESSIONAL
Worcraft PROFESSIONAL PAC11-180 instruction manual

Ingersoll-Rand
Ingersoll-Rand 7/31E Operation and maintenance manual

Campbell Hausfeld
Campbell Hausfeld HL5500 Series operating instructions


