Chalmor eTRV User manual

Installation guide and user instructions

Thank you for buying the eTRV (electronic thermostatic radiator valve) with infrared
remote control. Please read through this manual before using the product, and follow the
instructions in it.
This eTRV can only be fitted to a radiator that already has a thermostatic
radiator valve, as shown opposite. It has been designed to fit most
standard radiator valves (as shown on page 7). In this case, the eTRV is
easy to fit and there is no plumbing work involved –you do not need to turn
off your water or drain your radiators.
If you have a manual radiator valve, as shown opposite, you will need to
have a normal thermostatic radiator valve fitted first. You may need
professional help from a heating engineer or registered plumber.
Please take the time needed to read and understand these instructions. After you have
read the manual, store it in a safe place.
eTRV is protected under GB Patent, number 2452043.
eTRV is a registered trademark.
2010/10v1
TRVs sense the temperature of the air around them and regulate the flow of water
through the radiator accordingly. They do not control the boiler.
TRVs should be set at a level that gives you the room temperature you want. These
settings may have to be different in each room, and you should set the TRVs to suit each
room and then leave them to do their job.
Turning a TRV to a higher setting will not make the room heat up any faster. How quickly
the room heats up depends on the boiler and the size and type of radiator. Turning a TRV
to a lower setting will result in the room being controlled at a lower temperature, and
saves energy.
TRVs need a free flow of air to sense the temperature, so they must not be covered by
curtains or blocked by furniture.
TRVs cannot turn off the boiler when the whole house is warm. To do that, your boiler will
need to be controlled by a thermostat in a room. The radiator in the room the boiler
thermostat is in should not normally have a TRV. If it does, keep the TRV on the
maximum setting and adjust the boiler‟s thermostat as explained in the instructions for
your boiler.
What is a thermostatic radiator valve (TRV)?

Page 3of 36
If you do not use the eTRV correctly, in line with these operating instructions:
the warranty will end; and
we will not be liable for any damage or loss whatsoever, including indirect
loss, damage to property or personal injury.
The eTRV, remote control and accessories are not intended for children and must not
be used as toys.
Do not leave packaging material lying around as children might be tempted to play
with it, which is extremely dangerous.
You must only use the product in dry areas indoors, and it must be protected from
moisture and water.
Handle the product with care. It can be damaged through being hit or dropped, even
from a low height.
Do not open the eTRV as it does not contain any parts that you need to service. If the
eTRV arrives faulty, return it to where you bought it.
The outer box of the packaging is made from 69% recycled material from
managed forests and is 100% recyclable.
These instructions are 100% recyclable.
Do not throw this device away with your regular household waste.
You must take electronic equipment to a local tip to be disposed of in line
with current regulations.
Never try to recharge standard batteries as they may explode.
Do not take batteries apart or throw them into a fire.
Do not short circuit batteries.
Do not put used batteries in your regular household rubbish. Take them to
your local battery-disposal point.
If you need this guide in large print, download the instructions from
www.etrv.co.uk.
Disposal
Safety Instructions

Page 4of 36
1 Introduction..........................................................................................................................5
2 General use......................................................................................................................... 6
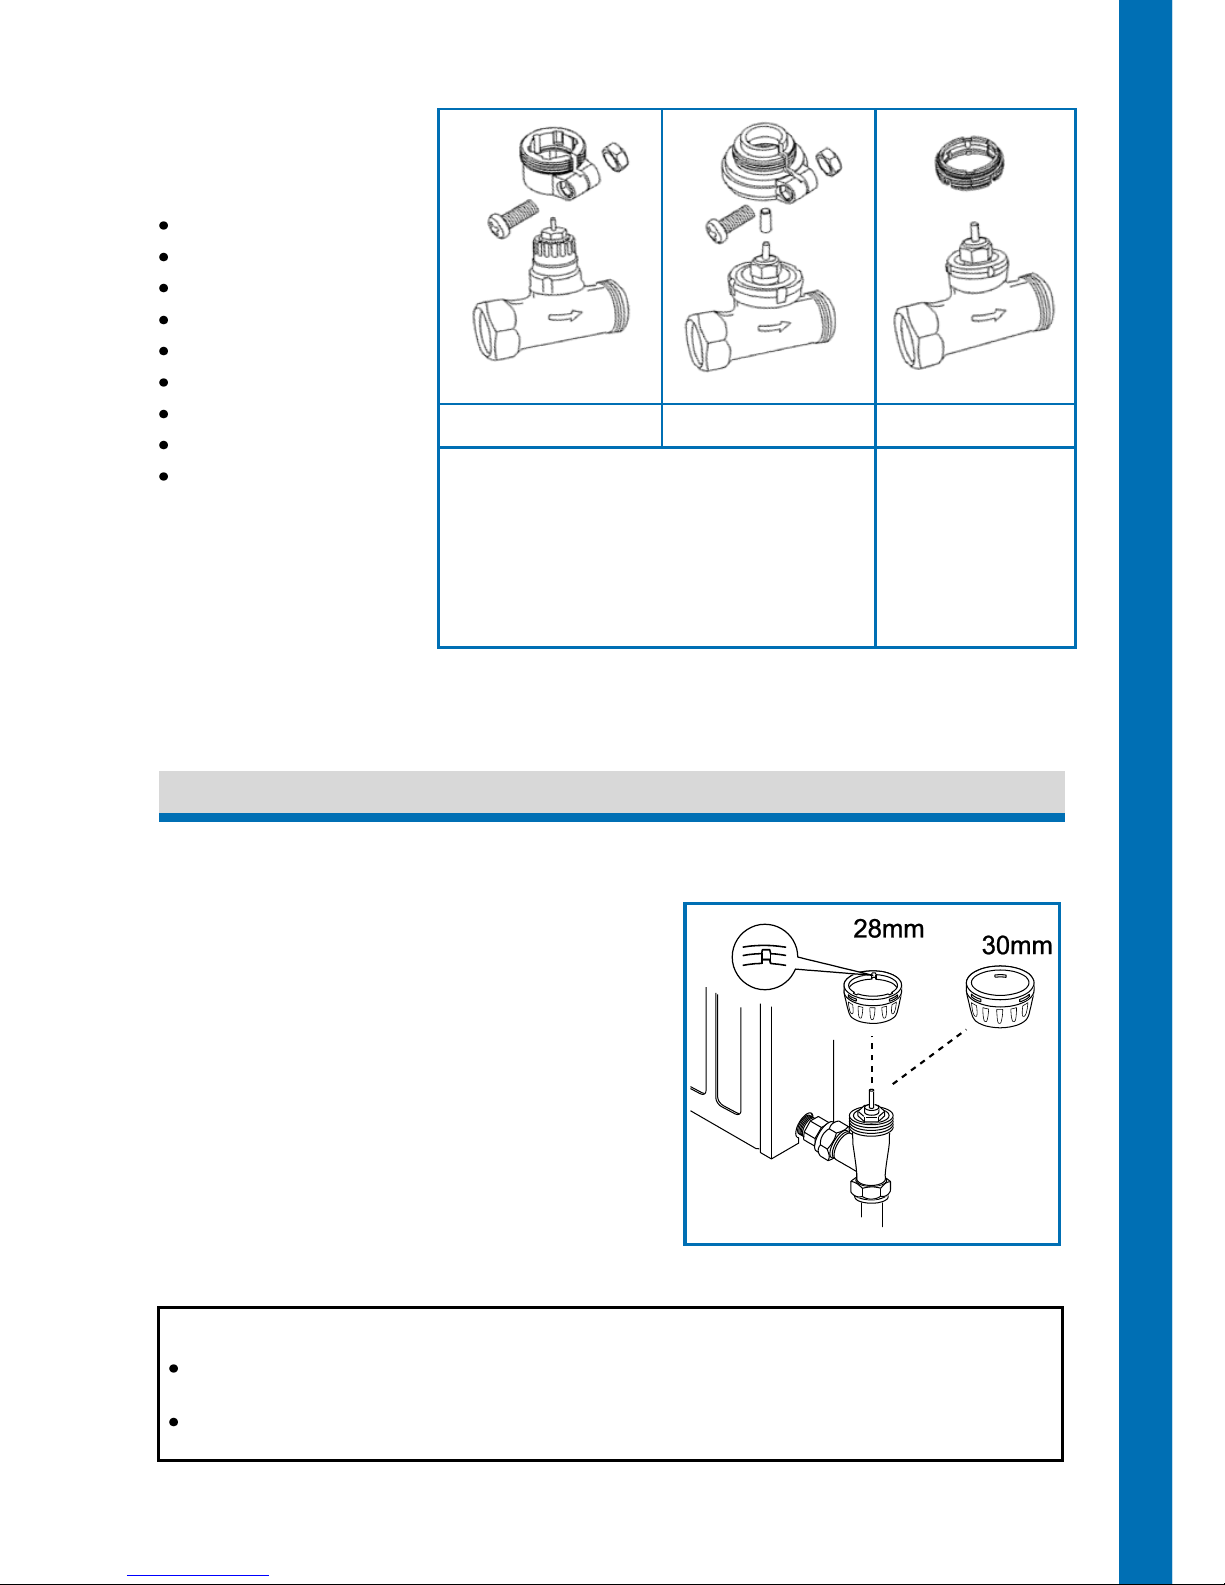
3 Fitting the base ring and spacer……................................................................................... 6
3a Choosing the correct base ring..............................................................................7
3b Choosing the correct spacer………....................................................................... 8
3c Attaching the base ring to the eTRV...................................................................... 8
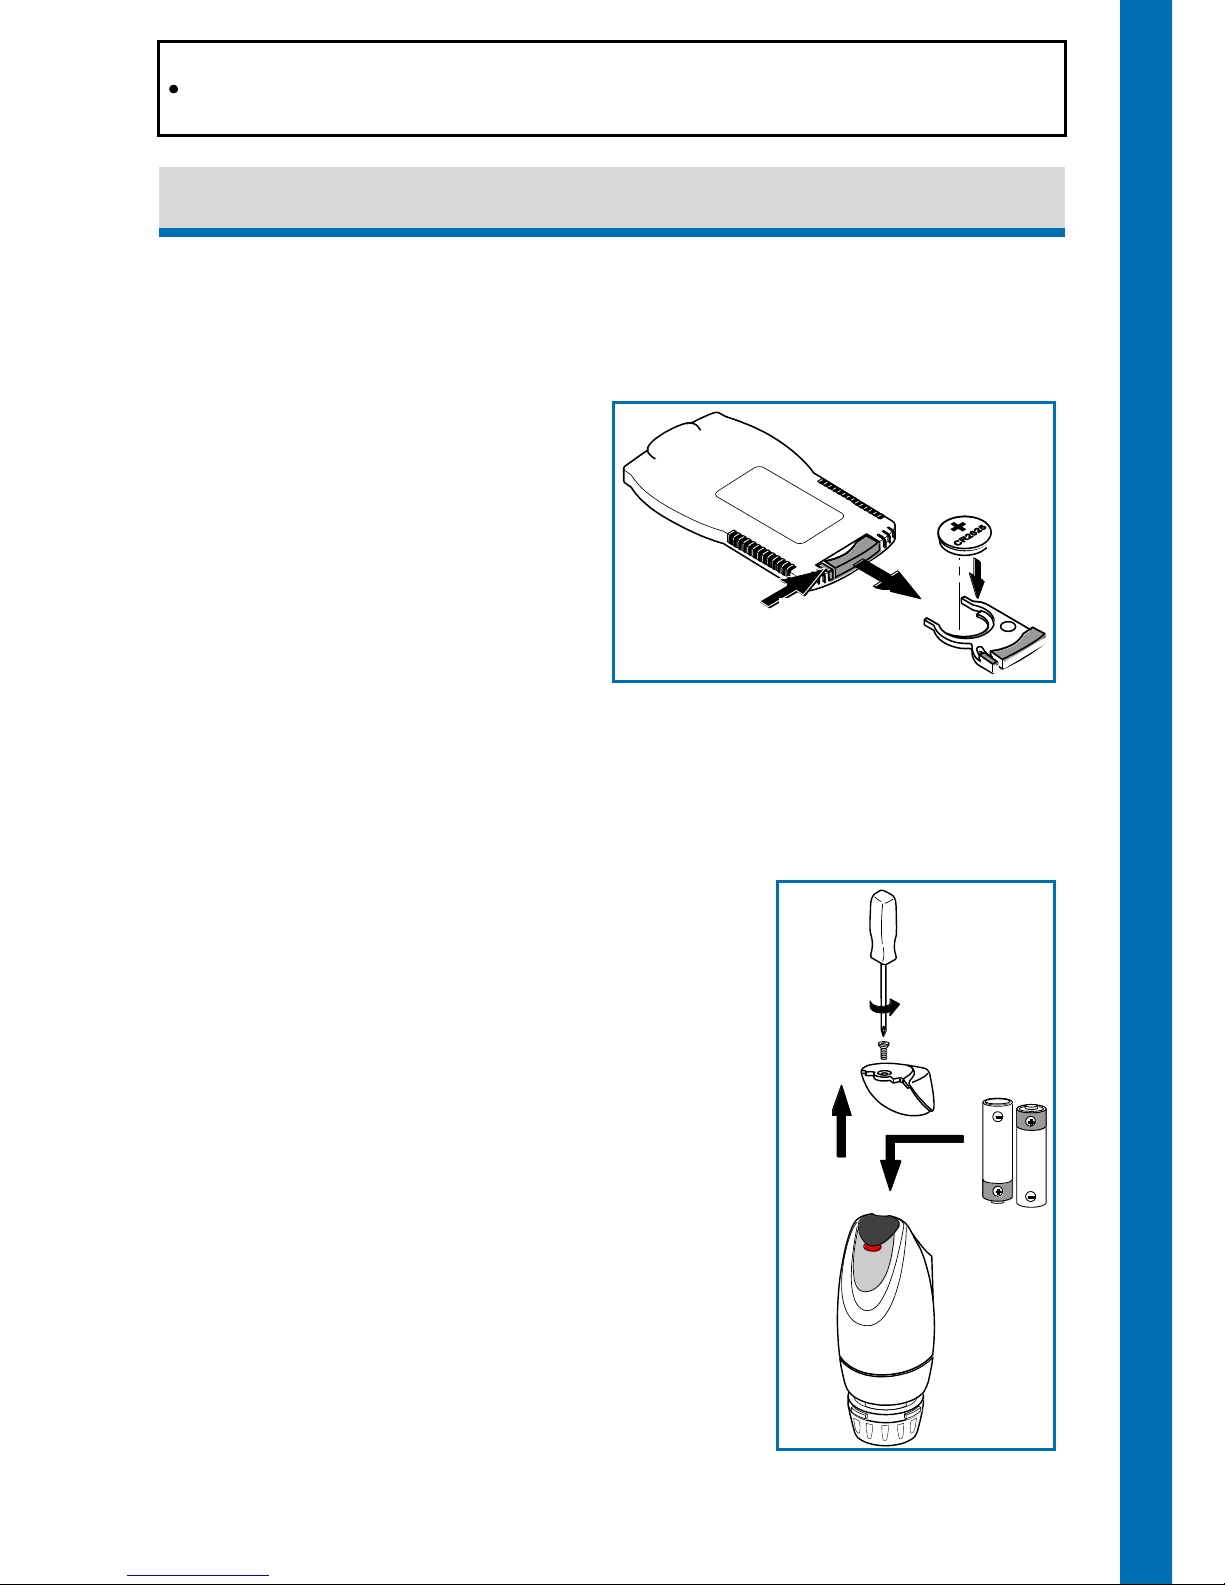
4 Batteries...............................................................................................................................9
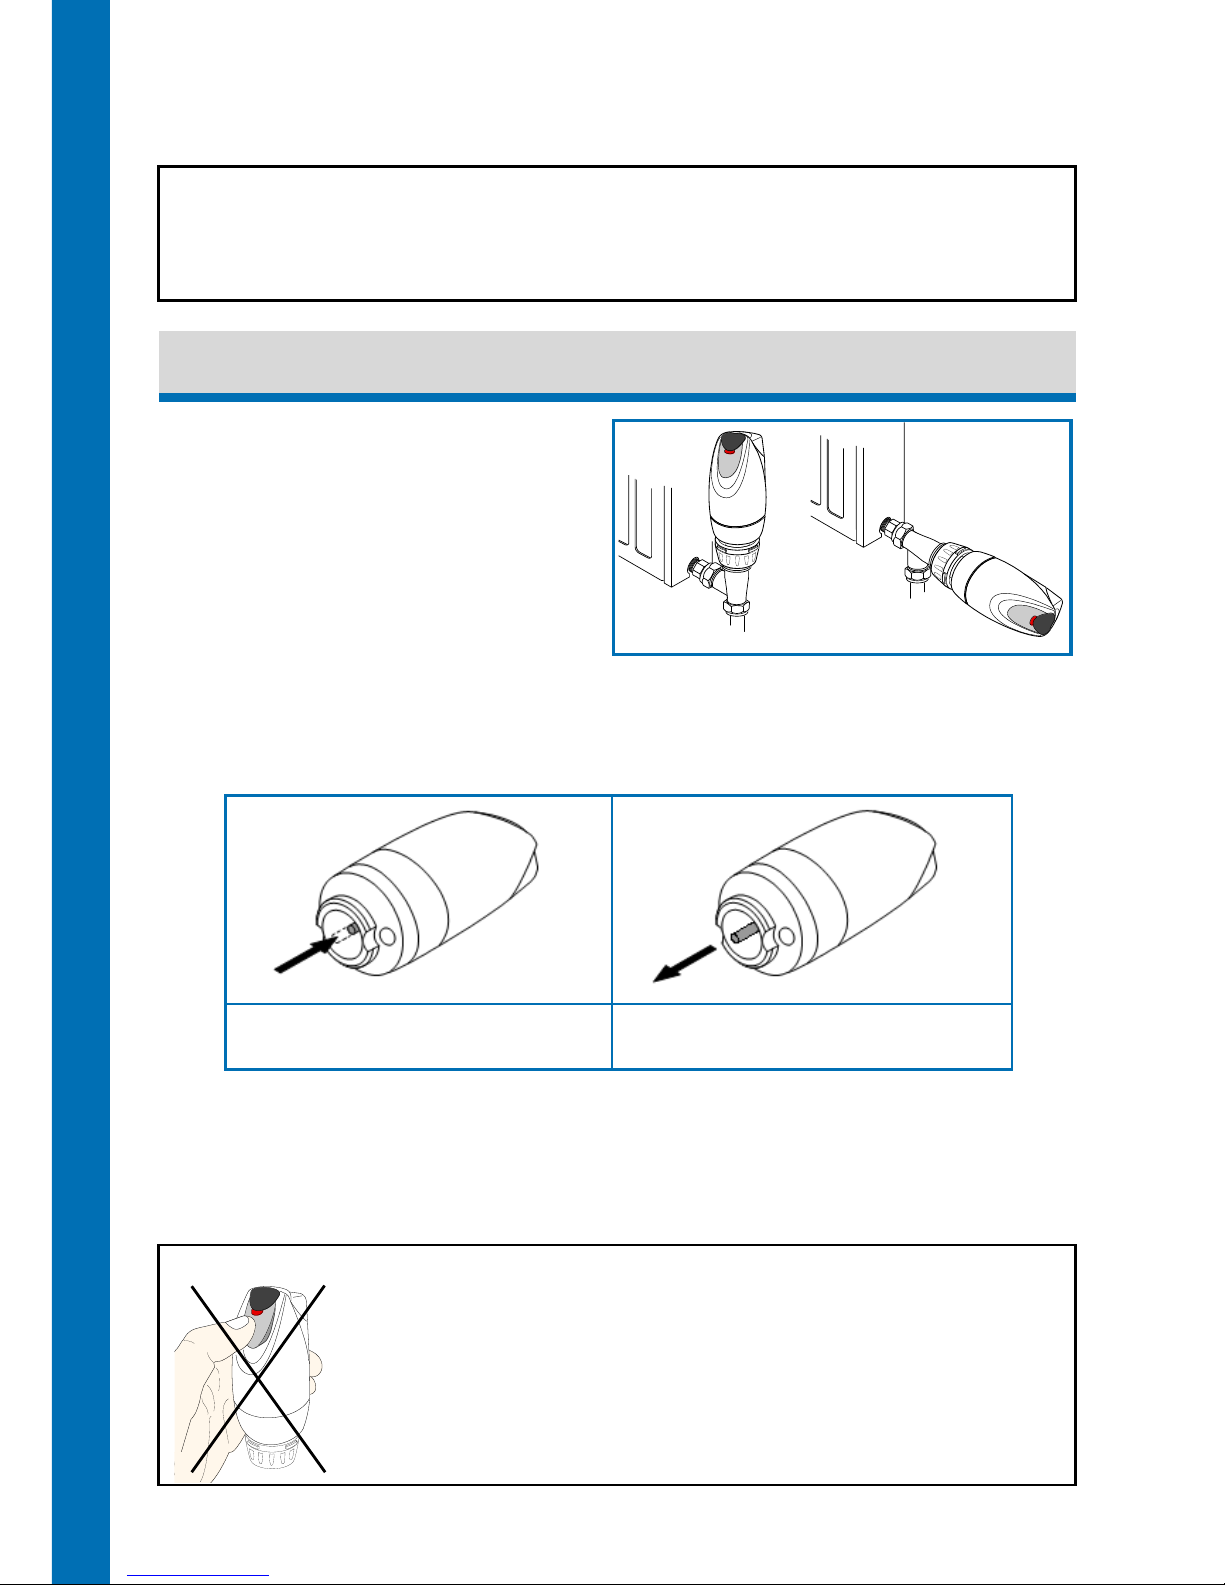
5 Fitting the eTRV to the radiator ...........................................................................................10
6 Factory settings....................................................................................................................11
6a What the LED indicator means..............................................................................12
6b Replacing low and dead batteries..........................................................................12
7 Using your eTRV..................................................................................................................13
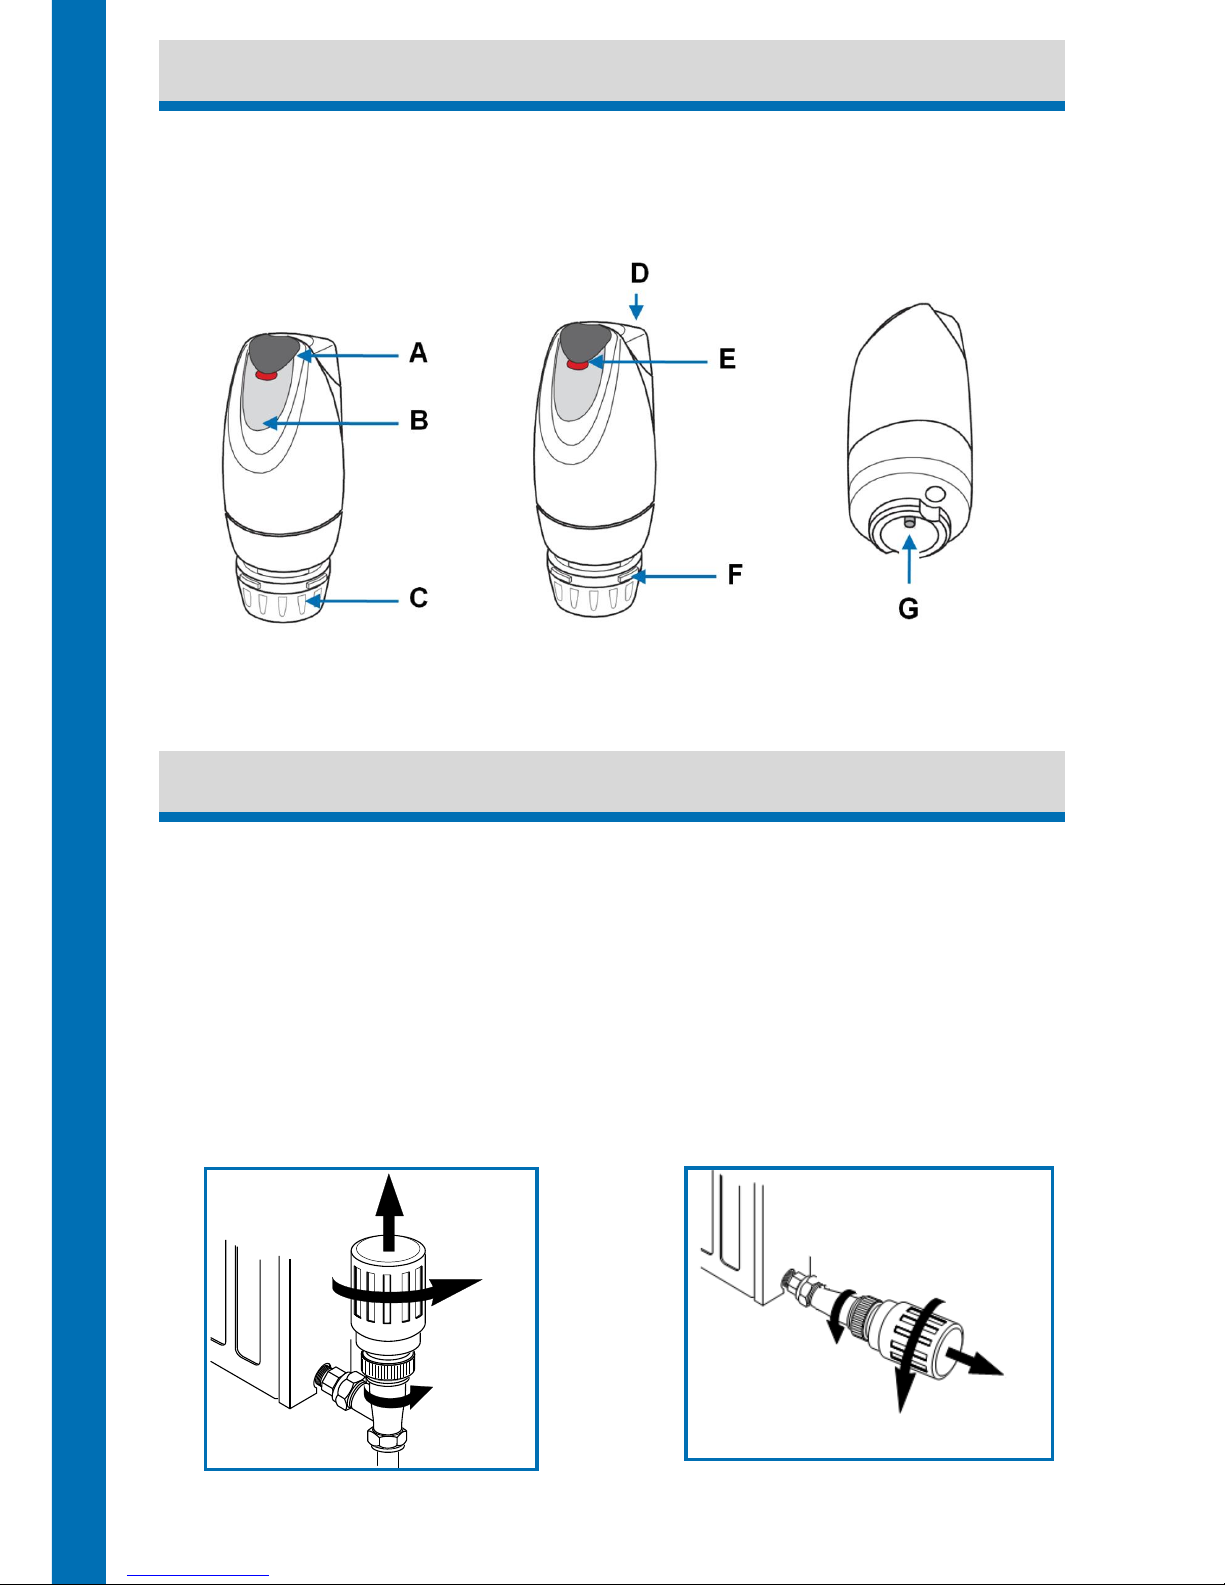
7a eTRV grey push button..........................................................................................13
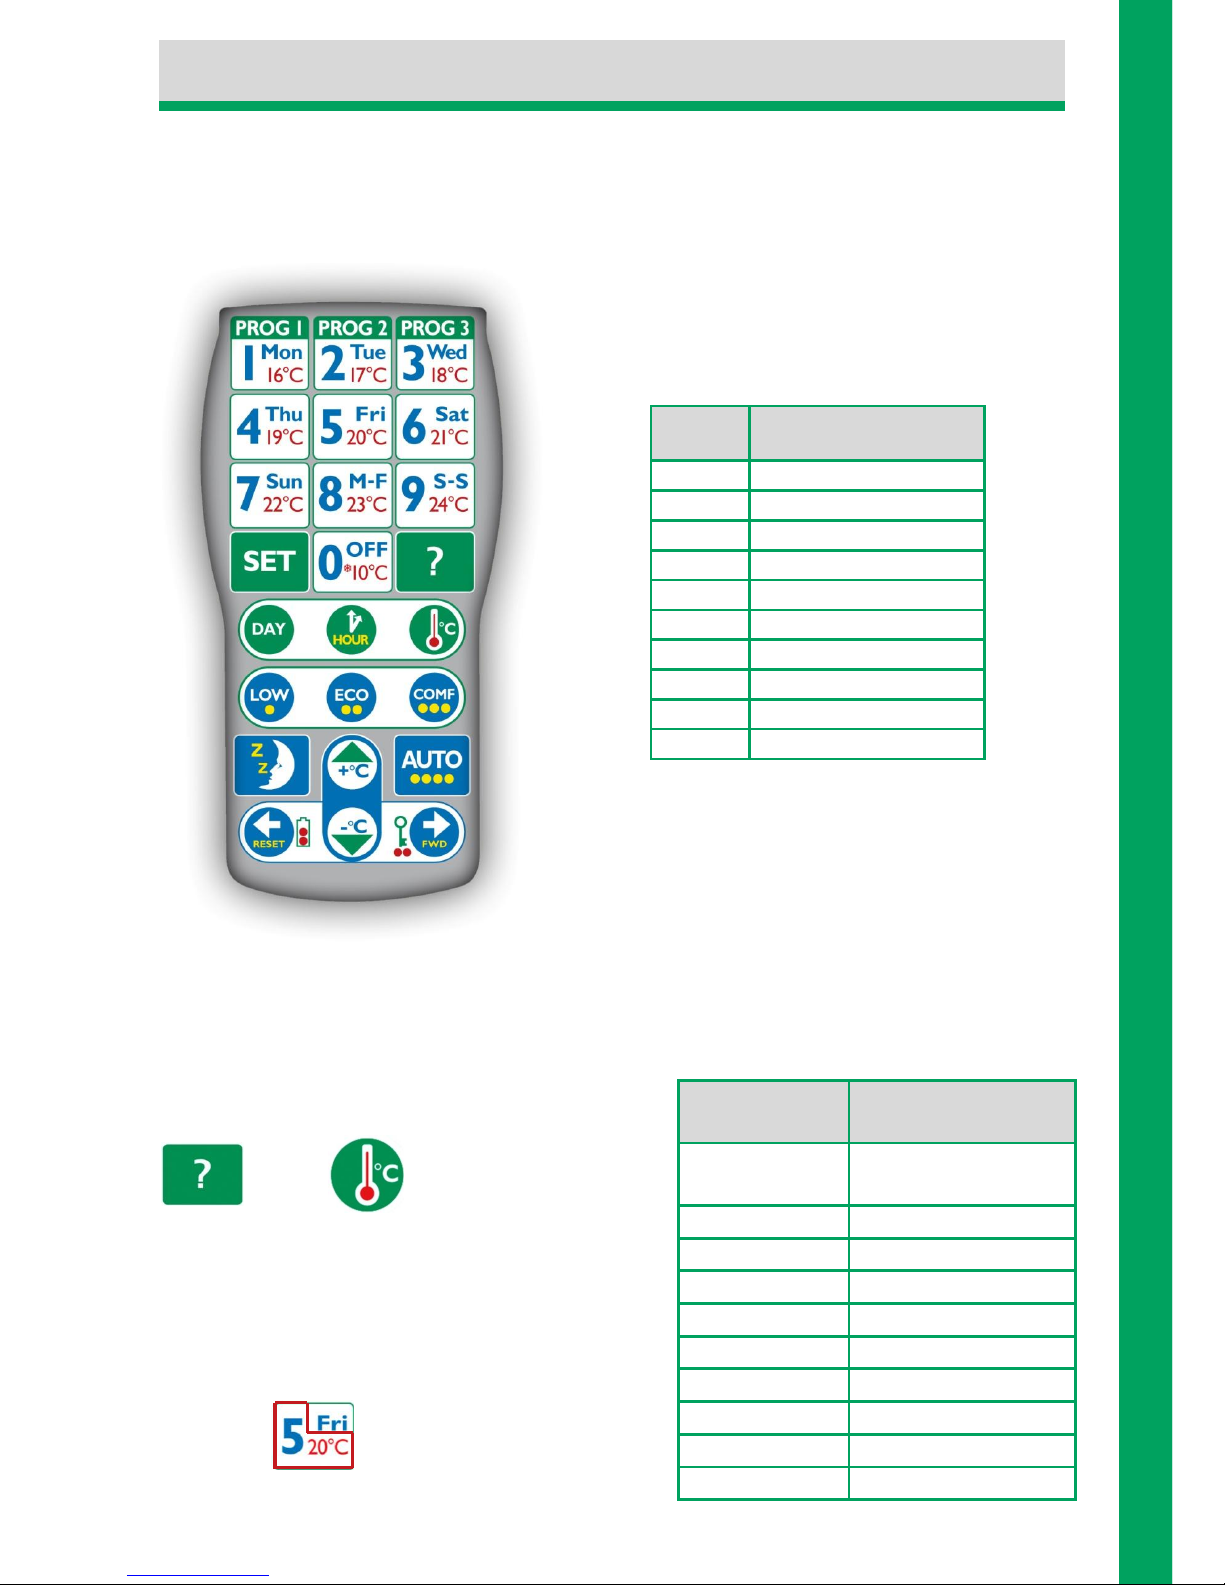
7b eTRV remote control..............................................................................................14
8 Using as a simple thermostat...............................................................................................15
8a OFF / frost protection.............................................................................................16
9 LOW, ECO and COMF.........................................................................................................16
9a Changing the stored LOW, ECO and COMF mode temperature settings............. 17
9b Unlimited temperature control................................................................................17
9c Check the temperature of the LOW, ECO and COMF modes............................... 17
9d Boosting from OFF, LOW, ECO or AUTO mode.................................................... 18
10 Individual programmes.........................................................................................................19
10a Sleep......................................................................................................................19
10b Setting the day and time........................................................................................ 19
10c Checking the day and time settings.......................................................................20
10d Setting quick programmes..................................................................................... 21
10e Customised programmes...................................................................................... 22
10f Example of a customised programme .................................................................. 24
10g Deleting day programmes......................................................................................25
10h Forward to next programme ..................................................................................25
10i One-hour boost……...............................................................................................26
10j +/- 1°C...................................................................................................................26
11 Checking settings and modes..............................................................................................26
11a Check current mode...............................................................................................26
11b Check temperature set for AUTO mode.................................................................27
11c Check the temperature setting...............................................................................27
11d Check the current room temperature.................................................................... 28
12 Extra settings.......................................................................................................................28
12a Setting maximum and minimum temperatures...................................................... 28
12b Checking maximum and minimum temperatures...................................................29
12c Setting an “offset” temperature.............................................................................. 29
12d Checking the offset temperature............................................................................30
12e Cancelling the offset temperature..........................................................................30
12f Retracting and extending the stem manually......................................................…31
12g Lock settings..........................................................................................................31
12h Exercising the valve.............................................................................................. 32
12i Restore factory settings......................................................................................... 33
13 Technical properties.............................................................................................................33
14 Programme tables................................................................................................................34
15 eTRV quick guide................................................................................................................ 36
Contents

Page 5of 36
This manual explains how to install, use and maintain the eTRV. Please keep this manual
in a safe place so you can refer to it in the future if you need to.
The box should contain the following items and accessories.
eTRV parts
Remote control
(if you ordered one)
eTRV
Three base-ring
pegs (3)
Remote control
28mm base ring
Two AA (LR6)
batteries
30mm base ring
Remote control
CR2025 battery
(already in the remote control)
Instructions
2mm-thick spacer
3.5mm-thick spacer
You will need:
a Phillips screwdriver (one with a cross tip); and
pen or pencil to record the eTRV settings.
You may need:
an adjustable spanner (to remove the existing TRV).
1 Introduction ▲

Page 6of 36
3
1
2
3
2
1
Each eTRV controls a radiator valve to regulate the heating in the room, based on time
programmes, set temperatures and how the room is used. A remote control and LED
indicator (a red, yellow or green light) allows you to programme and use the eTRV easily.
Using the eTRV improves your comfort and saves energy.
A:
Infrared receiver
D:
Battery cover
G:
Stem
B:
Grey push button
E:
LED indicator
C:
Base ring
F:
Base-ring pegs
The first step is to remove your existing TRV head.
Step 1
Turn the TRV thermostat anticlockwise as far as it will go.
Step 2
Release the base by turning it anticlockwise, by hand or with a spanner.
Step 3
Pull the existing TRV thermostat off the valve.
Removing the existing vertical TRV Removing the existing horizontal TRV
3 Fitting the base ring and spacer ▲
2 General use ▲

Page 7of 36
There are base-rings and spacers that allow your eTRV to fit to either 28mm or 30mm radiator
valves, whichever is already on your radiator.
The eTRV is compatible
with valves made by:
Barlo
Braukmann
Drayton
Honeywell
Landis & Gyr DuoGyr
Myson
Pegler
Regis (B&Q)
Siemens
and many others.
If you currently have Danfoss RA, RAV or RAVL valves (see above) you will first need to fit
special adaptors. Please contact your stockist.
There are two base rings –28mm (which has notches inside it) and 30mm (with no
notches).
It is important that you use the correct size base
ring for your valve. To check which one to use,
remove the existing TRV as shown on page 6.
To identify which base ring to use, take one and
screw it onto the radiator valve, before attaching
to the eTRV, to see if it fits.
When you have found the correct base-ring,
unscrew it so you can attach it to the eTRV.
Danfoss RA
Danfoss RAV
Danfoss RAVL
If you have an RA or RAV valve, you
must fit the adaptor with the nut and bolt
that comes with the adaptor.
In the case of the RAV adaptor, the
extension provided with the adaptor must
be attached to the valve tappet
The adaptor must
be placed on the
valve and
tightened.
Important
Test which base ring fits each radiator valve before attaching it to the eTRV.
Your radiators may have different sized valves in different rooms, so check
each one.
3a Choosing the correct base ring ▲

Page 8of 36
In most cases (where the valve pin is taller then 14mm), you will need
to fit a spacer inside the base ring. The spacer comes in two
thicknesses, 2mm and 3.5mm. It is important that you use the correct
size spacer.
Tip –the 3.5mm-thick spacer is the same thickness as a £1 coin.
Once the spacer is in place, attach the base-ring to the eTRV.
Step 1
Put the correct spacer (if one is needed) in
the base ring.
Step 2
Fit the base ring onto the eTRV.
Step 3
Firmly push the three base-ring pegs into
the slots on the base ring.
If you ever need to remove the base ring
from the eTRV, follow the steps below.
Step 1
Insert a 5mm, thin flat-head screwdriver
under the peg.
Step 2
Prise out pegs from base-ring. Take care
not to lose any of the pegs.
Different ring bases and spacers
3.5mm thick spacer
28mm base ring
2mm thin spacer
30mm base ring
Important
If you need to use a spacer, put it in place in the base ring before you attach
the base-ring to the eTRV.
3c Attaching the base ring to the eTRV ▲
3b Choosing the correct spacer ▲
1
2
1
3
2

Page 9of 36
Note
Keep the unused base ring and spacers in case you fit a different size radiator
valve in the future.
Remote control battery
Pull the plastic tab out of the battery-compartment. There is already a battery in the remote
control. But for future reference, below we explain how to replace the battery.
Step 1
Push the clip, which has a hole in it, to the
right.
Step 2
Pull out the battery holder.
Step 3
Pull out the CR2025 battery and replace it
with a new one, with the side showing the
positive (+) symbol facing upwards.
Step 4
Push the battery holder back into remote
control.
Inserting the eTRV batteries
Step 1
Using a Phillips screwdriver (one with a cross tip),
unscrew the screw at the top of the battery-compartment,
but do not remove the screw.
Step 2
Remove the battery-compartment cover, with the screw
still in it.
Step 3
Insert the two AA (LR6) alkaline batteries that came with
the eTRV into the battery compartment as shown. Make
sure you put the batteries in the right way. Inside the
battery cover there is a diagram showing which way to fit
the batteries when looking from the front of the eTRV.
Step 4
Put the battery-compartment cover back on. Hold it in
place while you fully tighten the screw.
4 Batteries ▲
2
1
3
2
3
1

Page 10 of 36
The motor will automatically start to retract the stem (pull it in). The LED indicator will
continuously flash red while the motor is running (this could take up to two minutes). Once
the stem is fully in, the red light will flash five times every five seconds.
You can fit the eTRV vertically or
horizontally (see the diagram), depending
on the way the existing radiator valve is
pointing.
Attaching the eTRV
Before you attach the eTRV, it is important that the stem is fully retracted (in), not
extended (out). If you have just fitted the batteries, then the stem will have automatically
retracted as shown below.
Retracted stem (in)
(opens radiator valve)
Extended stem (out)
(closes radiator valve)
If the stem is extended (see above), take the batteries out and then put them back in
again. The motor will automatically come on and start retracting the stem. While the stem
is retracting the red LED light will flash continuously. When the stem is fully retracted, the
red LED light will flash five times every five seconds.
Important
The batteries provided with the eTRV will last for up to 2½ years, depending on how
often the motor runs. When you need to replace the batteries, insert new high-quality
AA alkaline batteries. Do not use rechargeable batteries.
Important Once the stem has retracted, do not press the grey push button on
the front of the eTRV until it has been installed correctly on the
radiator valve. Pressing the grey push button will cause the stem to
extend. If you accidentally press the grey push button, the motor will
drive the stem out. In this case you will need to take the batteries out
and then put them in again so that the stem will automatically retract.
5Fitting the eTRV to the radiator ▲

Page 11 of 36
Once the stem has fully retracted, you can safely attach the eTRV to the radiator valve.
Remember to have it facing forwards, with the LED indicator pointing forwards.
Step 1
Place the eTRV on the valve.
Step 2
Carefully screw the base ring clockwise by hand until it
is firmly in place.
Be sure that the eTRV is not blocked by furniture,
curtains and so on. To be able to use the remote control
easily, you need to be able to see the eTRV.
Starting the eTRV
1. Press and release the grey push button on the eTRV
to extend the stem and fully close off the radiator
valve. This could take up to two minutes. While the
motor runs, the red LED light will blink continuously.
When the valve is fully closed, the red LED light will
flash four times every five seconds.
2. Press and release the grey push button again. The red
LED light will blink three times every five seconds to
indicate that no programme or mode has been set.
The LED indicator will stop blinking after one hour if
you do not take any further action.
3. The eTRV comes with a temperature setting of 19°C. It will control the radiator to
that temperature unless you change the setting to a different temperature (see
section 7 on page 13).
Your eTRV comes with temperatures and control settings stored in its memory. It will work
to these settings until you change them.
Important
Do not tighten the base ring too much as this may cause the pegs to push out
from their slots.
6 Factory settings ▲
2
1

Page 12 of 36
The LED indicator flashes red, yellow or green to tell you what the eTRV is doing and it‟s
setting.
Low battery
When the batteries are low, the red LED light will flash twice every five seconds. At this
point you should replace the batteries. When you replace the batteries at this stage, all the
time settings, temperature settings and programmes are stored so you will not have to
reset them. To change the batteries, see section 4 on page 9.
Dead battery
When the battery does not have enough charge to power the eTRV motor, the red LED
light will flash once every five seconds. At this point, the eTRV‟s stem will automatically
retract so heating will not be controlled.
If you do not change the batteries in good time (one minute),or the batteries lose all their
charge, you will need to reset the day and time (see sections 10b). You will always need to
set the mode setting or simple thermostat setting after the batteries have been exchanged.
Lights
Meaning
1
Red light flashes once every five
seconds
Dead battery needs replacing (see 6b
below)
2
Red light flashes twice every five
seconds
Low battery needs replacing (see 6b
below)
3
Red light flashes three times every
five seconds
No programme or mode set (flashing
stops after 1 hour)
4
Red light flashes four times
every five seconds
Valve fully closed
5
Red light flashes five times
every five seconds
Valve fully open
6
Red light flashes continuously
Motor is running (wait until it‟s finished)
7
Green light constantly on
eTRV is waiting for instructions after
„SET‟or „?‟on the remote control has
been pressed
8
Both green and yellow lights
flash on at the same time
Button pressed correctly, waiting for
another press
9
Red, yellow and green lights flash
on at the same time
OK - instructions have been given
correctly
10
Three red lights flash at the same
time after trying to change a setting
Error - instructions given are not
correct
11
Red, yellow and green lights
flash, at the same time, twice
eTRV has been reset
12
Two red lights flash at the same time
after trying to change a setting
eTRV is locked (see section 12g on
page 31)
13
Two green lights flash at the same
time
eTRV is unlocked (see section 12g on
page 31)
14
Both green and red flash at the same
time
Temperature control is „unlimited‟ (see
section 9b on page 17)
6b Replacing low and dead batteries ▲
6a What the LED indicator means ▲

Page 13 of 36
You can work the eTRV by pressing the grey push button on the front of the eTRV to
adjust the temperature setting, or by using the remote control to set programmes and your
own settings.
You can use the grey push button on the front of your eTRV to:
check the temperature setting and the actual temperature of the
room;
change the temperature setting (when the eTRV is not locked); and
boost to comfort temperature setting for an hour (when the eTRV is
locked).
1. Checking the temperature setting and the temperature of
the room using the eTRV grey push button
Press and release the grey push button once. The LED indicator will first tell you the
temperature setting with a number of green flashes, and then tell you the actual
temperature with a number of red flashes. The table below shows what the flashing
means.
For example, if the eTRV is set to 19°C, and the actual temperature of the room is 21°C,
the LED indicator will flash green four times. There will be a two-second pause and then
the red light will flash six times.
Green
flashes
Temperature
setting
Light on
for two
seconds
10°C
One
flash
16°C
Two
flashes
17°C
Three
flashes
18°C
Four
flashes
19°C
Five
flashes
20°C
Six
flashes
21°C
Seven
flashes
22°C
Eight
flashes
23°C
Nine
flashes
24°C
Red
flashes
Room
temperature
Light on
for two
seconds
Less than 16°C
One
flash
16°C
Two
flashes
17°C
Three
flashes
18°C
Four
flashes
19°C
Five
flashes
20°C
Six
flashes
21°C
Seven
flashes
22°C
Eight
flashes
23°C
Nine
flashes
24°C
7a eTRV grey push button ▲
7Using your eTRV ▲

Page 14 of 36
2. Changing the temperature setting using the eTRV grey push button
(when the eTRV is not locked)
If the eTRV is not locked (see section 12g on page 31), press and hold the grey push
button for two seconds and then release it. Each time you do this it increases the
temperature setting by 1°C.
If you want to reduce the temperature setting, you first need to increase it to 24°C. The next
two-second press will take the temperature setting down to 10°C. The next two-second
press will take the temperature setting up to 16°C. You will then need to increase it 1°C at a
time until it gets to the temperature setting you want (see the example below). After the
temperature has been set, the green light will flash the appropriate number of times to
confirm the new setting (four times for 19°C, five times for 20°C and so on).
For example:
If the temperature setting is currently 19°C and you want to increase it to 21°C, you will
need to press the grey push button twice, holding it in for two seconds each time.
If the temperature setting is 21°C and you want to reduce it to 19°C, you will need to
press the grey push button eight times (four times to drop it back to 10°C and four
times to increase it from 10°C to 19°C), holding it in for two seconds each time. See the
table on page 13.
3. Boosting to COMF setting for an hour using the eTRV grey push button (when
the eTRV is locked)
If the eTRV has been locked using the remote control (see section 12g on page 31),
pressing the grey push button and holding it in for two seconds boosts the eTRV to the
COMF mode temperature setting for one hour. For example, if the eTRV is locked to
control at 19°C and COMF mode is set to 21°C, holding the grey push button in for two
seconds temporarily boosts to the 21°C COMF mode setting for one hour.
You can use the remote control to operate
the eTRV and to check the eTRV settings. To
use the remote control, simply point it at the
infrared receiver on the front of the eTRV.
Firmly press the buttons on the remote
control. The LED indicator on the eTRV will
flash when it receives the signal from the
remote control.
Note
Locking the eTRV will prevent the grey push button from increasing the
temperature by 1°C. See section 12g on page 31 for instructions on how to lock
and unlock the eTRV.
When the eTRV is locked, the grey push button can be used to boost the
temperature setting for one hour.
Note
The remote control must be pointed directly at the infrared receiver, and must be
no more than five to six metres away from it.
7b eTRV remote control ▲

Page 15 of 36
You can use your eTRV as a simple thermostat, giving you the choice of 10 different
temperature settings –off (10°C) and then from 16°C to 24°C. Choose the temperature
setting you want by pressing any of the buttons numbered 0 to 9 on the remote control.
The temperature setting for each button is
shown in the table below
The eTRV will stay on that temperature setting until you change it by pressing another
button. If you change the setting, the LED indicator will flash red, yellow then green to
confirm that you have successfully changed the setting.
To check the current temperature setting, press:
then
The green light on the LED indicator will flash a
number of times to show the temperature setting.
For example, if the temperature is set to 20°C, the
green light will flash five times as displayed on the
handset.
Button
Temperature
setting
0
10°C
1
16°C
2
17°C
3
18°C
4
19°C
5
20°C
6
21°C
7
22°C
8
23°C
9
24°C
Number of
flashes
Temperature
setting
Light on for
two seconds
10°C
One flash
16°C
Two flashes
17°C
Three flashes
18°C
Four flashes
19°C
Five flashes
20°C
Six flashes
21°C
Seven flashes
22°C
Eight flashes
23°C
Nine flashes
24°C
8 Using as a simple thermostat ▲
thermostatHERMOSTAT OPERATION ▲

Page 16 of 36
When you press the OFF/0 button the eTRV goes into the OFF setting. Use this
in the summer to save the battery power.
In the OFF setting, the heating in the room will not come on until the temperature drops to
below 10°C, unless you set your own minimum temperature (see section 12a on page 28).
This is to prevent the water pipes and radiator from freezing. The one-hour extension (see
section 10i on page 26) will still work so you can boost the heating for one hour, after
which time it will return to the OFF setting.
To bring your eTRV out of the OFF setting, press any button from 1 to 9, whichever
temperature you want (as set out on page 15), or one of the following.
The LED indicator will flash red, yellow then green to confirm the change of setting.
You can use the LOW, ECO and COMF buttons to quickly choose an appropriate
temperature for the room.
Pressing any of the LOW, ECO or COMF buttons allows your
eTRV to switch to a stored temperature setting for the chosen
mode. It will then stay in that mode until you put it in a
different mode or change the temperature setting.
You can adjust the temperature settings for these modes as explained in section 9a on
page 17. The LED indicator will flash red, yellow and green to confirm the change of
setting.
Note
The valve will continue to exercise (see section 12h on page 32)
LOW –the eTRV goes to the low temperature setting (pre-set to 17°C)
ECO –the eTRV goes to the economy temperature setting (pre-set to 19°C)
COMF –the eTRV goes to the comfort temperature setting (pre-set to 21°C)
9 LOW, ECO and COMF ▲
8a Off / Frost protection ▲

Page 17 of 36
You can change the temperature settings for each mode (LOW, ECO, COMF) to any
temperature between 16°C and 24°C. When you have changed the temperature, the LED
indicator will flash red, yellow then green to confirm that the setting has changed.
Examples
If you want to change the LOW setting from 17°C to 16°C, press:
then
then
and then
If you want to change the ECO setting from 19°C to 20°C, press:
then
then
and then
If you want to change the COMF setting from 21°C to 22°C, press:
then
then
and then
The LED indicator will flash red, yellow then green to confirm the change of setting.
You can also set the COMF setting to unlimited, so the heating is not controlled to a set
temperature. This can be used where a radiator is enclosed in a decorative housing and
temperature control may be inappropriate.
To change the COMF setting to unlimited, press:
then
then
and then
The LED indicator will flash red, yellow then green to confirm the change of setting.
The eTRV can confirm the LOW, ECO and COMF temperature settings by using the
button on the remote control and then the appropriate LOW, ECO or COMF button.
Note
When COMF mode is set to unlimited, the LED will flash green and then red
when checking the temperature setting.
9c Checking the temperature setting of the LOW, ECO and COMF modes ▲
9b Unlimited temperature control ▲
9a Changing the stored LOW, ECO and COMF mode temperature settings ▲
NOTE
When setting the
temperature for
each mode, LOW
should be the
lowest temperature
you set and COMF
should be the
highest
temperature you
set.

Page 18 of 36
Examples
To find out the LOW mode temperature, press:
then
To find out the ECO mode temperature, press:
then
To find out the COMF mode temperature, press:
then
The green light on the LED indicator will flash a number of times to show the temperature
setting.
For example, if the temperature is set to 20°C,
the green light will flash five times.
When the COMF mode is set to unlimited, the LED
will flash green and then red when checking the
temperature setting of the mode.
When in the OFF, LOW, ECO or AUTO mode you can boost the temperature
setting, for one hour, to the COMF mode temperature setting. For more
details, see section 10i on page 26. The LED indicator will flash red, yellow
then green to confirm the temporary boost.
Number of
flashes
Temperature
setting
Light on for two
seconds
10°C
One flash
16°C
Two flashes
17°C
Three flashes
18°C
Four flashes
19°C
Five flashes
20°C
Six flashes
21°C
Seven flashes
22°C
Eight flashes
23°C
Nine flashes
24°C
One green flash
and one red
flash
Unlimited
9d Boosting from OFF, LOW, ECO or AUTO mode ▲

Page 19 of 36
The AUTO mode allows you to store up to three heating programmes for each
day –one programme for the morning, one for the afternoon and one for the
evening. Each programme consists of three parts.
Days you want the radiator to come on and go off
Times you want the radiator to come on and go off
Temperature mode you want to control to (see section 9)
The heating control is off (with a temperature setting of 10°C) between programmes unless
you set your own minimum temperature (see section 12a on page 28).
For each day, choose the best times and temperatures in each room to maintain a suitable
level of heating. This allows you to save energy by reducing the need to heat rooms that
are not used at certain times of the day (for example, not heating bedrooms during the
day). You can set your own customised programmes (see section 10e), or use quick
programmes stored in the eTRV (see section 10d). You can keep a record of settings
using the tables in section 14 on pages 34 and 35.
When in AUTO mode, pressing SLEEP turns your eTRV off until the next
day when a new programme starts. For example, if a room is no longer
being used, pressing SLEEP shuts off the radiator until the next day when a
new programme starts. Pressing AUTO or RESET cancels the SLEEP
mode and the eTRV will return to the AUTO mode and so whatever
programme you have set.
The first step in setting up a programme is to set your eTRV clock with the current day and
time, as explained below. The time should always be entered in 24-hour format, with hours
being entered first. (For example, for 8:10am input 08:10, and for 2:30pm input 14:30.)
Note
The SLEEP temperature setting is fixed at 10°C unless you set your own minimum
temperature (see section 12a on page 28).
The SLEEP button only works when the eTRV is in AUTO mode.
10b Setting the day and time ▲
10a Sleep ▲
10 Individual programmes ▲

Page 20 of 36
To set the day
Press
then
Then press the button on the remote control for the appropriate day.
For example, if you want to set Friday, press
Then press
The LED indicator will flash red, yellow then green to confirm the change of setting.
To set the time
Press
then
Then press the buttons to input the appropriate time. For example, if it‟s
2:30pm (14:30), press
then
then
then
Then press
The LED indicator will flash red, yellow then green to confirm the change of setting.
If you make a mistake setting the time, three red lights flash on the LED indicator. Try
again until the LED indicator shows red, yellow then green.
Note
The programme you set will only work as you want it to if you have set the correct
day and time.
You can check that the eTRV is set to the correct day
and time.
To check the day
Press
then
The green LED light will flash up to seven times to
show the day, as shown in the table opposite.
For example, Thursday will be indicated by
four flashes.
Number of
flashes
Day
One
Monday
Two
Tuesday
Three
Wednesday
Four
Thursday
Five
Friday
Six
Saturday
Seven
Sunday
10c Checking the day and time settings ▲
Table of contents
Popular Control Unit manuals by other brands

Allen-Bradley
Allen-Bradley DeviceNet 1747-SDN user manual

Graco
Graco Gun Flush Box 244105 Instructions-parts list

Siemens
Siemens SENTRON 7KM PAC 4DI/2DO operating instructions

BFT
BFT SIRIO FR-TMA Installation and user manual

Fort Vale
Fort Vale Super Maxi 0R3/006 Series Maintenance manual

Synapse
Synapse SB67080 Installation and configuration guide