manuals.online logo
Brands
  1. Home
  2. •
  3. Brands
  4. •
  5. Chamberlain
  6. •
  7. Receiver
  8. •
  9. Chamberlain CHAMBERLAIN 635LM User manual

Chamberlain CHAMBERLAIN 635LM User manual

Universal
Receiver
Model
635LM
OWNER’S
MANUAL
CHAMBERLAIN*
Lift
Master.
A
A
WARNING
To
prevent
possible
SERIOUS
INJURY
or
DEATH
from
electrocution:
*
Be
sure
power
is
not
connected
BEFORE
installing
the
receiver.
To
prevent
possible
SERIOUS
INJURY
or
DEATH
from
a
moving
gate
or
garage
door:
*
ALWAYS
keep
remote
controls
out
ot
reach
of
children.
NEVER
permit
children
to
operate,^
play
with
remote
control
transmitters.
*
Activate
gate
or
door
ONLY
when
il
can
be
seen
clearly,
is
properly
adjusted,
and
there
are
no
obstructions
to
door
travel.
*
ALWAYS
keep
gate
or
garage
door
in
sight
until
completely
closed.
NEVER
permit
anyone
to
cross
path
of
moving
gate
or
door.
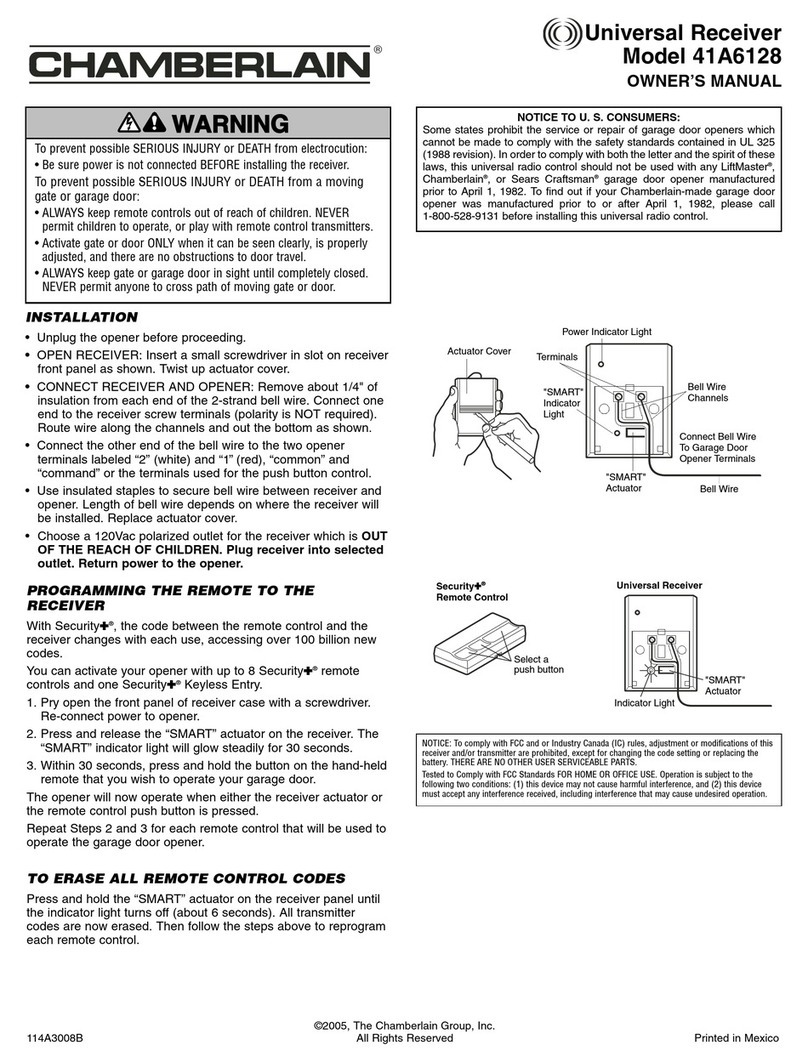
INSTALLATION
*
Unplug
the
opener
before
proceeding.
*
OPEN
RECEIVER
Insert
a
small
screwdriver
in
slot
on
receiver
front
panel
as
shown.
Twist
up
actuator
cover.
-
CONNECT
RECEIVER
AND
OPENER:
Remove
about
W
1
of
insulation
from
each
end
of
the
2-strand
bell
wire.
Connect
one
end
to
the
receiver
screw
terminals
(polarity
is
NOT
required).
Route
wire
along
the
channels
and
out
the
bottom
as
shown.
*
Connect
the
other
end
of
the
bell
wire
to
the
two
opener
termi¬
nals
labeled
"T
(white)
and
‘T
(red),
"common"
and
"command"
or
the
terminals
used
for
the
push
button
control.
*
Use
insulated
staples
to
secure
bell
wire
between
receiver
and
opener.
Length
of
bell
wire
depends
on
where
the
receiver
will
be
installed.
Replace
actuator
sever
*
Choose
a
120Vac
polarized
outlet
for
the
receiver
which
is
OUT
OF
THE
REACH
OF
CHILDREN.
Plug
receiver
into
selected
outlet.
Return
power
to
the
opener
PROGRAMMING
THE
REMOTE
TO
THE
RECEIVER
With
Security*,
the
code
between
the
remote
control
and
the
receiver
changes
with
each
use,
accessing
over
100
billion
new
codes.
You
can
activate
your
opener
with
up
to
8
Security*
remote
con¬
trols
and
one
Security*
Keyless
Entry.
1.
Pry
open
the
front
panel
of
receiver
case
with
a
screwdriver.
Re-connect
power
to
opener.
2.
Press
and
release
the
learn”
actuator
on
the
receiver.
The
learn
indicator
light
will
glow
steadily
for
30
seconds.
3
Within
30
seconds,
press
and
hold
the
button
on
the
hand-held
remote
that
you
wish
to
operate
your
garage
door.
The
opener
will
now
operate
when
either
the
receiver
actuator
or
the
remote
control
push
button
is
pressed.
Repeat
Steps
2
and
3
for
each
remote
control
that
will
be
used
to
operate
the
garage
door
opener.
TO
ERASE
ALL
REMOTE
CONTROL
CODES
Press
and
hold
the
‘learn"
actuator
on
the
receiver
panel
until
the
indicator
light
turns
off
(about
6
seconds).
All
transmitter
codes
are
now
erased.
Then
follow
the
steps
above
to
reprogram
each
remote
control.
NOTICE
TO
U.
S.
CONSUMERS:
Some
states
prohibit
the
service
or
repair
of
garage
door
openers
which
cannot
be
made
to
comply
with
the
safety
standards
contained
in
UL
325
(1968
revision).
In
order
to
comply
with
both
the
letter
and
the
spirit
of
these
laws,
this
universal
radio
control
should
not
be
used
with
any
LiflMaster'.
Chamberlain"
or
Sears
Craftsman*
garage
door
opener
manufactured
prior
to
April
1,
198?
To
find
out
if
your
Chamberlain
made
garage
door
opener
was
manufactured
prior
to
or
after
April
1,1982,
please
call
1-800-
528-9134
before
installing
this
universal
radio
control.
Power
Indicator
Light
Security*
Remote
Control
Universal
Receiver
NOTICE:
To
cc
mply
flith
FCC
and
or
Industry
Canada
rules,
adjustment
or
modilications
of
this
receiv¬
er
and/or
Transmitter
are
prohibited,
extent
for
changing
the
code
setting
or
replacing
tte
battery.
THEHEARE
NO
OTHER
USER
SERVICEABLE
PARTS.
listed
to
Comply
with
FCC
Standards
FOR
HOME
OR
OFFJCt
L.'SE.
Operation
is
subject
te
trie
Vlruvh'j'vvo
conditions:
(11
this
device
may
not
cause
harmful
'Pterterence.
and
(2.1
this
device
mu?:'
!'
■
y:-iterte
ienc
e
re
■
:
e
;ved
indud:ng
inierte
r
ence
hat
may
cause
unde-sir
eel
oj»
?
rat
v
.
■
r-
REPLACEMENT
PARTS:
Remote
Control
housing
only
(no
circuit
board).41A5056-3
Visor
clip
.
2
9
B
1
3
7
Lithium
Battery.10A2Q
Universal
Receiver
(complete).41A5Q41-2
Receiver
Actuator
Cover
.41A3591
FOR
SERVICE
DIAL
OUR
TOLL
FREE
NUMBER:
1-800-528-2S06
■
1
.I
ft
■■
j
^
{
'
■
fc.'?002.
The
Chamberlain
Group,
Inc
All
kiuhts
R<j
served
Printed
in
Mexico
Programming
Garage
Door
Openers
and
Gales
Both
standard
and
rolling
code-equipped
garage
door
openers
and
gales
can
be
programmed
by
following
the
outlined
procedures.
Precautions
When
programming
the
HomeLink®
Wireless
Control
System,
you
may
be
operating
a
garage
door
or
other
device.
Make
sure
that
people
and
objects
are
out
of
the
way
to
prevent
potential
harm
or
damage.
Do
not
use
this
HomeLink
Wireless
Control
System
with
any
garage
door
opener
that
lacks
the
safety
stop
and
reverse
feature
as
required
by
federal
safety
standards.
(This
includes
any
garage
door
opener
model
manufactured
before
April
1,1982.)
A
garage
door
opener
which
cannot
deflect
an
object,
signaling
the
door
to
stop
and
reverse,
does
not
meet
current
federal
safety
standards.
Using
a
garage
door
opener
without
these
features
increases
risk
of
serious
injury
or
death.
For
more
information,
please
visit
our
Web
site,
www.homefink.oom.
Retan
fee
original
transmitter
for
further
programming
procedures
(i.e.,
new
vehicle
purchase).
It
is
also
suggested
feat
upon
fee
sate
of
the
vehicle,
the
programmed
HomeLink
Wireless
Control
System
channels
be
erased
for
security
purposes.
Programming
Note:
For
best
results,
replace
the
battery
in
the
handheld
transmitter
wife
a
new
battery
before
programming.
If
your
garage
door
opener
receiver
(located
in
fee
garage)
is
equipped
with
an
antenna,
make
sure
fee
antenna
is
hanging
straight
down.
1.
For
first-time
programming,
press
and
hold
the
two
outside
buttons
until
the
indicator
light
begins
to
flash
(after
20
seconds).
Release
both
buttons.
Note:
Some
vehicles
may
require
the
ignition
switch
to
be
turned
to
the
second
(or
“accessory")
position
during
the
programming
process.
2.
Hold
the
end
of
your
handheld
transmitter
between
1
and
3
inches
away
from
fee
HomeLink
surface
(located
on
your
visor
or
overhead
console)
keeping
the
irxficator
light
in
view.
3.
Using
both
hands,
simultaneously
push
the
handheld
transmitter
button
and
the
desired
HomeLink
button.
DO
NOT
release
the
buttons
until
step
4
has
been
completed.
4.
Hold
down
both
buttons
until
the
indicator
light
on
fee
HomeLink
Wireless
Control
System
flashes,
first
slowly
then
rapidfy.
When
the
indicator
light
flashes
rapidly,
both
buttons
may
be
released.
(The
rapidly
flashing
light
indicates
successful
programming
of
fee
new
frequency
signal.)
To
activate
fee
garage
door
or
other
programmed
device,
press
and
hold
fee
HomeLink
button—releasing
when
the
device
begins
to
activate.
5.
To
program
the
remaining
two
buttons,
follow
steps
2
through
4.
Rolling
Code
Programming
ftofiing
code
garage
door
openers
which
are
“code-protected”
and
manufactured
after
1996
may
be
determined
by
fee-
Mowing:
*
Reference
fee
garage
door
opener
owner’s
manual
for
verification.
*
The
handheld
transmitter
appears
to
program
the
HomeLink
Universal
Transceiver
but
does
not
activate
the
garage
door.
*
Press
and
hold
fee
trained
HomeLink
button.
The
garage
door
opener
has
fee
rolling
code
feature
if
the
indicator
light
flashes
rapidly
and
then
turns
solid
after
2
seconds.
2
To
train
a
garage
door
with
the
rotting
code
feature,
follow
these
instructions
(the
aid
of
a
second
person
may
mate
the
training
Quicker
and
easier):
1.
Locate
the
training
button
on
the
garage
door
opener
motor
head
unit
Exact
location
and
color
of
the
button
may
vary
by
garage
door
opener
brand,
If
there
is
difficulty
locating
the
training
button,
reference
the
garage
door
opener
owner’s
manual
or
please
visit
our
Web
site
at
www.homeUnk.com.
2.
Press
the
training
button
on
the
garage
door
opener
motor
head
unit
(which
activates
the
“training
NghT).
Note:
Following
step
2,
there
are
30
seconds
in
which
to
initiate
step
3.
3.
Firmly
press
and
release
the
programmed
HomeLink*
button.
Press
and
release
the
HomeLink
button
a
second
time
to
complete
the
training
process.
(Some
garage
door
openers
may
require
you
to
do
this
procedure
a
third
time
to
complete
the
training.)
The
garage
door
opener
should
new
recognize
the
HomeLink
Wireless
Control
System.
The
remaining
two
buttons
may
now
be
trained
rf
this
has
not
previously
been
done.
Refer
to
the
Programming
portion
of
this
text.
The
HomeLink
Wireless
Control
System
(once
pro*
grammed)
or
the
original
handheld
transmitter
may
be
used
to
activate
the
garage
door.
In
the
event
that
there
are
still
difficulties
in
programming
the
HomeLink
Wireless
Control
System,
please
visit
our
Web
site,
www.homelink.com.
Canadian
Programming/Gate
Programming
During
programming,
your
handheld
transmitter
may
automatically
stop
transmitting.
Continue
to
press
the
HomeLink
Wireless
Control
System
button
(note
steps
2
through
4
in
toe
Programming
portion
of
this
document,
found
on
p^e
2)
while
you
press
and
re-press
(“cycle")
your
handheld
transmitter
every
two
seconds
until
the
frequency
signal
has
been
learned.
The
indicator
light
will
flash
slowly
and
then
rapidly
after
several
seconds
upon
successful
training.
Operating
the
HomeLink
Wireless
Control
System
Once
programmed,
toe
HomeLink
Wireless
Control
System
can
be
used
in
place
of
hanctoeki
transmitters.
To
operate,
simply
press
the
appropriate
button
on
the
HomeUnk
Wireless
Control
System.
(The
indicator
light
will
activate,
noting
that
the
signal
is
being
transmitted.)
Activation
wifi
now
occur
for
the
trained
product
(garage
door,
security
system,
entry
door
lock,
estate
gate,
or
home
or
office
lighting).
Note:
Some
vehicles
may
require
the
ignition
switch
to
be
turned
to
the
second
(or
“accessory")
position
for
operation
when
the
vehicle’s
motor
is
not
already
engaged.
Reprogramming
a
Single
HomeLink
Button
To
program
a
device
to
HomeUnk
using
a
HomeUnk
button
previously
trained,
follow
these
stops:
1.
Press
and
hold
the
desired
HomeUnk
button.
Do
NOT
release
until
step
4
has
been
completed.
Z
When
toe
indicator
light
begins
to
flash
slowly
(after
20
seconds),
position
the
handheld
transmitter
1
to
3
inches
away
from
the
HomeLink
surface.
3.
Press
and
hold
the
handheld
transmitter
button.
The
HomeUnk
indicator
light
will
flash,
first
slowly
and
then
rapidly.
4.
When
toe
indicator
light
begins
to
flash
rapidly,
release
both
buttons.
The
previous
device
has
now
been
erased
and
the
new
device
can
be
activated
by
pushing
the
HomeUnk
button
to
at
has
just
been
programmed.
This
procedure
will
not
affect
any
other
programmed
HomeUnk
buttons.
3
Erasing
Channels
tncfividuat
buttons
cannot
be
erased.
However,
to
erase
at!
three
programmed
buttons:
1.
Press
and
hold
the
two
outside
buttons
until
the
indicator
light
begins
to
flash
(alter
20
seconds)
2-
H©tease
both
buttons.
The
HomeUnk*
Wireless
Control
System
is
now
in
die
training
(teaming)
mode
and
cat
be
programmed
at
any
time
folowing
steps
2
through
4
in
the
Programming
section
on
page
2.
Accessories
If
you
would
like
additional
information
on
the
Ho
me
Link
Wireless
Control
System,
Homelink-compatible
products
or
to
purchase
other
accessories
such
as
the
HomeLink
Lighting
Package,
please
visit
our
Web
site
at
www.hormltrt.com.

Other Chamberlain Receiver manuals

Chamberlain merlin CSTAR250 User manual

Chamberlain

Chamberlain merlin CSTAR250 User manual

Chamberlain 8003EV User manual

Chamberlain

Chamberlain 8003EV User manual

Chamberlain 050DCTWFLK User manual

Chamberlain

Chamberlain 050DCTWFLK User manual

Chamberlain STAR450 Series User manual

Chamberlain

Chamberlain STAR450 Series User manual

Chamberlain TriCode TCG1 User manual

Chamberlain

Chamberlain TriCode TCG1 User manual
Chamberlain 365LM User manual

Chamberlain

Chamberlain 365LM User manual

Chamberlain STAR450 Series User manual

Chamberlain

Chamberlain STAR450 Series User manual

Chamberlain LiftMaster 422LM User manual

Chamberlain

Chamberlain LiftMaster 422LM User manual

Chamberlain 955D User manual

Chamberlain

Chamberlain 955D User manual

Chamberlain 8002E User manual

Chamberlain

Chamberlain 8002E User manual

Chamberlain 850LMC User manual

Chamberlain

Chamberlain 850LMC User manual

Chamberlain Ultra RX ULTRX900R User manual

Chamberlain

Chamberlain Ultra RX ULTRX900R User manual

Chamberlain 045DCT User manual

Chamberlain

Chamberlain 045DCT User manual

Chamberlain 050DCTWFLK User manual

Chamberlain

Chamberlain 050DCTWFLK User manual
Chamberlain 7433E User manual

Chamberlain

Chamberlain 7433E User manual

Chamberlain 635LM - Sears LiftMaster Chamberlain User manual

Chamberlain

Chamberlain 635LM - Sears LiftMaster Chamberlain User manual

Chamberlain 412HM User manual

Chamberlain

Chamberlain 412HM User manual

Chamberlain TRICODE User manual

Chamberlain

Chamberlain TRICODE User manual

Chamberlain LiftMaster Star250 User manual
Chamberlain

Chamberlain LiftMaster Star250 User manual

Chamberlain 955D User manual

Chamberlain

Chamberlain 955D User manual

Chamberlain TRICODE TCG2 User manual

Chamberlain

Chamberlain TRICODE TCG2 User manual

Chamberlain LiftMaster 423LM User manual

Chamberlain

Chamberlain LiftMaster 423LM User manual

Chamberlain 1025 User manual

Chamberlain

Chamberlain 1025 User manual
Chamberlain LiftMaster Star250 User manual

Chamberlain

Chamberlain LiftMaster Star250 User manual

Popular Receiver manuals by other brands

Phonocar VM 039 instruction manual

Phonocar

Phonocar VM 039 instruction manual

Cypress COH-Tx1 Operation manual

Cypress

Cypress COH-Tx1 Operation manual

ZGEMMA H.2S user manual

ZGEMMA

ZGEMMA H.2S user manual

Sony STR-DG1200 Specifications

Sony

Sony STR-DG1200 Specifications

Kogan LAPVR50XXXA user manual

Kogan

Kogan LAPVR50XXXA user manual

Yamaha RX-A1010 owner's manual

Yamaha

Yamaha RX-A1010 owner's manual

Motorola DCT1800 user guide

Motorola

Motorola DCT1800 user guide

Shure GLXD4 manual

Shure

Shure GLXD4 manual

Kathrein UFD 346 operating instructions

Kathrein

Kathrein UFD 346 operating instructions

Megasat HD 910 PREMIUM user manual

Megasat

Megasat HD 910 PREMIUM user manual

Inverto IDL-2000S user guide

Inverto

Inverto IDL-2000S user guide

Widex Widex Dream D-PA User instructions

Widex

Widex Widex Dream D-PA User instructions

Denon AVR-97 datasheet

Denon

Denon AVR-97 datasheet

Yaesu FT-710 Service update information

Yaesu

Yaesu FT-710 Service update information

Boss Audio Systems 550B user manual

Boss Audio Systems

Boss Audio Systems 550B user manual

Strong SRT 2121 user manual

Strong

Strong SRT 2121 user manual

Optibox ALLIGATOR user manual

Optibox

Optibox ALLIGATOR user manual

Sokkia GCX3 Operator's manual

Sokkia

Sokkia GCX3 Operator's manual

manuals.online logo
manuals.online logoBrands
  • About & Mission
  • Contact us
  • Privacy Policy
  • Terms and Conditions

Copyright 2025 Manuals.Online. All Rights Reserved.