Changzhou Smoothies Electronics Jumper T16 User manual

16-ChannelDigitalProportionalR/CSystem
ATTENTION
●Please read this manual carefully before use.
●Please keep this manual in a safe place after reading.
Warranty Card
●A warranty card is included in the kit. Please stamp the model store signature and purchase
date at the time of purchase.
Digital Proportional R/C System
User Manual

TABLE OFCONTENTS
INTRODUCTION...............................................4
•Support and Service..........................................4
•Application, Export, and Modification............ 5
•
Compliance Information Statement ...............5
•S.BUS Wiring example....................................38
•S.BUS2 System ............................................. 39
•S.BUS/S.BUS2 device setting ..........................40
•Switch harness..................................................41
•
Definitions of Symbols...................................... 7
•Safety Precautions (do not operate without
reading).............................................................7
BEFORE USE ................................................... 11
•Features..........................................................11
•
Contents and technical specifications ........... 12
•Multicopter/Robot specifications...................12
BASIC OPERATION..........................................42
•Home screen.....................................................42
•Link procedure ................................................43
•After setting......................................................44
•
If the receiver's voltage does not display on
the transmitter................................................45
•
Range testing your R/C system......................46
•Accessories....................................................... 13
•
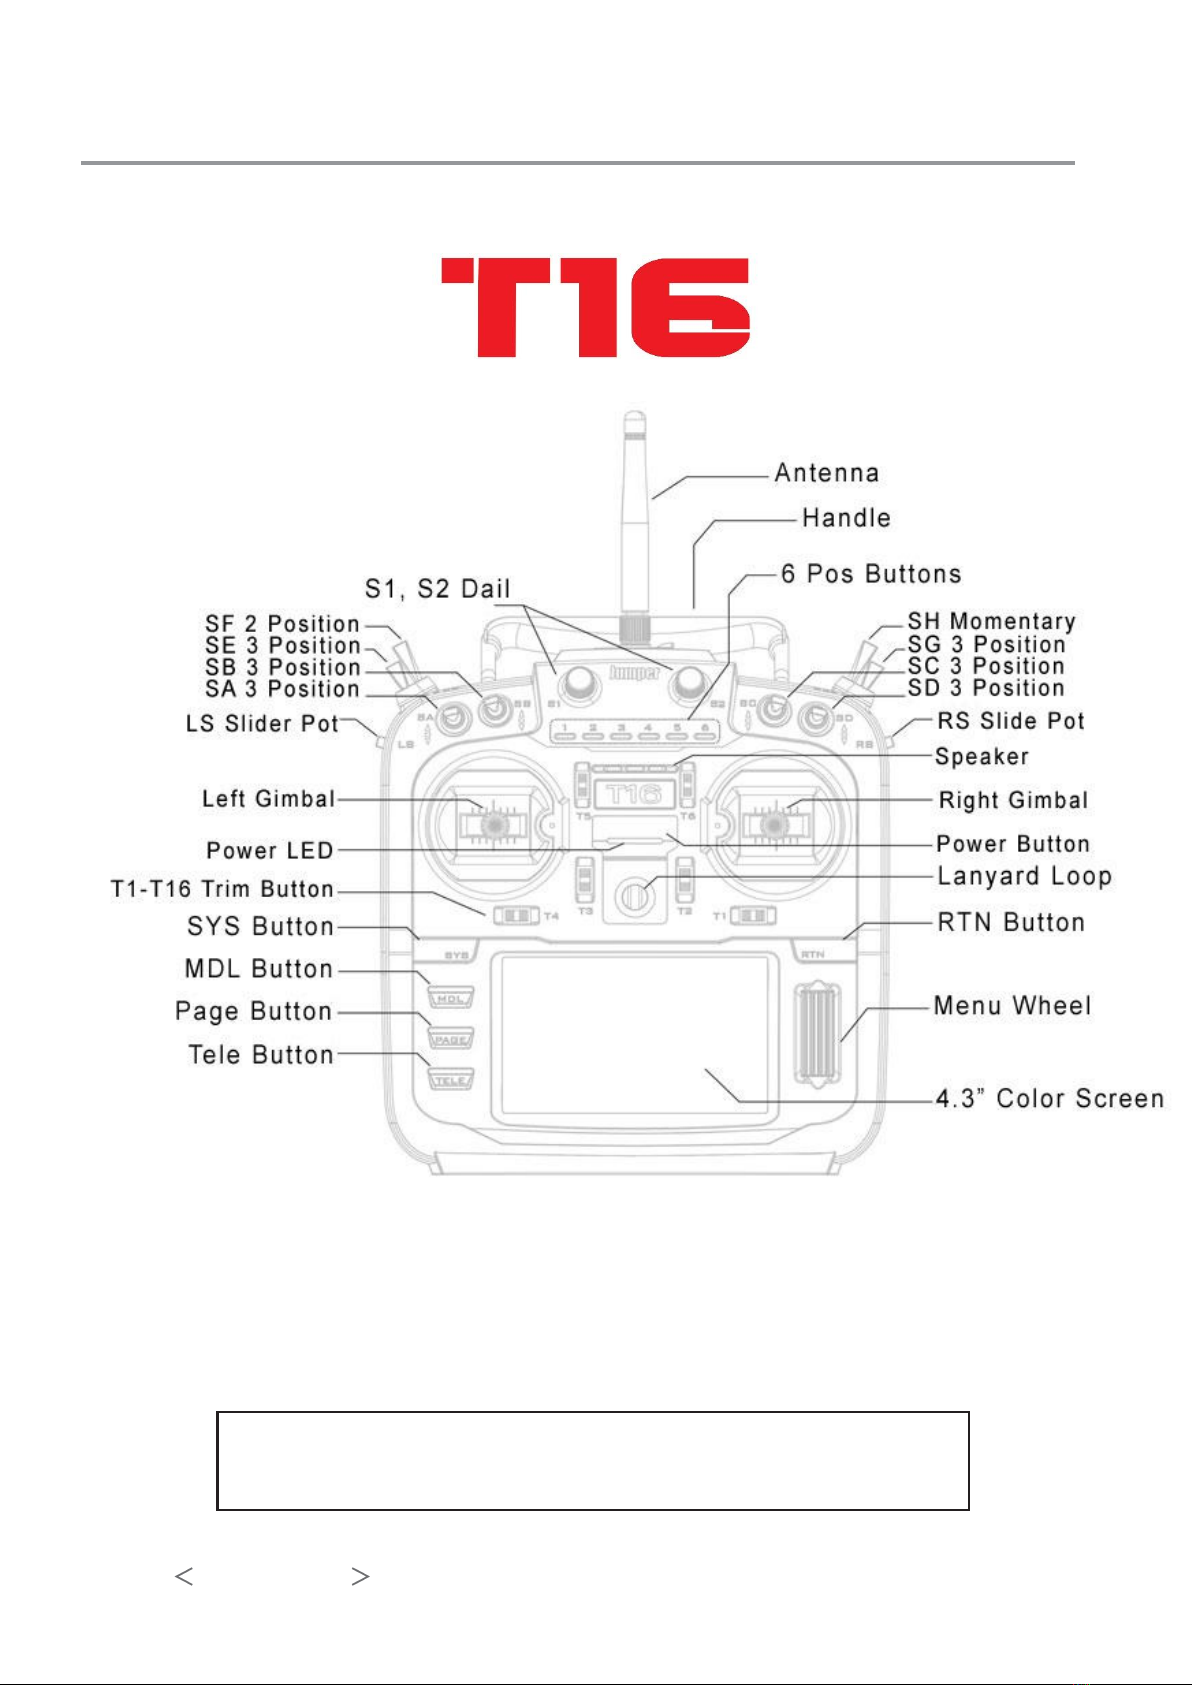
Transmitter controls....................................... 14
•
Transmitter's antenna.................................... 15
•Switch (SA-SH)................................................ 16
•
Volume...................................................................17
•Slide Lever.................................................... 17
•
Digital Trims (T1-T6)..................................... 18
•
Transmitter LiFe Battery FT2F2100B V2....19
•How to turn transmitter power ON/OFF .....21
•
Touch Panel..................................................... 22
•HOME/EXIT and U.MENU/MON................22
•Panel lock ...................................................... 23
•
RF off mode.....................................................23
•Monitor LED display...................................... 24
Model Basic Setting Procedure........................47
Airplane...........................................................47
Helicopter........................................................49
Servos connection by model type..................52
SYSTEM MENU...............................................58
Display.............................................................59
Sound volume..................................................60
Date and Time.................................................60
H/W setting......................................................61
Battery.............................................................62
Range check .........................................62( --46)
S.Bus servo......................................................63
Information.....................................................66
•Stick control ....................................................24
Stick control (Airplane Example)................. 25
Stick control (Helicopter Example).............. 26
Stick control (Multicopter Example)............27
•Stick Adjustment .............................................28
•Adjustment of Throttle Stick (Ratchet) ........ 30
•SD card.......................................................... 31
•
Connector/Plug............................................... 32
•
Receiver nomenclature...................................33
•
Receiver's antenna installation......................35
•Safety precautions when installing servos ...36
•S.BUS/S.BUS2 Installation .............................37
LINKAGE MENU.............................................67
Servo monitor..................................................68
Model select.....................................................69
Model type.......................................................72
Servo reverse...................................................74
End point.........................................................75
Servo speed......................................................76
Sub-trim ..........................................................76
Function...........................................................77
Fail safe............................................................79
System type......................................................80
Trim setting (T1-T6).......................................82

TABLE OFCONTENTS
Throttle cut..................................................... 83
Idle down.........................................................84
Swash ring (Heli only)....................................85
Swash (Heli only, except H-1)........................86
Stick alarm......................................................88
Timer...............................................................89
Function name................................................91
Telemetry system............................................ 92
Sensor..............................................................94
Telemetry........................................................... 97
Telemetry:Receiver [Battery]........................ 98
Telemetry:Receiver [Ext-batt] ......................99
Telemetry:Temperature.................................100
Telemetry:RPM sensor................................101
Telemetry:Altitude.......................................102
Telemetry:Altitude [Variometer]................103
Telemetry:Voltage [Battery]........................106
Telemetry:Voltage [Ext-batt].......................107
Telemetry:GPS [Distance]...........................108
Telemetry:GPS [Speed] ............................... 110
Telemetry:GPS[Altitude, Variometer,Position] .111
Telemetry:Servo sensor [Current].............. 112
Telemetry:Servo sensor [Temperature,Angle] 113
Telemetry:Current sensor [Current].......... 114
Tele. setting (Telemetry setting) .................. 115
Trainer..............................................................117
Warning setting............................................ 120
User menu setting......................................... 121
Data reset......................................................122
MODEL MENU (Common functions) ..........123
Condition select............................................124
AFR ...............................................................126
Dual rate........................................................127
Program, mixes............................................. 128
MODEL MENU (Airplane/Glider/Multicopter)
Aileron differential....................................... 132
Flap setting....................................................133
AIL →Camber flap ..................................... 134
AIL →Brake flap......................................... 135
Aileron →Rudder........................................136
Elevator →Camber.....................................137
Camber mixing .............................................138
Airbrake →ELE ..........................................140
Camber flap→ELE.....................................141
Rudder →Aileron........................................142
Rudder →Elevator ......................................143
Butterfly ........................................................144
Trim mix 1/2..................................................146
Snap roll (Airplane only).............................147
Air brake (Airplane only)............................148
Gyro...............................................................149
Ailevator........................................................151
Acceleration ..................................................152
Motor.............................................................153
V-tail.................................................................154
Winglet ..........................................................155
MODEL MENU (Helicopter)
Pitch curve.....................................................157
Throttle curve...............................................160
Acceleration ..................................................162
Throttle hold.................................................163
Swash mixing ................................................164
Throttle mixing.............................................165
Pitch →Needle..............................................166
Pitch → Rudder (Revolution mixing).........167
Gyro (Helicopter)..........................................168
Governor .......................................................170
Common Operations used in function setup
screen................................................................172
•
Operations value setting........................... 172
•
Operations related to flight conditions........172
•
Operations related to fine tuning VR..........173
•
Operations related to servo speed................174
•
Curve setting operation............................ 175
•Switch selection method................................180
•
Updating .................................................... 184
•
T14SG/FX-22 ⇒T18SZ DATA....................186

Introduction
Thank you for purchasing the Jumper® JumperTX-2.4GHz System T16 Remote Control. The system is
versatile and can be used by beginners and professionals. Please read this instruction manual carefully
before use to ensure correct and safe use. Due to version upgrades, there have been changes. The
information contained in this manual is subject to change without notice.
This T16 transmitter is suitable for all types of models of fixed wings, gliders, helicopters and multi-rotors.
The model type can be selected according to the body used, and various mixing functions can be used.
Relevant precautions for use, export, etc.:
1. This product can be used in unmanned aerial vehicles. It does not apply to any application other than
unmanned aerial vehicle control.
2. Precautions when exporting
A. This product is subject to regulations in to the country of manufacture. Users or companies importing
This product must ensure the product meets regulatory requirements in their country.
B. This product may have restrictions on applications and use specific to y our region.
Please ensure you comply with local regulations when operating.
C. This product is intended only for user with RC Models.
Flight Safety:
We recommend that you fly to a dedicated model airspace, paying special attention to the rules of the arena, as
well as the location, wind direction and any obstacles on the field. Be very careful in areas flying around wires,
high-rise buildings or communication facilities, as nearby may there is radio interference.
Precautions:
The contents of this manual are subject to change without notice. If there are any errors or omissions in this
manual, please contact us, we will correct them as soon as possible, and indicate your corrections.
4 INTRODUCTION

Precautions for ensuring safe use:
Please observe the following precautions to ensure that the product is always used safely. The meaning of
special tags:
From a safety point of view, the parts marked with the following marks in this manual require special attention.
= Prohibited = Pay Attention
Warning: Keep away from children at all times.
Flight considerations: caveat
Never hold the antenna of the transmitter during
flight.
Will cause the transmitter output signal to
decay to a very low level
For safety please keep the model flying within a
visible range
Never fly in ranging mode
In Range Testing mode the transmission
Distance is very short. This mode is for testing only
not for normal flight.
Do not place other transmitting devices such as
mobile phones or wifi devices close to your radio
transmitter while in use. Such devices may cause
interference.
During flight keep the antenna pointed upright to
ensure the best radio link with your model.
It is absolutely forbidden to fly on rainy days,
windy days, and nights.
■ Water inside your device may cause to failure of
the device and lose of control of the model.
Poor visibility can easily cause the loss of control
of the model.
Do not turn of the power to the radio while a
battery is connected or a engine is running
■ Falling to correctly shut down the model
before turning off the radio may lead to
damage or injury.
Take precaution when the using a lanyard with this
device. When radios are hanging from the user neck
it is possible to move the throttle stick causing motor to
activate or engines to throttle up.
Do not operate a model if you feel tired, unwell, under
the influence of legal or illicit drugs or alcohol or in poor
health.
INTRODUCTION 7

Do not operate remove control craft in the
following situations.
■ If others a operating RC craft near by
■ In cities or populated areas.
■Near airports or hospitals or any take of and landing
point or real aircraft.
■In places prohibited by law to operate RC craft.
Do not stand the radio upright when setting up your model
■ The radio may fall over causing unwanted switches
Ensure to check all flight control surfaces working
Correctly before flight.
■Any control surfaces jammed or not working
Correctly may cause crash.
Ensure the throttle is in the lowest position and all
Control switches are in the correct position before
Powering the models receiver.
Do not touch engines or electric motors after use. These
items may be hot and cause burns or injuries.
Keep the model in sight while flying. Do not behind trees
or buildings. Doing so may cause loss of signal and loss
of model or damage to property or people.
Ensure you have setup fail safe with your receiver. Set the
throttle to lowest position in failsafe situation. Refer to the
manual of your receiver for fail safe.
Ensure to return the model screen to the main page.
■Leaving the radio open in a menu screen while
flying may cause unwanted changes of settings.
Be sure to check the remaining battery power of the
transmitter receiver before flying.
Too little remaining power can cause a crash.
When making adjustments on the controller shut the
models engine first. Ensure safety is taken not to start
the throttle and cause unexpected rotation of engine
or motor.
Do not leave device or batteries in hot locations such as
cars or direct sunlight.
Do not cover batteries while charging.Do not leave the
battery in direct sunlight, in a hot weather
Do not use old or damaged batteries
Do not allow the device to get wet or operate the device in
wet conditions.
Do not dispose of batteries in fire
8 INTRODUCTION
■ Charging exceeding the specified value may
cause the battery to heat up, rupture, leak, or
catch fire. Waiting for danger. Do not charge
more than 1C when charging quickly.
■ Do not charge in the car while the vehicle is in
motion. Vibration, etc. will cause possible
problems.
Make sure the power plug is fully inserted into
the socket hole
Be sure to use the charger according to the
specified power supply voltage.
WARNING
Batteries can get hot during charge, Be careful when
charging batteries.
If batteries or charger becomes damaged do not continue
to use.
The battery and charger should be kept in a place that is not
accessible to infants and young children. .
It may cause injury such as electric shock.
WARNING
Do not use batteries that are not suitable for this device.
Follow manufacture guide lines for batteries and chargers
When ever using a charging device.
INTRODUCTION 9

Precautions when using an SD card
WARNING
Do not modify or damage the SD card
Do not use excessive force or bend SD Card
Do not allow the SD card to become wet or exposed to
Sunlight.
WARNING
■
SD cards are electronic products, so be
careful to prevent static electricity. It may
cause malfunction due to malfunction.
Do not use it on radios, TVs, stereos, etc.
Use near devices where interference occurs.
■ May cause an action error.
Do not store the SD card in the following
locations.
High temperature and humidity.
A place with a large temperature difference.
A place with a lot of static electricity and dust.
Places subject to vibration and shock.
A place with magnetic properties around the speaker.
Keep the remote-control SD card slot clean to
prevent foreign matter from entering。
■
A dirty slot may cause malfunction
Do not drop or shock the device during reading
or writing process.
■
It may cause damage or loss of data
WARNING
Do not store the remote control in the
following locations.
・
Extremely hot (40°C [104 °F] or higher)
or extremely cold (-10°C [14 °F] or less local.
・
The place where the sun shines directly.
・
A place with heavy moisture.
・
A place where there is a lot of vibration.
・
A place with a lot of dust.
・
Places with steam or heat.
When not in use for a long time, remove the battery from the
remote control at 0 °C.
Store in a dry environment at 30 °C [32 °F to 86 °F].
■ If it is not taken out, it may cause the battery to age and leak.
Do not touch the plastic part of the equipment directly
with fuel, waste oil, exhaust, etc.
Clean the device regularly to ensure good operation.
10 INTRODUCTION
The data recorded on the SD card,
regardless of the cause of the damage
Precautions
Other considerations
WARNING


Before use
Features:
2.4G multi-function 16 channel transmitter (T16)
The T16 uses a 2.4 GHz two-way communication system. The data transmitted from the receiver can
be received and confirmed by the remote controller.
Color LCD screen
With a 4.3-inch large color LCD screen, the operation at the time of setting is greatly improved.
S.BUS system
The receiver supports the S.BUS interface and can be used with the T16 up to 16 channels. Also suitable for
the output interface of the conventional system。
Select model type function
The T16 remote control is suitable for four types of fixed-wing aircraft, gliders, helicopters and
multi-rotors. The wing type of the main wing/tail can be selected from the model types of fixed-wing
aircraft and gliders, and various swashplate types can be selected from helicopter model types.
Optional lithium battery
The T16 remote uses two 18650 lithium batteries, or 2S lipo.
SD card can be used (default factory standard)
Model data can be saved via SD card.
Edit button
With 6 editing buttons, you can return to the main interface with one button during the operation.
Make setting up easier.
Vibration function
Various alarms and timer reminders, in addition to the optional auxiliary tone, you can also select
the remote-control vibration function to notify.
Voice function
Allows the system to provide the data returned by the receiver in an audible manner.
Before use 11

WARNING
RC fixed-wing aircraft and RC helicopters, as well as a part of multi-rotor aircraft, cannot use the throttle
lever of the automatic return mode. When the finger is released, the engine and motor will enter the
medium speed, so it is very dangerous.
Package content
Your T16 includes the following components:
(Depending on the package, the accompanying content will vary.)
• T16 remote control
• Receiver
• 18650 lithium battery tray
• Orange lanyard
•User's manual
• Only Chinese formal sales channels are equipped with this Chinese manual.
T16 Remote Control
Remote control frequency: 2.4GHz
System: JumperTX mixed control + multi-protocol high frequency transmission
Power supply: 7.4VDC
Receiver
Protocol type: S-FHSS full range
Frsky full range
Flysky full range
DSM2/DSMX full range
WFLY full range
DEVO full range
Wei Li (XK), Hasuan, Sima (SYMA)
More protocols are constantly being updated, users can get the latest update software from the official
website.。
Kit for multi-rotor/robot specifications
12 BEFORE USE
Ordinary Operation
Throttle stick of
ordinary remote
control
Does not automatically
return to a neutral
position
Throttle lever is
spring loaded
Set, it will
automatically return
to neutral position
Components
14 BEFORE USE
The LCD screen used in this manual may be upgraded according
to the settings and version.

Direction of the antenna
The remote-control antenna has directivity. The signal strength is greatest in the horizontal direction.
Therefore, please try not to let the antenna point in the direction of the body. The antenna can be rotated
to adjust the angle. Please adjust the position of the antenna according to the operating habits.
Antenna adjustment range
The horizontal rotation angle of the antenna is 360
degrees, vertical rotation. The angle range is 90
degrees. Please don't go beyond this range
Turning, it will cause damage to the antenna.
Switch configuration and type
Note
In flight, you must never hold the antenna or lead the
metal. Electrical contact antenna
■
The signal output is lowered to make it
unmanageable.
Please do not move the remote control or receiver
with a portable antenna. Do not stretch the antenna.
■
The antenna may be broken, resulting in the danger
of being unmanageable.

2 Position
3 Position 1 Position Momentary

Knob operation
Digital fine-tuning operation
This transmitter is equipped with 6 trimmer switches.
Each time you touch the fine adjustment switch, the corresponding fine adjustment position will move according to the
fixed span. However, if you keep pressing the fine adjustment switch, the movement speed of the fine adjustment
position will increase, and a “beep” sound will be emitted to the boundary point.
Knob operation
The volume S1and S2 knobs allow
analog input.
*The T18SZ transmitter beeps when the volume
knob reaches the center position.
*You can use each setting screen of the mixing
functions to select volumes and define the
direction of movement.
16 BEFORE USE

Slide Lever
S1(Left),S2(Right):
The Linear Slider S1and S2 offer analog input.
*The T18SZ transmitter beeps when the lever comes to the center.
*You can select a slide lever and set the movement direction on the setting screen of mixing functions.
BEFORE USE 17

Example of operation of digital fine-tuning
*Example using Mode2
◆
Elevator and joystick in neutral
position, aircraft out the situation of
rising action.
◆
Elevator and joystick in neutral position,
aircraft There is a decline.
Elevator fine-tuning down
Elevator neutral
position
Move slightly to
the lower side
Elevator neutral
position
Move slightly to
the upper side
◆ After several adjustments, the model will resume horizontal flight.
18 BEFORE USE
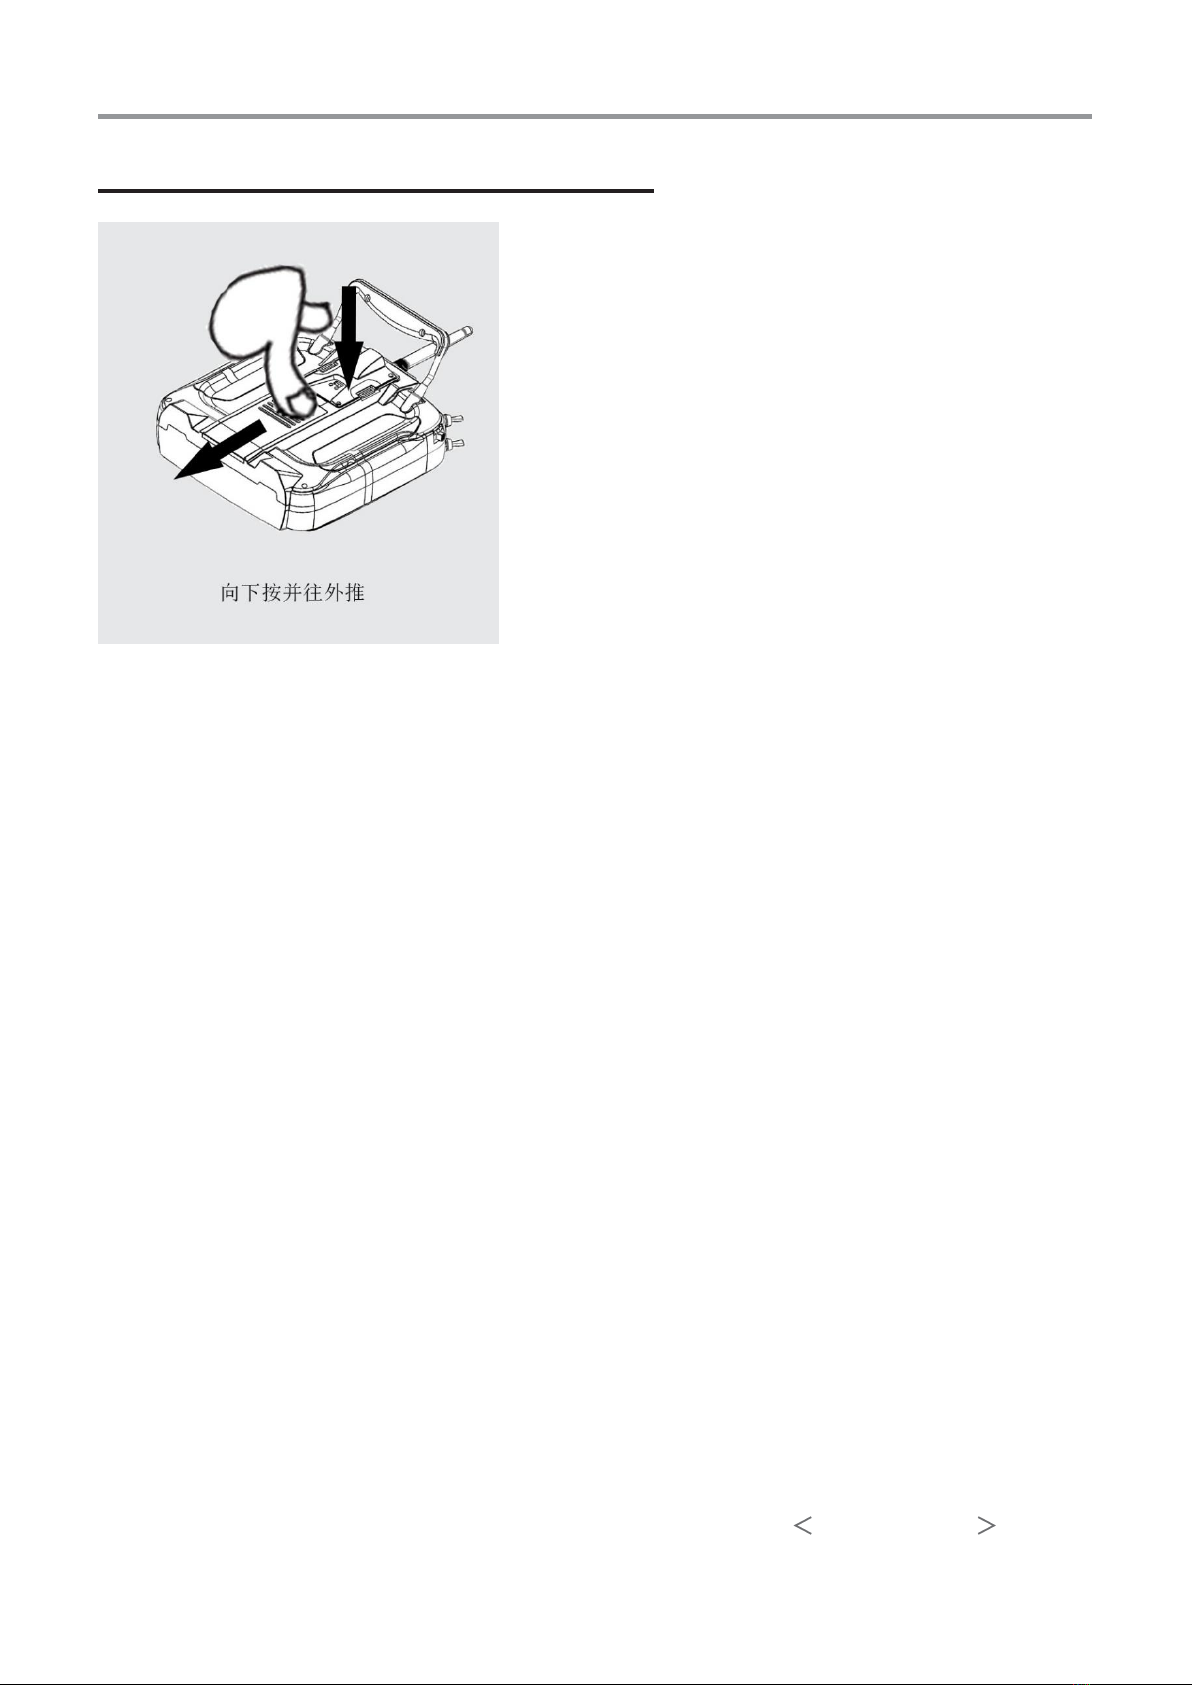
Battery installation and use
Installing/removing the FT2F2100B V2
BEFORE USE 19
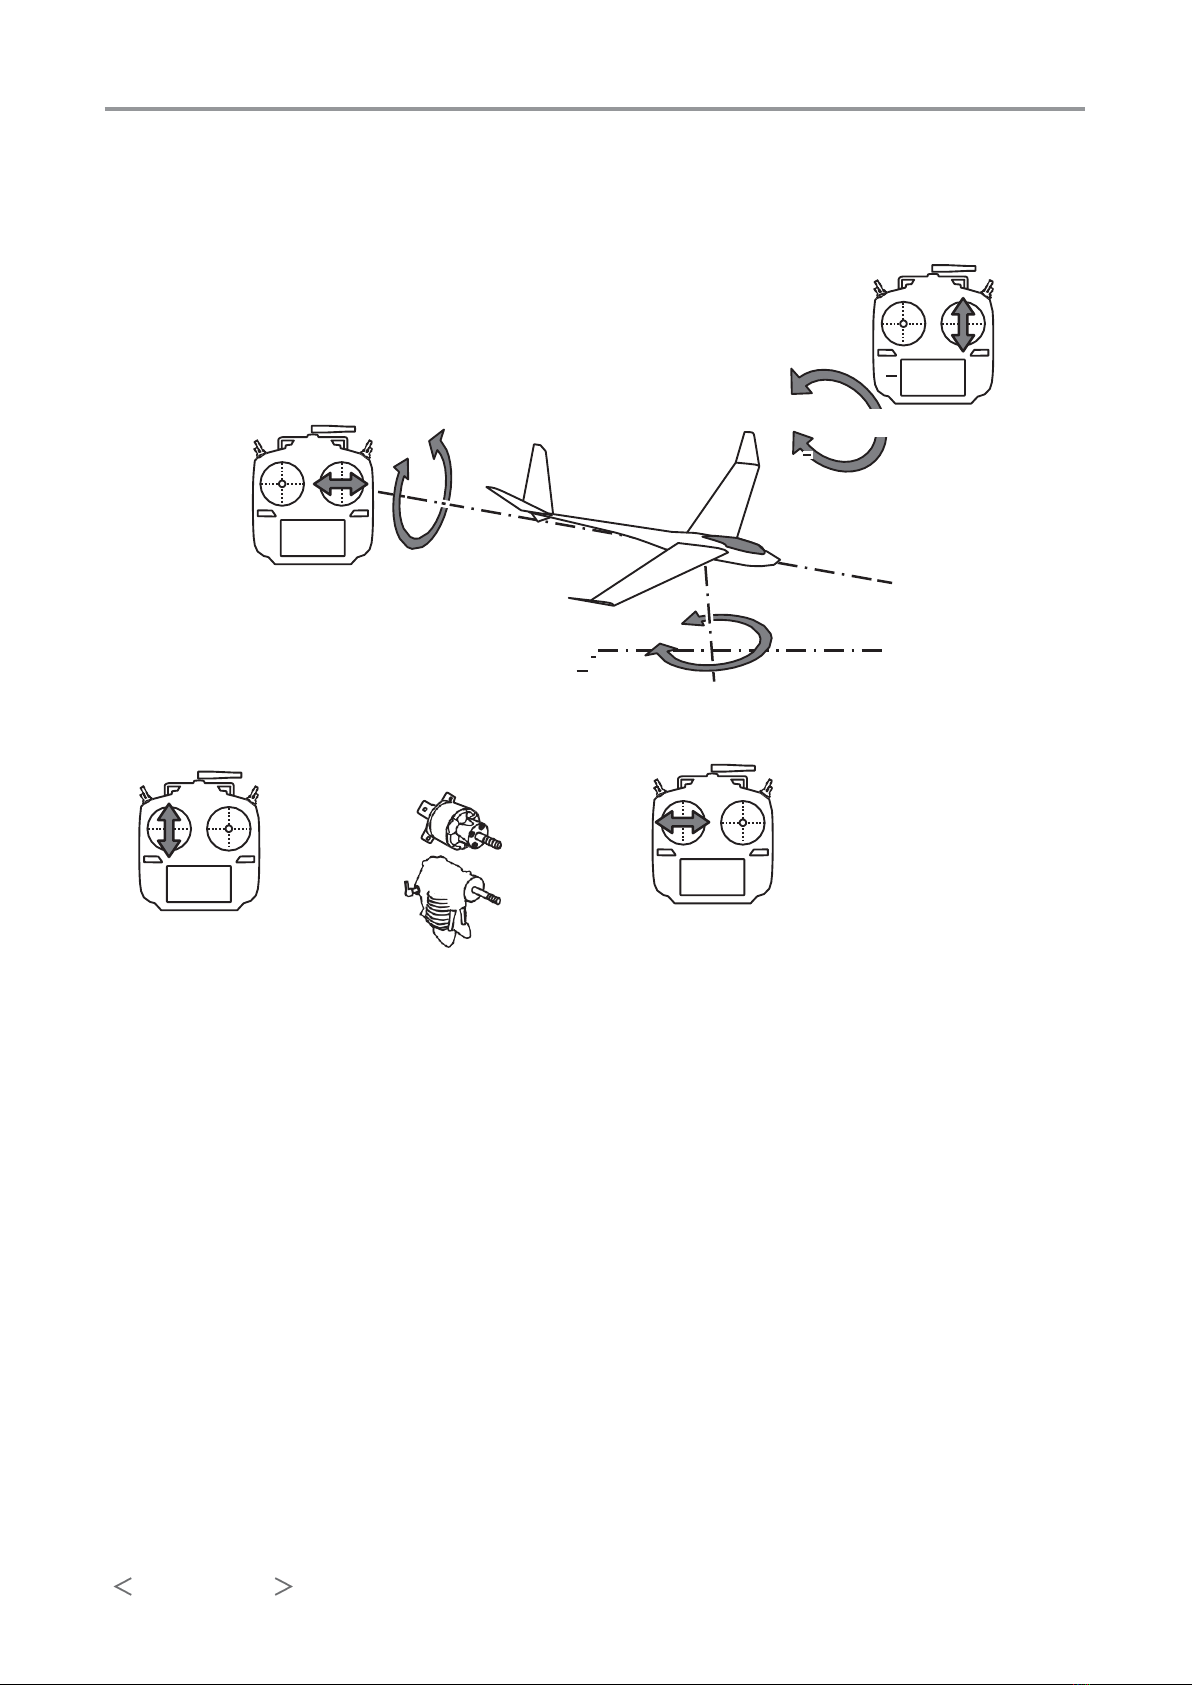
Joystick operation
*Example using Mode2
Aileron operation
Elevator operation
Pitch axis
Engine
Heading axis
Motor Output
Throttle
Operation
Rudder operation
24 BEFORE USE
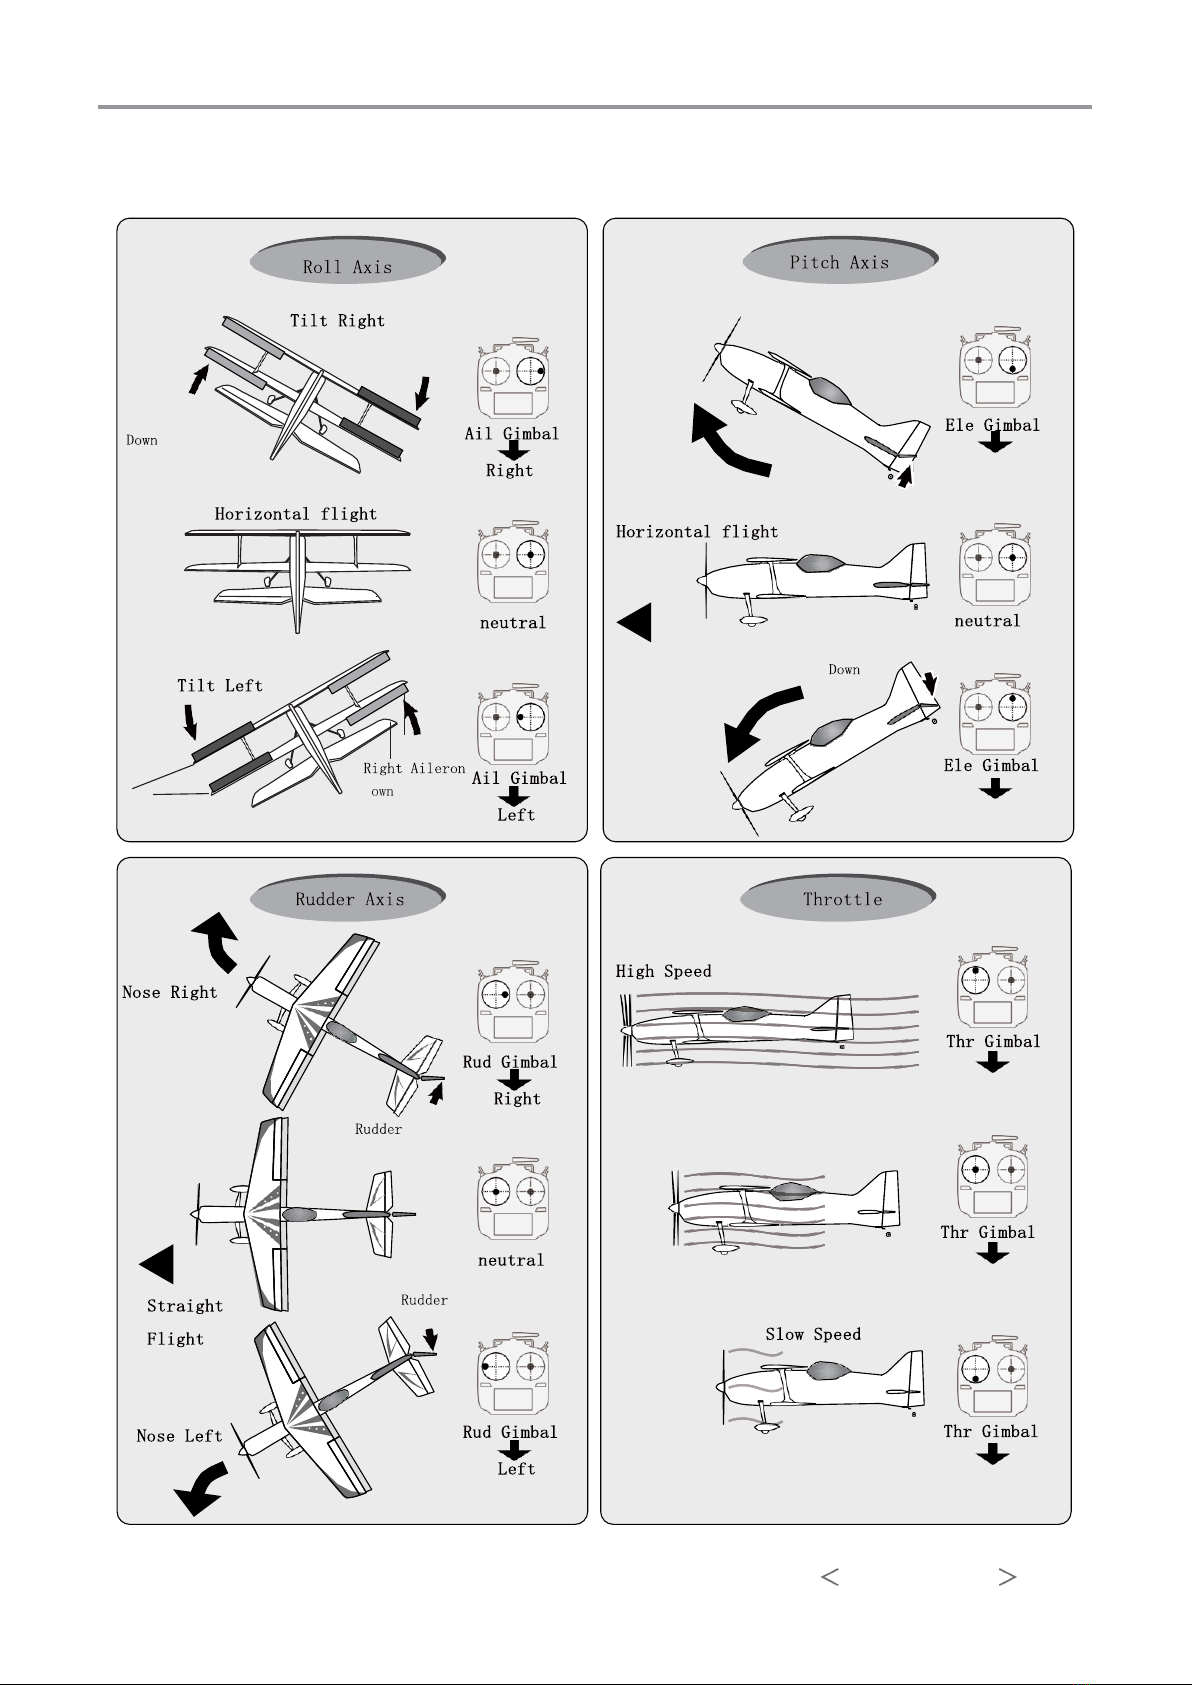
Example of joystick operation: fixed wing example
The method of operation may vary depending on the model.
*Example using Mode2
BEFOEW USE 25
Right Aileron
Up
Left Aileron
Down
Left Aileron
Up
Nose Up
Down
Elevator Up
Elevator
Nose Down
Up
Right
Lef
High
Medium Speed
Med
Low
Popular Remote Control manuals by other brands

Schwaiger
Schwaiger UFB 3801 instructions

MZ electronic
MZ electronic HC600 Instructions for use

Nobile
Nobile F400 -SI Mounting and operation instructions

Kenwood
Kenwood KNA-RCDV330 - Wireless Remote For Multimedia... instruction manual

ComNav
ComNav P4 Remotes Series Installation & operation manual

Daikin
Daikin BRC7EA631 Operation manual


