Channel Master CM-7000PAL DVR User manual

CM-7000PAL DVR

This page intentionally left blank.

This page intentionally left blank. This page intentionally left blank.

You must be aware of safety when you install and use this system. This User Guide
provides various procedures. If you do some of these procedures carelessly, you could
injure or kill yourself or damage equipment or property. Some other procedures require
special attention.
The lightning ash with arrowhead symbol, within an equilateral triangle, is
intended to alert the user to the presence of uninsulated “dangerous voltage” within
the product’s enclosure that may be of sufcient magnitude to constitute a risk of
electric shock to persons.
The exclamation point within an equilateral triangle is intended to alert the user to
the presence of important operating and maintenance (servicing) instructions in the
literature accompanying the apparatus.
Do not try to open the case. There is risk of electrical shock, which may cause
damage to the apparatus and/or personal injury or death to you. There are no user-
serviceable parts inside. Opening the case or making unauthorized changes will
void the warranty.
Warning: To reduce the risk of re or electric shock, do not expose this apparatus
to rain or moisture.
As with all software controlled products, unexpected behavior could arise if the user tries
to perform operations in a non-routine manner. This product, like almost any other high
tech product, is subject to bugs and hence Channel Master CANNOT AND DOES NOT
GUARANTEE OR WARRANT THAT ALL FEATURES, SUCH AS PARENTAL CONTROL,
WILL WORK AS INTENDED UNDER ALL CIRCUMSTANCES. In compliance with the
terms of the GNU Public License (GPL), Channel Master is making some source code
available to the public to download from www.channelmaster.com.
This User Guide covers the CM-7000PAL DVR with HDTV Receiver. This guide may cover
other devices, not listed here. The information in this User Guide may change without
notice. We may issue revisions to tell you about such changes.
Part Number: CM-7000PAL DVR. Copyright © 2010 Channel Master, Mesa, AZ 85202. All
rights reserved.
The software embedded in this product includes code that is copyright © 2005 the FreeType
Project (www.freetype.org) and which is licensed under the FreeType Project Licence of
January 27, 2006.
Manufactured under license from Dolby Laboratories. “Dolby” and the double-D symbol are
trademarks of Dolby Laboratories. HDMI®, the HDMI Logo, and High-Denition Multimedia
Interface are trademarks or registered trademarks of HDMI Licensing LLC in the United
States and other countries.

SAFETY
i
CM-7000PAL DVR

ii
SAFETY
ImporTAn T SAFETY
InSTrucTIonS
1. Read these instructions.
2. Keep these instructions.
3. Heed all warnings.
4. Follow all instructions.
5. Do not use this apparatus near water.
6. Clean only with a dry cloth.
7. Do not block any ventilation openings. Install in accordance with the
manufacturer’s instructions.
8. Do not install near any heat sources such as radiators, heat registers, stoves,
or other apparatus (including ampliers) that produce heat.
9. Do not defeat the safety purpose of the polarized or grounding-type plug.
A polarized plug has two blades with one wider than the other. A grounding-type
plug has two blades and a third grounding prong. The wide blade or the third
prong are provided for your safety. If the provided plug does not t into your
outlet, consult an electrician for replacement of the obsolete outlet.
10. Protect the power cord from being walked on or pinched, particularly at plugs,
convenience receptacles, and the point where they exit from the apparatus.
11. Use only attachments/accessories specied by the manufacturer.
12. Unplug this apparatus during lightning storms or when unused for long periods
of time.
13. Refer all servicing to qualied service personnel. Servicing is required when
the apparatus has been damaged in any way, such as the power supply cord
or plug is damaged, liquid has been spilled or objects have fallen into the
apparatus, the apparatus has been exposed to rain or moisture, does not
operate normally, or has been dropped.
Warning:
>>Apparatus>shall>not>be>exposed>to>dripping>or>splashing>and>no>
objects>filled>with>liquids,>such>as>vases,>shall>be>placed>on>
the>apparatus.
• Locate the CM-7000PAL DVR in an open, well-ventilated area. Do not place the
CM-7000PAL DVR in an enclosure (such as a cabinet) without proper ventilation.
• Do not impede ventilation by covering the ventilation slots (such as with
magazines, curtains, tablecloth, etc.), or the CM-7000PAL DVR will overheat.
• Do not stack the CM-7000PAL DVR on top of or below other electronic devices
as this can cause heat build-up and vibration.
• Do not install the CM-7000PAL DVR in any area where the temperature can be
less than 40 °F or more than 113 °F, and do not cover it.

iii
SAFETY
ImporTAn T SAFETY
InSTrucTIonS
• Connect the power plug to an outlet having a safety ground connection.
The power plug must be readily accessible so that the equipment can be easily
disconnected from the AC power.
• Operate the CM-7000PAL DVR using only the type of power source indicated
on the marking label. Unplug the CM-7000PAL DVR power cord by gripping the
power plug, not the cord.
• Do not overload wall outlets or extension cords — this can result in a risk of re
or electrical shock.
• Never insert objects of any kind through openings into the CM-7000PAL
DVR, as the objects may touch dangerous voltage points or short out parts.
This could cause re or electrical shock.
• Do not attempt to service the CM-7000PAL DVR yourself, as opening or
removing covers may expose you to dangerous voltage, and will void the
Limited Warranty. Refer all servicing to authorized service personnel.
• Unplug the CM-7000PAL DVR from the AC power outlet before cleaning.
The CM-7000PAL DVR is still connected to the AC power whenever it is
plugged in to a live power outlet, even if the CM-7000PAL DVR is turned off
using the remote control.
• Do not place naked ame sources such as lighted candles on or near the
CM-7000PAL DVR.
• Do not expose the remote control batteries to excessive heat or re.
Note to Installer:
>>This>reminder>is>provided>to>call>the>installer’s>attention>to>
Article>810>section>II>of>the>National>Electrical>Code>(NEC)>
that>provides>guidelines>for>proper>grounding>and,>in>particular,>
specifies>that>the>cable>ground>shall>be>connected>to>the>
grounding>system>of>the>building>as>close>to>the>point>of>cable>
entry>as>practical.
Do>not>locate>
the>antenna>near>
overhead>light>or>
power>circuits,>or>
where>it>can>fall>
into>such>power>
lines>or>circuits.>
When>installing>
the>antenna,>take>
extreme>care>to>
avoid>touching>such>
power>lines>or>
circuits,>as>contact>
with>them>can>be>
fatal.

iv
SAFETY
propEr cArE oF Your
EquIpmEnT
• Always handle the CM-7000PAL DVR carefully. Excessive shock and vibration
can damage the hard drive.
• Always turn the CM-7000PAL DVR off, unplug it, and then let it sit idle for at
least 30 seconds before moving it.
• If the CM-7000PAL DVR is cold to the touch, do not plug it in immediately. Let it
sit unplugged at room temperature for at least 45 minutes before plugging it in.
• The use of accessories or attachments not recommended by the CM-7000PAL
DVR manufacturer will void the Limited Warranty.
• Use an outlet that contains surge suppression or ground fault protection.
During an electrical storm or when the CM-7000PAL DVR is left unattended
and unused for long periods of time, unplug the power cord from the wall outlet,
and disconnect the lines between the CM-7000PAL DVR and the antenna. This
will provide additional protection against damage caused by lightning or power
line surges.
• In some TV’s, the presence of xed images for extended periods of time may
cause permanent imprints on the screen. Consult your TV’s manufacturer and
user manual to determine if this is an issue for your TV.

1
WATcHInG TV
-
-
-
-
-
-
-
-
-
-
-
-
-
-
CM-7000PAL DVR

WATcHInG TV
GETTInG STArTEd
2
Welcome! Your new high-denition, digital video recording, over-the-air receiver is
a powerful, yet easy-to-use device you'll enjoy!
Important Safety Note:
>>Do>not>connect>your>TV>or>your>CM-7000PAL>DVR>to>a>power>
supply>until>after>you>have>properly>connected>all>of>the>
cables>using>the>following>instructions.
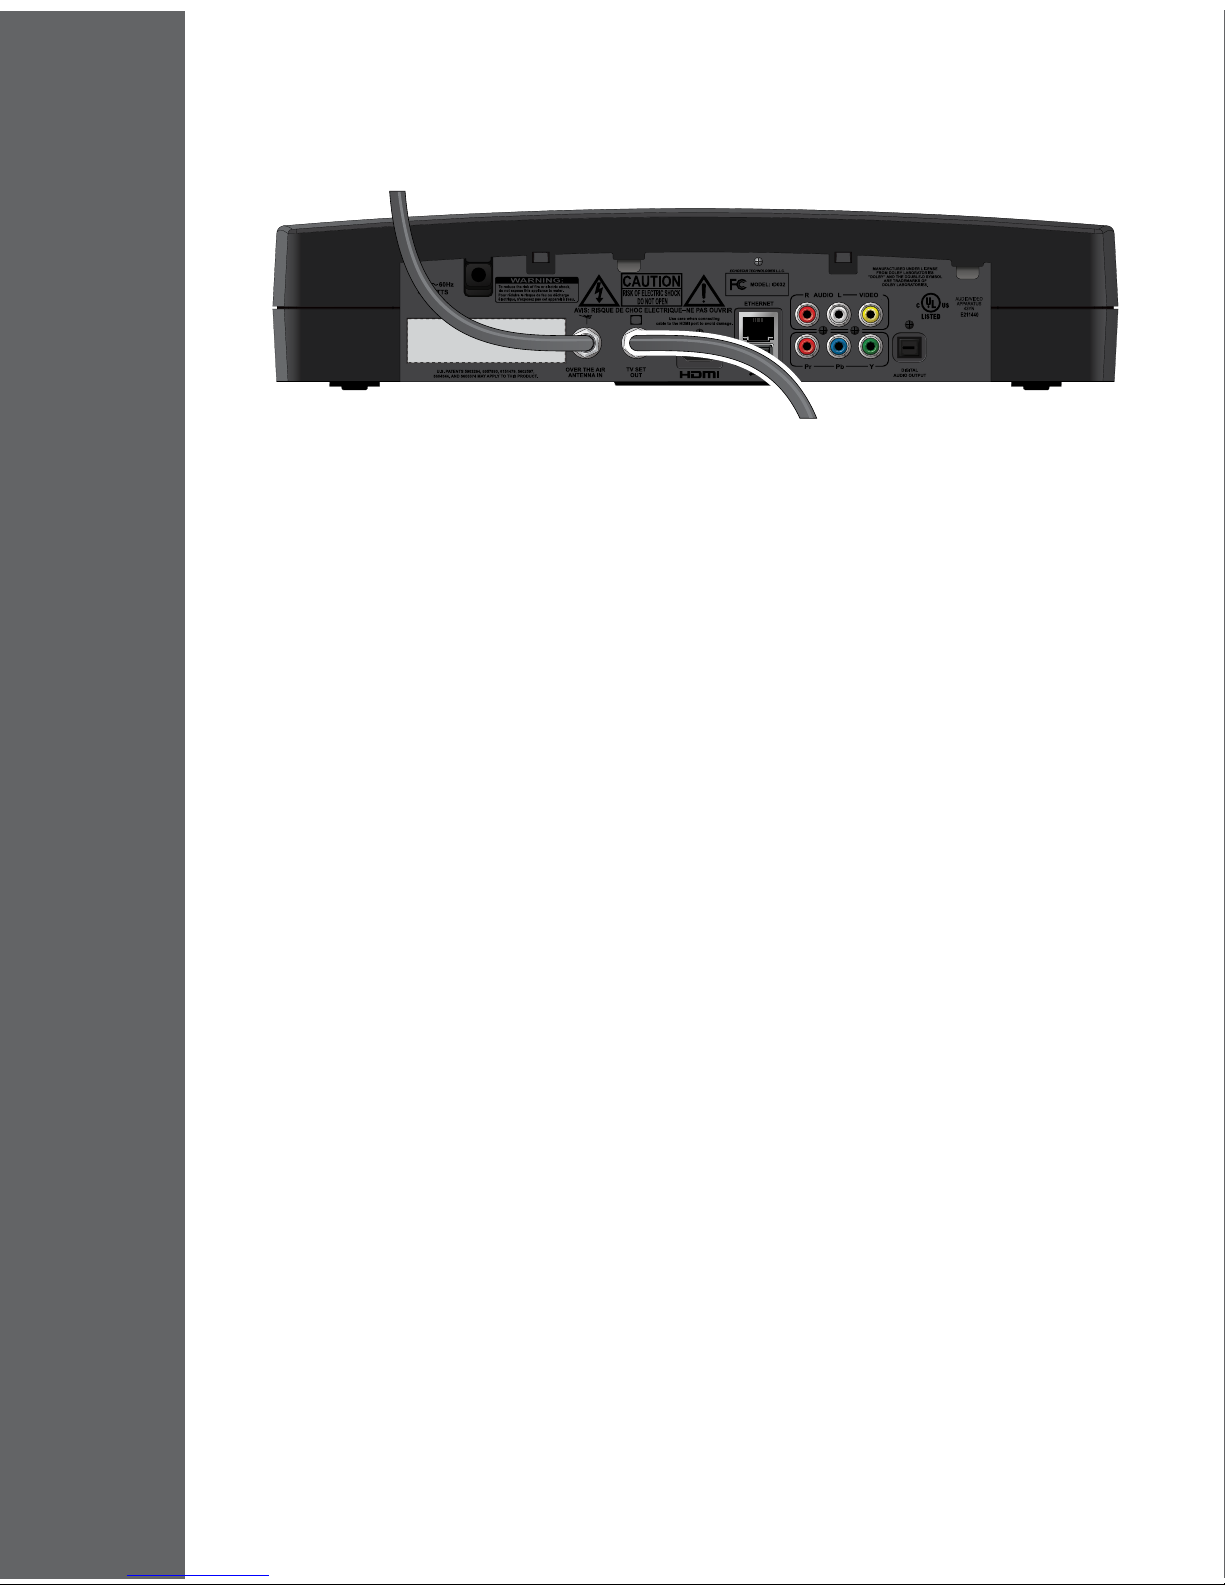
To connect your CM-7000PAL DVR, start with the antenna:
1. On the back of your TV, locate the Antenna In connection, which connects
your TV to your over-the-air antenna. This connection may be labeled
Over-The-Air Antenna In, Cable In, Coax In or another name. Refer to your
TV’s user guide for help locating this connection.
2. Disconnect the coaxial cable from your TV’s Antenna In connection.
Note:
>>If>your>TV>uses>twin-lead>(300>ohm)>connections,>you>will>need>
to>obtain>and>install>a>75>ohm>to>300>ohm>converter>on>your>
TV.>This>converter>can>be>found>at>most>consumer>electronics>
stores.
3. Look at the back of your CM-7000PAL DVR, and locate the Over-The-
Air Antenna In connection. Connect the coaxial cable from step 2 to the
Over-The-Air Antenna In connection on the CM-7000PAL DVR.
Important:
>>Do>not>use>a>wrench>to>tighten>this>connection.
Determine the connection type you’ll use to connect your CM-7000PAL DVR to
your TV. If your TV has:
• An HDMI® connection, you can use a HDMI cable to provide both high-denition
video and stereo audio to your TV’s compatible input (go to step 4).
• Component connectors (Y/Pb/Pr) for video, you can use a set of component
cables for video and either a Dolby Digital optical audio cable, or a pair of RCA-
type audio cables (one right and one left), to connect to your TV’s corresponding
audio input (go to step 5).
• RCA connectors for both stereo audio and video, you can use RCA cables
to connect from the R-Audio-L-Video connection (RCA-type) on your CM-
7000PAL DVR to your TV’s video input (go to step 6).
• An Antenna In connection that uses a coaxial cable, you can connect it to
the TV Set Out connection on the CM-7000PAL DVR, and it will provide both
standard video and mono audio on RF channel 3 or channel 4 (go to step 7).

HDMI Connection
To Television
Optional RCA-type
Audio Connection
Connection
From Antenna
3
WATcHInG TV
GETTInG STArTEd
4. To connect your CM-7000PAL DVR to your TV using an HDMI cable:
-Connect an HDMI cable between the HDMI connection on the
CM-7000PAL DVR and the HDMI connection on your HDTV or monitor.
-Plug the power cord of the CM-7000PAL DVR into an electrical outlet.
Make sure your TV is also plugged in to power and turned on.
-The CM-7000PAL DVR rst displays a startup screen.
-Conrm that you are getting a picture from the CM-7000PAL DVR.
Consult your HDTV user’s guide if you need to change your HDTV’s
settings to display from the HDMI input.
Note:
>>In>most>cases,>connecting>the>HDMI>cable>provides>>
plug-and-play>control>of>the>monitor’s>display>resolution>>
and>other>settings.>However,>your>HDTV>may>require>selecting>>
a>different>format>to>display>video>from>the>CM-7000PAL>DVR>
during>system>setup.
-Follow the instructions for Using the Setup Wizard on page 6 to
complete the initial setup of your CM-7000PAL DVR. Tune to live TV.
-Turn up the volume on your HDTV and conrm you have sound.
- OPTIONAL: If you don’t have sound, your system may require you
to connect a pair of RCA-type audio cables (one red and one white)
between the CM-7000PAL DVR’s audio outputs and your TV’s audio
input connections.

Connection
From Antenna
Optional RCA-type
Audio Connection
Optional Optical
Audio Connection
Component Connection
From Television
OR
WATcHInG TV
GETTInG STArTEd
4
5. To connect your CM-7000PAL DVR to your TV using component cables
(red, blue, and green connections):
-Connect a set of component cables from the CM-7000PAL DVR’s
YPrPb (Red, Blue, and Green) component connections to your TV.
-Connect audio (red and white) RCA-type cables between the
CM-7000PAL DVR’s audio outputs and the audio input connections
that go with the YPrPb video connectors on your HDTV. You can also
use the optional optical connection if you use a device to decode Dolby
Digital audio, for example for 5.1-channel surround sound.
-Plug the power cord of the CM-7000PAL DVR into an electrical outlet.
Make sure your TV also is plugged in to power and turned on.
-The CM-7000PAL DVR rst displays a startup screen.
-Conrm that you are getting a picture from the CM-7000PAL DVR.
Consult your HDTV user’s guide if you need to change your HDTV’s
settings to display from the component video input.
-Follow the instructions for Using the Setup Wizard on page 6 to
complete the initial setup of your CM-7000PAL DVR. Tune to live TV.
-Turn up the volume on your HDTV and conrm you have sound. If
you don’t have sound, verify the connections for both left and right
RCA-type audio cables on the back of your CM-7000PAL DVR and TV.

Connection From
Antenna
RCA-type Audio/Video
Connection To Television
5
WATcHInG TV
GETTInG STArTEd
6. To connect your CM-7000PAL DVR to your TV using composite A/V cables
(red, white, and yellow RCA-type):
-Connect a set of composite cables to your TV’s RCA-type composite
inputs.
-Connect the other ends of the cables to the R-Audio-L-Video
(RCA-type Audio/Video) connections on your CM-7000PAL DVR.
-Plug the power cord of the CM-7000PAL DVR into an electrical outlet.
Make sure your TV also is plugged in to power and turned on.
-The CM-7000PAL DVR rst displays a startup screen.
-Conrm that you are getting a picture from the CM-7000PAL DVR.
Consult your TV user’s guide if you need to change your settings to
display from the correct video input.
-Follow the instructions for Using the Setup Wizard on page 6 to
complete the initial setup of your CM-7000PAL DVR. Tune to live TV.
-Turn up the volume on your TV and conrm you have sound. If you
don’t have stereo sound, verify the connections for both left and right
RCA-type audio cables on the of your CM-7000PAL DVR and TV.
Coaxial Cable Connection
To Television
Connection
From Antenna
WATcHInG TV
GETTInG STArTEd
6
7. To connect your CM-7000PAL DVR to your TV using a coaxial cable:
-Connect one end of coax to the TV’s Antenna In (or Cable In, Coax In
or another name) connection.
-Connect the other end of the coax cable to the TV Set Out connection
on your CM-7000PAL DVR.
-Plug the power cord of the CM-7000PAL DVR into an electrical outlet.
Make sure your TV also is plugged in to power and turned on.
-The CM-7000PAL DVR rst displays a startup screen.
-Conrm that you are getting a picture from the CM-7000PAL DVR.
You may need to select a different channel or input source on your TV.
If you do not see the CM-7000PAL DVR screen on the default output
Channel 3, try tuning your TV to Channel 4. You can change this default for
CM-7000PAL DVR in Setup Wizard, on page 6.
-Follow the instructions for Using the Setup Wizard on page 6 to
complete the initial setup of your CM-7000PAL DVR. Tune to live TV.
-Turn up the volume on your TV and conrm you have sound. If you do
not have sound, check both ends of your coax connection.
To nish installing your CM-7000PAL DVR:
1. If you have not already done so, turn on your TV and change to the correct
channel or input to view your CM-7000PAL DVR.
-If your TV is connected to your CM-7000PAL DVR using the coaxial
connection (step 7), set the TV to channel 3, which is the default output
channel for the CM-7000PAL DVR.

7
WATcHInG TV
GETTInG STArTEd
Note:
>>If>you>have>a>local>channel>that>broadcasts>on>channel>3,>you>
can>change>the>modulator>output>setting>for>your>>
CM-7000PAL>DVR>to>channel>4>during>this>Setup>Wizard,>
described>below.
-If your TV is connected to your CM-7000PAL DVR using any other type
of connection (steps 4-6), you will need to set the TV to the correct video
input or source. Most TV remote controls have an INPUT, SOURCE, or
TV/VIDEO button that you can use to change the TV’s video input or
source. Refer to your TV’s user guide for additional help changing the
TV’s input or source for the CM-7000PAL DVR.
1. Ensure that your over-the-air antenna is connected to your CM-7000PAL DVR
and the antenna is positioned where it can receive local digital broadcasts.
If you need help choosing or installing an over-the-air antenna, refer to
www.antennaweb.org or call Channel Master at 1-877-746-7261.
2. Install the included AAA batteries in the CM-7000PAL DVR remote control.
Be sure to follow the battery installation diagram printed inside the remote
control’s battery compartment.
3. The rst time your CM-7000PAL DVR turns on, a Setup Wizard screen appears
and guides you through the system setup process. The wizard scans for local
digital over-the-air channels, and helps you set up the settings for your local
area and TV display.
4. To navigate through the Setup Wizard, use the SELECT button on your remote
control to conrm the highlighted on screen option. To highlight other options,
use the ARROW buttons.
Tip:
>>If>there>is>a>particular>digital>channel>you>would>like>to>use>
to>optimize>the>position>of>your>antenna,>you>may>select>it>by>
clicking>Point>Antenna>instead>of>Continue>on>the>first>screen>
of>the>Setup>Wizard.
5. Select Continue to begin the wizard. The Setup Wizard immediately begins
trying to nd channels and add them to your system. (If you have previously
run the wizard, then any currently stored channels will be removed.)
6. After the channel scan is complete, you are prompted
for information; use the UP and DOWN ARROWS
and SELECT buttons to complete the setup of the
CM-7000PAL DVR. (Select Next to go to the next setting
or Back to go to the previous setting. Select Help to view
on-screen help for the setting.)
-Select your local time zone from the list, and
indicate whether your area observes Daylight
Savings Time (DST).
WATcHInG TV
GETTInG STArTEd
8
-Choose the resolution your HDTV supports (480p, 720p, or 1080i) and
its aspect ratio (traditional 4 x 3, or “widescreen” 16 x 9). If you choose
a resolution your TV does not support, you may lose video.
-On the next screen, choose the SD output type if you do not have a TV
that supports any of the HD resolutions on the previous screen.
-Set the channel 3 or 4 output setting (if you’re using the coaxial
connection to your TV). If you have a local or cable channel that
broadcasts on channel 3, be sure to change this setting to channel 4.
If you do this, you will also need to set your TV’s channel to 4.
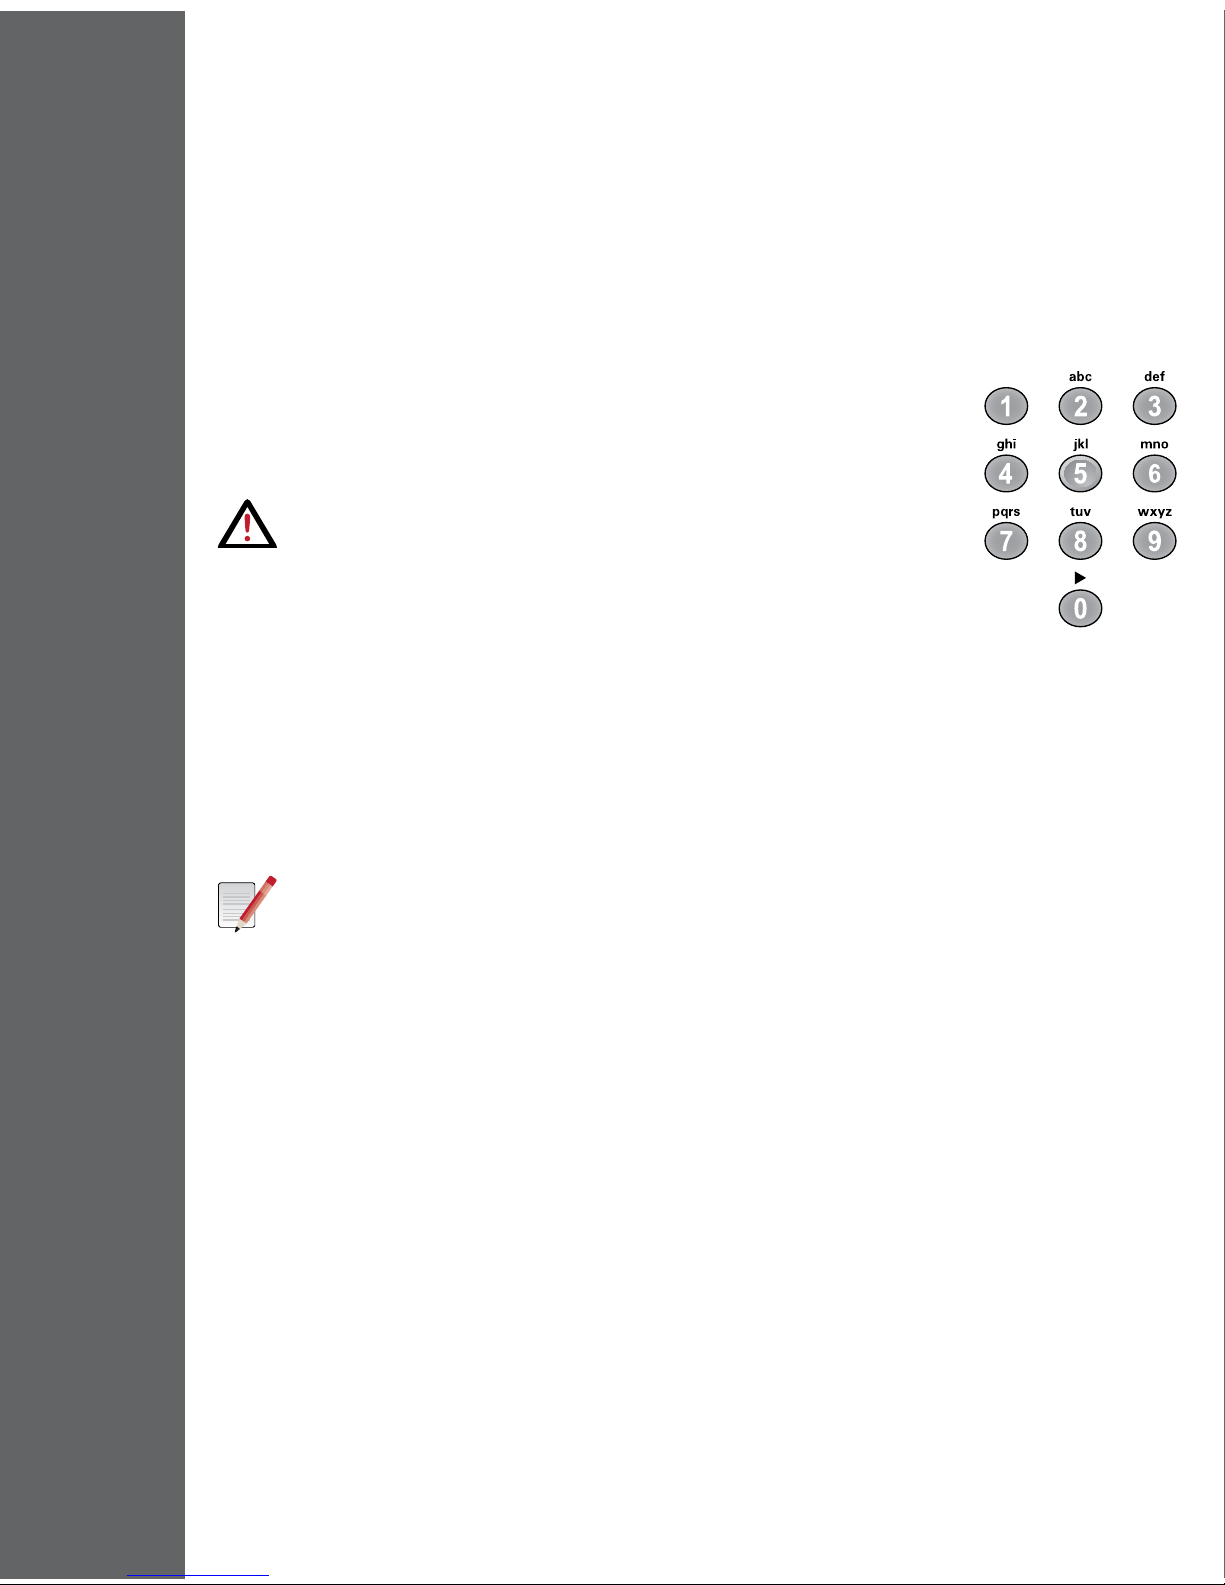
-Use the NUMBER PAD to enter your complete ZIP
Code, which is required to retrieve the proper TV
Guide On Screen program data for your area.
IMPORTANT:
>>If>you>enter>the>wrong>ZIP>Code,>then>the>
information>in>your>guide>will>be>Program>and>
System>Information>Protocol>(PSIP)>data>only.
1. The Setup Wizard will ask you to wait until it nishes
downloading the Program Guide’s PSIP data, and then will exit to display live
digital TV.
2. Congratulations! Your CM-7000PAL DVR is now installed and ready to use!
To start watching TV, press the UP or DOWN ARROW buttons on the remote
to change channels, or enter a channel number using the NUMBER PAD.
Note:
>>Some>broadcasters>choose>to>send>several>digital>channels>
in>their>broadcast>range>rather>than>just>one>channel.>These>
additional>channels>are>called>sub-channels,>and>are>identified>
by>a>dash,>followed>by>a>number>(for>example,>channel>9-2>
is>a>sub-channel>of>channel>9).>On>the>NUMBER>PAD,>enter>
“00902”>to>change>directly>to>channel>9-2,>for>example.

9
WATcHInG TV
GETTInG STArTEd

10
WATcHInG TV
opTIonS For VIEWInG TV
1. Press MENU to see the CM-7000PAL DVR Main Menu. You can
access most features from here. We’ll show you other short cuts
later.
2. Use the UP or DOWN ARROWS to move through the menu options.
Or, enter the option number using the NUMBER PAD.
3. Press SELECT to choose a highlighted menu option.
4. Exit a menu by choosing Cancel from the on-screen options, or
press CANCEL on the remote control.
5. Press VIEW LIVE TV to exit all menus and view current programming.
Note:
>>In>this>Guide,>we’ll>say>“select”>to>mean>
move>the>highlight>to>the>item>and>press>
SELECT>on>the>remote>control.
• Using this HDTV over-the-air receiver, you can view and record both
standard-denition (SD) and high-denition (HD) digital programming.
• You can view up-converted SD and native HD over-the-air digital broadcasts
on a connected HDTV.
• You can view both native SD and down-converted HD programming on a
connected SDTV.
While watching live TV, use the UP and DOWN ARROWS to change
channels one at a time.
Tune to a specic channel number by entering it using the NUMBER PAD. If the
number you entered is invalid, the CM-7000PAL DVR tunes to the nearest valid
channel number. To change directly to a sub-channel number, for example 8-3,
enter a zero before each number, for example “00803”.
11
WATcHInG TV
opTIonS For VIEWInG TV
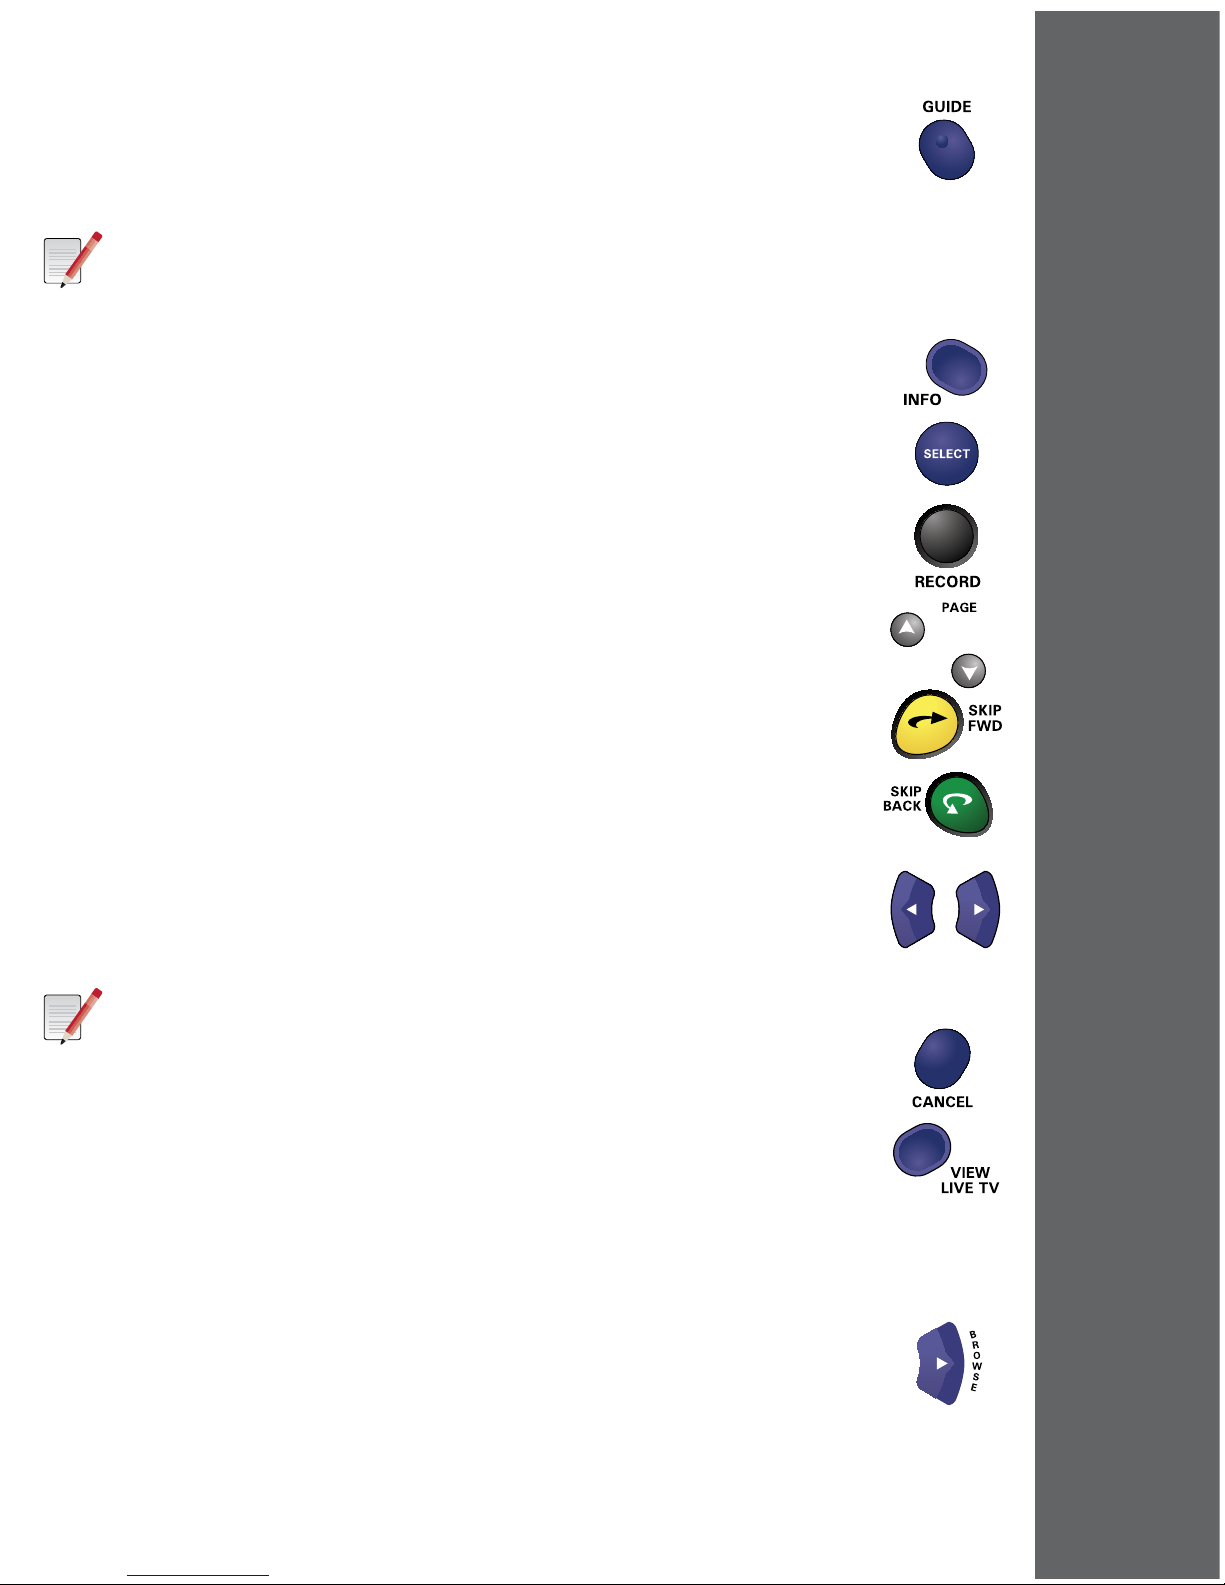
• Press GUIDE to open the Program Guide and view the listing of
current programs and programs scheduled to air over the next
seven days.
Note:
>>Last-minute>changes>made>to>programming>information>and>
schedules>may>not>always>be>reflected>in>Program>Guide>data.
• Highlight a program to see information, or press INFO for more
details.
• Change channels by highlighting a current program and pressing
SELECT.
• Set up recordings for future events by highlighting a future program
and pressing SELECT or RECORD. See Recording My Programs
on page 14 for more information.
• Press PAGE UP/PAGE DOWN to view a set of channels one page at
a time.
• Move forward, then back in time through the guide by:
-Press the SKIP FORWARD button to move ahead 24 hours;
press SKIP BACK to move back 24 hours.
-Use the NUMBER PAD to enter a number of hours to move
ahead, and then press the RIGHT ARROW. Once you’ve
moved forward, then you can use the NUMBER PAD to
enter the number of hours to move back, and press the
LEFT ARROW.
Note:
>>You>cannot>move>backward>in>the>Guide>into>the>past,>
or>forward>more>than>a>maximum>of>7>days>into>the>
future.
-If you entered the Guide from the Main Menu, press CANCEL
to return to the Main Menu, or VIEW LIVE TV.
The Browse Banner allows you to watch a program while looking at program
information on other channels.
• While watching a program, press the RIGHT ARROW to open the
Browse Banner.
• The current program’s information is displayed at the top of the screen.
• The bottom left of the Browse Banner displays information about the current
program on each channel you change to.

12
WATcHInG TV
SETup mEnu
• Use the UP or DOWN ARROWS or the NUMBER PAD to view other
channels’ information, and then the SELECT button to change to
channels.
• On the bottom right, move the highlight using the RIGHT ARROW to
see what shows are coming on in the future on that channel.
Event Search allows you to nd programs in the Program Guide by a
keyword within the Title, the Description, or either one. While watching
a program, press the LEFT ARROW to open the Event Search screen.
You can also press MENU and then select Event Search from the
Main Menu.
REMOTE CONTROL SHORTCUT:
>>Press>SEARCH>(#)>to>open>the>Keyword>search>
screen.>Press>(#)>when>highlighting>an>event>in>the>
Guide>to>perform>a>search>for>all>occurrences>of>
that>event.
1. Enter a search term by using the on-screen keyboard, or entering
letters using the remote control NUMBER PAD.
2. Select Done and then results matching your keyword are displayed.
3. If you want to use different options for this search then previous searches,
select Options and then choose:
• Title to search by program title, Description to search in the Program Guide
descriptions, or Title/Description to search both.
• Exact Match for a very specic search just on your keyword(s).
4. If you chose different search options, the results update automatically.
Choose History to perform new searches using keywords or other criteria you
have previously used and saved on the Event Search screen. Note that you must
select “Save” after a search to see that search in the History list.
Press MENU, and then select Setup to use the Setup Menu to:
• Set and reset password-protected locks, either based on
programming ratings or on a channel-by-channel basis.
• Run the Setup Wizard again, or change any of the individual settings you
selected when the wizard ran previously. You can even restore the system to
the factory DVR defaults from before the wizard was run.
Other manuals for CM-7000PAL DVR
3
Table of contents
Other Channel Master DVR manuals

Channel Master
Channel Master DVR+ User manual

Channel Master
Channel Master CM-7000PAL DVR User manual

Channel Master
Channel Master CM-7400 User manual

Channel Master
Channel Master CM-7000PAL DVR User manual

Channel Master
Channel Master CM-7000PAL DVR User manual

Channel Master
Channel Master CM-7400 User manual

Channel Master
Channel Master DVR+ User manual

Channel Master
Channel Master DVR+ User manual


