Chargerlab KT001 User manual

KT001
User Manual
Welcome to use KT001 USB power meter
designed and provided by yanke928, this
manual will lead you to use the device, please
save the manual properly for looking up.
USB Power Meter
Hint: The model name can vary from one
provider to another. So far, KT001, Kotomi
Premium, CT-2, UT100 are provided, they have
the same features and share the same manual,
PC software and firmware, it is not necessary
to concern about that.
Rev V1.02

Warning
It is a fatal mistake to operate the product
as follows:
1. After high voltage triggered, the
insertion of any device which has a maximum
operating voltage below that high voltage
may cause damage to the device plugged in.
2.When the power meter is monitoring
the voltage & current on the two ports, DO
NOT plug any device into the other ports, this
will cause damage (Especially when the device
being monitored required a high voltage) to
the devices.
3.After using PD listener/trigger, or E-Mark
Info Reader feature, please switch the PD
tester switch back to OFF position for safer
operation.
The author would not be responsible for
any result of a faulty operation.

Revision History
7-8-2017: Initial release.
12-12-2017:
1. Revision version updated into V1.02,
applicable for hardware version below V1.02,
released when firmware version V1.79.0.
2. In warning page, added warning of PD
tester switch switching back after use.
3. Section "Main Menu->Screen Settings",
added manual for "HomePage Update Rate"
and "Enable/Disable Fahrenheit".
4. Section "Auto Enumerate", added
description for internal dummy load on
hardware version V1.02 or above.
5. Added manual for trigger of Huawei SCP,
VOOC/DASH.
6. Added manual for trigger of PD PPS.
7. Added manual for E-Mark Info Reader.
8. Added manual for cable resistance test
mode "Bypass Load-Free".
9. Added new features in PD listener.

10. Section "Misc", added manual for logo
customization, added improved method of
theme customization.

Structure

Home Screen
The home screen has 5divided pages:
The 1st page shows the voltage & current
that the being-monitored devices are working
at the time. The accumulated energy and
capacity are shown below. Time, environment
temperature, data set number are also shown
in this page.

The 2nd page shows the voltages on D+
D- lines, and the protocol that may working
according to them. If a PD device is detected
on the line, the PD indicator turns on, so as
QC.
The arrows on the bottom of the screen
indicates the flowing direction of the
current(or energy) , Voltage, current, and
power are also shown in this page.

The 3nd page shows the time, platform
voltage, energy, capacity, and date.
Note that the platform voltage equals to
energy divided by capacity.

The 4th page shows the voltage, current,
power, and environment temperature in big
font.
The 5th page turns the screen off, usually
to reduce the power consumed by the meter
itself to get higher precision.

Menu
A long press to the middle key will make
the system enter the main menu.

•Switch Group
The device keeps 5groups of data, this
can switch from one to another.
•Time Settings
This option sets the time, which will be
shown on the idle clock page.
•Record Threshold
•Idle Clock Settings
This option sets the record threshold of
the device, the capacity, energy, and time
keep accumulating when the current is
above the threshold. The current below the
threshold will be ignored.
•Clear This Group
This will reset the data in the current
group.
This option contains settings on idle clock.

When there is no operation on the device
for some time, and the current is below
recording threshold, system enters idle clock
mode.
The Idle clock time can be set from 15s to
300s, and clock can be disabled. If a current
above the threshold is detected, system exit
this mode and enter home screen.
•Screen Settings
This option contains settings of the
screen.
Disable/Enable Screen Idle: After a given
time without operation, screen reduces
brightness to save power, this feature can
disabled/enabled this option.
Screen Idle Time: This option sets the
time that the screen turns idle.
Brightness Settings:This option sets the
brightness when the device is in operation.
Idle Brightness:This option sets the
brightness level when the screen is in idle
mode.

•Personalized
The device has some features on
personalization.
Theme Color: The theme color is the UI
color such like dialogues, menus, etc. This
option sets that color.
Enable/Disable Custom Theme: This
enable or disable the custom theme.
The guide of theme customizing is written
at the end of the manual.
•Language
Set the language.
•Clear All Groups
Clear all data sets in one time.
HomePage Update Rate: Set update rate
level of home-page.
Enable/Disable Fahrenheit: Enable or
disable temperature display in fahrenheit.
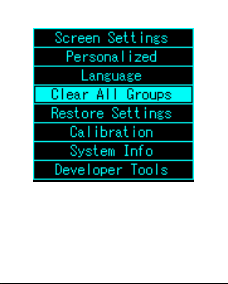
•Restore Settings
Restore settings to default.
•Calibration
The user shall not enter this option.

•System Info
See the software version, author, and
vendor.
•Developer Tools
The user shall not enter this option.

FastCharge Trigger
The device supports the triggering of
QC2.0/QC3.0, Apple 2.4A, PD, HuaWei FCP,
Samsung AFC, and contains the auto detect
routine of the protocols above. The device
also
provides a routine which can detect if an
apple cable is MFI authorized(Reference only).
• Warning
The faulty operation of this feature may
cause damage to the devices. The author isn't
responsible for those consequences.
A left click on the home screen will make
the system enter fast-charge trigger mode.

•QC2.0

In the QC2.0 mode, the user select the
voltage wanted to be triggered by scrolling
the left and right keys. A click on the middle
key is recognized as confirmation.
A double click on the middle key will lead
the system to exit this mode back to the home
screen. The voltage keeps the level that the
user required after exiting this mode.

•QC3.0
In the QC3.0 mode, the user adjust the
voltage by scrolling the left and right keys.
Every click will have an effect of 200mV
according to the protocol.

A double click on the middle key will lead
the system to exit this mode back to the home
screen. The voltage keeps the level that the
user required after exiting this mode.
•Auto Enumerate
Table of contents


