CHARLY Expert 100 User manual

Instruction manual for
rescue system
Expert 100
Expert 120
Version 1.1
Valid from year of construction 2010
State: Nov 2018
Finsterwalder GmbH Tel: +49 89 8116528
Pagodenburgstr. 8 ofce@nsterwalder-charly.de
D-81247 Munich www.nsterwalder-charly.de

2
Contents Page
Safety advice ............................................................................................................. 3
Technical data .......................................................................................................... 3
Intended purpose ..................................................................................................... 3
Operating limits ........................................................................................................ 3
Necessary equipment documents ........................................................................... 3
Mode of functioning of the rescue reserve ................................................................ 4
Care & maintenance ................................................................................................. 4
Storage ..................................................................................................................... 4
Cleaning ................................................................................................................... 5
Packing & inspection intervals .................................................................................. 5
In the case of established damage ........................................................................... 5
Repairs ..................................................................................................................... 5
Control and preparation of the rescue reserve ........................................................ 5
Unit construction ........................................................................................................ 6
Inner container .......................................................................................................... 6
Outer container ......................................................................................................... 6
Packing instructions ................................................................................................... 7
1. Laying out and unravelling .................................................................................................. 7
2. Laying of the panels ............................................................................................................ 7
3. Insertion of the canopy in the inner container ...................................................................... 9
4. Entry in the packing & inspection document .................................................................... 10
Insertion in the outer container ................................................................................. 11
Attachment to the harness ........................................................................................ 11
Insertion in the rescue reserve container of a harness ........................................... 12
Compatibility test ...................................................................................................... 13
Speciality for winch towing ....................................................................................... 13
Pre ight check ......................................................................................................... 13
Transport ................................................................................................................... 13
Flying on the coast .................................................................................................... 13
Environment-friendly disposal ................................................................................... 13
Behaviour reconcilable with nature & the landscape ................................................ 13
Thisinstructionmanualmustbecarefullystudiedbeforettingtherescuereserve!
It has been written to inform you comprehensively about the correct use of your CHARLY rescue
reserve. Should any questions arise related to the use of this rescue reserve then please contact
CHARLY PRODUCTS directly. If you require a professional packing and / or repair service then
please contact your local dealer, or likewise CHARLY PRODUCTS.

3
Safetyadvice
Thisrescuesystemmustnotbeusedwhenspringingfromanaircraft!
The rescue reserve Charly Expert 120 corresponds to the German construction specications LTF
35/03. The use of this rescue reserve is at the owners (users) risk. The manufacturer cannot be held
liable for personal or material damage arising in conjunction with the use of this rescue system.
It is imperative that attention is given to the correct tting of the rescue reserve into the harness, and
that a compatibility test is carried out by a trained specialist. Only a correctly tted rescue reserve
functions properly and thus contributes to safety.
Tecnicaldata
Type Charly Expert 100 Charly Expert 120
Surface area 30 m² 38 m²
Suspension line length 3,40 m 4,50 m
Length of apex lines 4,00 m 5,05 m
Nr. of suspension lines / panels 18 18
Nr. of apex lines 1 1
Full stretched length 7,30 m 6,80 m
Max. loading according to LTF 100 kg 120 kg
Min. certied loading 50 kg 60 kg
Sink speed b. max. loading 5 m/s 5,55 m/s
Volume 250x220x80 mm 250x220x90 mm
Type inspection # EP 027.2010 EAPR-RG-7094/09
Weight 1,5 kg 1,7 kg
Manufacturer FinsterwalderGmbH/CharlyProdukte
Pagodenburgstr. 8
D-81247 Munich
Tel: +49(0)89 8116528
Mail: ofce@nsterwalder-charly.de
Web: www.nsterwalder-charly.de
Intendedpurpose
Rescue reserve for single seat paraglider pilots to be manually deployed in cases of emergency.
Operatinglimits
Maximum usage speed: 115 km/h (32 m/s)
Packinginterval:12 months, thereafter repacking is necessary and must be noted in the packing
document.
Re-inspectioninterval:We recommend that the rescue reserve should be completely inspected
every 24 months. The re-inspection must be noted in the packing document.
Certieddurationofoperation:10 years, thereafter up to 12 years by annual re-inspections.
Necessaryequipmentdocuments
• Instruction manual
• Packing - and Inspection proof document
• The accompanying aviation sport equipment specication is a component part of this instruction
manual

4
Modeoffunctioningoftherescuereserve
In emergency situations the release handle is pulled up with a powerful jolt. In this manner the outer
container is opened and the rescue reserve released. Subsequently the reserve packet (still packed
in the inner container) must be thrown boldly into free air space. The release handle is thrown away
together with the reserve !
The inner container is constructed in such a way that the suspension lines and the reserve canopy
are rst released after being thrown.
A premature and undesired opening is thus prevented. This minimises the risk of the reserve beco-
ming tangled up with the paraglider / pilot / or any other reason for the emergency situation (eg.
collision with other pilots etc). In addition, the maximum speed of the inner container necessary for
a fast opening of the rescue reserve is rst reached after it has left the hand of the pilot.
As a general rule: the faster the reserve is thrown, the quicker it will stretch and open.
After being thrown, the aid chute on the inner container opens rst, and immediately afterwards the
inner container itself. The powerful throw and/or the ow of air stretches the suspension lines and
open the canopy.
When the reserve has completely opened, then the remaining height above ground must be ascer-
tained. If sufcient height allows, an attempt should be made to make the paraglider inoperable in
order to avoid a V – attitude from the reserve and the paraglider.
By insufcient height, the pilot should keep his eyes on the ground and prepare to touch down.
Care&maintenance
The CHARLY Expert 18 rescue reserve has been conceived for high loading and extreme opera-
tional demands. Accordingly, only especially durable materials were chosen, that have proven their
worth over many years. Since the service life is dependant to a great extent upon the care
of the owner however, we recommend that the reserve be regularly examined for wear and tear, and
where necessary, damaged components should be immediately repaired directly by CHARLY or by
a CHARLY authorised service centre.
Specialattentionshouldbepaidtothefollowingpoints:
• The reserve should not be unnecessarily exposed to the sun (ultraviolet rays).
• A damp or wet reserve should be completely unpacked & dried at room temperature or outside in
the shade.
• Do not subject the packed reserve to large changes in temperature. Make sure that sufcient air
circulation is present to avoid condensation.
• If the reserve has come into contact with salt water then rinse thoroughly with fresh water.
• Only clean the reserve with fresh water, at the most with neutral soap. Under no circumstances
should solvent be used.
• Warning:Chemicals, cleaning agents, insects, mildew etc can reduce the strength of the con-
struction parts just the same as mechanical inuences can.
Storage
Oils, fats, acids and paints must not be stored in the immediate vicinity of the reserve. Storage
should be in a well ventilated & dry room. Rescue reserves that are not to be used for longer periods
of time should be stored unpacked.

5
Cleaning
Soiled reserve canopies and containers can be washed with clean tap water. Acids or mildew can
affect the strength of the reserve. Rescue reserves that are soiled in such a manner must be retur-
ned to the manufacturer for re-inspection and repair where necessary. Reserves that have come
into contact with salt water must be thoroughly rinsed with fresh water as soon as possible ! Never
wring out or brush the canopy!
Packing&inspectionintervals
In order to guarantee a trustworthy and rapid opening at all times, the rescue reserve must be aired
and repacked according to current packing instructions every 12 months. If the reserve has been
exposed to moisture, dampness or extreme heat then it has to be immediately repacked.
If the reserve has been subject to an emergency deployment, or a deployment during safety trai-
ning, then it must be re-inspected by the manufacturer or by an authorised service centre. Likewise
the reserve must be thoroughly inspected from trained persons following increased stress (eg.
landing in a tree).
Inthecaseofestablisheddamage
Should damage be ascertained whilst checking, then the reserve should be sent to Charly Products
to be repaired. This also applies in cases when the affect on the airworthiness cannot be clearly
established. Repairs must be undertaken only by the manufacturer !
Repairs
As a matter of principle, repairs to rescue reserves must never be carried out oneself. The various
seams and lines have been manufactured with the utmost precision. For this reason, only the
manufacturer or an authorised service centre should undertake repairs using original materials.
Acids and mildew can inuence the strength of the construction parts. Rescue reserves that are
soiled in such a manner must be returned to the manufacturer for re-inspection and repair where
necessary.
Controlandpreparationoftherescuereserve
Prior to packing, the reserve canopy must be hung up off the ground in a well ventilated room, out of
direct sunlight (ultra-violet rays) for at least 6 hours. If the reserve canopy has become wet , always
ensure that the canopy lines (which are considerably heavier when wet) are supported & cannot be
stretched. Do not dry using a heater / radiator!
The packer has to inspect the reserve for possible damage. A re-inspection either by the manufac-
turer or by an authorised service centre must be carried out after an emergency deployment and
before the reserve is re-packed.
A release check should be undertaken when tting in the outer container, and it should be determi-
ned that a deployment strength of 70 N is not exceeded.
6
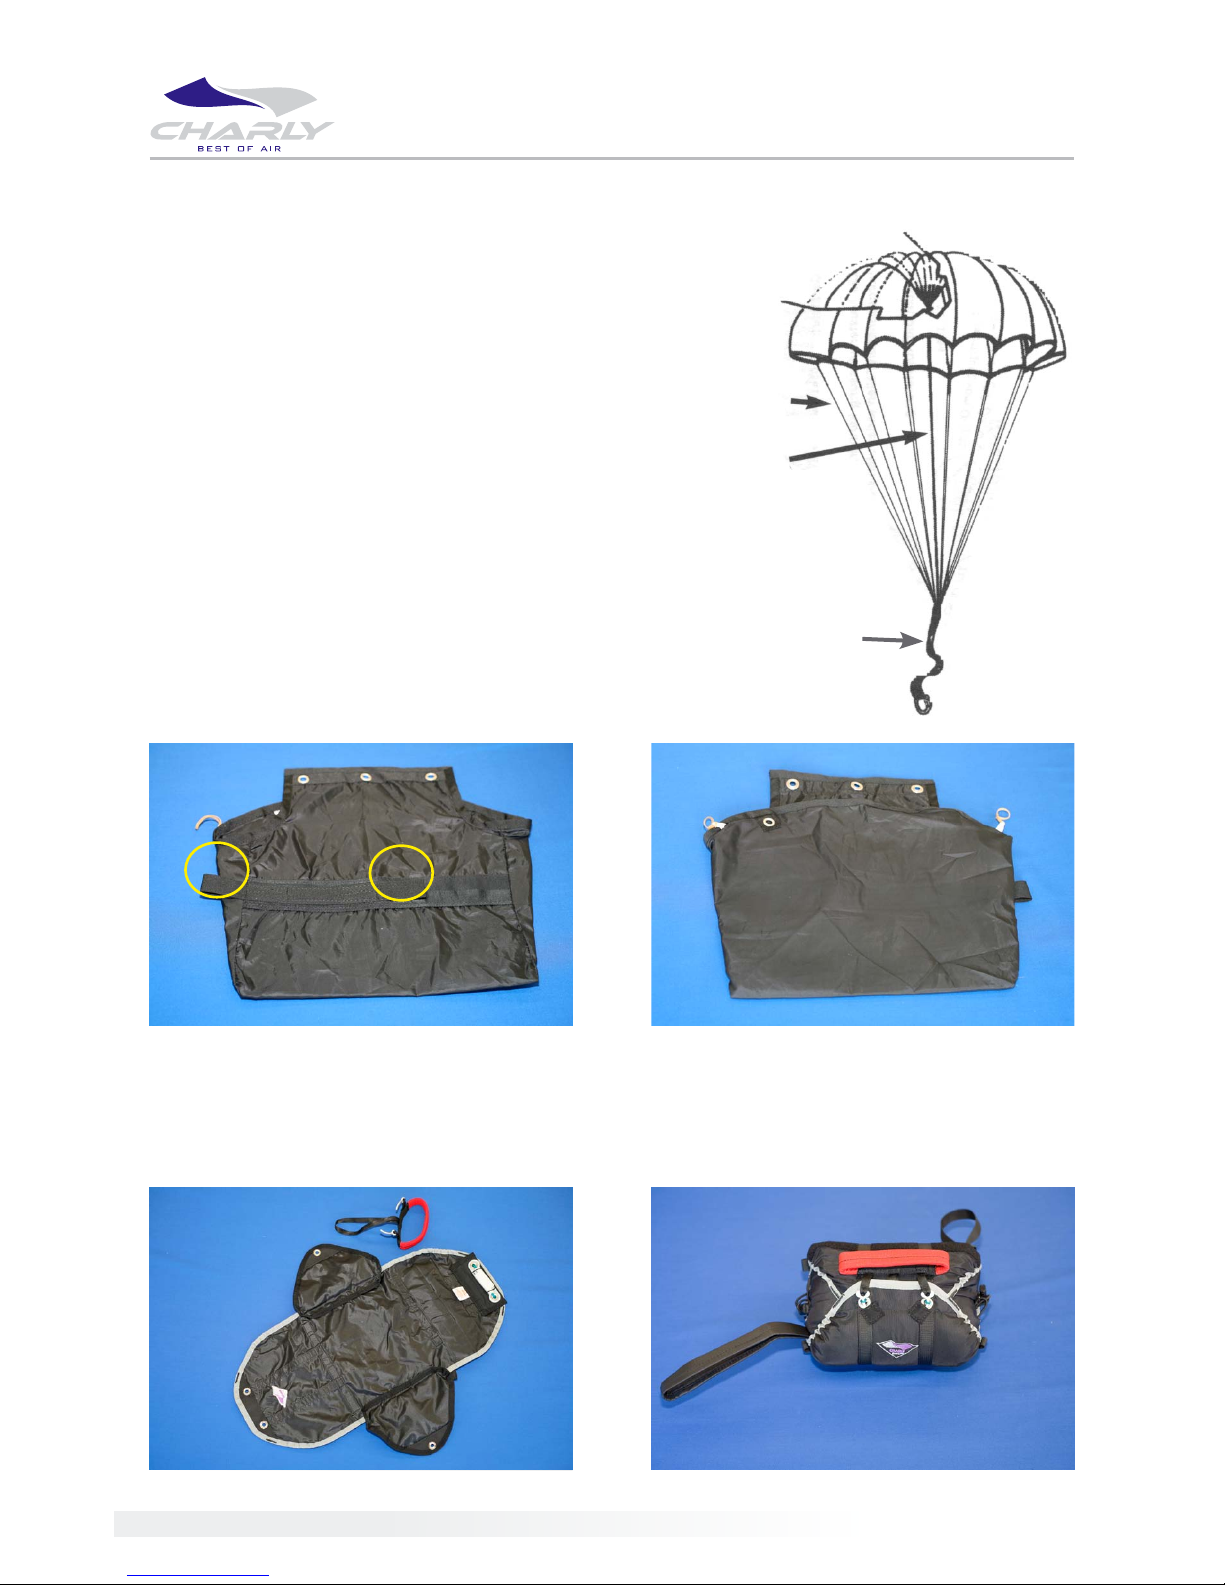
canopy
apex
suspension
lines
apex line
bridle
Unitconstruction
The rescue reserve canopy of the CHARLY Expert 100
/120 consists of 18 panels. The panels are made from
gas-permeable, tear-resistant nylon material weighing
a mere 30g/m2. The middle apex is drawn down and
positioned with an elastic apex line. The bridle line has
a strength of approx. 2300 kg. The apex line has a
strength of approx. 400 kg and it is spliced to the apex
lines and the bridle.
Innercontainer
The accompanying inner container is from tear retar-
dant nylon material, the edges of the inner container are
reinforced. The „envelope“ inner container has a three-
point fastening. On the at side of the inner container
are 2 places where the deployment handle of the outer
container / harness can be attached.
Outercontainer
The outer container is made from strong, water-repellent nylon material. It consists of 2 side fastening aps,
upper and lower fastening aps, and a deployment handle with 2 release pins which are used to fasten the
container.
Outer container open with deployment handle
Inner container with attachment (loop-through) points for
the deployment handle
Inner container
Outer container closed

7
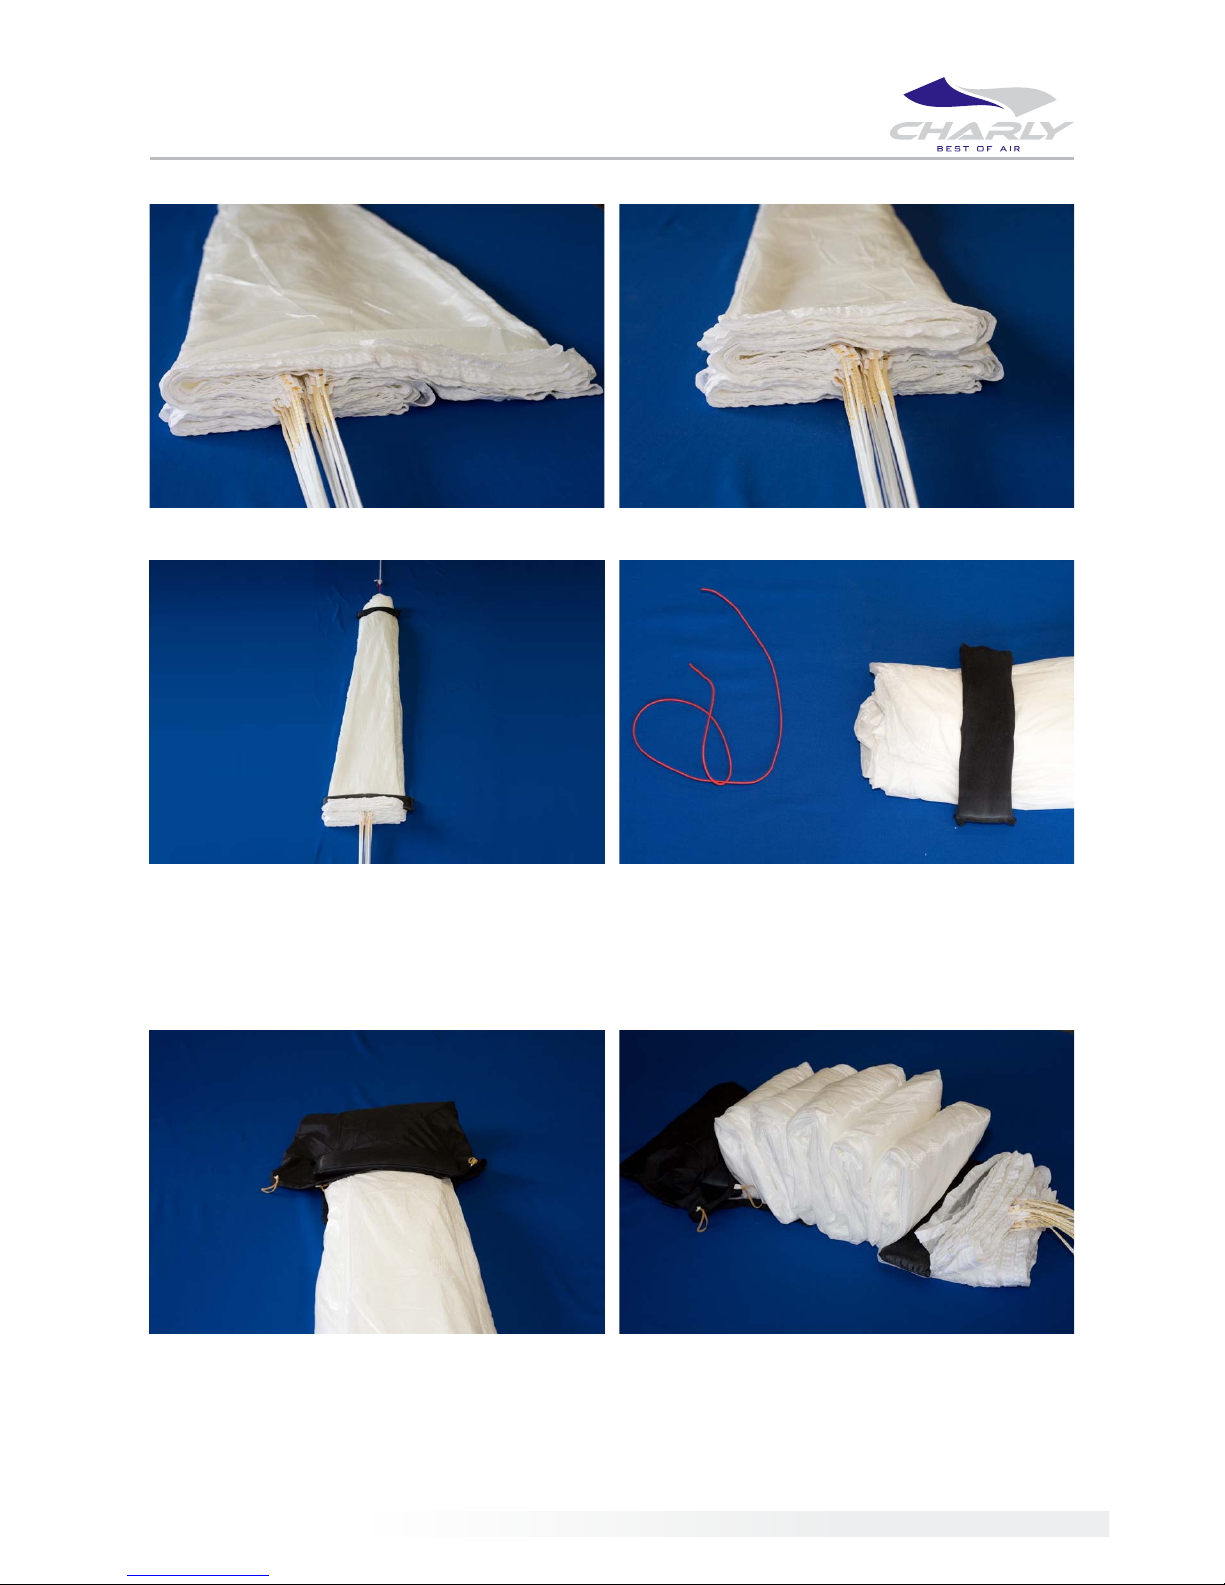
Packinginstructions
Before packing, the reserve should be visibly inspected by the packer. The reserve must then be aired over a
period of 24 hours by an air humidity of 60 – 65 %. Packing should at best be carried out on a packing table,
but at the least on a clean, antistatic underlay. Necessary aids to packing are : 2 meters of draw cord, several
small sacks lled with sand or lead shot for weighing down. All special rubber bands must be renewed at every
repacking, and these are available by Charly Products.
Thereserveshouldonlybepackedbyaregisteredpacker.
1.Layingoutandunravelling
The reserve is stretched out to its full length on the packing underlay.
1.1. Inspect the middle apex for symmetry 1.2. Pull a draw cord through the packing loops and attach to
the upper end of the packing table:
1.4. The bridle line is xed to the lower end of the packing table
and the reserve is stretched. The suspension lines are
checked to ensure that their course is straight.
1.3. Check the loops of the suspension lines on the end of the
bridle, and ensure that these are centred.

8
2.Layingofthepanels
Take panel # 1 and count off half of the panels. By the Expert 100/120 which has a total of 18 panels, 9 panels
be on the right hand side, and 9 panels on the left hand side. They are held down with a packing weight.
2.2. Panel 1 be on the top right, and panel 18 be on the top left.
2.4. Before laying out the suspension lines in an S-shape,
ensure once again that all lines are untangled and do not
cross over one another.
2.3. Now the apex which is pulled down on the packing loops
must be sorted and held down with a packing weight.
2.1. The panels 1-9 now be on the right, the panels 10-18 now
be on the left.
2.6. Now the complete bundle of suspension lines together
with the left hand panels must be carried back over to the
middle of the rst laid panel.
2.5. In order to lay the canopy in S-shapes, the complete bundle
of suspension lines and the left hand panels must be lifted
slightly and laid 2/3 over the right hand panels.
9
3.Insertionofthecanopyintheinnercontainer
Very important :Before proceeding to the next step, ensure once again that the drawing cord have been
removed.
3.2. Sort the rest of the canopy into small S-shapes in front of
the inner container.
3.1. Now release the attachment of the bridle line. Lay the top
part of the canopy into the inner container.
2.8. Now lay the rest of the panels back into the middle.2.7. Next lay the complete left hand panels back over the middle
(suspension lines).
2.10. Warning:Remove draw cord ! otherwise the reserve
cannot open !
2.9. Carry out S-shapes up to the draw cord.

10
Attention: The inner container has been fastened using the suspension lines. The tension of the packing
rubber bands on the inner container must not be too great. This can be tested by lifting the reserve using the
main bridle. The suspension lines must now release out of the packing rubbers bands independently.
4.
Entryinthepacking&inspectiondocument
An entry must now be made in the packing and inspection
proof document. With date, name, and signature of the packer,
in addition to the work carried out.
3.4. The suspension lines are now placed in gure eights and
held in place using the new special rubber bands. Pay at-
tention that the width of the inner container is not exceeded.
The last 50cm of the suspension lines are used to close the
container and must remain free from rubber bands.
3.6. Check that all packing tools / aids / draw cords that were
used, have really been removed.
3.5. Lay the 3 x 8 bundles of suspension lines on the canopy
in the inner container, and fasten the container lid from the
middle to the outside using the remaining suspension lines.
3.3. Lay the s-shaped canopy in the inner container and use a
packing weight to prevent the canopy from sliding out.

11
Insertionintheoutercontainer
The insertion in the Charly Light container (compressible) Art.# HFa187 now follows. By insertion in a different,
suitable container, or in a harness- integrated container, close attention absolutely must be paid to the valid
instruction manual.
Loop the deployment handle through the middle loop of the
inner container. Lead the bridle line out of the outer container
on the chosen side.
Thread two draw cords rstly through the loops and then
through the eyelets of the container aps as indicated on the
numbered diagram.
Pull the loops through all the eyelets and fasten with the re-
lease pins from the deployment handle. Insert the end of the
release pins into the intended pockets. Remove the draw cords
!
Pull on the elastic cords (positioned on the sides) and position
using the cord stopper.
The container can be compressed using the two webbing
straps on the rear side !
No extra weak link threads are needed to secure the release
pins, as the Charly Loop-tensioner system is integrated in the
container described here !
1
2
3
4
2
12
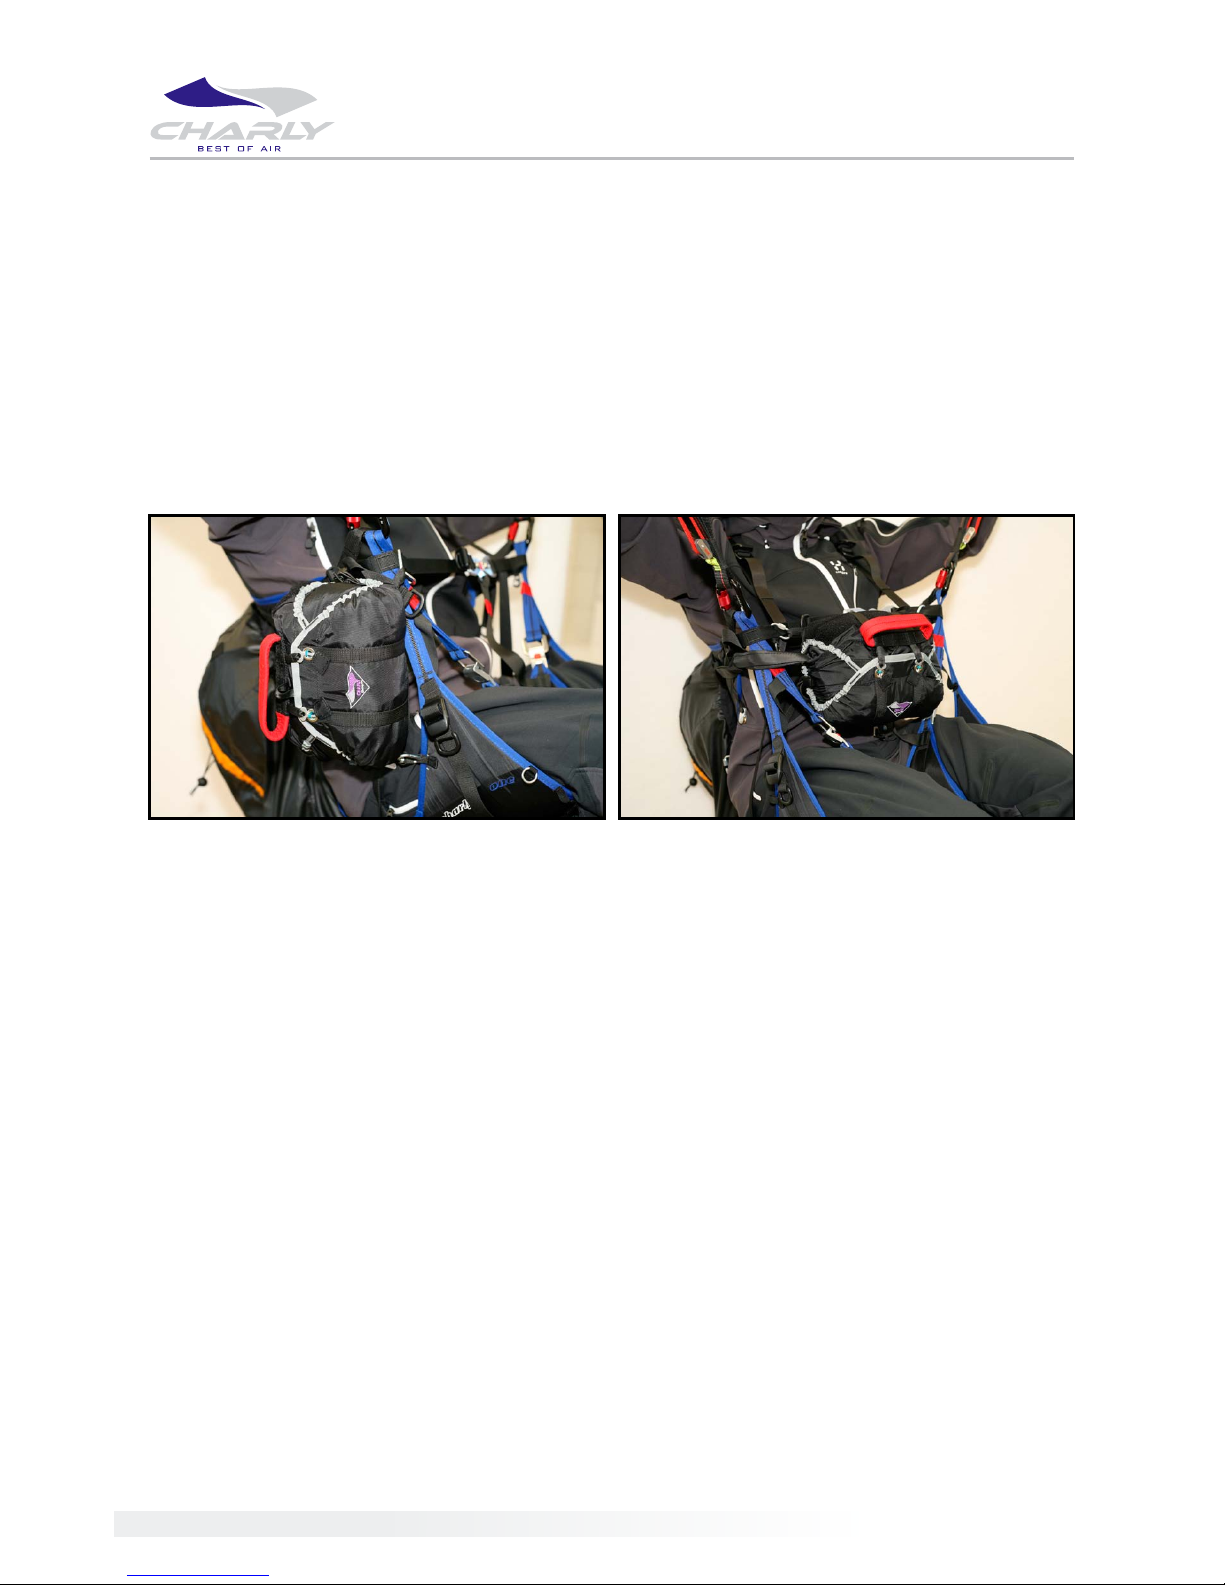
Attachmenttotheharness
If you own a harness without an integrated reserve container, you can attach the Charly Expert 18 to
the harness with an outer container as described on page 11. Firstly the bridle line of the reserve is
connected to the bridle line of the paraglider harness using a rapid link (Art.# Be31) or alternatively
by lopping the two bridle lines into one another. Care must be taken that the connection is symme-
trical and secure. The reserve can now be attached to the side or to the chest strap of the harness
by means of rapid links (Art. # Be29) through the bands on the rear side of the outer container.
When mounting the reserve container, follow the instructions in your harness handbook and use the
attachment points described therein. It is imperative that the container sits snug & safely. Besides,
moveable parts such as accelerator, free running straps etc may not be impeded.
Insertionintherescuereservecontainerofaharness
Follow the instructions in the handbook of your harness when inserting the reserve container. In all
cases attention must be paid to the following tips when inserting the reserve.
■ Only use the original deployment handle that came with the harness. Other deployment hand-
les should not be used as they do not guarantee perfect functioning!
■ Container must have a suitable capacity.
■ By inner containers with asymmetrical attachment loops, the container must be packed so that
the attachment loops are as near as possible to the deployment handle, and that the reserve
does not become twisted around during employment.
■ When packing the reserve into the container, play close attention that the connection between
deployment handle and security pins is shorter than the connection between the deployment
handle and the inner container.
■ The deployment handle is attached to the intended place on the Velcro fastener such that
the suspension lines are not under tension and the security splints are not pulled out of the
fastening loops.
■ A test deployment should be undertaken after every re-packing to ensure the correct functio-
ning of the rescue reserve! Operating the rescue reserve must be possible in the ight position
and must function perfectly according to the guidelines of the construction specications.

13
Compatibilitytest
Every new combination of rescue reserve and harness has to be retested by the manufacturer or
someone schooled and instructed by the manufacturer after the initial packing.
The operation of the rescue reserve must be possible in the ight position and must function per-
fectly according to the guidelines of the construction specications. It must be ascertained that the
deployment strength does not exceed 7kg.
The inspector has to conrm that a compatibility test has been carried out by entering this in the
packing and inspection document.
Specialityforwinchtowing
For winch towing pay attention to the conditions of the harness, paraglider and winch release
manufacturers! When using a front container, make certain that a deployment of the rescue reserve
can guaranteed at all times.
Pre-ightcheck
In addition to the normal pre-ight check (see instruction manual for paraglider, harness, tow re-
lease etc), the correct fastening of the rescue reserve and the deployment handle should also be
controlled before every ight.
If the reserve bridle line is disengaged after every ight (as with front container systems), then the
pre-ight check must also include ensuring that the bridle line is correctly attached!
Transport
When transporting the reserve, pay attention that it is not subject to extreme heat (eg. the boot of
a car in summer). Further, the reserve should be transported carefully (clean, no objects lain on
top etc.). When packing the Expert 18 into a paraglider backpack, take care not to damage it with
buckles or other objects, and not to inadvertently release the deployment handle.
Flyingonthecoast
If the reserve if own for long periods of time on the coast or in salty air, this can result in a prema-
ture aging of the materials. In such cases the reserve should be checked more often and inspected
for its airworthiness.
Environment-friendlydisposal
After the end of the service life, the reserve should be disposed of in an environment-friendly man-
ner. CHARLY Products will gladly dispose of your reserves appropriately if you return them to us.
Behaviourreconcilablewithnature&thelandscape
And nally a word or two from us, requesting that you practice our fantastic sport with as much
consideration for nature and the landscape as possible !
Please do not walk beyond the marked paths, do not leave litter, do not make unnecessary noise,
and try to respect the sensitive biological balance in the mountains. Consideration for nature is
required not only when launching and landing !
This manual suits for next models
1
Table of contents


