Chauvet Slim PAR PRO Pix User manual

SlimPAR PRO Pix
User Manual

SLIMPAR PRO PIX
SlimPAR Pro Pix User Manual Rev. 1
1. Before You Begin ....................................................................... 1
What Is Included ........................................................................................... 1
Unpacking Instructions.................................................................................. 1
Claims ............................................................................................................................ 1
Text Conventions .......................................................................................... 1
Symbols ........................................................................................................ 1
Disclaimer ..................................................................................................... 1
Safety Notes.................................................................................................. 2
FCC Compliance........................................................................................... 2
2. Introduction ................................................................................ 3
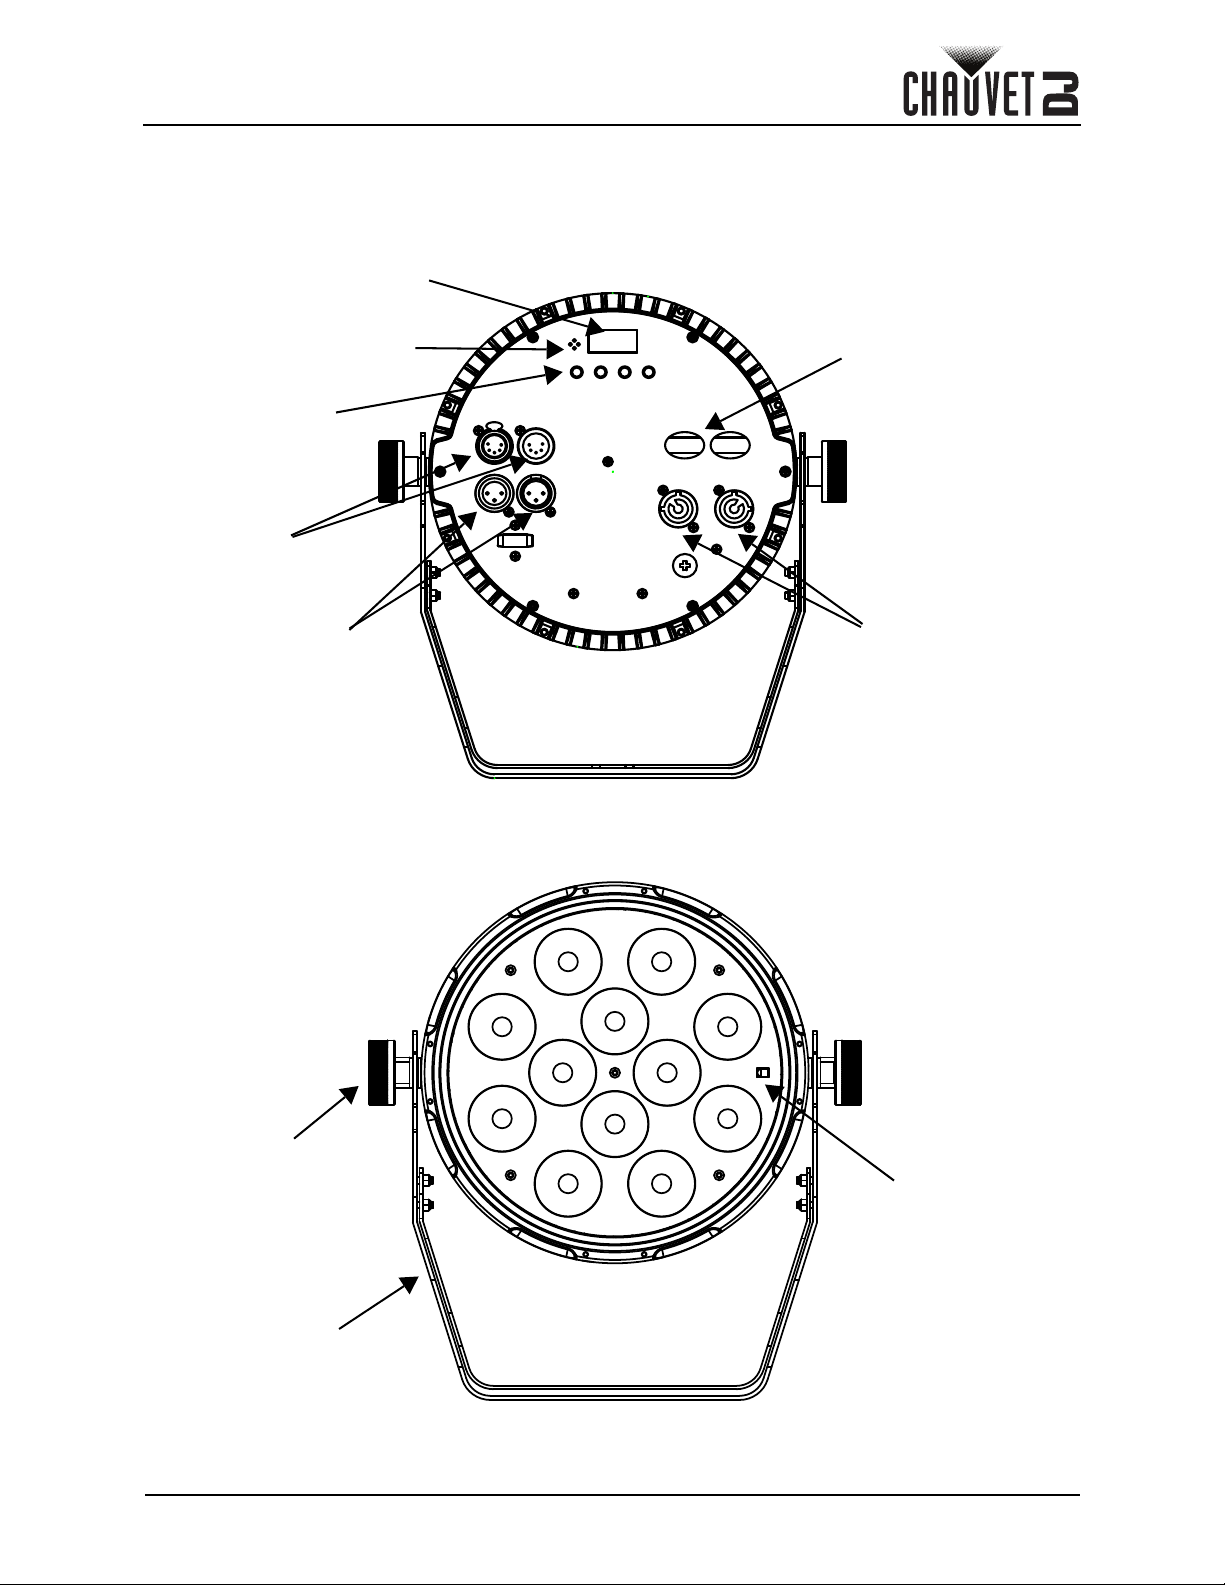
Product Overview.......................................................................................... 3
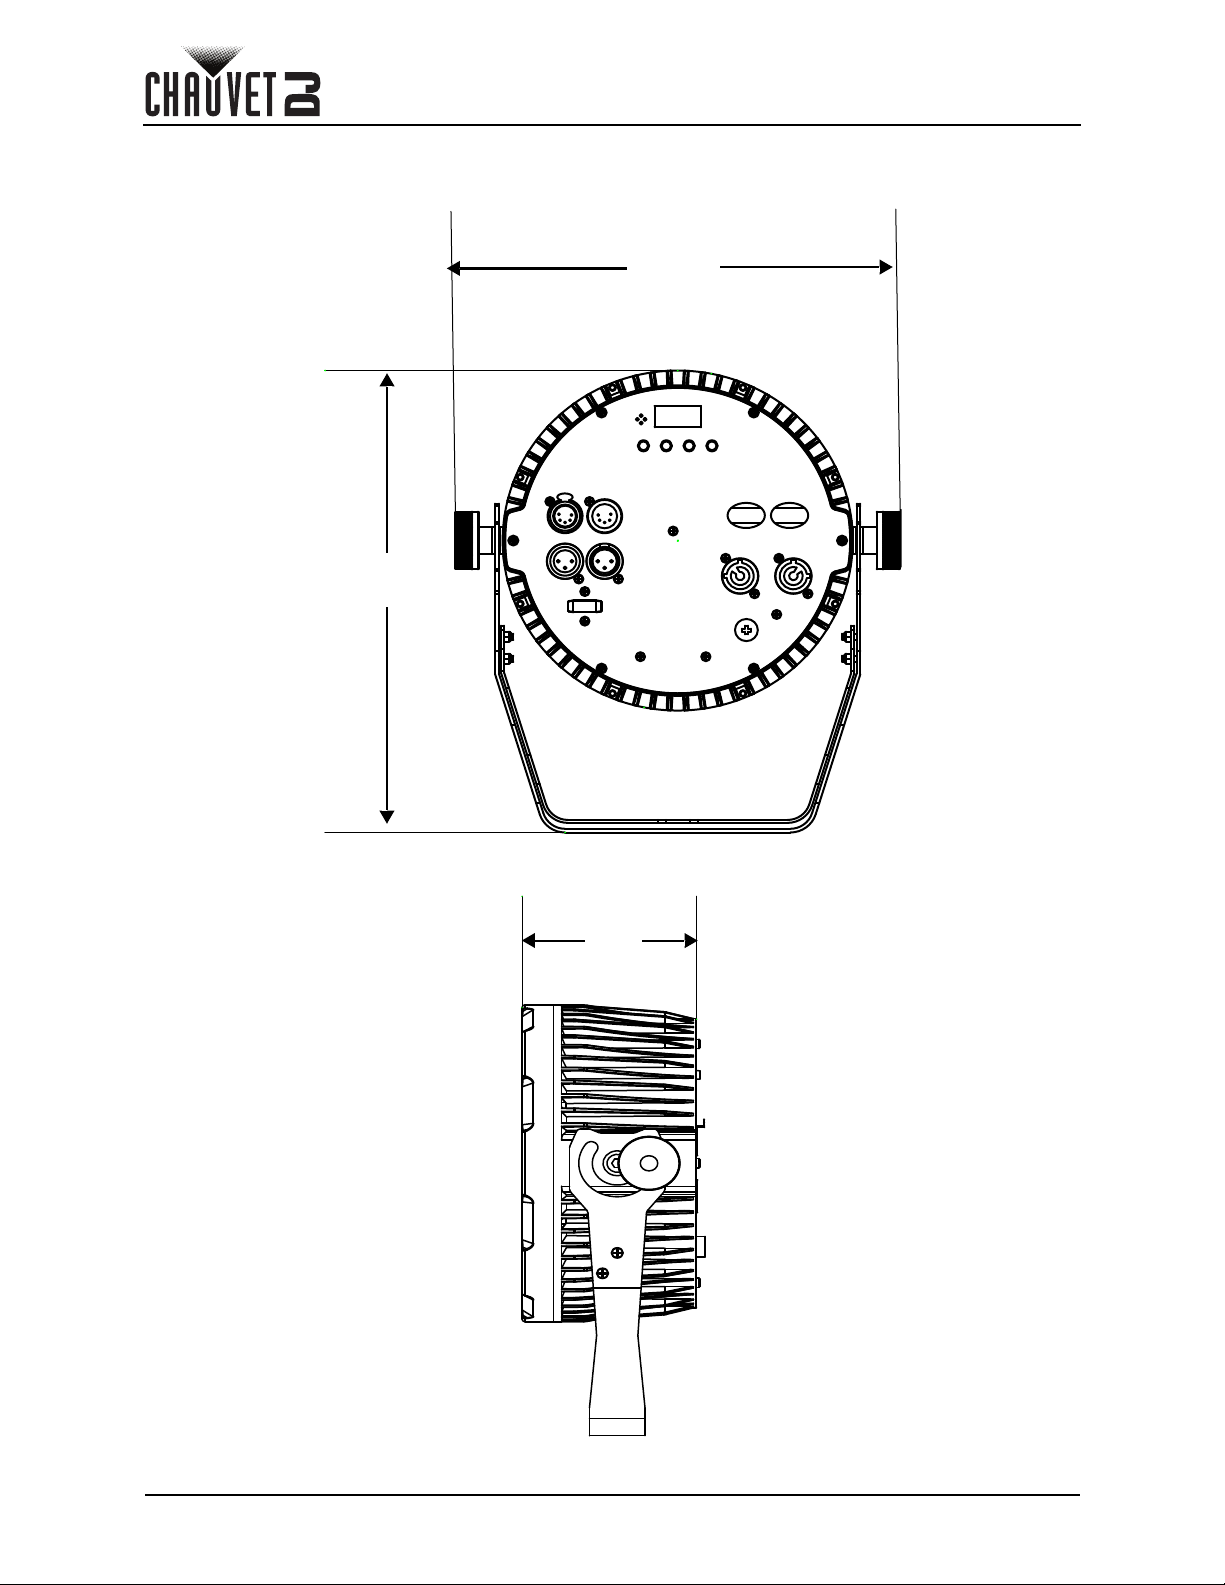
Product Dimensions ...................................................................................... 4
3. Setup ........................................................................................... 5
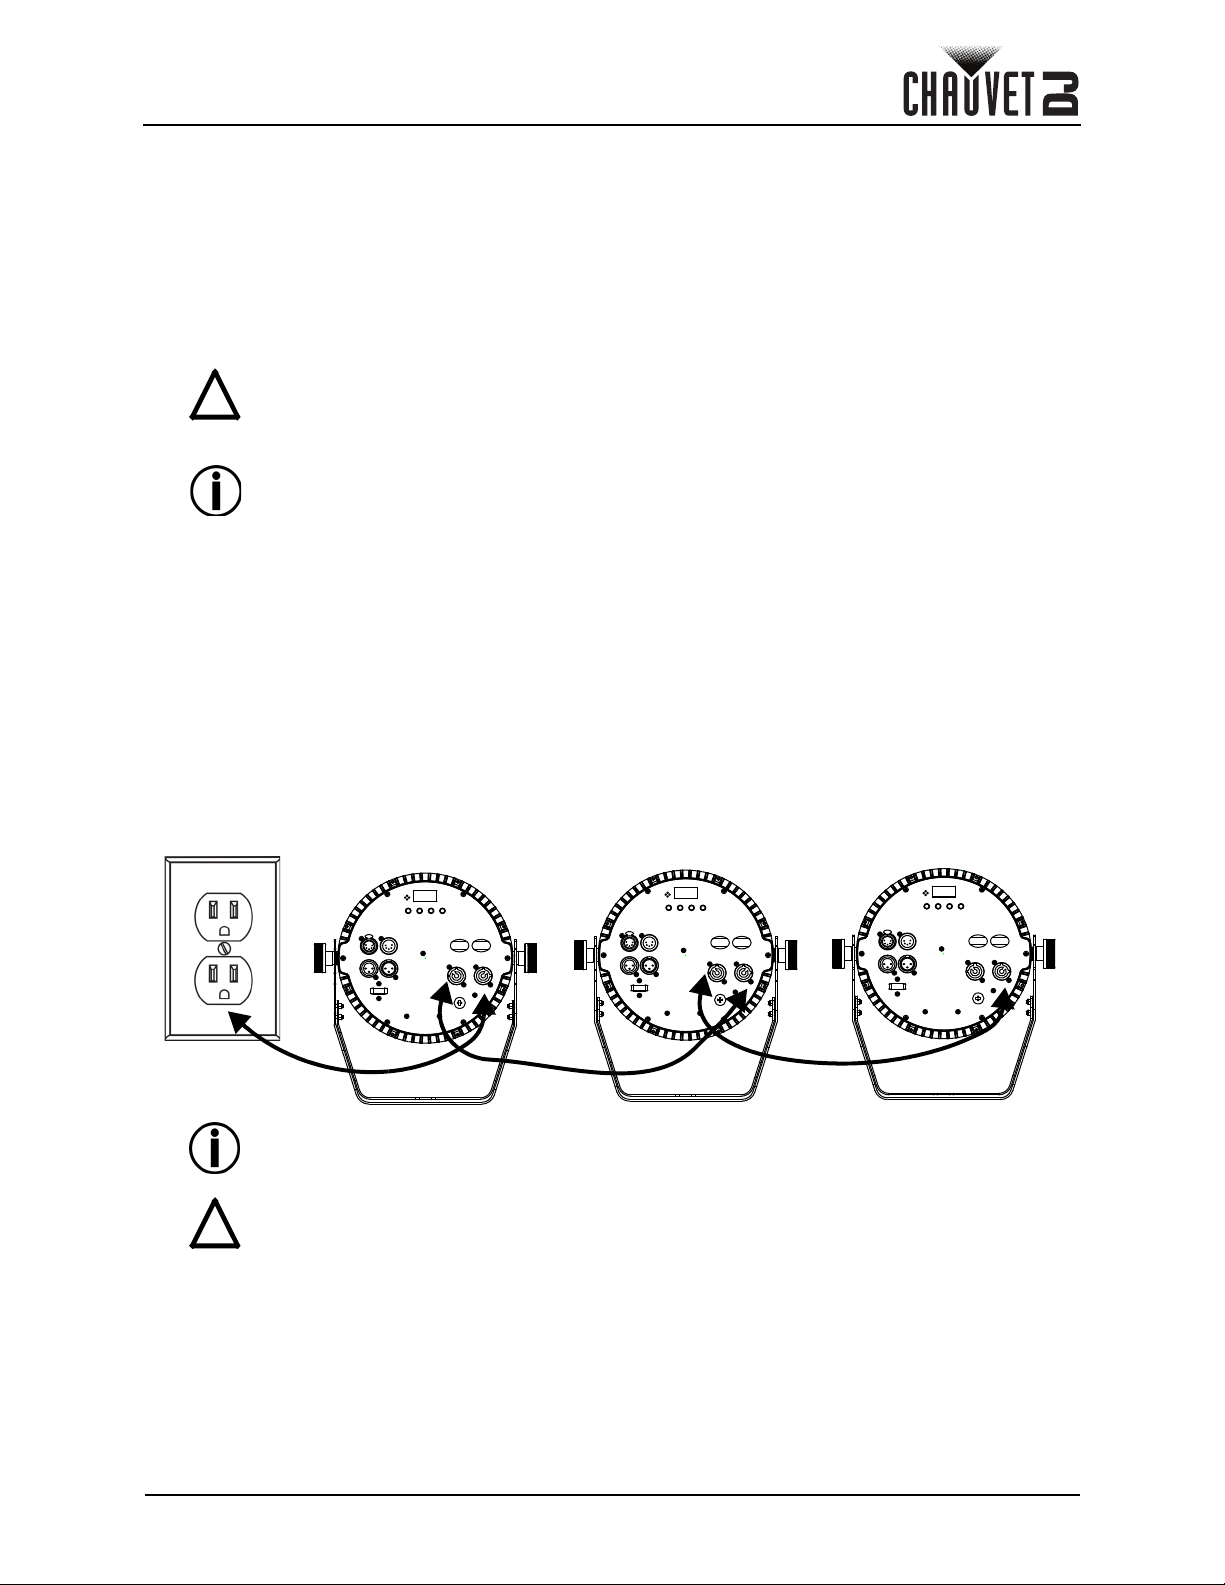
AC Power...................................................................................................... 5
Fuse Replacement ......................................................................................................... 5
Power Linking................................................................................................................. 5
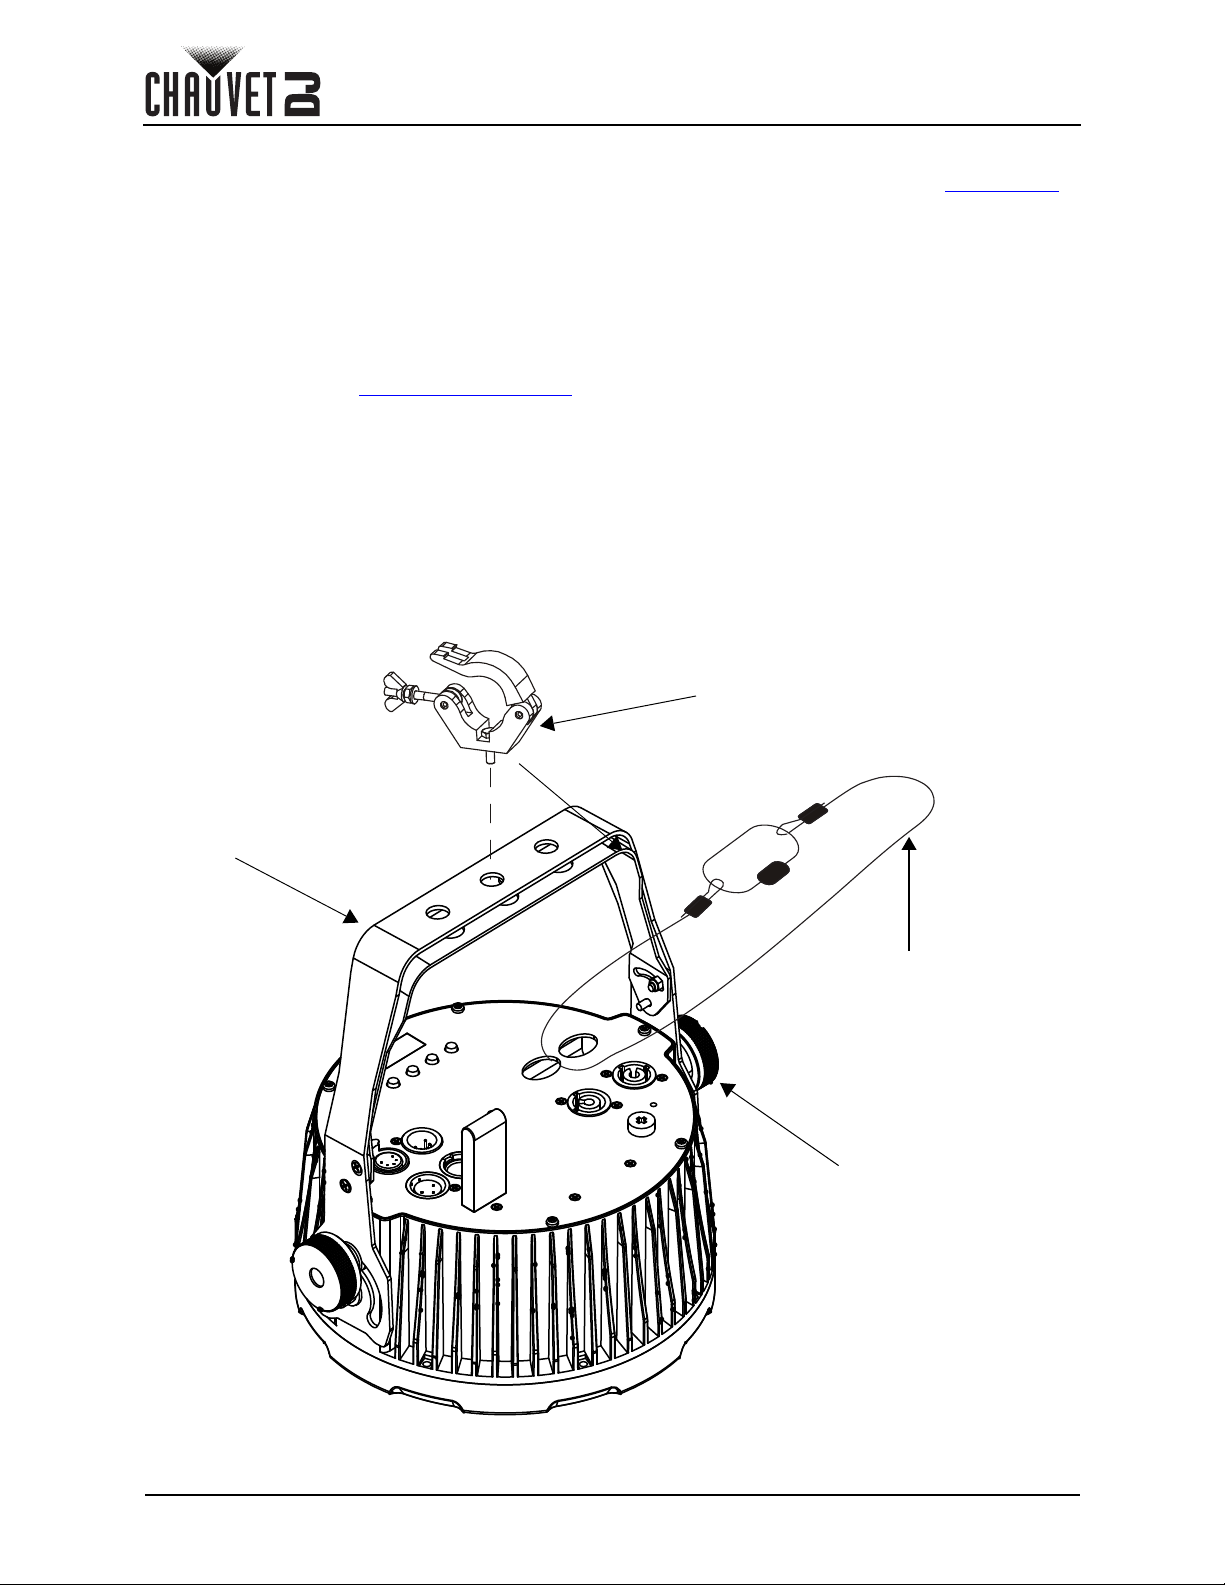
Mounting ....................................................................................................... 6
Orientation...................................................................................................................... 6
Rigging ........................................................................................................................... 6
4. Operation .................................................................................... 7
Control Panel Operation................................................................................ 7
Menu Map ..................................................................................................... 7
Configuration (DMX) ..................................................................................... 8
DMX Personality and Starting Address.......................................................................... 8
DMX Values .................................................................................................. 8
48Ch............................................................................................................................... 8
26Ch............................................................................................................................... 10
12Ch............................................................................................................................... 12
Configuration (Standalone) ........................................................................... 14
Automatic Programs....................................................................................................... 14
Auto-Program Speed ..................................................................................................... 14
Sound-Active Mode........................................................................................................ 14
Sound Sensitivity............................................................................................................ 14
Preset Color Mode ......................................................................................................... 14
Custom Color Mixing...................................................................................................... 14
Strobe............................................................................................................................. 15
IRC-6 Infrared Remote Control ..................................................................... 15
IRC-6 Operation ............................................................................................................. 15
Master/Slave Mode ....................................................................................... 16
5. Maintenance................................................................................ 17
Product Maintenance .................................................................................... 17
6. Technical Specifications ........................................................... 18
Returns............................................................................................ 19
Contact Us ...................................................................................... 20

Page 2 of 20
SlimPAR Pro Pix User Manual Rev. 1
BEFORE YOU BEGIN
1. Before You Begin
What Is Included
Unpacking Instructions
Carefully unpack the product immediately and check the container to make sure all the parts are in the
package and are in good condition.
Claims
If the box or the contents (the product and included accessories) appear damaged from shipping, or show
signs of mishandling, notify the carrier immediately, not Chauvet. Failure to report damage to the carrier
immediately may invalidate your claim. In addition, keep the box and contents for inspection.
For other issues, such as missing components or parts, damage not related to shipping, or concealed
damage, file a claim with Chauvet within 7 days of delivery.
Text Conventions
Symbols
Disclaimer
Chauvet believes that the information contained in this manual is accurate in all respects. However,
Chauvet assumes no responsibility and specifically disclaims any and all liability to any party for any loss,
damage or disruption caused by any errors or omissions in this document, whether such errors or
omissions result from negligence, accident or any other cause. Chauvet reserves the right to revise the
content of this document without any obligation to notify any person or company of such revision, however,
Chauvet has no obligation to make, and does not commit to make, any such revisions. Download the latest
version from www.chauvetdj.com.
The works of authorship contained in this manual, including, but not limited to, all design, text and images
are owned by Chauvet.
© Copyright 2020 Chauvet & Sons, LLC. All rights reserved.
Electronically published by Chauvet in the United States of America.
CHAUVET, the Chauvet logo, and SlimPAR Pro Pix are registered trademarks or trademarks of Chauvet &
Sons LLC. (d/b/a Chauvet and Chauvet Lighting) in the United States and other countries. Other company
and product names and logos referred to herein may be trademarks of their respective companies.
Patent Pending.
• SlimPAR Pro Pix
•Powercord
• Hanging bracket with mounting hardware
• Quick Reference Guide
CONVENTION MEANING
1–512 A range of values
50/60 A set of values of which only one can be chosen
Settings A menu option not to be modified
<ENTER> A key to be pressed on the product’s control panel
ON A value to be entered or selected
SYMBOL MEANING
Electrical warning. Not following these instructions may cause electrical damage to
the product, accessories, or the user.
Critical installation, configuration, or operation information. Not following these
instructions may make the product not work, cause damage to the product, or cause
harm to the operator.
Important installation or configuration information. The product may not function
correctly if this information is not used.
Useful information.
!

Page 2 of 20
BEFORE YOU BEGIN
SlimPAR Pro Pix User Manual Rev. 1
Safety Notes
FCC Compliance
This device complies with Part 15 Part B of the FCC rules. Operation is subject to the following two
conditions:
1. This device may not cause harmful interference, and
2. This device must accept any interference received, including interference that may cause
undesired operation.
Any changes or modifications not expressly approved by the party responsible for compliance could void
the user's authority to operate the equipment.
• Always connect the product to a grounded circuit to avoid the risk of electrocution.
• Always disconnect the product from the power source before cleaning or replacing the
fuse.
• Avoid direct eye exposure to the light source while the product is on.
• Make sure the power cord is not crimped or damaged.
• Never disconnect the product from power cord by pulling or tugging on the cord.
• If mounting the product overhead, always secure to a fastening device using a safety
cable.
• Make sure there are no flammable materials close to the product when operating.
• Do not touch the product’s housing when operating because it may be very hot.
• The product is not intended for permanent installation.
• Always make sure that the voltage of the outlet to which you are connecting the product
is within the range stated on the decal or rear panel of the product.
• The product is for indoor use only! (IP20) To prevent risk of fire or shock, do not expose
the product to rain or moisture.
• Always install the product in a location with adequate ventilation, at least 20 in (50 cm)
from adjacent surfaces.
• Be sure that no ventilation slots on the product’s housing are blocked.
• Never connect the product to a dimmer.
• Make sure to replace the fuse with another of the same type and rating.
• Never carry the product from the power cord or any moving part. Always use the hanging/
mounting bracket.
• The maximum ambient temperature (Ta) is 104 °F (40 °C). Do not operate the product at
higher temperatures.
• In the event of a serious operating problem, stop using the product immediately.
• Never try to repair the product. Repairs carried out by unskilled people can lead to
damage or malfunction. Please contact the nearest authorized technical assistance
center.
• To eliminate unnecessary wear and improve its lifespan, during periods of non-use
completely disconnect the product from power via breaker or by unplugging it.
Keep this User Manual for future use. If you sell the product to someone else, be sure that
they also receive this document.
!

Page 3 of 20
SlimPAR Pro Pix User Manual Rev. 1
INTRODUCTION
2. Introduction
Product Overview
Bracket
adjustment
knob
Menu
buttons
Microphone
Power in/out
Display
screen
Safety loop
5-pin DMX
in/out
IR sensor
3-pin DMX
in/out
Mounting
bracket

Page 4 of 20
INTRODUCTION
SlimPAR Pro Pix User Manual Rev. 1
Product Dimensions
11.4 in
290 mm
12.3 in
313 mm
4.3 in
110 mm

Page 5 of 20
SlimPAR Pro Pix User Manual Rev. 1
SETUP
3. Setup
AC Power
The SlimPAR Pro Pix has an auto-ranging power supply, and it can work with an input voltage range of 100
to 240 VAC, 50/60 Hz. To determine the product’s power requirements (circuit breaker, power outlet, and
wiring), use the current value listed on the label affixed to the product’s back panel, or refer to the product’s
specifications chart. The listed current rating indicates the product’s average current draw under normal
conditions.
Fuse Replacement
1. Disconnect the product from power.
2. Wedge the tip of a flathead screwdriver into the slot of the fuse holder.
3. Pry the safety cap out of the housing.
4. Remove the blown fuse from the clip on the front of the safety cap and replace with a fuse of the
exact same type and rating.
5. Re-insert the fuse holder and reconnect power.
Power Linking
The product provides power linking via the Edison outlet located in the back of the product. Please see the
diagram below for further explanation.
Power-Linking Diagram
• Always connect the product to a protected circuit (a circuit breaker or fuse).
Make sure the product has an appropriate electrical ground to avoid the risk of
electrocution or fire.
• To eliminate unnecessary wear and improve its lifespan, during periods of non-
use completely disconnect the product from power via breaker or by
unplugging it.
Never connect the product to a rheostat (variable resistor) or dimmer circuit, even if
the rheostat or dimmer channel serves only as a 0 to 100% switch.
You can power link up to 6 SlimPAR Pro Pix products on 120 VAC or up to 11
SlimPAR Pro Pix products on 230 VAC.
The power linking diagram corresponds to the North American version of the
product ONLY! If using the product in other markets, you must consult with the local
Chauvet distributor, as power linking connectors and requirements may differ in
your country or region.
!
1st product 2nd product 3rd product
!

Page 6 of 20
SETUP
SlimPAR Pro Pix User Manual Rev. 1
Mounting
Before mounting the product, read and follow the safety recommendations indicated in the Safety Notes.
Orientation
The SlimPAR Pro Pix may be mounted in any position; however, make sure adequate ventilation is
provided around the product.
Rigging
• Before deciding on a location for the product, always make sure there is easy access to the product
for maintenance and programming purposes.
• Make sure that the structure onto which you are mounting the product can support the product’s
weight. See the Technical Specifications for weight information.
• When mounting the product overhead, always use a safety cable. Mount the product securely to a
rigging point, whether an elevated platform or a truss.
• When rigging the product onto a truss, use a mounting clamp of appropriate weight capacity.
• When power linking multiple products, mount the products close enough for power-linking cables to
reach.
• The bracket adjustment knobs allow for directional adjustment when aiming the product to the
desired angle. Only loosen or tighten the bracket knobs manually. Using tools could damage the
knobs.
Mounting Diagram
Mounting bracket
Safety cable
(such as CH-05 from
Chauvet)
Mounting clamp
(such as CLP-15 or CLP-15N
from Chauvet)
Bracket
adjustment knob

Page 7 of 20
SlimPAR Pro Pix User Manual Rev. 1
OPERATION
4. Operation
Control Panel Operation
To access the control panel functions, use the four buttons located underneath the display. Please refer to
the Product Overview to see the button locations on the control panel.
Menu Map
Refer to the SlimPAR Pro Pix product page on www.chauvetdj.com for the latest menu map.
Button Function
<MENU> Press to find an operation mode or to back out of the current menu option
<UP> Press to scroll up the list of options or to find a higher value
<DOWN> Press to scroll down the list of options or to find a lower value
<ENTER> Press to activate a menu option or a selected value
Mode Programming Levels Description
DMX Mode
12Ch d 001–501
Sets the DMX personality26Ch d 001–487
48Ch d 001–465
Static Colors C1 C 1–24 Static PAR colors
C2 C 1–19 Outer LED ring colors
Auto
Programs P-- P 1–6 Auto programs
Auto Speed S-- S001–100 Program speed for auto programs
Dimmer D-- L001–255 Adjusts the dimmer on auto and sound
programs
Sound-Active
Mode Snd Snd1–6 Activates sound programs
Sound
Sensitivity SENS U1–100 Adjusts sound sensitivity
Custom Color
Mixing U--
R.000–255
Custom static colors
Combines red, green, blue, amber, white,
and UV
G.000–255
B.000–255
A.000–255
W.000–255
U.000–255
S.000–100
S.000 – Solid on
S.001–S.099 – Strobe, slow to fast
S.100 – Sound strobe
Control Mode SET IR on Turns infrared on or off
oFF

Page 8 of 20
OPERATION
SlimPAR Pro Pix User Manual Rev. 1
Configuration (DMX)
The SlimPAR Pro Pix works with a DMX controller. Information about DMX is in the CHAUVET DMX
Primer, which is available from the Chauvet website: www.chauvetdj.com.
DMX Personality and Starting Address
When selecting a starting DMX address, always consider the number of DMX channels the selected DMX
mode uses. If you choose a starting address that is too high, you could restrict the access to some of the
product’s channels.
The SlimPAR Pro Pix uses up to 48 DMX channels in a 48Ch DMX mode, which defines the highest
configurable address to 465.
If you are not familiar with the DMX protocol, download the DMX Primer from: www.chauvetdj.com.
To select the starting address, do the following:
1. Press <MENU> repeatedly until 12Ch, 26Ch, or 48Ch shows on the display.
2. Press <ENTER> and d 001–501 will show on the display.
3. Use <UP> or <DOWN> to select the starting address.
4. Press <ENTER>.
DMX Values
48Ch
Channel Function Value Percent/Setting
1 Master dimmer 000 255 0–100%
2 Red 1 000 255 0–100%
3 Green 1 000 255 0–100%
4 Blue 1 000 255 0–100%
5 Red 2 000 255 0–100%
6 Green 2 000 255 0–100%
7 Blue 2 000 255 0–100%
8 Red 3 000 255 0–100%
9 Green 3 000 255 0–100%
10 Blue 3 000 255 0–100%
11 Red 4 000 255 0–100%
12 Green 4 000 255 0–100%
13 Blue 4 000 255 0–100%
14 Red 5 000 255 0–100%
15 Green 5 000 255 0–100%
16 Blue 5 000 255 0–100%
17 Red 6 000 255 0–100%
18 Green 6 000 255 0–100%
19 Blue 6 000 255 0–100%
20 Red 7 000 255 0–100%
21 Green 7 000 255 0–100%
22 Blue 7 000 255 0–100%
23 Red 8 000 255 0–100%
24 Green 8 000 255 0–100%
25 Blue 8 000 255 0–100%
26 Red 9 000 255 0–100%
27 Green 9 000 255 0–100%
28 Blue 9 000 255 0–100%
29 Red 10 000 255 0–100%
30 Green 10 000 255 0–100%

Page 9 of 20
SlimPAR Pro Pix User Manual Rev. 1
OPERATION
31 Blue 10 000 255 0–100%
32 Red 11 000 255 0–100%
33 Green 11 000 255 0–100%
34 Blue 11 000 255 0–100%
35 Red 12 000 255 0–100%
36 Green 12 000 255 0–100%
37 Blue 12 000 255 0–100%
38 Amber 000 255 0–100%
39 White 000 255 0–100%
40 UV 000 255 0–100%
41 Strobe 000 015 No function
016 255 Slow to fast
42 Ring red 000 255 0–100%
43 Ring green 000 255 0–100%
44 Ring blue 000 255 0–100%
45 Ring strobe 000 015 No function
016 255 Slow to fast
46
Ring auto/
sound
programs
000 005 No function
006 016 Ring auto program 1
017 027 Ring auto program 2
028 038 Ring auto program 3
039 049 Ring auto program 4
050 060 Ring auto program 5
061 070 Ring auto program 6
071 080 Ring auto program 7
081 090 Ring auto program 8
091 100 Ring auto program 9
101 110 Ring auto program 10
111 120 Ring auto program scroll 1–10
121 130 Ring sound program 1
131 140 Ring sound program 2
141 150 Ring sound program 3
151 160 Ring sound program 4
161 170 Ring sound program 5
171 180 Ring sound program 6
181 190 Ring sound program 7
191 200 Ring sound program 8
201 210 Ring sound program 9
211 220 Ring sound program 10
221 255 Ring sound program scroll 1–10
47
Ring auto
speed / sound
sensitivity
000 255
Auto program speed (slow to fast)
Sound sensitivity (low to high)
48 Dimmer curve
000 050 No function (LEDs snap)
051 152 Dimmer fade (slow)
153 255 Dimmer fade (fast)
Channel Function Value Percent/Setting

Page 10 of 20
OPERATION
SlimPAR Pro Pix User Manual Rev. 1
26Ch
Channel Function Value Percent/Setting
1 Master dimmer 000 255 0–100%
2 Red 1 000 255 0–100%
3 Green 1 000 255 0–100%
4 Blue 1 000 255 0–100%
5 Red 2 000 255 0–100%
6 Green 2 000 255 0–100%
7 Blue 2 000 255 0–100%
8 Red 3 000 255 0–100%
9 Green 3 000 255 0–100%
10 Blue 3 000 255 0–100%
11 Red 4 000 255 0–100%
12 Green 4 000 255 0–100%
13 Blue 4 000 255 0–100%
14 Amber 000 255 0–100%
15 White 000 255 0–100%
16 UV 000 255 0–100%
17 Strobe 000 015 No function
016 255 Slow to fast
18 Pixel auto/sound
programs
000 005 No function
006 016 Pixel auto program 1
017 027 Pixel auto program 2
028 038 Pixel auto program 3
039 049 Pixel auto program 4
050 060 Pixel auto program 5
061 070 Pixel auto program 6
071 080 Pixel auto program 7
081 090 Pixel auto program 8
091 100 Pixel auto program 9
101 110 Pixel auto program 10
111 120 Pixel auto program scroll 1–10
121 130 Pixel sound program 1
131 140 Pixel sound program 2
141 150 Pixel sound program 3
151 160 Pixel sound program 4
161 170 Pixel sound program 5
171 180 Pixel sound program 6
181 190 Pixel sound program 7
191 200 Pixel sound program 8
201 210 Pixel sound program 9
211 220 Pixel sound program 10
221 255 Pixel sound program scroll 1–10
19 Auto speed/
sound sensitivity 000 255 Auto program speed (slow to fast)
Sound sensitivity (low to high)
20 Ring red 000 255 0–100%
21 Ring green 000 255 0–100%

Page 11 of 20
SlimPAR Pro Pix User Manual Rev. 1
OPERATION
22 Ring blue 000 255 0–100%
23 Ring strobe 000 015 No function
016 255 Slow to fast
24 Ring auto/sound
programs
000 005 No function
006 016 Ring auto program 1
017 027 Ring auto program 2
028 038 Ring auto program 3
039 049 Ring auto program 4
050 060 Ring auto program 5
061 070 Ring auto program 6
071 080 Ring auto program 7
081 090 Ring auto program 8
091 100 Ring auto program 9
101 110 Ring auto program 10
111 120 Ring auto program scroll 1–10
121 130 Ring sound program 1
131 140 Ring sound program 2
141 150 Ring sound program 3
151 160 Ring sound program 4
161 170 Ring sound program 5
171 180 Ring sound program 6
181 190 Ring sound program 7
191 200 Ring sound program 8
201 210 Ring sound program 9
211 220 Ring sound program 10
221 255 Ring sound program scroll 1–10
25 Ring auto speed/
sound sensitivity 000 255 Auto program speed (slow to fast)
Sound sensitivity (low to high)
26 Dimmer curve
000 050 No function (LEDs snap)
051 152 Dimmer fade (slow)
153 255 Dimmer fade (fast)
Channel Function Value Percent/Setting

Page 12 of 20
OPERATION
SlimPAR Pro Pix User Manual Rev. 1
12Ch
Channel Function Value Percent/Setting
1 Master dimmer 000 255 0–100%
2 Red 1 000 255 0–100%
3 Green 1 000 255 0–100%
4 Blue 1 000 255 0–100%
5 Amber 000 255 0–100%
6 White 000 255 0–100%
7 UV 000 255 0–100%
8Strobe 000 015 No function
016 255 Slow to fast
9Pixel auto/sound
programs
000 005 No function
006 016 Pixel auto program 1
017 027 Pixel auto program 2
028 038 Pixel auto program 3
039 049 Pixel auto program 4
050 060 Pixel auto program 5
061 070 Pixel auto program 6
071 080 Pixel auto program 7
081 090 Pixel auto program 8
091 100 Pixel auto program 9
101 110 Pixel auto program 10
111 120 Pixel auto program scroll 1–10
121 130 Pixel sound program 1
131 140 Pixel sound program 2
141 150 Pixel sound program 3
151 160 Pixel sound program 4
161 170 Pixel sound program 5
171 180 Pixel sound program 6
181 190 Pixel sound program 7
191 200 Pixel sound program 8
201 210 Pixel sound program 9
211 220 Pixel sound program 10
221 255 Pixel sound program scroll 1–10
10 Auto speed/
sound sensitivity 000 255 Auto program speed (slow to fast)
Sound sensitivity (low to high)

Page 13 of 20
SlimPAR Pro Pix User Manual Rev. 1
OPERATION
11 Ring auto/sound
programs
000 005 No function
006 016 Ring auto program 1
017 027 Ring auto program 2
028 038 Ring auto program 3
039 049 Ring auto program 4
050 060 Ring auto program 5
061 070 Ring auto program 6
071 080 Ring auto program 7
081 090 Ring auto program 8
091 100 Ring auto program 9
101 110 Ring auto program 10
111 120 Ring auto program scroll 1–10
121 130 Ring sound program 1
131 140 Ring sound program 2
141 150 Ring sound program 3
151 160 Ring sound program 4
161 170 Ring sound program 5
171 180 Ring sound program 6
181 190 Ring sound program 7
191 200 Ring sound program 8
201 210 Ring sound program 9
211 220 Ring sound program 10
221 255 Ring sound program scroll 1–10
12 Ring auto speed/
sound sensitivity 000 255 Auto program speed (slow to fast)
Sound sensitivity (low to high)
Channel Function Value Percent/Setting

Page 14 of 20
OPERATION
SlimPAR Pro Pix User Manual Rev. 1
Configuration (Standalone)
Set the product in one of the standalone modes to control without a DMX controller.
Automatic Programs
To run the SlimPAR Pro Pix in automatic mode, follow the instructions below:
1. Press <MENU> repeatedly until P-- shows on the display.
2. Press <ENTER>.
3. Use <UP> or <DOWN> to select an automatic program, from P (1–6).
4. Press <ENTER>.
Auto-Program Speed
To change the auto-program speed on the SlimPAR Pro Pix, do the following:
1. Press <MENU> repeatedly until S-- shows on the display.
2. Use <UP> or <DOWN> to increase or decrease the program speed, from (S001–100).
3. Press <ENTER>. The product will return to the last selected mode.
Sound-Active Mode
To run the SlimPAR Pro Pix in sound-active mode, follow the instructions below:
1. Press <MENU> repeatedly until Snd shows on the display.
2. Press <ENTER>
3. Use <UP> and <DOWN> to select a sound active program (Snd1–6).
4. Press <ENTER>.
Sound Sensitivity
To set the sound sensitivity on the SlimPAR Pro Pix, do the following:
1. Press <MENU> repeatedly until SENS shows on the display.
2. Press <ENTER>.
3. Use <UP> or <DOWN> to select a static color, from (U1–100).
4. Press <ENTER>.
Preset Color Mode
To run the SlimPAR Pro Pix on a static color, follow the instructions below:
1. Press <MENU> repeatedly until C1 (for static PAR colors) or C2 (for the outer LED ring colors)
shows on the display.
2. Press <ENTER>.
3. Use <UP> or <DOWN> to select a static color, from C 1–24 for the static PAR colors or C 1–19 for
outer LED ring colors.
4. Press <ENTER>.
Custom Color Mixing
To custom mix a static color, do the following:
1. Press <MENU> repeatedly until U-- shows on the display.
2. Press <ENTER> and one of the following will show on display.
•R_ _ _ (red)
•G_ _ _ (green)
•B_ _ _ (blue)
• A_ _ _ (amber)
• W_ _ _ (white)
•U_ _ _ (UV)
3. Press <ENTER> to cycle through the color settings.
4. When the desired color shows on the display, use <UP> or <DOWN> to increase or decrease the
color value, from 000–255.
5. Repeat steps 3 and 4 until the product outputs as desired.
Never connect a product that is operating in any standalone mode to a DMX string
connected to a DMX controller. Products in standalone mode may transmit DMX
signals that could interfere with the DMX signals from the controller.
The product will only respond to low frequencies of music (bass and drums).

Page 15 of 20
SlimPAR Pro Pix User Manual Rev. 1
OPERATION
Strobe
To set the strobe mode of the SlimPAR Pro Pix, follow the instructions below:
1. Press <MENU> repeatedly until U-- shows on the display.
2. Press <ENTER>.
3. Use <UP> or <DOWN> to select S.001–100:
•S.000 – Solid on
• S.001–S.099 – Strobe, slow to fast
• S.100 – Sound strobe
4. Press <ENTER>.
IRC-6 Infrared Remote Control
The SlimPAR Pro Pix is compatible with the IRC-6 infrared remote control from Chauvet. To activate IR
mode, follow the instructions below:
1. Press <MENU> repeatedly until SET shows on the display.
2. Press <ENTER>.
3. The IR option will be displayed. Press <ENTER>.
4. Press <UP> or <DOWN> to select On (turns the infrared function on) or oFF (turns the infrared
function off).
5. Press <ENTER>.
IRC-6 Operation
Automatic Mode
Automatic mode will enable you to run the automatic programs on the product.
To turn on Automatic mode:
1. Press <AUTO> on the IRC-6.
2. Press <+> or <–> to choose between the different auto programs
To adjust the speed of the automatic program:
1. Press <SPEED> on the IRC-6.
2. Press <+> or <–> to increase or decrease the speed of the program.
Sound-Active Mode
Sound-Active mode will enable the product to respond to the music.
To turn on Sound-Active mode:
1. Press <SOUND> on the IRC-6.
2. Press <+> or <–> to choose between the different Sound-Active programs.
To adjust sound sensitivity in Sound-Active mode:
1. Press <SENSITIVITY> on the IRC-6.
2. Press <+> or <–> to increase or decrease the sound sensitivity.
Manual Color Control
To choose a specific color with the IRC-6:
1. Press <MANUAL> on the IRC-6.
2. Press any number between <0>~<9> to choose your color.
To manually control the color percentage:
1. Press <MANUAL> on the IRC-6.
2. Press <R> (red), <G> (green), <B> (blue), <A> (amber), <W> (white), or
<UV> to choose the color.
3. Press <+> or <–> to increase or decrease the percentage of each color.
To black out the lights:
1. Press <BLACK OUT> on the IRC-6.
This will turn off all the lights until the button is pressed again.
NOTE: The IRC-6 will not respond to any inputs when Black Out is activated. If the
remote does not respond when a button is pressed, try pressing <BLACK OUT>.
You may have inadvertently activated Black Out.

Page 16 of 20
OPERATION
SlimPAR Pro Pix User Manual Rev. 1
Master/Slave Mode
The Master/Slave mode allows a single SlimPAR Pro Pix product (the “master”) to control the actions of
one or more SlimPAR Pro Pix products (the “slaves”) without the need of a DMX controller. The master
product will be set to operate in Standalone or with the IRC-6, whereas the slave products will be set to
operate in Slave mode. Once set and connected, the slave products will operate in unison with the master
product. Configure the products as indicated below.
Slave products:
1. Press <MENU> repeatedly until 12CH shows on the display.
2. Press <ENTER>.
3. Set the DMX address to d 001.
4. Connect the DMX input of the first slave product to the DMX output of the master product.
5. Connect the DMX input of the subsequent slave products to the DMX output of the previous slave
product.
6. Finish setting and connecting all the slave products.
Master product:
1. Press <MENU> repeatedly until SET shows on the display.
2. Press <ENTER>.
3. Use <UP> or <DOWN> to select on.
4. Press <ENTER>.
5. Set the master product to operate in standalone or IR mode.
6. Make the master product the first product in the DMX daisy chain.
• Configure all the slave products before connecting the master to the daisy chain.
• Never connect a DMX controller to a DMX string configured for Master/Slave
operation because the controller may interfere with the signals from the master.
• Do not connect more than 10 slaves to the master.

Page 17 of 20
SlimPAR Pro Pix User Manual Rev. 1
MAINTENANCE
5. Maintenance
Product Maintenance
Dust build-up reduces light output performance and can cause overheating. This can lead to reduction of
the light source’s life and/or mechanical wear. To maintain optimum performance and minimize wear, clean
your lighting products at least twice a month. However, be aware that usage and environmental conditions
could be contributing factors to increase the cleaning frequency.
To clean the product, follow the instructions below:
1. Unplug the product from power.
2. Wait until the product is at room temperature.
3. Use a vacuum (or dry compressed air) and a soft brush to remove dust collected on the external
surface/vents.
4. Clean all transparent surfaces with a mild soap solution, ammonia-free glass cleaner, or isopropyl
alcohol.
5. Apply the solution directly to a soft, lint-free cotton cloth or a lens-cleaning tissue.
6. Softly drag any dirt or grime to the outside of the transparent surface.
7. Gently polish the transparent surfaces until they are free of haze and lint.
Always dry the transparent surfaces carefully after cleaning them.

Page 18 of 20
TECHNICAL SPECIFICATIONS
SlimPAR Pro Pix User Manual Rev. 1
6. Technical Specifications
Dimensions and Weight
Note: Dimensions in inches rounded to the nearest hundredth.
Power
Light Source
Photometrics
Thermal
DMX
Ordering
Length Width Height Weight
11.4 in (290 mm) 4.3 in (110 mm) 12.3 in (313 mm) 9.8 lb (4.5 kg)
Power Supply Type Range Voltage Selection
Switching (internal) 100 to 240 VAC, 50/60 Hz Auto-ranging
Parameter 120 V, 60 HZ230 V, 50 HZ
Consumption 93 W 96 W
Operating current 1.3 A 0.7 A
Power-linking current (products) 8 A (6 products) 8 A (11 products)
Fuse T 2 A, 250 V T 2 A, 250 V
Power I/O U.S./Canada Worldwide
Power input connector IEC IEC
Power output connector Edison IEC
Power cord plug Edison (U.S.) Local plug
Type Quantity Color Power Current Lifespan
Main LED 12 Hex-color
RGBAW+ UV 10 W 2.1 A 50,000 hours
Ring LED 57 Tri-color RGB 11 W 2.2 A 50,000 hours
Parameter Value
Strobe rate 0 to 20 Hz
Beam angle 25°
Field angle 39°
Illuminance @ 2 m 3,246 lux
Illuminance @ 5 m 519 lux
Maximum External Temperature Cooling System
104 °F (40 °C) Convection
I/O Connector Channel Range
3-pin XLR 12, 26, 48
Product Name Item Code UPC Number
SlimPAR Pro Pix 10031815 781462221638
UL 1573
CSA C22.2 No. 166
E113093
R
Table of contents
Other Chauvet Power Supply manuals
Popular Power Supply manuals by other brands

Pulsar
Pulsar PSP54006 quick start guide

Extron electronics
Extron electronics P/S 150 user guide

Cosel
Cosel PCA Series Assembling and Installation Instructions

SDMO
SDMO NEO 2000 User and maintenance manual

Micro Technic
Micro Technic Micronix PC/104 Power Supply PV-1075-CAR Installation and user manual

Miyachi
Miyachi IPB-5000A Operation manual