Chauvin Arnoux RayCAm C.A 1886 User manual

Caméra thermographie I.R
Infrared Camera
I.R-Wärmebildkamera
Videocamera termografica I.R
Cámara de termografía IR
C.A 1886
C.A 1888
FRANÇAIS Notice d’utilisation simplifiée
ENGLISH User’s Manual : Quick start
DEUTSCH Bedienungsanleitung
ITALIANO Libretto d’istruzzioni : Inizio rapido
ESPAÑOL Manual de Instrucciones

Français
ATTENTION
Une camera infrarouge est un équipement de mesure optique précieux,
attention aux remarques suivantes :
1. Ne pas diriger la camera vers le soleil, devant une soudure au laser ou toute
autre source de fort rayonnement thermique.
2. Ne pas regarder directement dans le faisceau laser, ne pas diriger le
faisceau vers des personnes.
3. Ne pas utiliser une mauvaise gamme de température pour inspecter une
cible à haute température.
4. Lors de l’allumage de la caméra, attendre 10-15 minutes avant d’enregistrer
vos premiers thermogrammes pour être certain d’une stabilisation correcte
en température de votre RayCAm.
Appareil pouvant, et uniquement dans des conditions
particulières, être sensible aux décharges ESD.
Si des éléments de la caméra sont brûlés, endommagés ou présentent des
problèmes à la suite d’un non respect des consignes énumérées ci-dessus, le
constructeur ainsi que le distributeur ne seront en aucun cas responsables et
tous les frais mis en jeu seront entièrement à la charge de l’utilisateur.
STRUCTURE DE LA RayCAm C.A 1886 et C.A 1888
Objectif Image
réelle
Torche Ecran LCD
Clavier
Gâchette
configurable
Pointeur laser
Objectif IR,
focalisation manuelle
Trappe batterie
1

Français
INTERFACE RayCAm
Chargement. Entrée
externe DC
Carte Mini SD pour
mémorisation images
Interface vidéo
RCA standard
UTILISATION DES RayCAm C.A 1886 et C.A 1888
Description des touches
3
2
1
1. Bouton ON/OFF de la caméra
Appuyez sur cette touche durant quelques secondes pour allumer-éteindre la caméra
2. LED d’allumage (caméra allumée)
3. Panneau de contrôle
Ce panneau comprend :
“A”: bouton d’ajustement automatique
“C“: Bouton d’annulation / correction (en mode menu ou analyse)
“S”: Bouton mode gelé ou non / bouton d’enregistrement d’image
4 boutons de direction : “◄”,“►”,“” et “ ” et “ ”: Menu - Validation
Prise en main
Observation et réglage de l’image IR
1. Appuyez sur le bouton Marche / arrêt pendant quelques secondes pour
allumer la caméra ;
2. Attendez jusqu'à ce que l’initialisation et les données soient complètement
chargées ;
2

Français
3. Enlevez le cache lentille et pointez la camera sur la cible ;
4. Tournez l’objectif manuellement pour régler le focus ;
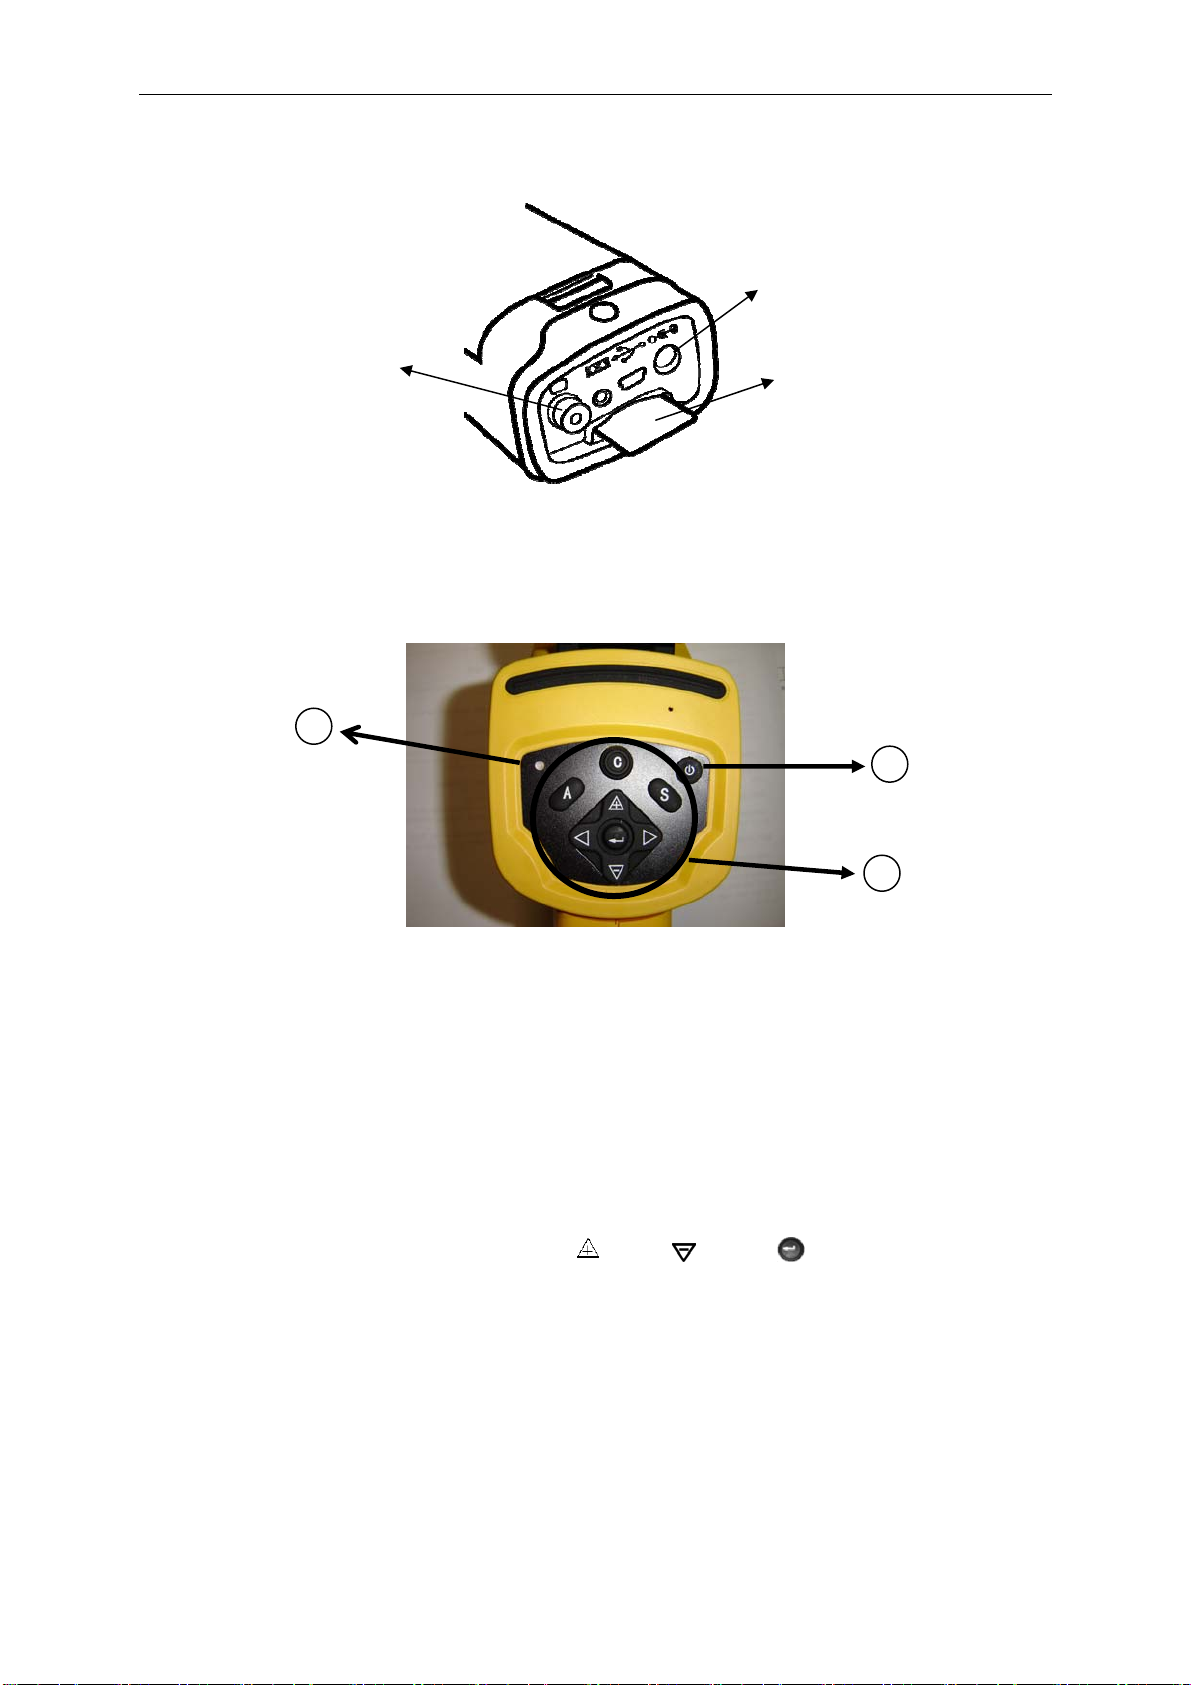
5. Appuyez sur la touche “A” afin d’ajuster la luminosité, le contraste et l’échelle
automatiquement
Note : Le bruit provenant de la caméra que vous entendez est normal.
Affichage I.R., Réel et MixVision.
Cette caméra I.R. enregistre des images visuelles avec son appareil numérique
intégré. Vous pouvez ainsi capturer une image réelle pour la comparer à l’image
thermique.
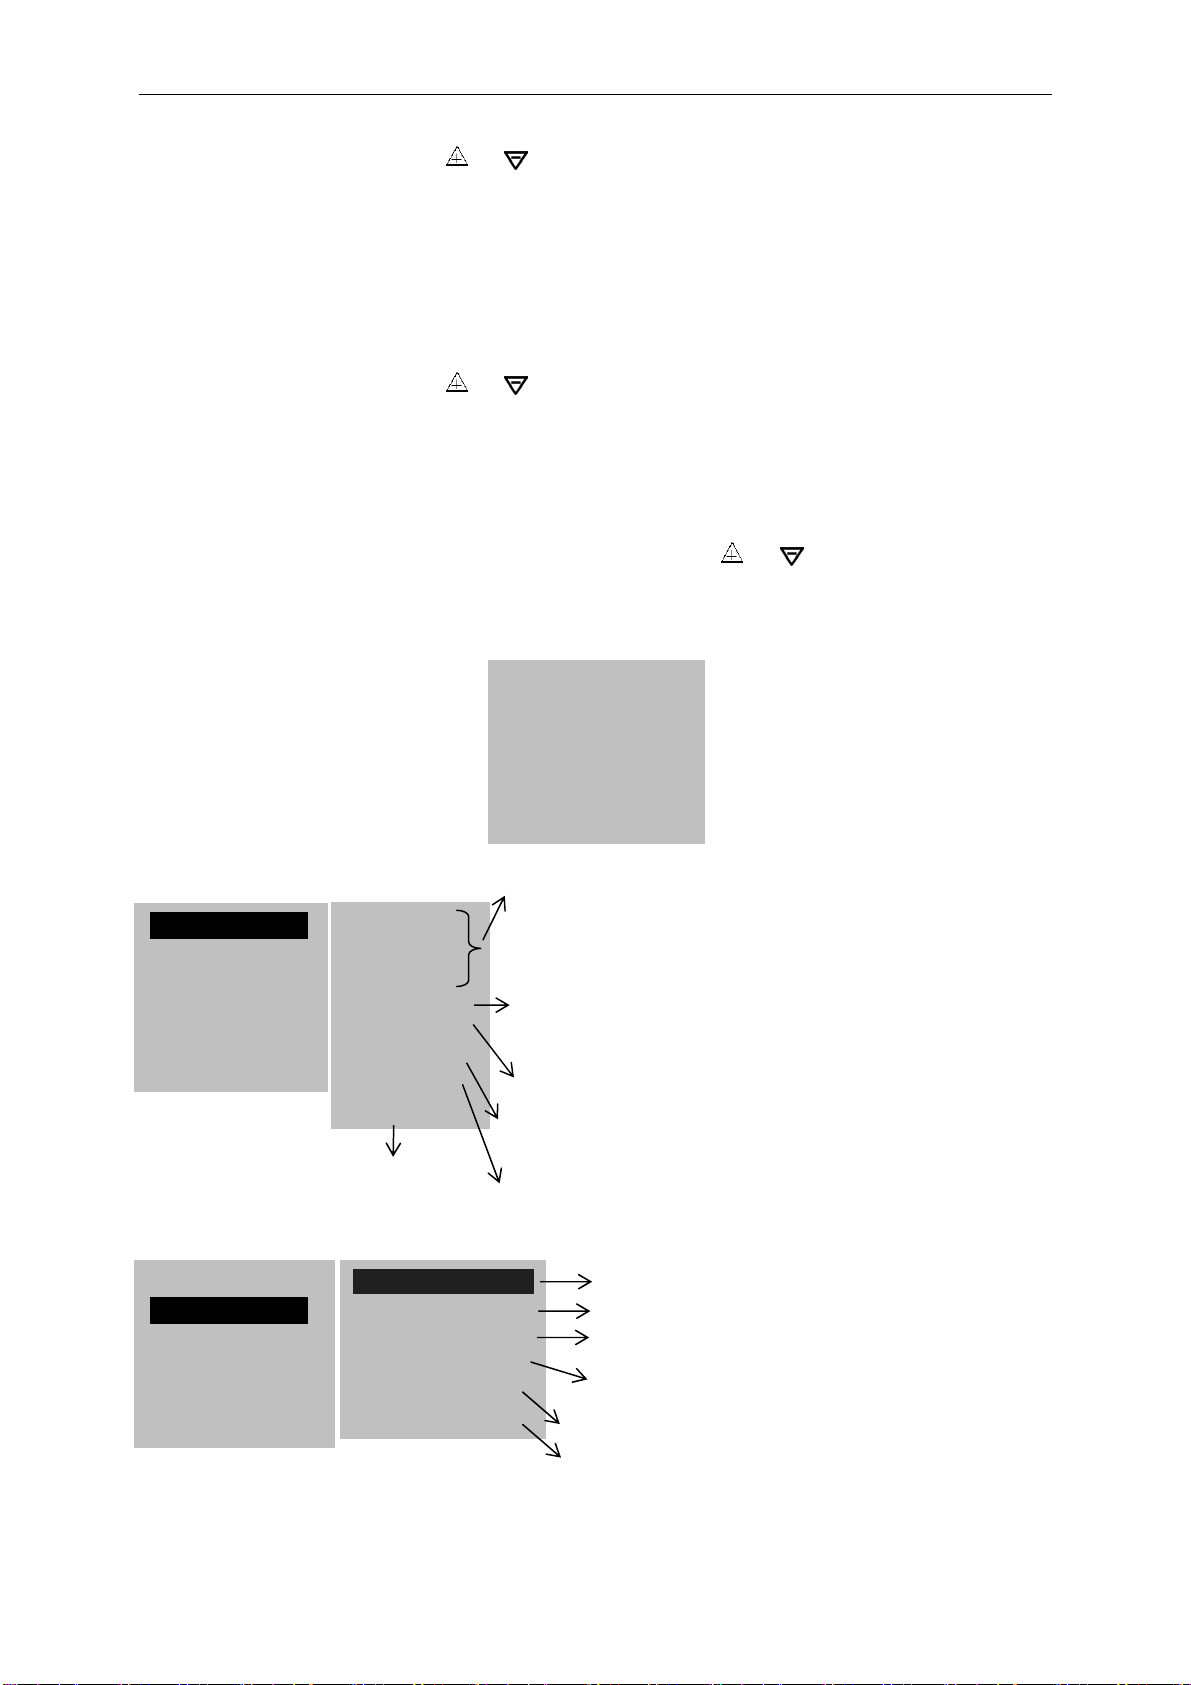
1. Appuyez sur la touche « ENTRER » pour afficher le menu, puis sélectionnez
« I.R. / Visible ».
2. Choisissez le mode désiré : « IR », « Vision » ou « MixVision »
3. Sélectionnez le pourcentage infrarouge (en mode « MixVision »).
Réglage de parallaxe
L’objectif infrarouge étant décalé vis à vis de l’objectif visuel, il se peut que les deux
images soient décalées en mode « MixVision ».
Pour aligner les deux images :
1. Assurez-vous que vous êtes en mode NULL
2. Tout en maintenant appuyé la touche C, pressez la flèche gauche pour
décaler l’image vers la gauche, la droite pour décaler l’image vers la droite,
flèche haute pour décaler l’image vers le haut et celle du bas pour décaler
l’image vers le bas.
Analyse de la température mesurée
1. Appuyez sur la touche « ENTRER » pour afficher le menu ;
2. Sélectionnez le sous-menu « Analyse »
3. Appuyez sur les touches de direction pour sélectionner « Curseur1 » ;
4. Appuyez sur la touche « ENTRER » pour valider;
5. Bougez la caméra ou le curseur à l’aide des touches de direction sur la cible ;
6. La valeur affichée sur le curseur correspond à la température en ce point ;
7. On peut obtenir la mesure Multi-curseur en sélectionnant « curseur2 » et
« curseur3 »
Note : Vous ne pourrez déplacer le curseur 1 manuellement uniquement si « SP1 »
est affichée dans la barre d’état (Il en est de même pour les curseurs 2 et 3)
Enregistrer une image IR
Solution 1 :
Maintenez appuyer la touche « S » pendant 3 secondes
Solution 2 :
1. Après avoir gelé l’image, appuyez sur « ENTREE » pour afficher le menu.
3

Français
2. A l’aide des touches et sélectionnez le sous-menu « FICHIER » puis
appuyez sur « ENTRER »
3. Sélectionnez « SAUVEGARDER » et validez à l’aide de la touche
« ENTRER »
Ouvrir une image IR
1. Appuyez sur « ENTRER » pour afficher le menu ;
2. A l’aide des touches et sélectionnez le sous-menu « FICHIER » puis
appuyez sur « ENTRER »
3. Sélectionnez « OUVRIR », validez à l’aide de la touche « ENTREE »
4. Faites défiler les images à l’aide des touches ◄►
Pour atteindre directement une image sans faire défiler l’ensemble des
thermogrammes enregistrés, appuyer sur les touches et .
Icônes et fonctions du menu
Analyse ►
Fichier ►
IR / Visible
Ajust. Manuel.
Param. Obj.
Menu ►
Sous menu « Analyse »
Sous menu « Fichier »
Accès aux données d’enregistrement et sélection
des répertoires.
Analyse ►
Fichier ►
IR / Visible
Ajust. Manuel.
Param. Obj.
Menu ►
Curseur 1
Curseur 2
Curseur 3
<Maximum>
Isotherme
Profil Temp.
Surface
<Tout Eff.>
Analyse ►
Fichier ►
IR / Visible
Ajust. Manuel.
Param. Obj.
Menu ►
Ouvrir
Sauvegarder
Supprimer
Rég. Fichier ►
Enr Vocal
Ecouter Comm
L’imageur entre en mode de mesure thermique. Orientez la
caméra ou utilisez les touches directionnelles de façon à
positionner le curseur sur la cible. En haut à droite de l’écran
s’affiche la température du point-cible.
Température Maximale ou Minimale : Cette option permet de
repérer et de suivre le point le plus chaud ou plus froid d’une
zone. L’utilisateur peut changer la taille de la zone.
La RayCAm effectue une analyse isotherme de la scène
thermique. Les objets appartenant au même intervalle de
température apparaissent suivant des couleurs identiques.
Pour ouvrir un fichier image de la carte mémoire
Pour enregistrer une image IR sur la carte mémoire
Pour Effacer un fichier ima
g
e de la carte mémoire
Pour associer commentaire vocal si option Bluetooth
Cette option permet l’affichage de la distribution de
température le long d’un outil de type ligne.
Cette option permet l’affichage des données de type Minimum,
Maximum et Moyenne sur zone
Pour écouter un commentaire vocal associé à une
image
Suppression des outils d’analyse
sélectionnés
4

Français
Sous menu « IR / Visible »
Sous menu « Ajustement manuel »
Sous menu « Par. Obj. »
Sous menu « Menu »
1. Réglage Analyse
5
Niveau
30°C
Echelle
10°C
Gamme Temp.
-20 -250
Filtre
Off
Analyse ►
Fichier ►
IR / Visible
Ajust. Manuel.
Param. Obj.
Menu ►
Réglage Analyse
Réglage Local
Date & Heure
Réglage Caméra
Info. Système
Alarme : Activé
Temp. Alarme : 100°C
Correct. Temp : 0° C
Saturation : Activé
Largeur Isoth. : 0.7° C
Couleur Isoth. : Vert
Type Isoth. : Interval
Alarme Isoth. : 100
Couleur curseur.: Blanc
Valeur médiane de l’échelle
de température
Amplitude de l’échelle, c’est à dire à la
différence de température entre la
température maximale et minimale
Correspondant à la plage de
mesure de la RayCAm
Propriété du matériau. Paramètre variant de 0 à 1 par
pas de 0,01
Ecart entre l’opérateur en thermographie et la cible visée
Température de l’environnement proche de la cible
Paramètre caractéristique de l’air environnant
Activer ou désactiver la fonction Alarme
Programmer le seuil d’alarme
Corriger la valeur de la température mesurée
Configurer la largeur de l’intervalle isothermique
Configurer le type d’isotherme
Seuil d’alarme de l’isotherme
Configurer la couleur des curseurs
L’activation de la fonction « Saturation » isolera les points dont
la température excède l’échelle de température en cours.
Configurer la couleur de l’intervalle isothermique
Analyse ►
Fichier ►
IR / Visible
Ajust. Manuel.
Param. Obj.
Menu ►
IR / Vision
Pourcentage IR
I.R. : Seule l’image I.R. s’affiche à l’écran.
Tous les outils d’analyse sont accessibles.
Vision : seule l’image visuelle s’affiche à l’écran. Les
outils d’analyse ne sont pas tous accessibles.
MixVision : L’image visuelle apparaît en arrière-plan et
la fenêtre centrale est la zone de fusion. Vous pouvez
appliquez à cette zone tous les outils d’analyse.
Pourcentage d’affichage de l’image thermique
(100% : uniquement image I.R., 0% : uniquement
image réelle).
Param. Obj.
Objet : Tous
Eléments sur les
q
uels vont s’a
pp
li
q
uer les
p
aramètres
Emissivité : 0,95
Distance : 5m
Param. Généraux
Temp. Env: 24,4°C
Humidité : 50%
Comp Obj 1 : Curseur1
Comp Obj 2 : Curseur2
Temp. Ref : 25 °C
Deux outils d’analyse peuvent être comparés entre eux ou
avec une température de référence définie dans Temp.
Ref. Le différentiel de température entre ces deux objets
est affiché en bas à droite de l’afficheur.

Français
2. Réglage Local
3. Réglage Date & Heure
4. Réglage Caméra
5. System Information
Sélectionner cette icône et appuyer sur la touche « ENTRER » pour afficher la
fenêtre d’information. Cette fenêtre montre les informations générales: Numéro de
série, Date de fabrication et version.
Description de la barre d’affichage
Alarme sonore activée ou non
La bande de couleur représente
les pseudos-couleurs
B
Palette : Métal
Ajust. Auto :Lumin. et con.
Ajust. Continu :Lumin. et con.
Pér. Auto Adj. : Jamais
Arrêt Caméra : Jamais
Gâchette : Laser
Ajust. Laser : Désactivé
Style Menu : Normal Définir la position de l’image du pointeur laser en
concordance avec le curseur 1
Rendu couleur : la RayCAm met à votre disposition 6
palettes de couleur
Heure
Style du menu
Condition opérationnelle : NULL,
MENU, SP1, ISO ou CAPT,
PRO.
,
AREA.
Emissivité en cours
Etat de charge de la batterie
« »: l’utilisateur est en
mode dynamique
« », l’utilisateur est en
mode gelé
Sert à définir si oui ou non l’appareil doit ajuster en
continu l’image mouvante
Pour programmer un arrêt automatique de l’affichage
Pour
p
ro
g
rammer une
p
ériodicité d’auto a
j
ustement
Configuration de la gâchette de déclenchement
Sert à définir le mode de réglage de la touche « A »
Langue : French
Sortie Vidéo : PAL
Unité Temp. : °C
Unité Dist. : Meter
Année : 2006
Mois : 8
Jour : 5
Heure : 7
Minute : 15
6

Français
SPECIFICATIONS TECHNIQUES
Conditions environnementales de fonctionnement
1 Température de fonctionnement -15° C~50° C
2 Humidité relative 10 – 95 %HR
3 Température de stockage -40° C~70° C
Indicateurs techniques
4 Type de détecteur Matrice à Plan Focal Non-refroidi
5 Réponse spectrale 8~14um
6 Résolution C.A 1886 : 160 x 120 C.A 1888 : 384 x 288
7 NETD C.A 1886 : 0,08°C C.A 1888 : 0,05°C
8 Objectif / m.a.p C.A 1886 : 20°x15°,
10cm
C.A 1888 : 24°x18°,
10cm
9 IFOV 2,2 mrad 1,1 mrad
10 Image visuelle Image numérique intégrée, 640x480 pixels avec
torche pour éclairement zones sombres
11 Affichage image IR, Visuel ou MixVision (IR+Réel)
12 Poids ≤0,7Kg ( batterie incluse )
13
Intervalle de
température
mesurable -20 ~600 ° C
14 Exactitude des
mesures ±2° C ou ±2%
15 Autonomie batterie Min. 3h
16 Ecran Orientable 3,5 pouces
17 Affichage et mesures
de température Pseudo-couleurs plein écran, mesures plein écran
18 Outils
4 curseurs : 3 curseurs manuels, 1 curseur
automatique.
Profil de température, Min./Max./Moy. sur zone,
isotherme, différentiel de température.
19 Commentaires Vocal par bluetooth en option
20 Structure Compact, maniable d’une main
21 Fréquence
trame /mode sortie
50 Hz (9Hz hors zone de l’union européenne,
modèles P01651260E et P01651270E),
PAL/NTSC au choix
22 Emballage Boîtier portatif en plastique ultra-résistant
23 Résistance aux chocs 25 G selon IEC 68-2-29
24 Résistance aux
vibrations 2 G selon IEC 68-2-6
25 Indice de Protection IP 54 selon IEC 529
7

English
WARNING
The Infrared Camera is one high precious optics and measurement equipment,
please be careful when using it:
1. Do not point the camera straightly to the sun, laser welding torch or
other over high temperature target for inspection
2. Do not use the incorrect temperature measurement range to measure
the high temperature target which is over the setting range.
3. When you start the RayCAm, please wait for 10-15 minutes before
saving your first thermograms to be sure that you have a correct
temperature stabilization of your RayCAm.
4.
If the camera was burned, damage or comes out other problems cause by the
reasons mentioned above, the manufacturer will not take the responsibility of
warranty, all the repair fees, transportation fees will be paid by the user.
RayCAm C.A 1886 and C.A 1888 STRUCTURE
INSTRUCTION
Device capable, and only under specific conditions, be sensitive
to ESD discharges.
Key panel
IR lens
Torch
Visual lens
Main LCD
Laser pointer
Configurable trigger
Cover of battery
compartment
8

English
RayCAm C.A 1886 and C.A 1888 INTERFACE DEFINITION
Power supply interface
Video output interface.
Standard RCA interface Mini SD Card
RayCAm C.A 1886 - C.A 1888 OPERATION INSTRUCTION
Instructions on Key Operations
3
2
1
4. Power switch
Press this button for few seconds to turn on or turn off the camera.
5. Power LED (When the camera is powered on, the LED will light)
6. Control panel
Including
“A”: Auto Adjust key (level, span, scale)
“C“: Cancel key / correction (in menu or analysis mode)
“S”: Freeze/live key, saving key
4 direction keys: “◄”,“►”,“” and “ ” and “ ”: Menu - Enter
Brief introduction
Observation and Adjustment of Infrared Image
1. Press and hold on the power switch key to turn on the camera.
2. Wait till the initialization and data loading completely.
3. Take off the cover of lens and point to the target;
4. Whirl the lens for focusing;
9

English
5. Press key “A” to auto-adjustment
Note: the noise from the camera when operating is normal.
I.R., Real, and Real + Mix Display.
This I.R. camera records visual images with its built-in digital device. This lets you
record a real image and compare it to the thermal image.
1. Press the "Menu/Validation" key to display the menu, then select "I.R./Visible".
2. Choose the right mode (IR, vision or MixVision)
3. Press the "left" or "right" arrow to select the percentage of infrared (possible
only in "MixVision" mode).
Parallax adjustment
Since the infrared and visual objectives are offset, the two images may be misaligned
in the "MixVision" mode.
To align the two images:
3. Make sure that you are in NULL mode
4. Hold the C key down and press; the left arrow to shift the image to the left; the
right arro w to shift the image to the right; the up arrow to shift the image
upward; the down arrow to shift the image downward.
Analysis of temperature measurement
8. After startup the camera, press the “menu (enter)” key to pop up the menu;
9. Press the direction key(«» or « »)to enter the “Analysis”
10.Press the direction key(«◄» or «►»)to select “Spot 1”;
11.Press the menu (enter) key again;
12.Move the camera or move the cursor through the direction key to point to the
target;
13.The value displaying on the right-up corner is the target’s temperature;
14.Multi-spot measurement is available when selecting “Spot 2” and “Spot 3”
Note: you will only be able to move cursor 1 if “SP1” is written on the status bar
(It is the same thing for SPOT2 and SPOT3)
Store the infrared image
Solution 1:
You can hold the key “S” for 2-3 seconds to store the image.
Solution 2:
4. After startup the camera, press the « menu (enter) » key to pop up the menu ;
5. Press the direction key and to enter the « FILE » ;
6. Select “Save” and press the “menu (enter)” key.
10

English
Recall the infrared image
5. After startup the camera, press the « menu (enter) » key to pop up the menu;
6. Press the direction key and to enter « FILE », then press the “menu”
key to enter
7. Press the direction key and to “Open” and press “ENTER”
8. Choose your picture with ◄►key
To go directly to a specific picture without seeing all the thermograms, press on
and key.
Items and Functions of the Menu
Sub menu « Analysis »
Sub menu « File »
Sub menu « IR / Visible »
Open the images of the Flash Disk
Save the image to the Flash Disk
Analysis ►
File ►
IR / Visible
Manual Adj.
Object Param.
S
y
stem Setu
p
►
Spot1
Spot2
Spot3
<Maximum>
Isotherm
Profile
Area
<Remove all>
The camera will come into the temperature measurement
condition. Move the camera or move the direction key to
point the cursor to the target, the target’s temperature
value will be displaying on the right-up of the screen
Maximal or minimal temperature: one spot is tracking the
highest or lowest temperature in the area.. The user can
change the size of the area.
Display of the temperature distribution on a line
Cancel the analysis
tools
Delete the images of the Flash Disk
Analysis ►
File ►
IR / Visible
Manual Adj.
Object Param.
S
y
stem Setu
p
►
Open
Save
Delete
File setup ►
Voice rec.
Voice Play You can associate up to 30 seconds of voice
remarks with an image (bluetooth option)
If a voice remark is associated with an image, you
can listen to it on the camera. (bluetooth option)
IR / Vision
IR Percent
I.R.: only the I.R. image is displayed on
screen. All of the analysis tools are available.
VISION: only the visual image is displayed on
screen. The analysis tools are not all available
MIXVISION: the visual image appears in the
background and the central window is the
fusion zone. You can apply all of the analysis
tools to this zone.
Percentage of thermal image in the display
(100% : pure I.R. image, 0% : real image only).
The camera will do the isotherm analysis of the infrared
image. If the temperature is in one setting area, it will be
displayed in one color.
The camera will do the analysis of minimum, maximum,
average on an area.
Display of the data stored and selection of the
directory name.
Analysis ►
File ►
IR / Visible
Manual Adj.
Object Param.
S
y
stem Setu
p
►
Analysis ►
File ►
IR / Visible
Manual Adj.
Object Param.
System Setup ►
11

English
Sub menu «Manual Adj. »
Sub menu « Obj. Par. »
Level
30°C
Span
10°C
Temp. Range
-20 -250
It represents the amplitude of the
scale, i.e. the difference between the
max. Temperature and the min.
temperature
It represents the
temperature range of the
RayCAm
It represents the median
value of the temperature
scale
Off
Filter
Object Setup
Object : All
Emiss. : 0,95 Distance between the thermography user and the target
Material property. Setting between 0 to 1
Distance : 5m
Global Setup
Env. Temp. : 24,4°C
Humidity : 50%
Comp Obj 1: Spot1
Comp Obj 2: Spot2
Ref. Temp : 25 °C
Two analysis tools can be compared with each other or with
a reference temperature defined in Temp. Ref. The
temperature differential between these two objects is shown
in the bottom right of the display.
It seems the temperature around the target
Parameter of the ambiant air
Elements on which will apply the settings
Sub menu « Setup »
Analysis ►
File ►
IR / Visible
Manual Adj.
Object Param.
System Setup ►
Analysis setup
Local setup
Date & Time
Camera setup
System info
6. Analysis setup
Set the color of the spot
Correct the value of the measured temperature
Turn on or turn off the temperature alarm function
Preset the alarm temperature value
When it’s on, Green will take place of the colour that
stands for the highest temperature
Alarm of the isotherm
Define the t
yp
e of isotherm
Set the color of the isotherm
Set the width of the isotherm range
Alert : On
Alert temp. : 100°C
Correct. Temp : 0° C
Saturation : On
Isotherm width : 0.7° C
Isotherm color : Green
Isoth. type : Interval
Isoth. alert : 100
SpotTemp color: White
12

English
7. Local setup
8. Date & Time
9. Camera setup
10.System Information
Select this option and press the menu (enter) key, the information will be displayed at
the center of the screen, including the model of the equipment, manufacturer, serial
number, production date and software version number, etc.
INSTRUCTION OF IMAGE DISPLAY STATUS BAR
Sets the menu style
Palette : Metal
Auto. Adjust : Level and span
Continuous adj. : Level and span
Shutter period : Never
Shut down : Never
Trigger button : Laser on
Laser adjust. : Off
Menu style : Normal
Sound alarm on or off
The colour bar in the middle
represents pseudocolors
B
Palette: It provides a number of artificial color options
Define the adjustment way of the key “A”.
Set whether the camera needs to auto-adjust
continuously according to the change of the image
Set the camera that whether it needs to auto-shut down
Define the position of image of the laser point and
measure spot SP1
Set the period of auto-adjustment
Set the control switch of the trigger button
« »: user is in dynamic
mode
« », user is in freeze
mode
Operation condition : NULL,
MENU
,
SP1
,
ISO or CAPT
Emissivity of the target point
Time
Video output : PAL
Temp unit : °C
Dist unit : Meter
Year : 2006
Month : 8
Day : 5
Hour : 7
Minute : 15
Language : French
Power status
13

English
TECHNICAL SPECIFICATIONS
Environmental Requirements
1 Operating temperature -15 ° C~50 ° C
2 Operating humidity 10 – 95 %HR
3 Storage temperature -40 ° C~70 ° C
Technical Indexes
4 Type of Detector Uncooled focal plane
5 Spectral range 8~14um
6 Resolution C.A 1886: 160 x 120 C.A 1888: 384 x 288
7 NETD C.A 1886: 0,08°C C.A 1888: 0,05°C
8 Lens / Focusing C.A 1886: 20° x 15°
10cm
C.A 1888: 24° x 18°
10cm
9 IFOV C.A 1886: 2,2 mrad C.A 1888: 1,1 mrad
10 Visual image 640x480 pixels, "full colour" with illuminator (high-
quality visual images in dark areas)
11 Display of image IR, Real image, Mix Vision
12 Weight ≤0.7Kg (including battery)
13 Temperature range -20 ~600 ° C
14 Temperature
accuracy ±2 ° C/±2%
15 Battery operating
time Min. 3h
16 Screen 3,5 “
17
Image display and
temperature
measurement
Full-screen pseudocolor and full-screen temperature
measurement
18 Analysis tools 3 manual cursors + 1 auto track Max/Min + Isotherm
+ Alert
19 Commentary Vocal if bluetooth option
14 Structure Integrated design and one-hand operation
15 Frame frequency/
output pattern
50Hz (9Hz outside the UE area, models
P01651260E and P01651270E),
PAL/NTSC selection
16 Packing High-strength plastics portable case
17 Shock resistance 25 G (IEC 68-2-29)
18 Vibration resistance 2 G (IEC 68-2-6)
19 IP IP 54 (IEC 529)
14

Deutsch
ACHTUNG
Eine Infrarotkamera ist ein wertvolles optisches Messgerät, bitte beachten Sie
daher folgende Hinweise:
1. Die Kamera nicht auf die Sonne, Laserschweißungen oder andere stark
strahlende Wärmequellen richten.
2. Achtung LASER - blicken Sie nicht direkt in den Laserstrahl!
3. Achten Sie darauf, den richtigen Temperaturbereich zu wählen, um ein
Objekt mit hoher Temperatur zu untersuchen.
4. Um sicher zu sein, dass die Kamera eine Temperaturstabilität erreicht
hat und somit die Messungen korrekt sind, ist beim Einschalten der
Kamera eine Wartezeit von 10 bis 15 Minuten einzuhalten bevor die
ersten Wärmebilder gespeichert werden.
Das Gerät kann unter gewissen Umständen gegenüber ESD-
Entladungen empfindlich sein.
Wenn Teile der Kamera verbrannt oder beschädigt sind oder
Probleme infolge der Nichtbeachtung oben genannter Hinweise auftreten,
können Hersteller und Händler hierfür nicht haftbar gemacht werden. Alle
anfallenden Kosten gehen in diesem Fall zu Lasten des Benutzers.
AUFBAU DER RayCAm C.A 1886 – C.A 1888
LCD-Anzeige
Sicht-Objektiv
IR-Objektiv
Laserzeiger
Batteriefachdeckel
Tastenfeld
Fotoleuchte
Konfigurierbarer
Auslöser
15

Deutsch
SCHNITTSTELLE RayCAm C.A 1886 – C.A 1888
Externer
Netzadapter
Mini SD-Karte
Video-Ausgang
BEDIENUNG DER RayCAm C.A 1886 – C.A 1888
Beschreibung der Tasten
3
2
1
1. ON/OFF-Schalter der Kamera
Taste einige Sekunden gedrückt halten, um die Kamera ein- oder auszuschalten
2. Einschalt-LED (Die LED leuchtet bei eingeschalteter Kamera)
3. Bedienfeld
"A": Taste für automatische Einstellung
“C“: Abbruchtaste/Korrekturtaste
“S”: Taste zum Aktivieren und Deaktivieren der Freeze-
Funktion/Speicherungstaste
4 Richtungstasten: “◄”,“►”,“” et “ ”, “ ”: Menü – Bestätigung
Kurzeinführung
Beobachtung und Einstellung des IR-Bildes
1. Drücken Sie einige Sekunden die Ein-/Aus-Taste, um die Kamera
einzuschalten;
2. Warten Sie, bis die Initialisierung und die Daten vollständig geladen sind;
3. Nehmen Sie den Linsenschutz ab und richten Sie die Kamera auf das
Zielobjekt;
4. Drehen Sie das Objektiv von Hand, um den Fokus einzustellen;
16

Deutsch
5. Drücken Sie die Taste “A”, um Helligkeit, Kontrast und Skala automatisch
einzustellen
Anmerkung: Das Geräusch der Kamera, das Sie vernehmen, ist normal.
IR-Anzeige, Sichtbild und MixVision.
Diese IR-Kamera speichert die Bildaufnahmen mit ihrem eingebauten Digitalgerät.
Damit haben Sie die Möglichkeit, Bilder aufzunehmen und diese mit
Infrarotaufnahmen zu vergleichen.
5. Drücken Sie auf die Taste „Menü/Bestätigung“ zur Anzeige des Menüs, dann
wählen Sie „I.R./ Sichtbild“.
6. Wählen Sie den gewünschten Modus
7. Mit dem Pfeil „links“ oder „rechts“ wählen Sie den Infrarot-Prozentsatz
Einstellung der parallaxe
Da das Infrarot-Objektiv zum Bildobjektiv versetzt ist, kann es vorkommen, dass die
zwei Bilder im „MixVision“ Modus ebenfalls versetzt sind.
Um zwei Aufnahmen aufeinander auszurichten:
1. Zuerst prüfen Sie, dass Sie im NULL-Modus sind.
2. Gleichzeitig halten Sie die Taste C gedrückt und drücken den linken Pfeil für
eine Verschiebung der Aufnahme nach links, den rechten Pfeil für eine
Verschiebung nach rechts, den oberen Pfeil für eine Verschiebung nach oben
und den unteren Pfeil für eine Verschiebung nach unten.
Analyse der gemessenen Temperatur
15.Wenn Sie die Kamera eingeschaltet haben, drücken Sie die Eingabetaste, um
das Menü aufzurufen;
16.Wählen Sie das Untermenü "Analyse"
17.Drücken Sie die Richtungstasten, um "Cursor 1" zu wählen;
18.Drücken Sie die Eingabetaste, um zu bestätigen.
19.Bewegen Sie die Kamera oder den Cursor mit Hilfe der Richtungstasten auf
dem Zielobjekt;
20.Der oben rechts angezeigte Wert entspricht der Temperatur des Objekts;
21.Den Messwert von mehreren Cursors erhält man, wenn man "Cursor 2" und
"Cursor 3" wählt
Hinweis: Der Cursor kann nur dann verstellt werden, wenn „SP1“ in der Anzeigeleiste
eingeblendet ist. (Dito für die Cursor 2 und 3)
Speichern eines IR-Bildes
Lösung 1:
Halten Sie die Taste "S" (SAVE) 3 Sekunden lang gedrückt
Lösung 2:
7. Wenn Sie das Bild eingefroren haben, drücken Sie "EINGABE", um das Menü
anzuzeigen.
17

Deutsch
8. Wählen Sie mit Hilfe der Tasten und das Untermenü "DATEI“ und
drücken dann "EINGABE“
9. Wählen Sie "SPEICHERN" und bestätigen Sie mit Hilfe der Eingabetaste.
Öffnen eines IR-Bilds
9. Drücken Sie "EINGABE“, um das Menü anzuzeigen;
10.Wählen Sie mit Hilfe der Tasten und das Untermenü "DATEI“ und
drücken dann auf "EINGABE“.
11.Wählen Sie "ÖFFNEN“ und bestätigen Sie mit Hilfe der Eingabetaste.
12.Blättern Sie die Bilder mit Hilfe der Tasten ◄►durch.
Um direkt zu einem gewünschten Bild zu gelangen, ohne alle Thermobilder ablaufen
zu lassen, drücken Sie bitte auf die Tasten und .
Bildsymbole und Menüfunktionen
Untermenü „Analyse“
Untermenü „Datei“
18
Zugriff auf Speicherdaten und Auswahl des
Verzeichnisses
Option zur Anzeige der Temperaturverteilung entlang eines
Tools wie zum Beispiel „Linie“.
Analyse ►
Datei ►
IR/Sichtbild
Manuel. -
Einst.
Obj.-Param.
Setup ►
Cursor 1
Cursor 2
Cursor 3
Max Temp.
Isotherm.
Profil.
Fläche ►
<Alles lösch.>
Analyse ►
Datei ►
IR/Sichtbild
Manuel. -Einst.
Die Kamera wechselt in den Modus "thermische
Messung". Bewegen Sie die Kamera oder benutzen Sie
die Richtungspfeile, um den Cursor auf das Objekt zu
lenken. Oben rechts im Display wird die Temperatur des
Ziel
p
unkts an
g
ezei
g
t.
Analyse ►
Datei ►
IR/Sichtbild
Manuel. -Einst.
Obj.-Param.
Setup ►
Maximale oder Minimale Temperatur: Mit dieser Option
kann man den wärmsten oder kältesten Punkt eines
Bereichs lokalisieren und verfolgen. Der Benutzer kann
die Größe des Bereichs ändern.
Die RayCAm führt eine isothermische Analyse der
Wärmeszene durch. Die zum gleichen Temperaturintervall
gehörenden Objekte werden in den entsprechenden
Farben angezeigt.
Löschen der gewählten
A
nal
y
setools Option zur Anzeige der Mindest-, Höchst- und Mittelwerte der
Fläche.
Obj.-Param.
Setup ►
Löschen einer Bilddatei von der Speicherkarte
Abspeichern eines IR-Bildes auf der Speicherkarte
Öffnen einer Bilddatei auf der Speicherkarte
Öffnen
Speichern
Löschen
Datei-Konfig ►
Sprach-Aufz.
Sprach-Wied
Wenn der Aufnahme ein Sprachkommentar
zugeordnet ist, kann dieser auf der Kamera
abgehört werden
Mit diesem Gerät kann ein Bluetooth-Kopfhörer benutzt
werden (als Option), um Sprachkommentare aufzunehmen

Deutsch
Untermenü „IR/Sichtbild“
Untermenü „Manuel. Einst.“ (manuelle Einstellung)
Entspricht der Skalen-Amplitude d.h.
die Differenz zwischen der maximalen
und der minimalen Temperatur
Untermenü „Obj.-Param.“
Für diese Elemente
g
elten die Parameter
Obj.-Param
Objekt : Alle
Emiss. : 0,95
Abstand : 5m
Allgemeine Konfig.
Umgeb. Temp: 24,4°C
Luftfeuch : 50%
Vergl. Obj1 : Cursor1
Vergl. Obj2 : Cursor2
Bezu
g
stemp : 25 °C
Pegel
30°C
Spanne
10°C
Temp. Bereich
-20 -250
Filter
Off
Entspricht dem Medianwert
der Temperaturskala
Messbarer
Temperaturintervall
Eigenschaft des Materials. Parameter einstellbar von 0
bis 1 in Schritten von 0,01
IR/Sichtbild
IR Prozent
IR: Mit diesem Modus erscheint nur die
Infrarotaufnahme auf der Anzeige. Alle
Analysetools sind mit diesem Modus zugänglich.
Sichtbild: Mit diesem Modus erscheint nur die
Bildaufnahme auf der Anzeige. Nicht alle
Analysetools sind mit diesem Modus zugänglich.
MixVision: Mit diesem Modus erscheint die
Bildaufnahme im Hintergrund und das
Hauptfenster ist der Fusionsbereich. Alle
A
nal
y
setools
g
elten für diesen Bereich.
Der Prozentsatz entspricht dem
Anzeigeprozentsatz der Infrarotaufnahme
(100%: nur Infrarotaufnahme, 0%: nur
Analyse ►
Datei ►
IR/Sichtbild
Manuel. -Einst.
Obj.-Param.
Setup ►
Abstand zwischen dem Bediener und dem Zielobjekt
Temperatur der Umgebung in unmittelbarer Nähe des
Zielobjekts
Charakteristischer Parameter der Umgebungsluft
Vergleich zwischen zwei Analysetools bzw. mit einer
Bezugstemperatur, die unter Bezugstemp. festgelegt
wurde. Der Temperaturunterschied zwischen den beiden
Objekten erscheint unten rechts auf der Anzeige.
Untermenü „Setup“
Analyse ►
Datei ►
IR/Sichtbild
Manuel. -Einst.
Obj.-Param.
Setup ►
Analyse-Konfig
Lokale Konfig.
Datum & Zeit
Kamera-Konfig.
System-Info
11.Analyse-Konfig
19
Isotherm Alarmschwelle
Mit der Sättigungsfunktion werden alle Punkte isoliert, deren
mTe
p
eratur über der aktuellen Skala lie
g
t
Wird die Alarmfunktion aktiviert oder deaktiviert
Wird die Alarmschwelle programmiert
Wird die Temperatur korrigiert
Curso
r
-Farbe : Weiß
Farbsättigung : Nie
Isoth.-Breite : 0.7° C
Wird der Isotherm-Typ konfiguriert.
Wird die Farbe des Isothermenabstands konfiguriert
Wird der Isothermenabstand konfiguriert
Alarm Isoth. : 100
Isoth.-Typ : Intervall
Isoth.-Farbe : Grün
Temp.-Korr. : 0°C
Alarm Temp. : 100°C
Alarm : Aktiviert
Other manuals for RayCAm C.A 1886
1
This manual suits for next models
1
Table of contents
Languages:
Other Chauvin Arnoux Thermographic Camera manuals