Checkpoint CPAC-Falcon-10G-B User manual

11 May 2019
Getting Started Guide
FALCON ACCELERATION
CARDS
R80.20
Classification: [Protected]

CHAPT E R 1
2019 Check Point Software Technologies Ltd.
All rights reserved. This product and related documentation are protected by copyright and
distributed under licensing restricting their use, copying, distribution, and decompilation. No part
of this product or related documentation may be reproduced in any form or by any means without
prior written authorization of Check Point. While every precaution has been taken in the
preparation of this book, Check Point assumes no responsibility for errors or omissions. This
publication and features described herein are subject to change without notice.
RESTRICTED RIGHTS LEGEND:
Use, duplication, or disclosure by the government is subject to restrictions as set forth in
subparagraph (c)(1)(ii) of the Rights in Technical Data and Computer Software clause at DFARS
252.227-7013 and FAR 52.227-19.
TRADEMARKS:
Refer to the Copyright page https://www.checkpoint.com/copyright/ for a list of our trademarks.
Refer to the Third Party copyright notices
https://www.checkpoint.com/about-us/third-party-trademarks-and-copyrights/ for a list of
relevant copyrights and third-party licenses.

Important Information
Latest Software
We recommend that you install the most recent software release to stay up-to-date
with the latest functional improvements, stability fixes, security enhancements and
protection against new and evolving attacks.
Certifications
For third party independent certification of Check Point products, see the Check Point
Certifications page
https://www.checkpoint.com/products-solutions/certified-check-point-solutions/.
Check Point R80.20 for Falcon Acceleration Cards
For more about this release, see sk116242
http://supportcontent.checkpoint.com/solutions?id=sk116242.
Latest Version of this Document
Open the latest version of this document in a Web browser
https://sc1.checkpoint.com/documents/Falcon/EN/CP_R80.20_FalconAccelerationCar
ds_GettingStartedGuide/html_frameset.htm.
Download the latest version of this document in PDF format
http://downloads.checkpoint.com/dc/download.htm?ID=76749.
Feedback
Check Point is engaged in a continuous effort to improve its documentation.
Please help us by sending your comments
mailto:cp_techpub_feedback@checkpoint.com?subject=Feedback on Falcon
Acceleration Cards R80.20 Getting Started Guide.
Revision History
Date Description
11 May 2019 First release of this document

Contents
Important Information...................................................................................................3
Introduction...................................................................................................................5
Supported Falcon Acceleration Cards and Security Appliances ...................................5
Falcon Acceleration Cards ............................................................................................8
CPAC-Falcon-10G-B .................................................................................................9
CPAC-Falcon-40G-B ............................................................................................... 10
Installing Falcon Acceleration Cards ..........................................................................11
Removing Falcon Acceleration Cards .........................................................................12
Configuring the Appliance...........................................................................................13
Configuring the New Appliance...............................................................................13
Configuring the Existing Appliance .........................................................................15
What is the Next Step? ................................................................................................ 16

Introduction
Falcon Acceleration Cards Getting Started Guide R80.20 | 5
Introduction
The Check Point Falcon Acceleration Cards provide a high performance, low-latency, flexible and
scalable solution for Check Point 5900, 6800, 15000, and 23000 appliances.
Falcon Acceleration Card is a dedicated network I/O card solution with an integrated Network
Processor, which supports multiple connectivity options at 10 GbE (CPAC-Falcon-10G-B) and 40
GbE (CPAC-Falcon-40G-B).
The Check Point Falcon Acceleration Cards provide:
•For HTTPS Inspection acceleration - increase in the throughput by utilizing the dedicated
hardware engines on the acceleration cards.
•For Threat Prevention - increase in the throughput by implementing Deep Inspection in the
acceleration cards hardware. This applies to Threat Prevention with SandBlast Zero Day
protections and to NGFW.
•For Firewall-only acceleration - increase in the throughput for Firewall-only traffic, low traffic
latency, session rate improvement.
•VSX and QoS support.
Supported Falcon Acceleration Cards
and Security Appliances
Falcon Acceleration Cards available for Security Appliances:
Orderable SKU
Abbreviated Name
Acceleration Module Description
CPAC-Falcon-10G-B Falcon-10G Acceleration Module with 4 x 10 GbE Fiber
Ports
CPAC-Falcon-40G-B Falcon-40G Acceleration Module with 2 x 40 GbE Fiber
Ports
Supported Security Appliances for each Falcon Acceleration Card:
Acceleration Module
Supported Security Appliance Models
Falcon-10G
5900
6800
15400, 15600
23500, 23800, 23900
Falcon-40G
5900
6800
15400, 15600
23500, 23800, 23900

Supported Falcon Acceleration Cards and Security Appliances
Falcon Acceleration Cards Getting Started Guide R80.20 | 6
Supported combinations and number of Falcon Acceleration Cards in Security
Appliances:
Security Appliance Model
Falcon-10G
Falcon-40G
Maximal Number of Cards
5900
6800 Yes Yes 2
15400, 15600 Yes Yes 3
23500, 23800, 23900 Yes Yes 5
Note -It is supported to install Falcon-10G and Falcon-40G acceleration cards in the same
Security Appliance.
Supported transceivers for each of the acceleration cards:
Acceleration Module
Supported Transceivers
Falcon-10G •CPAC-TR-10SR-B (also supports 1 GbE)
•CPAC-TR-10LR-B (also supports 1 GbE)
•
CPAC-TR-1T-B
Falcon-40G •CPAC-TR-40SR-QSFP-300m (supports the breakout mode)
For configuration details, see the
Falcon Acceleration Cards
Administration Guide
https://sc1.checkpoint.com/documents/Falcon/EN/CP_R80.
20_FalconAccelerationCards_AdminGuide/html_frameset.ht
m.
•CPAC-TR-40LR-QSFP-10K
•CPAC-TR-40SR-QSFP-BiDi
Supported DAC cables:
•Check Point DAC cables (CPAC-DAC-10G-... and CPAC-DAC-40G-...) are supported only for
connection to Check Point Maestro Hyperscale Orchestrators.
•Check Point DAC breakout cables 40G to 4x10G (CPAC-DAC-40/10G-...) are
not
supported.

Supported Falcon Acceleration Cards and Security Appliances
Falcon Acceleration Cards Getting Started Guide R80.20 | 7
Additional interfaces the Gaia on the appliance shows:
Acceleration
Module
Number of
additional
interfaces
Names of
additional
interfaces
Falcon-10G 4 eth
<Slot#>
-01, eth
<Slot#>
-02,
eth
<Slot#>
-03
, and
eth
<Slot#>
-04
Falcon-40G 2
eth
<Slot#>
-01
and
eth
<Slot#>
-05
Notes:
•"<
Slot#
>" denotes the ordinal number of the front-facing I/O slot, which the acceleration card
populates.
For example:
•For the first Falcon-10G acceleration card, Gaia OS would show eth1-01, eth1-02,
eth1-03, and eth1-04.
•For the second Falcon-10G acceleration card, Gaia OS would show eth2-01, eth2-02,
eth2-03, and eth2-04.
•In addition to the interfaces noted above, the Gaia OS on the appliance shows logical interfaces
called bcmnet-np
<Slot#>
.
Only the ifconfig -a command in the Expert mode shows these interfaces. Ignore these
logical interfaces.
Falcon Acceleration Cards Getting Started Guide R80.20 | 8
CHAPT E R 2
Falcon Acceleration Cards
In This Section:
CPAC-Falcon-10G-B.......................................................................................................9
CPAC-Falcon-40G-B.....................................................................................................10
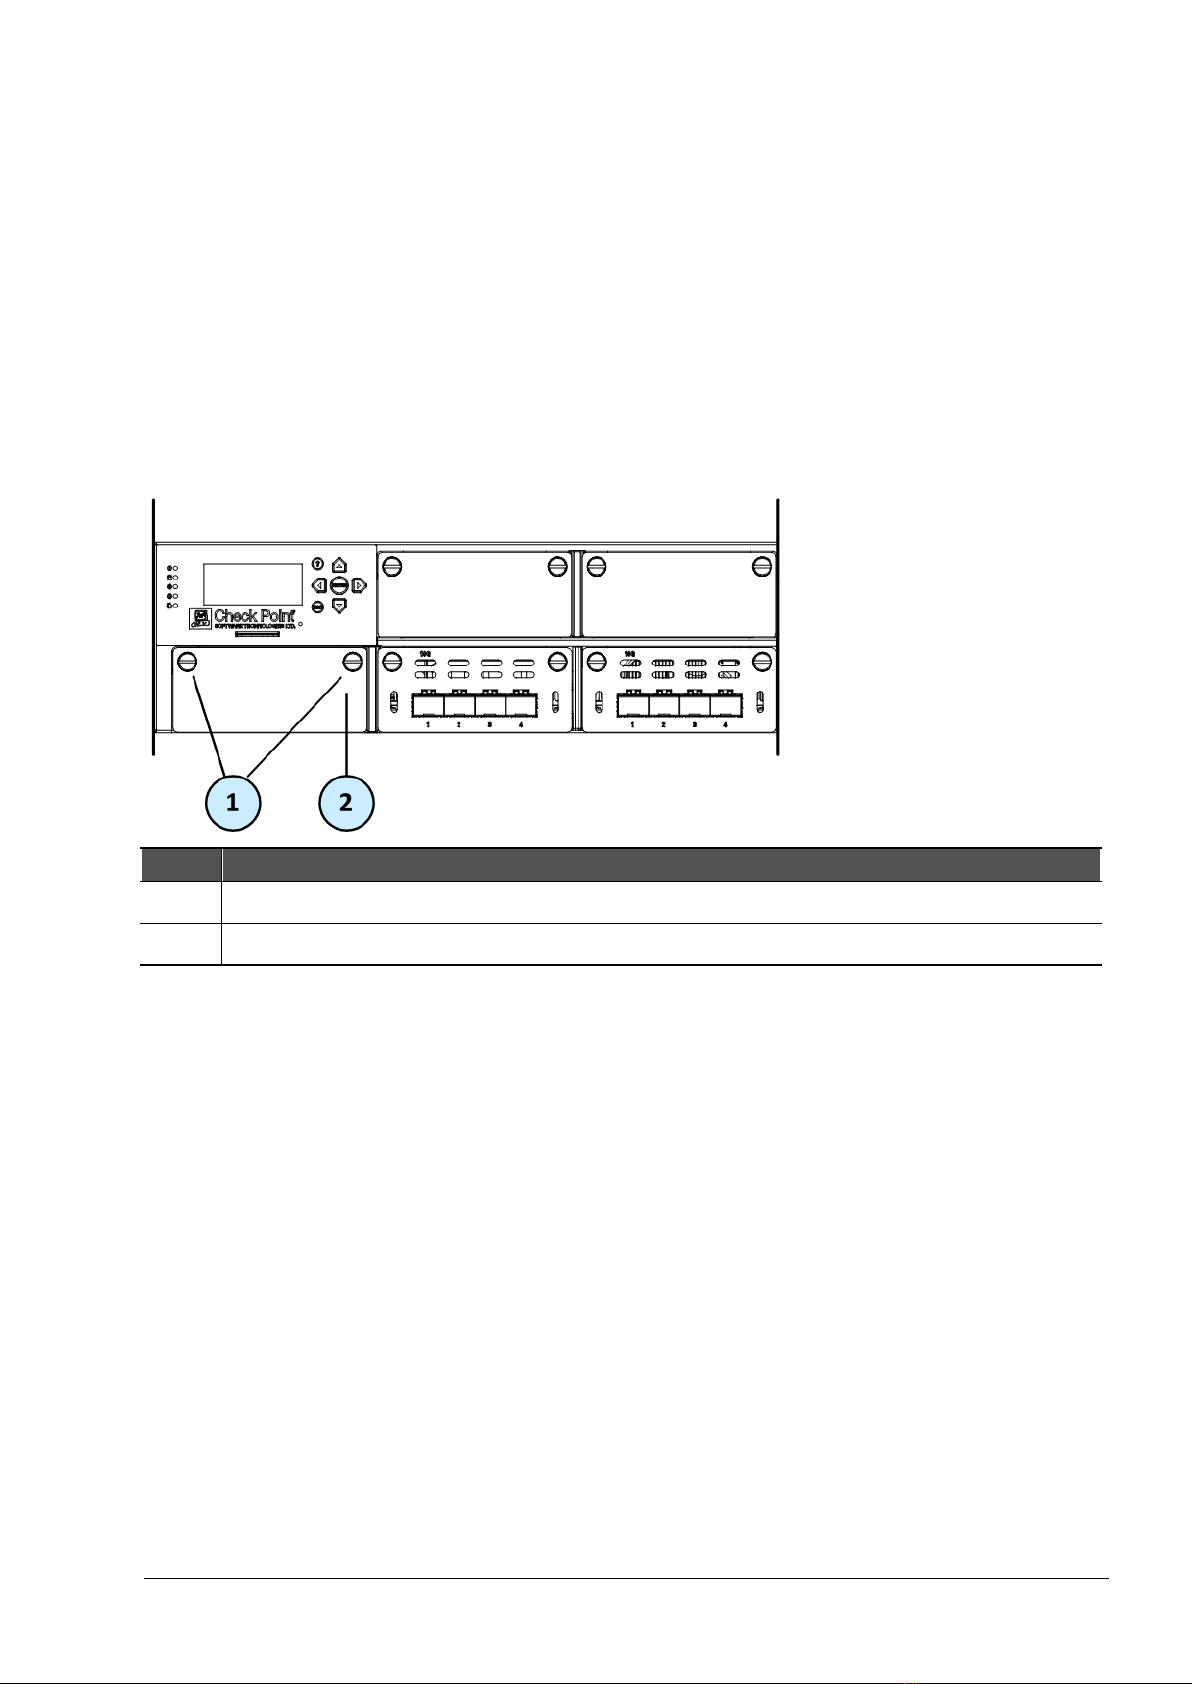
Refer to this generic illustration when you install, remove, or replace Falcon Acceleration Cards in
Check Point Security Appliances:
Item
Description
1 Captive screws
2 Dummy panel for the expansion slot

Falcon Acceleration Cards
Falcon Acceleration Cards Getting Started Guide R80.20 | 9
CPAC-Falcon-10G-B
Item
Component
Description
1 Port
Activity
LED
•Off - LAN link is not established
•Steady Green - LAN link is established
•Blinking Green - LAN activity
2 Link
Speed
LED
•Off
•Steady Amber - 1 Gbit/sec data rate is selected
•Steady Blue - 10 Gbit/sec data rate is selected

Falcon Acceleration Cards
Falcon Acceleration Cards Getting Started Guide R80.20 | 10
CPAC-Falcon-40G-B
Item
Component
Description
1 Port
Activity
LED
•Off - LAN link is not established
•Steady Green - LAN link is established
•Blinking Green - LAN activity
2 Link
Speed
LED
•Off
•Steady White - 40 Gbit/sec data rate is selected

Falcon Acceleration Cards Getting Started Guide R80.20 | 11
CHAPT E R 3
Installing Falcon Acceleration Cards
Step
Description
1 Shut down the Security Appliance from Gaia Portal, or Gaia Clish.
2 Remove the power cords from the power supply units.
3 On the front panel of the Security Appliance, loosen the screws on the dummy panel, or
on the installed expansion line card.
4 Remove the dummy panel, or the installed expansion line card.
5 Insert the acceleration card into the expansion slot.
Apply equal pressure on both sides of the acceleration card's front panel, directly
beneath the thumb screws.
6 Push until the module clicks into position.
Note - Make sure the module is firmly inserted on all sides.
7 Tighten the screws on the acceleration card.
8 Turn on the Security Appliance.
9 Follow the
Configuring the Existing Appliance
(on page 15).
Example:
Falcon Acceleration Cards Getting Started Guide R80.20 | 12
CHAPT E R 4
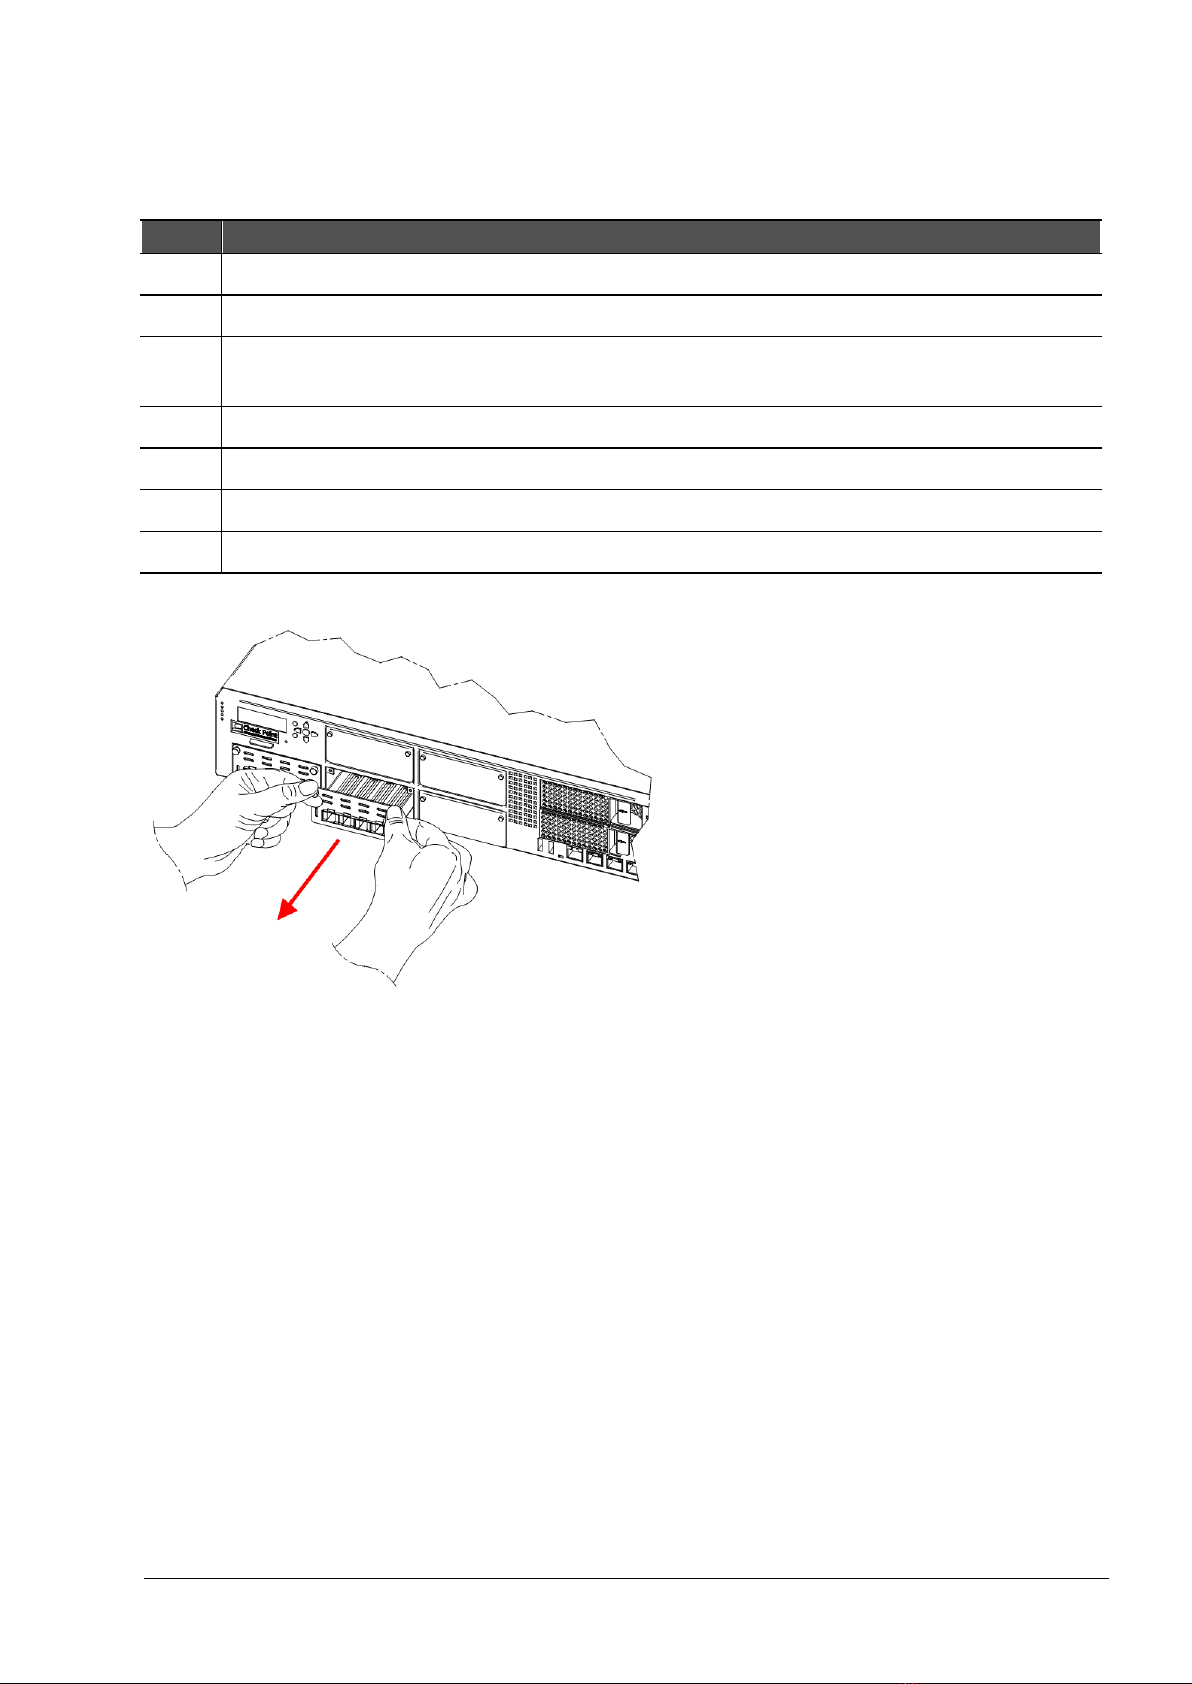
Removing Falcon Acceleration Cards
Step
Description
1 Shut down the Security Appliance from Gaia Portal, or Gaia Clish.
2 Remove the power cords from the power supply units.
3 On the front panel of the Security Appliance, loosen the captive screws on the
acceleration card.
4 Holding the screws, pull the acceleration card out of the expansion slot.
5 Insert the dummy panel or expansion line card into the expansion slot.
6 Tighten the screws on the dummy panel or expansion line card.
7 Turn on the Security Appliance.
Example:

Falcon Acceleration Cards Getting Started Guide R80.20 | 13
CHAPT E R 5
Configuring the Appliance
In This Section:
Configuring the New Appliance ...................................................................................13
Configuring the Existing Appliance .............................................................................15
Configuring the New Appliance
This section applies to a new Security Appliance with preinstalled Falcon Acceleration Card.
Note -Refer to the
Getting Started Guide
for your appliance. See sk96246
http://supportcontent.checkpoint.com/solutions?id=sk96246.
Step Description
1 Connect a PC to Security Appliance's console port.
2 On the PC, open a terminal program, such as PuTTY or SecureCRT.
3 For Connection type, select Serial.
4 Make sure the default speed is 9600, click Open.
5 Log in to the Gaia Clish on the Security Appliance with these default credentials:
•Username - admin
•
Password - admin
6 Configure the MGMT port on the Security Appliance that connects to the Check Point
Management Server and save the configuration:
a) set interface Mgmt ipv4-address <
IPv4 Address
> subnet-mask <
IPv4
Subnet Mask
>
b) set interface Mgmt state on
c) save config
7 Determine what slot number the acceleration card populates:
show asset ac
7 Configure the acceleration card ports (on page 5) and save the configuration:
a) show interfaces
b) set interface eth<
Slot#
>-<
Interface#
> state on
c) set interface eth<
Slot#
>-<
Interface#
> ipv4-address <
Interface's IPv4
Address
> subnet-mask <
Interface's IPv4 Subnet Mask
>
d) set interface eth<
Slot#
>-<
Interface#
> comments "<
Text
>"
e) save config

Configuring the Appliance
Falcon Acceleration Cards Getting Started Guide R80.20 | 14
Step
Description
8 In your web browser, connect to the Gaia Portal at:
https://<
IPv4 address of Appliance's Mgmt interface
>
10 The Gaia First Time Configuration Wizard opens.
Follow the on-screen instructions to configure this appliance as a Security Gateway or a
Cluster Member.
11 In SmartConsole:
a) Configure a Security Gateway or a Cluster object that represents this Security
Appliance.
b) Configure the applicable Security Policy.
c) Install the Security Policy.

Configuring the Appliance
Falcon Acceleration Cards Getting Started Guide R80.20 | 15
Configuring the Existing Appliance
This section applies to an existing and already configured Security Appliance, into which you need
to insert a new Falcon Acceleration Card.
Step
Description
1 Install the Falcon Acceleration Cards into the Security Appliance (on page 11).
2 Connect to the command line on the Security Appliance.
3 Log in to Gaia Clish, or Expert mode.
4 Determine what slot number the acceleration card populates.
•In Gaia Clish, run one of these commands:
•show asset ac
•fwaccel stat
•In the Expert mode, run one of these commands:
•clish -c "show asset ac"
•
fwaccel stat
5 Log in to Gaia Clish.
6 Configure the acceleration card ports (on page 5) and save the configuration:
a) show interfaces
b) set interface eth<
Slot#
>-<
Interface#
> state on
c) set interface eth<
Slot#
>-<
Interface#
> ipv4-address <
Interface's IP
v4Address
> subnet-mask <
Interface's IPv4 Subnet Mask
>
d) set interface eth<
Slot#
>-<
Interface#
> comments "<
Text
>"
e) save config
7 In SmartConsole:
a) Configure the Security Gateway or a Cluster object that represents this Security
Appliance.
b) Install a Security Policy.

Other manuals for CPAC-Falcon-10G-B
1
This manual suits for next models
1
Table of contents
Popular Control Unit manuals by other brands

BURK Technology
BURK Technology PlusConnect Nautel GV Installation and operation manual

Burkert
Burkert 6228 operating instructions

tams elektronik
tams elektronik S88-2 manual

Siemens
Siemens SIMATIC ET 200S 4DI DC24V ST manual

Gemu
Gemu 8357 Installation, operating and maintenance instructions

Automationdirect.com
Automationdirect.com Productivity 1000 P1-16CDR manual


