Chef-Master HEB632 User manual

Chefmaster Planetary Mixer
Instruction Manual
Model
HEB632 –10 Litre Planetary Mixer
HEB633 –20 Litre Planetary Mixer
HEB634 –30 Litre Planetary Mixer

2
Thank you for purchasing your Chefmaster Planetary Mixer. To make full
use of the product please read this manual carefully before using the
product and keep it safe for future reference.
Safety Tips
•If you find any damage when the product is unpacked, contact your
Chefmaster supplier within 24 hours of receipt of goods
•Always position on a flat stable surface
•Can be bolted to work surface
•Must be placed on bench which is capable of supporting the load of
mixers weight
•NEVER use with extension cord
•Clean before use
•Ensure work area has adequate light and ventilation
•Repairs should always be carried out by a qualified technician
•Always ensure the safety guard and cover is in place when using this
product
•Do not use this product outside
•Do not leave unattended when in use
•NEVER place hand in bowl while in operation
•NEVER insert utensil in bowl while in operation
•Keep hands, hair and clothing away from moving parts
•Always switch off and unplug the unit before cleaning
•If the power cord becomes damaged it must be replaced by a qualified
technician
•This product is not designed to be used by persons with reduced
physical or mental capabilities, or lack of experience or knowledge,
unless they are given suitable supervision. This includes children.
•Legislation requires that this machine and attachments shall be
operated only by a properly instructed person or an employee under the
supervision of a properly instructed person
Pack Contents
•1 x Chefmaster Planetary Mixer, with s/s bowl and bowl guard
•1 x dough hook, 1 x beater, 1 x whisk

3
Product Components
1. Speed control
5. Bowl lift handle
2. Planetary shaft
6. Bowl guard
3. Stainless steel bowl
7. Bowl cradle
4. Start/Stop switch
Operation
•Remove all packaging including all protective plastic, from your
Chefmaster Planetary Mixer
•Position on a flat surface
•Plug your Chefmaster Planetary Mixer into the mains and turn it on.
Cleaning & Maintenance
•Before cleaning disconnect from the electricity supply
•Clean the product with warm soapy water or wet soft cloth
•DO NOT submerge the mixer in water or use water sprays to clean it
•Always clean your Chefmaster Planetary Mixer after use

4
Correct use of Chefmaster Planetary Mixer
•Always follow instructions on this Manual when changing gear
•If motor slows/stops, then reduce size of mix. Damage resulting from
improper use will invalidate warranty
•For operator safety the machine is fitted with a bowl guard which is
electrically interlocked to ensure mixer cannot operate unless guard is
correctly positioned and bowl raised. Use of excessive force to open or
close bowl guard may damage electrical interlocker and will void the
warranty
•For operator safety the mixer has a no volt release feature. In the
event of loss of power to mixer it will only restart after Start control
button has been pressed.
•When adding flour to bowl use temporary cover to minimize flour
escape into mixer openings.
Tool Selection
Beater: Firm mixes such as light pastry,
cakes biscuits, icings fillings and mashed
vegetables.
Spiral Dough Hook: Heavy mixes such
as dough, pie pastry.
Whisk: Light mixes such as whipped
cream, mayonnaise, egg whites,
pancakes and soufflés.
•Do not use the beater or whisk for dough making.
•Do not use the whisk for anything other than whisking, aerating or
light mixing
•Always wash tool with mild soap and apply light quantity of mineral
oil to planetary shaft after cleaning.
Fitting the bowl
With the bowl cradle lowered, place the chosen mixing
tool in the bowl. Position bowl on cradle
1) The locking pin at the rear of the bowl must locate in
the adjacent hole in the cradle
2) The two holes in the bowl handles must engage on the
pins located on the cradle

5
3) Ensure the bowl is seated correctly on the cradle before
securing the bowl locking latches.
Fitting the mixing tool
To fit: Slide the bayonet fitting of the selected tool on to the drive
shaft and twist clockwise to secure in position
To remove: slide selected tool up the shaft slightly and twist
counter clockwise
Bowl Cradle and Bowl Guard
•The bowl cradle and the bowl guard are electrically interlocked so that
the machine will only operate with the bowl cradle in the raised position.
•The bowl guard must be locked into place by sliding it into position
across the top of the bowl to the point in can slide no further
Note: Once bowl is raised and bowl guard is locked the machine can
operate. If the guard is opened or the bowl lowered the mixer will stop
automatically and can only be started when bowl and guard are back in
place and the Start button is pressed.
Correct use of controls
•Press ON (green button) to start mixer.
•Press OFF (red button) to stop mixer
•In case of emergency press OFF button to stop mixer immediately
•Always stop mixer before changing gear.
PANEL OF 10L/20L MIXERS
PANEL OF 30L MIXER
6
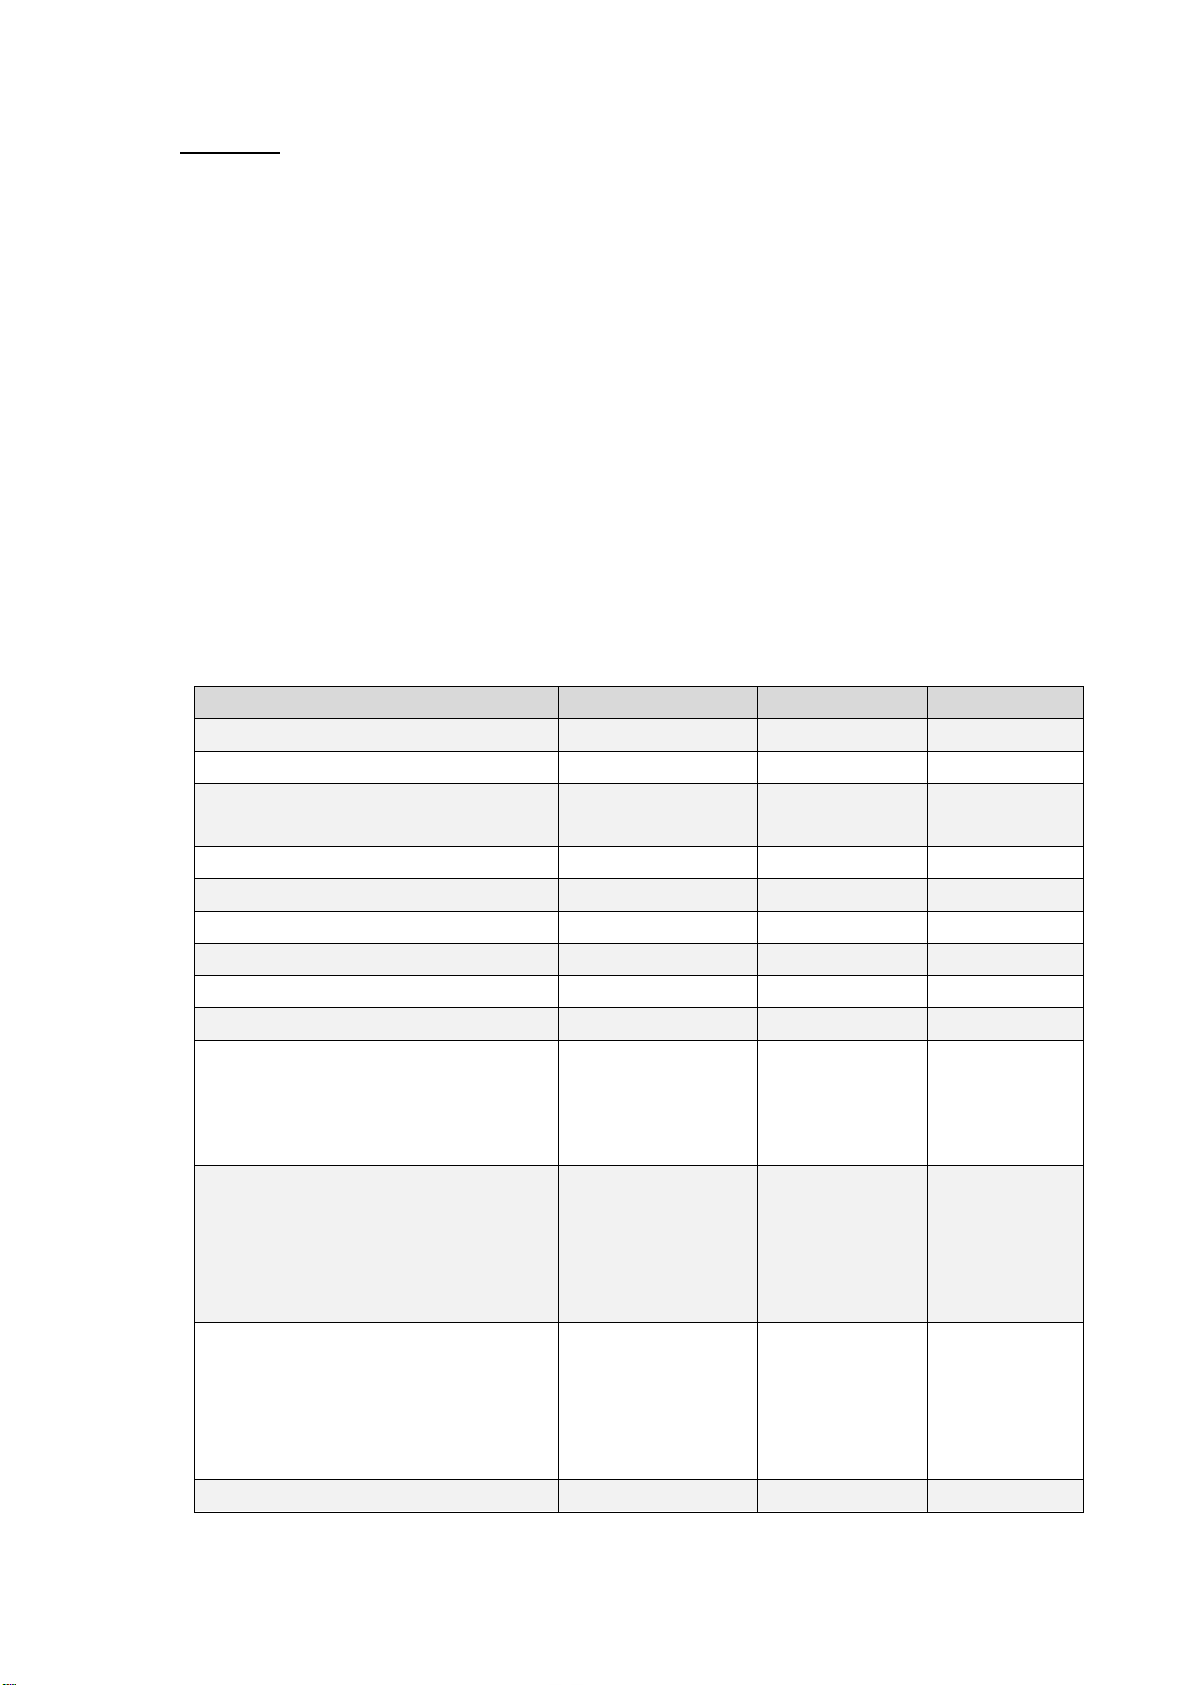
Capacity
The table below shows recommended capacities of finished weights of regular
mixes.
The mixer may appear capable of mixing larger quantities, but overloading will
lead to excessive and premature wear and possible failure.
Overloading will result in lengthened processing and unsatisfactory results.
The mixer capacity depends on moisture content of dough.
Capacities listed below are based on flour at room temperature and water at
70° F
1 gallon of water weighs 8.33 lbs
Note: Reduce batch size by 10% if using chilled flour, if water is below 20° C,
or if ice is used, or if high gluten flour is used.
Note: Overloading or not following chart below will result in damage to the
mixer and will void the warranty.
Product
Tool and Speed
10 Litre
20 Litre
Whipped Cream
Whisk
1.9 ltr
3.8 ltr
Egg Whites
Whisk
0.47 ltr
1 ltr
Meringue
(Qty of Water)
Whisk
0.35 ltr
0.83 ltr
Mashed Potatoes
Beater
3.6 kg
6.8 kg
Waffle or Hot Cake Batter
Beater
4.7 ltr
7.6 ltr
Fondant icing
Beater
2.7 kg
3.6 kg
Cake
Beater
4.5 kg
9.1 kg
Pie Dough
Beater
4.5 kg
8.2 kg
Pasta, Basic Egg Noodle
Hook
1.4 kg
2.3 kg
Raised Donut Dough
(65% absorption rate) (if using chilled flour or
water blow 20°or ice reduce batch size by
20%)
Hook
1st & 2nd gears only
2 kg
3.2 kg
Heavy Bread Dough
(55% absorption rate) (if high gluten flour is
used reduce batch size by 10%)(if using
chilled flour or water blow 20°or ice reduce
batch size by 20%)
Hook
1st gear only
3.4 kg
3.6 kg
Bread and Roll Dough
(60% absorption rate) (if high gluten flour is
used reduce batch size by 10%) (if using
chilled flour or water blow 20°or ice reduce
batch size by 20%)
Hook
1st gear only
5.7 kg
9.1 kg
Pizza Dough, Thin
Hook
2.3 kg
2.8 kg

7
(40% absorption rate) Maximum mixing time
is 7 mins (if high gluten flour is used reduce
batch size by 10%) (if using chilled flour or
water blow 20°or ice reduce batch size by
20%) (2nd speed should never be used on
50% absorption rate or less)
1st gear only
Pizza Dough, Medium
(50% absorption rate) (if high gluten flour is
used reduce batch size by 10%) (if using
chilled flour or water blow 20°or ice reduce
batch size by 20%) (2nd speed should never
be used on 50% absorption rate or less)
Hook
1st gear only
2.3 kg
3.6 kg
Pizza Dough, Thick
(60% absorption rate) (if high gluten flour is
used reduce batch size by 10%) (if using
chilled flour or water blow 20°or ice reduce
batch size by 20%) (2nd speed should never
be used on 50% absorption rate or less)
Hook
1st gear only
4.5 kg
6.8 kg
Gear selection
•Before changing gear the mixer must always be stopped.
•Speed selection depends on quantity and consistency of mix. It is
recommended that the mixer is started on the lowest gear and
progressively moved to the desired setting.
•In emergency always use the red Stop button to stop machine
Note: The mixer is equipped with a motor overload protection. If the mixer
shuts off during operation reduce batch size. Wait 2 minutes. Press stop
button. Then press Start button to restart the machine.
Note: For heavier loads mixer should not run for more than 15 minutes.
Allow 15 minutes for mixer to cool down before resuming.
For lighter loads mixer should not run for more than 30 minutes. Allow 30
minutes for the mixer to cool down before resuming
Table below shows recommended gears for the range of tools
Recommended gear
1st gear
2nd gear
3rd gear
Whisk
Beater
Hook

8
Care of Mixer
Cleaning instructions
ALWAYS DISCONNECT MIXER FROM ELECTRICAL POWER SOURCE
BEFORE CLEANING
Clean the mixer thoroughly after use. After isolating mixer from the electrical
supply the body should be wiped down with a damp cloth. Do not spray the
mixer or immerse in water. Do not allow the rear vents to become
blocked as this will result in overheating
The bowl and tools should be removed and washed in hot soapy water, rinsed
and dried thoroughly prior to storage.
Do not put tools in a dishwasher
Maintenance
ALWAYS DISCONNECT MIXER FROM ELECTRICAL POWER SOURCE
BEFORE CARRYING OUT ANY MAINTENANCE
IT IS RECOMMENDED THAT ANY SERVICING AND MAINTENANCE BE
CARRIED OUT BY A TRAINED TECHNICIAN OR ELECTRICIAN
Regular maintenance is necessary to remain in good working order
On a regular basis
•Clean the machine thoroughly after use and lubricate the shaft with food
quality lubricant
•Ensure there is no excess lubricant that could contaminate food.
•After cleaning the shaft wipe dry and lightly lubricate the shaft with food
grade lubricant to prevent rusting
•Do not insert any object into or cover the air vent of the motor.
•Disconnect mixer from electrical supply when not in use
On an annual basis
•Check all bolts are tight and bowl guard is secure
•Carry out check on more frequent basis if mixer is subject to heavy use
•After a technician replaces any parts ensure back is screwed tightly and
anti-leak coating is applied to avoid gear oil leaking.
Gearbox lubricant
Refill the lubricant inside the gearbox every 5 years. It is recommended that
this is carried out by trained technician.

9
Troubleshooting
Fault
Possible Cause
Solution
No power to mixer
1. Check plug socket
2. Check wiring in plug
3. Check fuse in plug
4. Check cable
5. Check micro switch
6. Check circuit breaker
over load
1. Mixer not plugged into live socket
or not switched on
2. Rewire correctly
3. Replace fuse
4. Replace damaged cable
5. Replace micro switch
6. Reset or replace circuit breaker
Mixer fails to
operate
1. Check bowl guard
2. Check transmission
belt
3. Check gear lever
change
1. Mixer will not operate with guards
open. Close guards and restart
mixer
2. Replace broken belt
3. Mixer will not operate if out of
gear. Put mixer in gear and restart
mixer
Mixer become
noisy
1. Check bowl and tool
2. Check work surface
3. Check bearing for wear
4. Check gearbox
5. Check planetary unit
1. Ensure bowl and tool are correctly
seated
2. Uneven surfaces create
excessive resonance
3. Replace worn bearings
4. Replace damaged gearbox
5. Reapply high-pressure grease
Mixer loses power
1. Check capacity
2. Check transmission gear
3. Check shaft bias
1. Reduce load if overloaded
2. Replace damaged belt
3. Replace damaged shaft bias
Motor overheating
1. Check capacity/speed
2. Check supply voltage
1. Refer to capacity table and reduce
load if overloaded
2. Voltage must correspond to rating
plate
Oil on planetary
shaft
Check oil seal
Change worn oil seal
Tools stuck on
planetary shaft
1. Check planetary shaft is
straight
2. Check planetary shaft is
clean and rust free
1. Replace bent planetary shaft
2. Use descaler to de-rust planetary
shaft
3. Turn planetary shaft anti
clockwise to meet square groove
and gently knock down tool

10
Transportation and Storage
•Please handle mixer with care to prevent any damage to the unit and
internal parts. The mixer should be stored somewhere which is
ventilated and free from corrosive gases.
•Always store flat and do no store products on top of it
•Do not store any flammable objects near the equipment.
•During transportation do not lean over 35 degrees to avoid gear oil
leaking from gear oil container.
•Use forklift for transportation
•Do not attempt to lift singlehanded by one person
Technical Information
HEB632 –10 ltr Planetary Mixer
Voltage ~230v 50Hz
Power 450W
Weight 40kg
Dimensions 460x 370 x 620mm (W x D x H)
HEA633 - 20 ltr Planetary Mixer
Voltage ~230v 50Hz
Power 1100W
Weight 85kg
Dimensions 555x 505 x 764mm (W x D x H)
HEB634 -30ltr Planetary Mixer
Voltage ~230v 50Hz
Power 1500W
Weight 170kg
Dimensions 617x 584 x 1136mm (W x D x H)
•Chefmaster Planetary Mixers are supplied with a 3 pin plug and lead
with a 13 amp fuse
•Appliance must be earthed
•If in doubt contact a qualified electrician or your Chefmaster distributor
11
Disposal
Under WEEE regulations this product must not be disposed of as household
waste. To prevent damage to the environment and humans this product must
be disposed of in an approved and environmentally friendly recycling process.
For more information on how to dispose of this correctly please contact your
Chefmaster distributor or local authority responsible for waste disposal.
Compliance
All Chefmaster parts and products have under gone a stringent testing process
to ensure that comply with all European standards and specifications.
All Chefmaster products carry the CE approval symbol.
This manual suits for next models
2
Table of contents
Other Chef-Master Mixer manuals


Popular Mixer manuals by other brands


Kenwood
Kenwood Chef and Major KMC010 series instructions

Cuisinart
Cuisinart SM-70 - Stand Mixer - SM-PM Pasta-Maker... Instruction booklet

Varimixer
Varimixer AR100 VL-1L operating instructions

Makita
Makita UT1305 instruction manual

Kenwood
Kenwood Cuisine KM120 manual

KitchenAid
KitchenAid KP2671XAC - Professional Stand Mixer parts list


